
Содержание
- Insert the current date and time in a cell
- Insert a static date or time into an Excel cell
- Change the date or time format
- Insert a static date or time into an Excel cell
- Change the date or time format
- Insert a static date or time into an Excel cell
- Change the date or time format
- Insert a date or time whose value is updated
- Need more help?
- Create a list of sequential dates
- Use the Fill Handle
- Use the Fill command
- Need more help?
- How to Autofill Dates in Excel (Autofill Days, Weekdays, Months & Years)
- Entering the First Date
- Autofill Sequential Dates in Excel Using the Fill Handle
- What is Fill Handle?
- Autofill Dates With the Series Dialog
- Autofill Months in Excel Using the Fill Handle/Series Dialog
- Autofill Month Names Using the Fill Handle
- Autofill Month Sequence Using the Fill Handle
- Autofill Month Sequence Using the Series Dialog
- Autofill Years in Excel Using the Fill Handle/Series Dialog
- Autofill Year Using the Fill Handle
- Autofill Year Sequence Using the Fill Handle
- Autofill Year Sequence Using the Series Dialog
- Autofill Weekdays in Excel Using the Fill Handle/Series Dialog
- Autofill Weekdays Using the Fill Handle
- Autofill Weekday Sequence Using the Fill Handle
- Autofill Weekday Sequence Using the Series Dialog
- Auto-Populate Dates in Excel with SEQUENCE Function
- Subscribe and be a part of our 15,000+ member family!
Insert the current date and time in a cell
Let’s say that you want to easily enter the current date and time while making a time log of activities. Or perhaps you want to display the current date and time automatically in a cell every time formulas are recalculated. There are several ways to insert the current date and time in a cell.
Insert a static date or time into an Excel cell
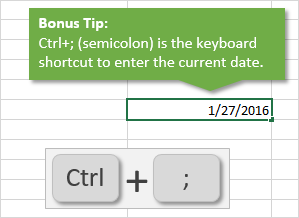
A static value in a worksheet is one that doesn’t change when the worksheet is recalculated or opened. When you press a key combination such as Ctrl+; to insert the current date in a cell, Excel “takes a snapshot” of the current date and then inserts the date in the cell. Because that cell’s value doesn’t change, it’s considered static.
On a worksheet, select the cell into which you want to insert the current date or time.
Do one of the following:
To insert the current date, press Ctrl+; (semi-colon).
To insert the current time, press Ctrl+Shift+; (semi-colon).
To insert the current date and time, press Ctrl+; (semi-colon), then press Space, and then press Ctrl+Shift+; (semi-colon).
Change the date or time format
To change the date or time format, right-click on a cell, and select Format Cells. Then, on the Format Cells dialog box, in the Number tab, under Category, click Date or Time and in the Type list, select a type, and click OK.
Insert a static date or time into an Excel cell
A static value in a worksheet is one that doesn’t change when the worksheet is recalculated or opened. When you press a key combination such as Ctrl+; to insert the current date in a cell, Excel “takes a snapshot” of the current date and then inserts the date in the cell. Because that cell’s value doesn’t change, it’s considered static.
On a worksheet, select the cell into which you want to insert the current date or time.
Do one of the following:
To insert the current date, press Ctrl+; (semi-colon).
To insert the current time, press  + ; (semi-colon).
To insert the current date and time, press Ctrl+; (semi-colon), then press Space, and then press + ; (semi-colon).
Change the date or time format
To change the date or time format, right-click on a cell, and select Format Cells. Then, on the Format Cells dialog box, in the Number tab, under Category, click Date or Time and in the Type list, select a type, and click OK.
Insert a static date or time into an Excel cell
A static value in a worksheet is one that doesn’t change when the worksheet is recalculated or opened. When you press a key combination such as Ctrl+; to insert the current date in a cell, Excel “takes a snapshot” of the current date and then inserts the date in the cell. Because that cell’s value doesn’t change, it’s considered static.
On a worksheet, select the cell into which you want to insert the current date or time.
Do one of the following:
To insert the date, type the date (like 2/2), and then click Home > Number Format dropdown (in the Number tab) > Short Date or Long Date.
To insert the time, type the time, and then click Home > Number Format dropdown (in the Number tab) > Time.
Change the date or time format
To change the date or time format, right-click on a cell, and select Number Format. Then, on the Number Format dialog box, under Category, click Date or Time and in the Type list, select a type, and click OK.
Insert a date or time whose value is updated
A date or time that updates when the worksheet is recalculated or the workbook is opened is considered “dynamic” instead of static. In a worksheet, the most common way to return a dynamic date or time in a cell is by using a worksheet function.
To insert the current date or time so that it is updatable, use the TODAY and NOW functions, as shown in the following example. For more information about how to use these functions, see TODAY function and NOW function.
Current date (varies)
Current date and time (varies)
Select the text in the table shown above, and then press Ctrl+C.
In the blank worksheet, click once in cell A1, and then press Ctrl+V. If you are working in Excel for the web, repeat copying and pasting for each cell in the example.
Important: For the example to work properly, you must paste it into cell A1 of the worksheet.
To switch between viewing the results and viewing the formulas that return the results, press Ctrl+` (grave accent), or on the Formulas tab, in the Formula Auditing group, click the Show Formulas button.
After you copy the example to a blank worksheet, you can adapt it to suit your needs.
Note: The results of the TODAY and NOW functions change only when the worksheet is calculated or when a macro that contains the function is run. Cells that contain these functions are not updated continuously. The date and time that are used are taken from the computer’s system clock.
Need more help?
You can always ask an expert in the Excel Tech Community or get support in the Answers community.
Источник
Create a list of sequential dates
You can quickly create a list of dates, in sequential order, by using the Fill Handle  or the Fill command.

Use the Fill Handle
Select the cell that contains the first date. Drag the fill handle across the adjacent cells that you want to fill with sequential dates.
Select the fill handle at the lower-right corner of the cell, hold down, and drag to fill the rest of the series. Fill handles can be dragged up, down, or across a spreadsheet.

Use the Fill command
Select the cell with the first date. Then select the range of cells you want to fill.
Select Fill > Series > Date unit. Select the unit you want to use.
Tip: You can sort dates much like any other data. By default, dates are sorted from the earliest date to the latest date.
Need more help?
You can always ask an expert in the Excel Tech Community or get support in the Answers community.
Источник
How to Autofill Dates in Excel (Autofill Days, Weekdays, Months & Years)
No matter how many or few dates you need, the whole day/month/year thing can be annoying to do even if it is just a few times. Today we learn about auto-filling dates in Excel. Why would anyone need so many dates? It could be for a calculation on daily wages, it could be for a dated column in payroll, it could be an attendance sheet, daily sales entry, you get the idea. If you’re thinking that most of these examples can’t rely on a date sequence since weekends would need to be deducted, you’re right and we’re prepared. That’s where the weekday sequence comes in.
By the end of this tutorial, you will learn how to autofill dates using the in-front-of-your-eyes Fill Handle, Series settings, and the SEQUENCE function. We will also fill you in on auto-filling weekdays, months, and years. If the daily fill isn’t what you’re looking for, we will also show you how to auto-fill alternate days, every 2 days, 3 days, etc.
Yes, this guide is about auto-fill but you need to give auto-filling some direction; the first date needs to be entered manually and we have a few things we need to say about that so let’s take a nosedive and begin.

Table of Contents
Entering the First Date
The first date for the sequence will have to be entered manually. Here are some tips on getting it right:
If you enter the date month-first with hyphens or forward slashes, Excel will recognize the entry as a date and change the format of the cell from General to Date. You know the entry has been recognized as a date when it self-aligns to the right of the cell.

If the entry is not recognized as a date, you can press Ctrl + 1 to access the Format Cells dialog box. From here, you can format the cell into the Date format and also choose the specific format from the options (such as 15-Dec-21 or 15/12/21).

Autofill Sequential Dates in Excel Using the Fill Handle
Sequential dates can be auto-filled using the Fill Handle. It’s super easy as you can quickly fill a range of cells with a date sequence, a convenience you probably have used many times before with or without realizing. But before jumping to the steps let’s get ourselves accustomed with the Fill Handle.
What is Fill Handle?
The Fill Handle is a tiny square at the bottom right corner of the active cell(s).

When hovered over the Fill Handle, the cursor will change to a black cross sign. That is the cue to click and drag the Fill Handle down to the cells you want to fill.
As you drag, a callout bubble on the side of your selection will keep notifying you of the content of the last auto-filled cell.

You can use this callout bubble to get an idea of which cell you want to drag up to.
Alright, with the basics out of our way, let’s see the steps:
- Enter the first date manually. For tips, refer to the segment on Entering the First Date
- Select the cell with the date.
- Click and drag the Fill Handle. We want the dates up to 31 st December. We can use the callout bubble notification on the side of our selection to see which cell we need to drag to.

- Clicked and dragged, the dates will be auto-filled according to the format of the first date:

Autofill Dates With the Series Dialog
A sequence of dates can be auto-filled using the settings from the Series dialog. For a quick autofill, the Fill Handle option above is the best pick but for some tinkering with the settings, the Series dialog offers a handful of options and can be used to autofill dates, months, years, and weekdays as you will find later. Below are the steps to autofill dates using the Series dialog:
- Manually enter the first date. For tips, refer to the segment on Entering the First Date
- Select the cell. Right-click and drag the Fill Handle.

- When you release the right-click mouse button, you will see a context menu.
- Select the last action Series… to open the Series dialog box.

- The Series dialog box can also be accessed by the Fill button in the Home tab in the Editing group. Select the range of cells to fill, go to the Fill button and select the Series… option.

- In the Series dialog box, the settings below will be detected from your selection. Make any adjustments if required then click OK.

- And that will enter a sequence of dates for you.

In the Series dialog box, you may have noted various options and that should help you with entering other series. E.g. if you need a date sequence of alternate days, you could set the Steps as 2 instead of 1 in the Series dialog box.

Here are the results:

Now that was dates; in the Series dialog, there are more options that will autofill months, years, and weekdays too which is what our following segments are about.
Autofill Months in Excel Using the Fill Handle/Series Dialog
Like days, you can autofill months in Excel. For month names alone, the Fill Handle will be the quickest. For full dates with a month sequence, we will show you how to autofill using both the Fill Handle and the Series dialog.
Autofill Month Names Using the Fill Handle
- Enter the first month’s name manually.

- Select the cell with the month name. Click and drag. As you drag, a callout bubble on the side of your selection will keep notifying you of the content of the last auto-filled cell. Use this callout bubble to determine your destination cell. E.g. we will drag down until we see December.

- Clicked and dragged, the months will be auto-filled to the dragged cells:

Autofill Month Sequence Using the Fill Handle
These are the steps to autofill the months in full date format using the Fill Handle. It’s like auto-filling dates but the sequence will be of the months, keeping the date constant. Here’s how to do it:
- Enter the starting date. For tips, refer to the segment on Entering the First Date

- Select the cell with the date. Click and drag the Fill Handle down to the cells you want to fill. The dates will be auto-filled based on the format of the first date:

- As you can see, this is a sequential date fill, which is not what we wanted. So, click on the Auto Fill Options icon highlighted above at the bottom-right of your selection. From the list, select the Fill Months option.

- And now you can see that the date 15 has remained constant while the months have changed in sequence:

Autofill Month Sequence Using the Series Dialog
Now we look into auto-filling the months in full date format using the Series dialog which is just like auto-filling dates but the sequence will be of the months, keeping the date constant. Here’s how to do it:
- Enter the first date manually. For tips, refer to the segment on Entering the First Date

- Select the cell with the date. Right-click and drag the Fill Handle down to the cells you want to fill. When you release the right-click mouse button, a context menu will appear.
- Select the last option Series… to access the Series dialog box.

- In the dialog box, select the Month radio button. Then click OK.

- Following the steps above, the date 15 has remained constant while the months have changed in sequence:

Autofill Years in Excel Using the Fill Handle/Series Dialog
Like days, you can autofill years in Excel. For years on their own, the Fill Handle makes for the easiest way. For full dates with a year series, we will show you how to autofill using both the Fill Handle and the Series settings.
Autofill Year Using the Fill Handle

- With both cells selected, click and drag the Fill Handle down to the cells you want to fill. While dragging you can take help of the callout bubble to determine the destination of the fill.

- That should autofill the years:

Autofill Year Sequence Using the Fill Handle
Now we will autofill the years in full date format with the Fill Handle. Auto-filling years keeps the date and month constant with a year’s series. Find out how, below:
- Enter the starting date manually. For tips, refer to the segment on Entering the First Date
- With the cell selected, click and drag the Fill Handle to the number of dates you want. Following the format of the starting date, the dates autofill like this:

Note that these are auto-filled dates, which is not what we’re looking for right now. To change this into a year sequence, click on the Auto Fill Options icon highlighted above at the bottom-right of the selection and select the Fill Years action.

Now the date and month (15/1) have remained constant while the years are in sequence:

Autofill Year Sequence Using the Series Dialog
Using the Series dialog, here are the steps to autofill the years in full date format with the years in sequence and the date and month constant. Follow below:
- Enter the first date. For tips, refer to the segment on Entering the First Date
- Select the cell with the date. Right-click and drag the Fill Handle down to the cells you want to fill. Upon releasing the right-click mouse button, there will be a context menu.
- Select Series…from the list.

- In the launched Series dialog box, select the Year radio button.
- Then click OK.

With the date and month 15/1 constant, there we have a series in years:

Autofill Weekdays in Excel Using the Fill Handle/Series Dialog
Like dates, weekdays can be auto-filled in Excel. For weekday names, the Fill Handle provides a quick solution. For weekday dates in sequence, we will show you how to use both the Fill Handle and the Series dialog to autofill the dates.
Autofill Weekdays Using the Fill Handle

- Select cells, right-click and drag the Fill Handle down to the cells you want to fill. While dragging, the callout bubble on the side of the selection can help with the autofill.

- The weekdays get auto-filled in this way:

If you only need weekdays (without the weekends), just click on the Auto Fill Options icon highlighted above at the bottom-right of your selection. From the list, select the Fill Weekdays

Now you have just the weekdays in sequence:

Autofill Weekday Sequence Using the Fill Handle
Now we move on to auto-filling the weekdays in full date format using the Fill Handle. It’s like auto-filling dates but the sequence will be only of the weekday dates, not weekends. For reference, we will make a weekday name column so you can see which days are being listed. See the steps for auto-filling weekday dates below:
- Enter the first date manually. For tips, refer to the segment on Entering the First Date

- Select the cell with the date. Click and drag the Fill Handle down to autofill the dates.

The autofill above includes weekends which is what we are aiming to leave out. For that, click on the icon highlighted above at the bottom-right of your selection: Auto Fill Options. From the list, select the Fill Weekdays option.

Now the weekends have been removed from the sequence leaving only the weekdays:

Autofill Weekday Sequence Using the Series Dialog
The second method of auto-filling the weekdays in full date format uses the Series dialog. The sequence will include weekday dates, not weekends. We will also keep a weekday name column for referral to show you which days will be auto-filled. Here’s how to do it:
- Enter the first date manually. For tips, refer to the segment on Entering the First Date
- Select the cell with the date, right-click and drag the Fill Handle down to the number of dates you want. Release the right-click mouse button to have a context menu appear.
- Select the last action Series… to launch the Series dialog box.

- In the dialog box, select the Weekday radio button.
- Then click OK.

These steps will leave the weekday dates, removing the weekend dates:

Auto-Populate Dates in Excel with SEQUENCE Function
And last but not least, we couldn’t wrap up a detailed guide without a function. Dates in Excel can be auto-populated using the SEQUENCE function. The SEQUENCE function returns a sequence of numbers according to the arguments fed in the function (the number of rows & columns, the starting value, and the steps). Let’s see how we can use it here.
This is the formula we will apply for a regular sequence of dates:
Here is the formula applied:

We needed 17 dates from December 15 th to December 31 st so we have entered 17 into the function as the number of rows we need in the sequence. 1 is the number of columns. D3 is the start of the sequence and since we need sequential dates, we have entered the starting value as a date reference. The last 1 is the number of steps. If you wanted alternate dates, you can put 2 instead of 1 here and so on so forth.
The result of the function is a spill, as you can see from the blue border surrounding the result. This means you do not need to drag and fill the formula; it will be auto-filled.
Talking of spilling, we have spilled all our beans on auto-filling dates in Excel. Next time you’re stuck with filling out a series, try one of the methods above to get your work flowing in a jiffy. We have so much more to kick your work in gear so keep heading back because let’s be real, all that Excel knowledge is not going to autofill itself!
Subscribe and be a part of our 15,000+ member family!
Now subscribe to Excel Trick and get a free copy of our ebook «200+ Excel Shortcuts» (printable format) to catapult your productivity.
Источник
No matter how many or few dates you need, the whole day/month/year thing can be annoying to do even if it is just a few times. Today we learn about auto-filling dates in Excel. Why would anyone need so many dates? It could be for a calculation on daily wages, it could be for a dated column in payroll, it could be an attendance sheet, daily sales entry, you get the idea. If you’re thinking that most of these examples can’t rely on a date sequence since weekends would need to be deducted, you’re right and we’re prepared. That’s where the weekday sequence comes in.
By the end of this tutorial, you will learn how to autofill dates using the in-front-of-your-eyes Fill Handle, Series settings, and the SEQUENCE function. We will also fill you in on auto-filling weekdays, months, and years. If the daily fill isn’t what you’re looking for, we will also show you how to auto-fill alternate days, every 2 days, 3 days, etc.
Yes, this guide is about auto-fill but you need to give auto-filling some direction; the first date needs to be entered manually and we have a few things we need to say about that so let’s take a nosedive and begin.
 1")
Entering the First Date
The first date for the sequence will have to be entered manually. Here are some tips on getting it right:
If you enter the date month-first with hyphens or forward slashes, Excel will recognize the entry as a date and change the format of the cell from General to Date. You know the entry has been recognized as a date when it self-aligns to the right of the cell.
 2")
If the entry is not recognized as a date, you can press Ctrl + 1 to access the Format Cells dialog box. From here, you can format the cell into the Date format and also choose the specific format from the options (such as 15-Dec-21 or 15/12/21).
 3")
Autofill Sequential Dates in Excel Using the Fill Handle
Sequential dates can be auto-filled using the Fill Handle. It’s super easy as you can quickly fill a range of cells with a date sequence, a convenience you probably have used many times before with or without realizing. But before jumping to the steps let’s get ourselves accustomed with the Fill Handle.
What is Fill Handle?
The Fill Handle is a tiny square at the bottom right corner of the active cell(s).
 4")
When hovered over the Fill Handle, the cursor will change to a black cross sign. That is the cue to click and drag the Fill Handle down to the cells you want to fill.
As you drag, a callout bubble on the side of your selection will keep notifying you of the content of the last auto-filled cell.
 5")
You can use this callout bubble to get an idea of which cell you want to drag up to.
Alright, with the basics out of our way, let’s see the steps:
- Enter the first date manually. For tips, refer to the segment on Entering the First Date
- Select the cell with the date.
- Click and drag the Fill Handle. We want the dates up to 31st December. We can use the callout bubble notification on the side of our selection to see which cell we need to drag to.
 6")
- Clicked and dragged, the dates will be auto-filled according to the format of the first date:
 7")
Autofill Dates With the Series Dialog
A sequence of dates can be auto-filled using the settings from the Series dialog. For a quick autofill, the Fill Handle option above is the best pick but for some tinkering with the settings, the Series dialog offers a handful of options and can be used to autofill dates, months, years, and weekdays as you will find later. Below are the steps to autofill dates using the Series dialog:
- Manually enter the first date. For tips, refer to the segment on Entering the First Date
- Select the cell. Right-click and drag the Fill Handle.
 8")
- When you release the right-click mouse button, you will see a context menu.
- Select the last action Series… to open the Series dialog box.
 9")
- The Series dialog box can also be accessed by the Fill button in the Home tab in the Editing group. Select the range of cells to fill, go to the Fill button and select the Series… option.
 10")
- In the Series dialog box, the settings below will be detected from your selection. Make any adjustments if required then click OK.
 11")
- And that will enter a sequence of dates for you.
 12")
In the Series dialog box, you may have noted various options and that should help you with entering other series. E.g. if you need a date sequence of alternate days, you could set the Steps as 2 instead of 1 in the Series dialog box.
 13")
Here are the results:
 14")
Now that was dates; in the Series dialog, there are more options that will autofill months, years, and weekdays too which is what our following segments are about.
Autofill Months in Excel Using the Fill Handle/Series Dialog
Like days, you can autofill months in Excel. For month names alone, the Fill Handle will be the quickest. For full dates with a month sequence, we will show you how to autofill using both the Fill Handle and the Series dialog.
Autofill Month Names Using the Fill Handle
- Enter the first month’s name manually.
 15")
- Select the cell with the month name. Click and drag. As you drag, a callout bubble on the side of your selection will keep notifying you of the content of the last auto-filled cell. Use this callout bubble to determine your destination cell. E.g. we will drag down until we see December.
 16")
- Clicked and dragged, the months will be auto-filled to the dragged cells:
 17")
Autofill Month Sequence Using the Fill Handle
These are the steps to autofill the months in full date format using the Fill Handle. It’s like auto-filling dates but the sequence will be of the months, keeping the date constant. Here’s how to do it:
- Enter the starting date. For tips, refer to the segment on Entering the First Date
 18")
- Select the cell with the date. Click and drag the Fill Handle down to the cells you want to fill. The dates will be auto-filled based on the format of the first date:
 19")
- As you can see, this is a sequential date fill, which is not what we wanted. So, click on the Auto Fill Options icon highlighted above at the bottom-right of your selection. From the list, select the Fill Months option.
 20")
- And now you can see that the date 15 has remained constant while the months have changed in sequence:
 21")
Autofill Month Sequence Using the Series Dialog
Now we look into auto-filling the months in full date format using the Series dialog which is just like auto-filling dates but the sequence will be of the months, keeping the date constant. Here’s how to do it:
- Enter the first date manually. For tips, refer to the segment on Entering the First Date
 22")
- Select the cell with the date. Right-click and drag the Fill Handle down to the cells you want to fill. When you release the right-click mouse button, a context menu will appear.
- Select the last option Series… to access the Series dialog box.
 23")
- In the dialog box, select the Month radio button. Then click OK.
 24")
- Following the steps above, the date 15 has remained constant while the months have changed in sequence:
 25")
Autofill Years in Excel Using the Fill Handle/Series Dialog
Like days, you can autofill years in Excel. For years on their own, the Fill Handle makes for the easiest way. For full dates with a year series, we will show you how to autofill using both the Fill Handle and the Series settings.
Autofill Year Using the Fill Handle
- Enter the first 2 years.
 26")
- With both cells selected, click and drag the Fill Handle down to the cells you want to fill. While dragging you can take help of the callout bubble to determine the destination of the fill.
 27")
- That should autofill the years:
 28")
Autofill Year Sequence Using the Fill Handle
Now we will autofill the years in full date format with the Fill Handle. Auto-filling years keeps the date and month constant with a year’s series. Find out how, below:
- Enter the starting date manually. For tips, refer to the segment on Entering the First Date
- With the cell selected, click and drag the Fill Handle to the number of dates you want. Following the format of the starting date, the dates autofill like this:
 30")
Note that these are auto-filled dates, which is not what we’re looking for right now. To change this into a year sequence, click on the Auto Fill Options icon highlighted above at the bottom-right of the selection and select the Fill Years action.
 31")
Now the date and month (15/1) have remained constant while the years are in sequence:
 32")
Autofill Year Sequence Using the Series Dialog
Using the Series dialog, here are the steps to autofill the years in full date format with the years in sequence and the date and month constant. Follow below:
- Enter the first date. For tips, refer to the segment on Entering the First Date
- Select the cell with the date. Right-click and drag the Fill Handle down to the cells you want to fill. Upon releasing the right-click mouse button, there will be a context menu.
- Select Series…from the list.
 34")
- In the launched Series dialog box, select the Year radio button.
- Then click OK.
 35")
With the date and month 15/1 constant, there we have a series in years:
 36")
Recommended Reading: How to Sort by Date in Excel
Autofill Weekdays in Excel Using the Fill Handle/Series Dialog
Like dates, weekdays can be auto-filled in Excel. For weekday names, the Fill Handle provides a quick solution. For weekday dates in sequence, we will show you how to use both the Fill Handle and the Series dialog to autofill the dates.
Autofill Weekdays Using the Fill Handle
- Enter the first weekday.
 37")
- Select cells, right-click and drag the Fill Handle down to the cells you want to fill. While dragging, the callout bubble on the side of the selection can help with the autofill.
 38")
- The weekdays get auto-filled in this way:
 39")
If you only need weekdays (without the weekends), just click on the Auto Fill Options icon highlighted above at the bottom-right of your selection. From the list, select the Fill Weekdays
 40")
Now you have just the weekdays in sequence:
 41")
Autofill Weekday Sequence Using the Fill Handle
Now we move on to auto-filling the weekdays in full date format using the Fill Handle. It’s like auto-filling dates but the sequence will be only of the weekday dates, not weekends. For reference, we will make a weekday name column so you can see which days are being listed. See the steps for auto-filling weekday dates below:
- Enter the first date manually. For tips, refer to the segment on Entering the First Date
 42")
- Select the cell with the date. Click and drag the Fill Handle down to autofill the dates.
 43")
The autofill above includes weekends which is what we are aiming to leave out. For that, click on the icon highlighted above at the bottom-right of your selection: Auto Fill Options. From the list, select the Fill Weekdays option.
 44")
Now the weekends have been removed from the sequence leaving only the weekdays:
 45")
Autofill Weekday Sequence Using the Series Dialog
The second method of auto-filling the weekdays in full date format uses the Series dialog. The sequence will include weekday dates, not weekends. We will also keep a weekday name column for referral to show you which days will be auto-filled. Here’s how to do it:
- Enter the first date manually. For tips, refer to the segment on Entering the First Date
- Select the cell with the date, right-click and drag the Fill Handle down to the number of dates you want. Release the right-click mouse button to have a context menu appear.
- Select the last action Series… to launch the Series dialog box.
 47")
- In the dialog box, select the Weekday radio button.
- Then click OK.
 48")
These steps will leave the weekday dates, removing the weekend dates:
 49")
Auto-Populate Dates in Excel with SEQUENCE Function
And last but not least, we couldn’t wrap up a detailed guide without a function. Dates in Excel can be auto-populated using the SEQUENCE function. The SEQUENCE function returns a sequence of numbers according to the arguments fed in the function (the number of rows & columns, the starting value, and the steps). Let’s see how we can use it here.
This is the formula we will apply for a regular sequence of dates:
=SEQUENCE(17,1,D3,1)
Here is the formula applied:
 50")
We needed 17 dates from December 15th to December 31st so we have entered 17 into the function as the number of rows we need in the sequence. 1 is the number of columns. D3 is the start of the sequence and since we need sequential dates, we have entered the starting value as a date reference. The last 1 is the number of steps. If you wanted alternate dates, you can put 2 instead of 1 here and so on so forth.
The result of the function is a spill, as you can see from the blue border surrounding the result. This means you do not need to drag and fill the formula; it will be auto-filled.
Talking of spilling, we have spilled all our beans on auto-filling dates in Excel. Next time you’re stuck with filling out a series, try one of the methods above to get your work flowing in a jiffy. We have so much more to kick your work in gear so keep heading back because let’s be real, all that Excel knowledge is not going to autofill itself!
Fill data automatically in worksheet cells
Use the Auto Fill feature to fill cells with data that follows a pattern or are based on data in other cells.
Find more videos on Mike Girvin’s YouTube channel, excelisfun.
-
Select one or more cells you want to use as a basis for filling additional cells.
For a series like 1, 2, 3, 4, 5…, type 1 and 2 in the first two cells. For the series 2, 4, 6, 8…, type 2 and 4.
For the series 2, 2, 2, 2…, type 2 in first cell only.
-
Drag the fill handle
 .
. -
If needed, click Auto Fill Options
and choose the option you want.
 and choose the option you want.
Need more help?
You can always ask an expert in the Excel Tech Community or get support in the Answers community.
Need more help?
Want more options?
Explore subscription benefits, browse training courses, learn how to secure your device, and more.
Communities help you ask and answer questions, give feedback, and hear from experts with rich knowledge.
Bottom line: With Valentine’s Day rapidly approaching I thought it would be good to explain how you can get a date with your Excel skills. Just kidding! 🙂 This post and video explain how the date calendar system works in Excel.
Skill level: Beginner
Dates in Excel can be just as complicated as your date for Valentine’s Day. We are going to stick with dates in Excel for this article because I’m not qualified to give any other type of dating advice. 🙂
Video Tutorial on How Dates Work in Excel
The following is a video from The Ultimate Lookup Formulas Course on how the date system works in Excel.
Watch the Video on YouTube
There are over 100 short videos just like the one above included in the Ultimate Lookup Formulas Course.
This course has been designed to help you master Excel’s most important functions and formulas in an easy step-by-step manner.
The Ultimate Lookup Formulas course is now part of our comprehensive Elevate Excel Training Program.
Click Here to Learn More About Elevate Excel
What is a Date in Excel?
I should first make it clear that I am referring to a date that is stored in a cell.
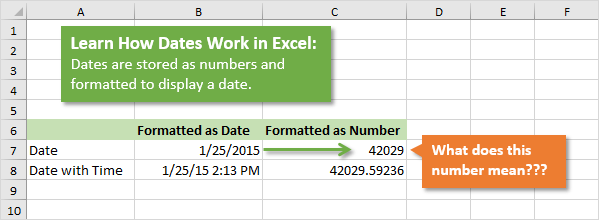
The dates in Excel are actually stored as numbers, and then formatted to display the date. The default date format for US dates is “m/d/yyyy” (1/27/2016).
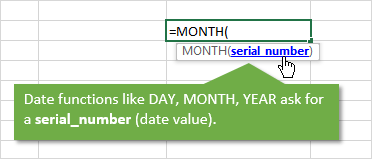
The dates are referred to as serial numbers in Excel. You will see this in some of the date functions like DAY(), MONTH(), YEAR(), etc.
So then, what is a serial number? Well let’s start from the beginning.
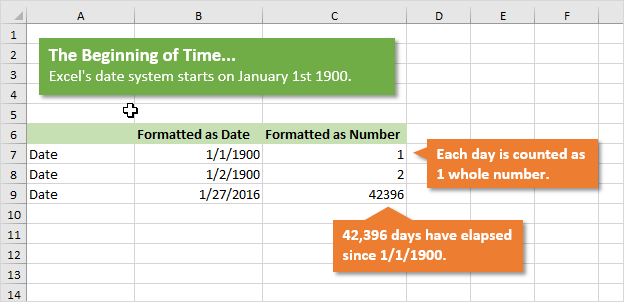
The date calendar in Excel starts on January 1st, 1900. As far as Excel is concerned this day starts the beginning of time.
Each Day is a Whole Number
Each day is represented by one whole number in Excel. Type a 1 in any cell and then format it as a date. You will get 1/1/1900. The first day of the calendar system.
Type a 2 in a cell and format it as a date. You will get 1/2/1900, or January 2nd. This means that one whole day is represented by one whole number is Excel.
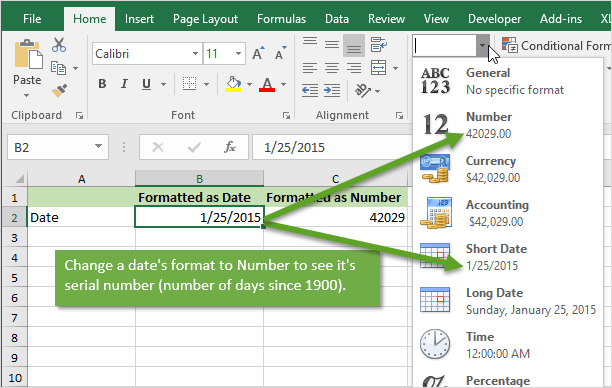
You can also take a cell that contains a date and format it as a number.
For example, this post was published on 1/27/2016. Put that number in a cell (the keyboard shortcut to enter today’s date is Ctrl+;), and then format it as a number or General.
You will see the number 42,396. This is the number of days that have elapsed since 1/1/1900.
Date Based Calculations
It is important to know that dates are stored as the number of days that have elapsed since the beginning of Excel’s calendar system (1/1/1900).
When you calculate the difference between two dates by subtraction, the result will be the number of days between the two dates.
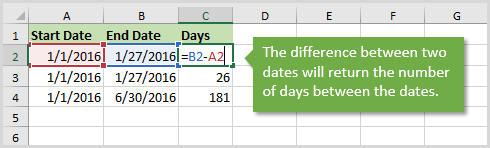
1/27/2016 – 1/1/2016 = 26 days
6/30/2016 – 1/1/2016 = 181 days
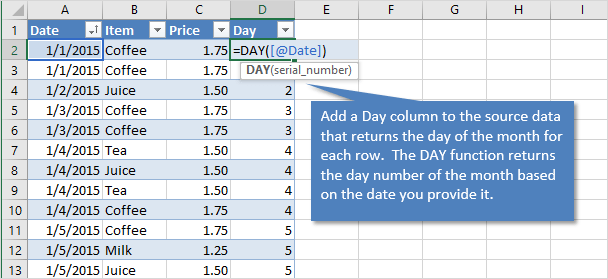
There are a lot of Date functions in Excel that can help with these calculations. Last week we learned about the DAY function for month-to-date calculations with pivot tables.
We won’t go into all the date functions here, but understanding that the serial number represents one day will give you a good foundation for working with dates.
What About Dates with Times?
Do you ever work with dates that contain time values?
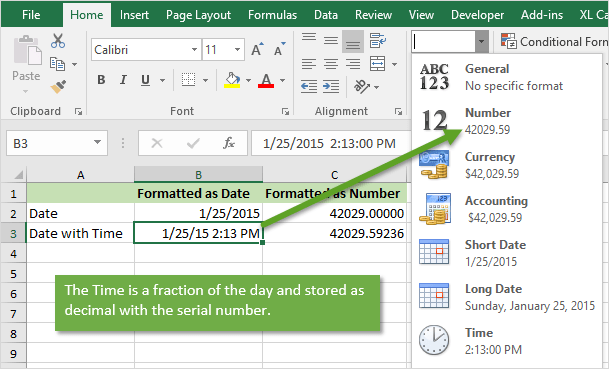
These dates are still stored as serial numbers in Excel. When you convert the date with a time to the number format, you will see a decimal number.
This decimal is a fraction of the day.
One hour in Excel is represented by the number: 1/24 = 0.04167
One minute in Excel is represented by the number: 1/(24*60) = 1/1440 = 0.000694
So 8:30 AM can be calculated as: (8 * (1/24)) + (30 * (1/1440)) = .354167
An easier way to calculate this is by typing 8:30 AM in a cell, then changing the format to Number.
So if you are running a half hour late and want to let your boss know, text him/her and say you will be there at 0.354167. 🙂
Checkout my article on 3 ways to group times in Excel for more date time based calculations.
Don’t Talk About Excel Dates with Your Date
Unless your Valentine shares a similar passion for Excel, I strongly recommend NOT sharing this information on your date.
I remember the first time I met my wife, and told her I worked in finance. The first word out of her mouth was, “BORING!”. Awe… it was love at first sight… LOL 🙂
But you should now be able to use Excel to determine how many days it has been since you last spoke to your date. That’s the only dating advice I can give.
Please leave a comment below with any questions on Excel dates. Thanks!
![]()
If you want to fill sequential dates in your spreadsheet cells, you don’t have to type them manually. Microsoft Excel offers two ways to quickly and automatically fill dates in your chosen cells. We’ll show you how to use those methods.
In both these methods, you enter the first date in a cell in your spreadsheet. Then, based on this date, Excel automatically populates the other cells with sequential dates. You get the same results regardless of what fill method you use below. However, the Fill Command method gives you control over the date unit counted.
Use Fill Handle to Automatically Fill Dates in Excel
With the Fill Handle, you drag the first date across all the cells where you want the dates added. Excel populates those cells with sequential dates.
To use this method, in your spreadsheet, click the cell that contains a date. If you don’t already have one, type one in, like today’s date.

From the selected cell’s bottom-right corner, drag downwards covering all the cells where you want dates.
Tip: To fill dates in columns, then drag the date cell covering your columns.
Your selected cells now have sequential dates in them.
And you’re all set.
RELATED: 13 Microsoft Excel Date and Time Functions You Should Know
Fill Sequential Dates in Excel Using the Fill Command
Using the Fill command, you tell Excel your first date and the cells where you want sequential dates. The command then populates the specified cells with sequential dates.
To use this command, in your spreadsheet, select your date cell as well as the cells where you want sequential dates.
While your cells are highlighted, in Excel’s ribbon at the top, click the “Home” tab. Then, from the “Editing” section, choose Fill > Series.
On the “Series” box, from the “Date Unit” section, choose what unit you’d like to fill in your cells. Then click “OK.”
Back on the spreadsheet, you’ll find that Excel has filled your selected cells with the dates.
And that’s how you eliminate the hassle of manually entering dates in your Excel spreadsheets. Very useful!
RELATED: How to Fill Excel Cells Automatically with Flash Fill and Auto Fill
READ NEXT
- › Google Chrome Is Getting Faster
- › How to Adjust and Change Discord Fonts
- › The New NVIDIA GeForce RTX 4070 Is Like an RTX 3080 for $599
- › BLUETTI Slashed Hundreds off Its Best Power Stations for Easter Sale
- › This New Google TV Streaming Device Costs Just $20
- › HoloLens Now Has Windows 11 and Incredible 3D Ink Features
How-To Geek is where you turn when you want experts to explain technology. Since we launched in 2006, our articles have been read billions of times. Want to know more?