Let me tell you the shortest horror story ever.
Excel Crashed!
Imagine working on that urgent report or that extremely important dashboard where you have done such a fantastic job. You are proud of yourself and all the hard work you have put into it.
But you forgot a key step.
You didn’t save the Excel file (gasp!!!)
Ok, let me cut down on the dramatics and come straight to the point.
Excel has a tendency to crash, especially when you need it not to. Somehow, it happens at the worst possible time (not that there is a good time for this ever).
In such a scenario, your only option is to try and recover unsaved Excel files.
In some cases, you will be smiled upon by the Excel Gods and you’ll get the file, and in some cases, you may not.
In this article, I will share all there is to know when it comes to recovering unsaved Excel files. I will also show you the precautions and pre-emptive steps you need to take.
And if you want to absolutely make sure nothing goes wrong, I will also share a VBA code that will save a copy of your Excel file with a timestamp whenever you save the existing file.
Let’s get started!
All Possible Ways to Recover Unsaved Excel Files / Data
Excel (and even Windows) is highly unpredictable. It can crash anytime and can your Excel files with it.
It’s a bad situation to be in…
…but there are ways to tackle this.
Excel has a few functionalities where it can help you recover unsaved Excel files or data in some cases.
Here are three scenarios where Excel’s in-built checks can help you recover files/data:
- You are working on a new file (which you haven’t saved yet) and your system/Excel crashes.
- You updated a file which has been saved earlier and Excel crashes before you could save it.
- You made a mistake and saved the changes, but now want to go back to the previous version.
Let’s see how to tackle each of these.
Recover a New Unsaved Excel File (that has never been saved)
If you are working on something and Excel crashes (or your system crashes), you can still recover that unsaved file.
Note: This method works as Excel has an inbuilt AutoSave and AutoRecover functionality. It’s enabled by default so you should be able to use these methods to recover the files. In case it’s not enabled, you will have to do it to be able to use these functionalities. How to enable AutoSave and AutoRecover is covered later in this article.
Below are the steps to recover an unsaved Excel file:
- Open a new Excel workbook.
- Click the ‘File’ tab
- Click on ‘Open’
- Click the Recent Workbook option (it’s at the top-left)
- Click the ‘Recover Unsaved Workbooks’ button which is at the bottom
- In the dialog box that opens, scroll through the list of unsaved Workbooks and open the one you want.
- Save the file (using the ‘Save As’ option) with a different name in the location of your choice.
By default, Excel saves a copy of all the unsaved files at the following location:
C:Users[YourSystemName]AppDataLocalMicrosoftOfficeUnsavedFiles
In the above address, you need to replace [YourSystemName] with the name of your system (which is ‘Sumit’ in my case).
You can also go directly to this folder (where unsaved copies of Excel files are saved) by opening any browser and copy-pasting the address in it (in the place of URL).
When you open any file from this folder, you will see a notification bar that will prompt you to save it.
Click on it and save it at a new location with a name of your choice.
Note: By default, all the recovered unsaved files are in the ‘XLSB’ format. When you save it, make sure you’re saving it in a format you want.
With this method, you can recover files which you created but never saved.
Recover Updated Excel Files (the previous version was saved)
This method can be used for files which you have saved earlier, and Excel crashed (or the system crashed or the power went off) when you were working on it.
So you still have the previously saved file, but you lost the changes you did.
Below are the steps to recover the updated Excel file:
- Open any of the existing Excel Workbook.
- As soon as it opens, you will see a document recovery pane that lists all the unsaved files. Click on any the file names to load the data.
- When you get the data you want, save the file with a different name.
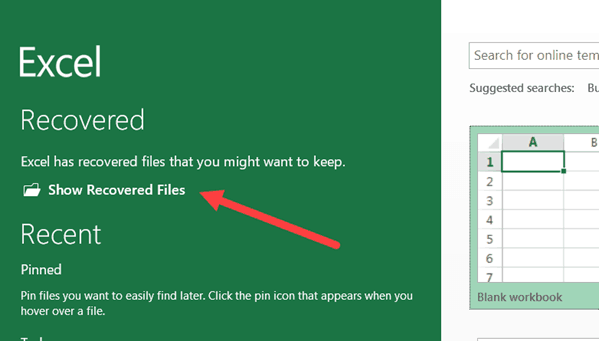
Alternatively, you can also open the Excel application, and you will see the ‘Show Recovered Files’ option (as shown below).
You can click on it and it will open the same Document Recovery pane.
Recover Overwritten Excel Files / Previously Saved Version (from within Excel)
While in the above two methods you can blame Excel or Windows for crashing or the power failure, this one is purely on you.
This is the case when you have a saved Excel file and you update the data and save it again.
But you end up making some changes you don’t want now (happens to me a lot).
What you really want is to get the previous version back.
While you can’t go back in life and correct your mistakes (unless you have a time machine of course), you can do that in the wonderful world of Excel spreadsheets.
In Excel 2010 and versions after that, Excel got an in-built feature to help you get the previous versions.
Below are the steps to revert to a previous version of Excel (even when you have updated and saved it):
- Click the File tab.
- In the Info page, click on Manage Workbook, you’ll find all the previous versions of that file.
- Click on the version you want to restore
- Save the file (preferably with a new name).
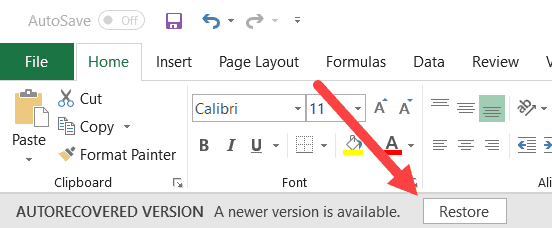
When you select a previously saved version and open it, Excel will show you a prompt as shown below. You can click on Restore to get the previous version that you have selected or can save it as a new file with a different name.
Note that for this to work, you need to make sure that AutoRecover option is enabled. While it usually is enabled by default, it’s something you can check and ensure. I cover how to enable ‘AutoRecover’ later in this tutorial.
When it comes to recovering unsaved Excel files or data, these are the three in-built options in Excel that can be used.
Another way (which I highly recommend) is to save your files on the cloud (OneDrive or DropBox). This takes away a lot of worries as the cloud services keep previous versions of your files.
Recover Overwritten Excel Files / Previously Saved Version (from the cloud – OneDrive/DropBox)
If you’re in the habit of saving your Excel files on the cloud – by using services such as OneDrive or DropBox, you don’t have to completely rely on Excel to help you recover unsaved files or lost data.
These cloud services also keep previous versions of your Excel files.
Let me show you how to get the previous versions from OneDrive and DropBox. I am sure there must be many more such services that have this functionality.
Getting the Previous Version of the Excel File from OneDrive
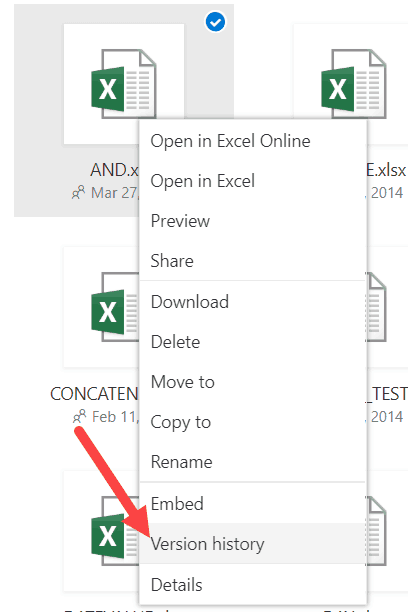
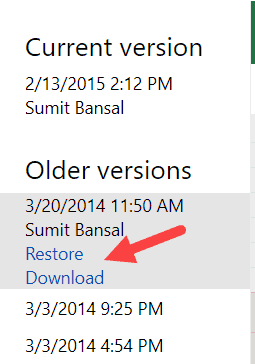
To get the previous version of an Excel file, right click on the current version in Onedrive and click on Version History.
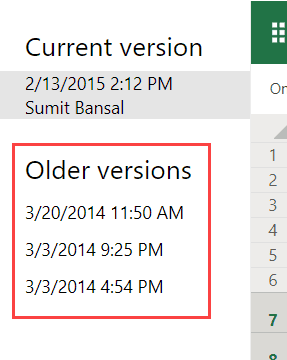
This will open the file and you can see all the previous versions of the file in the pane on the left.
Click on the version that you want. It will show you the file content and also give you the option to download that file or restore it.
Getting the Previous Version of the Excel File from DropBox
Just like OneDrive, DropBox also keeps the past versions of the Excel files that you can revisit and download.
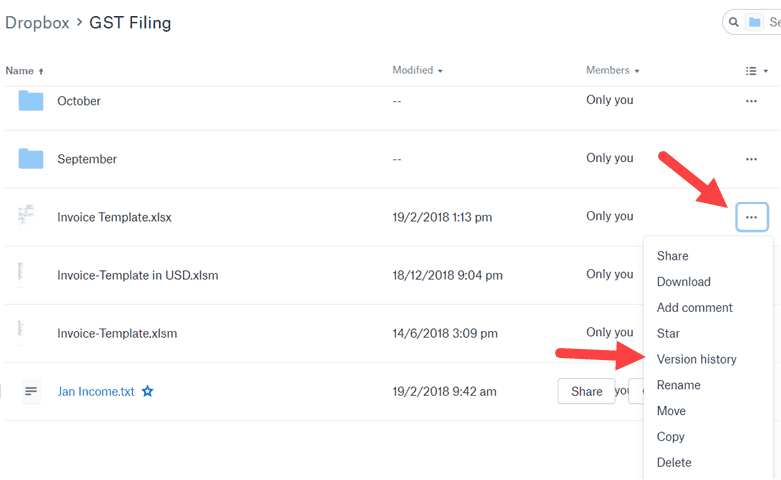
To get the previous versions, go to the file in Dropbox web-portal and click on the three dots for the file for which you want to see the previous versions.
Click on Version History option.
This will show you all the versions of that file. You can open and download this version from DropBox.
In case you have installed the DropBox folder on your system and keep your files there, you can simply right click on any of the files and click on Version History.
Doing this will take you to the web version of DropBox where you can see and download all the versions of the file.
Precautions to Enable Easy Recovery of Unsaved Files
While Excel has some default settings that make sure you have good chances of recovering Excel files, it’s still a good practice to make sure everything is enabled.
Enable AutoSave and AutoRecover
To make sure Excel automatically save your files and show recovery options, you need to have these enabled.
Although it should be enabled by default, in case it’s not, you can do that manually.
Below are the steps to enable AutoSave and AutoRecover functionality in Excel:
- Click the ‘File’ tab
- Click on ‘Options’
- In the Excel Options dialog box, click on Save (it’s in the left pane of the dialog box).
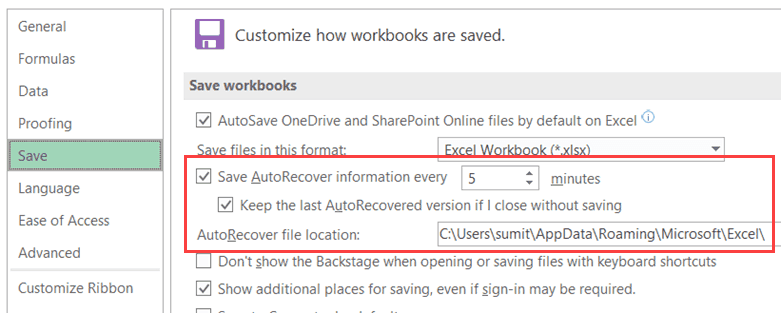
- Make sure the following settings are enabled (as shown below).
Let me quickly explain what these options mean:
- Save AutoRecover information every X minutes: This option will make sure that your files are saved every 5 minutes (or whatever time value you specify here). This is 10 minutes by default and I have changed this to 5 minutes. You can reduce this further if you want.
- Keep the last AutoRecovered version if I close without saving: This will ensure that in case your Excel/system crashes or you close a file without saving, a version is saved that can be auto-recovered.
- AutoRecover file location: This is the default location where auto-recovered files are saved. You can change this if you want.
Note: If you have a huge file with lots of formulas and charts, saving it every 5 minutes will lead to recalculation and some possible system freeze. If you don’t want that, you can choose a longer time duration (or can change calculation mode to manual).
Automatically Create a Backup Copy of the Saved Excel File
While Autosave and Autorecover options are useful when you forget to save the files and system crashes, auto-backup is something which creates a copy of the file whenever you save it.
For example, if I am working on a file with the name Test.xlsx and I save it in a folder, this would automatically create a copy with the name – ‘Backup of Test.xlk’
Now, whenever I save the Test file, all the changes are also saved in the backup copy.
This can be useful if you make some changes in a saved file and want to undo it. In that case, you can use the backup copy instead.
Or if your file crashes or gets corrupt, you will have the backup copy which will have the last saved content.
Below are the steps to enable the auto-backup feature for a workbook:
- Click the File tab.
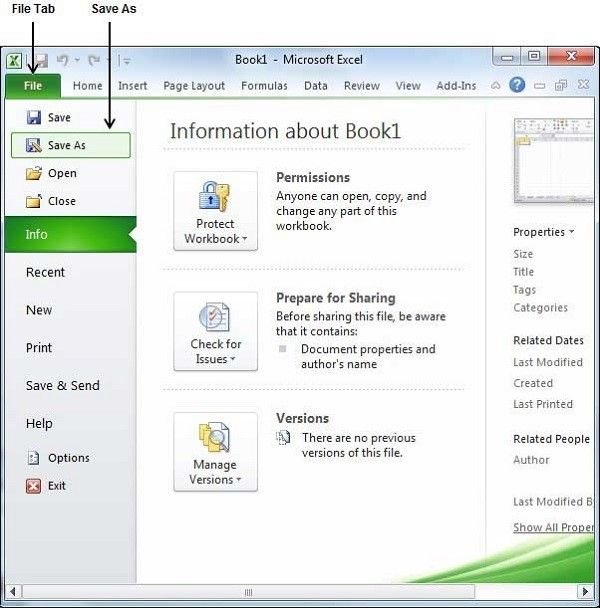
- Click on ‘Save As’
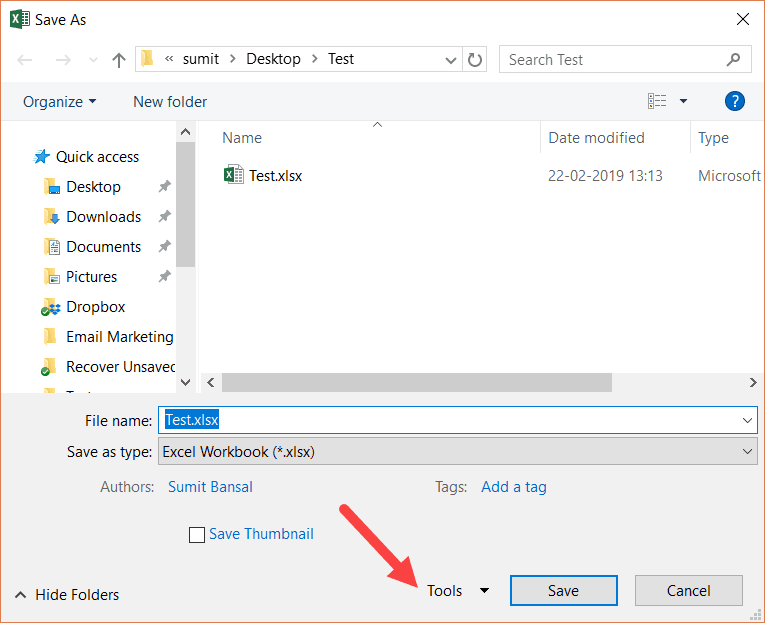
- Click on Browse to open the ‘Save As’ dialog box.
- In the Save As dialog box, click on the Tools option (it’s in the lower right part of the dialog box).
- Click on ‘General Options’.
- In the ‘General Options’ dialog box, check the ‘Always Create Backup’ option.
- Click OK.
- Save the file in the desired folder/location.
Now, whenever you save this file, an exact copy will be saved with the pre-fix ‘Backup of’.
Here are a few important things you need to know about using this auto-backup functionality in Excel:
- This is a workbook level setting. This means that if you enable it for one workbook, it will only work for that workbook. If you want it to work for others as well, you will have to manually enable it.
- This is different than Autorecover and Autosave options. These are independent settings and configuring one doesn’t impact the other. So you can have a workbook where AutoRecover, AutoSave, and AutoBackup all work.
- The backup file is saved with a .XLK extension. This is the extension for back-up files, and you may see a prompt when you open this file. Just click on Yes and it will open the backup file.
- The backup file is always one version behind your main file (except the time you save it for the first time). For example, if you create a new file and enable backup in it and do some changes and save it. This will save the new file as well as a backup copy of it. At this point, both the files (the main file and the backup) will be exactly the same. Now, if you make some changes in the main file and save it once, it will not be saved in the backup file. But if you save it again, it will be done in the backup file as well.
Auto-backup is a good feature as it gives you the file’s last saved version in case you make some unwanted changes and save the file. You can use the backup file to get the version before the last saved version.
Automatically Save a Time-Stamped Copy of the Excel Workbook
While all the methods covered so far rely on the Excel in-built features, you can also use a short VBA code to make sure you don’t lose your work ever.
With a VBA code, you save a timestamped copy of your Excel file as soon as you save it (or close it).
This ensures that you always have all the previous versions and you can go back and recover a file in case you mess up. Also, since these are time-stamped, you can easily find which version you want (or where you messed up).
Below is the code that will create a timestamped copy of the workbook as soon as you save it:
Private Sub Workbook_BeforeSave(ByVal SaveAsUI As Boolean, Cancel As Boolean)
Application.ScreenUpdating = False
Dim BackUpPath As String
BackUpPath = "C:UserssumitDesktopTest"
ThisWorkbook.SaveCopyAs BackUpPath & Format(Now, "dd-mm-yyyy hh:mm:ss") & " " & ActiveWorkbook.Name
Application.ScreenUpdating = True
End Sub
Note that you have to specify the location of the folder where you want to save the backup copies (change the path highlighted in bold in the above code).
This may mean that you end up with a lot of copies, but it can be a huge life-saver when you’re working on critical projects.
You can use a similar code to save a copy before you close the workbook (instead of saving a copy every time you save).
Private Sub Workbook_BeforeClose(Cancel As Boolean)
Dim BackUpPath As String
BackUpPath = "C:UserssumitDesktopTest"
ThisWorkbook.SaveCopyAs BackUpPath & Format(Now, "dd-mm-yyyy hh-mm-ss") & " " & ActiveWorkbook.Name
End Sub
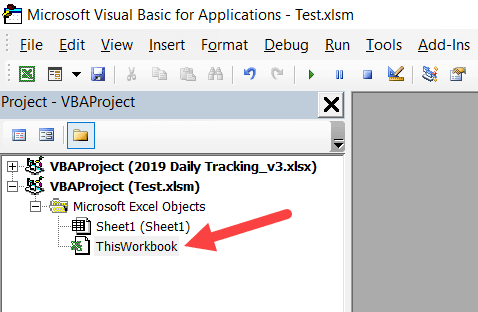
You need to put this code in the ThisWorkbook code window.
To do this, open the VB Editor (keyboard shortcut – ALT + F11) and double click on the This Workbook object in the project explorer.
Repairing Corrupt Excel Files
In case you find yourself with a corrupt Excel file, there are a few things you can do.
First and foremost, you can use the repair option that’s in-built in Excel.
Below are the steps to recover a corrupt file by repairing it:
- Open the Excel application.
- Click on ‘File’ and then click on ‘Open’ (or use the keyboard shortcut Control + O).
- Click the Browse button.
- In the dialog box that opens, select the file that has been corrupted.
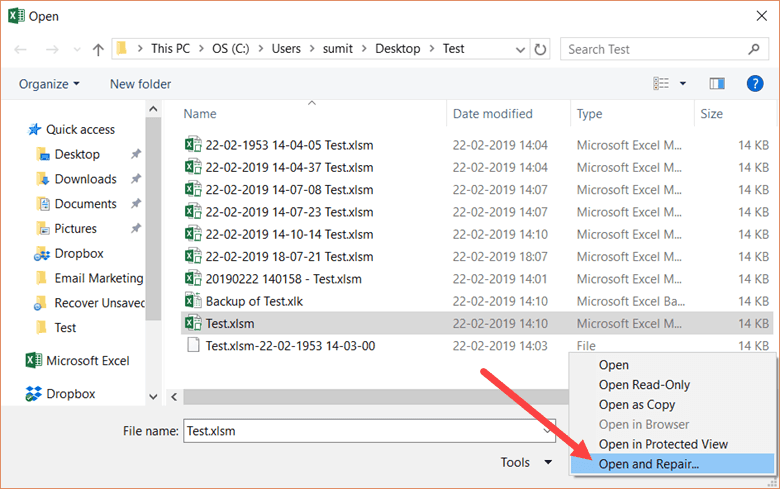
- Click on the small downward pointing triangle in the ‘Open’ button (as shown below).
- Click on Open and Repair.
- Excel will show you a prompt as shown below. Click on Repair.
If you’re lucky, everything would go smooth and you’ll be able to recover your data from the corrupt file.
In case repair option doesn’t work, follow the above steps till Step 5, and then instead of Repair, click on ‘Extract Data’. Excel will ask you whether you want to ‘Convert to values’ or ‘Recover Formulas’.
You can try using whatever option works for you. Excel will try and extract as much data as it can, and create a new workbook with the extracted data.
If this also doesn’t work. you may have to rely on third-party tools to recover corrupt Excel files.
You May Also Like the Following Excel Tutorials:
- Reduce Excel File Size
- How to Turn On AutoSave in Excel
- Clean Data in Excel.
- Excel Interview Questions.
- Excel Pivot Table
- Automatically Open Specific Excel Files on Startup
- How to Mark an Excel Workbook as Final?
Microsoft Excel документ не сохранен? Проверьте надстройки стороннего разработчика и разрешения, убедитесь в наличии места на диске, попробуйте сохраниться с новым именем или в другое место, измените формат, отключите на ПК / ноутбуке антивирусную программу и убедитесь в наличии доступа. Ниже подробно рассмотрим, в чем могут быть причины такой ошибки, и как ее устранить.
Причины, почем не сохранен Microsoft Excel
Для начала выделим несколько причин, почему файл Эксель не сохраняется, хотя вы все делаете правильно. Этому может быть несколько объяснений:
- надстройки сторонних разработчиков;
- сбои в процессе сохранения;
- отсутствие необходимых разрешений;
- утрачено соединение с Microsoft Excel;
- недостаток места на диске;
- действие антивирусной программы;
- отсутствие доступа;
- длина пути больше 218 знаков;
- нестабильное подключение к Сети (если документ Microsoft Excel не сохранен при работе через Интернет);
- прочие проблемы.
Выше приведен основные причины, почему Эксель не сохраняет документ, что позволяет сделать выводы по дальнейшим шагам.
Что делать
Зная возможные проблемы, связанные с Microsoft Excel, можно принять решение по дальнейшим шагам.
С чего начать
В ситуации, когда не сохраняется файл Excel, специалисты рекомендуют начать с приведенных ниже действий.
Сохранитесь с новым именем:
- Войдите в «Файл» и жмите «Сохранить как…».
- Выберите другое имя.
Переместите первоначальный лист в новый документ:
- Откройте новый документ.
- Добавьте лист заполнителя с помощью Shift+F11.
- Сгруппируйте листы. Для этого жмите 1-й лист данных, а после зафиксируйте Shift и кликните на последний лист данных.
- Жмите на сгруппированные листы правой кнопкой мышки и «Переместить или скопировать».
- В перечне «В книгу» выберите «Новая книга».
- Жмите «ОК».
После этих действий активные листы перемещаются в новый документ.
Измените формат, если Эксель не дает сохранить файл:
- Жмите на «Файл».
- Выберите «Сохранить как».
- В перечне «Тип …» выберите формат, который будет отличаться от текущего. Попробуйте сохраниться в XLSM или XLSX.
Сохранитесь в другое место:
- Жмите «Файл».
- Выберите «Сохранить как».
- Впишите имя и выберите другое место, к примеру, съемный или второй диск.
Такой метод может выручить, если в Экселе не сохраняется документ из-за временных сбоев, большой длины файла, отсутствия разрешений, конфликт доступа и т. д.
Проверьте, будет ли сохранен документ Microsoft Excel в исходное место:
- Создайте файл Эксель.
- Войдите в «Файл» и «Сохранить как».
- В поле «Папка» жмите на папку, где хранится исходный файл.
- В поле «Имя файла» введите имя для нового документа Microsoft Excel.
- Выберите «Сохранить».
Если документ не сохранен, причиной может быть большая длина пути, конфликт доступа, дефицит свободного места и т. д.
Дополнительные шаги
Рассмотрим еще ряд шагов, что делать, если Microsoft Excel документ не сохранен. При этом каждое из указанных ниже действий может помочь в устранении ошибки.
Проверьте, будет ли Microsoft Excel сохранен в безопасном режиме
Распространенные причины, почему Эксель не сохраняет файл — конфликт с антивирусом, применение надстроек сторонних организаций и т. д. В таком случае попробуйте перезапустить Виндовс в Safe Mode и сохранитесь на локальный жесткий диск. Если для хранения книги применяется сетевая папка, перезапустите ОС в указанном выше режиме и с поддержкой сети. После этого проверьте, сохранен ли документ Microsoft Excel. Если все нормально, снова перезагрузитесь в обычном режиме и повторите действие.
При неудачном сохранении после стандартной загрузки, причина, скорей всего — пользовательская надстройка. Для решения проблемы удалите ее.
Закройте лишние приложения
Причиной, почему в Эксель документ не сохранен, может быть прерывание процесса. К примеру, при выполнении работы могла быть нажата кнопка Esc, или имело место вмешательство сторонней программы, аппаратный / программный сбой. Для решения проблемы временно закройте запущенные программы, а после попробуйте, будет ли сохранен документ Microsoft Excel или нет.
Проверьте работу сети
При появлении проблемы при добавлении Microsoft Excel в сетевую папку убедитесь в работе локальной сети. Если подключение работает корректно, проверьте пинг, который может быть причиной проблем.
Убедитесь в наличии места на диске
Банальная причина, почему не сохраняются документы Microsoft Excel — отсутствие места на диске. Если его недостаточно, программа не сможет завершить процесс и отобразит информацию о переполненности мест. В таком случае нужно очистить место и просканировать жесткий диск на факт ошибок.
Получите нужные разрешения
Если документ Microsoft Excel не сохранен, причиной может быть отсутствие прав на запись. Чаще всего ошибка возникает, если пользователь не имеет прав администратора. Попробуйте создать отдельную папку на «D» и сохраниться в нее. Если необходимы данные по владельцу папки, войдите в «Безопасность», а после жмите «Дополнительно».
Отключите временно антивирусное ПО
Если на ПК / ноутбуке установлен антивирус, он часто не дает сохранить Microsoft Excel и выдает сообщение об ошибки. Последняя может возникать из-за того, что некоторый антивирусный софт быстро сканирует документы, которые появляются на устройстве. Оно прерывает процесс, из-за чего и возникают ошибки. Чтобы убедиться в отсутствии конфликта, временно отключите антивирусное ПО. Если документ Microsoft Excel после этого был сохранен, значит, проблема в нем.
Отключите общий доступ
Трудности могут возникать из-за попытки одновременного сохранения Майкрософт Эксель двумя разными людьми. В таком случае нужно согласовать работу и получить единоличный доступ к исправлению.
Введите правильный путь
Если Microsoft Excel не удается сохранить файл, убедитесь в соответствии имени требованиям программы. Путь к сохраняемому / открываемому документу вместе с именем не должен быть больше 218 символов. В ином случае появляется сообщение об ошибке о недопустимости данных. Попробуйте изменить путь и имя.
Теперь вы знаете, почему Microsoft Excel документ не сохранен, в каких случаях появляются ошибки, и как их самостоятельно исправить. Для начала определитесь с проблемой, попробуйте ее устранить, а при необходимости используйте обходные пути.
В комментариях расскажите, какое решение вам подошло, и какие еще методы можно использовать, если Microsoft Excel не сохранен.
Отличного Вам дня!
Не удается записать файл Microsoft Excel на диск, при каждой попытке отображается сообщение об ошибке «Документ не сохранен»? Узнаем подробнее причины ошибки и как ее исправить?
Чем вызвана ошибка?
Существует несколько причин, из-за которых не сохраняется документ в Excel:
- Проблемы с оборудованием. Ошибка может возникнуть при сохранении на флешку или внешний жесткий диск, которые частично повреждены или файл не записывается из-за неполадок порта USB.
- Нестабильное подключение по сети. Если сохраняете таблицу Excel через интернет, возникают случаи, когда из-за нестабильного соединения доступ к общей папке прерывается.
- Отсутствуют разрешения на папку. Проблема возникает при сохранении документа в каталог, на который у пользователя нет разрешения на запись.
Чтобы не потерять набранный документ попробуйте его сохранить путем копирования в другой файл. Таким способом можно сохранить содержимое. Для этого создайте новую таблицу Excel, затем вернитесь к документу, который не сохраняется, выделите все содержимое и скопируйте нажатием на Ctrl + C.
Перейдите в новый документ, щелкните на верхнюю левую ячейку и нажмите Ctrl + V, чтобы вставить содержимое предыдущей таблицы. После в меню Файл нажмите на «Сохранить как», выберите локальное расположение на жестком диске компьютера. После сохранения перейдите к методам устранения неполадок.
Проверка сетевого подключения
Есть много случаев, когда не удается сохранить файл Excel в общей папке по локальной сети. Если сеть работает нестабильно, постоянно прерывается и ей свойственны большие задержки, то столкнетесь с ошибкой при сохранении.
Для проверки причастности сети, попробуйте записать какой-либо файл на сетевой ресурс с другого компьютера. Если это сделать не удастся, то проблема с сетевым подключением. В этом случае сохраните таблицу на жесткий диск (при его наличии) или флешку. Проверьте сетевые адаптеры на своем и удаленном компьютере, плотность контактов сетевых коннекторов при кабельном подключении и уровень сигнала по Wi-Fi.
Проблемы с оборудованием
Ошибка может возникнуть при повреждении жесткого диска или образования на нем сбойных секторов. Это происходит в случае, когда ранее записанный документ после редактирования не удавалось сохранить.
Если сталкиваетесь с сообщением при сохранении на внешний накопитель, то, возможно поврежден или возникли проблемы с USB портом. Попробуйте переключить устройство в другой USB порт и повторить попытку.
Проверка разрешений
Во многих случаях ошибка возникает при сохранении файла Excel в каталог, на который у текущего пользователя нет полного доступа. Каждая папка имеет свои разрешения, которые обычно предоставляются администратором (или владельцем). Доступ к системным каталогам ограничивается встроенной учетной записью. Также администратор может намерено изменить разрешения на пользовательские папки.
Для изменения разрешений нужно войти в Windows под учетной записью администратора, чтобы предоставить доступ обычному пользователю.
В проводнике (Win + E) перейдите в папку, в которую пытаетесь записать документ. Сделайте шаг назад и откройте каталог, в котором вложена эта папка. Щелкните на ней правой кнопкой мыши и выберите Свойства.
На вкладке Безопасность кликните на кнопку Дополнительно.
В окне дополнительных параметров безопасности нажмите на «Изменить». Здесь изменим владельца этой папки на учетную запись пользователя.
Нажмите на Дополнительно, затем на кнопку «Найти». Отобразится список, состоящий из всех групп пользователей. Найдите свою учетную запись и кликните на «ОК». В следующем окне нажмите на «ОК».
Отметьте флажком опцию «Заменить владельца подконтейнеров и объектов», чтобы вложенные каталоги изменили принадлежность. Таким образом, не придется выполнять весь процесс повторно для существующих подкаталогов.
Нажмите «Применить» и выйдите из окна свойств. Снова откройте вкладку Безопасность и щелкните на «Дополнительно».
Нажмите на кнопку «Добавить».
В следующем окне щелкните на «Выбрать субъект».
Отобразится окно выбора пользователей и групп. Щелкните на Дополнительно, затем на кнопку Найти. Укажите учетную запись и сохраните изменения.
Отметьте флажком опцию полного контроля и кликните на «ОК».
Отметьте флажком строку «Заменить все записи разрешений дочернего объекта наследуемыми» и кликните на «Применить».
После выполнения шагов появится полный доступ к каталогу, в который хотите сохранить таблицу.
Если продолжаете сталкиваться с ошибкой, попробуйте запустить офисный пакет в безопасном режиме. При таком запуске будут отключены все надстройки, которые могут вызвать неполадки.
Откройте окно «Выполнить» нажатием на Win + R и выполните команду:
excel /safe
Скопируйте данные из проблемного документа, а затем попробуйте сохранить новый файл в безопасном режиме. Таким образом, можно определить, препятствуют ли надстройки сохранению.
Если метод не работает, попробуйте запустить Windows в режиме чистой загрузки. В нем можно определить какой процесс или служба вызывают проблемы.
Working on the spreadsheets in MS Excel can be really exciting. But at times, it turns into fear when Excel throws an error “Document not saved”. This happens when trying to save the spreadsheet in Microsoft Excel. Fortunately, you can solve document not saved error in Excel by applying a few workarounds mentioned in this post.
So, let’s find them out…!
Quick Fixes:
- Save Your File Using Another Dummy File
- Remove The Interrupting Program /Process
- Resolve Network Connection Problem
- Check The Hardware Components
- Checking Permissions
- Open Your Excel in Safe Mode
- Update the MS Excel
- Repair MS Office
- Best Way To Fix Excel Document Not Saved Error
To repair & recover corrupted Excel file data, we recommend this tool:
This software will prevent Excel workbook data such as BI data, financial reports & other analytical information from corruption and data loss. With this software you can rebuild corrupt Excel files and restore every single visual representation & dataset to its original, intact state in 3 easy steps:
- Download Excel File Repair Tool rated Excellent by Softpedia, Softonic & CNET.
- Select the corrupt Excel file (XLS, XLSX) & click Repair to initiate the repair process.
- Preview the repaired files and click Save File to save the files at desired location.
Why Is My Excel Document Not Saving?
Instead of directly fixing the Excel document not saved. the document may be open or an error may have been encountered when saving it is important to extract what actually causes it.
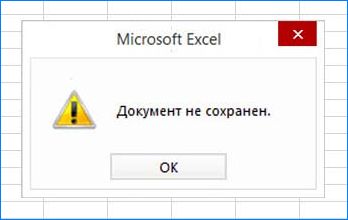
Here you can see the real interface of this error:
These are the major factors for generating this error message:
Network Issues:
Another reason can be the weak or bad internet connection and due to this shared files over the network got damaged.
So when you start working on such a document it won’t allow you to do any modification nor you can save it.
Hardware Problems:
The situation may arise where the files kept on external devices like USB or hard drives somehow got damaged or corrupted.
So when you try to make changes on such files it’s obvious to encounter unable to save Excel file error.
Process Interrupted:
The process of saving documents somehow got interrupted is the most obvious reason to generate Excel file save error. Usually, this happens when meanwhile the saving process you press the close icon or ESC button.
Permission Restrictions:
In some cases, the user is not allowed to make any changes to the particular excel file. So this can be also the reason because of why your Excel file is denying getting saved.
Now the big question that arises is how to deal with such situations. Don’t worry! We have some easy tips for you to tackle Excel saving errors or issues. Read on.
Solution 1- Save Your File Using Another Dummy File
The first solution that you need to try is saving the already existing Excel document by using another dummy file.
Doing this will at least help you to save your Excel document content and later on you can try to fix the error.
Note: log in to your PC as an administrator.
- Open your Excel file in which you are getting a document not saved error. Now press Ctrl + C button to copy the complete content of your Excel file.
- Now press the ctrl+N button from your keyboard this will open a new excel file page on your screen.
- On this new Excel document, you have to press the ctrl+v After this you will see all the content including the formula that you have copied from the problematic Excel file is now get copied in this new Excel file.
- After this tap to the File > Save As Also assign the location where you want to save this file.
Solution 2- Remove The Interrupting Program /Process
As we have already discussed that accidental pressing of the ESC button or the presence of some interrupting process prevents the saving of Excel files.
So once more go to the save tab and try saving up your Excel file again without making press to any key.
Apart from this, you can end the ongoing interrupting process from the task manager.
- For this press Windows + R button and now in the opened run
- Enter text “taskmgr” in the box and press the enter.
- Now in the opened task manager window check for the potential program or services which are interrupting your saving task.
- Once you find it, just end the interrupting process and then try to save your Excel document again.

Solution 3- Resolve Network Connection Problem
Well, there are so many situations that arise where you need to save your Excel file over the network for easy sharing and remote working.
Microsoft says that if your network is not stable or facing a delay to make any changes then you will definitely face difficulty in saving your document.
If you are using your organizational network then try to send the remote document from some other peer’s PC.
If still you are getting the same document not saved. the document may be open because of a network connection problem, you need to contact the IT support team.
Also Read: Fix Excel Not Saving Formatting Changes Issue?
Solution 4- Check The Hardware Components
Another thing you need to check is whether the entire hardware component attachment in your PC is working correctly or not.
If you are trying to save an Excel file on an external hard/flash drive then ensure that a seamless and proper connection is done. Apart from this, physical damage to the external or system’s hard disk also results in the document not saved error in Excel.
Follow these tricks to Check Hard Disk Health in Windows 10
1: Windows CHKDSK Tool
Windows CHKDSK tool is a Windows built-in tool that scans your disk to fetch any type of bad sector and system errors.
Besides that, it helps in easy checking of the hard disk health by showing a complete list of errors.
It will scan and troubleshoot the problem if possible and inform you about any bigger issue if it’s present.
So use this inbuilt tool to make a check for the disk health and fix bad sector errors.
- Open the File Explorer and make a right-click over the system’s drive in which you want to make a check. Choose “Properties >>Tools” Hit the “Check” option.
- In most of the cases, users get the following message “You don’t need to scan this drive”.
It’s because the windows 10 PC automatically scans for disk health issues. If you want then you can still execute the manual scan.
2: WMIC
It is a command-line interface that does so many administrative tasks, like checking the hard disk health, etc.
WMIC works on a very enhanced feature i.e S.M.A.R.T. (Self-Monitoring, Analysis, and Reporting Technology) to check the hard disk status. After complete checking, it will show message like “OK,” “Pred Fail,” etc.
Here are the steps to check hard disk status with WMIC.
- Hit the Win+ R key from your keyboard. This will open the run dialog box.
- Type cmd in it and hit OK.
- Now in the opened command prompt window enter the text “wmic” and hit enter.
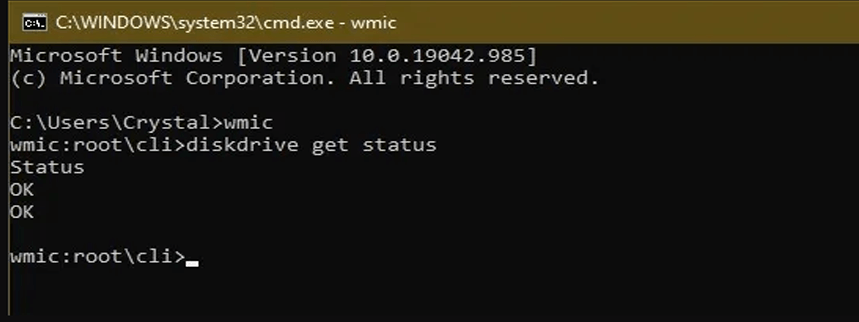
- Once the WMI interface seems ready in the command prompt type the text “diskdrive get status”. After that press the enter button.
- Very soon you will receive the hard disk status.
Solution 5- Checking Permissions
If you have saved your excel file to such a location where no other users have permission to access it. At that time it was obvious to get the Excel Document not saved. The document may be open, or an error may have been encountered when saving.
Likewise, each folder is having its own permission which is by default given to the administrators.
Even some system folders are also restricted to administrators or users. So for that, you need to change the access permission.
Note: Login like a general administrator.
- Hit the Windows + E button and then go to the folder location where you want to save your file.
- Make a right-click on that folder or drive location and then choose the Properties tab.
- Go to the “Security” tab after that hit the “Advanced” option which is present at the screen’s bottom. If here you won’t get any proper permission for the account then tap to the change.
- Here you can change the folder’s owner to your PC account.
- Hit the “Advanced” option when any new window pops out. On this, you have to hit the “Find Now” option.
- The list will appear on the screen bottom which contains all the user’s group detail present on the PC.
- Choose the account and hit the “OK” button.
- Select the option “Replace owner on sub containers and objects”. Doing this will modify the ownership of entire files/folders present within that particular folder. In this way, you can avoid repetition of the same task for any sub-directories present within it.
- As per your preference you can make a check across the option “Replace all child object permission entries with inheritable permission entries from this object”.
- Click the apply button and close the Properties.
- Once again open the Properties window and search for the security > Advanced.
- Now go to the permission window and tap the “Add” button present at the screen bottom.
- Tap to the “Select principle” option.
- Select all the permissions which you want to assign and hit the “OK” button.
- After that choose the “Replace all child object permission entries with inheritable permission entries from this object” and hit the Apply.
After doing this you have got exclusive control over the directory in which you need to save your Excel file. Now once again try to save your Excel document and check whether the problem still persists.
Also Read: Fix Excel Encountered Errors During Save
Solution 6- Open Your Excel In Safe Mode to Document Not Saved Error in Excel
Try to launch the Excel application in Safe mode because in this mode plugins running in this application are complete take a cut off and the application starts with only a basic editor.
So if this Excel document not saving issue is originated due to bad plugins then running it in safe mode will resolve the issue.
- Hit the Windows + R This will open the Run dialogue box on which you have to type the following text:
excel /safe
- Now Excel will get into safe mode. Try to save your Excel document data.
Solution 7- Update the MS Excel
Many users have reported that they received Microsoft Excel document not saved error because of using an outdated Excel. Hence, updating MS Excel to the latest version has fixed that issue for them.
So, here you have to do the same thing to get rid of it. To update the Excel, follow the below steps;
- Open the Microsoft Excel.
- After this, choose the Account from a left side pane.
- Next, you have to tap on the Update Options.
- Now, select the Update Now option from a context menu.
Finally, Microsoft will download the Office updates if any are available.
Solution 8- Repair MS Office
Even after following the above methods, if you are still facing the same error, consider repairing the Microsoft Office.
It might possible that you are facing this problem due to corruption in MS Office.
So, simply repair it by following the below steps:
- Go to Start & choose Settings (instead, you can use Win + I key).
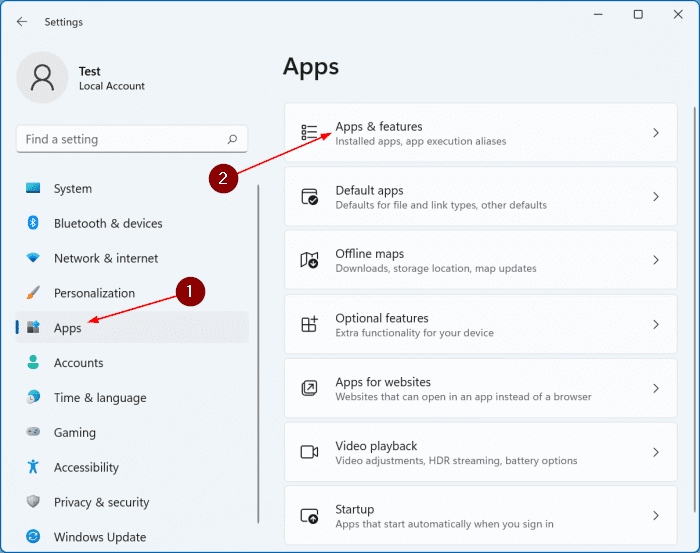
- Then, choose the Apps from a left pane >> Apps & Features.
- Now, find & choose Microsoft Office then click on 3 dots menu.
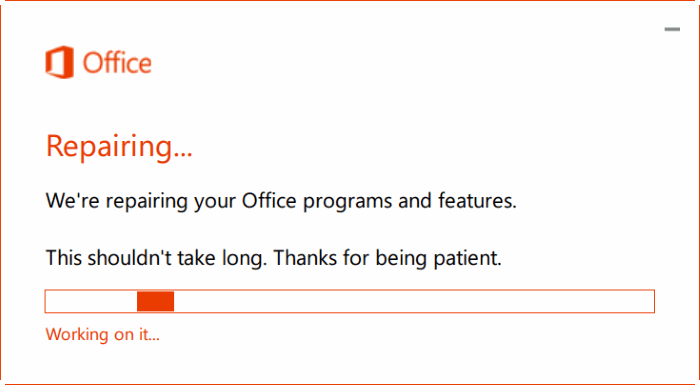
- Click on Advanced options >> Online Repair.
- Finally, click on the Repair > Repair.
Now, MS Office will solve any sort of corruption found in a suit.
Solution 9- Best Software To Fix Excel Document Not Saved Error:
If you are unable to save your excel file and frequently get the Document not saved error. In that case, chances are quite high that your Excel document somehow got corrupted.
To resolve the Excel document corruption issue you are recommended to go with the professional’s recommended MS Excel Repair Tool. This is the best tool to fix any sort of issues, corruption, or errors in Excel workbooks.
With the help of this tool, you can easily restore all corrupt Excel files including the charts, worksheet properties cell comments, and other important data. This is a unique tool to repair multiple excel files in one repair cycle and recovers the entire data in a preferred location.
* Free version of the product only previews recoverable data.
Steps to Utilize MS Excel Repair Tool:
What Are The Different Types Of Excel Document Not Saved Error Occurs?
Following are some error messages which may encounter when Excel document denies to get saved:
Error 1# “Document Not Completely Saved or Document Not Saved”
Meanwhile working on an Excel file if you accidentally press the ESC button at the time of saving it then this will interrupt the process of making a temp file. Due to which Document Not Completely Saved or Document Not Saved as the error occurs.
Apart from this, Document Not Completely Saved error is also encountered when the software or hardware has stopped working properly.
Even if your system hasn’t generated the temporary file but your original file won’t get damaged if any issue occurs in the system.
Error 2# Document Not Saved / Any Previously Saved Copy Has Been Deleted
Your PC will start showing Document Not Saved / Any Previously Saved Copy Has Been Deleted in Excel when any ongoing process of temp file creation fails. This error mainly occurs at the time of temporary file renaming or removal of the original file.
Well in such a situation, you can use the temporary file but the original one gets deleted.
Error 3# “Cannot Access Read-Only Document <Your File Name>”
If someone tries to save the changes done in the read-only file then Excel will display the Cannot Access Read-Only Document <Your File Name> error.
This happens because you are not allowed to do any editing on the Excel file rather than you can only read it.
But if your file is not having any read-only tag but still you are getting the same Cannot Access Read-Only Document Excel error. In that case, the following reasons are highly responsible:
- When you are working on one excel file and simultaneously open another already existing file to do some changes on it. At that time saving any of these files starts displaying a read-only file error in Excel.
- Another reason is when you have saved your Excel file on the external drive such as a network drive and due to weak network saving process get interrupted. At that time Excel will show “Cannot access read-only document <Your File Name>” error.
Wrap Up:
Now you need not get fret with this Excel document may be open, or an error may have encountered when saving.
All the above-given tricks will definitely work to resolve this issue. If unfortunately, these tricks fail to work then you can rely on an expert’s recommended Excel repair tool.
Do share your opinion regarding this post and whether it helped you in removing the Microsoft Excel document not saved message on our social accounts Facebook and Twitter.
Priyanka is an entrepreneur & content marketing expert. She writes tech blogs and has expertise in MS Office, Excel, and other tech subjects. Her distinctive art of presenting tech information in the easy-to-understand language is very impressive. When not writing, she loves unplanned travels.
Imagine you had been working on a really important Workbook for hours and the system crashes. The file is not saved, and you just lost hours of work because you forget to hit the save button.
But what about when you realize that you made a mistake while working on the workbook an hour ago? How do you go back to an older version of the Excel file?
Well, don’t panic because we have compiled together some of the most efficient tips to recover unsaved Excel files and their older versions.
By default, Microsoft provides an AutoRecovery option which can recover files that were saved, but their latest version cannot be accessed because the system or Excel crashed.
Configure the AutoRecover Settings in Excel
- Go to the File tab and click on Options
- Click on the Save tab
- Make sure both ‘Save AutoRecover information every Z minutes’ and Keep the last autosaved version if I close without saving’ are checked. You can also keep the autorecover duration to the smallest to make sure every file is saved
- Click on OK
After this, whenever you open Excel after a crash, you will be able to see the files that can be autorecovered. But, this only applies to files that have been saved at least once. For files that haven’t been saved at all, follow the steps in the next section.
Recover unsaved Excel file
In order to recover an Excel file that you forget to save, follow the steps below
- Go to the file tab and click on ‘Open’
- Now click on the Recent Workbooks option on the top left
- Now scroll to the bottom and click on ‘Recover Unsaved Workbooks’ button
- Scroll through the list and search for the file you lost.
- Double-click on it to open it
- The document will open in Excel, now all you have to do is hit the Save As button
Recover overwritten Excel files
If you are using Excel 2010 or 2013, then you can easily recover an older version of the document. It is extremely helpful if you made a mistake on the Workbook and realized it late or you just want to see what the workbook looked like before.
To do this, here are the steps you need to follow
- Click on the File tab and select Info
- Now click on the manage versions tab. There you will be able to see all the versions that were autosaved by Excel
But you can also see these autosaved versions until you have saved the file. Once the current version of the file has been saved, all the previous autosaved files will disappear. To save them, you need to take the backup of the file.
Saving a backup of Excel file
Taking a backup of Excel files makes it possible to revisit older versions in case you made a mistake. This can be useful when you hit the save button when you didn’t mean it or when you delete the main original final.
Here is how you can take a backup in Excel 2010 and 2013
- Go to the File tab and click on ‘Save as’
- Now click on the Browse tab at the bottom
- A Save as window will open up. At the bottom of it, there is an option called Tools
- Click on Tools and select ‘General options’
- In the new Window, check on ‘Always create backup
Now every new Excel file that you create will have a backup file associated with it. But remember that backup Excel files have a different extension – .xlk
Overall, it’s very easy to recover Excel files even when you forgot to save them. All you have to do is not panic and follow the steps we mentioned.


