
As documents are passed around, upward or downward, perhaps one needs to think about restricting what the other users can do. Maybe it’s okay to make a few changes to see how things add up but imagine the chain effect of accidentally saving an experimental change to a very important document. Or even accidentally hitting a key somewhere. Such changes have reported thousands of losses to companies.
Scary talk aside and solution-storming in, if you’re aiming for a complete restriction where cell values can’t be changed at all, you’re looking for sheet protection. But if it’s okay to make changes to the file as long as they’ll be restricted from being saved, you’re heading right for Read-Only.
 1")
We have prepared this tutorial on how to open Excel in Read-Only mode. You will find few easy methods to do that including VBA. We’ve also covered two options for those who need to have the users of the file reminded that they need to access the file as Read-Only.
But basically, what happens in Read-Only Mode? Firstly, the file name at the top of the workbook gets a Read-Only tag:
 2")
When you make any changes to the file, they will apply but when you try to save the file, you’ll have to save it as a copy because the original file can’t be overwritten in Read-Only mode.
Now we can jump on the “how” part of opening a file as Read-Only. Let’s begin.
Open Workbook as Read-Only Using File Open Dialog
Instead of regularly opening a file, it can be opened as Read-Only, and below are the steps:
- Open Excel and navigate to the File tab, on the ribbon.
- Click on the Open button from the left panel and select Browse from the options to access the Open
 3")
- Browse and select the file you want to open as Read-Only.
- Click on the arrow of the Open command button at the bottom-right of the dialog box and select Open Read-Only from the list.
 4")
Selecting this option will open the file as Read-Only.
Open Workbook as Read-Only Using VBA
Any workbook can be opened as Read-Only using VBA. You need to run the file path in the provided code and feed it in VBA via a module and the chosen file will open as Read-Only. We have the steps for this below:
- Open a new Excel file.
- Open the VB editor from the Developer tab or press Alt + F11.
- In the editor, click on Insert and select Module to open the Module
 6")
- Copy-paste the following code in the Module window but change the file path to the file path including the filename of the workbook you want to open as Read-Only.
Sub Open_Workbook_As_Read_Only()
'Open a Workbook as Read-Only
Workbooks.Open "C:Employee data.xlsx", ReadOnly:=True
End Sub
- Press the F5 key to run the command.
 7")
The chosen file will open as Read-Only. You can close the previous file.
Forcing the File to Always Open with a Read-Only Prompt
Someone may forget to open a file as Read-Only, oops. Instead of opening the file every time as Read-Only, the file can be made to pop up a prompt, suggesting the user to open the file in Read-Only mode whenever the file is accessed. There are a couple of ways of setting the file with a Read-Only prompt that we have detailed as follows.
Forcing the File to Open with a Read-Only Prompt Using Save As Options
This method utilizes the tools in the Save As dialog, setting it with a Read-Only recommend. These are the steps:
- With the file open, go to the File tab and select Save As from the left pane. Select the location for saving the file. The Save As dialog box will open.
 9")
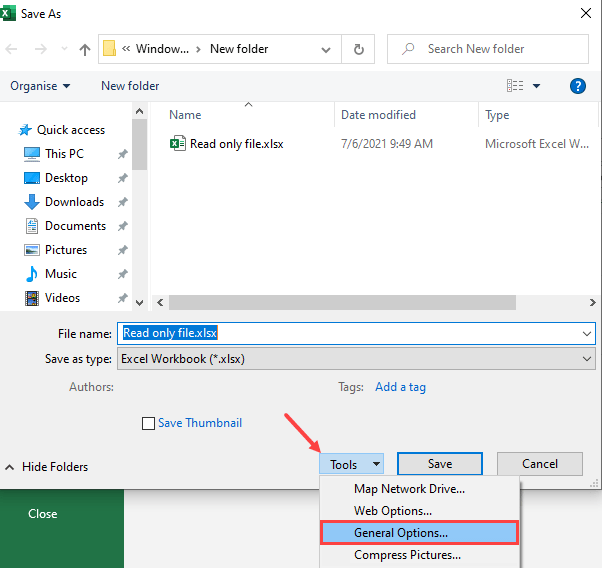
- Click on the Tools button at the bottom of the dialog box and select General Options.
 10")
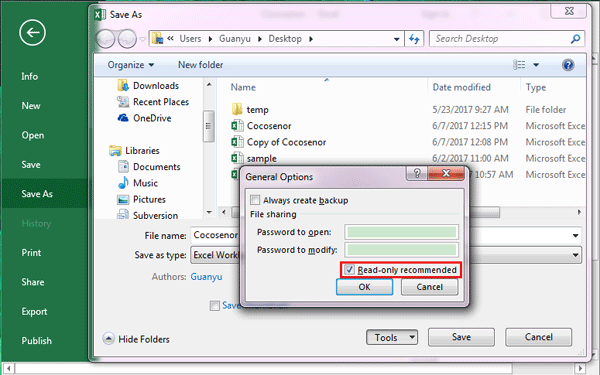
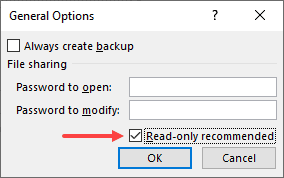
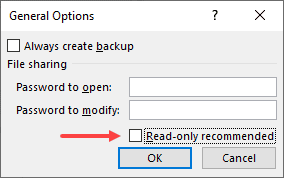
- In the General Options dialog box, check the Read-only recommended checkbox, then click OK.
 11")
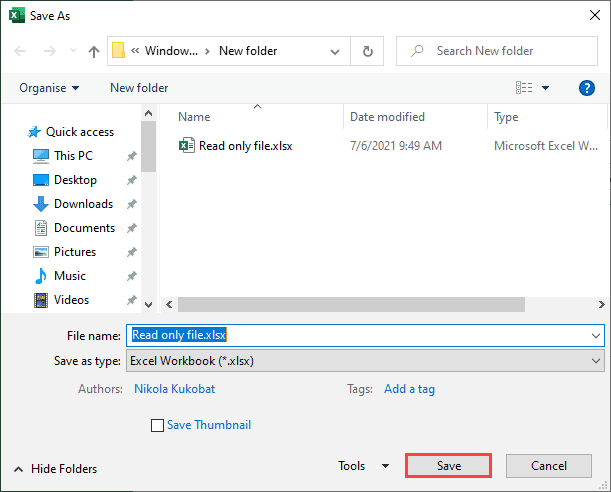
- Click the Save command button in the Save As dialog box.
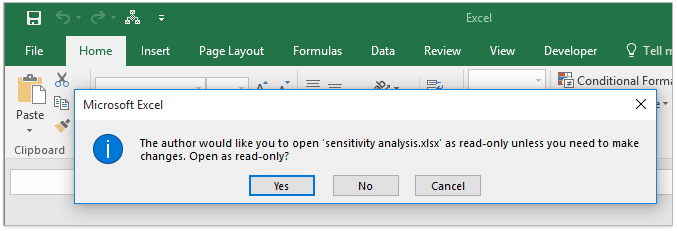
- Close the file. When opening the file, the Read-Only recommend will pop up:
 12")
The user can still choose to access the editable file by selecting No here but the prompt does its work to serve as a reminder.
Forcing the File to Open with a Read-Only Prompt from Protect Workbook Options
Another way to fit the file with a Read-Only prompt is to use the Protect Workbook options from the Info settings. Here’s how to go about it:
- Click on the File tab of the opened workbook.
- In the File menu, select Info from the left panel and then click on the Protect Workbook button to access the options.
 13")
- Select Always Open Read-Only from the options.
 14")
- After selecting the option, the workbook will have been protected with the Read-Only prompt.
 15")
- Close the file and save the changes.
And that’s done. Now the file will show the prompt whenever accessed.
Now if you’re done with only reading, have a go at applying one of the methods to open a file as Read-Only. Next time you consider saving your file from meddling, see if you want to have it run as Read-Only or have the workbook protected; Excel hardly comes with a single possibility for things. See you shortly with more possibilities from Ever-Ever-Excel-land!
Have you ever stuck with the Excel read only error or cannot access read only document Excel issue? Mostly it is seen that Excel file read only error occurs meanwhile trying to open the Excel file which is downloaded from a network server, emails, and the internet.
If you too are dealing with the same issue then leave all your worries. This article will provide you with the best solutions to fix Excel file read only error.
SO, JUST GIVE THEM A TRY…!
What Is Excel Read Only File And How It’s Helpful?
Excel read-only file is one such file having attribute ‘read only’ turned on. Basically, such excel read-only file can be easily viewed and opened just like any other file but writing or saving changes on it is that allowed in it. So you can only read the file not write or save anything on it.
Excel file which is marked read-only, generally considered under great caution right before making any changes to it.
To repair corrupt Excel file, we recommend this tool:
This software will prevent Excel workbook data such as BI data, financial reports & other analytical information from corruption and data loss. With this software you can rebuild corrupt Excel files and restore every single visual representation & dataset to its original, intact state in 3 easy steps:
- Download Excel File Repair Tool rated Excellent by Softpedia, Softonic & CNET.
- Select the corrupt Excel file (XLS, XLSX) & click Repair to initiate the repair process.
- Preview the repaired files and click Save File to save the files at desired location.
Many users take benefit of this Excel file read only feature to restrict the editing and formatting of their Excel document by any content reviewers.
Suppose if you don’t want that any content reviewer will make any type of modification in your document. Then make your Excel workbook read-only before handing over your document.
If any reviewers perform any changes to that Excel read-only file. In that case, modifications can only be saved if any new location or a new name is assigned to the file.
No doubt it’s a good feature..!
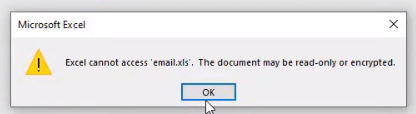
But, what if you are unable to open the read only Excel File. This will ultimately throw the following error message: Excel cannot access read only document. After the occurrence of this error, you are completely unable to access your Excel workbook. So, it’s important to fix Excel read only error to get back access to your Excel workbook.
Why Does My Excel File Keep Saying Read Only?
Before stepping into the fixes to resolve Excel read only error. It’s important to know about the reasons behind Excel worksheet showing read only error.
1# Spreadsheet Settings
Excel workbooks and spreadsheets can be applied with protection features to get easy prevention from any kind of changes.
As per the protection level, you may make it completely or partly Read Only. For this, you have to choose the”Unprotect” option within the review tab. If any user has enabled the protection with a password then it’s important for you to have that password to remove the read-only protection.
2# File Corruption
In many cases, it is seen that Excel file corruption also makes your Excel spreadsheet Read Only.
Even after checking all the setting and ensuring file location if you excel workbook still displaying the Excel read only error. Then it’s a clear sign that your Excel file got corrupted somehow and hence it denies getting open.
3# Location
Another very common reason for Excel read-only error is its location. If your Excel spreadsheet is within the network folder and you don’t have network permission to do any changes in the folder. In that case, your Excel spreadsheet worked as read-only. This means you can only view its data but can’t perform any editing into it.
Excel spreadsheet present on the locked USB stick, DVD CD-ROM, area also considered as Read Only. A spreadsheet that is sent as email attachments or previewed inside any email program is counted as Read Only.
Well in all the above cases, to fix Excel read only file error. You need to either move or save the spreadsheet into the folder having complete permission to make changes.
How To Fix ‘Excel Cannot Open Read-Only Documents’ Message?

Check out the following fixes to resolve ‘Excel Cannot Open Read-Only Documents’ error Message:
1# Change the Excel File Property Set
One very typical reason for the occurrence of Excel cannot open read-only documents’ message is Excel file property is set to read-only.
To solve this matter, you just need to uncheck the Excel ‘Read-only’ file property option.
Here are the following steps to uncheck the ‘Read-only’ attribute,
- Make a right-click on some specific Excel file
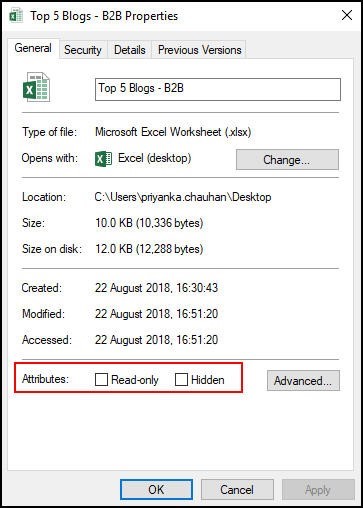
- From the available option, choose the ‘Properties’ tab.
- Remove the checkmark from the ‘Read-only’ attribute and tap the ‘OK’ option.
Check out whether the Excel read-only error is been resolved now or not.
2# Excel File Is In Read-Only Recommended
If you are opening a recommended read-only Excel file. Then you are asked to open your Excel workbook in read-only mode for making any modification in the Excel file.
Tap the yes option in the Excel read-only error message dialog box. If you don’t want to do any changes to your opened Excel file. Or else tap to ‘No’ options.
If you don’t want to get this read-only recommended on your Excel workbook then perform these below steps:
- Make a double tap on the Excel file. After then choose the No option to open it.
- Hit the File then Save As. In the opened save as window go to the Browse option.
- In the bottom section of the Save As dialog box, tap the Tools, and then choose the General Options.

- Within the General options, you have to uncheck the Read-only recommended check box. After then tap the OK option. Doing this will disable the read-only message in your Excel file.
3# Adjust the Antivirus Setting
Sometimes the read only error in Excel is also encountered due to the antivirus program. As it is seen that few anti-virus programs restrict the accessing of Excel spreadsheets and many other MS Office documents by opening them in ‘read-only’ mode.
To deal with such cases you need to make adjustments in the antivirus settings. So, that the antivirus will allow your Excel workbook to get open in normal mode and you can perform easy modifications in it.
Don’t forget to reopen your Excel workbook after making changes in your antivirus settings.
4# Remove the Excel Protected-View
Excel file which gets opened from a potentially unsafe location like the internet, email attachments, downloaded from any third party source, etc. are opened in protected view. This feature of Excel Protected-View restricts the user to make any modification in their opened Excel spreadsheet. So, you can turn off the Protected-View security warning messages in Excel and freely use the Excel file with the only read-only error.
5# Deactivate Or Renew Microsoft Office
Chances are also that your MS Office application is either reached in the deactivated state. Or maybe its subscription has been expired.
Maybe this makes your Excel application to show such ‘read-only’ error or encounter ‘reduced functionality mode.’
To deal with such an issue, you need to either activate the MS Office or just renew the subscription of MS Office.
After performing such an operation, make check whether the error ‘Excel cannot open read-only documents’ has now fixed or not.
6# Make A Fresh Copy Of Your Excel Document:
Well, there are so many reasons behind Excel Cannot Open Read-Only Documents. There are such situation occurs in which you can easily make changes in the Excel workbook but saving up your changes is not possible. So, in that situation, a quick solution is to choose the “save as” option.
As this option makes a copy of your Excel workbook with all your changes done. If you want to permanently fix the issue of “Unable To Save Excel File” then move the Excel spreadsheet.
But if accidentally you have losted up your Excel workbook content due to inability to save it. In that case recover MS Excel Lost content from Excel temp files.
7# Make Use Of Excel Repair Tool Software:
As we have already discussed above that among various reasons for Excel read only error; “corruption of Excel file” is the most common one. So, to troubleshoot Excel file corruption issues make use of the professional and reliable Excel Repair Software.
* Free version of the product only previews recoverable data.
The software is specially designed to fix any kind of corruption issue and Excel error. This tool also provides a lot of features that can easily help you to fix any kind of error and also recover the data quickly and easily without any hassle.
Conclusion:
After reading the above article now you can easily troubleshoot the ‘Excel cannot open read-only documents’ on your own. But if the read only Excel file error is because of the excel file corruption then fix the damaged Excel files by making use of Excel repair tool.
Let us know whether your Excel read only file error is been resolved after trying the above fixes or not. So don’t forget to share your experiences with us in our comment section. Besides, you can ask any kind of queries related to the Excel workbook.


Priyanka is an entrepreneur & content marketing expert. She writes tech blogs and has expertise in MS Office, Excel, and other tech subjects. Her distinctive art of presenting tech information in the easy-to-understand language is very impressive. When not writing, she loves unplanned travels.
If you have been working with Microsoft apps (such as Excel, PowerPoint, or Word), I am sure you have encountered files that are read-only.
What a read-only file means is that it’s only supposed to be read, and not be edited.
So if you make a file read-only (and the user opens it as a read-only file), they won’t be able to make any changes to the original file.
In this tutorial, I will cover how to make an Excel file read-only, all the options a user gets when opening a read-only file, and how to remove the read-only property from an Excel file.
You’ve probably created a lot of Excel files that you need to share with other users, but don’t want it to be changed.
If you make a file read-only, other users will have access to it, but all changes will have to be saved in the new file. Therefore, the original file will be untouched.
This way you can be sure that your file will be the same despite sharing it with other colleagues (especially if that file is on a network drive where multiple people can change it).
Let’s now see how to save an Excel file and protect it as read-only. This option can be activated during the saving of the file.
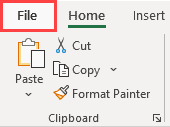
- In the ribbon, go to the File tab.

- In the menu on the left side, choose Save As.

- Choose Browse.

- In the Browse window, click on Tools and choose General Options.
- In the General Options window, you need to check Read-only recommended and click OK.
- Now you’re back in the Browse window, and just click Save button to save the file and read-only settings.

Finally, you saved your file as a read-only Excel document.
Let’s now see what happens when you open the file and try to edit it.
One thing you need to remember is that when you make a file read-only, the user can still open the original file and make changes to it (they just need to decline the option to open the file as read-only). So if you’re doing this to make sure no one changes the original file, be informed that this is not a fool-proof way.
What Happens when You Open a Read Only File?
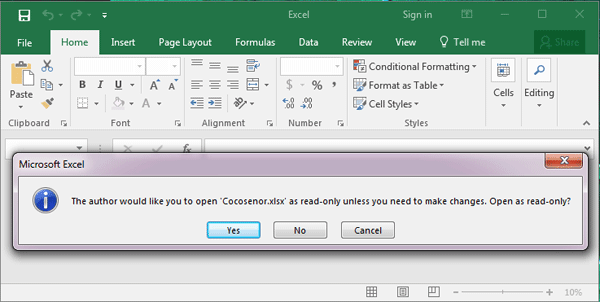
If you try to open the previously saved read-only file, you will get the following prompt:

Excel notifies you that the file you’re opening is read-only and asks you if you want to open it as read-only or not.
Possible answers here are:
- Yes – if you select Yes, the file will be opened in the read-only mode, which means that you will have to save it as new file (with a different name) in order to save your changes
- No – if you choose No, the file will open as a regular Excel file (not in read-only mode), and you’ll be able to make changes to the original file and save it
- Cancel – if you choose to cancel, it will close the file
As you can conclude from the previous explanation, the read-only feature doesn’t actually protect your workbook.
This option just notifies a user that you don’t want the original file to be changed. However, if a user doesn’t choose to open as read-only, the file can be changed normally.
So, if you want to be sure that your file is secured and not changed, you need to password protect it. On the other side, the read-only option is just a notification for other users.
One scenario where making the file read-only helps is when you don’t want yourself or any other user to make any changes in the file inadvertently. So if you only want to read the file (and it has been saved as read-only), it’s better to open it as read-only. This way, even if you make some changes and hit the save button, it will save it as a separate file.
Changing a Read Only File
If you select yes when opening a file (which means that you opened the file as read-only), you will have to save it as a new file after making any changes.
When you open a read-only file, you can see at the top of the file (next to the name) that the file is read-only.
- Once you’re done with the changes and want to save the file, click the save icon or press CTRL + S on the keyboard to save the file.
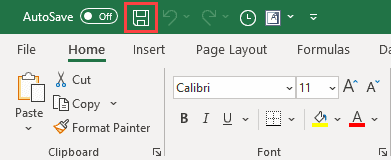
- The warning message pops up, with the information that you can’t change the read only file and have to save it as a new file with a different name or in a different location.

- When you press OK, the Save As window will appear. Here you have to give a new name to the file or go to Browse and select a new file location to save it.
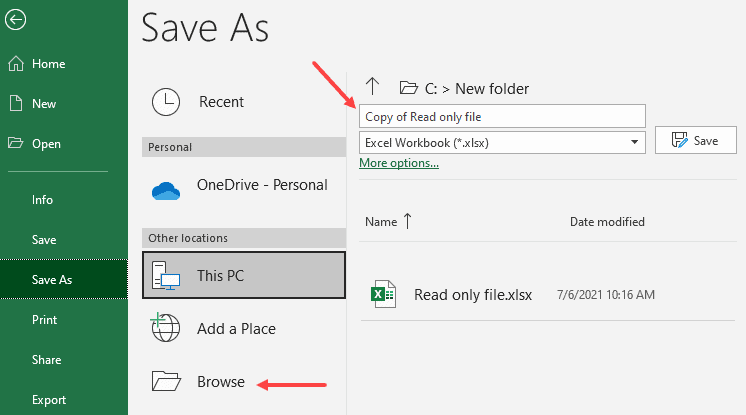
As a result, the original file remains unchanged, while the changes you made are saved in a new file that you created.
Removing Read-Only Option from a File
If you don’t need your file to be read-only anymore, you can easily remove a read-only option from the file and make it editable again.
In order to do this, you have to follow similar steps to creating a read-only file.
- First, you need to open the file as editable, not read only. When you open the read only file, Excel will ask you if you want to open it as read only, and you have to click No.

- In the ribbon, go to the File tab.
- In the menu on the left side, choose Save As.

- Choose Browse.

- In the Browse window, click on Tools and choose General Options.

- In the General Options window, you need to uncheck Read-only recommended and click OK.
- Now you’re back in the Browse window, and just click the Save button to save the file.
Finally, you saved your file without the read-only feature. If you open it again, you will be able to change it and save, without any restrictions or warnings.
Also read: How to Edit Document Properties in Excel
Conclusion
As you saw in the article, making an Excel file read-only, can help you to prevent unwanted changes to your file.
However, this feature can’t stop a user from changing your file. It will only give a warning, that a file is read-only, and shouldn’t be changed.
You must keep in mind that a user can always choose to ignore a warning. Furthermore, the file doesn’t need to be opened as a read-only and in that case, it can be easily changed and saved.
So, if you need to protect your file from changes and want to be sure that it won’t be changed, you need to use password protection.
Every read-only file has the information next to the name on the top when it’s opened, that you’re working in a read-only file. When changing this kind of file, all changes have to be saved in a new file with a new name, or in a different location on a computer.
If you want to remove a read-only attribute from a file, you need to open it not as a read-only, but as an editable file. This way, you can use the same steps as for creating a read-only file to remove this feature. All of this, you need to do during the saving of a file.
I hope you found this tutorial useful!
Other Excel tutorials you may also like:
- How to Insert an Excel file into MS Word
- How to Open Excel File [xls, xlsx] Online (for FREE)
- How to Start Excel in Safe Mode
- How to Clear Cache in Excel?
- How to Find out What Version of Excel You Have (Easy Way)
- Why does Excel Open on Startup (and How to Stop it)
- How to Save Selection in Excel as PDF
- How to Open a Text File to Excel?
- How to Convert a CSV File to Excel?
- How to Merge Two Excel Files?
- Why is Excel so Slow? 11 Tips to Fix Slow Excel Files!
- How to Mark an Excel Workbook as Final?
‘Excel cannot open read-only documents’ is an error message that usually appears when you try to open an Excel (XLS or XLSX) file downloaded from the Internet, email, or the network server. It may also appear when you try to open an encrypted or password-protected Excel document. In such a case, MS Excel prevents the user from making any changes to the document.
Reasons behind the “Excel cannot access ‘xxx.xls.’ The Document may be read-only or encrypted” Error
There could be several reasons that may cause the error. Some of them are as follows:
- Corrupt or damaged Excel workbook
- Incompatible or unsupported add-in
- Antivirus or malware software conflict
- Read-Only Excel file
- The file is encrypted
- File or drive read/write permissions issues
- Protected Excel workbook
- Damaged or missing MS Office (MS Excel) program files
Solutions to Open and Edit Read-Only Excel Documents
Below are a few solutions that can help you fix the ‘Excel cannot access ‘xxx.xls.’ The Document may be read-only or encrypted’ error and allow you to open and edit Excel documents.
- Remove Read-only Attribute from Excel File Properties
The ‘Excel cannot open read-only documents’ error message may appear when the Excel file property is set to read-only. To check if this is the case, follow these steps:
- Right-click on the particular Excel (xls/xlsx) document and select ‘Properties’.
- Uncheck the ‘Read-only’ attribute and then click the ‘OK’ button.
Now try to open the Excel document and check if the problem is fixed.
- Adjust Antivirus Settings
A few antivirus programs block Excel files and other Office documents by opening those in ‘read-only’ mode. In such cases, try adjusting the antivirus settings to open the Excel files normally. This will allow you to edit, modify, and save the Excel workbook without encountering the “Excel cannot access ‘xxx.xls.’ The Document may be a read-only or encrypted” error message.
- Disable Protected-View
The error may appear when you try to open an Excel file received as email attachments or downloaded from unsafe source. The file may potentially contain viruses, worms, or other types of malware that could damage the system or the server.
To safeguard the system, MS Excel opens such files in Protected View. It may also open an Excel workbook in Protected Mode when it detects a problem with the file. This security feature allows you to read or view Excel files and reduces the risks to the computer system or PC.
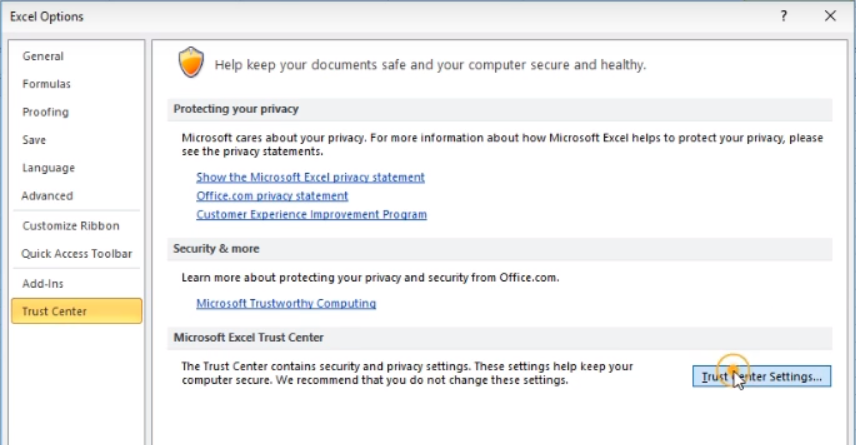
However, you can click File > Info and then click ‘Edit Anyway‘ to access and edit file content. You may also disable the Protected View setting via File > Options > Trust Center > Trust Center Settings…> Protected View. However, we do not recommend this.
- Renew/Activate Microsoft Office
If MS Office is in a deactivated state or its subscription has expired, the Office documents, including the Excel, could be in ‘read-only reduced functionality mode.’
In such a scenario, activate Microsoft Office or renew the Office subscription. Then open the Excel workbook and check if the problem of ‘Excel cannot open read-only documents’ is resolved.
- Check if OneDrive Storage is Full
If Excel files are saved on OneDrive with low or no storage space, you may encounter such issues with your files.
To know the amount of free space on OneDrive, follow these steps:
- On your PC, open Settings and navigate to OneDrive.
- Click ‘Sync Settings > File Storage‘ to see available space.
You may also visit onedrive.live.com, sign in to the account, and then check the available space. If there’s no space available or the drive is full, empty the storage space and see if the problem is resolved.
- Check and Update MS Office and Windows
Microsoft releases updates to fix known errors. Thus, it is critical to update both Windows and MS Office to the latest release and avoid issues, such as ‘Excel cannot access ‘xxx.xls.’ The Document may be read-only or encrypted.’
- Repair MS Office (MS Excel)
The error ‘Excel cannot open read-only documents’ may appear due to a problem with your MS Office (MS Excel) program. You can repair the MS Office program to resolve such errors. The steps are as follows:
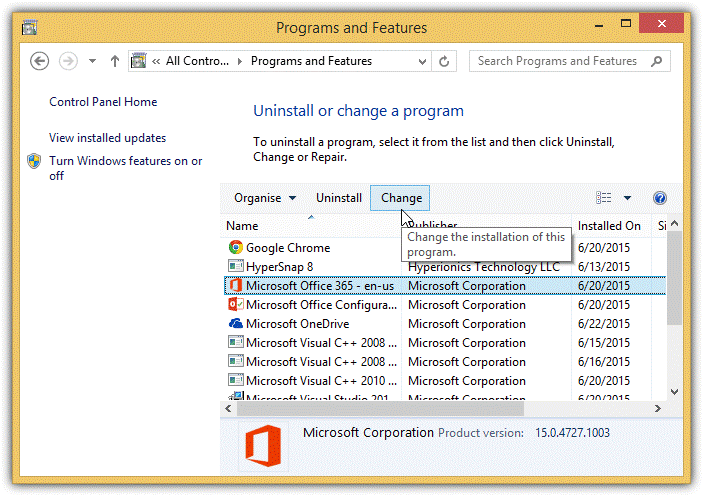
- Open Control Panel and click Uninstall a Program link under Programs.
- Choose Microsoft Office from the list and click the Change button.
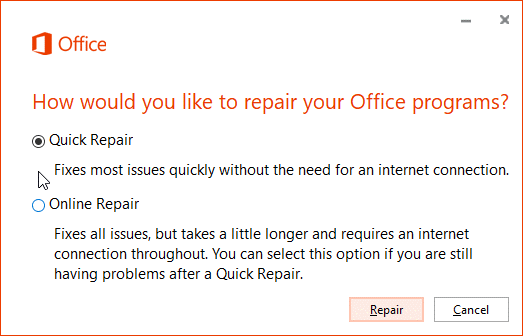
- Select Quick Repair and then click Repair to fix problems with MS Office and MS Excel. It will also restore any missing or damaged program files.
After the Repair, open the Excel workbook and check if the error is resolved.
- Check Permissions
The error message may also appear if you access an Excel workbook from a network or shared drive due to lack of write permission. Make sure you have read and write permissions assigned for the particular network drive. Alternatively, you can copy the file from the network drive and save it in your local folder to access and edit it without encountering this error message.
- Repair MS Excel File
If none of the solutions worked, the Excel workbook could be damaged or corrupt. To repair such damaged Excel workbook or spreadsheet, you can use the inbuilt ‘Open and Repair…’ option in MS Excel or install an Excel repair software, such as Stellar Repair for Excel. The software comes in handy when the Open and Repair option fails to fix the Excel workbook problems. It repairs the corrupt or damaged Excel workbook, extracts all components and content from the file with 100% integrity, and saves them in a new Excel workbook.
Conclusion
Sometimes, the ‘Excel cannot open read-only documents’ error can be resolved by a simple restart. But if it doesn’t work, you can follow the solutions discussed in this article to resolve the ‘Excel cannot open read-only documents’ issue. However, if the issue is caused due to a damaged or corrupt Excel workbook, these methods may not work. In such a case, you can use Excel’s inbuilt repair utility, i.e., Open and Repair, or install Stellar Repair for Excel software recommended by MVPs and industry experts to fix all kinds of problems with MS Excel workbooks.
Этот пример продемонстрирует, как сделать книгу Excel доступной только для чтения. Пользователи по-прежнему смогут сохранить изменения, создав новую копию книги.
Чтобы защита была надёжней, защитите лист.
- Откройте книгу.
- На вкладке File (Файл), нажмите кнопку Save As (Сохранить как).
- Кликните по Tools (Сервис) и выберите General Options (Общие параметры).

- Введите пароль в поле Password to modify (Пароль для изменения) и нажмите OK.


Примечание: Если вы хотите всего лишь порекомендовать пользователям открывать файл Excel только для чтения, не защищая его, то не вводите пароль и поставьте галочку напротив Read-only recommended (Рекомендовать доступ только для чтения).
- Снова введите пароль и нажмите ОК.

Эта функция не зашифровывает файл Excel. Злоумышленники могут отредактировать файл и удалить пароль.
- Введите имя файла и кликните по Save (Сохранить).

Теперь книга доступна только для чтения.
Урок подготовлен для Вас командой сайта office-guru.ru
Источник: /> Перевел: Антон Андронов
Правила перепечаткиЕще больше уроков по Microsoft Excel
Оцените качество статьи. Нам важно ваше мнение:
November 11, 2016 admin Office Password
Surely, read-only excel file could prevent accidental changes on it. But read-only mode could be removed or disabled as you wish anytime when you want to edit excel file?
I don’t know. But I think some options you have used to set excel workbook read only, would be able to remove this setting always. So that you can remove or disable read only in excel file. Now in this article, I will list several possible cases that make your workbook and worksheet read only and introduce how we can do to remove read only status from Excel file.
- Case 1: Excel file is made read-only by “Mark as Final”
- Case 2: Excel file becomes read-only recommended by “Save As”
- Case 3: Excel file is restricted modify and read only
- Case 4: Worksheet and Workbook structure is locked and read only
Case 1: Excel file is made read-only by “Mark as Final”
While you open an excel file that has been marked as final, you would see a message bar at the top of sheet window. To remove read only from excel file, you just need to click on “Edit Anyway” button on message bar.

Now you have been able to edit excel file and make any changes to worksheet or workbook.
Case 2: Excel file becomes read-only recommended by “Save As”
When a dialog appears and shows three options for you to choose after you double click the read-only excel file, just click “Yes” and you could open excel file in read-only mode.

Now if you make any changes on the excel file, and want to save, there would be a message that prompts you again to save a copy of the file and rename it.
1. Click OK and open Save As dialog. Then click “Tools > General Options” in Save As dialog.

2. Uncheck “Read-only recommended“ and click OK.

3. Back to Save As dialog and click “Save” button to make a copy of original excel file. From then on, the copied Excel file would be not read-only and could be used instead of original one. It means you have disabled read-only in Excel file.
Case 3: Excel file is restricted modify and read only
While you are trying to open excel file that is restricted modify, and a password is required for write access, instead of entering password, please just click “Read Only” button to open excel file as read only.

It seems you cannot do any changes on it, but you can save the read-only excel file as another one to remove modify password. So remove read only in excel file.
1. Click File > Save As, and click Save button in pop-up Save As dialog.

2. Click OK to save excel file to replace the read-only one.
Case 4: Worksheet and Workbook structure is locked and read only
While your excel file is read only and you know it is because worksheet and workbook structure is protected, it will be easy or difficult to disable read only. We don’t know.
If you know the password that protect worksheet and workbook, remove read only in excel file would be so easy.
1. Open your excel file in MS Excel and you can view all worksheet and its content.
2. Click Unprotect Sheet under Review > Changes group, and enter password to unprotect sheet one by one.

3. Click Protect Workbook in the same location and type password to unprotect workbook structure and windows.

4. Save excel file and read-only mode would be removed from excel file.
But if you don’t know protected password, disabling read only in Excel file would be a little difficult unless you could find a utility to directly remove password protection from excel workbook, such as iSunshare Workbook Unprotect Genius, which could directly and easily remove worksheet/workbook protected password with only one click.
Tips:
Probably your excel file is also protected with open password now besides above edit restrictions. Then just opening the excel file is a difficult thing, not to say removing read only mode in excel file. But if you want to disable excel file read only, removing or recovering excel file password to open the password protected excel file is necessary at first. Otherwise, you just could let excel file read-only all the time.
Related Articles:
- How to Unlock Encrypted Excel Spreadsheet without Password
- Forgot Excel Workbook 2010/2013 Password
- How to Disable Protected View for Office 2010 to Enable Editing
- How to Unprotect Excel Workbook without Password
This example shows you how to make your workbook read-only. Users can still save changes by creating a new copy of the workbook. For a better protection, protect a sheet.
1. Open a workbook.
2. On the File tab, click Save As.
3. Click Browse.
4. Click on the Tools button and click General Options.
5. In the Password to modify box, enter a password and click OK.
Note: If you only want to recommend users to open the Excel file as read-only, without protecting it, don’t enter a password and check Read-only recommended.
6. Reenter the password and click on OK.
Note: this feature does not encrypt your Excel file. Malicious users can edit the file and remove the password.
7. Enter a file name and click Save.
Your workbook is read-only now. The password for the downloadable Excel file is «easy».
Information moves quickly with modern technology. With a single email, a colleague can share a complicated Excel worksheet for you to customize as needed. There is one problem: That file is locked as “read-only.” You can unlock this quickly within the program, without even needing super-spy powers.
Unlocking Made Simple
The key to unlock an Excel 2011 or 2016 worksheet is in the File menu of the Finder feature on your computer. Get out of the Excel program, closing the worksheet. Go to the Finder menu box; this is not in Excel but rather is the main finder in your computer’s C-drive where you search for saved files. Search for the named Excel worksheet in question. Select it, then under «File,» select «Get Info.» Note that on some versions of Excel, this is also accomplished with a right-click on the filename. At the top under the General tab will be a box checked if the worksheet is locked. Uncheck this to unlock it. Once it is unlocked, reopen the file in Excel to work on it.
Excel 2010 and 2013 also use a «Protected View» banner that prevents editing unless you click the «Enable Editing» button on the right side of the banner. Once you click this, you are able to edit the Excel document.
If the file doesn’t unlock, you might not have permission to unlock it. If this is the case, you need to request permission from the original sender.
Sharing and Permissions
Now that you can edit and manipulate the data in the worksheet, you might want to share it with your team or colleagues. But you also might not want them to change data, using it for review only. You can lock the file from your end. In the same tab you used to unlock the file, check the box to lock it. This does, however, prevent you from being able to change anything else.
You can instead lock it through sharing and permissions located at the bottom of the Get Info box. It will list your name, your staff and everyone else who has access to this file. Each name listed has a drop-down privilege to either “read only” or “read & write.” Make sure you have read and write permission, but give everyone else read-only.
Difference Between Locked and Read-Only
The two ways to lock and unlock the worksheet can be confusing. If you can unlock a file, can’t your team unlock it as well? Yes, if the privileges they are given say they can read and write. Only owners, creators and those given these permissions are able to unlock the file.
It is possible, therefore, that you receive a file as locked and even checking the box doesn’t unlock it. The reason is you probably don’t have permission to read and write. You would need to ask the original file creator to resend it after updating your permissions. Once that’s done, you can manipulate and change the information.