
Bookmark this app
Press Ctrl + D to add this page to your favorites or Esc to cancel the action.
Send the download link to
Send us your feedback
Oops! An error has occurred.
Invalid file, please ensure that uploading correct file
Error has been reported successfully.
You have successfully reported the error, You will get the notification email when error is fixed.
Click this link to visit the forums.
Immediately delete the uploaded & processed files.
Are you sure to delete the files?
Enter Url
You have several Excel workbooks and you want to merge them into one file? This could be a troublesome and long process. But there are 6 different methods of how to merge existing workbooks and worksheets into one file. Depending on the size and number of workbooks, at least one of these methods should be helpful for you. Let’s take a look at them.
Summary
If you want to merge just a small amount of files, go with methods 1 or method 2 below. For anything else, please take a look at the methods 4 to 6: Either use a VBA macro, conveniently use an Excel-add-in or use PowerQuery (PowerQuery only possible if the sheets to merge have exactly the same structure).
Method 1: Copy the cell ranges
The obvious method: Select the source cell range, copy and paste them into your main workbook. The disadvantage: This method is very troublesome if you have to deal with several worksheets or cell ranges. On the other hand: For just a few ranges it’s probably the fastest way.
Method 2: Manually copy worksheets

The next method is to copy or move one or several Excel sheets manually to another file. Therefore, open both Excel workbooks: The file containing the worksheets which you want to merge (the source workbook) and the new one, which should comprise all the worksheets from the separate files.
- Select the worksheets in your source workbooks which you want to copy. If there are several sheets within one file, hold the Ctrl key
 and click on each sheet tab. Alternatively, go to the first worksheet you want to copy, hold the Shift key
  and click on the last worksheet. That way, all worksheets in between will be selected as well.
 - Once all worksheets are selected, right click on any of the selected worksheets.
- Click on “Move or Copy”.
- Select the target workbook.
- Set the tick at “Create a copy”. That way, the original worksheets remain in the original workbook and a copy will be created.
- Confirm with OK.

One small tip at this point: You can just drag and drop worksheets from one to another Excel file. Even better: If you press and hold the Ctrl-Key when you drag and drop the worksheets, you create copies.
Do you want to boost your productivity in Excel?
Get the Professor Excel ribbon!

Add more than 120 great features to Excel!
Method 3: Use the INDIRECT formula
The next method comes with some disadvantages and is a little bit more complicated. It works, if your files are in a systematic file order and just want to import some certain values. You build your file and cell reference with the INDIRECT formula. That way, the original files remain and the INDIRECT formula only looks up the values within these files. If you delete the files, you’ll receive #REF! errors.
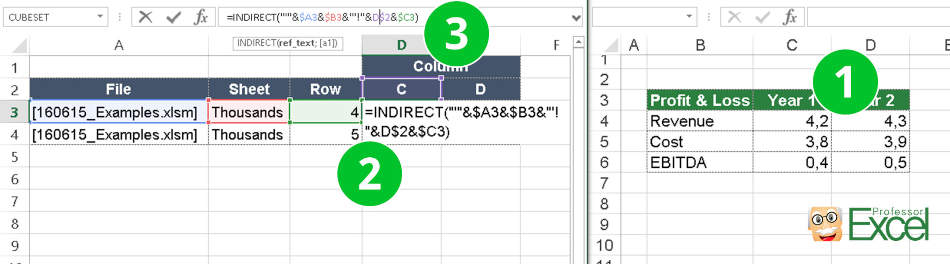
Let’s take a closer look at how to build the formula. The INDIRECT formula has only one argument: The link to another cell which can also be located within another workbook.
- Copy the first source cell.
- Paste it into your main file using paste special (Ctrl + Alt + v ). Instead of pasting it normally, click on “Link” in the bottom left corner of the Paste Special window. That way, you extract the complete path. In our case, we have the following link:
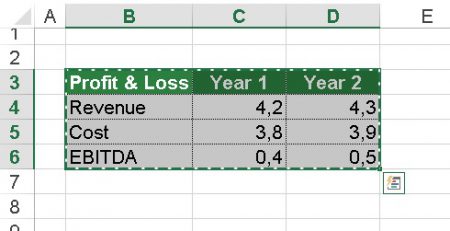
=[160615_Examples.xlsm]Thousands!$C$4 - Now we wrap the INDIRECT formula around this path. Furthermore, we separate it into file name, sheet name and cell reference. That way, we can later on just change one of these references, for instance for different versions of the same file. The complete formula looks like this (please also see the image above):
=INDIRECT(“‘”&$A3&$B3&”‘!”&D$2&$C3)
Important – please note: This function only works if the source workbooks are open.
Method 4: Merge files with a simple VBA macro
You are not afraid of using a simple VBA macro? Then let’s insert a new VBA module:
- Go to the Developer ribbon. If you can’t see the Developer ribbon, right click on any ribbon and then click on “Customize the Ribbon…”. On the right hand side, set the tick at “Developer”.
- Click on Visual Basic on the left side of the Developer ribbon.
- Right click on your workbook name and click on Insert –> Module.
- Copy and paste the following code into the new VBA module. Position the cursor within the code and click start (the green triangle) on the top. That’s it!
Sub mergeFiles()
    'Merges all files in a folder to a main file.

    'Define variables:
    Dim numberOfFilesChosen, i As Integer
    Dim tempFileDialog As fileDialog
    Dim mainWorkbook, sourceWorkbook As Workbook
    Dim tempWorkSheet As Worksheet

    Set mainWorkbook = Application.ActiveWorkbook
    Set tempFileDialog = Application.fileDialog(msoFileDialogFilePicker)

    'Allow the user to select multiple workbooks
    tempFileDialog.AllowMultiSelect = True

    numberOfFilesChosen = tempFileDialog.Show

    'Loop through all selected workbooks
    For i = 1 To tempFileDialog.SelectedItems.Count

        'Open each workbook
        Workbooks.Open tempFileDialog.SelectedItems(i)

        Set sourceWorkbook = ActiveWorkbook

        'Copy each worksheet to the end of the main workbook
        For Each tempWorkSheet In sourceWorkbook.Worksheets
            tempWorkSheet.Copy after:=mainWorkbook.Sheets(mainWorkbook.Worksheets.Count)
        Next tempWorkSheet

        'Close the source workbook
        sourceWorkbook.Close
    Next i

End Sub
Method 5: Automatically merge workbooks
The fifth way is probably most convenient:
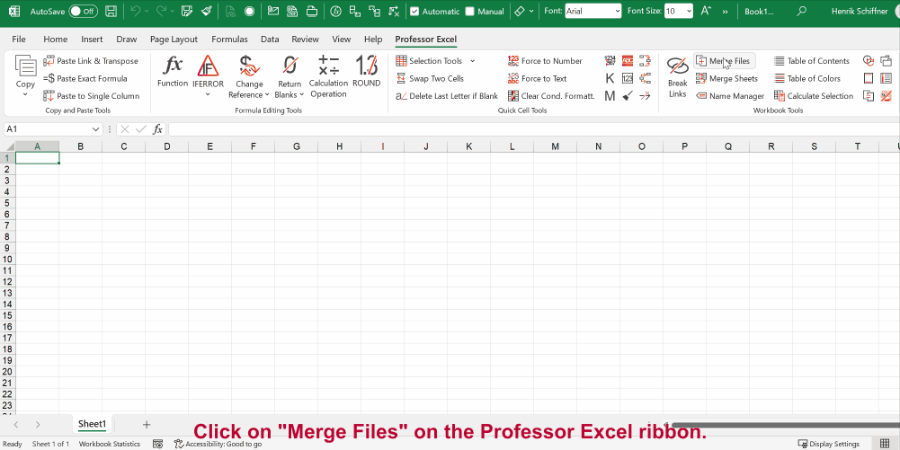
Click on “Merge Files” on the Professor Excel ribbon.
Now select all the files and worksheets you want to merge and start with “OK”.
This procedure works well also for many files at the same time and is self-explanatory. Even better: Besides XLSX files, you can also combine XLS, XLSB, XLSM, CSV, TXT and ODS files.
To do that you need a third party add-in, for example our popular “Professor Excel Tools” (click here to start the download).
Here is the whole process in detail:
Method 6: Use the Get & Transform tools (PowerQuery)
The current version of Excel 365 offers the “Get & Transform” tools to import data. These functions are very powerful and are supposed to replace the old “Text Import Wizard”. However, they have one useful feature: Import a complete folder of documents.
The requirements: The workbooks and worksheets you want to import have to be in the same format.
Please follow these steps for importing a complete folder of Excel files.
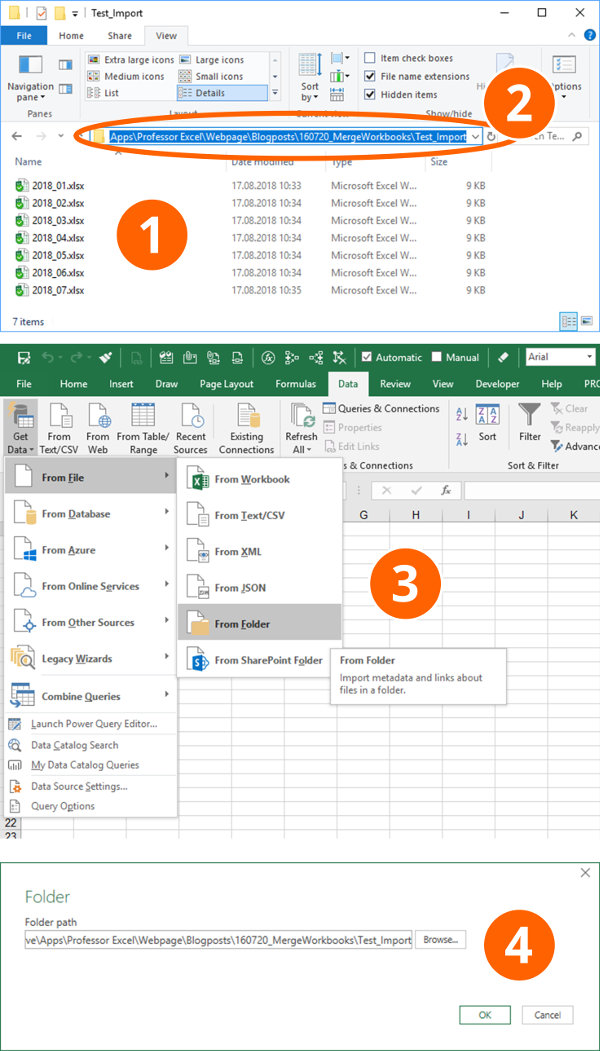
- Create a folder with all the documents you want to import.
- Usually it’s the fastest to just copy the folder path directly from the Windows Explorer. You still have the change to later-on select the folder, though.
- Within Excel, go to the Data ribbon and click on “Get Data”, “From File” and then on “From Folder”.
- Paste the previously copied path or select it via the “Browse” function. Continue with “OK”.
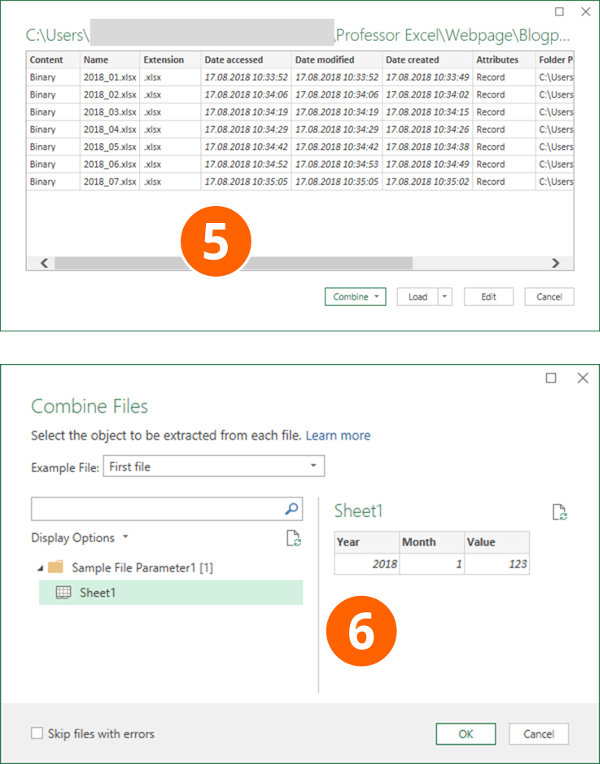
- If all files are shown in the following window, either click on “Combine” (and then on “Combine & Load To”) or on “Edit”. If you click on “Edit”, you can still filter the list and only import a selection of the files in the list. Recommendation: Put only the necessary files into your import folder from the beginning so that you don’t have to navigate through the complex “Edit” process.
- Next, Excel shows an example of the data based on the first file. If everything seems fine, click on OK. If your files have several sheets, just select the one you want to import, in this example “Sheet1”. Click on “OK”.
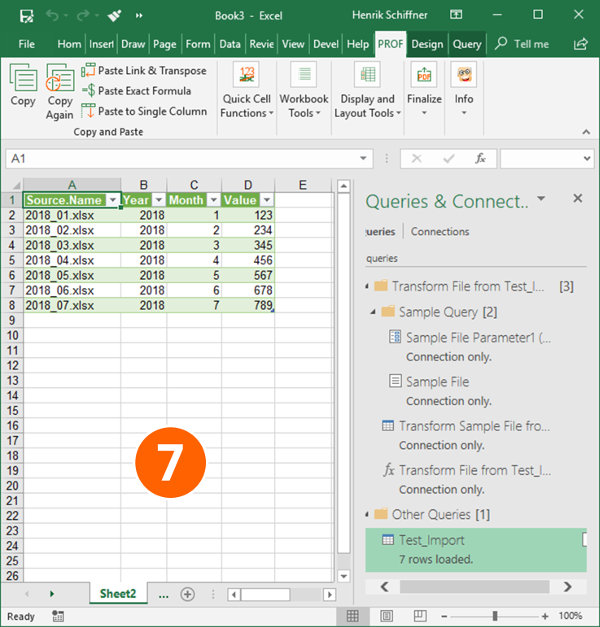
- That’s it, Excel now imports the data and inserts a new column containing the file name.
For more information about the Get & Transform tools please refer to this article.
Next step: Merge multiple worksheets to one combined sheet
After you have combined many Excel workbooks into one file, usually the next step is this: Merge all the imported sheets into one worksheet.
Because this is a whole different topic by itself, please refer to this article.
Image by MartinHolzer from Pixabay
Skip to content
Мы рассмотрим три способа объединения файлов Excel в один: путем копирования листов, запуска макроса VBA и использования инструмента «Копировать рабочие листы» из надстройки Ultimate Suite.
Намного проще обрабатывать данные в одном файле, чем переключаться между многочисленными книгами. Однако объединение нескольких книг Excel в один файл может быть сложным и долгим процессом, особенно если книги, которые вам нужно объединить, содержат много листов. Итак, как подойти к этой проблеме? Вы будете копировать их вручную или с помощью кода VBA? Или вы используете один из специализированных инструментов для объединения файлов Excel?
Ниже вы найдете несколько хороших способов, позволяющих реализовать объединение.
- Самое простое — копировать вручную.
- Объединение файлов Excel при помощи VBA.
- Как объединить несколько файлов с помощью Ultimate Suite.
Примечание. В этой статье мы рассмотрим, как копировать листы из нескольких книг Excel в одну книгу. Если вы ищете быстрый способ скопировать данные с нескольких листов на один общий лист, вы найдете подробную инструкцию в другой статье: Как объединить несколько листов в один.
Простой метод — копировать листы руками.
Если вам нужно объединить всего пару файлов Excel, вы можете вручную скопировать или переместить листы из одного файла в другой. Вот как это можно сделать:
- Откройте книги, которые мы планируем объединить.
- Выберите листы в исходной книге, которые вы хотите скопировать в основную книгу.
Чтобы выбрать несколько листов, используйте один из следующих приемов:
- Чтобы выбрать соседние листы, щелкните вкладку первого, который вы хотите скопировать, нажмите и удерживайте клавишу Shift, а затем щелкните вкладку последнего. Это действие выберет все листы между ними.
- Чтобы выбрать несмежные, удерживайте клавишу Ctrl и щелкайте вкладку каждого из них по отдельности.
- Выделив все нужные листы, щелкните правой кнопкой мыши любую из выделенных вкладок и выберите «Переместить» или «Копировать…» .

- В диалоговом окне «Перемещение или копирование» выполните следующие действия:
- В раскрывающемся списке «Переместить выбранные листы в книгу» выберите целевую книгу, в которую вы хотите объединить другие файлы.
- Укажите, где именно должны быть вставлены вкладки. В нашем случае мы выбираем вариант вставки в конец списка.
- Установите флажок «Создать копию», если хотите, чтобы исходные данные оставались оригинальном файле.
- Нажмите
ОК, чтобы завершить операцию.

Чтобы объединить вкладки из нескольких файлов Excel, повторите описанные выше шаги для каждой книги отдельно.
Замечание. При копировании листов вручную помните о следующем ограничении, налагаемом Excel: невозможно переместить или скопировать группу листов, если какой-либо из них содержит «умную» таблицу. В этом случае вам придется либо преобразовать таблицу в диапазон, либо использовать один из других методов, не имеющих этого ограничения.
Как объединить файлы Excel с VBA
Если у вас есть несколько файлов Excel, которые необходимо объединить в один файл, более быстрым способом будет автоматизировать процесс с помощью макроса VBA.
Ниже вы найдете код VBA, который копирует все листы из всех файлов Excel, которые вы выбираете, в одну книгу. Этот макрос MergeExcelFiles написан Алексом.
Важное замечание! Макрос работает со следующим ограничением — объединяемые файлы не должны быть открыты физически или находиться в памяти, в буфере обмена. В таком случае вы получите ошибку во время выполнения.
Sub MergeExcelFiles()
    Dim fnameList, fnameCurFile As Variant
    Dim countFiles, countSheets As Integer
    Dim wksCurSheet As Worksheet
    Dim wbkCurBook, wbkSrcBook As Workbook

    fnameList = Application.GetOpenFilename(FileFilter:="Microsoft Excel Workbooks (*.xls;*.xlsx;*.xlsm),*.xls;*.xlsx;*.xlsm", Title:="Choose Excel files to merge", MultiSelect:=True)

    If (vbBoolean <> VarType(fnameList)) Then

        If (UBound(fnameList) > 0) Then
            countFiles = 0
            countSheets = 0

            Application.ScreenUpdating = False
            Application.Calculation = xlCalculationManual

            Set wbkCurBook = ActiveWorkbook

            For Each fnameCurFile In fnameList
                countFiles = countFiles + 1

                Set wbkSrcBook = Workbooks.Open(Filename:=fnameCurFile)

                For Each wksCurSheet In wbkSrcBook.Sheets
                    countSheets = countSheets + 1
                    wksCurSheet.Copy after:=wbkCurBook.Sheets(wbkCurBook.Sheets.Count)
                Next

                wbkSrcBook.Close SaveChanges:=False

            Next

            Application.ScreenUpdating = True
            Application.Calculation = xlCalculationAutomatic

            MsgBox "Processed " & countFiles & " files" & vbCrLf & "Merged " & countSheets & " worksheets", Title:="Merge Excel files"
        End If

    Else
        MsgBox "No files selected", Title:="Merge Excel files"
    End If
End Sub
Как добавить этот макрос в книгу
Если вы хотите вставить макрос в свою книгу, выполните следующие обычные действия:
- нажимать
Alt + F11, чтобы открыть редактор Visual Basic. - Щелкните правой кнопкой мыши ThisWorkbook на левой панели и выберите « Вставить» > « Модуль» в контекстном меню.
- В появившемся окне (Окно кода) вставьте указанный выше код.
Более подробная инструкция описана в разделе Как вставить и запустить код VBA в Excel .
Кроме того, вы можете загрузить макрос в файле Excel, открыть его в этой книге (включить выполнение макросов, если будет предложено), а затем переключиться на свою собственную книгу и нажать Alt + F8 для его запуска. Если вы новичок в использовании макросов в Excel, следуйте подробным инструкциям ниже.
Как использовать макрос MergeExcelFiles
Откройте файл Excel, в котором вы хотите объединить листы из других книг, и выполните следующие действия:
- Нажмите комбинацию
Alt + F8, чтобы открыть окно диалога. - В разделе « Имя макроса» выберите MergeExcelFiles и нажмите «Выполнить».

- Откроется стандартное окно проводника, вы выберите одну или несколько книг, которые хотите объединить, и нажмите «Открыть» . Чтобы выбрать несколько файлов , удерживайте нажатой клавишу Ctrl, указывая на их имена.
В зависимости от того, сколько файлов вы выбрали, дайте макросу несколько секунд или минут для их обработки. После завершения всех операций он сообщит вам, сколько файлов было обработано и сколько листов было объединено:

Как объединить несколько файлов с помощью Ultimate Suite.
Если вам не очень комфортно с VBA и вы ищете более простой и быстрый способ объединить файлы Excel, обратите внимание на инструмент «Копирование листов (Copy Sheets)» — одну из более чем 60 функций, включенных в невероятно функциональную программу Ultimate Suite for Excel. Она работает в версиях Excel 2010-2019.
С Ultimate Suite объединение нескольких файлов Эксель в один так же просто, как раз-два-три (буквально, всего 3 быстрых шага). Вам даже не нужно открывать те из них, которые вы хотите объединить. И это могут быть два файла или несколько — не важно.
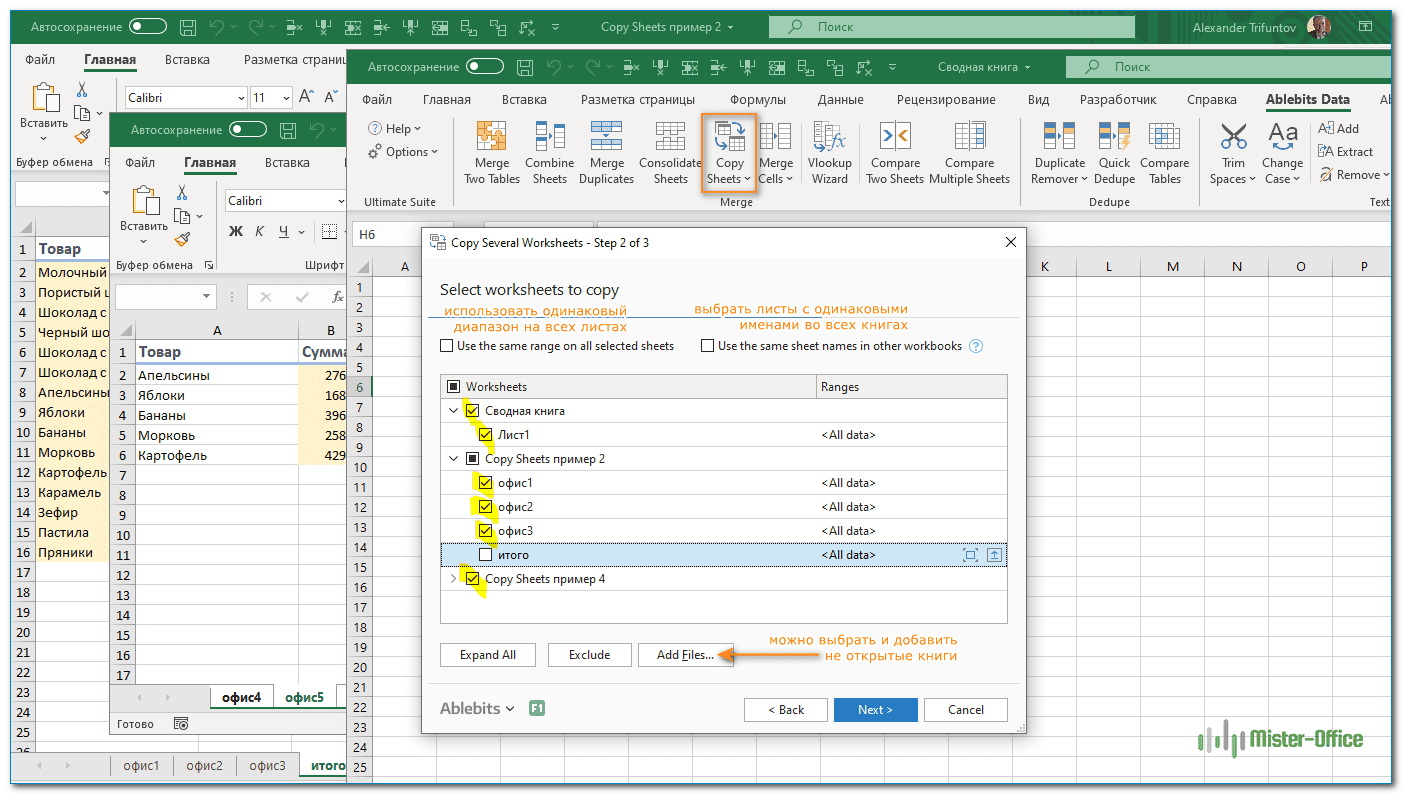
- Открыв главную книгу, перейдите на вкладку «Ablebits Data» и нажмите «Копировать листы (Copy Sheets)» > «Выбранные в одну книгу (Selected Sheets to one workbook)».

- В диалоговом окне выберите файлы (а в них — листы), которые вы хотите объединить, и нажмите «Далее (Next)» .
Советы:
- Чтобы выбрать все листы в определенной книге, просто поставьте галочку в поле рядом с именем книги, и все они в этом файле будут выбраны автоматически.
- Чтобы объединить листы из закрытых книг, нажмите кнопку «Добавить файлы…» и выберите столько книг, сколько нужно. Это добавит выбранные файлы только в окно копирования, не открывая их в Excel.
- По умолчанию копируются все данные. Однако, в разных листах можно выбрать разные диапазоны для объединения. Чтобы скопировать только определенную область, наведите указатель мыши на имя вкладки, затем щелкните значок
 и выберите нужный диапазон.
 - При необходимости укажите один или несколько дополнительных параметров и нажмите «Копировать» . На снимке скриншоте а ниже показаны настройки по умолчанию: Вставить все (формулы и значения) и Сохранить форматирование.

Дайте мастеру копирования листов несколько секунд для обработки и наслаждайтесь результатом!
На этой странице есть подробное описание всех возможностей работы мастера копирования.
Чтобы поближе познакомиться с этим и другими инструментами для Excel, вы можете загрузить ознакомительную версию Ultimate Suite.
Итак, я надеюсь, вы получили ответ на вопрос — как быстро объединить несколько файлов Excel в один.
You have several Excel files that make it harder for you to access data. You keep switching between different opened files, and this process takes a lot of your time. You are well aware that it is a lot easier to process data in a single file instead of switching between numerous sources. Then comes the question, how can I merge all these files into one comprehensive file? It is a troublesome and long process trying to combine different Excel files into one file when you factor in the number of worksheets found in one workbook. There are various ways of merging Excel files.
In this article, we discuss how to merge multiple Excel files into one file. Let’s get started.
Method 1: Combine multiple workbooks into one workbook with the Move or Copy function
1. If you want to merge all the existing files into a new Excel workbook, create the new Excel workbook and open it. But if you’re going to combine all of them into a current workbook, open that workbook.


2. Open all the Excel files you want to merge. You need to open all files to be able to combine them into one. Instead of doing it manually, select all the files and press the enter key on your keyboard. To select multiple files that are non-adjacent, hold the Ctrl key and click the files one by one. For adjacent files, hold the Shift key and click on the last file to select them all.

3. Maximize the first file you want to merge.
4. Right-click the worksheet you want to merge, then select Move or Copy.

5. On the pop-up window, click ‘Pick from Drop-down List.’ All the Excel files opened on your computer will be displayed here

6. Select the excel file you want to merge other files into in the ‘To book’ drop-down arrow.

7. To merge excel files, check the Create a copy checkbox.

8. In the Before Sheet section, select ‘move to end and click OK. It will create a copy of the worksheet in the destination file.

9. Repeat all the above steps for all the remaining files and save your file.
Method 2: Combine multiple workbooks into one with VBA
1. Open a new workbook that will act as a master workbook.

2. Press Alt + F11 to the VBA page

3. Click on the Insert tab. Next, select the Module tab.

4. Copy and paste the macro code below.
Sub GetSheets()
Path = "C:UsersdtDesktopdt kte"
Filename = Dir(Path & "*.xlsx")
Do While Filename <> ""
Workbooks.Open Filename:=Path & Filename, ReadOnly:=True
For Each Sheet In ActiveWorkbook.Sheets
Sheet.Copy After:=ThisWorkbook.Sheets(1)
Next Sheet
Workbooks(Filename).Close
Filename = Dir()
Loop
End Sub
Click here for more code.
5. After this, it is time to initiate the command by pressing F5 to run the excel macro code. Doing this will open a file and then copy the data. It will paste the same in your new workbook. Close the workbook.

Method 3: Merging Microsoft Excel files as CSV files.
1. Open the excel files.
2. Go to the Menu bar. Click File. Then Save As.
4. In the Save as type, there is a drop-down list. Select CSV from the list.

5. Do this for all the files you want to merge, and then place all the CSV files into one folder.

6. Open the command prompt then navigate to your folder. Type the following command to merge all CSV files in the folder into a new CSV file. Copy *.csv newfile.CSV

7. After creating the new file, open the new CSV file in Microsoft Excel.
8. Save it as an Excel file.

Method 4: Using Power Query
The Power Query method is the best way to merge data since you only need to store all the excel files in a single folder. You can then use that folder to load data from files into the Power Query Editor. It also allows you to transform data while combining.
However, for the Power Query editor to merge Excel files, you need to understand that all data should be structured in the same way. That means the number of columns and their order should be the same. Below are steps to follow when merging files with the Power Query application.
Power query allows to import, edit and consolidate the data. It can also be used to import and combine multiple excel files into one folder.
With the Same Name of Worksheets and Tables
1. Move all the files into the new folder that you want to combine.

2. In Excel go to the Data tab

3. Press Get Dat > From File > From Folder

4. Browse and select the folder path

5. Press Ok
6. If files are ready to combine press Combine & Load

7. If you want to manipulate the data, then press the Transform Data button. This will open the query editor where you can work on the data.

From here, select the table in which you have data in all the workbooks. A preview of this will appear at the side of the window.

8. Once you select the table, click OK to merge data from all the files into your Power Query editor. You will see a new column with the name of the workbooks from which data is extracted.

9. Right-click on the column header and select “Replace Values”.

10. Enter the text “.xlsx” in the Replace Values box and leave the “Replace With” box blank. The idea here is to remove the file extension from the name of the workbook.

11. Next, double-click on the header and select “Rename” to enter a name for the column.

12. At this point, your merged data is ready and you only need to load it into your new workbook. To perform this, go to the Home Tab and click on Close & Load. Now you will have your combined data from all tables or workbooks with the same name in a single workbook.

Note: You will not have the same table name in all the excel files all the time. At that point, you can use the worksheet name to combine data with the Power Query method. However, you should note two points when using the worksheet name to combine data with the power query method:
- Power Query is case-sensitive. So, you should have the same letter names of worksheets in all the workbooks.
- You should have the same name for the column headers, but the order of the columns does not matter. If column1 in the north.xlxs is column2 in the west.xlxs, Power Query will match it, but you need to have the same column names.
Therefore, when combining files using the power query, you can use the worksheet name instead of the table name. You only need to select the worksheet name, click on the Combine & Edit, and follow all the steps outlined above from step number 6.
When You Don’t Have the Same Name of Worksheets and Tables.
In some situations, you can lack the same name of worksheets and tables in the excel files. In this case, you must know how to combine data from these different worksheets and tables into one file, following these steps:
1. Open the “From Folder” dialog box to locate the folder where you have all the files and click OK.

2. After that, click on the “Edit” to edit the table.
3. Once the table and Power Query editor open, select the first two columns of the table and click on the Remove other Columns from the right-click menu.

4. From here, you need to add a custom column to fetch data from the worksheets of the workbooks. To do this, go to Add Column Tab and click on the Custom Column button. The step will automatically open the Custom Column in the dialog box.

5. In the dialog box enter the formula below and click OK.
=Excel.Workbook([Content])

6. You will have a new column in the table from which you need to extract data. Open the filter from that newly added custom column and click OK to expand all the data into the table.
7. You will see a newly expanded table with some new columns. Delete all columns from the new table except the third and the fourth column.

8. Now open the filter for the Custom Data column to expand it and click OK.

Once you click OK, you will get all the data from the files having been merged into a single table. Though, if you notice all the headings of the columns are in the data itself, you need to add the column headings as follows;
- Double-click on the header and add a name. You can also right-click and select Rename It.
- Exclude the headings you have in the data table. For this, open any column’s filter options and unselect the heading name which you have in the column data and click OK after that. After you click ok, your data is ready to load into the worksheet.
- Go to the Home Tab and click on Close and Load. This allows you to combine data from different workbooks that had different worksheets names.

At this point, you have already merged the data into one single file. You should then apply some formatting to avoid losing a single file of your data when updating it. To format a single file, you can use these steps:
- Go to Design Tab and open Properties.
- Untick the Adjust Column width and tick the Preserve Cell Formatting
Conclusion
The above tips help you to be organized and save time. Whether you decide to merge data in excel into a single file, or if you prefer to spread your work across multiple files, either of the methods above will help you. Excel offers immense features such as an in-built tracking feature that keeps track of any changes made in your files. So, losing your original data should not be a cause of dilemma.

You might be surprised how much time is lost flipping between Excel workbooks trying to find information – especially if you have a lot to sort through. Learning how to merge Excel files will make finding information easier, faster, and more user-friendly (especially if you’re sharing workbooks).
While you can use VBA to combine files, not everyone is familiar with the programming language or creating Microsoft Excel macros. Here are five different ways to merge files without having to use VBA.
- How to Merge Excel Files Manually
- How to Merge Excel Files Using Excel’s Move or Copy Features
- How to Combine Excel Files Using Links
- How to Merge Excel Files Using Power Query
- How to Merge Multiple Excel Sheets into One
How to Merge Excel Files Manually
Copying the data from one file to another is the simplest and most direct way to combine two Excel files. This method enables you to copy data into separate destination worksheets or into a single worksheet simply by how you paste.
- Navigate to the source worksheet.
- Press Ctrl + A (Windows) or Cmd + A (Mac) to select the full sheet, or select a specific range to copy, and use Ctrl + C or Cmd + C to copy the selection.
- Navigate to the destination workbook and add a new worksheet if necessary.
- After selecting a cell to tell Excel where to insert the data, press Ctrl + V or Cmd + V.
By performing a standard Paste (with Ctrl + V), Excel will paste not only the values, but also the formulas, formatting, and other cell attributes. If you only want to transfer the values, instead of doing a standard paste with Ctrl + V, do a Paste Special > Values. This will paste only the cell values and it will convert formula cells into their resulting static values.
This method works in a lot of different situations – but isn’t very automated. So, it’s probably best to use this strategy on a one-time project with small datasets.
Using Excel’s Move or Copy Features
One or more Excel sheets can be immediately copied from one Workbook to another by using the “Move or Copy Sheet” tool in Excel. This method will keep each worksheet in tact (if you need to combine data into a single sheet, check out the Power Query method below).
- Open your Excel file.
- While holding Ctrl (Windows) or Cmd (Mac) buttons, choose the sheets you want to copy to the destination workbook. The sheets you’ve selected will be highlighted. (Clicking on the sheets again will deselect them.) Note: alternatively, if the sheets are adjacent to each other you can select the first sheet, hold down the Shift key, and select the last sheet in the range of sheets.
- Right-click a selected sheet’s tab and choose Move or Copy.
- In the resulting dialog, choose the destination workbook.
- Choose where to insert the sheets under Before sheet. (You’ll be able to move them later if you want to.)
- If you want to leave a copy of the selected sheets in the source file, click Create a Copy.
- Select OK.
Now the destination workbook will include the selected sheets.
How to Combine Excel Files Using Links
In Excel, you can use links pasted in a cell of one workbook to link to another workbook. This method allows you to retrieve a value from an individual cell located in a different workbook.
- Launch both Excel documents.
- Copy a cell in the source workbook that you’d like to reference.
- Navigate to the destination workbook.
- Click the cell where you want your link pasted, select Paste Special, and then Paste Link.
When you select Paste Link, Excel should generate the following formula for you automatically:
='[file.xlsx]sheet'!$A$1
If you want to display other cells, you can remove the dollar signs from the formula above, making the cell reference relative. Then just copy and paste that formula into the other cells you want to display.
While this method works in extremely simple scenarios, it is not the preferred method for connecting multiple cells and multiple sheets. These external links are fragile and can easily break. If you have a large or complex dataset, this method will become unnecessarily complicated. You may wind up with errors that are difficult to fix if rows or columns are inserted, the cell location changes, or a file is moved, renamed, or unintentionally deleted.
Luckily, there’s a safer way to combine your Excel files together using one of the program’s most popular tools.
How to Merge Excel Files Using Power Query
Power Query allows users to import data into Excel and consolidate, shape, and edit it in a way that fits their needs. You can also use the tool to merge data located in multiple Excel files that are in the same folder (and subfolders). This method results in the data from separate workbooks being combined into a single data range on a single destination worksheet.
Note: if you are running a fairly modern version of Excel for Windows, you’ll have Power Query. But note that Power Query is not available in all Excel versions.
If you have access to Power Query, here’s how to use it to combine data from multiple files.
- Move every file you want to merge into a single folder (or organized in subfolders).
- Select the Data tab.
- Click Get Data, then From File, and From Folder.
- Choose the folder directory.
- Click OK.
- Click Combine & Load to merge your Excel files.
Note: If you’d like to change the data before loading the results into your destination worksheet, click the Transform Data button. The Query Editor will pop up. There, you can edit rows and columns, filter data, and more.
Using Power Query is an easy and safe way to merge your Excel files. The neat thing is that you aren’t limited to combining Excel files, either – you can merge formats like CSV, XML, JSON, and more!
Plus, Power Query has a lot of powerful capabilities. You can get some practice using the tool by checking out our most popular Power Query tutorials including this one which focuses on multiple CSV files and this one which focuses on multiple Excel files.
FREE: Excel Speed Challenge
If you enjoyed this post, please check out our free Excel speed challenge.

Watch one short Excel video a day for 5 days. Total video time is only 45 minutes. Learn the Excel skills that can help you save an hour a week.
How to Merge Multiple Excel Sheets into One
You might want to combine multiple datasets into a single sheet for something like a presentation or dashboard. The result will be a table of aggregated values, with one row per unique label.
This is pretty easy to do, with one catch – your Excel data needs to be properly formatted before you get started. You’ll have to be sure your sheets are using identical layouts and data types, and that there aren’t any blank columns or rows.
You’re ready to create a new worksheet once you’ve organized your data according to those requirements.
- Choose the upper-left cell on the new sheet where you’d like to place the combined data.
- Click on the Data ribbon item.
- Select Data Tools, then Consolidate.
- Choose the summary function you want to use from the Function menu. SUM, which adds values collectively, is the default.
- In the Reference area, select the range you want to merge, then click Add. Repeat this step until you’ve selected all the data you want to merge.
When you click OK, Excel will create one row for each unique label and aggregate the values from all range accordingly. If you are familiar with PivotTables, this creates a static report that is similar in layout to a PivotTable, with one column of labels and one column of aggregated values.
If you plan to consistently update data in other sheets and want to have those changes reflected in the merged data, select Create links to source data. Then click OK.
Always Be Careful When Merging Excel Data
Excel workbooks tend to get more difficult to maintain the larger they become. Even if you use the safest methods of combining data, it’s always best to plan ahead and think about how future changes will affect your datasets.
It’s also a good idea to always back up your files before merging them together (or just keep backups in general). That way, your original workbooks will still be intact if anything ever goes wrong while combining them.
Do you prefer one of these methods for merging Excel files, or do you have a different way? Let us know in the comments!