
Многие пользователи считают, что использование внешней клавиатуры с сочетаниями клавиш в меню Файл приложений Microsoft 365 в Windows помогает им работать более эффективно. Людям с ограниченной подвижностью или нарушениями зрения работать с сочетаниями клавиш может быть удобнее, чем с сенсорным экраном или мышью.
Меню Файл содержит параметры для управления файлами Microsoft 365, учетными записями и параметрами приложения, доступ к которым можно получить прямо из обычного представления или режима редактирования с помощью приведенных ниже сочетаний клавиш.

В меню Файл можно выполнять задачи, которые касаются того, что происходит в фоновом режиме, поэтому меню Файл также называется представлением Backstage.
Примечания:
-
Сочетания клавиш в этой статье соответствуют принятой в США раскладке клавиатуры. Сочетания клавиш для других раскладок клавиатуры могут отличаться от приведенных здесь.
-
Знак «плюс» (+) в сочетании клавиш означает, что одновременно необходимо нажать несколько клавиш.
-
Знак запятой (,) в сочетании клавиш означает, что необходимо нажимать несколько клавиш по порядку.
-
Чтобы быстро найти сочетание клавиш в этой статье, воспользуйтесь поиском. Нажмите CTRL+F, а затем введите слова поиска.
В этом разделе
-
Открытие меню «Файл»
-
Использование сочетаний клавиш меню «Файл»
-
Часто используемые сочетания клавиш
-
Создание файла Майкрософт 365
-
Вывод списка, открытие и поиск файлов
-
Сохранение и переименование Майкрософт 365 файлов
-
Печать Майкрософт 365 файлов
-
Создание PDF- или XPS-файла или изменение типа файла
-
Защита, проверка и управление файлами Майкрософт 365
-
Преобразование документа Word в веб-страницу
-
Доступ к сведениям об учетной записи Майкрософт 365
-
Доступ к учетной записи электронной почты Outlook
-
Доступ к параметрам и параметрам приложения Майкрософт 365
-
Отправка отзывов о Майкрософт 365 приложениях
Использование сочетаний клавиш меню «Файл»
Каждой странице и параметру в меню Файл назначена подсказка ключа. Подсказки клавиш можно использовать для выбора параметров, детализации до дополнительных параметров и открытия диалоговых окон в меню Файл вместо того, чтобы каждый раз предоставлять полное сочетание клавиш.
Подсказки клавиш отображаются в виде букв, цифр или сочетания в небольшом квадратном поле на страницах меню «Файл» и параметров.
Совет: Если подсказки клавиш не отображаются, нажмите клавишу ALT. Если подсказка клавиши неактивна, параметр недоступен.
-
Нажмите клавиши ALT+F, чтобы открыть меню Файл. Подсказки клавиш отображаются над параметрами страницы меню Файл .
-
На клавиатуре нажмите клавишу, соответствующую букве в подсказке клавиши страницы, чтобы выбрать и открыть страницу. Например, чтобы открыть страницу Создать в Word, нажмите клавишу N.
Откроется страница, а над параметрами выбранной страницы отобразится новый набор подсказок клавиш.
-
Чтобы выбрать параметр на странице, нажмите клавишу клавиатуры, соответствующую букве Подсказка клавиши.
Например, на странице Создать в Word нажмите клавишу S, чтобы перейти в поле Поиск шаблонов в Интернете.
Если вы перейдете в меню Файл с помощью средства чтения с экрана и приземлились к параметру с подсказкой клавиши, вы услышите имя параметра, а затем полное сочетание клавиш. Например, при нажатии кнопки Печать экранный диктор произнесет фразу «Печать, кнопка, ALT, F, P, P».
В приведенных ниже таблицах первая строка данных под строкой заголовка обычно содержит полный ярлык для страницы. Следующие строки содержат подсказки ключей, используемые на этой странице.
К началу страницы
Часто используемые сочетания клавиш
В этой таблице перечислены наиболее часто используемые сочетания клавиш для доступа к параметрам в меню Файл вMicrosoft 365.
|
Действие |
Клавиши |
|---|---|
|
Откройте меню Файл . |
ALT+F |
|
В меню Файл используйте следующие сочетания клавиш: |
|
|
Откройте домашнюю страницу для доступа к последним, закрепленным или общим файлам, создайте новый пустой файл или используйте шаблон и выполните поиск файла на одной странице. |
H |
|
Откройте страницу Создать , чтобы создать пустой файл, или найдите шаблон. |
N |
|
Сохраните файл со значениями по умолчанию. Этот параметр доступен, если параметр Автосохранение не выбран. |
Сб |
|
Откройте диалоговое окно Сохранить как , чтобы сохранить файл с другим именем или в другом расположении. |
A, 1 или A, O |
|
Откройте страницу Печать , чтобы задать параметры печати и распечатать файл. |
P |
|
Выйдите из меню Файл и вернитесь к обычному режиму, режиму редактирования или папке «Входящие». |
ESC |
К началу страницы
Создание файлаMicrosoft 365
В этой таблице перечислены сочетания клавиш для создания файла Microsoft 365 с помощью параметров на странице Создать меню Файл .
Совет: Чтобы быстро создать пустой файл или сообщение электронной почты, нажмите клавиши CTRL+N.
|
Действие |
Клавиши |
|---|---|
|
Откройте страницу Создать . |
Alt+F, N |
|
На странице Создать используйте следующие сочетания клавиш: |
|
|
Создайте файл с помощью шаблона в списке шаблонов приложения. |
Z, за которым следует число от 1 до 9 или буква от A до P, а затем C. Например, нажмите клавиши Z, 1, C. |
|
Поиск онлайн-шаблонов. |
S, введите слова поиска и нажмите клавишу ВВОД. |
|
Выполните предопределенный поиск типов шаблонов. |
U, за которым следует число от 1 до 7. Например, нажмите клавишу U, 1. |
К началу страницы
Вывод списка, открытие и поиск файлов
В этой таблице перечислены сочетания клавиш для перечисления, открытия и поискаMicrosoft 365 файлов с помощью параметров на странице Открыть меню Файл . Вы также можете использовать ярлыки для открытия папок в разных местах сохранения, например на компьютере или OneDrive.
Совет: Чтобы быстро открыть файл и отобразить список последних файлов, нажмите клавиши CTRL+O.
|
Действие |
Клавиши |
|---|---|
|
Откройте страницу Открыть . |
Alt+F, O |
|
На странице Открыть используйте следующие сочетания клавиш: |
|
|
Найдите файл в последних файлах. |
R, E и введите слова поиска |
|
Отображение списка последних файлов. |
R, Y, 2 |
|
Отображение списка последних папок. |
R, Y, 3 |
|
Отображение списка файлов, которыми вы предоставили общий доступ или которыми вы поделились с другими пользователями. |
Y, 1 |
|
Отображение списка файлов и папок в организации OneDrive. |
S, 1 |
|
Отображение списка сайтов на SharePoint, которые вы используете и подписаны. |
S, 2 |
|
Отображение списка файлов и папок в личных OneDrive. |
К |
|
Отображение параметров навигации и списка файлов и папок на локальном устройстве. |
C |
|
Откройте стандартное диалоговое окноWindowsОткрыть , чтобы найти файлы и папки. |
O |
|
Откройте последний документ, который был закрыт без сохранения. |
U, найдите файл и нажмите клавишу ВВОД. |
К началу страницы
Сохранение и переименование файлов Microsoft 365
В этой таблице перечислены сочетания клавиш для сохранения и переименования Microsoft 365 файлов с помощью параметров в меню Файл, сохранить страницу или Сохранить как, доступ к которым можно получить из обычного представления или режима редактирования.
Совет: Чтобы быстро сохранить файл, нажмите клавиши CTRL+S.
|
Действие |
Клавиши |
|---|---|
|
Сохраните файл со значениями по умолчанию. Этот параметр доступен, если параметр Автосохранение не выбран. |
Сб |
|
Откройте страницу Сохранить или сохранить как . |
A |
|
На странице Сохранить или сохранить как используйте следующие сочетания клавиш: |
|
|
Добавьте облачное расположение для сохранения файла. |
A, A |
|
Переименуйте файл. |
A, Y, 3 |
|
Сохраните копию файла в папке Документы на компьютере. |
A, C, Y, 8 для перемещения расположения в документы. Затем нажмите клавиши ALT+A, Y, 5 для сохранения. |
|
Откройте диалоговое окно Сохранить как , чтобы сохранить файл с другим именем или в другом расположении. |
A, 1 или A, O |
К началу страницы
Печать файлов Microsoft 365
В этой таблице перечислены сочетания клавиш для печати Microsoft 365 файлов с помощью параметров на странице Печать меню Файл , доступ к которым можно получить в обычном режиме или режиме редактирования.
Совет: Чтобы быстро распечатать файл с параметрами по умолчанию, нажмите клавиши CTRL+P, P.
|
Действие |
Клавиши |
|---|---|
|
Откройте страницу Печать . |
ALT+F, P |
|
На странице Печать используйте следующие сочетания клавиш: |
|
|
Откройте меню принтера, чтобы выбрать принтер. |
I |
|
Откройте меню для выбора диапазона печати. |
A |
|
Задайте диапазон печати по номерам страниц или слайдов. |
Сб |
|
Задайте ориентацию страницы для печати. |
O |
|
Задайте размер бумаги. |
L |
К началу страницы
Создание PDF- или XPS-файла или изменение типа файла
В этой таблице перечислены сочетания клавиш для изменения типа файла и создания PDF- или XPS-файла Microsoft 365 файла с помощью параметров на странице Экспорт меню Файл .
|
Действие |
Клавиши |
|---|---|
|
Откройте страницу Экспорт . |
Alt+F, E |
|
На странице Экспорт используйте следующие сочетания клавиш: |
|
|
Создайте PDF- или XPS-файл файла Microsoft 365. |
A |
|
Измените тип файла Microsoft 365. |
В выберите тип файла, а затем сохраните файл. |
|
В PowerPoint откройте диалоговое окно Отправить в MicrosoftWord , чтобы создать раздаточные материалы презентации в Word формате. |
H, A |
К началу страницы
Защита, проверка файлов Microsoft 365 и управление ими
В этой таблице перечислены сочетания клавиш для защиты файлов Microsoft 365 и управления ими с помощью параметров на странице Сведения в меню Файл .
|
Действие |
Клавиши |
|---|---|
|
Откройте страницу Сведения . |
Alt+F, I |
|
На странице Сведения используйте следующие сочетания клавиш: |
|
|
Скопируйте путь к файлу. |
C |
|
Откройте расположение файла. |
Пт |
|
Откройте меню Защита документа , чтобы определить тип изменений, которые могут внести другие пользователи. |
P |
|
Перед публикацией проверьте файл на наличие скрытых свойств и личных сведений. |
Я, я |
К началу страницы
Преобразование документа Word в веб-страницу
В этой таблице перечислены сочетания клавиш для преобразования документа Word в веб-страницу MicrosoftSway с помощью параметров в меню Файл .
|
Действие |
Клавиши |
|---|---|
|
Откройте диалоговое окно Преобразование в веб-страницу . |
Alt+F, M |
К началу страницы
Доступ к сведениям об учетной записи Microsoft 365
В этой таблице перечислены сочетания клавиш для доступа к сведениям об учетной записи Microsoft 365. Например, можно изменить фотографию учетной записи и проверить наличие доступных обновлений Microsoft 365 с помощью параметров на странице Учетная запись в меню Файл . В Outlook страница называется учетной записьюMicrosoft 365.
|
Действие |
Клавиши |
|---|---|
|
Откройте страницу Учетная запись или Microsoft 365 Учетная запись. |
Alt+F, D |
|
На странице Учетная запись или учетная записьMicrosoft 365 используйте следующие сочетания клавиш: |
|
|
Измените фотографию учетной записи. |
C |
|
Выйдите из своей учетной записи. |
E |
|
Переключение учетной записи пользователя. |
Сб |
|
Проверьте наличие и примените доступные обновления Microsoft 365. |
R, U |
К началу страницы
Доступ к сведениям об учетной записи электронной почты Outlook
В этой таблице перечислены сочетания клавиш для доступа к сведениям об учетной записи электронной почты Outlook. Например, вы можете управлять параметрами учетной записи и задавать автоматическое сообщение ответа (не на месте) с помощью параметров на странице Сведения об учетной записи в меню Файл .
|
Действие |
Клавиши |
|---|---|
|
Откройте страницу Сведения об учетной записи . |
Alt+F, I |
|
На странице Сведения об учетной записи используйте следующие сочетания клавиш: |
|
|
Откройте меню параметров учетной записи электронной почты. |
Сб |
|
Откройте диалоговое окно Автоматические ответы , чтобы добавить сообщение «Нет на месте». |
O |
|
Откройте диалоговое окно добавления новой учетной записи в Outlook. |
D |
|
Очистите папку «Удаленные». |
T, Y |
|
Откройте диалоговое окно Правила и оповещения , чтобы упорядочить входящие сообщения электронной почты и получать обновления при изменении или удалении элементов. |
R, |
К началу страницы
Доступ к параметрам и параметрам приложения Microsoft 365
В этой таблице перечислены сочетания клавиш для открытия диалогового окна Параметры и доступа к параметрам приложения Microsoft 365. В зависимости от приложения можно, например, управлять параметрами проверки орфографии или персонализировать внешний вид приложения.
|
Действие |
Клавиши |
|---|---|
|
Откройте диалоговое окно Параметры . |
Alt+F, T |
|
В диалоговом окне Параметры используйте следующие сочетания клавиш: |
|
|
В Outlook включите или выключите параметр Воспроизведение звука для полученных сообщений. |
M, затем клавиши TAB и P. Нажмите клавишу ПРОБЕЛ, чтобы включить или отключить параметр. |
|
Получите доступ к параметру Правописание , чтобы изменить параметры правописания и грамматики. |
P |
|
Измените тему Microsoft 365. |
G, затем клавиша TAB и T |
К началу страницы
Отправка отзывов о приложениях Microsoft 365
В этой таблице перечислены сочетания клавиш для отправки отзывов о приложениях Microsoft 365 с помощью параметров на странице Отзыв в меню Файл .
|
Действие |
Клавиши |
|---|---|
|
Откройте страницу Отзыв . |
Alt+F, K |
|
На странице Отзыв используйте следующие сочетания клавиш: |
|
|
Откройте форму для отправки положительных отзывов. |
L |
|
Откройте форму для отправки отрицательных отзывов. |
D |
|
Откройте веб-страницу, чтобы предложить новую функцию или улучшение. |
Сб |
К началу страницы
См. также
Доступное содержимое для всех пользователей
Сочетания клавиш в Excel
Сочетания клавиш в Word
Сочетания клавиш в Outlook
Использование сочетаний клавиш для создания презентаций PowerPoint
Использование сочетаний клавиш для проведения презентаций PowerPoint
Техническая поддержка пользователей с ограниченными возможностями
Корпорация Майкрософт стремится к тому, чтобы все наши клиенты получали наилучшие продукты и обслуживание. Если у вас ограниченные возможности или вас интересуют вопросы, связанные со специальными возможностями, обратитесь в службу Microsoft Disability Answer Desk для получения технической поддержки. Специалисты Microsoft Disability Answer Desk знакомы со многими популярными специальными возможностями и могут оказывать поддержку на английском, испанском, французском языках, а также на американском жестовом языке. Перейдите на сайт Microsoft Disability Answer Desk, чтобы узнать контактные сведения для вашего региона.
Если вы представитель государственного учреждения или коммерческой организации, обратитесь в службу Disability Answer Desk для предприятий.
Another name for the file menu is the “File” tab, it controls and accesses MS Office Products’ file functions. Formally, a file menu handles the files by using various commands. The list of file menu commands is info, New, Open, Save, Save as, Print, Share, Export, Account, Share, Options, and Close.
Table of Contents
- What is an Info under the File Menu Options?
- Protect Document:
- Inspect Document:
- Manage Document:
- Creating a New Blank document:
- Opening a Word Document:
- Saving a Word Document:
- Saving as a Word Document:
- Printing a Word Document:
- Sharing a Word Document:
- Exporting a Word Document:
- Closing a Word Document:
- Account:
- File Menu Options:

In the File Menu, Info stands for Information. It controls and gives information about Document Protection, Inspection and Management. These are discussed below.
Protect Document:

In the File Menu, protection means fully or partially controlling your document work to secure by marking a document as final, giving the password, adding an invisible digital signature or applying some other restrictions. In this process, the people are not able to access, change, edit, print, copy and protect the document.
Inspect Document:

You need to inspect the document before publishing what it has. In this, you need to check out the document properties, author’s name, accessibility, compatibility, Headers, footers, watermark, and invisible objects, etc.
Manage Document:

You can recover your unsaved word document by browsing it. Follow the steps given below.
→ Go to the File menu
→ Click on the File
→ Click on the management document
→ Click on the “Recover Unsaved Documents” to open the unsaved files list
→ Double-click to select the file you want
→ Click on the “Save as”
→ Select the Disk Location where you want to save the file
→ Change the File Name if you want
→ Then click on Save. Click here to read more>>
Creating a New Blank document:

The New is one of the File Menu Options in Word. The command “New” creates a New Blank Document. The shortcut Key for Creating a New Document is “Ctrl+ N”.
Opening a Word Document:

The Open is one of the File Menu Commands in Word. The command “Open” opens the window for opening the saved document by searching from your computer disk. The shortcut Key for Opening a Document is “Ctrl+ O”.
Saving a Word Document:
Save is one of the File Menu Commands in Word. The command “Save” is used to save the current document work if the file was already saved in any disc location of the computer if not, it asks to save the document work wherever you want in the disk. The shortcut Key for Saving a document is “Ctrl+ S“.
Saving as a Word Document:
The Save as is one of the File Menu Commands in Word. The command “Save As” saves the same document wherever you want with a different name you want. The shortcut Key for Save as is “F12“.
Printing a Word Document:
Print is one of the File Menu Commands in Word. The Command “Print” Prints the currently opened document pages as much as you want. To enable the printing option, go to the File menu (Ctrl+P), and then click on the command “Print”. The shortcut Key for Printing a document is “Control + P“.
Sharing a Word Document:
Sharing is one of the File Menu Commands in Word. Sharing is caring about your work which means you can save/share your work on different platforms such as Google Cloud, One Drive, E-mail, Blogs, and people, etc.
Exporting a Word Document:
The Command “Export” is used to save your document by creating the PDF/XPS Document or Converting your document in a different format such as Rich Text Format, Plain Text, Web Page, Word 97-2003 Document, etc.
Closing a Word Document:
Closing is an exit from the document, not an application. The shortcut Key for Closing an existing document is “Ctrl+W” and to close an entire application, Strike “Alt+F4“.Read More>>
Account:
It is a Microsoft free account, used to access Microsoft services. So you can save and get your documents from anywhere using the service. You can also use this account to sign in to OneDrive, Skype, and Microsoft store, and Purchase and Activate Microsoft products, etc.
In the File Menu, you can use the different options in a word document, whether it is general or advanced. These are; General, Display, Proofing, Save Language, Advanced, Customize Ribbon, Quick Access Toolbar, and Add-Ins.
What is a File in MS Word, Excel, and PowerPoint?
The File Menu Options controls and accesses the file functions of the MS Office Products. Formally, a file menu handles the files by using various commands.
Вкладка (меню) «Файл»
Вкладка Файл всегда
расположена в ленте первой слева. По
своей сути вкладка Файл представляет
собой меню (рис.
1.27).

Рис. 1.27. Вкладка
(меню) Файл раздел Сведения
Меню содержит
команды для работы с файлами
( Сохранить, Сохранить
как, Открыть, Закрыть, Последние, Создать ),
для работы с текущим документом
( Сведения,Печать, Доступ ),
а также для настройки Word ( Справка, Параметры ).
Команды Сохранить
как и Открыть вызывают
соответствующие окна для работы с
файловой системой.
Команда Сведения (см. рис.
1.27)
открывает раздел вкладки для установки
защиты документа, проверки совместимости
документа с предыдущими версиями Word,
работы с версиями документа, а также
просмотра и изменения свойства документа.
Команда Последние открывает
раздел вкладки со списком последних
файлов, с которыми работали в Word, в том
числе закрытых без сохранения (рис.
1.28).

Рис. 1.28. Вкладка
(меню) Файл раздел Последние
Команда Создать открывает
раздел вкладки с шаблонами для создания
новых документов (рис.
1.29).

Рис. 1.29. Вкладка
(меню) Файл раздел Создать
Команда Печать открывает
раздел вкладки для настройки и организации
печати документа, а также предварительного
просмотра документа (рис.
1.30).
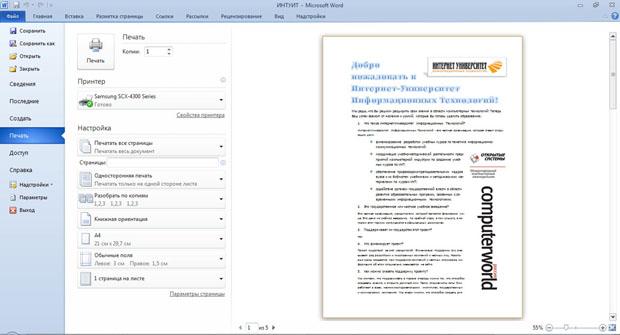
Рис. 1.30. Вкладка
(меню) Файл раздел Печать
Команда Доступ открывает
раздел вкладки для отправки документа
по электронной почте, публикации в
Интернете или в сети организации и
изменения формата файла документа (рис.
1.31).

Рис. 1.31. Вкладка
(меню) Файл раздел Доступ
Команда Справка открывает
раздел вкладки для просмотра сведений
об установленной версии Microsoft Office,
проверки наличия обновлений, настройки
параметров Word (рис.
1.32).

Рис. 1.32. Вкладка
(меню) Файл раздел Справка
Команда Параметры отображает
диалоговое окно Параметры
Word для
настройки параметров Word.
Кнопка Выход завершает
работу с приложением.
Панель быстрого доступа
Панель быстрого
доступа по умолчанию расположена в
верхней части окна Word и предназначена
для быстрого доступа к наиболее часто
используемым функциям.
По умолчанию панель
содержит всего три
кнопки: Сохранить, Отменить, Вернуть ( Повторить ).
Панель быстрого доступа можно настраивать,
добавляя в нее новые элементы или удаляя
существующие.
-
Нажмите
кнопку Настройка
панели быстрого доступа. -
В меню выберите
наименование необходимого элемента
(рис.
1.33).
Элементы, отмеченные галочкой, уже
присутствуют на панели.

Рис. 1.33.
Настройка панели быстрого доступа
-
Для добавления
элемента, отсутствующего в списке,
выберите команду Другие
команды (см. рис.
1.33). -
В разделе Панель
быстрого доступа окна Параметры
Word в
раскрывающемся списке Выбрать
команды из:
выберите вкладку, в которой расположен
добавляемый элемент, затем выделите
элемент в списке и нажмите
кнопку Добавить (рис.
1.34).
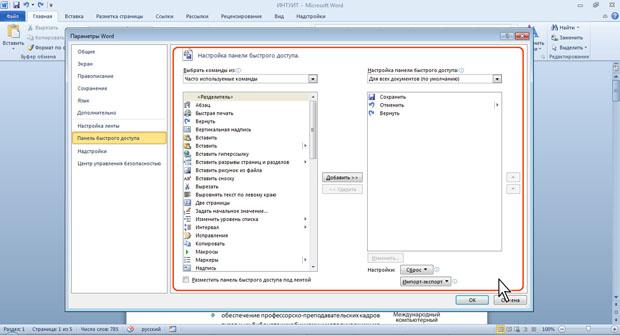
Рис. 1.34.
Настройка панели быстрого доступа
Также для добавления
на панель любого элемента из любой
вкладки на ленте можно щелкнуть по этому
элементу правой кнопкой мыши и в
контекстном меню выбрать команду
Добавить на панель
быстрого доступа.
Для удаления
элемента из панели достаточно щелкнуть
по нему правой кнопкой мыши и в контекстном
меню выбрать команду Удалить
с панели быстрого доступа.
Для восстановления
стандартного состава панели быстрого
доступа в разделе Панель
быстрого доступа окна Параметры
Word (см. рис.
1.34)
нажмите кнопку Сброс и
выберите команду Сброс
только панели быстрого доступа.
Соседние файлы в папке Лекции_1
- #
- #
- #
- #
- #
- #
- #
- #
- #
- #
 Всем доброго времени суток, продолжая серию статей по изучению Microsoft Word, рассмотрим подробнее вкладку файл непосредственно в самом документе. Сразу скажу, что Вы ей будете пользоваться постоянно при работе с Microsoft Word.
Первый блок функций это сохранение документа. Существует два способа, что бы документ остался у вас в компьютере, и вы могли им пользоваться в любое время.
1 способ. Создать новый документ не запуская Microsoft Word. Для этого достаточно в папке, где хранятся документы или на рабочем столе кликнуть правой кнопкой мыши, в появившемся меню выбрать – Создать – Документ Microsoft Word. Должно получиться следующее:

Далее мы должны дать название документу. Для этого так же кликаем правой клавишей мыши на созданный документ и выбираем пункт – переименовать.
2. Способ. Запускаем Microsoft Word, выбираем пункт — Сохранить как – далее указываем место, где будет сохранен документ – даем ему название и нажимаем кнопку сохранить. Смотрим рисунок:

Второй блок функций это открытие и закрытие документа. Предназначен для открытия документа не закрывай программу Microsoft Word. Кнопка «Закрыть» — прекращат работу word с выбором сохранить или не сохранять документ.
Третий блок функций включает в себя работу с файлом. Рассмотрим подробнее:

— Сведение. Позволяет защитить документ от редактирования, установить пароль, сделать документ авторским.
— Последние. Показывает последние открытые документы программой word.
— Создать. Предназначена данная функция для создания нового документа, есть так же возможность выбрать шаблон документа.
— Печать. Отправляет документ на печать с помощью принтера.
— Сохранить и отправить. Функция отправки документа через сеть интернет по электронной почте или на другой интернет портал.
— Справка. Показывает версию продукта, статус подлинности продукта и активации.
Четвертый блок функций состоит из двух вкладок. Это параметры и выход.
Параметры – функция позволяет произвести индивидуальную и более тонкую настройку word. Эта функция наиболее полезна пользователем, тесно связанные с работой в текстовом редакторе. Для повседневной работы настройки по умолчанию вполне достаточно. Но если части имеете дело с word, то вам придется немного покопаться в настройках для дальнейшей комфортной работы на компьютере.
Далее приведу ряд скриншотов, вы должны их сверить со своими настройками и исправить, если нашли отличия. Эти настройки можно поменять не используйте мои настройки за обязательные. Поэкспериментируйте, может что-то вам понравится, и вы сможете это применить на практике.


Подведем итог изученного. Мы научились создавать и сохранять файл. Важно отметить, что всегда старайтесь присваивать документам имена. Это необходимо для удобного поиска документа. Рассмотрели вкладку «файл», и функции которые она выполняет. Далее рассмотрели более тонкую настройку программы Microsoft Word.
В следующих статья я буду рассказывать как работать с текстом и редактированием текста.
Желаю Вам удачи до встречи в следующих статьях!
Как вам статья?

Welcome to our guide to the menus in Microsoft Word.
We cover all of the menus individually, with explanations of what the various commands do. We include the File, Edit, View, Insert, Format, Tools and Table menus.
Note: These menus disappeared in Word versions 2007 and 2010.
The File Menu
The file menu is one you will find yourself using extensively. It is used to create new documents, open existing documents and saving your new/updated documents. It also includes the page setup, print preview, and other important functions relating to your document and its properties.

New: This creates a new Microsoft Word document. The page setup of the new document, ie, the size, margins, etc, will depend on your page settings.
Open: This opens an existing Microsoft Word document, it will open a file explorer window allowing you to navigate to the file you want to open.
Close: This will close the current word document. Microsoft Word may prompt you to save the file, if you have made changes to the document since the last save.
Save: Saves the current document, replacing the existing file (if previously saved).
Save As: This allows you to save the document as a different file. This is very useful, imagine you open your letterhead template and write a letter that you want to save, if you just saved it (using the option above), it would replace your letterhead template. When you click on Save As you will be able to choose the new filename and location for your document.
Save As Web Page: This option will save the current document with the HTM(L) extension, allowing it to be viewed by a web browser.
Search: Clicking Search will open the basic search window, allowing you to search your computer for documents containing certain text.
Versions: This feature allows you to save different versions of the current Microsoft Word document. For example, if you changed your letterhead and wanted to keep the older version too.
Web Page Preview: Clicking on this option will display your current document as it would look in a web browser. When you click, Microsoft Word will open the document in your default web browser.
Page Setup: This opens the page setup options dialogue box. It allows you to set the properties (dimensions, margins, etc) of the current document and change the default for new Microsoft Word documents.
Print Preview: Selecting this option opens the print preview window, allowing you to preview how your document will look when printed.
Print: Opens the print dialogue box allowing you to print the current document.
Send To: Hovering your mouse over this option will allow you to send your document via email, or export it to Microsoft Powerpoint (if installed).
Properties: This will open the Microsoft Word document properties dialogue box, allowing you to view/edit various properties of the document. Including author information, statistics, type, location and filesize of the document.
![]()
The A symbol in fig 1.1 above shows where a list of recently opened documents are listed. This is a very handy feature of Microsoft Word, it saves using the normal opening procedure.
Exit: Clicking this will exit Microsoft Word, it may prompt you to save any unsaved documents.
The Edit Menu
The edit menu, as its name suggests, includes commands relating to the editing of your document. It includes important editing features such as undo, repeat, cut, copy, paste, select all, find, replace and more.

Undo (last task): This option allows you to undo the last thing you did in your Microsoft Word document, in our example (fig 1.1) you can see our last action was to type some text. This is a handy command, especially if you delete something by accident.
Repeat (last task): This repeats your last action. In our example clicking on the Repeat Typing will repeatedly insert the same piece of text into the document.
Cut: This command will cut (delete) the currently selected element. For example if you highlight (select) some text and then click on cut, it will be deleted.
Copy: The Copy command will copy the curently selected element (text, image, etc) into the office clipboard. It can then be inserted (pasted) into a document using the Paste command (see below), which will appear in the edit menu once you have copied something to the office clipboard.
Office Clipboard: This command will display the current contents of the office clipboard, allowing you to click on the stored elements to insert (paste) them directly into the current document. Elements (text, images, etc) can be added to the clipboard using the Copy command (see above), this clipboard will also show any elements stored in the Windows Clipboard.
Paste: This will paste (insert) into the current document the last element to be stored in the Office Clipboard.
Paste Special: Clicking on this command will bring up the Microsoft Word Paste Special dialogue box, it allows you to control the format of the text that will be inserted (pasted) from the Office/Windows clipboard.
Paste as Hyperlink: This command allows you to link (create a hyperlink) to a certain place in another Microsoft Word document, Excel worksheet, PowerPoint slide, or Access database. To achieve this, first copy the element that you want to link to into the clipboard, and then select the Paste as Hyperlink command.
note: The target file must have been saved previously, likewise if you are linking to an element in the current document, it must be saved first.
Clear: This command allows you to remove any formatting from the currently selected (highlighted) element (text/image). It also allows you to delete the selected element.
Select All: This will select (highlight) every element in the current document.
Find: Find allows you to search the current document for a certain word or phrase.
Replace: Replace allows you to replace a given text with a substitute of your choice.
Goto: Goto allows you to go directly to a certain page, section, line, bookmark, comment, footnote, endnote, field, table, graphic, equation, object, or heading.
Links: This allows you to manage any linked objects in the current document. A linked object is information (data) that is stored in another file, for example a Microsoft Excel spreadsheet, Microsoft Access database, or other compatible source. We will be covering linked objects in a future Microsoft Word tutorial.
Objects: This command allows you to manage any embedded objects within the current document.
The View Menu
This menu is used to control not only the visual layout of your Word document but also the printing configuration. It is also used to select which toolbars are visible in the Word environment. Commands include web layout, print layout, outline, task pane, toolbars, ruler, header and footer, footnotes, full screen view and zoom.

Normal: Selecting this will show your current document in a layout without the document margins.
Web Layout: The Web Layout view will show you how the current document will look on a web browser, a full-screen layout.
Print Layout: This view will show the document in a layout including all margins and page breaks.
Outline: The Outline view allows you to change the structure of your document, when selected it will open the Outline Toolbar. The Outline Toolbar allows you to, amongst other things, move headings up or down and/or change the heading types.
Task Pane: This command toggles (shows/hides) the Task Pane. The task pane is designed to give you quick access to frequently used commands, including Document Commands, The Office Clipboard, Basic Search, Style and Formatting and more.
Toolbars: When you hover your mouse pointer over Toolbars you will be presented with a submenu, this includes all of the different toolbars that are available. You can toggle (hide/show) the different toolbars by simply clicking on them within the submenu.
Ruler: Clicking on this will toggle (hide/show) the document ruler which appears across the top and down the side of the Microsoft Word document.
Document Map: The document map is a handy feature which allows you to navigate the current document, it will list the headings (heading 1, heading 2, etc) in the current document. To go directly to a certain paragraph heading, simply click on it in the left hand pane that opens.
Header and Footer: This allows you to edit the header and footer of the current document. We show you how to edit the header and footer in our letterhead tutorial here.
Footnotes: This command will show all footnotes and endnotes (you will be promoted for which) within the current document. Footnotes and Endnotes will be covered in a future Microsoft Word tutorial.
Markup: This will toggle (hide/show) any Markup (comments and tracked alterations/additions) in the current document.
Full Screen: This will show the current Microsoft Word document in full screen mode.
Zoom: This will open the zoom dialogue box, enabling you to change the percentage of zoom for the current view.
The Insert Menu
The insert menu is used to place various objects into your document, such as page numbers, pictures, symbols, comments and other objects. Commands include break, date and time, field, symbol, reference, web component, text box, file and hyperlink.

Break: This command opens the Break dialogue box, allowing you to insert page breaks and section breaks into the current document.
Page Numbers: Clicking on Page Numbers will open a dialogue box, which allows you to insert page numbers into the document using various options.
Date and Time: This command will open the Date and Time dialogue box. You can choose from many different date and time formats, you may also have different languages to choose from.
Autotext: Choosing this option will open the Microsoft Word Autotext dialogue box. We will cover Autotext in a future tutorial.
Field: This command allows you to enter specified fields into your document. The available fields include Date & Time, Document Automation, Document Information, Equations and Formulas, Index and Tables, Links and References, Mail Merge, Numbering and User Information.
Symbol: This allows you to insert symbols and special characters into your document. For example, if you wanted to include a copyright symbol or a trademark symbol, then you would use this feature. Other symbols (special characters) include currency symbols, mathematical symbols and foreign language alphabet characters.
Comment: This command will place a comment into the document at the location of the cursor. You will be able to type your comment into the comment box, once done, simply click anywhere outside of the comment box.
Reference: The Reference command will allow you to insert a footnote, caption, cross-reference, index, and tables.
Web Component: This command is used to insert any web components into your Microsoft Word document.
Picture: Allows you to insert a picture into your document. You will be offered various locations to locate the image, including clip art, the file system on your computer, and a digital camera or scanner.
Diagram: The Diagram command will open the diagram gallery dialogue box. You can choose from a selection of diagrams to insert into your document, including an organization chart, cycle diagram, radial diagram, pyramid diagram, venn diagram and a target diagram. You may have less or more diagrams available to insert, depending on your Microsoft Word installation.
Text Box: This allows you to insert text boxes, we will be covering text boxes in a future tutorial.
File: Enables you to insert part or all of a file into the current document.
Object: This command will insert an object of your choice, including media clips, Microsoft Excel charts and worksheets, Microsoft Powerpoint slides and presentations.
Bookmark: This handy feature allows you to bookmark a certain element (text, image, etc). You can name the bookmark and then return to it at any time by using the goto command in the edit menu.
Hyperlink: The Insert Hyperlink dialogue box allows you to add a hyperlink to an existing file, web page, certain place in the current document, a new document, or an email address.
The Format Menu
A guide to the format menu which controls your font’s properties along with the borders and shading options. Commands include paragraph, bullets and numbering, columns, tabs, text direction, background, autoformat, reveal formatting and more.

Font: This will change the font attributes of either the currently selected text, or any subsequent text, using the font dialogue box.
Paragraph: This command will open the Paragraph dialogue box, allowing you to make changes to either existing text or subsequent text. To change an existing paragraph, select the text you wish to change and then use this command to make the alterations, such as alignment, indentation, and spacing.
Bullets and Numbering: This is a handy command, it creates indented lists with various formats. You can either click the command and then start typing your list (pressing enter for the next line), or you can select some existing text to convert to a list. The listing format options include bulleted, numbered, outline numbered, and other styles.
Borders and Shading: This command allows you to create borders and shading on elements within your Microsoft Word document. The borders and shading can be applied to text, paragraphs, pictures, and more.
Columns: The Columns command will split the current document into the number of columns you specify. You can either split the whole page, or just from that point onwards.
Tabs: This command allows you to manage tabs, including the alignment, spacing, and whether the tab has a leader or not.
Drop Cap: A drop cap is a letter at the start of a paragraph of text that spans 2 or more rows of text, you will often see a drop cap in a book at the start of a chapter. This tool allows you to either add a drop cap character to your document or change an existing letter (at the start of a sentence) to a drop cap.
Text Direction: This allows you to change the text direction of a text object, for example a text box.
Change Case: The Change case tool allows you to alter the case of existing text. Options include sentence case, lowercase, uppercase, title case, and toggle case.
Background: This changes the background colour (color) of your Microsoft Word document. It also allows you to add watermarks and use different gradient effects.
Theme: The themes command will open the theme dialogue box, allowing you to change the theme of your document, including heading style, hyperlinks and background colour (color).
Frames: This command opens the Frames dialogue box.
AutoFormat: The AutoFormat feature will format a whole document with preset attributes.
Styles and Formatting: This will open the Styles and Formatting toolbar, allowing you create headings, lists and more.
Reveal Formatting: Clicking on this will show a dialogue box detailing the format attributes of the selected element.
Object: Allows you to make changes to any existing objects within the current document.
The Tools Menu
The tools menu will also be one you may use regularly, it includes the options command which controls spelling and grammar, security and more. Commands include language, word count, speech, letters and mailing, macro, customize and more.

Spelling and Grammar: This command will check the spelling and grammar of the current Microsoft Word document. It also allows you to add words to the dictionary, as well as changing the dictionary language (if available).
Language: The language tool has various options, including setting the language of the document, translating text, open the thesaurus and manage hyphenation.
Word Count: This will open the Word Count dialogue box, enabling you to count the amount of words in the whole document, or the currently selected text.
AutoSummarize: This can be a handy feature of Microsoft Word, depending on the type and format of your document. It will summarize a document using the attributes you give it, for example, you can choose the percentage of the document to be used for the summary, as well as the format of the summary.
Speech: This will open the Speech Recognition feature of Microsoft Word (if installed/available).
Track Changes: Clicking on this command will cause Microsoft Word to track any subsequent changes to the document. These changes can then be viewed by turning on the Markup option on the Edit menu.
Compare and Merge Documents: This feature enables you to easily compare and/or merge 2 documents.
Protect Document: This command allows you to control the protection of the document, including tracked changes, comments and forms.
Online Collaboration: Enables NetMeeting allowing you to communicate with others in real time via the internet or local network.
Letters and Mailing: Gives you access to various features, including the Mail Merge Wizard, the Letter Wizard, the Envelopes and Labels tool, and the Mail Merge Toolbar.
Macro: This opens the Macro Dialogue box, allowing you to manage subsequent and existing macros. We will be covering Microsoft Word macros in a future tutorial.
Templates and Add-Ins: Opens the Templates and Add-Ins Dialogue box, allowing you to add, remove or update styles and template.
AutoCorrect Options: Opens the AutoCorrect dialogue box, enabling you to manage capitalisation, and also the replace text as you type settings.
Customize: Allows you to customize the Microsoft Word toolbars, commands, and other options.
Options: This opens the main options dialogue box in Microsoft Word. It allows you to change many aspects of the current document and Microsoft Word environment.
The Table Menu
Tables are a great way of laying out content within your document. The table menu provides all you need to manage your tables and cells. Includes draw table, insert, delete, merge cells, split cells, split table, autoformat, convert, sort and more.

Draw Table: This command opens the Tables and Borders dialogue box with the draw table tool active. First you draw the outline of your table, then using the same tool, you can create cells by vertical or horizontal movements within the table.
Insert: Allows you to insert a whole table or just columns, rows and cells into the current document.
Delete: Delete complete tables, columns, rows and selected cells.
Select: This command allows you to select the current table, column, row or cell.
Merge Cells: This tool will merge the currently selected cells into one.
Split Cells: This will split the selected cell/s into your chosen amount of columns and rows, it will also offer (if more than one cell selected) to merge the selected cells before the split.
Split Table: This command will split the current table, making the split at the currently selected cells.
Table AutoFormat: This command will open the Microsoft Word Table AutoFormat dialogue box, where you can choose from a number of different table templates, including preset fonts and cell background colours (colors).
AutoFit: This tools gives you several options for resizing the selected table in relation with the contents or window. It also allows you to automate the distribution between columns and rows.
Heading Rows Repeat: This handy tool will repeat the currently selected row at the top of every page for the length of the table.
Convert: This command will convert existing text into a table format. The text will have to have a common separator to indicate the different columns, it will also needs new paragraphs where you would like each row.
Sort: This opens the Sort Table dialogue box. You can choose which column you would like to sort and by what order.
Formula: This tool allows you to apply a formula to the selected cell. For example, if you wanted to add up the contents of several rows in a specific column, you could use the SUM formula in the Formla dialogue box.
Hide Gridlines: This simply hides the gridlines of the selected table.
Table Properties: This will display the various properties of the selected table.