
Содержание
- How to Copy a List of Files in a Windows Folder Into an Excel List
- Related
- 2 Methods to Copy the List of All File Names in a Folder into Your Excel Worksheet
- Method 1: Use a New Text Document
- Method 2: Define Name
- A Comparison of the Two Methods
- Take Actions Quickly in a Data Disaster
- List of all Files and Folders: How to Easily Insert a Directory in Excel!
- Summary
- Method 1: Simply copy and paste from Mac Finder to Excel
- Method 2: Insert a file list with built-in Excel functions using “Named Ranges”
- Set up the named range
- Use the named range in Excel functions
- Method 3: Use an internet browser to quickly copy and paste a file list to Excel
- Method 4: Create a file list with PowerQuery
- Method 5: Excel Add-in Professor Excel Tools
- Method 6: Use PowerShell to extract a file list
- Open PowerShell and write the directory into a text file
- Import text file into Excel
- Method 7: Let a VBA Macro loop through the files
- Download
How to Copy a List of Files in a Windows Folder Into an Excel List

Maintaining an Excel spreadsheet of computer files can help you keep track of important business documents or images. Unfortunately, Microsoft Excel doesn’t include a one-step method for importing a file list from Windows Explorer, but Windows 7 offers an easy workaround. Using the Command Prompt, you can tell Windows to output a text document containing a directory list. This text document can then be imported into Excel and modified just like any other spreadsheet.
Press «Win-E» to open Windows Explorer and locate the folder for which you need a file list.
Hold the «Shift» key, right-click the folder and select «Open Command Window Here.» This only works with folders, not libraries. Libraries point to a specific folder, so select the folder located under the library icon. If the library points to a drive, right-click the drive letter from the folder tree.
Type «dir /b > dirlist.txt» without quotes and press «Enter.» This creates a list containing file names only. To include file sizes and dates, type «dir > dirlist.txt» instead. To also include files in sub-directories, type «dir /b /s > dirlist.txt» to create a list of files with the full directory structure name, such as «C:foldersubdirectoryfile.txt.»
Open Microsoft Excel and press «Ctrl-O» to bring up the Open dialog window.
Navigate into the folder containing the files. Click the file type drop-down menu and select «Text Files (.prn,.txt,*.cvs).» Double-click «dirlist.txt» to open it.
Click «Finish» in the Text Import Wizard window to use the default options and import the directory list into Excel.
Источник
2 Methods to Copy the List of All File Names in a Folder into Your Excel Worksheet
Sometimes you will need to list all the file names in a folder in an Excel worksheet. Thus, you can better manage those files. In this article, we will introduce two effective methods to copy the list in a folder.
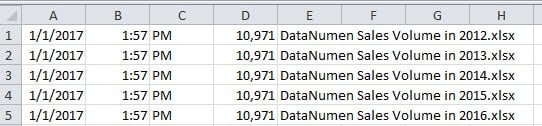
In an Excel worksheet, you can make a menu of some important files. And you need to copy the list of all the file names into one worksheet. However, when there are hundreds or thousands of files, you will find it hard to do this. In the image below, you can see several files.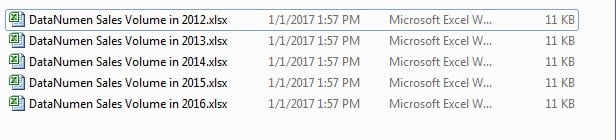
Now you need to copy the list of all the file names into a worksheet in another Excel file. If you copy and paste them one by one manually, you will certainly spend a lot of time and energy. At this time, you can use the two methods below.
Method 1: Use a New Text Document
Now follow the steps below and see how this method takes effect.
- Before you perform this process, make sure that you have shown the file extensions in your computer. Click the button “Start” in your computer.
- And then click the button “Control Panel”.

- In the control panel, click the “Appearance”.
- And then click the button “Folder Options”.
- After that, choose the option “View” in the “Folder Options” window.
- Next uncheck the option “Hide extension for known file types”.
- And then click “OK” to save the setting.

Therefore, you can see all the extensions of files in your computer.
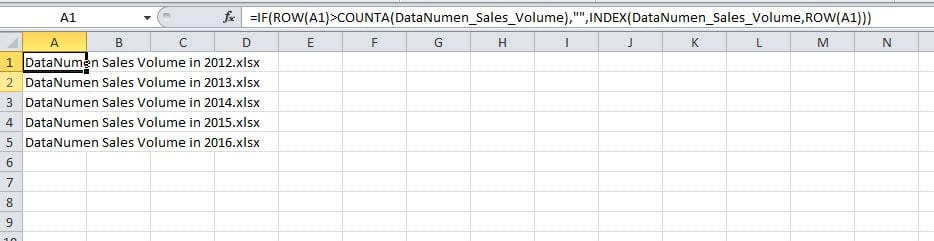
- Come back to the folder, create a new text document and give it a new name. We will name it “DataNumen Sales Volume”.
- And then open this text file.
- After that, input the following characters into this file:
- Next save this file and close it.
- In this step, change the extension of this file from “.txt” into “.bat”.
- After that, you will see a new window pop up. Here you need to click the button “Yes” to confirm this change.
- And then double click this file again. Next you will see a new text document with the name “1” in this folder.
- Open this new text document in this folder. You will see all the name information in it.
- After that, copy the necessary part in this file.
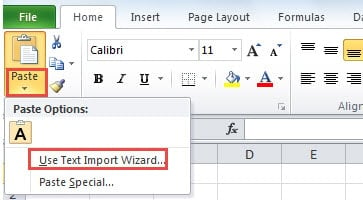
- And then in the target worksheet, click the small arrow under the button “Paste”.
- In the drop-down list, choose the option “Use Text Import Wizard”.
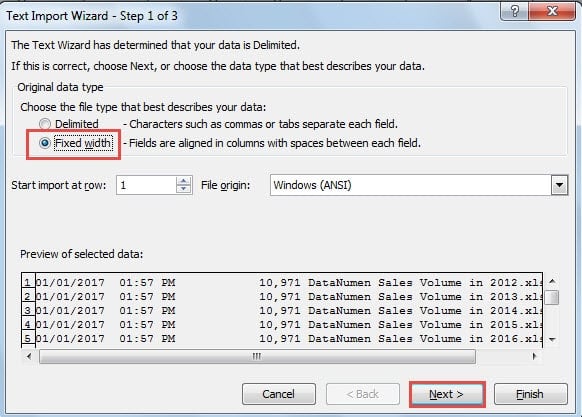
- Next in the new window, choose the option “Fixed width”.
- And then click the button “Next”.
- In step 2 of the wizard, move the break line and make sure that the names of those files will be in one cell.
- And then also click “Next”.
- In step 3, click “Finish”. Thus, all the information will appear in the worksheet.


You can delete the other useless columns in the worksheet. By using this method, you don’t have to copy and paste the names one by one.
Method 2: Define Name
In this part, we will introduce another excellent method.
- Click the tab “Formulas” in the ribbon.
- And then click the button “Define Name”.
- In the “New Name” window, input a name into the first text box. We will also name it “DataNumen_Sales_Volume”.
- After that, input this formula into the “Refers to” text box:
=FILES(“C:UsersSampleDesktopSales Volume*.*”) &T(NOW())
The path of the folder is “C:UsersSampleDesktopSales Volume” in this example. You need to change it into your actual folder path.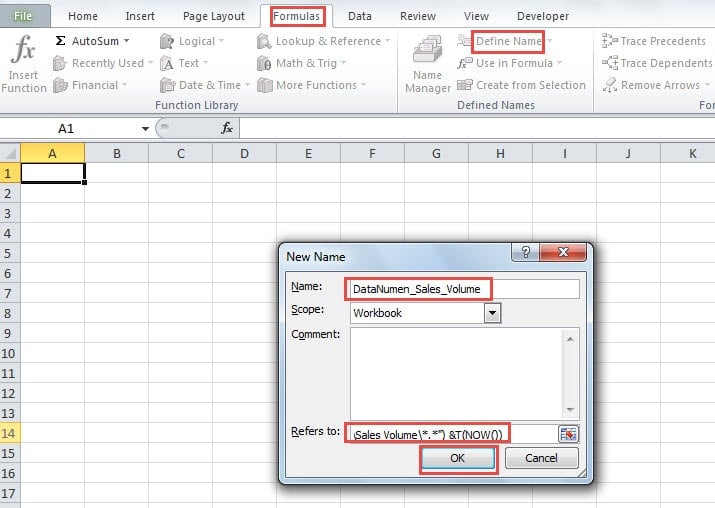
- And then click the button “OK” in the window.
- Now input the following formula into one cell in the worksheet:
In this formula, you need to change the define name into yours.
- After that, click the fill handle of this cell and drag downwards. As you move your mouse, you will also find that all the names will appear in this column.
- But you may also find that those results are the results of formulas. You still need to copy and paste them as texts.
- Next delete the formulas in the worksheet.
Until now, you have gone through all the steps. This method is also very effective for this requirement.
A Comparison of the Two Methods
You can see that both of the two methods are very useful. Here we will compare the two methods in this part.
If you are not familiar with Name and the complex formula in cells, you can use this first method. There are fewer steps in this method. You can finish your tasks quickly by using it.
Compared with the second methods, there are more steps in this method. You still need to spend a lot of time. The formulas in cells will produce the results that you need. Therefore, you still need to copy and paste them as values.
When you need to input all file names into a worksheet, you will know which method is the most suitable one.
Take Actions Quickly in a Data Disaster
It is unavoidable that you will meet with data disaster. In such an accident, your Excel files will most possibly be damaged. Therefore, you need to take actions quickly. In order to repair corrupt xls data quickly and safely, you can use out excellent Excel repair tool. This tool is able to fix most of the Excel problems.
Источник
List of all Files and Folders: How to Easily Insert a Directory in Excel!

You probably don’t need this every day: But once a file you might want to have a list of all files within a folder or directory in Excel. The good thing: There are many methods available. If you Google it, you will find a lot of different methods to create a file list in Excel. But unfortunately, all of them have advantages and disadvantages – which you usually only find out after trying them. That’s the reason for this article: You won’t only learn each method step by step: You will rather find an overview comparing all the advantages and disadvantages of each method. After seeing this, you don’t need to start extensive trials and errors. Much better: You can easily select the method that works best for you!
Summary
| Method 1: Copy & Paste on Mac |
Method 2: Named function |
Method 3: Internet browser |
Method 4: PowerQuery |
Method 5: Excel-Add-In |
Method 6: Windows PowerShell |
Method 7: VBA Macro |
|
|---|---|---|---|---|---|---|---|
| Short description | Copy and paste from the Mac Finder. | Use a function in a named range to insert a file list. | Open folder with a web browser and copy the file list. | Use PowerQuery to insert a directory. | Let an Excel add-in do the work for you. | Use the Windows built-in PowerShell feature. | Use a VBA Macro to insert a file list. |
| Ease of use |  |
|
|
|
|
|
|
| Operating system | Mac | Windows | Windows / Mac | Windows / Mac | Windows | Windows | Windows |
| Include subfolders and files |
No | No | No | Yes | Yes | Yes | (Yes) (depends on the VBA macro) |
| File information available | File names | File names | File names, file links (not working properly), file size, date modified | Folder path, name extension, date accessed, date modified, date created More attributes: |
Links to files on the drive, file path, date and time last saved, date and time created, file size, file type File name, file path, date and time last saved, file size Depends on the VBA macro Technology Mac Finder Named function in Excel Internet browser PowerQuery Excel Add-In PowerShell, Text Import Wizard VBA Comment Fast but with limited options. Only shows files, no folders. File links not working in our test; not working with all internet browsers (tested with Google Chrome and working). Elegant and uses built-in functions. Convenient, fast and many options. Results not good, difficult process; performs well on large file structures, though. Modifying the macro rather for advanced users. Link Click here Click here Click here Click here Click here Click here Click here
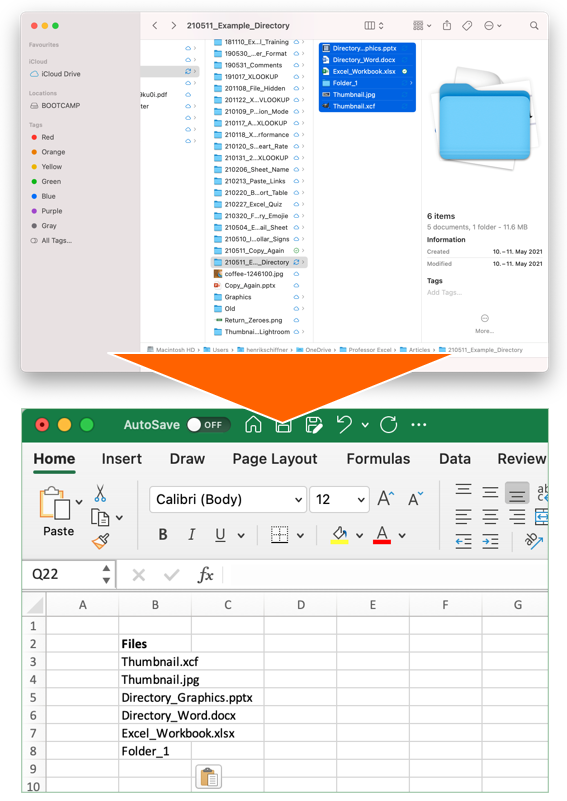
Method 1: Simply copy and paste from Mac Finder to Excel
This first method works on a Mac only: Just select all files in a Finder window and press copy (Command + C on the keyboard). Next, switch to Excel and paste the list: Press Command + V on the keyboard.
The advantage of this method is that it’s very easy and fast. Unfortunately, you don’t have any further options than just pasting the file names. That means you can’t insert data of subfolders or file properties.
Recommendation: Use this if you need a quick file list on the Mac – without any further information.
Method 2: Insert a file list with built-in Excel functions using “Named Ranges”
The second method is actually quite elegant: Use built-in Excel functions to insert a file list in Excel. It is built on advanced functions, such as an Excel function within a named range. But following these steps should be quite straight-forward.
Set up the named range
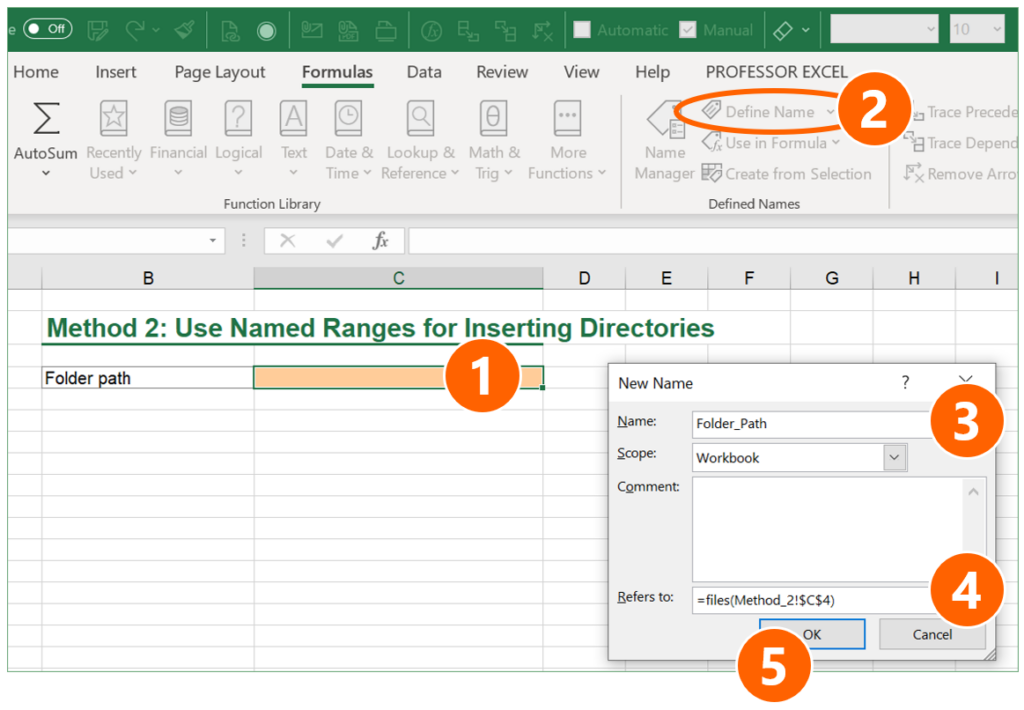
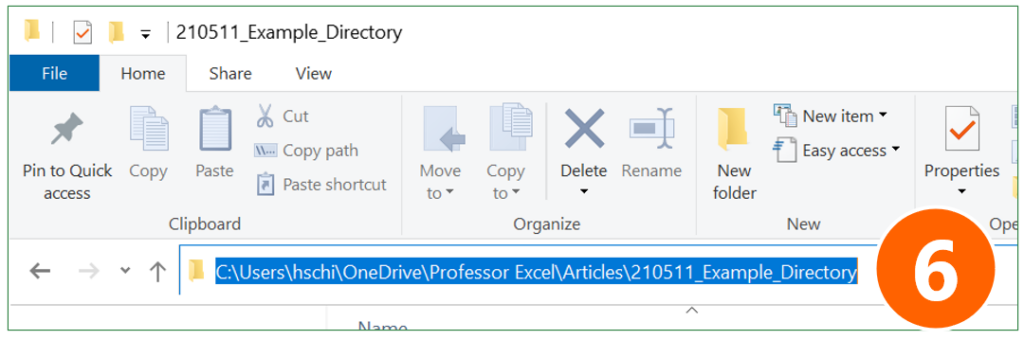
- Choose a cell in which you later write the folder path. In this case, it’s cell C4.
- Click on “Defined Name” on the Formulas ribbon.
- Give a name for the cell containing the folder path (here: “Folder_Path”)
- In the “Refers to” field, type: =files(linktopathcell) (replace “linktopathcell” with your cell reference – in this case “Method_2!$C$4”).
- Confirm with OK.
Use the named range in Excel functions
- Go to the Windows Explorer and copy the folder path.
- Paste the folder link into the folder path cell (the cell you have set as the named range in step 1 above). Add one of the following endings:
- If you want to include all files – no matter which file type – in your list, add *
- For listing only Excel files, add *.xls*
- If you want to see all files ending on “.xlsx”, add *.xlsx
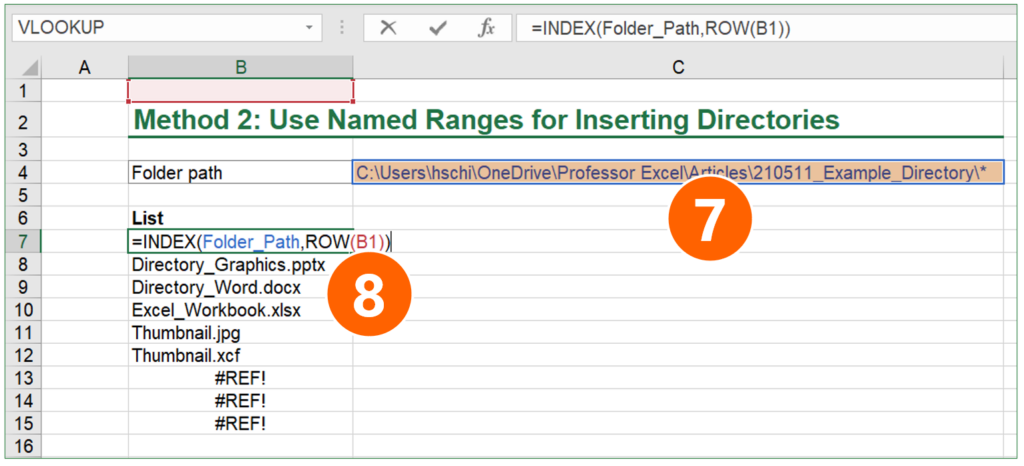
- As the last step, enter an INDEX function for compiling the list (here in cell B7):
=INDEX(Folder_Path,ROW(B1))
Folder_Path should be the same name that you have given in step 3 above. The ROW function should refer to any cell in the first row (for example to B1). That means, this argument could also be A1, C1, etc.
As the last step: Copy the INDEX function down until you see the first #REF error. #REF means in this case that there are no more files in your folder. If you like, you could wrap the IFERROR function around in order to mitigate the error.
Recommendation: Use this if you only need a list of files (no subfolders) that dynamically updates itself.
Method 3: Use an internet browser to quickly copy and paste a file list to Excel
I must say, I like this idea because it’s almost as fast as our method number 1 above: Open a folder in a webbrowser and then copy & paste the list to Excel.
- Copy the folder path from the Windows Explorer like on the screenshot or Mac Finder (for Mac: open file Info (right-click on folder and then on “Get Info”. Select and copy link from “Where” section).
- Open a browser, for example Google Chrome (should be working with most other browsers as well). Paste the previously copied link into the address field.
- Copy the table of files.
- Open Excel and paste the file list.
One comment to this methods: The links (which are also created) usually won’t work in Excel.
Recommendation: Use this if you quickly need a file list (without subfolders), including some file properties such as file size and date last saved.
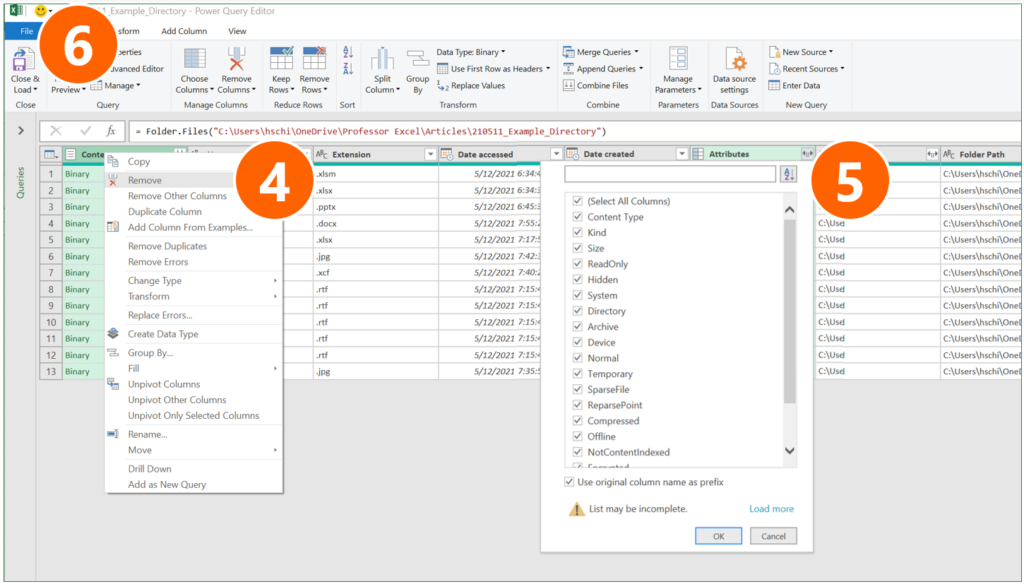
Method 4: Create a file list with PowerQuery
The next method is also among my favorites: It uses PowerQuery and comes with the advantages that it doesn’t require any complex programming or third-party technologies. Also, it can be refreshed easily later on.
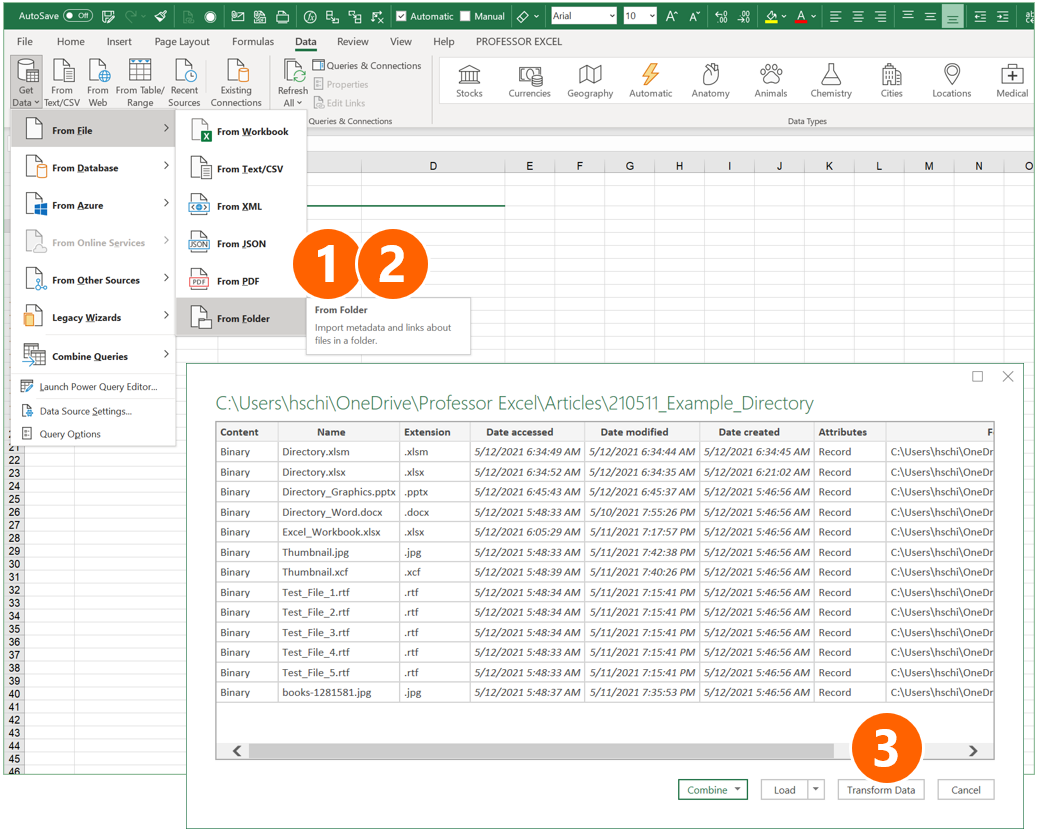
- Go to the Data ribbon, click on “Get Data” on the left, and select “From Folder” in the “From File” sub-menu.
- Select the Folder and click on “Open” (not in the screenshot on the right).
- You can now see a preview. Click on “Transform Data”.
- Remove the first column “Content” (right-click on the heading and click on “Remove”).
- If you want to see more file attributes than shown already in the preview, click on the small arrows of the “Attributes” column and select the attributes.
- Click on Close & Load.
Recommendation: Use this method if you to have lots of file properties. It can later on easily be refreshed.
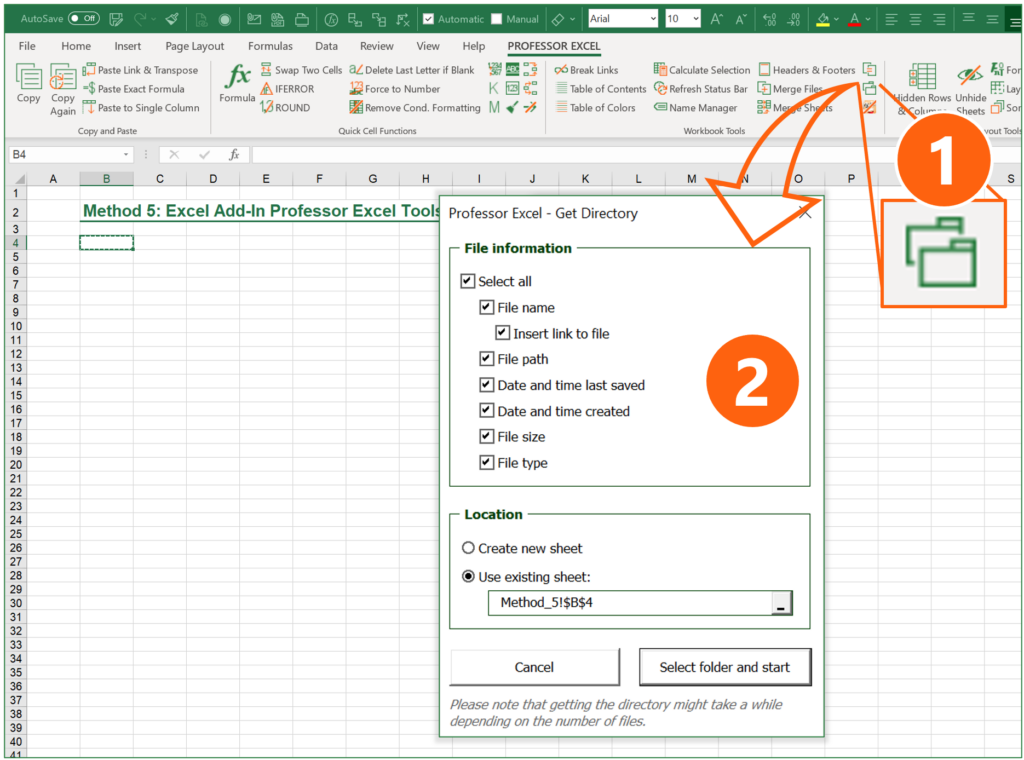
The Excel add-in Professor Excel Tools offers a function to easily insert directories. It regards subfolders and can insert various file properties:
- Links to files on the drive
- File path
- Date and time last saved
- Date and time created
- File size
- File type
You can further specify, where the directory should be created.
Using the “Get Directory” function is very simple:
- Click on the Directory button on the Professor Excel ribbon.
- Select all the file properties you’d like to show and the location, where the directory table should be placed in your Excel file.
- Click on “Select folder and start”. Then, choose the folder and proceed with ok.
That’s it. Please feel free to download Professor Excel Tools here.
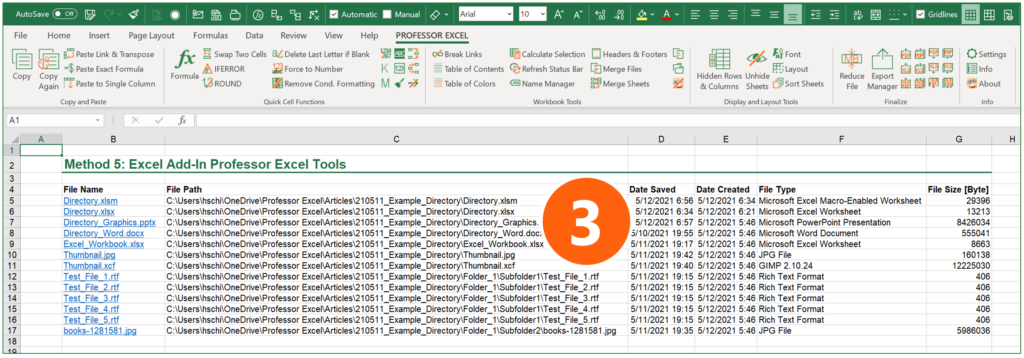
Recommendation: Use this method if you accept third-party add-ins within Excel. If you do, it’s quite convenient and fast.

This function is included in our Excel Add-In ‘Professor Excel Tools’
(No sign-up, download starts directly)
More than 35,000 users can’t be wrong.
As you can see in the following description, using PowerShell takes quite a lot of steps. It might be useful, though, if you have very large folder structures. Otherwise, try to use a different method.
Open PowerShell and write the directory into a text file
- Navigate to the folder which you want to have the file list from. Hold down the Shift key on the keyboard and right-click on it (if you don’t hold down the Shift key, the option of “Open PowerShell window here” is not available).
- Click on “Open PowerShell window here”.
- Copy and paste the following code and press enter afterwards:
Import text file into Excel
Open Microsoft Excel.
- Open the Text Import Wizard: Go to the Data ribbon, click on “Get Data” on the left, then on “Legacy Wizards” and then on “From Text (Legacy)”. If this option is not available, you can activate it within the Excel settings (check this article for more information).
- Select the file filelist.txt from your folder. In step 3 above it was created within your target folder.
Follow the import steps of the Text Import Wizard on the screen:
- In the first step of three, make sure that “Fixed width” is selected. Click on Next.
- In the lower part of the window, Excel shows a preview of your import. Check here, if the column separators are set correctly: You can move the vertical lines if necessary or add more by clicking on the respective number in the heading of the preview. Then click on Next and in the third step Next again. After that finish the Text Import Wizard by selecting the location where the file list should be placed.
- As you can see in number 8, the file list is inserted, but has some disadvantages: Directory paths are cut, each subfolder has its own block, and so on.
In a nutshell: This method of creating file lists within Microsoft Excel via PowerShell is complex and the results aren’t as good as in the other methods.
Recommendation: Try to avoid this method.
Do you want to boost your productivity in Excel?
Get the Professor Excel ribbon!

Add more than 120 great features to Excel!
Method 7: Let a VBA Macro loop through the files
The following VBA code creates a list of all files in a folder. The list will be placed on the currently active worksheet, starting from cell A1. Please make sure that you don’t override anything here.
Here is how to use the VBA-Code. If you need more help of how to use VBA macros, please refer to this article.
- Copy the VBA code from above.
- Open the VBA editor by pressing Alt + F11 on the keyboard.
- Insert a new module: Right-click on the active workbook name on the left.
- Go to “Insert” and click on “Module”.
- Paste the code by pressing Ctrl + V on the keyboard.
- Replace Your folder path with the path from your own folder.
- Click on start in the VBA editor.
Download

Please feel free to download all examples from above in this comprehensive Excel workbook. Each method is located on a different worksheet. Just click here and the download starts.
Источник
Maintaining an Excel spreadsheet of computer files can help you keep track of important business documents or images. Unfortunately, Microsoft Excel doesn’t include a one-step method for importing a file list from Windows Explorer, but Windows 7 offers an easy workaround. Using the Command Prompt, you can tell Windows to output a text document containing a directory list. This text document can then be imported into Excel and modified just like any other spreadsheet.
-
Press «Win-E» to open Windows Explorer and locate the folder for which you need a file list.
-
Hold the «Shift» key, right-click the folder and select «Open Command Window Here.» This only works with folders, not libraries. Libraries point to a specific folder, so select the folder located under the library icon. If the library points to a drive, right-click the drive letter from the folder tree.
-
Type «dir /b > dirlist.txt» without quotes and press «Enter.» This creates a list containing file names only. To include file sizes and dates, type «dir > dirlist.txt» instead. To also include files in sub-directories, type «dir /b /s > dirlist.txt» to create a list of files with the full directory structure name, such as «C:foldersubdirectoryfile.txt.»
-
Open Microsoft Excel and press «Ctrl-O» to bring up the Open dialog window.
-
Navigate into the folder containing the files. Click the file type drop-down menu and select «Text Files (.prn,.txt,*.cvs).» Double-click «dirlist.txt» to open it.
-
Click «Finish» in the Text Import Wizard window to use the default options and import the directory list into Excel.
You probably don’t need this every day: But once a file you might want to have a list of all files within a folder or directory in Excel. The good thing: There are many methods available. If you Google it, you will find a lot of different methods to create a file list in Excel. But unfortunately, all of them have advantages and disadvantages – which you usually only find out after trying them. That’s the reason for this article: You won’t only learn each method step by step: You will rather find an overview comparing all the advantages and disadvantages of each method. After seeing this, you don’t need to start extensive trials and errors. Much better: You can easily select the method that works best for you!
Summary
| Method 1: Copy & Paste on Mac |
Method 2: Named function |
Method 3: Internet browser |
Method 4: PowerQuery |
Method 5: Excel-Add-In |
Method 6: Windows PowerShell |
Method 7: VBA Macro |
|
|---|---|---|---|---|---|---|---|
| Short description | Copy and paste from the Mac Finder. | Use a function in a named range to insert a file list. | Open folder with a web browser and copy the file list. | Use PowerQuery to insert a directory. | Let an Excel add-in do the work for you. | Use the Windows built-in PowerShell feature. | Use a VBA Macro to insert a file list. |
| Ease of use | |
|
|
|
|
|
|
| Operating system | Mac | Windows | Windows / Mac | Windows / Mac | Windows | Windows | Windows |
| Include subfolders and files |
No | No | No | Yes | Yes | Yes | (Yes) (depends on the VBA macro) |
| File information available | File names | File names | File names, file links (not working properly), file size, date modified | Folder path, name extension, date accessed, date modified, date created More attributes: Content type, kind, size, ReadOnly, hidden, S |
Links to files on the drive, file path, date and time last saved, date and time created, file size, file type | File name, file path, date and time last saved, file size | Depends on the VBA macro |
| Technology | Mac Finder | Named function in Excel | Internet browser | PowerQuery | Excel Add-In | PowerShell, Text Import Wizard | VBA |
| Comment | Fast but with limited options. | Only shows files, no folders. | File links not working in our test; not working with all internet browsers (tested with Google Chrome and working). | Elegant and uses built-in functions. | Convenient, fast and many options. | Results not good, difficult process; performs well on large file structures, though. | Modifying the macro rather for advanced users. |
| Link | Click here | Click here | Click here | Click here | Click here | Click here | Click here |
Method 1: Simply copy and paste from Mac Finder to Excel
This first method works on a Mac only: Just select all files in a Finder window and press copy (Command + C on the keyboard). Next, switch to Excel and paste the list: Press Command + V on the keyboard.
The advantage of this method is that it’s very easy and fast. Unfortunately, you don’t have any further options than just pasting the file names. That means you can’t insert data of subfolders or file properties.
Recommendation: Use this if you need a quick file list on the Mac – without any further information.
Method 2: Insert a file list with built-in Excel functions using “Named Ranges”
The second method is actually quite elegant: Use built-in Excel functions to insert a file list in Excel. It is built on advanced functions, such as an Excel function within a named range. But following these steps should be quite straight-forward.
Set up the named range
- Choose a cell in which you later write the folder path. In this case, it’s cell C4.
- Click on “Defined Name” on the Formulas ribbon.
- Give a name for the cell containing the folder path (here: “Folder_Path”)
- In the “Refers to” field, type: =files(linktopathcell) (replace “linktopathcell” with your cell reference – in this case “Method_2!$C$4”).
- Confirm with OK.
Use the named range in Excel functions
- Go to the Windows Explorer and copy the folder path.
- Paste the folder link into the folder path cell (the cell you have set as the named range in step 1 above). Add one of the following endings:
- If you want to include all files – no matter which file type – in your list, add *
- For listing only Excel files, add *.xls*
- If you want to see all files ending on “.xlsx”, add *.xlsx
- As the last step, enter an INDEX function for compiling the list (here in cell B7):
=INDEX(Folder_Path,ROW(B1))
Folder_Path should be the same name that you have given in step 3 above. The ROW function should refer to any cell in the first row (for example to B1). That means, this argument could also be A1, C1, etc.
As the last step: Copy the INDEX function down until you see the first #REF error. #REF means in this case that there are no more files in your folder. If you like, you could wrap the IFERROR function around in order to mitigate the error.
Recommendation: Use this if you only need a list of files (no subfolders) that dynamically updates itself.
Method 3: Use an internet browser to quickly copy and paste a file list to Excel
I must say, I like this idea because it’s almost as fast as our method number 1 above: Open a folder in a webbrowser and then copy & paste the list to Excel.
- Copy the folder path from the Windows Explorer like on the screenshot or Mac Finder (for Mac: open file Info (right-click on folder and then on “Get Info”. Select and copy link from “Where” section).

- Open a browser, for example Google Chrome (should be working with most other browsers as well). Paste the previously copied link into the address field.
- Copy the table of files.
- Open Excel and paste the file list.
One comment to this methods: The links (which are also created) usually won’t work in Excel.
Recommendation: Use this if you quickly need a file list (without subfolders), including some file properties such as file size and date last saved.
Method 4: Create a file list with PowerQuery
The next method is also among my favorites: It uses PowerQuery and comes with the advantages that it doesn’t require any complex programming or third-party technologies. Also, it can be refreshed easily later on.
- Go to the Data ribbon, click on “Get Data” on the left, and select “From Folder” in the “From File” sub-menu.
- Select the Folder and click on “Open” (not in the screenshot on the right).
- You can now see a preview. Click on “Transform Data”.
- Remove the first column “Content” (right-click on the heading and click on “Remove”).
- If you want to see more file attributes than shown already in the preview, click on the small arrows of the “Attributes” column and select the attributes.
- Click on Close & Load.
Recommendation: Use this method if you to have lots of file properties. It can later on easily be refreshed.
The Excel add-in Professor Excel Tools offers a function to easily insert directories. It regards subfolders and can insert various file properties:
- Links to files on the drive
- File path
- Date and time last saved
- Date and time created
- File size
- File type
You can further specify, where the directory should be created.
Using the “Get Directory” function is very simple:
- Click on the Directory button on the Professor Excel ribbon.
- Select all the file properties you’d like to show and the location, where the directory table should be placed in your Excel file.
- Click on “Select folder and start”. Then, choose the folder and proceed with ok.
That’s it. Please feel free to download Professor Excel Tools here.
Recommendation: Use this method if you accept third-party add-ins within Excel. If you do, it’s quite convenient and fast.
This function is included in our Excel Add-In ‘Professor Excel Tools’
(No sign-up, download starts directly)
As you can see in the following description, using PowerShell takes quite a lot of steps. It might be useful, though, if you have very large folder structures. Otherwise, try to use a different method.
Open PowerShell and write the directory into a text file

- Navigate to the folder which you want to have the file list from. Hold down the Shift key on the keyboard and right-click on it (if you don’t hold down the Shift key, the option of “Open PowerShell window here” is not available).
- Click on “Open PowerShell window here”.
- Copy and paste the following code and press enter afterwards:
Get-ChildItem -Path $MyInvocation.MyCommand.Path -force -recurse > filelist.txtImport text file into Excel
Open Microsoft Excel.
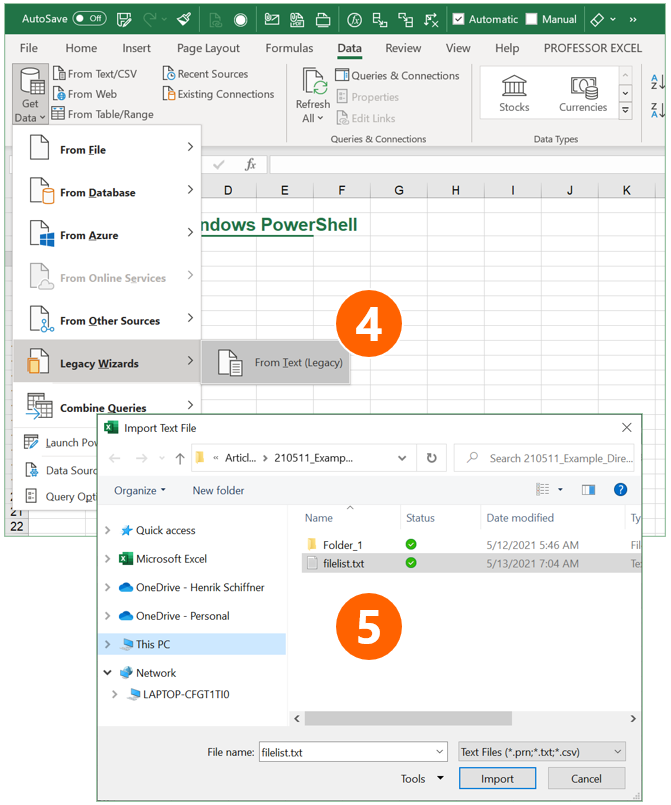
- Open the Text Import Wizard: Go to the Data ribbon, click on “Get Data” on the left, then on “Legacy Wizards” and then on “From Text (Legacy)”. If this option is not available, you can activate it within the Excel settings (check this article for more information).
- Select the file filelist.txt from your folder. In step 3 above it was created within your target folder.

Follow the import steps of the Text Import Wizard on the screen:
- In the first step of three, make sure that “Fixed width” is selected. Click on Next.
- In the lower part of the window, Excel shows a preview of your import. Check here, if the column separators are set correctly: You can move the vertical lines if necessary or add more by clicking on the respective number in the heading of the preview. Then click on Next and in the third step Next again. After that finish the Text Import Wizard by selecting the location where the file list should be placed.
- As you can see in number 8, the file list is inserted, but has some disadvantages: Directory paths are cut, each subfolder has its own block, and so on.
In a nutshell: This method of creating file lists within Microsoft Excel via PowerShell is complex and the results aren’t as good as in the other methods.
Recommendation: Try to avoid this method.
Do you want to boost your productivity in Excel?
Get the Professor Excel ribbon!
Add more than 120 great features to Excel!
Method 7: Let a VBA Macro loop through the files
The following VBA code creates a list of all files in a folder. The list will be placed on the currently active worksheet, starting from cell A1. Please make sure that you don’t override anything here.
Sub InsertFileList()

Dim objFileSystemObject As Object, objFolder As Object, objFile As Object, i As Integer

Set objFileSystemObject = CreateObject("Scripting.FileSystemObject")
Set objFolder = objFileSystemObject.GetFolder("Your folder path")

For Each objFile In objFolder.Files
    i = i + 1
    ActiveSheet.Cells(i, 1) = objFile.Name
Next

End Sub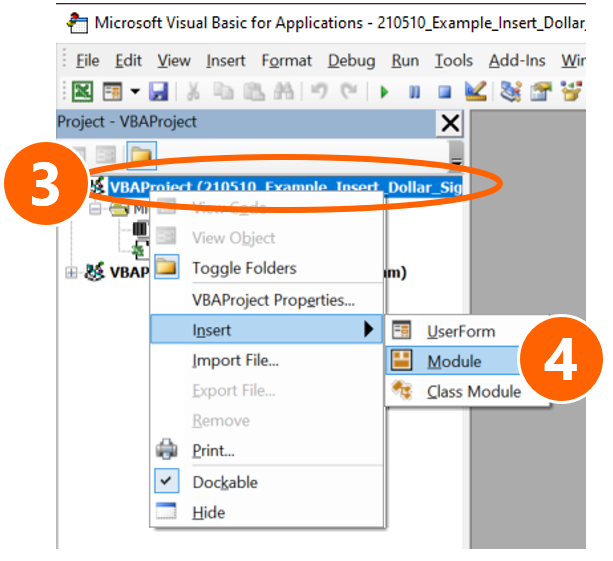
Here is how to use the VBA-Code. If you need more help of how to use VBA macros, please refer to this article.
- Copy the VBA code from above.
- Open the VBA editor by pressing Alt + F11 on the keyboard.
- Insert a new module: Right-click on the active workbook name on the left.
- Go to “Insert” and click on “Module”.
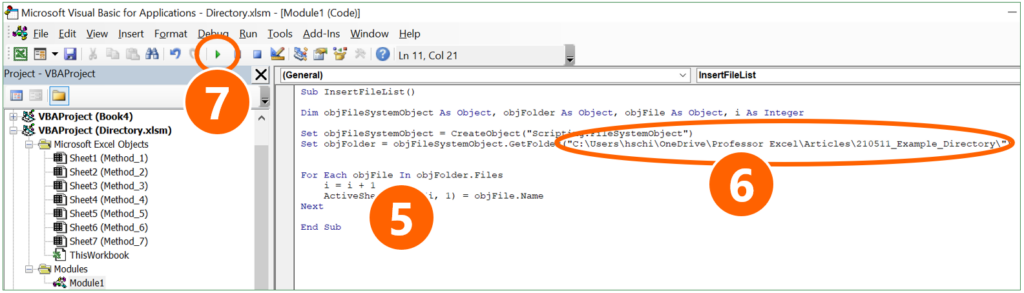
- Paste the code by pressing Ctrl + V on the keyboard.
- Replace Your folder path with the path from your own folder.
- Click on start in the VBA editor.
Download
Please feel free to download all examples from above in this comprehensive Excel workbook. Each method is located on a different worksheet. Just click here and the download starts.
Image by Pexels from Pixabay
Home > Data Recovery > 2 Methods to Copy the List of All File Names in a Folder into Your Excel Worksheet
Sometimes you will need to list all the file names in a folder in an Excel worksheet. Thus, you can better manage those files. In this article, we will introduce two effective methods to copy the list in a folder.
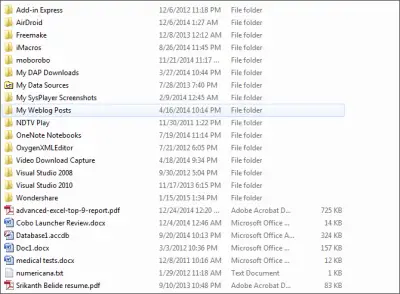
In an Excel worksheet, you can make a menu of some important files. And you need to copy the list of all the file names into one worksheet. However, when there are hundreds or thousands of files, you will find it hard to do this. In the image below, you can see several files.
Now you need to copy the list of all the file names into a worksheet in another Excel file. If you copy and paste them one by one manually, you will certainly spend a lot of time and energy. At this time, you can use the two methods below.
Method 1: Use a New Text Document
Now follow the steps below and see how this method takes effect.
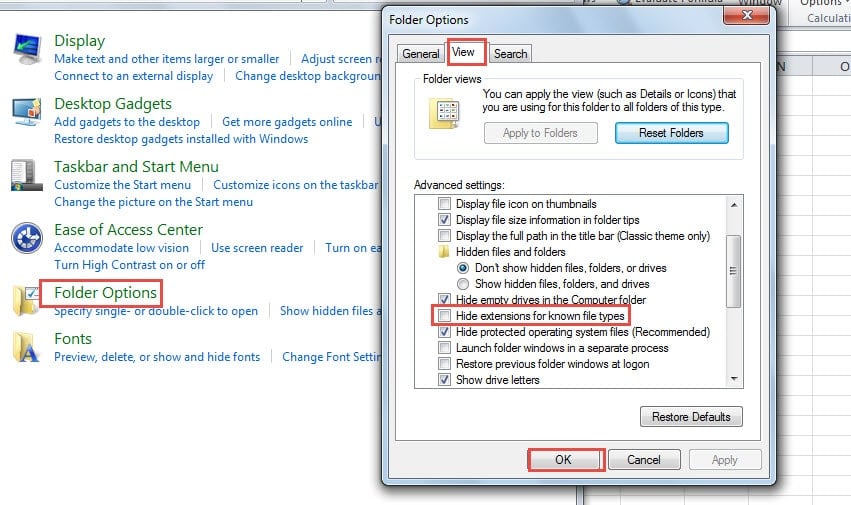
- Before you perform this process, make sure that you have shown the file extensions in your computer. Click the button “Start” in your computer.
- And then click the button “Control Panel”.

- In the control panel, click the “Appearance”.
- And then click the button “Folder Options”.
- After that, choose the option “View” in the “Folder Options” window.
- Next uncheck the option “Hide extension for known file types”.
- And then click “OK” to save the setting.

Therefore, you can see all the extensions of files in your computer.
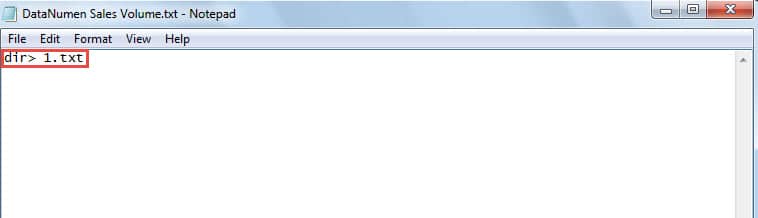
- Come back to the folder, create a new text document and give it a new name. We will name it “DataNumen Sales Volume”.
- And then open this text file.
- After that, input the following characters into this file:
dir> 1.txt
- Next save this file and close it.
- In this step, change the extension of this file from “.txt” into “.bat”.
- After that, you will see a new window pop up. Here you need to click the button “Yes” to confirm this change.

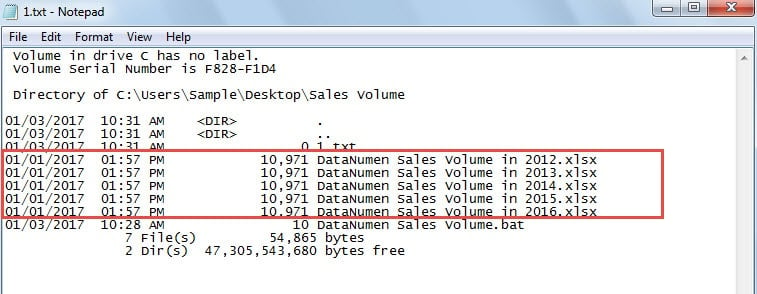
- And then double click this file again. Next you will see a new text document with the name “1” in this folder.
- Open this new text document in this folder. You will see all the name information in it.
- After that, copy the necessary part in this file.

- And then in the target worksheet, click the small arrow under the button “Paste”.
- In the drop-down list, choose the option “Use Text Import Wizard”.

- Next in the new window, choose the option “Fixed width”.
- And then click the button “Next”.

- In step 2 of the wizard, move the break line and make sure that the names of those files will be in one cell.
- And then also click “Next”.

- In step 3, click “Finish”. Thus, all the information will appear in the worksheet.

You can delete the other useless columns in the worksheet. By using this method, you don’t have to copy and paste the names one by one.
Method 2: Define Name
In this part, we will introduce another excellent method.
- Click the tab “Formulas” in the ribbon.
- And then click the button “Define Name”.
- In the “New Name” window, input a name into the first text box. We will also name it “DataNumen_Sales_Volume”.
- After that, input this formula into the “Refers to” text box:
=FILES(“C:UsersSampleDesktopSales Volume*.*”) &T(NOW())
The path of the folder is “C:UsersSampleDesktopSales Volume” in this example. You need to change it into your actual folder path.
- And then click the button “OK” in the window.
- Now input the following formula into one cell in the worksheet:
=IF(ROW(A1)>COUNTA(DataNumen_Sales_Volume),””,INDEX(DataNumen_Sales_Volume,ROW(A1)))
In this formula, you need to change the define name into yours.
- After that, click the fill handle of this cell and drag downwards. As you move your mouse, you will also find that all the names will appear in this column.

- But you may also find that those results are the results of formulas. You still need to copy and paste them as texts.
- Next delete the formulas in the worksheet.
Until now, you have gone through all the steps. This method is also very effective for this requirement.
A Comparison of the Two Methods
You can see that both of the two methods are very useful. Here we will compare the two methods in this part.
|
Comparison |
Use a New Text Document |
Define Name |
|
Advantages |
If you are not familiar with Name and the complex formula in cells, you can use this first method. | There are fewer steps in this method. You can finish your tasks quickly by using it. |
|
Disadvantages |
Compared with the second methods, there are more steps in this method. You still need to spend a lot of time. | The formulas in cells will produce the results that you need. Therefore, you still need to copy and paste them as values. |
When you need to input all file names into a worksheet, you will know which method is the most suitable one.
Take Actions Quickly in a Data Disaster
It is unavoidable that you will meet with data disaster. In such an accident, your Excel files will most possibly be damaged. Therefore, you need to take actions quickly. In order to repair corrupt xls data quickly and safely, you can use out excellent Excel repair tool. This tool is able to fix most of the Excel problems.
Author Introduction:
Anna Ma is a data recovery expert in DataNumen, Inc., which is the world leader in data recovery technologies, including repair Word doc data error and outlook repair software products. For more information visit www.datanumen.com
Download PC Repair Tool to quickly find & fix Windows errors automatically
In this post, we will see how to get a list of files in a folder into Excel. We will show you how to use Excel to view Files and Folder details in Windows, by importing all files and folders details into Microsoft Excel to keep track of file size, file type, and last modified date.
We have many files and folders in our Windows PC and we may delete or add more files and folders frequently. There could be some folders and files which are very important to us and someone might edit them without our notice. But, we cannot keep on looking at each and every folder and file to know which one was edited. If it was a modification of a file or folder, we can sort them by using ‘Last modified’ and we can get to know which were modified recently.
But, what if some of the files and folders were deleted from that directory? We would not be in a position to keep track of what was exactly deleted. But, you can use Excel to view files and folder details of directory which would be helpful to you to know at least the list of files and folders that were deleted.

Import and get a list of filenames into an Excel sheet
If you use Microsoft Excel to import all details of files and folders into Excel, it will help you keep track of last modified date and time, file types, list of files, files size and many more regularly. To do this, follow these simple steps.
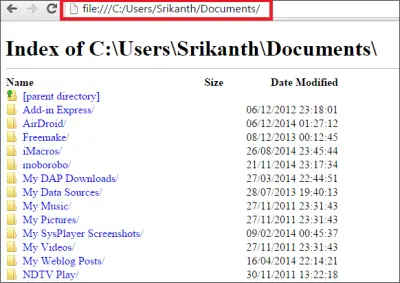
Move to the directory or folder on Windows File Explorer which you want to keep track of. Here, I want to keep track of my files and folders of Documents folder. Copy the path of that directory.

Now, open any web browser of your choice and paste the copied path (Path of the folder you just copied in the previous step) in the address bar of the browser. I used Google Chrome here. Just prefix the URL by file:///and the content will be shown as the web page.
To save this web page as the offline copy, press CTRL+S or right-click on the web page and select “Save Page As”. Select the destination, give it a name, and save the webpage.
Now, via Windows Explorer go the location you saved the offline webpage and copy the path. The, open the Excel sheet and tap on the Data tab and click on From Web. It opens up the Window and in the Address bar paste the copied path and click the “Go” button. It will load all the contents of the webpage.
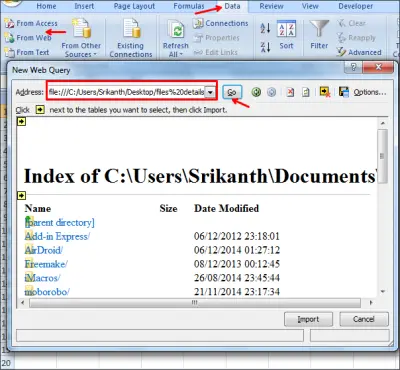
It shows you the yellow boxes with arrows and it will allows you to select the required frame. You can find here that I selected the part I want.
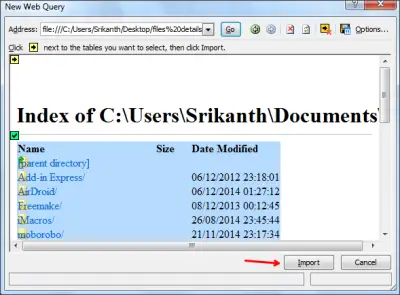
Once done with these steps, now click on Import button and you see that all the files and folders details are imported to your Excel sheet in no time. You can see that the data is shown in the columns and gives us a clear idea of every detail.
Conclusion
As we are engaged most of the time, in organizing files and folders, it is advisable to import files and folders details into Excel. This would be helpful if any of your file or folder was to get deleted. The data in the Excel sheet does not refresh, so we need to import the data regularly.
You can use this method when to not only keep track of file changes but also filenames.

Sridhar is a Software Engineer who loves to stay updated with developments in the world of technology. He is fond of writing everything related to Internet, Computers and Mobile and Desktop Operating Systems.