
You probably don’t need this every day: But once a file you might want to have a list of all files within a folder or directory in Excel. The good thing: There are many methods available. If you Google it, you will find a lot of different methods to create a file list in Excel. But unfortunately, all of them have advantages and disadvantages – which you usually only find out after trying them. That’s the reason for this article: You won’t only learn each method step by step: You will rather find an overview comparing all the advantages and disadvantages of each method. After seeing this, you don’t need to start extensive trials and errors. Much better: You can easily select the method that works best for you!
Summary
| Method 1: Copy & Paste on Mac |
Method 2: Named function |
Method 3: Internet browser |
Method 4: PowerQuery |
Method 5: Excel-Add-In |
Method 6: Windows PowerShell |
Method 7: VBA Macro |
|
|---|---|---|---|---|---|---|---|
| Short description | Copy and paste from the Mac Finder. | Use a function in a named range to insert a file list. | Open folder with a web browser and copy the file list. | Use PowerQuery to insert a directory. | Let an Excel add-in do the work for you. | Use the Windows built-in PowerShell feature. | Use a VBA Macro to insert a file list. |
| Ease of use |  |
|
|
|
|
|
|
| Operating system | Mac | Windows | Windows / Mac | Windows / Mac | Windows | Windows | Windows |
| Include subfolders and files |
No | No | No | Yes | Yes | Yes | (Yes) (depends on the VBA macro) |
| File information available | File names | File names | File names, file links (not working properly), file size, date modified | Folder path, name extension, date accessed, date modified, date created More attributes: Content type, kind, size, ReadOnly, hidden, S |
Links to files on the drive, file path, date and time last saved, date and time created, file size, file type | File name, file path, date and time last saved, file size | Depends on the VBA macro |
| Technology | Mac Finder | Named function in Excel | Internet browser | PowerQuery | Excel Add-In | PowerShell, Text Import Wizard | VBA |
| Comment | Fast but with limited options. | Only shows files, no folders. | File links not working in our test; not working with all internet browsers (tested with Google Chrome and working). | Elegant and uses built-in functions. | Convenient, fast and many options. | Results not good, difficult process; performs well on large file structures, though. | Modifying the macro rather for advanced users. |
| Link | Click here | Click here | Click here | Click here | Click here | Click here | Click here |
Method 1: Simply copy and paste from Mac Finder to Excel
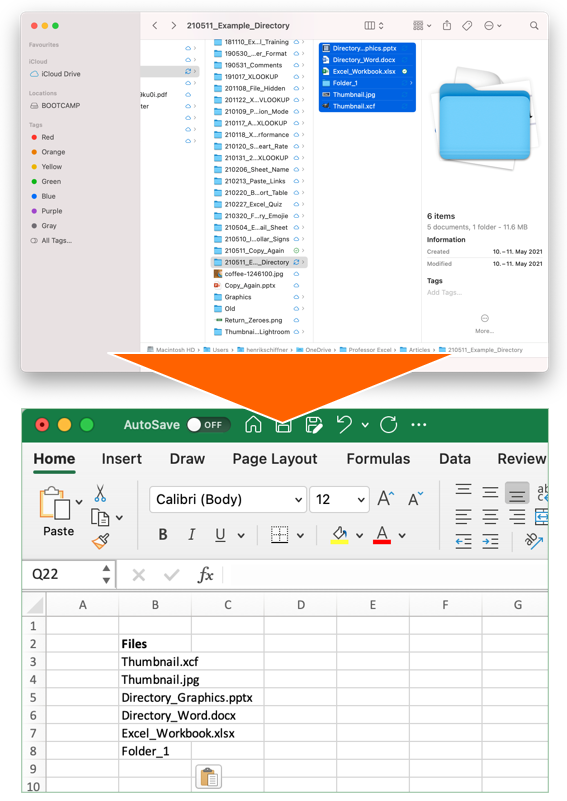
This first method works on a Mac only: Just select all files in a Finder window and press copy (Command + C on the keyboard). Next, switch to Excel and paste the list: Press Command + V on the keyboard.
The advantage of this method is that it’s very easy and fast. Unfortunately, you don’t have any further options than just pasting the file names. That means you can’t insert data of subfolders or file properties.
Recommendation: Use this if you need a quick file list on the Mac – without any further information.
Method 2: Insert a file list with built-in Excel functions using “Named Ranges”
The second method is actually quite elegant: Use built-in Excel functions to insert a file list in Excel. It is built on advanced functions, such as an Excel function within a named range. But following these steps should be quite straight-forward.
Set up the named range
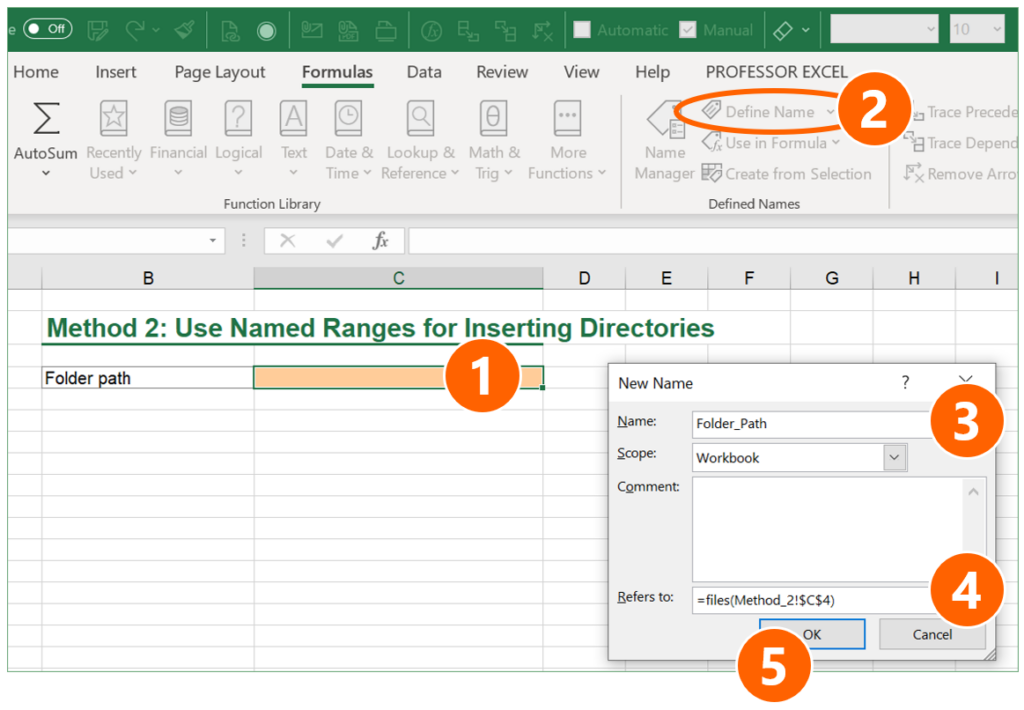
- Choose a cell in which you later write the folder path. In this case, it’s cell C4.
- Click on “Defined Name” on the Formulas ribbon.
- Give a name for the cell containing the folder path (here: “Folder_Path”)
- In the “Refers to” field, type: =files(linktopathcell) (replace “linktopathcell” with your cell reference – in this case “Method_2!$C$4”).
- Confirm with OK.
Use the named range in Excel functions
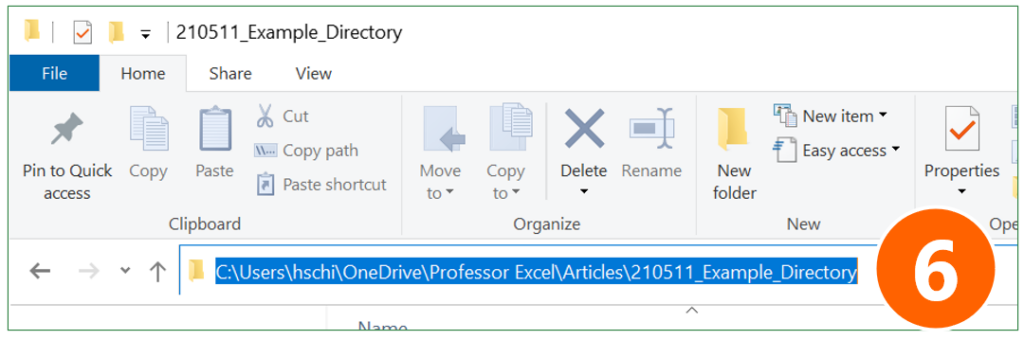
- Go to the Windows Explorer and copy the folder path.
- Paste the folder link into the folder path cell (the cell you have set as the named range in step 1 above). Add one of the following endings:
- If you want to include all files – no matter which file type – in your list, add *
- For listing only Excel files, add *.xls*
- If you want to see all files ending on “.xlsx”, add *.xlsx
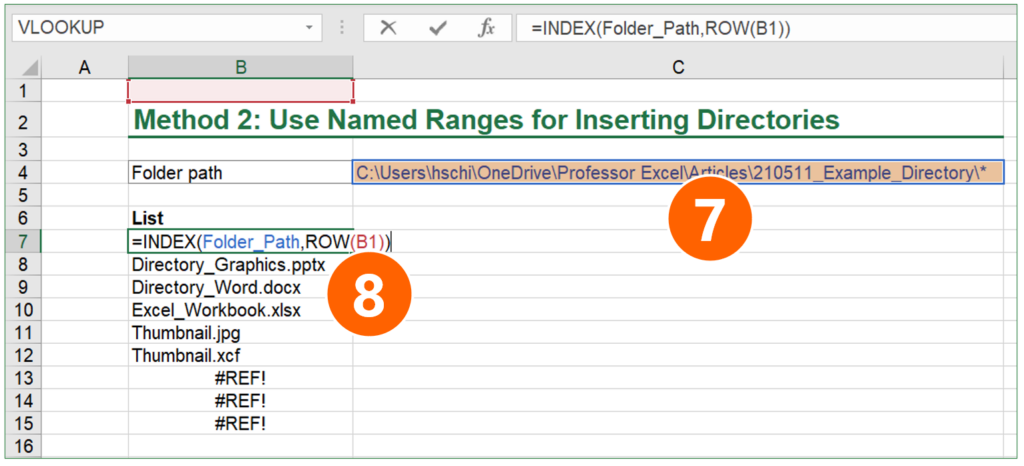
- As the last step, enter an INDEX function for compiling the list (here in cell B7):
=INDEX(Folder_Path,ROW(B1))
Folder_Path should be the same name that you have given in step 3 above. The ROW function should refer to any cell in the first row (for example to B1). That means, this argument could also be A1, C1, etc.
As the last step: Copy the INDEX function down until you see the first #REF error. #REF means in this case that there are no more files in your folder. If you like, you could wrap the IFERROR function around in order to mitigate the error.
Recommendation: Use this if you only need a list of files (no subfolders) that dynamically updates itself.
Method 3: Use an internet browser to quickly copy and paste a file list to Excel
I must say, I like this idea because it’s almost as fast as our method number 1 above: Open a folder in a webbrowser and then copy & paste the list to Excel.
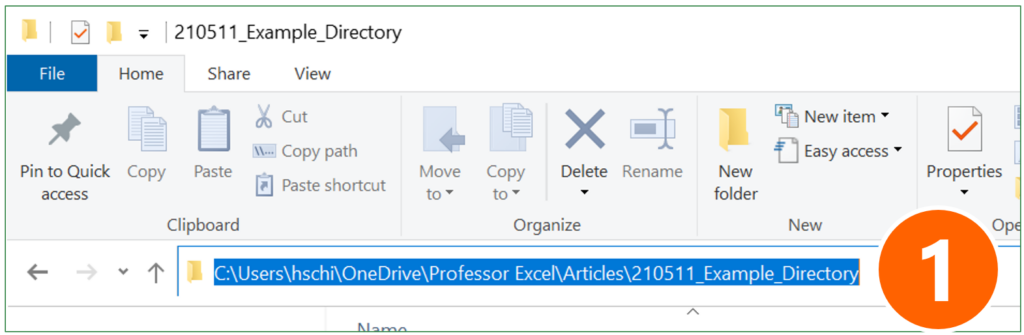
- Copy the folder path from the Windows Explorer like on the screenshot or Mac Finder (for Mac: open file Info (right-click on folder and then on “Get Info”. Select and copy link from “Where” section).

- Open a browser, for example Google Chrome (should be working with most other browsers as well). Paste the previously copied link into the address field.
- Copy the table of files.
- Open Excel and paste the file list.
One comment to this methods: The links (which are also created) usually won’t work in Excel.
Recommendation: Use this if you quickly need a file list (without subfolders), including some file properties such as file size and date last saved.
Method 4: Create a file list with PowerQuery
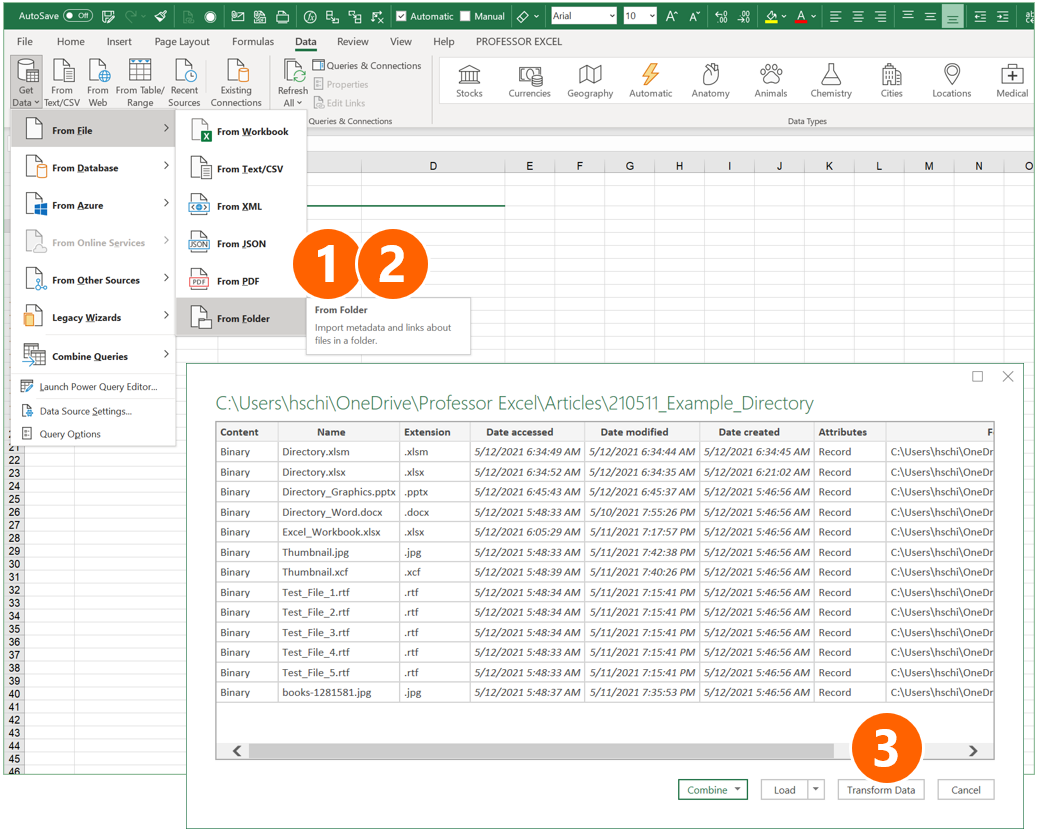
The next method is also among my favorites: It uses PowerQuery and comes with the advantages that it doesn’t require any complex programming or third-party technologies. Also, it can be refreshed easily later on.
- Go to the Data ribbon, click on “Get Data” on the left, and select “From Folder” in the “From File” sub-menu.
- Select the Folder and click on “Open” (not in the screenshot on the right).
- You can now see a preview. Click on “Transform Data”.
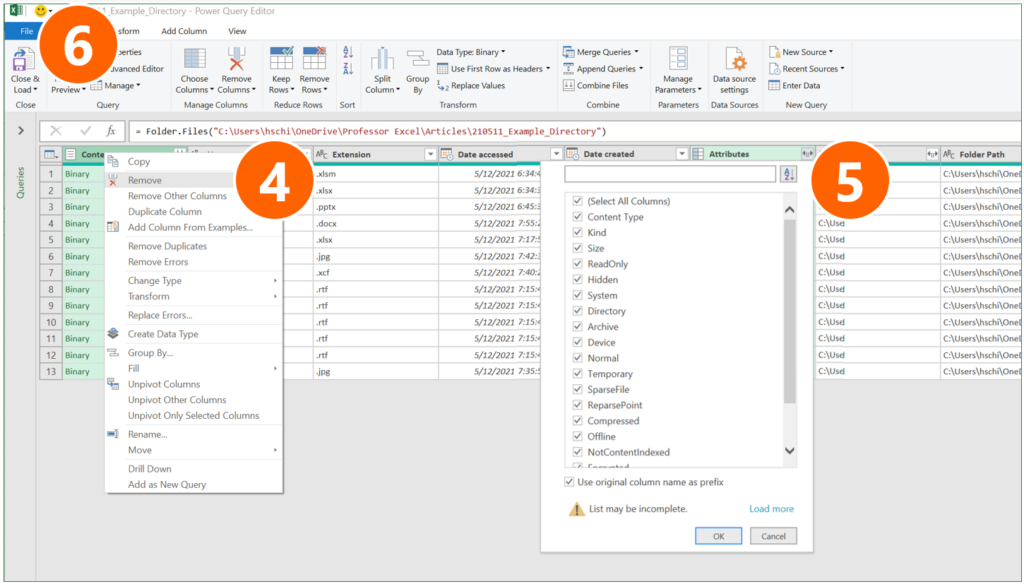
- Remove the first column “Content” (right-click on the heading and click on “Remove”).
- If you want to see more file attributes than shown already in the preview, click on the small arrows of the “Attributes” column and select the attributes.
- Click on Close & Load.
Recommendation: Use this method if you to have lots of file properties. It can later on easily be refreshed.
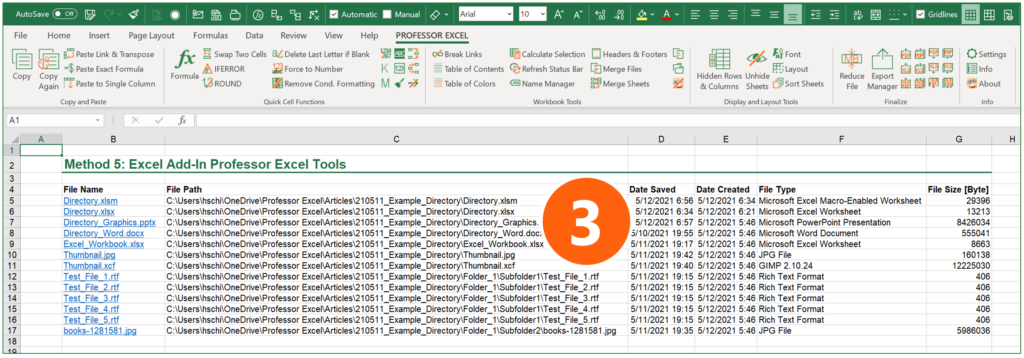
The Excel add-in Professor Excel Tools offers a function to easily insert directories. It regards subfolders and can insert various file properties:
- Links to files on the drive
- File path
- Date and time last saved
- Date and time created
- File size
- File type
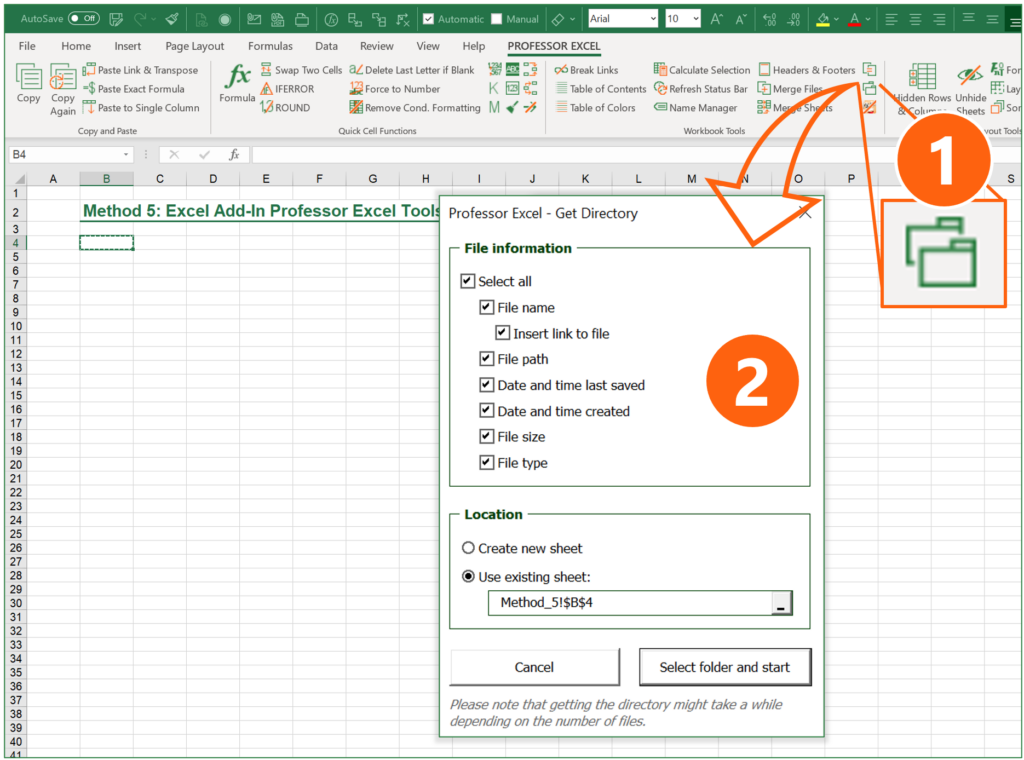
You can further specify, where the directory should be created.
Using the “Get Directory” function is very simple:
- Click on the Directory button on the Professor Excel ribbon.
- Select all the file properties you’d like to show and the location, where the directory table should be placed in your Excel file.
- Click on “Select folder and start”. Then, choose the folder and proceed with ok.
That’s it. Please feel free to download Professor Excel Tools here.
Recommendation: Use this method if you accept third-party add-ins within Excel. If you do, it’s quite convenient and fast.

This function is included in our Excel Add-In ‘Professor Excel Tools’
(No sign-up, download starts directly)
As you can see in the following description, using PowerShell takes quite a lot of steps. It might be useful, though, if you have very large folder structures. Otherwise, try to use a different method.
Open PowerShell and write the directory into a text file

- Navigate to the folder which you want to have the file list from. Hold down the Shift key on the keyboard and right-click on it (if you don’t hold down the Shift key, the option of “Open PowerShell window here” is not available).
- Click on “Open PowerShell window here”.
- Copy and paste the following code and press enter afterwards:
Get-ChildItem -Path $MyInvocation.MyCommand.Path -force -recurse > filelist.txtImport text file into Excel
Open Microsoft Excel.
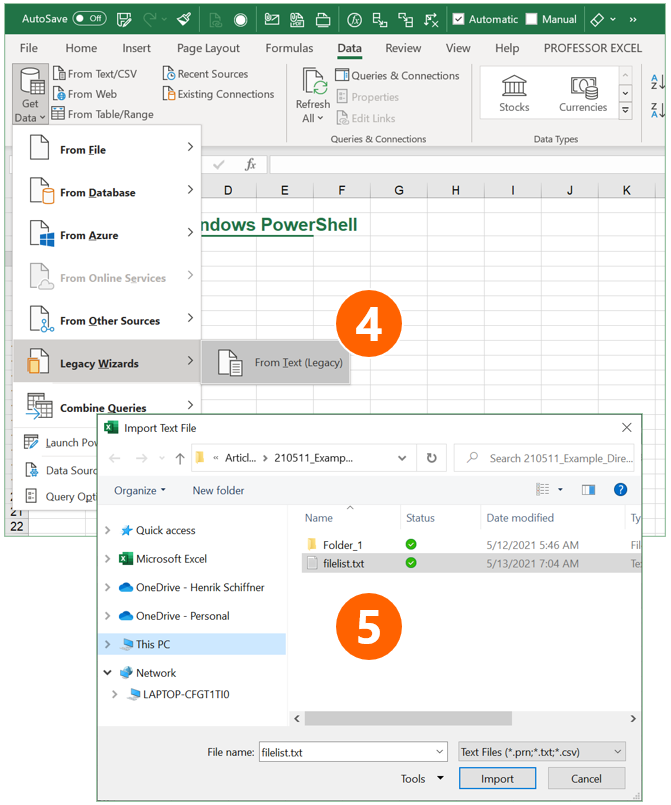
- Open the Text Import Wizard: Go to the Data ribbon, click on “Get Data” on the left, then on “Legacy Wizards” and then on “From Text (Legacy)”. If this option is not available, you can activate it within the Excel settings (check this article for more information).
- Select the file filelist.txt from your folder. In step 3 above it was created within your target folder.

Follow the import steps of the Text Import Wizard on the screen:
- In the first step of three, make sure that “Fixed width” is selected. Click on Next.
- In the lower part of the window, Excel shows a preview of your import. Check here, if the column separators are set correctly: You can move the vertical lines if necessary or add more by clicking on the respective number in the heading of the preview. Then click on Next and in the third step Next again. After that finish the Text Import Wizard by selecting the location where the file list should be placed.
- As you can see in number 8, the file list is inserted, but has some disadvantages: Directory paths are cut, each subfolder has its own block, and so on.
In a nutshell: This method of creating file lists within Microsoft Excel via PowerShell is complex and the results aren’t as good as in the other methods.
Recommendation: Try to avoid this method.
Do you want to boost your productivity in Excel?
Get the Professor Excel ribbon!

Add more than 120 great features to Excel!
Method 7: Let a VBA Macro loop through the files
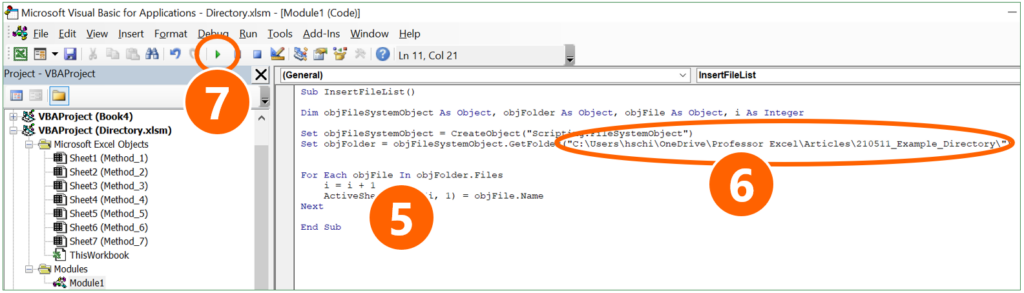
The following VBA code creates a list of all files in a folder. The list will be placed on the currently active worksheet, starting from cell A1. Please make sure that you don’t override anything here.
Sub InsertFileList()

Dim objFileSystemObject As Object, objFolder As Object, objFile As Object, i As Integer

Set objFileSystemObject = CreateObject("Scripting.FileSystemObject")
Set objFolder = objFileSystemObject.GetFolder("Your folder path")

For Each objFile In objFolder.Files
    i = i + 1
    ActiveSheet.Cells(i, 1) = objFile.Name
Next

End Sub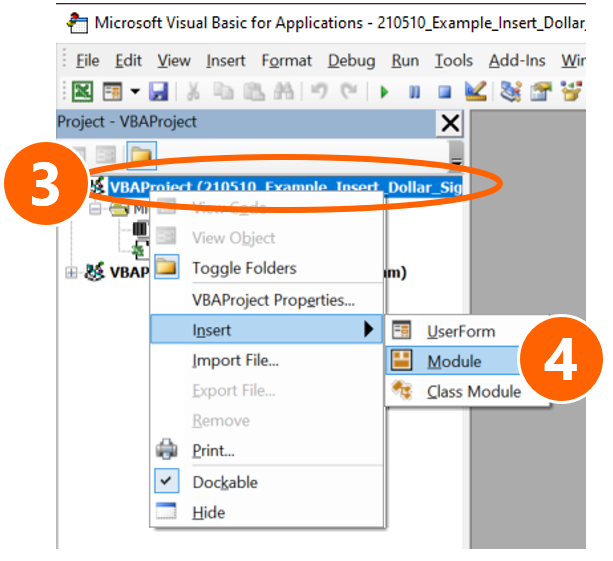
Here is how to use the VBA-Code. If you need more help of how to use VBA macros, please refer to this article.
- Copy the VBA code from above.
- Open the VBA editor by pressing Alt + F11 on the keyboard.
- Insert a new module: Right-click on the active workbook name on the left.
- Go to “Insert” and click on “Module”.
- Paste the code by pressing Ctrl + V on the keyboard.
- Replace Your folder path with the path from your own folder.
- Click on start in the VBA editor.
Download
Please feel free to download all examples from above in this comprehensive Excel workbook. Each method is located on a different worksheet. Just click here and the download starts.
Image by Pexels from Pixabay
See all How-To Articles
In this article, you will learn how to change the default directory in Excel.
Change the Default Directory
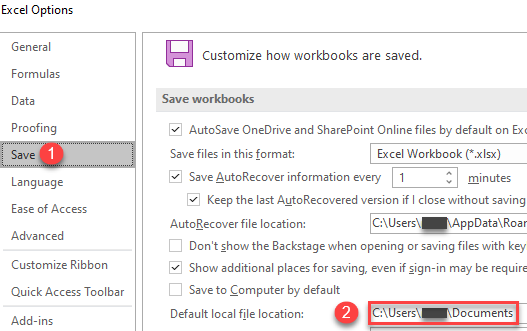
Excel, by default, saves all files in the folder: C:Users*username*Documents. To change this, in the Ribbon, go to File > Options.

- In the Excel Options screen, choose Save.
- Then change the Default local file location (under Save Workbooks) to the desired directory.
Now, Excel files will, by default, be saved in the new folder that you specified in Excel Options.
-
— By
Sumit Bansal
On my first day in my job in a small consulting firm, I was staffed on a short project for three days.
The work was simple.
There were many folders on the network drive and each folder had hundreds of files in it.
I had to follow these three steps:
- Select the file and copy its name.
- Paste that name in a cell in Excel and hit Enter.
- Move to the next file and repeat step 1 & 2.
Sounds simple right?
It was – Simple and a huge waste of time.
What took me three days could have been done in a few minutes if I knew the right techniques.
In this tutorial, I will show you different ways to make this entire process super fast and super easy (with and without VBA).
Limitations of the methods shown in this tutorial: With the techniques shown below, you will only be able to get the names of the files within the main folder. You will not get the names of the files in the sub-folders within the main folder. Here is a way to get names of files from folders and sub-folders using Power Query
Using FILES Function to Get a List of File Names from a Folder
Heard of FILES function before?
Don’t worry if you haven’t.
It is from the childhood days of Excel spreadsheets (a version 4 formula).
While this formula does not work in the worksheet cells, it still works in named ranges. We will use this fact to get the list of file names from a specified folder.
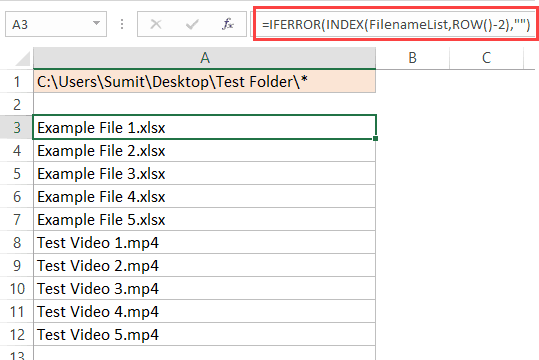
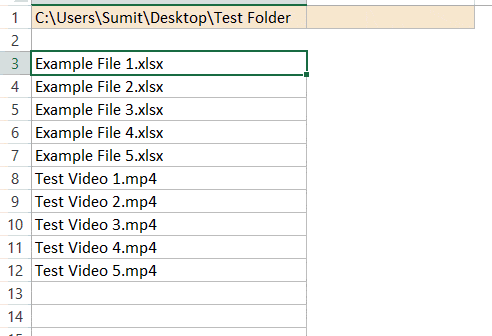
Now, suppose you have a folder with the name – ‘Test Folder‘ on the desktop, and you want to get a list of file names for all the files in this folder.
Here are the steps that will give you the file names from this folder:
- In cell A1, enter the folder complete address followed by an asterisk sign (*)
- For example, if your folder in the C drive, then the address would look like
C:UsersSumitDesktopTest Folder*
- If you are not sure how to get the folder address, use the following method:
-
- In the folder from which you want to get the file names, either create a new Excel Workbook or open an existing workbook in the folder and use the below formula in any cell. This formula will give you the folder address and adds an asterisks sign (*) at the end. Now you can copy-paste (paste as value) this address in any cell (A1 in this example) in the workbook in which you want the file names.
=REPLACE(CELL("filename"),FIND("[",CELL("filename")),LEN(CELL("filename")),"*")[If you have created a new workbook in the folder to use the above formula and get the folder address, you may want to delete it so that it doesn’t feature in the list of files in that folder]
- In the folder from which you want to get the file names, either create a new Excel Workbook or open an existing workbook in the folder and use the below formula in any cell. This formula will give you the folder address and adds an asterisks sign (*) at the end. Now you can copy-paste (paste as value) this address in any cell (A1 in this example) in the workbook in which you want the file names.
-
- For example, if your folder in the C drive, then the address would look like
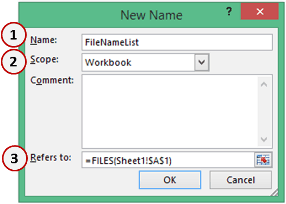
- Go to the ‘Formulas’ tab and click on the ‘Define Name’ option.

- In the New Name dialogue box, use the following details
- Name: FileNameList (feel free to choose whatever name you like)
- Scope: Workbook
- Refers to: =FILES(Sheet1!$A$1)

- Now to get the list of files, we will use the named range within an INDEX function. Go to cell A3 (or any cell where you want the list of names to start) and enter the following formula:
=IFERROR(INDEX(FileNameList,ROW()-2),"") - Drag this down and it will give you a list of all the file names in the folder


Want to Extract Files with a Specific Extension??
If you want to get all the files with a particular extension, just change the asterisk with that file extension. For example, if you want only excel files, you can use *xls* instead of *
So the folder address that you need to use would be C:UsersSumitDesktopTest Folder*xls*
Similarly, for word document files, use *doc*
How does this work?
FILES formula retrieves the names of all the files of the specified extension in the specified folder.
In the INDEX formula, we have given the file names as the array and we return the 1st, 2nd, 3rd file names and so on using the ROW function.
Note that I have used ROW()-2, as we started from the third row onwards. So ROW()-2 would be 1 for the first instance, 2 for the second instance when the row number is 4, and so on and so forth.
Watch Video – Get List of File Names from a Folder in Excel
Using VBA Get a List of All the File Names from a Folder
Now, I must say that the above method is a bit complex (with a number of steps).
It’s, however, a lot better than doing this manually.
But if you’re comfortable with using VBA (or if you’re good at following exact steps that I am going to list below), you can create a custom function (UDF) that can easily get you the names of all the files.
The benefit of using a User Defined Function (UDF) is that you can save the function in a personal macro workbook and reuse it easily without repeating the steps again and again. You can also create an add-in and share this function with others.
Now let me first give you the VBA code that will create a function to get the list of all the file names from a folder in Excel.
Function GetFileNames(ByVal FolderPath As String) As Variant
Dim Result As Variant
Dim i As Integer
Dim MyFile As Object
Dim MyFSO As Object
Dim MyFolder As Object
Dim MyFiles As Object
Set MyFSO = CreateObject("Scripting.FileSystemObject")
Set MyFolder = MyFSO.GetFolder(FolderPath)
Set MyFiles = MyFolder.Files
ReDim Result(1 To MyFiles.Count)
i = 1
For Each MyFile In MyFiles
Result(i) = MyFile.Name
i = i + 1
Next MyFile
GetFileNames = Result
End Function
The above code will create a function GetFileNames that can be used in the worksheets (just like regular functions).
Where to put this code?
Follow the steps below to copy this code in the VB Editor.
How to Use this Function?
Below are the steps to use this function in a worksheet:
- In any cell, enter the folder address of the folder from which you want to list the file names.
- In the cell where you want the list, enter the following formula (I am entering it in cell A3):
=IFERROR(INDEX(GetFileNames($A$1),ROW()-2),"") - Copy and paste the formula in the cells below to get a list of all the files.
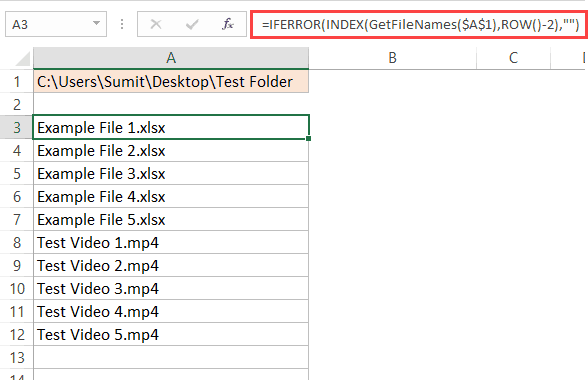
Note that I entered the folder location in a cell and then used that cell in the GetFileNames formula. You can also hard code the folder address in the formula as shown below:
=IFERROR(INDEX(GetFileNames("C:UsersSumitDesktopTest Folder"),ROW()-2),"")
In the above formula, we have used ROW()-2 and we started from the third row onwards. This made sure that as I copy the formula in the cells below, it will get incremented by 1. In case you’re entering the formula in the first row of a column, you can simply use ROW().
How does this formula work?
The GetFileNames formula returns an array that holds the names of all the files in the folder.
The INDEX function is used to list one file name per cell, starting from the first one.
IFERROR function is used to return blank instead of the #REF! error which is shown when a formula is copied in a cell but there are no more file names to list.
Using VBA Get a List of All the File Names with a Specific Extension
The above formula works great when you want to get a list of all the file names from a folder in Excel.
But what if you want to get the names of only the video files, or only the Excel files, or only the file names that contain a specific keyword.
In that case, you can use a slightly different function.
Below is the code that will allow you get all the file names with a specific keyword in it (or of a specific extension).
Function GetFileNamesbyExt(ByVal FolderPath As String, FileExt As String) As Variant
Dim Result As Variant
Dim i As Integer
Dim MyFile As Object
Dim MyFSO As Object
Dim MyFolder As Object
Dim MyFiles As Object
Set MyFSO = CreateObject("Scripting.FileSystemObject")
Set MyFolder = MyFSO.GetFolder(FolderPath)
Set MyFiles = MyFolder.Files
ReDim Result(1 To MyFiles.Count)
i = 1
For Each MyFile In MyFiles
If InStr(1, MyFile.Name, FileExt) <> 0 Then
Result(i) = MyFile.Name
i = i + 1
End If
Next MyFile
ReDim Preserve Result(1 To i - 1)
GetFileNamesbyExt = Result
End Function
The above code will create a function ‘GetFileNamesbyExt‘ that can be used in the worksheets (just like regular functions).
This function takes two arguments – the folder location and the extension keyword. It returns an array of file names that match the given extension. If no extension or keyword is specified, it will return all the file names in the specified folder.
Syntax: =GetFileNamesbyExt(“Folder Location”,”Extension”)
Where to put this code?
Follow the steps below to copy this code in the VB Editor.
- Go to the Developer tab.
- Click on the Visual Basic button. This will open the VB Editor.
- In the VB Editor, right-click on any of the objects of the workbook you’re working in, go to Insert and click on Module. If you don’t see the Project Explorer, use the keyboard shortcut Control + R (hold the control key and press the ‘R’ key).
- Double click on the Module object and copy and paste the above code into the module code window.
How to Use this Function?
Below are the steps to use this function in a worksheet:
- In any cell, enter the folder address of the folder from which you want to list the file names. I have entered this in cell A1.
- In a cell, enter the extension (or the keyword), for which you want all the file names. I have entered this in cell B1.
- In the cell where you want the list, enter the following formula (I am entering it in cell A3):
=IFERROR(INDEX(GetFileNamesbyExt($A$1,$B$1),ROW()-2),"")
- Copy and paste the formula in the cells below to get a list of all the files.
How about you? Any Excel tricks that you use to make life easy. I would love to learn from you. Share it in the comment section!
You May Also Like the Following Excel Tutorials:
- Filter cells with bold font format.
- How to Combine Multiple Excel Files into One Excel Workbook.
- Creating a Drop Down Filter to Extract Data Based on Selection.
- Using VBA FileSystemObject (FSO) in Excel.

Get 51 Excel Tips Ebook to skyrocket your productivity and get work done faster
121 thoughts on “Get the List of File Names from a Folder in Excel (with and without VBA)”
-
Awesome, Thanks. really helpful….Though i guess this works only for local drive folders. Is there a way to get the sever location work? As, if there are huge amounts of data it’s not wise to copy paste on my local drive and then do this. There should be a way to get the files names from the severs connected. Could you please help me out with that?
-
Fantastic, thanks many tonnes.
-
1. select file in folder
2. hold shit and right click
3. select “copy as path”
4. paste in excel
5. Use find/replace to find “folder path” and replace with ” “ -
Amazing solutions both with/without VBA.
It works in my PC but I would like to know why is doesn’t work if the folder is in Onedrive?
I´m using in cell A1 =REPLACE(CELL(“filename”),FIND(“[“,CELL(“filename”)),LEN(CELL(“filename”)),”MyFolder/”)
to obtain the folderpath that is in One drive and in B1=INDEX(GetFileNames(A1,1),””) -
This is awesome!! Thanks
-
Super bro! worked out correctly for me (using the Excel formula). Many thanks for sharing your knowledge.
-
Very well. I like the code of vba. But i think you have some issue with ReDim Result(1 To MyFiles.Count) and with the ReDim Preserve Result(1 To i – 1). Because i run the code and 1 of files i can’t see.
I think the best to change
ReDim Result(0 To MyFiles.Count)
ReDim Preserve Result(0 To i – 1).
And after this all works.
Thanks for great job. -
i have more sub folder in one folder in need formula to get all folder name in excl
-
Awesome!!! Thanks a lot, man! Got it done, what I needed to, following your video. Kudos to you!
-
Is there a way to select file names based on their created date or last modified date? For example, I want files created in the last 24 hrs, 36 hrs, and 5 days?
-
Hi, this is great, but I need a list of the file names without their extension.. how to do this in one step?
-
You can use below formula
=IFERROR(LEFT(INDEX(FileNameList,ROW()-2),FIND(“.”,INDEX(FileNameList,ROW()-2))-1),””)
-
-
is that any way to update excel list when one of the file in the folder delete ?
-
if one of the file in the folder delete this program can not update that and old file name remain in the list
-
I find it faster to stick the folder path into a browser and then copy and paste into excel.
But yes, even better when excel is set up to extract the data with a click of the button. -
Great!
Why doesn’t it work? -
Hi, what i like to know is….
i have a cell A1 in sheet1, and i like to output the highest file number of a folder in that cell.
So when the folder name = userinvoice and the file name in pdf and xlsm is for example 20190001.pdf range 20190199 and 20190001.xlsm to 20190199 i like to display the value of the highest number in that folder to cell A1 in sheet1. In this example it would be 20190199.pdf and 20190199.xlsmThank you very much for you effort.
-
Thanks very much. Saved me hours of manual entry!
-
hi
thankyou for the post
I need a macro which can automate the work of renaming the pdf with amount within the pdf, instead of depending on a software
-
I want to see Respective File Name with Save Time & Date…
Please help for the Macro Code for the same. -
Thank you for this wonderful post !!!
-
I see the method for only listing specific extensions but is there a way to exclude extensions?
-
Thanks a lot for your tip. it’s helped me a lot.. 🙂 ..
-
Thanks for the tip – worked like a charm!
-
I need to get at the place to make a file name and go where I took pictures at yesterday
-
Nice work
it made our work very easy with our macro
-
oh
-
-
Amazing ! i’m mind blown here,
I knew of to do it with marco but with a simple formula! wonderful! -
DEVE
-
hoping someone could help, hoping I could automate my excel list using VBA or other procedure,
For A, the idea is I have a PDF file, let say rev. 1,2,3,4 etc, and I will put it in one folder, what I need is I need to capture the latest revision with hyperlink using formula.
For B, the idea is almost same as above except for one revision, let say rev. 01 and I will put it in one folder (same folder as formula A), what I need is I need to capture the exact revision with hyperlink using formula.
I get this this formula but i don’t know how it will work- thanks in advance.
A) Formula for latest “rev number” column
=IF(Bfile(“Z:3 M+ MWC3.1 M+_RSSM+ (CC_2015_3A_022)3_DrawingsUSBM+ WS4_Drawings”&MIDB($A50,11,3)&”PDF”&MIDB($A50,1,35)&”-“&LOOKUP(1,0/($K50:$DF50” “),$K50:$DF50)&”.PDF”),HYPERLINK(“Z:3 M+ MWC3.1 M+_RSSM+ (CC_2015_3A_022)3_DrawingsUSBM+ WS4_Drawings”&MIDB($A50,11,3)&”PDF”&MIDB($A50,1,35)&”-“&LOOKUP(1,0/($K50:$DF50” “),$K50:$DF50)&”.PDF”,LOOKUP(1,0/($K50:$DF50″ “),$K50:$DF50)),”*”&LOOKUP(1,0/($K50:$DF50” “),$K50:$DF50))
B) Formula for latest “rev number individual” column
=IF(Bfile(“Z:3 M+ MWC3.1 M+_RSSM+ (CC_2015_3A_022)3_DrawingsUSBM+ WS4_Drawings”&MIDB($A52,11,3)&”PDF”&MIDB($A52,1,35)&”-00.PDF”),HYPERLINK(“Z:3 M+ MWC3.1 M+_RSSM+ (CC_2015_3A_022)3_DrawingsUSBM+ WS4_Drawings”&MIDB($A52,11,3)&”PDF”&MIDB($A52,1,35)&”-00.PDF”,”00″),”*00″)
-
I only tried the first method and it works perfectly for me… thank you so much for saving me days of boring inputing!!
-
How to get the file name list in Date Modified order in this excel workbook ??
-
Umm its not working on MAC 🙁
The formula you’ve provided (in column A) gives me this:
/Volumes/Data/Reports/*So the INDEX formula (in column B) gives #N/A
🙁-
Remove the first “/” (the one before Volumes) and change the rest of the slashes to colons.
-
-
I used the code above to obtain a list of files. The files names are as below:
Diesel___1234567___NIR_cuvette___20180912_234811.0
Diesel___1234567___NIR_cuvette___20180912_235510.0
The code only pulls the first file for each sample and fails to list the second (or third file). Is there a way to correct for this? Thanks. -
Hey,
I have a ecxel sheet which have some product names, and also have a folder which have some pdf files named same as in cell data, like if cell A2 value is apple1, Pdf file name is apple1.pdf, i want to know which name file is missing, can we get that in excel somwhow.. -
Hi Sumit,
I want to list the names and duration of all videos in a folder and its subfolders using Excel VBA. From the code below I can get the duration of video files, but I can’t exclude all other files. This gives me a list of all the file names, which I don’t need. Also I am failing to loop through subfolders.
What I want to achieve is for the macro to loop through all subfolders in the the given root folder and list only video names and duration in columns A and B.
Some help with this is truly appreciated.
Option ExplicitDim i As Long, SourceFldr
Dim c As Range, rng As Range
Dim sFile As Variant
Dim oWSHShell As Object
Dim WS As Worksheet
Dim lRow As LongSub GetDuration()
Dim fldr As FileDialog
Set fldr = Application.FileDialog(msoFileDialogFolderPicker)
Set oWSHShell = CreateObject(“WScript.Shell”)With fldr
.Title = “Select a Source Folder”
.AllowMultiSelect = False
.InitialFileName = oWSHShell.SpecialFolders(“Desktop”)
If .Show -1 Then GoTo NextCode
SourceFldr = .SelectedItems(1)
NextCode:
End WithDim oShell: Set oShell = CreateObject(“Shell.Application”)
Dim oDir: Set oDir = oShell.Namespace(SourceFldr)i = ActiveSheet.Range(“A” & Rows.Count).End(xlUp).Row + 1
For Each sFile In oDir.Items
Cells(i, 1).Value = oDir.GetDetailsOf(sFile, 0) ‘File Name
Cells(i, 2).Value = oDir.GetDetailsOf(sFile, 27) ‘File Lenght
i = i + 1
Next sFileSet oDir = Nothing
Set oShell = NothingEnd Sub
-
-
-
Wow! That’s ingenious and too much for free 😀 May Allah bless you brother. Thanks a lot.
-
Hey! Sumit Bansal right? As a matter of fact you are my excel HERO. I’ve been following your blog for quite a while now and everything you thought was amazing. Even though I’m still a student, I know one day this knowledge is going to save me a lot of time. I thought I was an excel expert with my one semester training So I created a blog to publish my skills on (http://excel-programming.com). But upon discovering your skills and experience I think I still have a a long way to go. Thank you very much for this blog.
-
You are doing wonderful work Sumit to educate Excel users. God bless you.
Please try the Excel Addin called ASAP Utilities by downloading it. There is a free (Home&Student) and paid version. File listing in Excel sheet of any directory and nested sub directories, with many properties of the files is so easy with many menu driven options (Menu-File & System-Item 24) This is just one of more than 300 utilities. It will be very useful for all Excel users and saves tons of time and effort. Current version is 7.4 and the link to the site is http://www.asap-utilities.com/ . I do not have any pesronel intrest in the product except to make it known to many Excel users to benifit in their work. It was developed by Bastien Mensink from Netherlands way back in 1999. I am using it since that time. Feed back on your experience is appreciated. -
Sumit this one deserves a kudos!!
Some time back i was working on its VBA and m non VBA guy……….
-
I was also wondering if there is a way to extract additional properties information at the same time
ie
“File Name”
“Created”
“Owner”
“Author”
“Title”
“Comments”
“Tags”-
This would be fabulous.
-
-
nice. really interesting. thanks a lot
-
Hmm, nowadays I would go with a Power Query ( Get and Transform) solution. Read from folder, and delete all columns except file name. Save and load to table. No macro, no formula involved.
-
Thank you for this repost. Is there a way to list folders in a directory?
-
I just saw a post below that this function does not work with folders. Too bad 🙁
-
-
Since it has not been corrected I assume that it has not been reported yet. The first version of this formula: =IFERROR(INDEX(FileNameList,ROW()-2,””) should actually be: =IFERROR(INDEX(FileNameList,ROW()-2),””). The trick won’t work until the right formula is used.
-
Thanks for pointing out Charles.. have corrected it!
-
-
Hi Sumit, Great trick. Thanks a lot. However I was wondering if there is a way to extract the file path as well along with the file name
-
I copied everything exactly but my cells are blank in the B column and it doesn’t populate the file names. any reason why? Also I’m using office 2010.
-
I figured out the issue, i didn’t have a slash before the asterisk * at the end. But I have one more question. Can this be used to get a value from a cell in these docs as well? e.g. I get a list of all docs in a given folder, can I then get a value from a cell in each of those docs if its all the same cell in each doc?
-
-
Hi
Was wondering if there is a way to extract properties information at the same time
ie
“File Name”
“Created”
“Owner”
“Author”
“Title”
“Comments”
“Tags”Much appreciated
-
Hi Sumit, great tutorial. I used this because files are constantly being added to a specific folder. This allows for the names of those new folders to show. Since I do not know the names of the new files that will be created I was hoping to then use the results of this in an external reference formula. Do you know if this is possible?
-
-
One method I have used before uses the command prompt. Navigate to the folder you want to extract file names from. Type (dir /b > “sample.txt”) minus the parenthesis. This will create a text file in the same directory that you can then open in Excel for further processing.
-
how to have excel list all the file in one row instead of using multiple rows
-
dear sir,
how can i Get a List of File Names from a Folder in Excel without extension like . jpg, .pdf -
Amazing! Thanks for this Great Trick!!!
Question: When the New File Names come in, they Start Over from the Top-Shifting File Names Down, how can I get them to come in at the bottom of the list (based on date/time modified)?
Make File Name Hyperlink? If I Select the Column with your Formula, Insert Hyperlink and Add Folder Location, this links them to the folder, but how can I make it open the file directly? Also If you can Help: I have a Folder Filled with Email Messages (.msg Files) that I am keeping a Running List of in Excel and have to manually enter data from each Email such as Name (Email Address before @) + Company (Email Address after @), Date Received etc. – Is there a way to Auto Populate this information into Excel from the .msg File following the Automated File Name you have created here?
-
I have a single folder with multiple sub-folders each with multiple files, can I extract at the highest folder level?
-
Hi, Is there a way i can get the time the file is created in addition to the file name?
-
Hei Sumit. I got Folder name in A1. But INDEX will not work properly, I get only #N/A, (I define A1 as “NM”)
Can you plz look at screenshot and give me some guide lines that where i do wrong?
And my required folder is on Sharepoint. -
Amazingly quick response. I will re-check. Thank you.
-
I tried Getting a List of File Names from a Folder in Excel. Why did I get #NAME? instead of the name of the first file? I like your video lesson. Thank you.
Husen Kabeer, myaquadome@yahoo.comc:This PCDocumentsHusen Data Files – 2014Word*
=INDEX(FileNameList,1)
#NAME?-
Hello Husen.. Check the named range reference. It seems your named range is not referring to the cell that has the folder path.
-
-
Thank you very much. This is amazing ..:)
-
Thanks for commenting.. Glad you liked it 🙂
-
-
Sumit, is there a way for this formula to look within a series of sub-folders for the same results.
-
Thanks for commenting David.. With this method, you can only get file names from a specified folder
-
-
Hi, Sumit
Googled for a few minutes just now. I love your work. As a newbie you’ve helped me so much but for the life of me I just couldn’t get this working. Found an alternative method that actually lists the file names as hyperlinks. Thought I’d share the link here, in case you or your other fans/followers were interested –http://www.extendoffice.com/documents/excel/627-excel-list-files.html
-
if this done with a folder that gets updated a lot, will this auto update with the new file names or will you have to start all over
-
It would automatically update if you open the workbook or you press F9 (to force a calculation), or even if you make any change in the worksheet.
-
Thanks, its working just the way that i was wanting it to
-
Hello Sumit, thank you for your post. Made my life easier. Never the less I still have a problem with the update. It does not update automatically. I have to drag the formula again each time I open the document, or either double click the cell to updated itself. Do you know what I might do wrong? For your information I used your formula in combination with other formulas as bellow :
=LEFT($B$3;LEN($B$3)-1)&IFERROR(INDEX(FileList0916;ROWS($B$4:B33));””)
-
-
-
Hi. I have been here for more than an hour and for some reason I can’t get this to work. Know I’m going to love it and use it a lot, once I can get the first one working. Any chance you can take a look at mine and tell me what I’m doing wrong? I would so much appreciate it!
https://www.dropbox.com/s/ex6rtxpgr2twyne/Excel%20Index.xlsx?dl=0
-
Hello Brenda. You have created a named range with the name “ExcelList”, while the formula uses “FileNameList”. Change the formula to =IFERROR(INDEX(ExcelList,ROWS($B$1:B1)),””)
-
-
Are you using the formula to get the folder address. Use this formula =REPLACE(CELL(“filename”),FIND(“[“,CELL(“filename”)),LEN(CELL(“filename”)),”*”)
It shouldn’t look something as shown in your spreadsheet. Also, make sure the excel file (in which you are extracting the file names) is saved in the same folder.
-
Morning,
At it again this am. Losing my mind. Want this so bad and I just can’t get it to work. Tried everything. Must be something really small and stupid hanging me up. Heading to work. Little bit OCD – lol. I will get back at it when I get home but not too optimistic.
-
-
-
-
-
hi sumit! i followed the instructions but all i got was a blank cell..
-
Hi
The function of FILES does not exist in my version of excel 2010! May be it originated from some Add-Ins? -
That is an awesome way. Thanks a lot!!…
Also, is there a way to get the list of all the folders,subfolders and filenames along with file size and modification date columns.-
Thanks for commenting.. Using this method, you can only get file names from a specified folder
-
-
Another way to get the directory.
Portuguese version of formula =INFORMAÇÃO(“DIRECTÓRIO”)
I guess in English will be =INFO(“DIRECTORY”)
Even easier! -
Hi Sumit, thanks a lot for that.. is there any way I can also get the tabs within each excel file that I am looking up in a drive to populate in the columns next to file names? Please let me know it will be really helpful
-
Hi Bharat. You won’t be able to get tab names using the FILES function. For that, you would need to resort to a VBA code
-
HI Sumit, thanks for the quick response. is there anyway you can help with that code? I have been trying to search for it online but nothing seems to pop up.
-
-
-
Never seen this trick before. Great stuff.
i think this formula should also work for retrieving the file path, looks shorter 🙂
=LEFT(CELL(“filename”),FIND(“[“,CELL(“filename”))-1)&”*”-
Thanks for sharing the formula Victor.. Yours is much better 🙂
-
-
I was able to follow your instructions, but when i save it and go back it isnt there it just has name#. I am not familiar with Macros and it ask me to save Macros-Free and when I do my list isnt there. how can I save it. apologize in advance.
-
Hi Elisa.. Thanks for commenting. Try and save your file as a macro-enabled workbook (with .xlsm extension) and it would work. Since FILES is an old macro formula, it requires the workbook to be saved in .XLSM format. And don’t worry about not knowing macros, it would still work
-
-
Awesome solution thank you! However I could only register 256 files (rows). After that I get #¡REF!. Do you know a way to make it work for larger number of files. I need it for 2.000 files aprox. Thank you again. Jacobo
-
Thanks for commenting.. Could you share the sample file you are using. Since FILES is an old formula it may have some limitations, need to check on it.
-
-
Once I wanted to do the same so I wrote an Excel Add-in for doing that.
It can get filenames, folders, file extensions and other information regarding files.
This tool can write up to excel limit number of rows in just a few minutes.
In a stress test I did, I got more than 1,000,000 file names in just about 3 minutes.
Here is a link to try:
http://excel.gegprifti.com
-
Dear Sumit,
Suppose i want to do same for folder name than how we can do?-
Hi, I am waiting for your revert.
-
Hi Narayandatta.. FILES can not be used to get the folder names within in folder. It only works for files that have an extension
-
-
-
This was a great time saver Sumit, thanks. ? is there a way to make them a hyperlink without going through every single one?
Thanks -
fantastic
-
A formula that only works in named range?!!..this is great find.
-
-
That is really useful, thanks very much!
-
Thanks for commenting.. Glad you found this useful 🙂
-
-
Interesting.
Before dragging down, we may use
=COUNTA(FileNameList)
to get a sense of how far we need to go down.
btw, another approach in getting the directory for consideration.
=REPLACE(CELL(“filename”),FIND(“[“,CELL(“filename”)),LEN(CELL(“filename”)),”*”)
-
Thanks for commenting.. Your formula is much better 🙂
-
-
Thanks this will be useful
We can also do the same thing with Power Query -
Wow, this is great. Easier than the VBA code I wrote to do the same thing!
-
Yeah.. this old macro4 formula does makes it quite easy to do this
-
-
you save my life.
thnx a lot for such a great trick.
-
Thanks for the comment. Glad you liked it 🙂
-
Dear Sumit,
Is “Files” function is valid only Excel 2013.
I am trying to make it in Excel 2010 but could not find the Turkish of “Files” in Excel?
Do you have an idea?
-
Dear Sumit,
I am dying here to try above trick but still waiting your reply about the function FILES ?
🙁-
Hey.. this formula is valid for all versions of Excel. However, I could not find its equivalent for Turkish Excel. Since it’s an old function, even the help is not available for it now.
-
Dear Sumit,
Thnx for your reply.
I made it but unfortunately when I drag down, it gives only the first file name ?
Do you have any idea?
-
It seems the second argument of INDEX is not changing. Can you try changing it to see if it work. Also, would be great if you could share the file (a link to dropbox or onedrive)
-
-
I think I got the issue.. Replace the function ROW with ROWS, and it should work for you. Hope this helps.
-
omg!
how dumb! I am…
Thnx a lot and sorry for wasting your time! -
Glad it worked 🙂
-
I need those macros in Polish, and find this way:
In VBA I write and run simple macro like:
Sub Makro1()
ActiveWorkbook.Names.Add Name:=”Test”, RefersToR1C1:=”=FILES(Sheet1!R2C1)”
End SubThen in Name Menager I have 4.0 Macro Function name in my Excel language (for my it’s Polish)
-
-
-
-
Comments are closed.
Listing the files in a folder is one of the activities which cannot be achieved using normal Excel formulas. I could tell you to turn to VBA macros or PowerQuery, but then any non-VBA and non-PowerQuery users would close this post instantly. But wait! Back away from the close button, there is another option.
For listing files in a folder we can also use a little-known feature from Excel version 4, which still works today, the FILES function.
If you search through the list of Excel functions, FILES is not listed. The FILES function is based on an old Excel feature, which has to be applied in a special way. The instructions below will show you step-by-step how to use it.
Create a named range for the FILES function
The first step is to create a named range, which contains the FILES function. Within the Excel Ribbon click Formulas -> Define Name

Within the New Name window set the following criteria:
- Name: listFiles
Can be any name you wish, but for our example we will be using listFiles. - Refers to: =FILES(Sheet1!$A$1)
Sheet1!$A$1 is the sheet and cell reference containing the name of the folder from which the files are to be listed.
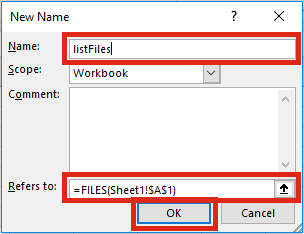
Click OK to close the New Name window.
Apply the function to list files
The second step is to set-up the worksheet to use the named range.
In Cell A1 (or whichever cell reference used in the Refers to box) enter the folder path from which to list the files, followed by an Asterisk ( * ). The Asterisk is the wildcard character to find any text, so it will list all the files in the folder.
Select the cell in which to start the list of files (Cell A3 in the screenshot below), enter the following formula.
=INDEX(listFiles,1)
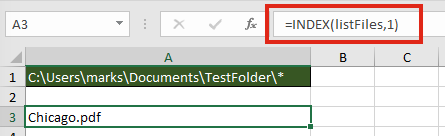
The result of the function will be the name of the first file in the folder.
To retrieve the second file from the folder enter the following formula
=INDEX(listFiles,2)
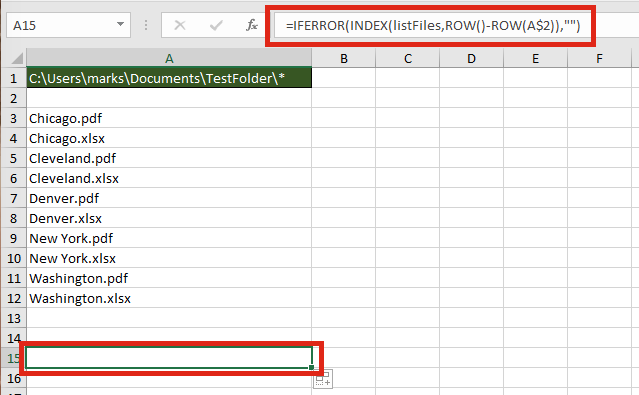
It would be painful to change the file reference number within each formula individually, especially if there are hundreds of files. The good news is, we can use another formula to calculate the reference number automatically.
=INDEX(listFiles,ROW()-ROW(A$2))
The ROW() function is used to retrieve the row number of a cell reference. When used without a cell reference, it returns the row number of the cell in which the function is used. When used with a cell reference it returns the row number of that cell. Using the ROWS function, it is possible to create a sequential list of numbers starting at 1, and increasing by 1 for each cell the formula is copied into.
If the formula is copied down further than the number of files in the folder, it will return a #REF! error.
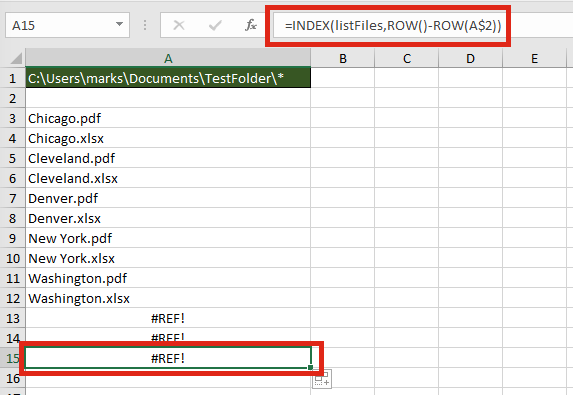
Finally, wrap the formula within an IFERROR function to return a blank cell, rather than an error.
=IFERROR(INDEX(listFiles,ROW()-ROW(A$2)),"")
Listing specific types of files
The FILES function does not just list Excel files; it lists all file types; pdf, csv, mp3, zip, any file type you can think of. By extending the use of wildcards within the file path it is possible to restrict the list to specific file types, or to specific file names.
The screenshot below shows how to return only files with “pdf” as the last three characters of the file name.
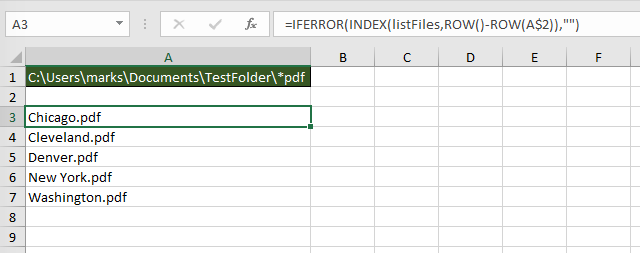
The wildcards which can be applied are:
- Question mark ( ? ) – Can take the place of any single character.
- Asterisk ( * ) – Represents any number of characters
- Tilde ( ~ ) – Used as an escape character to search for an asterisk or question mark within the file name, rather than as a wildcard.
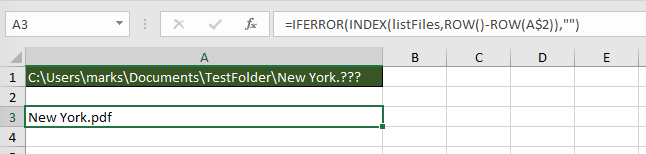
The screenshot below shows how to return only files with the name of “New York.“, followed by exactly three characters.
Advanced uses for the FILES named range
Below are some ideas of how else you could use the FILES function.
Count the number of files
The named range created works like any other named range. However, rather than containing cells, it contains values. Therefore, if you want to calculate the number of files within the folder, or which meet the wildcard pattern use the following formula:
=COUNTA(listFiles)
Create hyperlinks to the files
Wouldn’t it be great to click on the file name to open it automatically? Well . . . just add in the HYPERLINK function and you can.
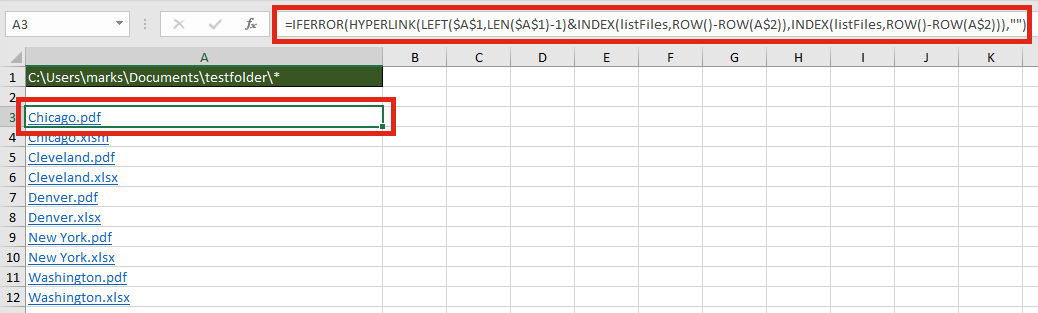
The formula in Cell A3 is:
=IFERROR(HYPERLINK(LEFT($A$1,LEN($A$1)-1)&INDEX(listFiles,ROW()-ROW(A$2)),
INDEX(listFiles,ROW()-ROW(A$2))),"")
Check if a specific file exists within a folder
It isn’t necessary to list all the files to find out if a file exists within the folder. The MATCH function will return the position of the file within the folder.
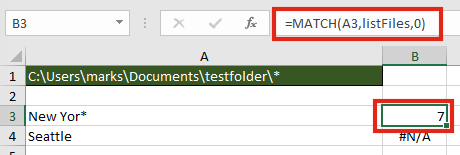
The formula in cell B3 is:
=MATCH(A3,listFiles,0)
In our example, a file which contains the text “New Yor*” exists, as the 7th file, therefore a 7 is returned. Cell B4 displays the #N/A error because “Seattle” does not exist in the folder.
Find the name of the next or previous file
The files returned are in alphabetical order, therefore it is possible to find the next or previous file using the INDEX / MATCH combination.
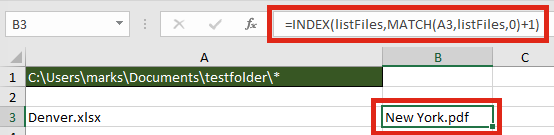
The next file after “Denver.xlsx” is “New York.pdf“. The formula in Cell B3 is:
=INDEX(listFiles,MATCH(A3,listFiles,0)+1)
Retrieve values from each file with INDIRECT
The INDIRECT function can construct a cell reference using text strings. Having retrieved the list of files in a folder, it would be possible to obtain values from those files.

The formula in Cell B3 is:
=INDIRECT("'"&LEFT($A$1,LEN($A$1)-1)&"["&A3&"]Sheet1'!$A$1")
For INDIRECT to calculate correctly the file does need to be open, so this may be a significant flaw in this option.
Usage notes
When working with the FILES function there are a few things to be aware of:
- The file path and file name is not case sensitive
- Files are returned in alphabetical order
- Folders and hidden files are not returned by the function
- The workbook must be saved as a “.xlsm” file format
Further reading
There are variety of other Excel 4 functions available which still work in Excel. Check out this post to find out how to apply them and download the Excel 4 Macro functions reference guide.
If you decide to use a VBA method, check out this post.

About the author
Hey, I’m Mark, and I run Excel Off The Grid.
My parents tell me that at the age of 7 I declared I was going to become a qualified accountant. I was either psychic or had no imagination, as that is exactly what happened. However, it wasn’t until I was 35 that my journey really began.
In 2015, I started a new job, for which I was regularly working after 10pm. As a result, I rarely saw my children during the week. So, I started searching for the secrets to automating Excel. I discovered that by building a small number of simple tools, I could combine them together in different ways to automate nearly all my regular tasks. This meant I could work less hours (and I got pay raises!). Today, I teach these techniques to other professionals in our training program so they too can spend less time at work (and more time with their children and doing the things they love).
Do you need help adapting this post to your needs?
I’m guessing the examples in this post don’t exactly match your situation. We all use Excel differently, so it’s impossible to write a post that will meet everybody’s needs. By taking the time to understand the techniques and principles in this post (and elsewhere on this site), you should be able to adapt it to your needs.
But, if you’re still struggling you should:
- Read other blogs, or watch YouTube videos on the same topic. You will benefit much more by discovering your own solutions.
- Ask the ‘Excel Ninja’ in your office. It’s amazing what things other people know.
- Ask a question in a forum like Mr Excel, or the Microsoft Answers Community. Remember, the people on these forums are generally giving their time for free. So take care to craft your question, make sure it’s clear and concise. List all the things you’ve tried, and provide screenshots, code segments and example workbooks.
- Use Excel Rescue, who are my consultancy partner. They help by providing solutions to smaller Excel problems.
What next?
Don’t go yet, there is plenty more to learn on Excel Off The Grid. Check out the latest posts:

This Excel tutorial explains how to use the Excel DIR function with syntax and examples.
Description
The Microsoft Excel DIR function returns the first filename that matches the pathname and attributes specified. To retrieve additional filenames that match pathname and attributes, call DIR again with no arguments.
The DIR function is a built-in function in Excel that is categorized as a File/Directory Function. It can be used as a VBA function (VBA) in Excel. As a VBA function, you can use this function in macro code that is entered through the Microsoft Visual Basic Editor.
Syntax
The syntax for the DIR function in Microsoft Excel is:
Dir [( path [, attributes ] ) ]
Parameters or Arguments
- path
- Optional. It the path to a file, folder, or directory. If the path is not found, the DIR function will return a zero-length string.
- attributes
-
Optional. It is the sum of the file attributes. File attributes can be one or a combination of the following values:
VB Constant Value Explanation vbNormal 0 Normal (Default) vbReadOnly 1 Read-only vbHidden 2 Hidden vbSystem 4 System file vbVolume 8 Volume label vbDirectory 16 Directory or folder vbAlias 64 File name is an alias
Note
You can use wildcard characters to specify multiple files. The patterns that you can choose from are:
| Wildcard | Explanation |
|---|---|
| * | Allows you to match any string of any length (including zero length) |
| ? | Allows you to match on a single character |
Dir ("")
Returns
The DIR function returns a string value.
Applies To
- Excel for Office 365, Excel 2019, Excel 2016, Excel 2013, Excel 2011 for Mac, Excel 2010, Excel 2007, Excel 2003, Excel XP, Excel 2000
Type of Function
- VBA function (VBA)
Example (as VBA Function)
The DIR function can only be used in VBA code in Microsoft Excel.
Let’s look at some Excel DIR function examples and explore how to use the DIR function in Excel VBA code:
Dir("C:instructions.doc")
Result: "instructions.doc"

Dir("C:in*.doc")
Result: "instructions.doc"

Dir("C:instruction?.doc")
Result: "instructions.doc"
For example:
Dim LResult As String

LResult = Dir("C:instructions.doc")
In this example, the variable called LResult would now contain the filename of the instructions.doc file.
Frequently Asked Questions
Question: How can I use the DIR function to test whether a file exists?
Answer: This can be done with a formula that utilizes a combination of the DIR function, IF function, and LEN function.
For example:
If Len(Dir("c:Instructions.doc")) = 0 Then
   Msgbox "This file does NOT exist."
Else
   Msgbox "This file does exist."
End If
Question: I’m not sure if a particular directory exists already. If it doesn’t exist, I’d like to create it using VBA code. How can I do this?
Answer: You can test to see if a directory exists using the VBA code below:
If Len(Dir("c:TOTNExcelExamples", vbDirectory)) = 0 Then
   MkDir "c:TOTNExcelExamples"
End If
In this example, the code would first check to see if the c:TOTNExcelExamples directory exists. If it doesn’t exist, the MKDIR statement would create a new directory called Examples under the c:TOTNExcel directory.