
| Summary: Facing the issue of the ‘File Could Not Be Found’ error in Excel? We present 3 ways to fix the issue including Stellar Repair for Excel.
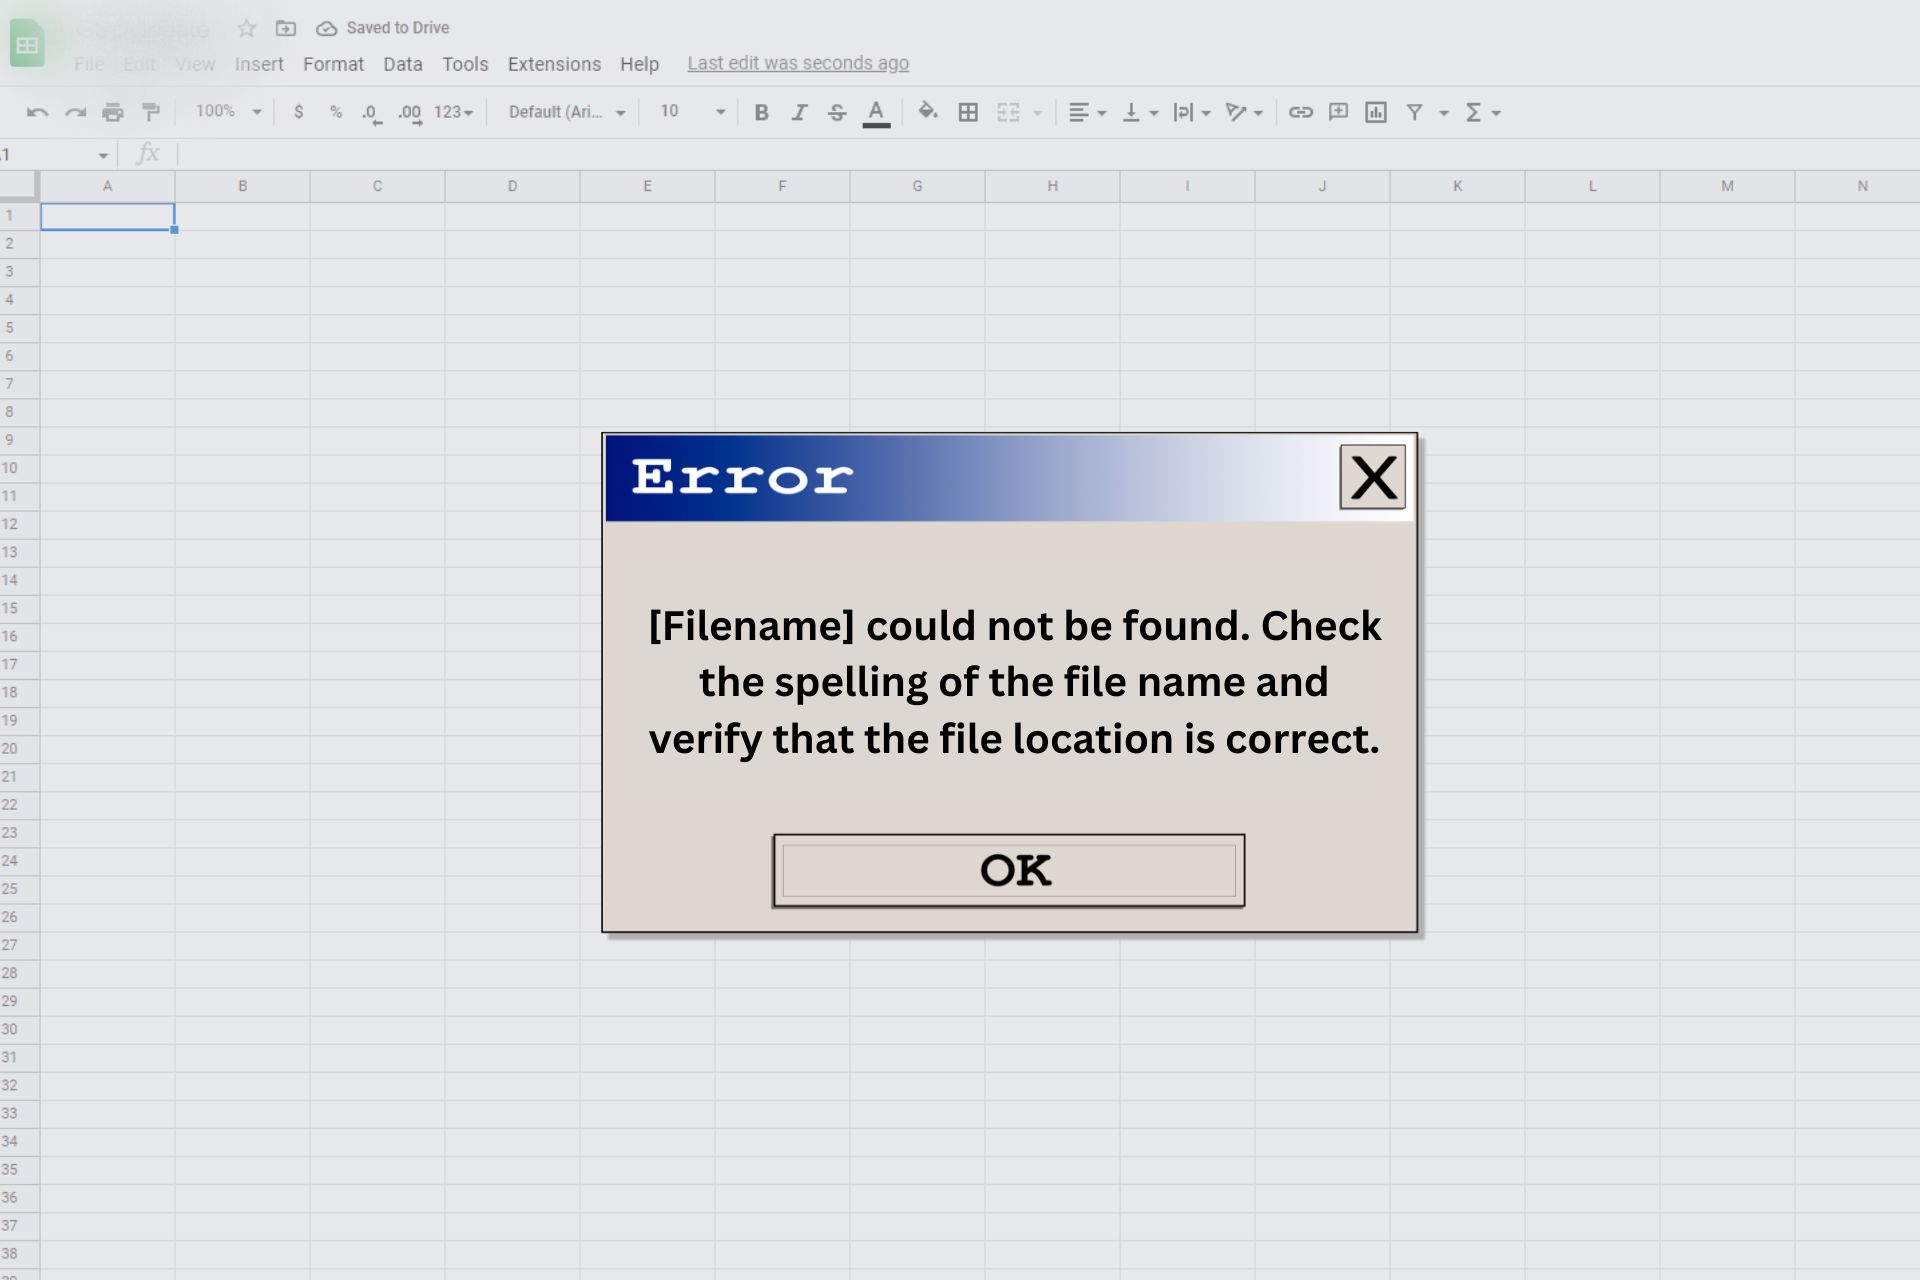
Imagine this scenario. You’ve stored all your business data on an MS Excel file on your laptop. Now, it’s analysis time. You double-click on the Excel file. However, instead of the file opening, this is what you see on the screen: |
|---|

Your heartbeat quickens. Anxiety kicks in. You want to pull your hair as you can’t access the important data.
“I don’t need to imagine it. It has happened already.” Saying this already?
If yes, this article is the best place for you to be in. Why? The article will share how you can fix the ‘File Could Not Be Found’ Error in Excel.
In the next five minutes, learn all about how to fix the ‘File Could Not Be Found’ error in Excel. The complete guide will offer:
- The 3 ways to fix the ‘File Could Not Be Found’ Error in Excel
- An FAQ section
- One final suggestion
Without further ado, let’s begin.
Also Read: How to Fix “The file is corrupted and cannot be opened” Error in Excel?
3 Ways to Fix the ‘File Could Not Be Found’ Error in Excel
1. Use Stellar Repair for Excel

Stellar Repair for Excel is the best way to fix the ‘File Could Not Be Found’ Error in Excel.
Check out how to use the software to fix the issue:
1. Browse and add the Excel files causing the issue.
 2. Click on Repair.

3. Preview the repaired Excel files and save them at any location you want.

You read it right; it’s that easy.
Here’s why you should choose Stellar Repair for Excel:
- Supports Excel 2016, 2019, and even older versions.
- Recovers all the data from damaged or corrupt Excel files (.xls, .xlsx, .xltm, .xltx, and .xlsm).
- Offers batch repair of Excel files.
- Repairs & Recover Deleted Excel Files, pivot tables, charts, formulas, etc.
- It removes corruption from individual objects, fixes the damage, and restores the Excel file back to its original state.
- Comes with the Stellar File Repair Toolkit which is a package of 4 bestseller repair software – MS Excel Repair, PDF Repair, MS Powerpoint Repair, and MS Word Repair.
- Repairs PDF files of up to 2 GB in size.
- Compatible with Windows 7, 8, 8.1, 10, and 11.
Also Read: How to Repair Excel File Online?
2. Move the file to a different folder path
Here’s how to do so:
1. Open File Explorer.
2. Choose the Excel spreadsheet you want to move.
3. Click on Move to.

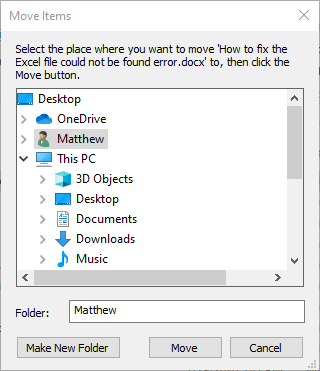
4. Choose the desired folder from the drop-down menu or click on Choose location.

5. Select a different folder path and click on Move.
6. Click OK.
3. Edit the registry
Here’s how to do so:
1. Right-click on the Start button and select Run.
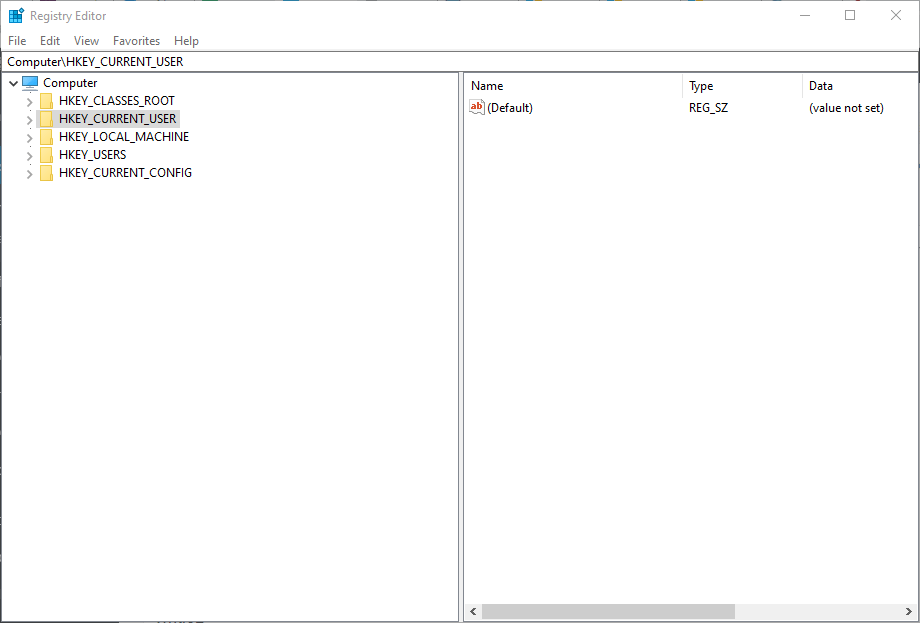
2. Enter regedit and press Return to open the Registry Editor.

3. Open the registry key path: HKEY_CLASSES_ROOT > Excel.Sheet.8 > shell > Open > command.

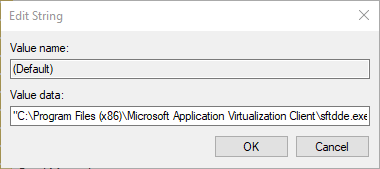
4. Double-click on the right pane to open the Edit string window.

5. Erase %1 from the end of the string in the value data box.
6. The value data string should be: C:PROGRAM FILESMICROSOFT OFFICEOFFICEEXCEL.EXE.
7. Click OK.
Watch the video on “How to recover deleted files?” with the help of Stellar Recovery Software
FAQ
1. Why does the ‘File Could Not Be Found’ Error in Excel occur?
Check out the two reasons why the ‘File Could Not Be Found’ Error in Excel:
- The open action entry for the file ends in %1. The scenario occurs when you edit the open action of the file type and the line gets restored before you press OK. You can intentionally add a %1 to the open action entry for the file type as well. In both scenarios, the system adds a %1 to the registry key. If you later delete the %1 from the open action entry, the registry key stays unchanged and needs to be manually edited.
- If you manually change the file association of .xls files or run multiple versions of Excel on the same computer.
2. How to resolve the issue of the ‘File Could Not Be Found’ Error in Excel?
You can use 3 ways to resolve the issue:
- Use Stellar Recover for Excel
- Move the file to a different folder path
- Edit the registry
3. How to recover an earlier version of an Office file?
If you haven’t saved the file:
- Go to File > Info > Manage Document > Recover Unsaved Workbooks in Excel.
- Select the file and click on Open.
- Select Save As to save the file.
If you have already saved the file:
- Open the file you want to recover.
- Go to File > Info.
- Select the specific file under the option Manage Presentation or Manage Workbook.
- Select Restore to overwrite any previously saved versions.
4. What’s the best software to fix the ‘File Could Not Be Found’ Error in Excel?
Stellar Repair for Excel is the best software to fix the issue.
Here are 5 reasons why:
- Recovers all the data from damaged or corrupt Excel files.
- Offers batch repair of Excel files.
- Supports Excel 2016, 2019, and even older versions.
- Repairs PDF files of up to 2 GB in size.
- Compatible with Windows 7, 8, 8.1, 10, and 11.
5. How to repair a corrupted workbook in Excel?
If you’ve tried the standard repair procedure recommended by Microsoft, then your best option is to download Stellar Repair for Excel and try to recover the file.
6. How do I recover a deleted Excel file?
If the file is still in the Recycle Bin, you can restore it. Right-click the file and click on Restore.
If you’ve permanently deleted the file(means it’s not present in the Recycle Bin), then you’ll need Stellar Data Recovery software.
‘File Could Not Be Found’ Error in Excel – one final suggestion
This article has gathered all the information you need to fix the ‘File Could Not Be Found’ Error in Excel. However, you might still be confused about which one of the solutions mentioned should you choose.
Here’s one final suggestion to help you: Go for Stellar Repair for Excel.
Compare the 3 plans: Excel Repair, File Repair Toolkit – Soho, File Repair Toolkit – Technician. Compare, try for free, and then purchase a license that’s most suitable for you.
Now that you know all about how to fix the ‘File Could Not Be Found’ error in Excel, the knowledge will help you make the most informed decision.
Symptoms
When you double-click a Microsoft Excel file type (.xls), Excel starts as expected, but then you may receive an error message that is similar to the following:
C:filename.xls’ could not be found. Check the spelling of the file name, and verify that the file location is correct. If you are trying to open the file from your list of most recently used files on the File menu, make sure that the file has not been renamed, moved, or deleted.
When you click OK on the error message, the message reappears. After you repeatedly click OK, the file opens.
Cause
This behavior can occur if the Open action entry for this file type ends in %1.
If the Open action of the file type is edited and the line is restored before you press OK, a %1 is added to the registry key.
If you intentionally add a %1 to the Open action entry for this file type, a %1 is added to the registry key. If you subsequently delete the %1 from the Open action entry, the registry key remains unchanged and must be manually edited.
Additionally, this issue can occur when you manually change the file association of .xls files, or in some circumstances, when you are running multiple versions of Excel on the same computer.
Resolution
To resolve this issue, install the latest cumulative updates for Office Excel. You can find the latest cumulative updates by following the following link:
953878 Cumulative updates are available from the Microsoft Office team to deliver hotfixes for reported problems
Workaround
Important This section, method, or task contains steps that tell you how to modify the registry. However, serious problems might occur if you modify the registry incorrectly. Therefore, make sure that you follow these steps carefully. For added protection, back up the registry before you modify it. Then, you can restore the registry if a problem occurs. For more information about how to back up and restore the registry, click the following article number to view the article in the Microsoft Knowledge Base:
322756 How to back up and restore the registry in Windows
To work around this issue, follow these steps:
-
Click Start, and then click Run.
-
In the Open box, type regedit, and then click OK.
-
Open the following registry key:
HKEY_CLASSES_ROOTExcel.Sheet.8shellOpencommand
-
In the right pane, click (Default).
-
On the Edit menu, click Modify.
-
Remove the %1 from the end of the Value data string so that the data string reads as follows:
«C:PROGRAM FILESMICROSOFT OFFICEOFFICEEXCEL.EXE» /e (including the quotation marks)
-
Click OK, and then close Registry Editor.
More Information
Note Because there are several versions of Microsoft Windows, the following steps may be different on your computer. If they are, see your product documentation to complete these steps.
To change the Open action of a file type, follow these steps:
-
Start the Microsoft Windows Explorer.
-
On the Tools menu, click Folder Options.
-
Click the File Types tab.
-
Click the file type that you want (that is, Microsoft Excel Worksheet) in the Registered file types list.
-
Click Advanced.
-
Under Actions, click Open, and then click Edit.
-
Make the changes that you want, and then click OK.
-
Note: For additional file types, you may also need to review these registry locations: HKEY_CLASSES_ROOTExcel.Sheet.12shellOpencommandHKEY_CLASSES_ROOTExcel.SheetBinaryMacroEnabled.12shellOpencommandHKEY_CLASSES_ROOTExcel.SheetMacroEnabled.12shellOpencommandHKEY_CLASSES_ROOTExcel.Template.8shellOpencommand HKEY_CLASSES_ROOTExcel.TemplateMacroEnabledshellOpencommandHKEY_CLASSES_ROOTExcel.TemplateshellOpencommand
Need more help?
Want more options?
Explore subscription benefits, browse training courses, learn how to secure your device, and more.
Communities help you ask and answer questions, give feedback, and hear from experts with rich knowledge.
Последнее обновление Ноя 12, 2021
Чтобы исправить различные проблемы с ПК, мы рекомендуем Restoro PC Repair Tool: это программное обеспечение исправит распространенные компьютерные ошибки, защитит вас от потери файлов, вредоносных программ, сбоев оборудования и оптимизирует ваш компьютер для максимальной производительности. Решите проблемы с ПК и удалите вирусы прямо сейчас, выполнив 3 простых шага:
- Загрузите Restoro PC Repair Tool, который поставляется с запатентованными технологиями (патент доступен здесь ).
- Нажмите Начать сканирование, чтобы найти проблемы Windows, которые могут вызывать проблемы с ПК.
- Нажмите «Восстановить все», чтобы исправить проблемы, влияющие на безопасность и производительность вашего компьютера.
- В этом месяце Restoro скачали 662 786 читателей.
Некоторые пользователи Excel спрашивали, как исправить ошибку «Не удалось найти файл Excel» на форуме Microsoft. В сообщении об ошибке говорится:
[имя файла] не найдено. Проверьте правильность написания имени файла и убедитесь, что файл указан правильно.
Это сообщение об ошибке появляется, когда эти пользователи пытаются открыть файл Excel в программе или щелкнуть файл электронной таблицы XLS, чтобы запустить приложение. Проблема возникает в версиях Excel 2007 и 2010.
Вот как пользователи могут исправить ошибку, не найденную в файле Excel.
1 Отредактируйте заголовки файлов и папок
- Откройте папку, содержащую электронную таблицу, для которой не удалось найти файл Excel, возникает ошибка.
- Щелкните правой кнопкой мыши файл электронной таблицы, в котором необходимо исправить ошибку, и выберите параметр «Переименовать».

- Введите более короткий заголовок файла электронной таблицы.
- Кроме того, отредактируйте заголовок папки с файлом электронной таблицы, щелкнув его правой кнопкой мыши и выбрав «Переименовать».
- Введите более короткий заголовок для папки и нажмите клавишу Enter.

Если путь к папке включает в себя множество подпапок, попробуйте сократить заголовки их папок, выбрав параметр «Переименовать», как описано выше.
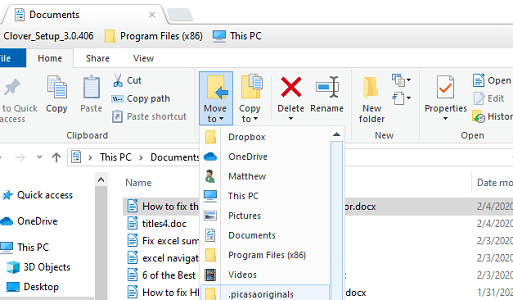
2 Переместите файл в альтернативный путь к папке
- Или попробуйте переместить файл Excel, в котором возникает ошибка, в другую папку.
- Для этого откройте проводник.
- Выберите электронную таблицу Excel, которую нужно переместить.
- Нажмите кнопку «Переместить в» на снимке экрана ниже.
- Выберите в меню папку, в которую нужно переместить файл.
- Либо нажмите «Выбрать место», чтобы открыть окно ниже.
- Оттуда вы можете выбрать альтернативный путь к папке.
- Оттуда вы можете выбрать альтернативный путь к папке.
- Щелкните кнопку ” Переместить”.
- Нажмите OK, чтобы закрыть окно «Перемещение элементов».

3 Отредактируйте реестр
- Если не удается найти файл Excel, возникает ошибка при запуске приложения, попробуйте это исправление реестра.
- Щелкните правой кнопкой мыши кнопку «Пуск» в Windows 10 и выберите «Выполнить».
- Введите regedit в Run и нажмите Return, чтобы открыть редактор реестра.
- Откройте этот путь к ключу реестра:
- HKEY_CLASSES_ROOT> Excel.Sheet.8> оболочка> Открыть> команда.
- HKEY_CLASSES_ROOT> Excel.Sheet.8> оболочка> Открыть> команда.
- Дважды щелкните (По умолчанию) на правой панели, чтобы открыть окно редактирования строки.
- Удалите% 1 с конца строки в поле «Значение».
- Строка данных Value должна иметь следующий вид:
- C: ПРОГРАММА FILESMICROSOFT OFFICEOFFICEEXCEL.EXE
- Строка данных Value должна иметь следующий вид:
- Нажмите кнопку ОК, чтобы закрыть окно редактирования строки.

4 Деактивировать надстройки Excel
- Не удалось найти файл. Ошибка также может быть связана с файлом надстройки XLA.
- Чтобы деактивировать надстройки Excel, щелкните вкладку «Файл» в приложении.
- Выберите «Параметры», чтобы открыть окно «Параметры Excel».
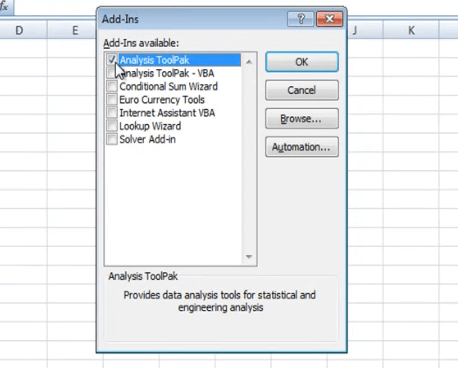
- Щелкните вкладку Надстройки в этом окне.
- В раскрывающемся меню выберите Надстройки Excel.
- Щелкните кнопку ” Перейти”.
- Снимите флажки надстройки в окне надстройки, чтобы отключить их.
- Выберите опцию ОК, чтобы закрыть окно.
Пользователи подтвердили, что эти разрешения исправлены, и для них не удалось найти ошибку в файле Excel.
Пользователи, которые исправили то же сообщение об ошибке другими методами, могут поделиться своими альтернативными исправлениями ниже.
СВЯЗАННЫЕ СТАТЬИ ДЛЯ ПРОВЕРКИ:
- Как исправить ошибку “Файл не загружен полностью” в Microsoft Excel
- Как исправить ошибку нарушения общего доступа в Excel
- Microsoft Excel не может получить доступ к файлу? Следуйте этим простым шагам
Источник записи: windowsreport.com
To fix this issue begin with checking the file’s location ✅
by Matthew Adams
Matthew is a freelancer who has produced a variety of articles on various topics related to technology. His main focus is the Windows OS and all the things… read more
Updated on December 22, 2022
Reviewed by
Alex Serban

After moving away from the corporate work-style, Alex has found rewards in a lifestyle of constant analysis, team coordination and pestering his colleagues. Holding an MCSA Windows Server… read more
- Any user can encounter issues while working in Excel, and one of them is the Excel file not found.
- The simplest workaround for this would be to simply rename the file or folder’s name.
- Another intuitive way to solve the Excel file cannot be found error is to move your file to another folder.
- If nothing works, make sure you disable the add-ins on your spreadsheet files.
Some Excel users have queried how they can fix an Excel file could not be found error on the Microsoft forum. The error message states:
[filename] could not be found. Check the spelling of the file name and verify that the file location is correct.
That error message pops when those users try to open an Excel file within the software or by clicking an XLS spreadsheet file to start the application. The issue arises for Excel 2007 and 2010 versions.
How to fix ‘[filename] could not be found. Check the spelling of the file name and verify that the file location is correct.’ ?
- How to fix ‘[filename] could not be found. Check the spelling of the file name and verify that the file location is correct.’ ?
- ✅ Preliminary Checks:
- 1. Edit the file and folder titles
- 2. Move the file to an alternative folder path
- 3. Edit the registry
- 4. Deactivate Excel add-ins
✅ Preliminary Checks:
To fix this error, you will need to determine the cause of the problem and take appropriate action.
- Check the file’s location: Make sure that the file is still in the location where you expect it to be. If the file has been moved or deleted, you will need to find the new location or restore the file.
- Check the file name: Make sure that the file name is spelled correctly and that the extension is correct. If the file name or extension is incorrect, you will need to rename the file or change the extension to match the actual format of the file.
- Check the file path: If the file is located on a network drive or a remote server, make sure that the file path is correct and that you have the necessary permissions to access the file.
1. Edit the file and folder titles
- Open the folder that includes the spreadsheet the Excel file could not be found error arises for.
- Right-click the spreadsheet file you need to fix the error for and select the Rename option.

- Enter a shorter file title for the spreadsheet document.
- In addition, edit the spreadsheet file’s folder title by right-clicking it and selecting Rename.
- Input a shorter title for the folder, and press the Enter key.

If the folder’s path includes numerous subfolders, try shorting their folder titles by selecting the Rename option as outlined above.
2. Move the file to an alternative folder path
- Alternatively, try moving the Excel file the error arises for to a different folder.
- To do so, open File Explorer.
- Select the Excel spreadsheet to move.
- Click the Move to button in the snapshot directly below.

- Select a folder to move the file to on the menu.
- Alternatively, click Choose Location to open the window below.
- You can select an alternative folder path from there.

- You can select an alternative folder path from there.
- Click the Move button.
- Click OK to exit the Move Items window.

- Excel Running Slow? 4 Quick Ways to Make It Faster
- Fix: Excel Stock Data Type Not Showing
3. Edit the registry
- If the Excel file could not be found error arises when you launch the application, try this registry fix.
- Right-click the Start button in Windows 10 and select Run.
- Enter regedit in Run and press Return to open the Registry Editor.

- Open this registry key path:
- HKEY_CLASSES_ROOT > Excel.Sheet.8 > shell > Open > command.
- HKEY_CLASSES_ROOT > Excel.Sheet.8 > shell > Open > command.
- Double-click (Default) on the right pane to open its Edit String window.

- Erase %1 from the end of the string in the Value data box.
- The Value data string should then be:
- C:PROGRAM FILESMICROSOFT OFFICEOFFICEEXCEL.EXE
- The Value data string should then be:
- Click OK to close the Edit String window.


4. Deactivate Excel add-ins
- The file could not be found error can also be due to an XLA add-in file.
- To deactivate Excel’s add-ins, click the File tab in the application.
- Select Options to open the Excel Options window.
- Click the Add-ins tab on that window.
- Select Excel Add-ins on the drop-down menu.
- Click the Go button.

- Deselect the add-in checkboxes on the Add-in window to deactivate them.
- Select the OK option to exit the window.

Those are resolutions users have confirmed fixed the Excel file could not be found error for them.
Users who have fixed the same error message using other methods are welcome to share their alternative fixes below.
![]()
Newsletter
- Remove From My Forums
-
Вопрос
-
Hi.
I have some clients with office 2010 sp3 that, sporadically, have problems about saving excel file on Microsoft share.
The message is:
File.xls could not be found. Check the spelling of the file name, and verify that the file location is correct.
I checked:
— the path to the file contains fewer than 219 characters
— sheet name contains fewer than 31 char
— Permission share
— NTFS permission
Any suggestions
Best regards
Ответы
-
Hi,
Please try to reset Excel file associations:
- Please go to Control Panel.
- Click Default Programs, and then click Set your default programs.
- Click Excel, and then click Choose default for this program.
- On the Set Program Associations screen, click Select All, and then click Save.
Regards,
Emi Zhang
TechNet Community Support
Please
mark the reply as an answer if you find it is helpful.If you have feedback for TechNet Support, contact
tnmff@microsoft.com.-
Помечено в качестве ответа
8 марта 2016 г. 5:17