
Excel for Microsoft 365 Excel 2021 Excel 2019 Excel 2016 Excel 2013 Excel 2010 More…Less
Let’s say you want to add information to a spreadsheet report that confirms the location of a workbook and worksheet so you can quickly track and identify it. There are several ways you can do this task.
Insert the current file name, its full path, and the name of the active worksheet
Type or paste the following formula in the cell in which you want to display the current file name with its full path and the name of the current worksheet:
=CELL(«filename»)
Insert the current file name and the name of the active worksheet
Type or paste the following formula as an array formula to display the current file name and active worksheet name:
=RIGHT(CELL(«filename»),LEN(CELL(«filename»))- MAX(IF(NOT(ISERR(SEARCH(«»,CELL(«filename»), ROW(1:255)))),SEARCH(«»,CELL(«filename»),ROW(1:255)))))
Notes:
-
To enter a formula as an array formula, press CTRL+SHIFT+ENTER.
-
The formula returns the name of the worksheet as long as the worksheet has been saved at least once. If you use this formula on an unsaved worksheet, the formula cell will remain blank until you save the worksheet.
Insert the current file name only
Type or paste the following formula to insert the name of the current file in a cell:
=MID(CELL(«filename»),SEARCH(«[«,CELL(«filename»))+1, SEARCH(«]»,CELL(«filename»))-SEARCH(«[«,CELL(«filename»))-1)
Note: If you use this formula in an unsaved worksheet, you will see the error #VALUE! in the cell. When you save the worksheet, the error is replaced by the file name.
Need more help?
You can always ask an expert in the Excel Tech Community or get support in the Answers community.
Need more help?
Return to Excel Formulas List
Download Example Workbook
Download the example workbook
This tutorial will demonstrate how to get the path and file name using a formula in Excel.
Get Path and File Name
In Excel there isn’t a function to get the path and file name directly, but the CELL Function will return the file path, name, and sheet. Using the text functions FIND, LEFT, and SUBSTITUTE, we can isolate the path and file name.
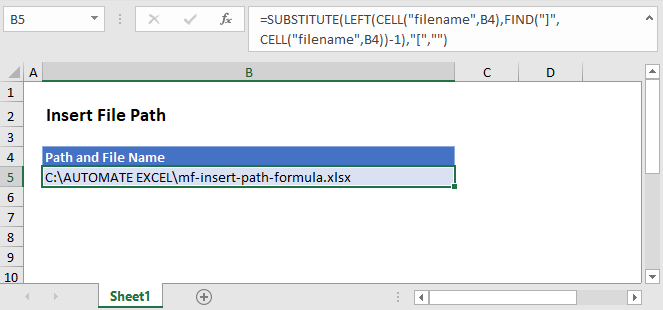
=SUBSTITUTE(LEFT(CELL("filename",B2),FIND("]",CELL("filename",B2))-1),"[","")
Let’s step through the formula.
File Name, Path, and Worksheet
We use the CELL Function to return the file path, name, and sheet by entering “filename” as the info type.
=CELL(“filename”,B2)
FIND the File Name Position
As shown above, the CELL Function returns the file path, name, and worksheet. We don’t need the worksheet or the square brackets, so we use the FIND function to determine the position of the last character (i.e. the one before “]”) of the file name.
=FIND("]",B3)-1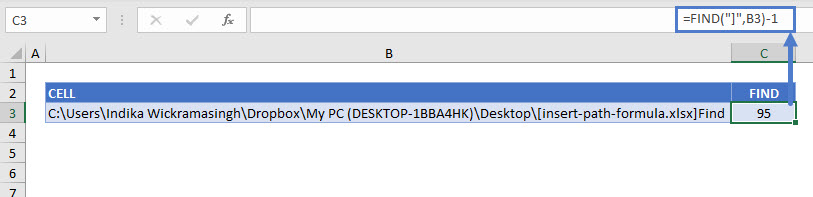
Remove the Worksheet Name
Once we have the position of the file name’s last character, we use the LEFT Function to remove the name of the worksheet.
=LEFT(B3,C3)
SUBSTITUTE Function
You can see above that there is still an open square bracket between the path and file names. Use the SUBSTITUTE function to replace the “[“ with an empty string.
=SUBSTITUTE(D3,"[","")
Combining these steps into a single formula gives us:
=SUBSTITUTE(LEFT(CELL("filename",B2),FIND("]",CELL("filename",B2))-1),"[","")Get Path Only
You might want to show the path only, without the file name. For this, we can stop at the LEFT Function with a little tweak. There’s no need to SUBSTITUTE since there won’t be any mid-string characters to delete. To return just the path, we find the position of the first character of the file name (“[“), instead of the last, and the path name is everything to the left.
=LEFT(CELL("filename",B2),FIND("[",CELL("filename",B2))-1)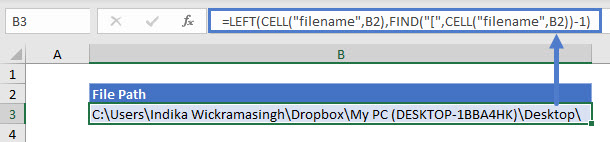
Содержание
- How to get filename from path in Excel
- File path and file name
- Conservative method
- VBA with FileSystemObject
- VBA with a recursive function
- Using LAMBDA to get filename from path
- Using LAMBDA Function with different approach
- Insert the current Excel file name, path, or worksheet in a cell
- Insert the current file name, its full path, and the name of the active worksheet
- Insert the current file name and the name of the active worksheet
- Insert the current file name only
- Need more help?
- Insert the current Excel file name, path, or worksheet in a cell
- Insert the current file name, its full path, and the name of the active worksheet
- Insert the current file name and the name of the active worksheet
- Insert the current file name only
- Need more help?
- Insert File Path in Excel
- Get Path and File Name
- File Name, Path, and Worksheet
- FIND the File Name Position
- Remove the Worksheet Name
- SUBSTITUTE Function
- Get Path Only
- Adding a File Path and Filename
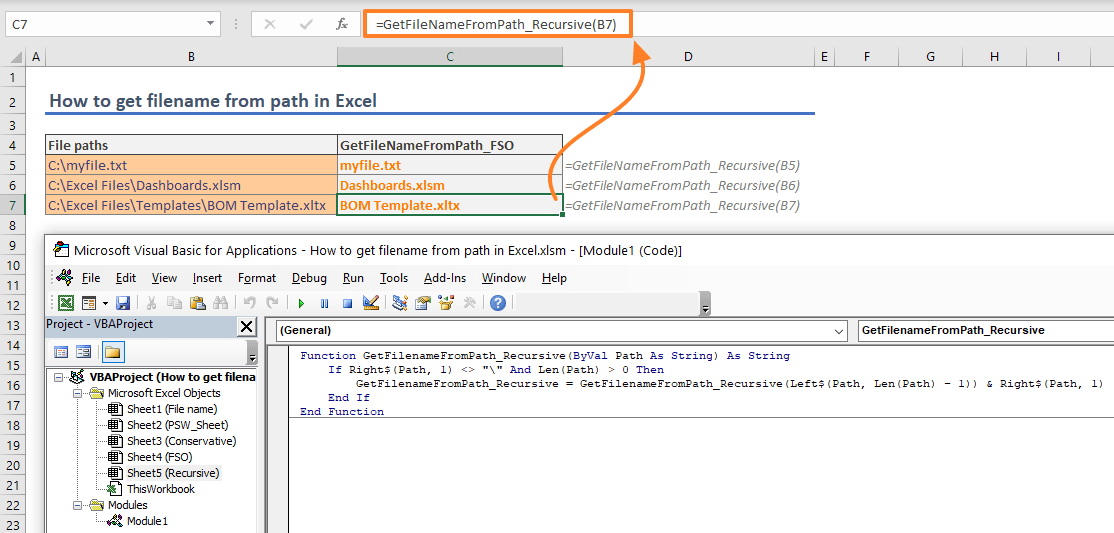
How to get filename from path in Excel

In this guide, we’re going to show you how to get filename from path in Excel. We will cover how to do this with and without VBA.
File path and file name
A file path is a string identifier that specifies the unique location in a file system. It contains folders in a hierarchical order following by a file name. Each element is separated by a delimiter which is usually a backslash «». The goal of getting filename from path is to parse that filename after the last delimiter.

We will show you four different approaches to get filename from path in Excel.
Conservative method
Our first approach is using well known Excel functions MIN, SUBSTITUE and LEN to get the file name. You can use this formula in any Excel version.
This formula has couple of steps:
- At the inner section, all separators («») get replaced with empty strings.
- The formula subtracts the length of substituted path (1) from original path to find the number of separators.
- The outer SUBSTITUTE function replaces the last separator («») with «*». Obviously, the last separator’s instance is equal to number of separators (2).
- Finally, the FIND locates the «*» character, and the MID function parses the file name after the character.

VBA with FileSystemObject
You can use VBA to create your own custom functions which you can use in worksheet as well. Of course, you can use this function in your macros as well.
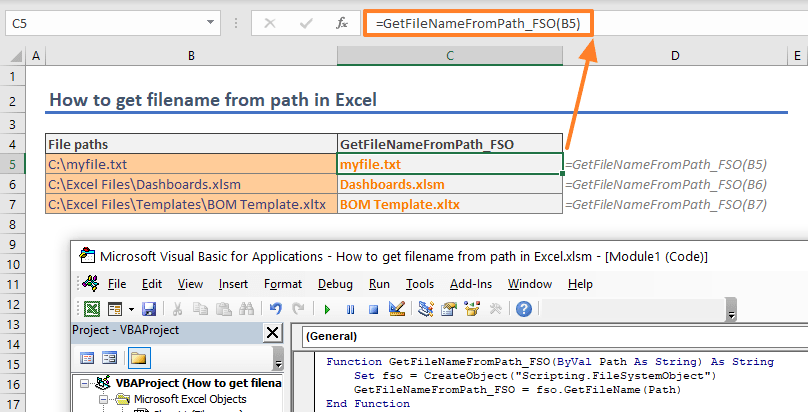
The code is very short. It uses GetFileName method of FileSystemObject object. The important section of the code is the initializing of the object. The following code sets FileSystemObject object to fso variable.
Set fso = CreateObject(«Scripting.FileSystemObject»)
Once the object is initialized, use the GetFileName method by providing the path.
GetFileNameFromPath_FSO = fso.GetFileName(«C:Excel FilesDashboards.xlsm»)
The above line returns «Dashboard.xlsm» string. Here is the function version you can use in your worksheets as well.
VBA with a recursive function
A recursive function is function which calls itself. The recursive approach acts like an iteration and helps us to parse values starting from the end of a string. You could have used recursive functions only in VBA until the LAMBDA function has been released. Because the most of Excel users do not have access to the LAMBDA function, we will show you VBA version which any Excel user can use.
This function has only few rows as well. The function’s name is GetFilenameFromPath_Recursive and take a single argument named Path.
The first row is a logical test that checks if the last character in the argument is a backslash («») or not and if the argument is not an empty string. If the test is passed, the function returns itself with the argument without its last character and the last character of the path. This is where the recursion occurs.
The function runs itself until coming up a backslash («») or not a character left. It parses the characters from the right side and combines them with each run.
The last row contains a standard End If statement which determines where the If block ends.
Using LAMBDA to get filename from path
If you are Microsoft 365 subscriber, you can create recursive functions without using VBA. Briefly, the LAMBDA function is a special function that converts named ranges into user defined functions. Its syntax allows you to define arguments and a custom formula which uses that defined arguments.
For example, let’s say my custom function will have two arguments and returns multiplication of two arguments. All I need to is creating a named range, such as «MyLambda» and enter the following formula into Refers to box.
| Syntax | Sample Formula | Sample Result |
| =LAMBDA(x, y, x*y) | =MyLambda(2,3) | 6 |

If you call the named range «MyLambda» in the «MyLambda» function, you will create a recursive function. Same logic can be applied to VBA function at previous section.
The following is the LAMBDA version of our VBA code. The function’s name is GetFileNameFromPath_Lambda. Check out how the function calls itself after IF function’s logical test.

Using LAMBDA Function with different approach
Alternatively, you can use the LAMBDA function without calling the «function name». The definition may sound complicated since you must call the function in the function by its name. This structure dictates you to update each occurrence of the name every time change the function’s name.
You can overcome this necessity by using another Microsoft 365-specific function called LET. The LET function allows you to define named ranges in a formula scope. You can define repeating values or blocks into these names and use them continuously.
If you define the name of the LAMBDA function in the formula, you can use the in-formula name over and over to make the function recursive. In our example, we create the name «Func» in the formula and call it within self. Outer LAMBDA function is to give the whatever name we want, «GetFileNameFromPath_LambdaMe».
Источник
Insert the current Excel file name, path, or worksheet in a cell
Let’s say you want to add information to a spreadsheet report that confirms the location of a workbook and worksheet so you can quickly track and identify it. There are several ways you can do this task.
Insert the current file name, its full path, and the name of the active worksheet
Type or paste the following formula in the cell in which you want to display the current file name with its full path and the name of the current worksheet:
Insert the current file name and the name of the active worksheet
Type or paste the following formula as an array formula to display the current file name and active worksheet name:
=RIGHT(CELL(«filename»),LEN(CELL(«filename»))- MAX(IF(NOT(ISERR(SEARCH(«»,CELL(«filename»), ROW(1:255)))),SEARCH(«»,CELL(«filename»),ROW(1:255)))))
To enter a formula as an array formula, press CTRL+SHIFT+ENTER.
The formula returns the name of the worksheet as long as the worksheet has been saved at least once. If you use this formula on an unsaved worksheet, the formula cell will remain blank until you save the worksheet.
Insert the current file name only
Type or paste the following formula to insert the name of the current file in a cell:
Note: If you use this formula in an unsaved worksheet, you will see the error #VALUE! in the cell. When you save the worksheet, the error is replaced by the file name.
Need more help?
You can always ask an expert in the Excel Tech Community or get support in the Answers community.
Источник
Insert File Path in Excel
Download the example workbook
This tutorial will demonstrate how to get the path and file name using a formula in Excel.
Get Path and File Name
In Excel there isn’t a function to get the path and file name directly, but the CELL Function will return the file path, name, and sheet. Using the text functions FIND, LEFT, and SUBSTITUTE, we can isolate the path and file name.
Let’s step through the formula.
File Name, Path, and Worksheet
We use the CELL Function to return the file path, name, and sheet by entering “filename” as the info type.
FIND the File Name Position
As shown above, the CELL Function returns the file path, name, and worksheet. We don’t need the worksheet or the square brackets, so we use the FIND function to determine the position of the last character (i.e. the one before “]”) of the file name.
Remove the Worksheet Name
Once we have the position of the file name’s last character, we use the LEFT Function to remove the name of the worksheet.
SUBSTITUTE Function
You can see above that there is still an open square bracket between the path and file names. Use the SUBSTITUTE function to replace the “[“ with an empty string.
Combining these steps into a single formula gives us:
Get Path Only
You might want to show the path only, without the file name. For this, we can stop at the LEFT Function with a little tweak. There’s no need to SUBSTITUTE since there won’t be any mid-string characters to delete. To return just the path, we find the position of the first character of the file name (“[“), instead of the last, and the path name is everything to the left.
Источник
Adding a File Path and Filename
![]()
Written by Allen Wyatt (last updated November 7, 2020)
This tip applies to Excel 97, 2000, 2002, and 2003
Margo wants to insert a file path and filename in an Excel worksheet. She wants to be able to insert the information in either a cell or into the header/footer. This is rather easy to do in Excel.
To insert the file path and filename into a cell, you use the CELL worksheet function in the following manner:
This formula returns the entire path, filename, and tab name of the current worksheet, like this:
If you want to strip out the brackets and the sheet name, you can use the following variation on the formula:
The LEFT function gets rid of everything from the right bracket to the end of the string, while the SUBSTITUTE function gets rid of the left bracket.
Putting a path and filename into a header or footer is easy:
- Select the worksheet whose header or footer you want to change.
- Choose the Page Setup option from the File menu. Excel displays the Page Setup dialog box.
- Click on either the Custom Header or Custom Footer buttons, as desired. Word displays either the Header or Footer dialog box. (See Figure 1.)
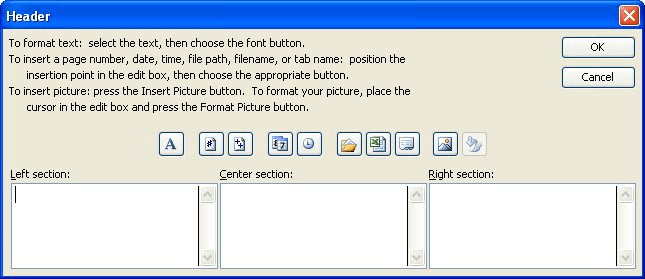
Figure 1. The Header dialog box.
When you print the worksheet, Excel replaces the codes in step 5 with the path name and the file name of the workbook, respectively.
If you are using Excel 97 or Excel 2000, then the above steps won’t work. Instead, you need to use a macro to insert the path and filename:
This macro will also work in later versions of Excel. To specify a different place for the path and filename, simply change CenterFooter to another location (such as LeftFooter, RightFooter, LeftHeader, CenterHeader, or RightHeader). If you decide to use the macro approach, you will need to remember to run it every time that you change either the workbook’s filename (you use Save As), or you change the place where the workbook is stored on your disk.
ExcelTips is your source for cost-effective Microsoft Excel training. This tip (2875) applies to Microsoft Excel 97, 2000, 2002, and 2003. You can find a version of this tip for the ribbon interface of Excel (Excel 2007 and later) here: Adding a File Path and Filename.
Author Bio
With more than 50 non-fiction books and numerous magazine articles to his credit, Allen Wyatt is an internationally recognized author. He is president of Sharon Parq Associates, a computer and publishing services company. Learn more about Allen.
Источник
 Please Note:
This article is written for users of the following Microsoft Excel versions: 97, 2000, 2002, and 2003. If you are using a later version (Excel 2007 or later), this tip may not work for you. For a version of this tip written specifically for later versions of Excel, click here: Adding a File Path and Filename.
![]()
Written by Allen Wyatt (last updated November 7, 2020)
This tip applies to Excel 97, 2000, 2002, and 2003
Margo wants to insert a file path and filename in an Excel worksheet. She wants to be able to insert the information in either a cell or into the header/footer. This is rather easy to do in Excel.
To insert the file path and filename into a cell, you use the CELL worksheet function in the following manner:
=CELL("filename")
This formula returns the entire path, filename, and tab name of the current worksheet, like this:
E:My DataExcel[Budget.xls]Sheet1
If you want to strip out the brackets and the sheet name, you can use the following variation on the formula:
=SUBSTITUTE(LEFT(CELL("filename"),FIND("]",CELL("filename"))-1),"[","")
The LEFT function gets rid of everything from the right bracket to the end of the string, while the SUBSTITUTE function gets rid of the left bracket.
Putting a path and filename into a header or footer is easy:
- Select the worksheet whose header or footer you want to change.
- Choose the Page Setup option from the File menu. Excel displays the Page Setup dialog box.
- Click on either the Custom Header or Custom Footer buttons, as desired. Word displays either the Header or Footer dialog box. (See Figure 1.)
- Position the insertion point in the Left Section, Center Section, or Right Section boxes, as desired.
- Click on the File button. (It looks like a file folder with a piece of paper sticking out.) Excel inserts the following code at the insertion point:
- Click on OK two times to close both dialog boxes.
Figure 1. The Header dialog box.
&[Path]&[File]
When you print the worksheet, Excel replaces the codes in step 5 with the path name and the file name of the workbook, respectively.
If you are using Excel 97 or Excel 2000, then the above steps won’t work. Instead, you need to use a macro to insert the path and filename:
Sub DoFullPath()
    ActiveSheet.PageSetup.CenterFooter = _
      ActiveWorkbook.FullName
End Sub
This macro will also work in later versions of Excel. To specify a different place for the path and filename, simply change CenterFooter to another location (such as LeftFooter, RightFooter, LeftHeader, CenterHeader, or RightHeader). If you decide to use the macro approach, you will need to remember to run it every time that you change either the workbook’s filename (you use Save As), or you change the place where the workbook is stored on your disk.
If you would like to know how to use the macros described on this page (or on any other page on the ExcelTips sites), I’ve prepared a special page that includes helpful information. Click here to open that special page in a new browser tab.
ExcelTips is your source for cost-effective Microsoft Excel training.
This tip (2875) applies to Microsoft Excel 97, 2000, 2002, and 2003. You can find a version of this tip for the ribbon interface of Excel (Excel 2007 and later) here: Adding a File Path and Filename.
Author Bio
With more than 50 non-fiction books and numerous magazine articles to his credit, Allen Wyatt is an internationally recognized author. He is president of Sharon Parq Associates, a computer and publishing services company. Learn more about Allen…
MORE FROM ALLEN
Inserting the Template Name in Your Document
Templates are a powerful part of the Word experience, as they allow you to create and format documents based on patterns. …
Discover More
Aligning Cells when Importing from CSV
When you import information from a CSV text file, Excel formats the data according to its default settings. Wouldn’t it …
Discover More
Stubborn Phantom Paragraphs
When converting documents from WordPerfect to Word, you may run into a problem with what the conversion produces. If you …
Discover More
There are many cases, in which you want to show the sheet name or file name in an Excel cell. Don’t worry, you don’t have to use VBA and create a macro. Excel provides a (rough) formula for returning all the information you need. The bad news: In most cases it takes some complex modifications. The good news: Usually you can just copy and paste the formula you need.
Introduction: Get all the names you need
Fortunately, you don’t have to use VBA. There are formulas for each variation of the sheet name, file name and path. The main part of the formula is the =CELL() formula.
The CELL formula looks something like this: =CELL(“filename”,A1). That means that the CELL formula we have to use has two parts:
- The first part just says “filename”. It is important to add the quotation marks.
- The second part is optional and can link to any cell or workbook. If you leave it blank the current cell and workbook will be used.
The basic version of the CELL formula (=CELL(“filename”,A1) ) returns the full path, file name and sheet name. You can use this formula and cut it into the parts you need. Therefore you use string formulas like LEFT, LEN and so on. We won’t go into detail now as those formulas are highly specific and complex but rather provide the formulas for you to copy.
Note: We’ve published an article about three methods of how to get the sheet name. Maybe this one is interesting for you as well.
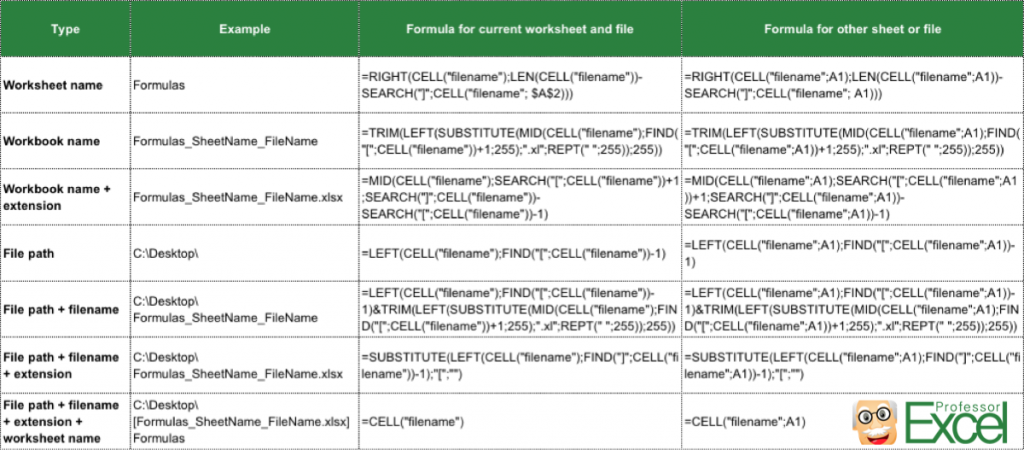
The formulas for sheet name, file name, path etc.
The formulas for inserting file names, sheet names or the path (with and without the extension) are very different. This table gives you an overview. If you want to copy the formulas, you can find them underneath again.
Copy these formulas for the current cell or sheet:
- Worksheet name (example: “Formulas”):
=RIGHT(CELL(“filename”),LEN(CELL(“filename”))-SEARCH(“]”,CELL(“filename”, $A$2))) - Workbook name (example: “Formulas_SheetName_FileName”):
=TRIM(LEFT(SUBSTITUTE(MID(CELL(“filename”),FIND(“[“,CELL(“filename”))+1,255),”.xl”,REPT(” “,255)),255)) - Workbook name + extension (example: “Formulas_SheetName_FileName.xlsx”):
=MID(CELL(“filename”),SEARCH(“[“,CELL(“filename”))+1,SEARCH(“]”,CELL(“filename”))-SEARCH(“[“,CELL(“filename”))-1) - File path (example: “C:Desktop”):
=LEFT(CELL(“filename”),FIND(“[“,CELL(“filename”))-1) - File path + filename (example: “C:DesktopFormulas_SheetName_FileName”):
=LEFT(CELL(“filename”),FIND(“[“,CELL(“filename”))-1)&TRIM(LEFT(SUBSTITUTE(MID(CELL(“filename”),FIND(“[“,CELL(“filename”))+1,255),”.xl”,REPT(” “,255)),255)) - File path + filename + extension (example: “C:DesktopFormulas_SheetName_FileName.xlsx”):
=SUBSTITUTE(LEFT(CELL(“filename”),FIND(“]”,CELL(“filename”))-1),”[“,””) - File path + filename + extension + worksheet name (example: “C:Desktop[Formulas_SheetName_FileName]Formulas”):
=CELL(“filename”) - Folder name (example: “Desktop”):
=TRIM(RIGHT(SUBSTITUTE(LEFT(CELL(“filename”),FIND(“[“,CELL(“filename”),1)-2),””,REPT(” “,100)),100))
Copy these formulas for any linked cell or sheet:
If you want to get the file name, sheet name or path from another cell or workbook, you can use one of the following formulas. Instead of “A1” you insert your cell reference.
- Worksheet name (example: “Formulas”):
=RIGHT(CELL(“filename”,A1),LEN(CELL(“filename”,A1))-SEARCH(“]”,CELL(“filename”, A1))) - Workbook name (example: “Formulas_SheetName_FileName”):
=TRIM(LEFT(SUBSTITUTE(MID(CELL(“filename”,A1),FIND(“[“,CELL(“filename”,A1))+1,255),”.xl”,REPT(” “,255)),255)) - Workbook name + extension (example: “Formulas_SheetName_FileName.xlsx”):
=MID(CELL(“filename”,A1),SEARCH(“[“,CELL(“filename”,A1))+1,SEARCH(“]”,CELL(“filename”,A1))-SEARCH(“[“,CELL(“filename”,A1))-1) - File path (example: “C:Desktop”):
=LEFT(CELL(“filename”,A1),FIND(“[“,CELL(“filename”,A1))-1) - File path + filename (example: “C:DesktopFormulas_SheetName_FileName”):
=LEFT(CELL(“filename”,A1),FIND(“[“,CELL(“filename”,A1))-1)&TRIM(LEFT(SUBSTITUTE(MID(CELL(“filename”,A1),FIND(“[“,CELL(“filename”,A1))+1,255),”.xl”,REPT(” “,255)),255)) - File path + filename + extension (example: “C:DesktopFormulas_SheetName_FileName.xlsx”):
=SUBSTITUTE(LEFT(CELL(“filename”,A1),FIND(“]”,CELL(“filename”,A1))-1),”[“,””) - File path + filename + extension + worksheet name (example: “C:Desktop[Formulas_SheetName_FileName]Formulas”):
=CELL(“filename”,A1) - Folder name (example: “Desktop”):
=TRIM(RIGHT(SUBSTITUTE(LEFT(CELL(“filename”,A1),FIND(“[“,CELL(“filename”,A1),1)-2),””,REPT(” “,100)),100))
Please note:
- The formulas are different for each language and regional settings. So you have to make sure to adapt it to your Excel version. Please check out the download below, it’s probably the easiest option for adapting the formulas to your settings.
- In order to insert the filename or path, you have to save your workbook first. It doesn’t work with a newly created Excel file.
Download an Excel file with all the formulas
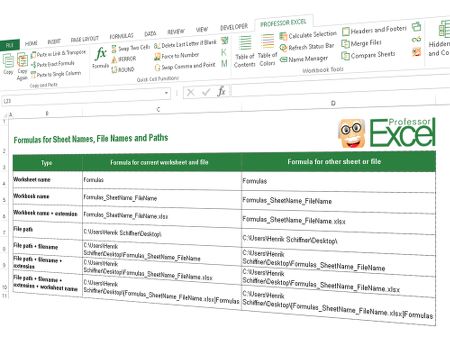
In order to avoid any problems with language and regional settings, you can download all the above formulas with an Excel file.
Just open it and copy the complete cell to your desired location. The download starts instantly (no sign-up or any other annoyances…).
- Download link: Click here.
- File name: Formulas_SheetName_FileName.xlsx
- Size: 35 KB
- File type: XLSX
Anything missing? Suggestions for improvements? Please let us know and leave a comment.

Henrik Schiffner is a freelance business consultant and software developer. He lives and works in Hamburg, Germany. Besides being an Excel enthusiast he loves photography and sports.