
You can apply text formatting to field results in the same way you format any text in your document (for example, bold, underlined, and so on): select the field code or field result, and apply formatting.
Note: If you update a field, any text formatting that you applied to the field results may be lost. To retain the formatting, include the * MERGEFORMAT switch in the field code. When you insert fields by using the Field dialog box, the * MERGEFORMAT switch is included by default.
In addition to text formatting, you can control the format of field results at the field level, with general switches that determine how data in the field is displayed. Depending on the field code, there are three types of general switches:
-
Format switch
-
Numeric format switch
-
Date-Time format switch
The Format field switch (*) defines how to display field results. The format instructions determine the following:
-
The use of uppercase and lowercase letters
-
Number formats — for example, whether 9 is displayed as ix (roman numerals) or ninth (ordinal text)
-
character formats
Format switches also retain a field result’s formatting when the field is updated.
The following is a list of switches and the items that they capitalize:
-
* Caps This switch capitalizes the first letter of each word. For example, { FILLIN «Type your name:» * Caps } displays Luis Alverca even if the name is typed in lowercase letters.
To select this option in the Field Options dialog box, click Title case.
-
* FirstCap This switch capitalizes the first letter of the first word. For example, { COMMENTS * FirstCap } displays Weekly report on sales.
To select this option in the Field Options dialog box, click First capital.
-
* Upper This switch capitalizes all letters. For example, { QUOTE «word» * Upper } displays WORD.
To select this option in the Field Options dialog box, click Uppercase.
-
* Lower This switch capitalizes none of the result; all letters are lowercase. For example, { FILENAME * Lower } displays weekly sales report.doc.
This switch has no effect if the entire field that contains the switch is formatted as small capital letters.
To select this option in the Field Options dialog box, click Lowercase.
The following is a list of number switches and their results:
-
*alphabetic This switch displays results as alphabetic characters. The result has the same case as the word «alphabetic» in the field code. For example, { SEQ appendix * ALPHABETIC } displays B (instead of 2), and { SEQ appendix * alphabetic } displays b.
To select this option in the Field Options dialog box, click a, b, c,.
-
*Arabic This switch displays results as Arabic cardinal numerals. For example, { PAGE * Arabic } displays 31.
Notes:
-
If the Number format setting in the Page Number Format dialog box is not Arabic, this switch overrides the Number format setting.
-
For page numbers only, there is also an ArabicDash format, which displays results as Arabic cardinal numbers surrounded by hyphen characters. For example, { PAGE * ArabicDash } displays — 31 —.
To select this option in the Field Options dialog box, click 1, 2, ,3, ….
-
-
*CardText This switch displays results as cardinal text. The result is formatted in lowercase letters unless you add a format switch to specify a different capitalization. For example, { = SUM(A1:B2) * CardText } displays seven hundred ninety, and { = SUM(A1:B2) * CardText * Caps } displays Seven Hundred Ninety.
To select this option in the Field Options dialog box, click One, Two, Three.
-
*DollarText This switch displays results as cardinal text. Word inserts and at the decimal place and displays the first two decimals (rounded) as Arabic numerators over 100. The result is formatted in lowercase letters unless you add a format switch to specify a different capitalization. For example, { = 9.20 + 5.35 * DollarText * Upper } displays FOURTEEN AND 55/100.
To select this option in the Field Options dialog box, click Dollar Text.
-
*Hex This switch displays results as hexadecimal numbers. For example, { QUOTE «458» * Hex } displays 1CA.
To select this option in the Field Options dialog box, click hex ….
-
*OrdText This switch displays results as ordinal text. The result is formatted in lowercase letters unless you add a format switch to specify a different capitalization. For example, { DATE @ «d» * OrdText } displays twenty-first, and { DATE @ «d» * OrdText * FirstCap } displays Twenty-first.
To select this option in the Field Options dialog box, click First, Second, Third, ….
-
*Ordinal This switch displays results as ordinal Arabic numerals. For example, { DATE @ «d» * Ordinal } displays 30th.
To select this option in the Field Options dialog box, click 1st, 2nd, 3rd.
-
*roman This switch displays results as Roman numerals. The result has the same case as the word «roman» in the field code. For example, { SEQ CHAPTER * roman } displays xi, and { SEQ CHAPTER * ROMAN } displays XI.
To select this option in the Field Options dialog box, click I, II, III,.
The following are character formatting switches and their results:
-
*Charformat This switch applies the formatting of the first letter of the field name to the entire result. The result of the following example has bold formatting because the R in REF is bold.
{ REF chapter2_title * Charformat } displays Whales of the Pacific in bold text.
To add this switch, type it in the field code or in the Field codes box in the Field dialog box.
-
*MERGEFORMAT This switch applies the formatting of the previous result to the new result. For example, if you select the name displayed by the field { AUTHOR * MERGEFORMAT } and apply bold formatting, Word retains the bold formatting when the field is updated to display a new author name.
When you insert fields by using the Field dialog box , the *MERGEFORMAT switch is included by default. You can turn this option off by clearing the Preserve formatting during updates check box in the Field dialog box.
The Numeric format switch (#) specifies the display of a numeric result.
For example, the switch # $,0.00 in { = SUM(ABOVE) # $,0.00 } displays a result such as «$4,455.70.» If the result of a field is not a number, this switch has no effect.
Note: Quotation marks are not required around simple numeric formats that do not include spaces — for example, { MarchSales # $,0.00 }. For more complex numeric formats and those that include text or spaces, enclose the numeric format in quotation marks, as shown in the following examples. Word adds quotation marks to numeric format switches if you insert a field by using the Field dialog box or the Formula command in the Data group of the Layout tab (Table Tools contextual tab).
Combine the following format items to build a numeric format switch:
-
0 (zero) This format item specifies the requisite numeric places to display in the result. If the result does not include a digit in that place, Word displays a 0 (zero). For example, { = 4 + 5 # 00.00 } displays 09.00.
-
# This format item specifies the requisite numeric places to display in the result. If the result does not include a digit in that place, Word displays a space. For example, { = 9 + 6 # $### } displays $ 15.
-
x This format item drops digits to the left of the «x» placeholder. If the placeholder is to the right of the decimal point, Word rounds the result to that place. For example:
{ = 111053 + 111439 # x## } displays 492.
{ = 1/8 # 0.00x } displays 0.125.
{ = 3/4 # .x } displays .8. -
. (decimal point) This format item determines the decimal point position. For example, { = SUM(ABOVE) # $###.00 } displays $495.47.
Use the decimal symbol that is specified as part of the regional settings in Control Panel.
-
, (digit grouping symbol) This format item separates a series of three digits. For example, { = NetProfit # $#,###,### } displays $2,456,800.
Use the digit grouping symbol that is specified as part of the regional settings in Control Panel.
-
— (minus sign) This format item adds a minus sign to a negative result or adds a space if the result is positive or 0 (zero). For example, { = 10 — 90 # -## } displays -80.
-
+ (plus sign) This format item adds a plus sign to a positive result, a minus sign to a negative result, or a space if the result is 0 (zero). For example, { = 100 — 90 # +## } displays +10, and { = 90 — 100 # +## } displays -10.
-
%, $, *, and so on This format item includes the specified character in the result. For example, { = netprofit # «##%» } displays 33%.
-
«example formatting for positive; negative» This format item specifies different number formats for positive and negative results, separated by a semicolon. For example, if the bookmark Sales95 is a positive value, the field { Sales95 # «$#,##0.00;-$#,##0.00» } displays the value with regular formatting — for example, «$1,245.65». A negative value is displayed with bold formatting and a minus sign — for example, -$ 345.56.
-
«example formatting for positive; negative; zero» This format item specifies different number formats for a positive result, a negative result, and a 0 (zero) result, separated by semicolons. For example, depending on the value of the Sales95 bookmark, { Sales95 # «$#,##0.00;($#,##0.00);$0» } displays positive, negative, and 0 (zero) values as follows: $1,245.65, ($ 345.56), $0.
-
‘text’ This format item adds text to the result. Enclose the text in single quotation marks. For example, { = { Price } *8.1% # «$##0.00 ‘is sales tax’ » } displays $347.44 is sales tax.
-
`numbereditem` This format item displays the number of the preceding item that you numbered by using the Caption command (References tab, Captions group) or by inserting a SEQ field. Enclose the item identifier, such as «table» or «figure,» in grave accents (`). The sequential number is displayed in Arabic numerals. For example, { = SUM(A1:D4) # «##0.00 ‘is the total of Table’ `table`» } displays 456.34 is the total of Table 2.
The Date-Time format switch (@) specifies how to display the date or time.
For example, the switch @ «dddd, MMMM d, yyyy» in the field { DATE @ «dddd, MMMM d, yyyy» } displays «Friday, November 23, 2019.» Combine the following date and time instructions — day (d), month (M), and year (y); hours (h) and minutes (m) — to build a date-time format. You can also include text, punctuation, and spaces.
Month (M)
The letter M must be uppercase to distinguish months from minutes.
-
M This format item displays the month as a number without a leading 0 (zero) for single-digit months. For example, July is 7.
-
MM This format item displays the month as a number with a leading 0 (zero) for single-digit months. For example, July is 07.
-
MMM This format item displays the month as a three-letter abbreviation. For example, July is Jul.
-
MMMM This format item displays the month as its full name.
Day (d)
The letter d displays the day of the month or the day of the week. The letter d can be either uppercase or lowercase.
-
d This format item displays the day of the week or month as a number without a leading 0 (zero) for single-digit days. For example, the sixth day of the month is displayed as 6.
-
dd This format item displays the day of the week or month as a number with a leading 0 (zero) for single-digit days. For example, the sixth day of the month is displayed as 06.
-
ddd This format item displays the day of the week or month as a three-letter abbreviation. For example, Tuesday is displayed as Tue.
-
dddd This format item displays the day of the week as its full name.
Year (y)
The letter y displays the year as two or four digits. The letter y can be either uppercase or lowercase.
-
yy This format item displays the year as two digits with a leading 0 (zero) for years 01 through 09. For example, 1999 is displayed as 99, and 2006 is displayed as 06.
-
yyyy This format item displays the year as four digits.
Hours (h)
A lowercase h bases time on the 12-hour clock. An uppercase H bases time on the 24-hour, or military, clock; for example, 5 P.M. is displayed as 17.
-
h or H This format item displays the hour without a leading 0 (zero) for single-digit hours. For example, the hour of 9 A.M. is displayed as 9.
-
hh or HH This format item displays the hour with a leading 0 (zero) for single-digit hours. For example, the hour of 9 A.M. is displayed as 09.
Minutes (m)
The letter m must be lowercase to distinguish minutes from months.
-
m This format item displays minutes without a leading 0 (zero) for single-digit minutes. For example, { TIME @ «m» } displays 2.
-
mm This format item displays minutes with a leading 0 (zero) for single-digit minutes. For example, { TIME @ «mm» } displays 02.
Seconds (s)
-
s This format item displays seconds without a leading 0 (zero) for single-digit seconds. For example { TIME @ “s” displays 5.
-
ss This format item displays seconds with a leading 0 (zero) for single-digit seconds For example { TIME @ “ss” displays 05.
A.M. and P.M. (AM/PM)
This displays A.M. and P.M. To change the A.M. and P.M. symbols for Microsoft Windows, change the regional settings in Control Panel.
-
am/pm or AM/PM This format item displays A.M. and P.M. as uppercase. For example, { TIME @ «h AM/PM» } and { TIME @ «h am/pm» } display 9 AM or 5 PM.
-
‘text’ This format item displays any specified text in a date or time. Enclose the text in single quotation marks. For example, { TIME @ «HH:mm ‘Greenwich mean time’ » } displays 12:45 Greenwich mean time.
-
character This format item includes the specified character in a date or time, such as a : (colon), — (hyphen), * (asterisk), or space. For example, { DATE @ «HH:mm MMM-d, ‘yy» } displays 11:15 Nov-6, ’99.
-
`numbereditem` This format item includes in a date or time the number of the preceding item that you numbered by using the Caption command in the Captions group (References tab), or by inserting a SEQ field. Enclose the item identifier, such as table or figure, in grave accents (`). Word displays the sequential number in Arabic numerals. For example, { PRINTDATE @ «‘Table’ `table` ‘was printed on’ M/d/yy» } displays Table 2 was printed on 9/25/02.
Note: Quotation marks are not required around simple date-time formats that do not include spaces or text — for example, { DATE @ MM/yy }. For more complex date-time formats and those that include spaces or text, enclose the entire date-time format in quotation marks, for example, { DATE @ «dddd MMMM d, yyyy’, at’ h:mm» }. Word adds quotation marks to date-time format switches if you insert a field by using the Date and Time command in the Text group of the Insert tab or the Field dialog box.
As you work on a document, you usually see the results of the field codes that you’ve inserted instead of
the actual codes themselves. Because of this, these field results may be difficult to distinguish from
standard text, so Word has added a feature called shading that helps you to locate such results.
When this feature is turned on, the information that represents the results of a field code is placed
over a gray background shading.
To change the shading setting, do the following:
1. On the File tab click Options:

2. On the Advanced tab, under the Show document content
group, select the Field Shading drop-down list box.

It provides three different options:
- Never: Turns off the shading feature altogether.
- Always: Shades all field codes all the time.
- When Selected: Shades field codes or their results whenever the cursor is placed on them.
Field shading lets you know where the fields are located in a document. This shading doesn’t show in
Print Preview, however, and it doesn’t print with the document.
As you work on your document, you may want to skip from one field to the next to verify that you’ve
inserted the ones that you want. You can use shortcut key combinations to move to the next or the
previous field code. Press F11 to move to the next field code, or press Shift+F11 to move
to the previous field.
See also this tip in French:
Comment révéler des champs de document.
In a printed document, characters such as spaces, tabs and paragraph marks are invisible. However, Word lets you display such formatting marks on the screen. Formatting marks are also known as nonprinting characters or codes.
In this article you will learn how the formatting marks work and why they are useful.
Latest updated 22-Oct-2019. Video renewed in order to work without using Adobe Flash Player.
The basics about formatting marks
Some of the basic formatting marks
When formatting marks are turned on, you will see spaces, tabs, paragraph marks and other formatting marks on the screen. Some of the basic formatting marks are illustrated below.

Keyboard shortcut
Ctrl+Shift+8 can be used to turn formatting marks on and off.
You can also turn formatting marks on and off by clicking the pilcrow symbol ¶ on the Home tab of the Ribbon (found in the Standard toolbar in Word 2003).
Where to find the options for formatting marks:
- Word 2010 and later versions: File > Options > Display
- Word 2007: Office button > Word Options > Display
- Word 2003: Tools > Options > View tab
For an introduction to the formatting marks and for information about how to turn them on and off, view the video below.
View video — see how formatting marks work
Note that the video below was originally made using Word 2003. The formatting marks work the same way in Word 2007 and later versions of Word. Information about where to find options for formatting marks in Word 2007 and later versions has been added in the video. You will also find that information in written text in this article.
Visible formatting marks help you keep track of formatting
Many users who are not familiar with formatting marks get confused if they by incident turn on the formatting marks. However, if you need to control the formatting of documents down to the last detail, visible formatting marks are a must.
It may take some time getting used to work with visible formatting marks but it is well worth the effort.
About display of text boundaries
In addition to the formatting marks, the video illustrates how the option Text boundaries works. In Word 2003, Word 2007 and Word 2010, you can turn on text boundaries to have dotted lines shown around margins. This is very useful for layout purposes. Unfortunately, Word 2013 and newer Word versions display text boundaries as dotted lines around each paragraph instead which makes the option very little useful in those versions of Word.
Where to find the option for text boundaries:
- Word 2010 and later versions: File > Options > Advanced > Show document content group > Show text boundaries
- Word 2007: Office button > Word Options > Advanced > Show document content group > Show text boundaries.
- Word 2003: Tools > Options > View tab > Text boundaries
When you insert a field in your document it stores as a field code, a special set of instructions that tells Word what to display. Usually what you see is the field’s result, the value that Word creates by evaluating the field code. For example, the {DATE @ "M/d/yyyy"} field code is used to display the current date on the document.
To insert date field, click Insert tab, choose Date & Time from the Text group, choose a date format from the Date and Time dialog box, make sure the Update Automatically box is check, and click OK to insert the date. Press Alt+F9 to see date-field code. If you want to see field result instead of code, press Alt+F9 again:
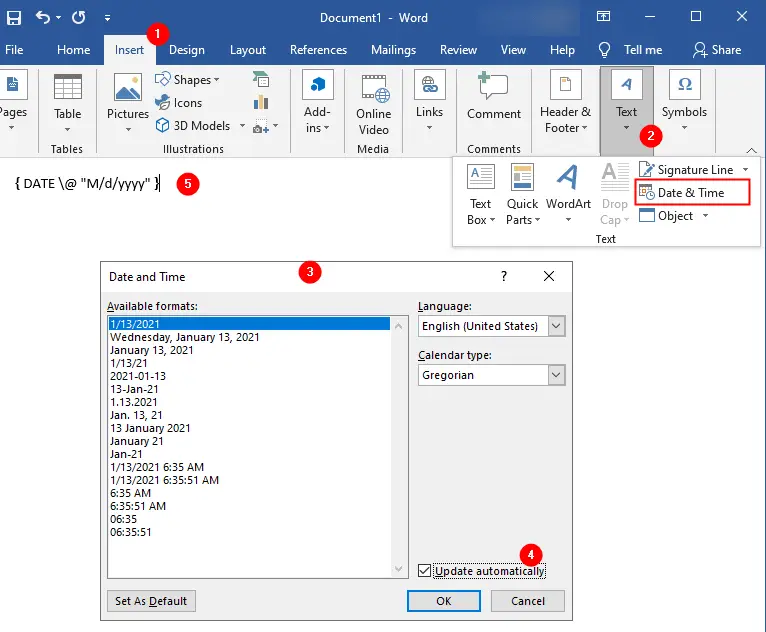
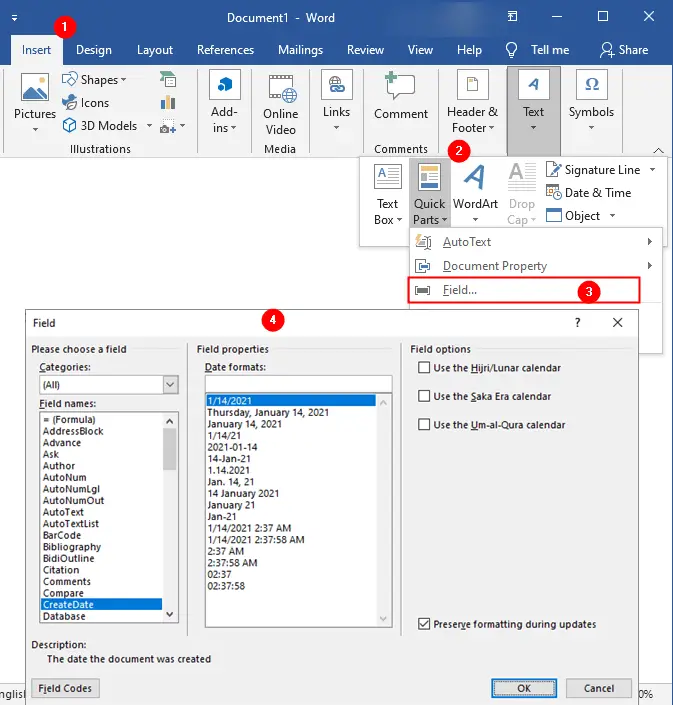
Field dialog box
There are several ways to insert fields into a document, but the Field dialog box provides more types of fields. Click Insert tab, in the Text group, click Quick Parts and then click Field to open the dialog box:
Insert a field with keyboard
A field code consists of:
- Field markers
{}: The entire field code is enclosed in a pair of field markers. PressCtrl+F9to insert a pair of field markers. - Field name.
- Instructions, such as a formula.
- Switches (optional), to modify or format the field’s result
To manually write the field code, click in your document where you want the field result to appear. Press Ctrl+F9 to insert a pair of field markers. Type the field code between the markers, including any text and switches that are needed to produce the code result that you want.
For example, to insert the date field manually:
- Press
Ctrl+F9to insert field markers - Write
DATEinside the field marks - Click
Update Fieldbutton which appears on top of the field marks (or pressF9keyboard button):

- After updating the field, code disappears and you can see the result of the field code (the current date).
Toggle field codes
To show or hide field codes for the entire document:
- Press
Alt+F9to display all the field codes. - Press
Alt+F9again to redisplay all the field results.
To show or hide field code for a selection or specific field:
- Press
Shift+F9to display the field codes for a selection. - Press
Shift+F9again to redisplay the field results for a selection.
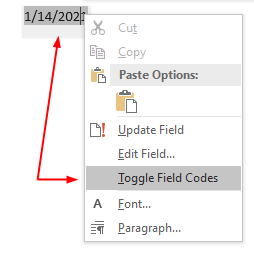
Use mouse to toggle field code
Right-click the selection, and then in the shortcut menu that appears, click Toggle Field Codes to display the field codes of only the fields within the selected text:
Field Switches
You can control the appearance of fields that produce numbers, dates, or text as their field results by using optional switches that modify the result in the way that you specify. The insert the date field manually example inserts the date in Word’s default format. If you want to specify a date format other than the default form, or the format you want to use is not available in Field dialog box, you need to use the Switches.
Press Alt+F9 to manually edit the date field, or open the Field dialog box (Insert > Quick Parts > Field), select Date and click Field Codes:
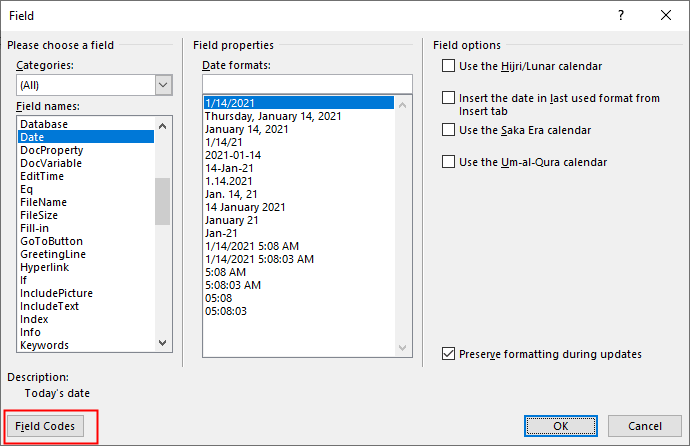
Field Codes to customize the field format
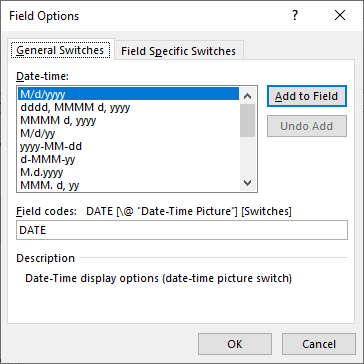
Write field code to format the date field, for example, the DATE @ "dddd, MMMM d" code displays Thursday, January 14:

Field codes box or click Options to see the available switches
Click the Options button to see the available switches for the Date field:
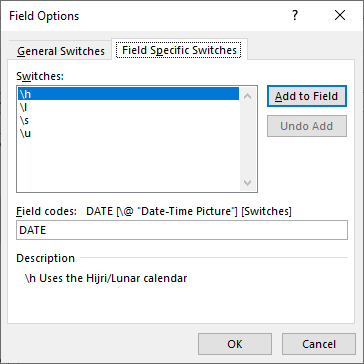
The Field Specific Switches:
More Fields Tutorials:
- Word Fields
- Insert a field with keyboard
- Show/hide (toggle) field codes
- Field Switches
- The ListNum field
- Define Multilevel List with “ListNum field list name”
- List Numbering using SEQ Fields
- AutoCorrect for SEQ Fields
- Hide, Unhide, Lock, or Unlock Fields
- Field Shading
- Apply Formula Field in Paragraphs
As we know in MS Word there is a lot of so-called «formating characters”: spaces, tabs, paragraph breaks ets. We can see them by toggling Show/Hide formating characters button:

This button has a ScreenTip «Show/Hide ¶.” and in Word 2007
is in the Paragraph group on the Home tab.). So, the shortkeys are (Ctrl+*) and (Ctrl+Shift+8).When turn on showing nonprinting characters, you see many «interesting» symbols. So what do all these marks represent?
Paragraph marks
The paragraph mark or pilcrow (¶) represents a paragraph break. You should
see one at the end of each paragraph (if there is not one, you’ll likely find
that you have a problem). Ordinarily you should not see one anywhere else. By
this I mean that you should not be ending lines with paragraph breaks, nor
should you be using «empty paragraphs” to create «blank lines” between
paragraphs (in most cases this is better accomplished with Space Before or
After).
The ¶ contains all the paragraph formatting. You can select it, copy it, and
paste it onto another paragraph to copy and paste formatting (though there are
other ways to do this as well). The last ¶ in the document contains formatting
for the entire document (header/footer and margin information, for example) or
for the last section if there are more than one.
Line breaks
A right-angle arrow pointing to the left
![]()
represents a line break, inserted with Shift+Enter. You
can use a line break to start a new line without starting a new paragraph.
A right-angle arrow between two vertical lines
![]()
represents a text-wrapping break. This new break type, introduced in Word
2000 and intended primarily for Web pages, is used to force subsequent text
below an adjacent text-wrapped object. For example, if you have a caption beside
a picture and end it with a text-wrapping break, the text following the caption
will start below the picture regardless of how long or short the caption is.
Pagination breaks
More obvious in their meaning are manual column, page, and Section Breaks. To
delete these, you can simply select them and press the delete key (or you can
use
Find and Replace). The examples below show how they appear in Word 2003 and
earlier; the display is a little different (but still recognizable) in Word
2007.
![]()
![]()
![]()
![]() Finally,
Finally,
you will sometimes see a small black bullet
![]() in
in
the margin next to a paragraph.
This indicates that the paragraph is formatted with the «Keep with
next,” «Keep lines together,” «Page break
before,” or «Suppress line numbers” property.
These settings are found on the Line and Page Breaks tab of
the Paragraph dialog (Format | Paragraph in
Word 2003 or earlier; accessed through the dialog launcher in the bottom right
corner of the Paragraph group on the Home tab
in Word 2007); if you double-click on the «bullet” itself, you will bring up
this dialog with the Line and Page Breaks tab selected. Word’s built-in Heading
styles by default are formatted as «Keep with next,” so you will always see
these bullets next to them.
Space characters
In most fonts, and certainly all Windows «core fonts”, a∙
small∙
raised∙ dot∙
represents∙
an∙ ordinary∙
space∙ (some∙
fonts,∙ such∙
as∙ Arial
Special G1, don’t
include a character
to represent a space;![]() and
and![]() some
some![]() use
use![]() a
a![]() large
large![]() square,
square,
which can be very distracting).
Be sure you don’t have space ∙ ∙
characters ∙ ∙
where ∙ ∙ they are
∙ ∙ not
∙ ∙ needed. If you are tidy-minded, for
example, you won’t want a string of them at the end of a paragraph where your
thumbs relaxed on the spacebar while you stopped to think.∙
∙ ∙ ∙ ∙ ∙ ∙ ∙ ∙ ∙ ∙ ∙ ∙
A degree symbol °
represents a nonbreaking space (Ctrl+Shift+Spacebar), which you
can use to prevent words from being separated at the end of a line.
This is useful for keeping dates together (so you don’t end up with September
5, 2000), as well as initials such as J. P.
V. D. Balsdon.
En and em spaces (on the Special Characters tab of the
Symbol dialog) are also represented by the degree symbol, but
there is extra space to the left of the symbol for an en space
°and extra space both left
and right for an em °
space.
Tabs
An arrow pointing to the right →
represents a tab character, where you have pressed the Tab key. As
explained in the article on
setting tabs,
in a well-formatted document you should not see more than one of these in a row.
→ → →
Hyphens
A conditional hyphen (one that is printed only if it falls at a line break,
entered with Ctrl+Hyphen) is shown as ¬.
A nonbreaking hyphen (Ctrl+Shift+Hyphen), which is useful for phone numbers
and any hyphenated compound you don’t want to break at the end of a line, is
displayed as a dash whose length is intermediate between an en (–) dash and an
em (—) dash. This is one of the most confusing symbols because it is very
difficult to tell, with nonprinting characters displayed, whether you have
actually entered a nonbreaking hyphen or a dash.
Cell markers
In tables you will see one additional character, the universal monetary
symbol (¤), which displays variously at various point sizes and magnifications
but upon close inspection is seen to be a circle with four lines radiating from
the corners. ¤
| This is the end-of-cell marker. It is a little like the paragraph mark in that it contains paragraph formatting for the last (or only) paragraph in the cell, but it also holds formatting for the cell. The same mark at the end of each row is the (wait for it) end-of-row |
¤ |
Hidden text
One other type of «nonprinting character” that is toggled by the Show/Hide
button
![]()
is Hidden text.
![]()
Even when it is displayed, Hidden text is not printed unless you check the
box for it on the Print tab of Tools | Options (in Word 2007, this setting is at
Office Button | Word Options | Display: Printing options)
There are a number of clever formatting tricks you can do by formatting text
(especially paragraph breaks) as Hidden, but you must hide it in order to see
how the document will look when printed. It is especially important to hide it
before generating a table of contents or index; if there is enough of it to
affect the pagination, then the page numbers in your TOC or index may be
incorrect. Note in particular that the XE (index entry) fields
used to generate an index and the TC fields that can be used to
generate entries in a TOC are formatted as hidden text, so it is important to
hide these before generating the index and TOC.
Coloured underlines
In addition to the dotted underline indicating hidden text, Word uses a
variety of different types of colored underlines—solid, dotted, and wavy—to give
information about the text. For an explanation of the meaning of these various
underlines, see the Help topic «What do the underlines in my
document mean?” or the Microsoft Knowledge Base article «Unusual
marks that may appear in a Word document.”
Anchors
Another very important nonprinting character is the
anchor symbol –
when working with
floating objects it’s often crucial to know where these are
![]()
There are two other types of nonprinting characters that are not (usually)
toggled with the Show/Hide ¶ button:
Field codes
A field is a set of codes that instructs Microsoft Word to
insert text, graphics, page numbers, and other material into a document
automatically. For example, the
DATE field
inserts the current date. Ordinarily Word displays the result of a field (the
date, page number, number of pages, number of words, etc.), but if you press
Alt+F9 or select Toggle Fields on the shortcut
menu, you will see the code itself, enclosed in curly braces, such as { DATE @ «dddd, MMMM d» }.
As mentioned above, there are two types of field codes that are toggled with
the Show/Hide ¶ button rather than the Toggle Fields command.
Both TC (table of contents entry) and XE
(index entry) fields are formatted as Hidden text; when you insert either type
of field, the display of nonprinting characters is toggled on by default so that
you can see these codes.
Bookmarks.
When the box for «Bookmarks ” is checked on the View tab of
Tools | Options (in Word 2007, find this setting at
Office Button | Word Options | Advanced: Show document content),
user-defined bookmarks are indicated by heavy square gray brackets. A
single-point bookmark has the brackets reversed so that it looks like a capital
I.

Even if you choose to keep nonprinting characters hidden most of the time,
displaying them can be very helpful in
troubleshooting
obstreperous documents. If your pages are not breaking as you like, perhaps
it is because you have too many (or the wrong) paragraphs set as «Keep with
next.” If your printer is
adding a blank page
at the end of your document, it could be that you have a string of empty
paragraphs at the end that are forcing an extra page. Accidentally deleting the
paragraph break before a manual page break or Section Break can cause very
peculiar problems. And if an automatic number insists on being bold even though
you have applied bold formatting to only a part of the numbered paragraph, it
could be that you need to select the paragraph mark and unbold it, since
automatic bullets and numbering take on the formatting of the paragraph mark.
All of these problems are much easier to diagnose if you can see what you’re
dealing with.
In general, it’s best to proofread your documents twice; once for content,
with nonprinting characters off (as they can be distracting when reading); and a
second time with nonprinting∙
characters ∙
visible, ∙ so
∙ that
∙ you
∙ can
∙ check
∙ for redundant
![]()
line breaks, space ∙ ∙ ∙
characters ∙ and
∙ the like.