
3 Ways to Extract Images from a Word File
by Avantix Learning Team | Updated April 7, 2021
Applies to: Microsoft® Word® 2010, 2013, 2016, 2019 or 365 (Windows)
In Microsoft Word, images can be extracted one by one or you can extract all images by converting a Word document to a zip file or saving it as a web page. Extracting all images is helpful if you’d like to find pictures that are inflated in size or reuse pictures in other files. In this article, we’ll use 3 methods to extract images (we’re referring to images or pictures that have been inserted into your Word document, not shapes or SmartArt you’ve created).
Recommended article: How to Reduce the Size of a Microsoft Word Document (10 Ways to Compress a Word File)
Do you want to learn more about Word? Check out our virtual classroom or live classroom Word courses >
Extracting one image at a time using Save as Picture
You can extract individual images and save them as new files using Save As Picture.
There are two benefits to this method:
- You can give each image a meaningful name and save it in a specific location.
- You can save the image as a different file type.
To save an image as a new file:
- Right-click the image and then click Save as Picture from the drop-down menu.
- In the Save as type drop-down menu, select the image file format you want to use. You can save a picture in many formats but common choices are JPG or JPEG (Joint Photographics Experts Group) or PNG (Portable Network Graphics).
- In the File name box, type a name for the file.
- Navigate to the desired location.
- Click Save.
Displaying file extensions in Windows
In order to use the zip procedure (below), you may need to display file extensions in Windows if they are not showing automatically.
If you’re using Windows 8 or 10:
- In File Explorer, click the View tab in the Ribbon.
- In the Show/Hide group, click the File name extensions check box.
If you’re using Windows 7:
- In Windows Explorer, click Folder and Search Options and then click Organize.
- On the View tab, under Files and Folders, clear the check box for Hide extensions for known file types.
- Click OK.
Extracting all images by changing the file to a zip format
If you want to extract all images, the following trick works with any Microsoft Word file using XML (Extensible Markup Language) format. XML files are stored as a package and can therefore be unzipped. They also end with an «x» such as .docx.
In order to use the zip method, you will need a document created in Word 2007 or a later version and File Explorer or Windows Explorer must be set so that it shows file names with extensions (see the following section if extensions are not displayed).
To extract all image files from a Microsoft Word file:
- In File Explorer or Windows Explorer, select the document (it should have a .dotx extension) with the images you wish to extract.
- Right-click and choose Copy or press Ctrl + C.
- Right-click and choose Paste or press Ctrl + V.
- Right-click the copy of the document and choose Rename.
- Change the file extension from .dotx to .zip (Windows must be set to display file extensions).
- Press Enter. A dialog box appears warning you that the file may become unusable if you change the extension.
- Click Yes to continue. The file icon changes to a folder icon.
- Double-click the zipped folder. The zipped folder contains multiple folders (some contain information such as XML code or properties).
- Double-click the Word folder.
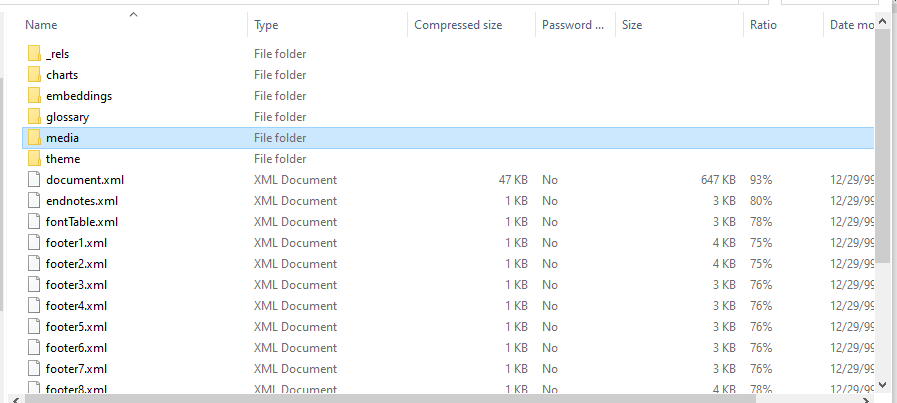
- Double-click the media folder to view image, video and audio files. Each file is given a generic name.
- Copy these files (or the entire folder) to another location to use in other documents and to rename the files. Copying to another location will unzip the files. You can also click the Extract button in Windows Explorer to extract the files to another location.
Below is a sample Word folder (with a media folder) created during this process:
Extracting all images by saving the Word file as a web page
Unlike PowerPoint, Microsoft Word files can be saved as web pages (HTML format). If you save a Word file as a web page, then separate files are created for pictures and media files.
To extract all image files from a Microsoft Word file by saving the file as a web page:
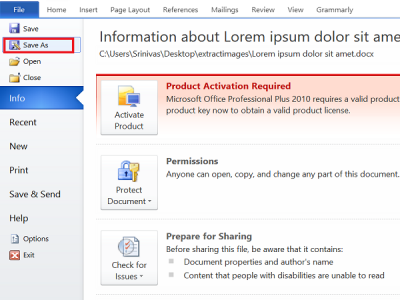
- Click the File tab in the Ribbon and select Save As.
- From the Save As Type drop-down menu, select Web Page.
- Enter a new name for the file. A .htm extension will be added.
- Click OK.
- A dialog box may appear indicating that you may lose some formatting. Click Continue. Word will change the view to Web Layout View.
- Close the file.
- In File Explorer or Windows Explorer, navigate to the location in which you had saved the file. A folder should have been created with the same name and «files» at the end.
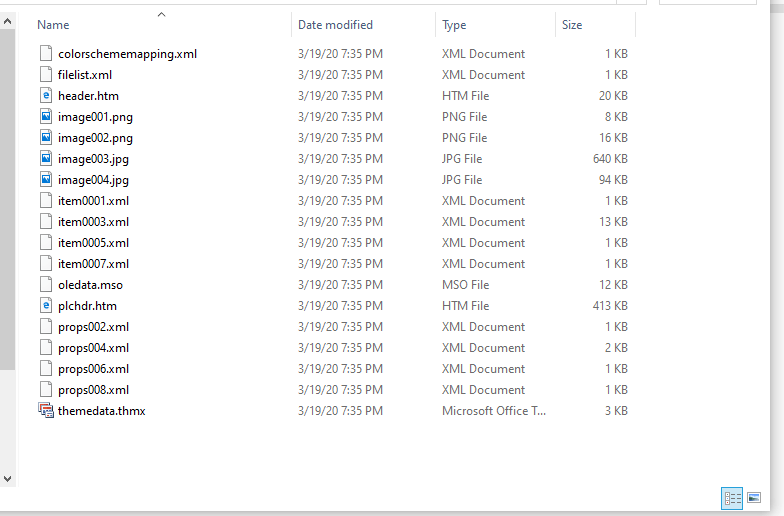
- Double-click the folder. Image, video and audio files should appear in this folder. Each file is given a generic name.
- Right-click any of the files to rename them.
Below are the contents of a folder that was created when a Word file was saved as a web page:
When you open Word again, click the View tab and select Print Layout (the default view).
It’s up to you which method you’d prefer but the last two are the easiest if you are extracting multiple images.
Subscribe to get more articles like this one
Did you find this article helpful? If you would like to receive new articles, join our email list.
More resources
How to Double Space in Word (4 Ways)
14 Shortcuts to Quickly Select Text in Microsoft Word
How to Check Word Count in Microsoft Word (4 Ways)
How to Show or Hide White Space in Word Documents
How to Create a Hanging Indent or First Line Indent in Microsoft Word
Related courses
Microsoft Word: Intermediate / Advanced
Microsoft Excel: Intermediate / Advanced
Microsoft PowerPoint: Intermediate / Advanced
Microsoft Word: Long Documents Master Class
Microsoft Word: Styles, Templates and Tables of Contents
Microsoft Word: Designing Dynamic Word Documents Using Fields
VIEW MORE COURSES >
Our instructor-led courses are delivered in virtual classroom format or at our downtown Toronto location at 18 King Street East, Suite 1400, Toronto, Ontario, Canada (some in-person classroom courses may also be delivered at an alternate downtown Toronto location). Contact us at info@avantixlearning.ca if you’d like to arrange custom instructor-led virtual classroom or onsite training on a date that’s convenient for you.
Copyright 2023 Avantix® Learning
Microsoft, the Microsoft logo, Microsoft Office and related Microsoft applications and logos are registered trademarks of Microsoft Corporation in Canada, US and other countries. All other trademarks are the property of the registered owners.
Avantix Learning |18 King Street East, Suite 1400, Toronto, Ontario, Canada M5C 1C4 | Contact us at info@avantixlearning.ca
Download PC Repair Tool to quickly find & fix Windows errors automatically
Microsoft Word allows us to insert images easily and without reducing any resolution. We might come across a situation where we want to share only images and not the entire document, or you might have deleted all images from your Windows PC and want to get them back from the Word document. Normally, what everyone would do is right-click on the image and select “Save image as”, but that is a time-consuming and tedious task. In this article, I will let you know of three ways to extract all images from Word documents in an easy way without the need for any special tools or 3rd-party software.
There may be other ways to extract all the images from a Word document, but here are the 3 best ways to do it. So, let us start without any ado.
1. Save the Word Document as Web Page
This is one of the easiest methods to extract all images from a Word document. We will save the Word document as a Web Page and it will extract all images as a batch.
Open the Word document from which you want to extract all images. Now, click on the “File” button on the top left of the document and select “Save As”.
Select the location where you want to save and give the meaningful name. Now, under “Save As” dropdown, select “Web Page”.
You will also see “Web Page, Filtered” but do not select it as it may reduce the resolution of images. Click on “Save” button to save the Word document as the Web Page.
Go to the location where you have saved the document and you would see ‘.htm’ file and the folder with the given name will be created.
Open the folder and you could see all the images listed there. Copy all these images to any folder you like.
2. Change the extension from ‘.docx’ to ‘.zip’
This method to extract all images as a batch from the document is so simple that all you need to do is rename the extension of the file from ‘.docx’ to ‘.zip’.
Select the required document, right-click on it and select “Rename”.

Now, change the extension from ‘.docx’ to ‘.zip’ and hit Enter. It will show you this dialog box, but do not worry and click “Yes”.
Use any of the zip extraction software like 7-Zip, WinRAR, etc, to extract this zip file. Give the location where you want to extract the zip folder.
Now, open the folder you have extracted and go to Word > Media.
Now, in the ‘media’ folder you will find all images which you can copy to another folder if you want.
UPDATE: You may just right-click the Word file and use 7-Zip to extract the images.
3. Copy and Paste Method
This method is not as good as the above two, but it would be very helpful when you want to extract one or two images only.
Right-click on the image and select “Copy” from the options. The size and resolution of the copied image will not be affected.
Now, open any image processing tool like Paint, Photoshop or GIMP, but here I would use the default tool called “Paint”. Open Paint, paste the image and press “CTRL+S” or click Save button to save the image.
These are some of the ways to extract images in a Word document as a batch.
If you are looking for a freeware to easily batch extract and save images from any Office document use the Office Image Extraction Wizard.
Also read: How to Find and Replace all Images in Word at once.

Sridhar is a Software Engineer who loves to stay updated with developments in the world of technology. He is fond of writing everything related to Internet, Computers and Mobile and Desktop Operating Systems.
In the following article, we will emphasize on discussing 3 easy and operable ways to extract pictures from Word documents.
Now and then there are times when you need to save all the pictures from a Word document. As a result, here we are to offer you 3 quick ways to extract images with original resolution. Read on to find out more details.
Method 1: Save as Picture
- Firstly, open a Word document which contains images.
- Second, right click a picture to be saved.
- Next choose “Save as Picture” option on the drop-down menu.

- In “File Save” window, choose a location for the image.
- Remember to name the image.
- Then click “Save”.

- To extract all images, however, you have to repeat from step 2 to step 6 so that you can save them one by one.


Method 2: Save as Web Page
- Similarly, open a Word document first.
- Then click “File”.
- Next go to click “Save As” option to open the “Save As” window.

- Choose a location for the document first.
- This time, choose “Web Page” in “Save as type” list box.
- Click “Save”. Now you will notice the document is on a “Web Layout” view.

- Move to the place where you save the document.
- Find the file holder with the document name.
- Next double click to open it.
- Then you can find all images in both original and Word intrinsic resolution.


Method 3: Change File Extension Name from “.docx” to “.zip”
If you decide to use this way to extract images, then you have to make sure the extension of your file is shown first.
Display the File Extension
Below are steps for displaying the file extension:
- To begin with click “Start”.
- Then click “Computer”.
- In the window, click “Organize” first.
- Next, click “Folder and search options”.

- Now the “Folder Options” window will pop up. Firstly, click “View”.
- Then, in the group boxes below the “Advanced settings”, remove the check mark in “Hide extensions for known file types” box.
- Then click “OK”.


Steps to Extract Images
- At the beginning, we suggest you take a backup of your file first in case your file get corrupted.
- Next right click the document.
- Then choose “Rename”.
- Just change “.docx” to “.zip”.
- And press “Enter”.
- Now on your screen there will be a warning message. Click “Yes”.

- You can see the document turns into a zipped folder. Double click to open it.
- Then double click the folder with the name “word”.

- And now you can see a folder with the name “media”. Double click it to view all images in original resolution.
- Next right click the “media” folder.
- Choose “Extract to the specified folder”.

- Finally choose a location to save all the images.


Comparison
| Methods | Similarity | Advantages | Disadvantages |
| Save as Picture | All 3 ways enable you to extract images in original resolution. | Simple | 1. Time-consuming when document has a lot of pictures
2. Only works in Word 2010 and higher versions. |
|
Save as Web Page |
1. Simple
2. You can get images in Word intrinsic resolution as well. 3. You can extract all images at one time. 4. Works for all versions of Word |
None |
|
|
Change Extension from “.docx” to “.zip” |
You can extract all images at one time. |
1. Get images in original resolution only.
2. Only works for .docx documents generated by Word 2007 and higher versions |
Remember to Back up Your Files
To sum up, we mentioned changing document type as well as its extension. Admittedly, these operations are absolutely threatening your file security. Therefore if you don’t want to spend time in word recovery, you should take the time to back up your files before every dangerous move. In the long run, take backups will only cost you minutes but can save you much more valuable time.
Author Introduction:
Vera Chen is a data recovery expert in DataNumen, Inc., which is the world leader in data recovery technologies, including excel recovery and pdf repair software products. For more information visit www.datanumen.com
Lately I’ve been in a situation where I had an image embedded into a .docx Word document, and I absolutely needed to get the original image file in order to be able to retrieve the original best-quality picture. See the screenshot below? My document contains a picture, it shows up as a small thumbnail, but I need the original high-resolution picture. This tutorial shows the way, it works with Microsoft Word 2007 and above.
There are several ways to retrieve or extract images from a Word document. I am going to be listing the top 3 ways to do so in this article. Feel free to use whichever way you want, but expect different results. Here is the article index here:
- Renaming the .docx to .zip, opening the zip file and extracting the images (Best way!)
- Copying and pasting the image into a picture processing application (Alright)
- Saving the document as a web page and retreiving the generated images (Nice!)
Alternatively you could just use the Snipping Tool from Windows Vista/7, which allows you to save a portion of the screen into an image. Try it, it’s pretty much self explanatory, but the final quality of the picture depends on how much you can fit on your screen.
Option #1: renaming the .docx to .zip
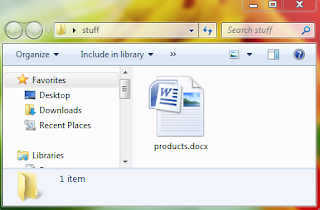
This is definitely the best way to retrieve your images. Microsoft Word’s .docx documents are actually zip files! Before you ask: what if your document is a .doc, a .html, .odt or any other format? Well just open the document in Word and save it as .docx file, Word will convert it to a zip/docx file for you. So here is my file:
Note: if you do not see the .docx at the end of the file name, you *MUST* follow this tutorial for this to work (this will help you show file extensions in Windows Explorer).
I am going to rename the file to «products.zip» here, note as seen on the screenshot below, the icon changes to something different:
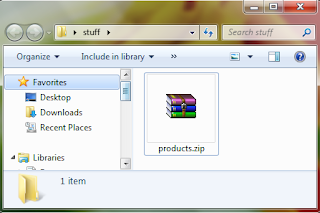
Now, double click your .zip file to open it with whatever program is associated with Zip files on your computer. In my case, Winrar does the job. If the document still opened with Word, you probably did not read carefully enough — go back to the part where I say to follow this tutorial.
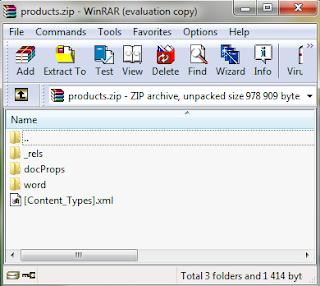
Open the «word» folder as seen in the above screenshot. You should be seeing a «media» folder:
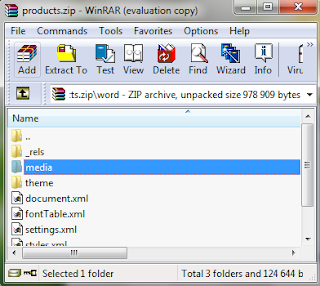
Open it, and you’ll now see all the images that appear in your document.
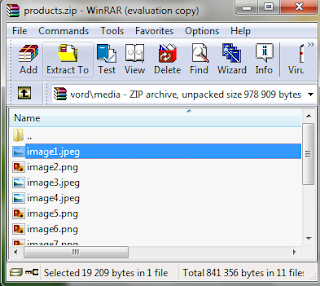
These are the original images that were inserted in the documents, regardless of the size in which they appear when viewing your document. You can extract them to your storage disk by selecting them and dragging&dropping them to the folder of your choice.
Option #2: copying and pasting the image
Another obvious option is to simply select the picture in Word, click Ctrl+C to copy the picture to the clipboard:
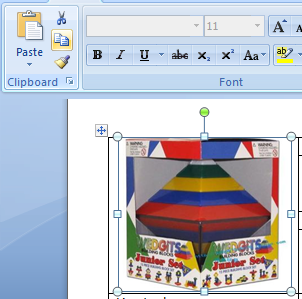
If you have and use a design/picture processing tool such as Photoshop, Paint shop pro or something, just open it and paste the picture by pressing Ctrl+V. I don’t have anything like this, so I’ll just open Paint:
Press Ctrl+V to paste the image into the current canvas in Paint. Unfortunately, the picture is copied in the same size as it appears in Word. If you want a bigger version, you’ll have to resize the image in Word first, copy it again, and paste it again in Paint! This is obviously not the best way to go, but it can be easier and faster than the first option I described earlier.
Option #3: saving the document as a Web page
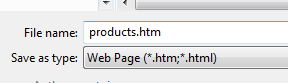
This last option is technically the easiest in my opinion. First, open your document in Word, then save it as a Web page:

When offered to select the format, make sure to choose the «Web page» format… do NOT select «Web page (filtered)», this option will export low-resolution images. The «Web page» option on the other hand exports the original images as well as thumbnails.
Once the file is saved as a Web page, you will find that two new icons appear in your folder:

There’s the document itself, but also a folder that Word generated for you. Open the folder to reveal the images (both in original and thumbnail sizes):

You can now copy or save those files to other folders of your computer.
Conclusion
That’s it! That wasn’t so hard, was it? I still wonder why Microsoft didn’t originally include this feature in the Word application itself. In my opinion, we should be able to just right-click an image and see a «Save image as…» option in the menu.
Now, why did I bother writing about this on what is seemingly a sysadmin’s/developer’s blog, you ask? Because I’ve been looking this up on the web and most of the answers I found were unsatisfying. It took me ages before I finally stumbled upon a blog article that revealed the docx/zip trick. When I don’t (or hardly) find the answer to my questions, I usually whip up a quick article about what I was looking for, and hopefully it ends up helping people.
Today I stumble upon an important issue. I wanted to extract images from my word document but couldn’t because I didn’t know how to do that. That’s when I start digging different ways to extract images from Word document. And because of that, I put together this sweet guide on different ways to extract images from Microsoft Word file without using any third-party software.
![How to Extract Images from Word Document 2019 [GUIDE]](https://techcult.com/wp-content/uploads/2018/12/How-to-Extract-Images-from-Word-Document-2019-GUIDE.png)
Now let me tell you why I needed to extract images from the word file, today my friend sent me a word document that contains 25-30 images which he was supposed to send me in a zip file, but he totally forgot to add the images to the zip file. Instead, he deleted the images right after he inserted the images in the word document. Thankfully, I still have the word document. After searching on the internet, I was able to find out easy ways to extract images from a word document without using any software.
The easiest way is to open the word document and copy the image you want to extract and paste it inside Microsoft Paint and then save the picture. But the problem with this approach is that to extract 30 images it would take too much time, so instead, we will see 3 easy ways to extract images easily from Word Document without using any software.
Make sure to create a restore point just in case something goes wrong.
Method 1: Rename the .docx file to .zip
1. Make sure your word document is saved with .docx extension, if not then double-click on the word file.

2. Click on File button from the Toolbar and select Save As.

3. Select the location where you want to save this file and then from “Save as type” drop-down, select “Word Document (*.docx)” and click Save.

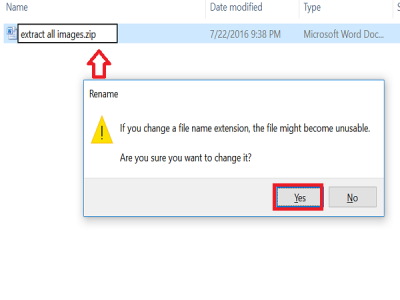
4. Next, right-click on this .docx file and select Rename.

5. Make sure to type .zip in place of .docx in the file extension and then hit Enter to rename the file.

Note: You may need to give permission by clicking yes to rename the file in destination directory.

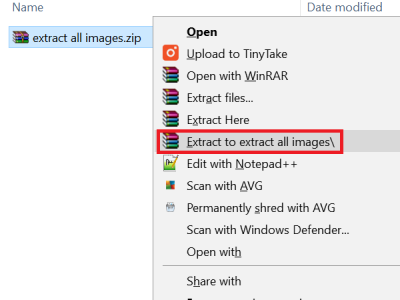
6. Again right-click on the zip file and select “Extract Here“.

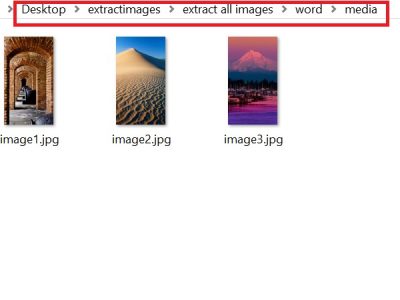
7. Double-click on the folder (with the same file name as the .docx document) and then navigate to word > media.

8. Inside the media folder, you will find all the images extracted from your word document.

Method 2: Save the Word Document as Web Page
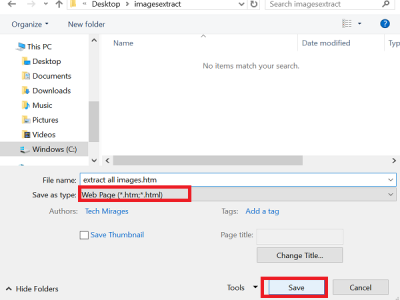
1. Open the Word Document from which you want to extract all the images and then click on File button from the Toolbar and select Save As.

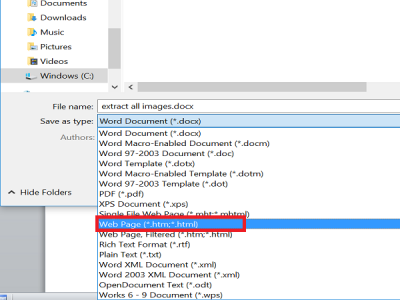
2. Select where you want to save the file, then navigate to desktop or document and from “Save as type” drop-down, select “Web Page (*.html;*.html)” and click Save.

Note: If you want then you can change the name of the file under “Filename”.
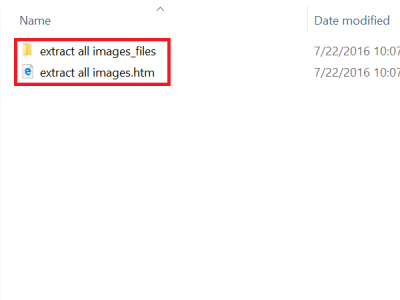
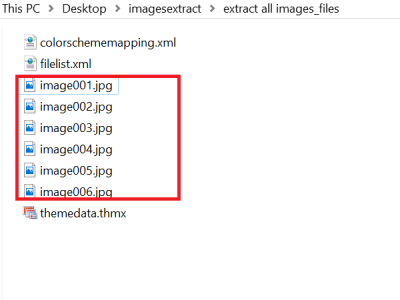
3. Navigate to the location you save the above webpage, and here you would see .htm file and a folder with the same name.

4. Double-click on the folder to open it, and here you would see all the images extracted from the Word document.

Method 3: Copy and Paste Method
Use this method when you only need to extract 2-4 images; else, this method would take too much time to extract more than 5 images.
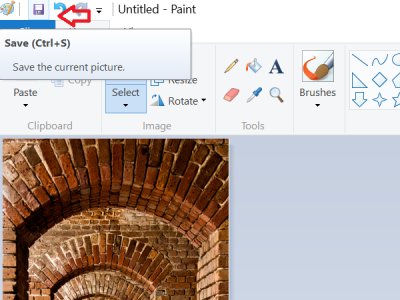
1. Open your word document, select the image you want to extract, and then press Ctrl+C to copy the picture to the clipboard.

2. Next, open Microsoft Paint and press Ctrl+V to paste the picture from the clipboard to paint.

3. Press Ctrl+S to save the image and navigate where you want to save the file then a new name to the file and click Save.

The problem is that the picture you paste in the paint will be of the same size as it appears in Word. And if you want the image to have a better resolution, you will need to first resize the image in the Word document and then paste the picture in paint.
The only question which came to my mind was why the hell Microsoft didn’t include this feature in the Word itself. Anyway, those were the few methods with the help of which you can easily extract images from Word document without using any software. But if you don’t mind using third-party tools, then you could easily extract images from Word using this free software called Office Image Extraction Wizard.

Recommended:
- Fix 100% Disk Usage In Task Manager In Windows 10
- How to Connect Cortana to Gmail Account in Windows 10
- Fix Windows can’t communicate with the device or resource
- Fix MSVCP140.dll is Missing in Windows 10
That’s it you have successfully learned How to Extract Images from Word Document 2022 but if you still have any questions regarding this tutorial then feel free to ask them in the comment’s section.