
Word for Microsoft 365 Word 2021 Word 2019 Word 2016 Word 2013 Word 2010 Word Starter 2010 More…Less
You can easily insert a special character, fraction, or other symbol in your Word documents.
The most important thing to understand when inserting symbols, fractions, special characters, or international characters is that the font you use is critical. Not all fonts have the same characters in them. For example, the Elephant font has no fraction characters in it, while Verdana does. As a result it’s important to use the right font to find the symbol or character you want.
These marks are static symbols. If you’re looking for an interactive check box that you can click on to check or uncheck, see Make a checklist in Word.
Symbol such as currency (¥), music (♫), or check marks (✔)
-
Place your cursor in the file at the spot where you want to insert the symbol.
-
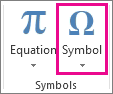
Go to Insert > Symbol.

-
Pick a symbol, or choose More Symbols.
-
Scroll up or down to find the symbol you want to insert.
Different font sets often have different symbols in them and the most commonly used symbols are in the Segoe UI Symbol font set. Use the Font selector above the symbol list to pick the font you want to browse through.
-
When you find the symbol you want, double-click it. The symbol will be inserted in your file.
-
Select Close.
Tip: If you want to make your symbol larger or smaller, select it and use the Font Size setting.
If you’re going to insert the same symbol often, consider setting up AutoCorrect to insert it for you. You can find more info about that here: Insert a check mark or other symbol using AutoCorrect.
-
Click or tap where you want to insert the special character.
-
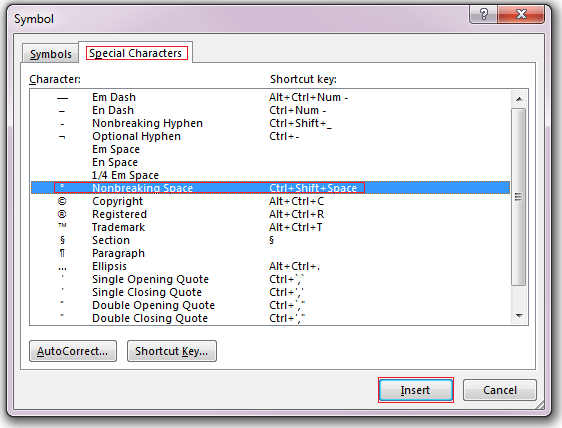
Go to Insert > Symbol > More Symbols.
-
Go to Special Characters.
-
Double-click the character that you want to insert.
Tip: Many of the special characters have shortcut keys associated with them. If you want to insert that special character again in the future, just press the shortcut key. ALT+CTRL+C inserts the Copyright symbol (©), for example.
-
Select Close.
Some fractions (1/4, 1/2, and 3/4) automatically switch to a fraction character (¼, ½, ¾) when you type them. But others do not (1/3, 2/3, 1/5, etc.) so if you want to insert those as symbols you’ll need to use the insert symbol process.
-
Click or tapwhere you want to insert the fraction.
-
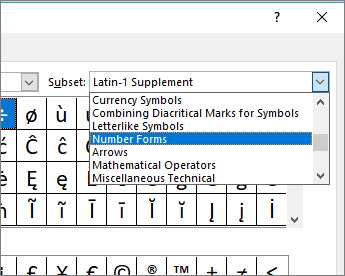
Go to Insert > Symbol > More Symbols.
-
In the Subset dropdown, choose Number Forms.
Note: Not all fonts have a number forms subset. If you don’t see the number forms subset available for your font you will have to use a different font, such as Calibri, to insert the fraction character.
-
Double-click the fraction that you want to insert.
-
Select Close.
Only a handful of common fractions have a symbol that you can substitute. For more unusual fractions, such as 8/9, you can approximate the symbol by setting the numerator as superscript and the denominator as subscript. For more information see Insert subscript or superscript text.
If you plan to type in other languages often you should consider switching your keyboard layout to that language. You can find more information about that at Enable or change a keyboard layout language.
For one-off characters there are almost always keyboard shortcuts in Office to do that. For example:
-
CTRL+SHIFT+ALT+? inserts a ¿
-
CTRL+SHIFT+~ followed immediately by «a» will insert ã.
-
CTRL+SHIFT+: followed immediately by «u» will insert ü.
For more info on international characters see: Keyboard shortcuts for international characters.
You can also use the character code of the symbol as a keyboard shortcut. Symbols and special characters are either inserted using ASCII or Unicode codes. You can tell which is which when you look up the code for the character.
-
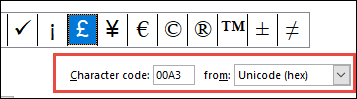
Go to Insert >Symbol > More Symbols.
-
Scroll up or down the list to find the symbol you want. You might have to change the font or the subset to locate it.
Tip: The Segoe UI Symbol font has a very large collection of Unicode symbols to choose from.
-
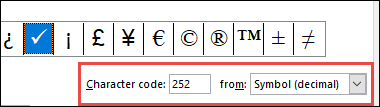
Towards the bottom right you’ll see boxes for Character code and a from:. The character code is what you’ll enter to insert this symbol from the keyboard and the from: tells you what kind of character it is. If from: says «Unicode (hex)» it’s a Unicode character. If from: says «Symbol (Decimal)» then it’s an ASCII character.
Unicode
ASCII
ASCII and Unicode information and character tables
For more info about using ASCII or Unicode characters, see Insert ASCII or Unicode character codes.
Insert a check mark
For info on inserting a check mark, see Insert a check mark.
Need more help?
Want more options?
Explore subscription benefits, browse training courses, learn how to secure your device, and more.
Communities help you ask and answer questions, give feedback, and hear from experts with rich knowledge.
This tutorial shows three ways to insert special characters in Microsoft Word:
1. The Symbol dialog box
2. Keyboard shortcuts
3. AutoCorrect
Word’s special characters include twelve text characters, such as the en dash, that don’t appear on traditional keyboards and fifteen formatting characters, such as the nonbreaking hyphen, that affect text layout. The table below lists all twenty-seven special characters.
| 1. Em Dash | 10. Registered Symbol | 19. No-Width Optional Break |
| 2. En Dash | 11. Trademark | 20. No-Width Non Break |
| 3. Nonbreaking Hyphen | 12. Section Break | 21. Left-to-Right Mark |
| 4. Optional Hyphen | 13. Paragraph Break | 22. Right-to-Left Mark |
| 5. Em Space | 14. Ellipsis | 23. Left-to-Right Embedding |
| 6. En Space | 15. Single Opening Quote | 24. Right-to-Left Embedding |
| 7. 1/4 Em Space | 16. Single Closing Quote | 25. Left-to-Right Override |
| 8. Nonbreaking Space | 17. Double Opening Quote | 26. Right-to-Left Override |
| 9. Copyright Symbol | 18. Double Closing Quote | 27. Pop Directional Formatting |
For a description of each character, visit “What Are Special Characters in Microsoft Word?”
If you want to insert accent marks (the extra marks that appear above and below letters) instead of special characters, visit “Three Ways to Insert Accent Marks in Microsoft Word.”
This tutorial is also available as a YouTube video showing all the steps in real time.
Watch more than 100 writing-related software tutorials on my YouTube channel.
The images below are from Word for Microsoft 365. The steps are the same for Word 2021, Word 2019, and Word 2016, and are similar for Word 2013 and Word 2010.
Insert Special Characters Using the Symbol Dialog Box
All twenty-seven special characters can be inserted using the Symbol dialog box.
1. Place your cursor where the special character should be inserted in your text.
2. Select the Insert tab in the ribbon.

3. Select Symbols in the Symbols group.

4. Select More Symbols in the drop-down menu.

5. Select the Special Characters tab in the Symbol dialog box.

6. Select the special character that you need from the Character menu.

7. Select the Insert button to insert the special character.

8. Select the Close button to close the Symbol dialog box.

Pro Tip: If the Symbol dialog box blocks your view of your newly inserted special character, left-click your mouse arrow on the uppermost area of the dialog box to grab it and then move it to a different location on your screen.

Insert Special Characters Using Keyboard Shortcuts
Thirteen special characters can be inserted with preset keyboard shortcuts.
Please note that the shortcuts shown below for the Double Opening Quote and Double Closing Quote are different than those shown in Word’s Symbol dialog box (which may be typos because they don’t function as intended).
1. Place your cursor where the special character should be inserted.
2. Select the appropriate key combination on your keyboard.
Em Dash: Alt + Ctrl + Num –
(Alt plus Ctrl plus the minus sign on the number pad)
En Dash: Ctrl + Num –
(Ctrl plus the minus sign on the number pad)
Nonbreaking Hyphen: Ctrl + Shift + _
(Ctrl plus Shift plus underscore)
Optional Hyphen: Ctrl + –
(Ctrl plus hyphen)
Nonbreaking Space: Ctrl + Shift + Spacebar
Copyright: Alt + Ctrl + C
Registered: Alt + Ctrl + R
Trademark: Alt + Ctrl + T
Ellipsis: Alt + Ctrl + .
(Alt plus Ctrl plus period)
Single Opening Quote: Ctrl + `,`
(Ctrl plus two grave accents)
Single Closing Quote: Ctrl + ‘,’
(Ctrl plus two single quotation marks)
Double Opening Quote: Ctrl + ` , Shift + ‘
(Ctrl plus one grave accent followed by Shift plus one single quotation mark)
Double Closing Quote: Ctrl + ‘, Shift + ‘
(Ctrl plus one single quotation mark followed by Shift plus one single quotation mark)
Insert (a Few) Special Characters Using AutoCorrect
Word’s preset AutoCorrect feature lets you insert the copyright symbol, trademark symbol, registered mark, and en dash by typing specific character strings into your text.
Trademark: (tm)
Copyright: (c)
Registered: (r)
En Dash: --
The en dash won’t appear automatically until you complete the next word or character string and then press the spacebar.
Pro Tips: Select Ctrl + Z to reject an autocorrected character. You can also customize Word’s autocorrect options in the Proofing section of the Word Options dialog box.
Further Reading: How to Find and Replace Special Characters in Microsoft Word
Updated November 14, 2021
If you have extra dots, dashes, and symbols in a Word document, then you might have accidentally turned on one of two features.
Formatting Symbols in Word
Word can be set to show symbols in the place of invisible formats, like spaces, paragraph breaks, and section breaks. These symbols won’t print, but can be annoying on the screen.
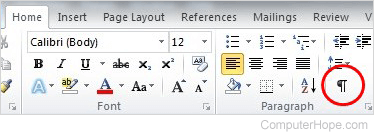
To remove formatting symbols in Word, Click on the paragraph symbol under the Home tab.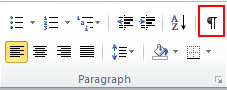
Formatting Marks in the Options menu
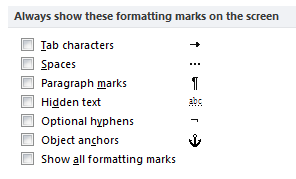 Some formatting marks can be set to display in the options menu. To turn these on or off, click on the File tab and choose options. Then click on Display on the left. If any of the boxes to the right are checked, they will always display.
Track Changes symbols in Word
Another Word feature that can add extra symbols and breaks is the track changes feature. Track Changes is used to document what changes have been made to a document.
If Track Changes is turned on, new text will be bright blue and deleted text will be red with a strike through it.
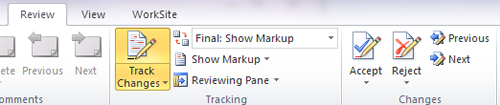 Turn Track changes off and on under the Review tab. You’ll need to go through the document and accept or reject all changes to remove the extra symbols.
For more word tips see our Word Training Classes.
Updated: 06/30/2020 by
The «Show All» feature in Microsoft Word lets you see each of the formatting mark tags, such as spaces, carriage returns or new lines, tabs, and new paragraphs in Microsoft Word.
Note
You cannot delete the formatting marks. They can only be hidden by disabling the Show All feature.

The image above shows the pilcrow icon, which enables and disables this feature (looks like a backwards ‘P’). The image also displays example text with the main formatting symbols. To enable or disable this feature, click the Show All, or pilcrow, icon on the standard toolbar. If this toolbar is not visible, click View, Toolbars, and select Standard.
In Microsoft Word 2007 and later, the Show All icon is on the Home tab, in the Paragraph section.
Note
If some symbols are not being hidden when disabling the Show All feature, those symbols are not formatting marks and must be removed manually.
Featured, Fonts, Microsoft 365, Microsoft Excel, Microsoft Office, Microsoft Office for Mac, Microsoft Powerpoint, Microsoft Visio, Microsoft Word, Office 2007, Office 2010, Office 2013, Office 2016, Office 2019, Office 2021 / Office LTSC, Office 365 /
Symbols & Emoji in Microsoft Office, Windows and Mac /
5 August 2022
Segoe Fluent Icon is a handy extra symbols font with some icons that aren’t easily available anywhere else. It’s free for Windows and Mac. Here’s how to use it in Word and Office.

Segoe Fluent Icons is intended for use by developers making their Windows apps but there’s no reason why you can’t use them in documents, sheets or slides.
The font uses the ‘private’ space in the Unicode system, meaning font makers can put any symbol they like into that area.
In Office that means the usual Insert Symbol methods, like Word’s Alt + X trick won’t work without a little extra,
Insert a symbol in Word from a font with private characters
You have to insert the characters first, then select the current font.
Selecting the font first doesn’t work because, when you insert the symbol, modern Word will try to choose another font to show an ‘unknown’ symbol. Word’s symbol substitution, the good and the bad
Insert the symbol then change the font
The usual Word Alt + X trick works with a little flourish at the end.
Type the Unicode number (hex) in Word then press Alt + X. In this example we’ve tried it with a few values:

All you get are boxes because Word doesn’t know what font to use. It’ll select Segoe UI emoji because that’s it’s default option. Modern Word’s automatic font substitution doesn’t work for fonts using the private area, perhaps understandably.
The fix is simple, select the boxes then select the font Segoe Fluent Icons

When to use Fluent Icon symbols
Many of the Fluent Icons are like symbols in the public Unicode lists and are available in other fonts like Segoe UI Symbol. But others are not.
Segoe Fluent Icons can be useful if you’re designing the look of a Windows app or you just want to ‘evoke the look’ of modern Windows.
How to get Segoe Fluent Icons fonts
The font is installed with Windows 11 automatically.
It’s available for Windows 10 and Mac by downloading from Microsoft here.
Selected Fluent Icons
Here’s a few of the Segoe Fluent Icon symbols that caught our eye with their Unicode Hex values (use with Alt + X in Word). Also the Microsoft name for the symbol plus some words from us.


Microsoft has the full list of Segoe Fluent Icons symbols here.
Word’s symbol substitution, the good and the bad
Try the old Alt + X trick for Word and Outlook
Why and how Windows substitutes Arial font for Helvetica
Font Embedding in Microsoft Office