
You can just simply give your table id (without the # ) to the exportToExcel function, your table will be exported to an Excel file.
If you are rendering the Material flex table by using , , . The above approach will not work. You have to use the second approach for exporting to excel file using an array.
Or in the other words, this structure will not work with our first approach to export a table.
2. Export an array to excel file
With the first method, you have to take an array and then render it to the view and then finally, you export the HTML that was rendered. But js-xlsx also provides the built-in function to export the array directly to an excel file. Without the need to render it on the UI first.
And because you could pass an array to js-xlsx . It will solve a lot of problems.
- You can select which column to include on the excel sheet by simple using Array.map() to transform your array
- Many comments said they want to remove the last column of the table, which usually has some action buttons. You don’t have to worry about that anymore if you export the array directly to the excel file.
- You could have an array of 1000 items but you only render 25 items per page with your client-side pagination. If you still want to click Export to have an excel file of all 1000 items, you are good to go. Just pass in the method your array and you’re all set.
I still use the array above which looks like:
There are four properties, position, name, weight, and symbol. But let say I only want name and the symbol. I could easily transform the array using a map function.
And I have another utility to export an array
And that’s all for exporting your array into an excel sheet. Again, there are many other different options that js-xlsx support, you can take a look at their documentation.
Источник
JavaScript: Convert / Export HTML table data to excel [xls]
Satinder Singh / September 13, 2021 /
JavaScript Convert Html Table to Excel XLS: Here in this tutorial, we can create an excel file from our HTML table data on the client-side. i.e Export HTML table to Excel (.xlsx) using javascript.
There are many libraries available that create CSV files or xlsx files from the HTML table, but all are giving a prompt message. That is when we open that excel file it prompts a message as The file format and extension of the filename doesn’t match. The file could be corrupted or unsafe.
Today in this article will use SheetJS, which allow us to create and open excel file without any prompt message and that’s pure in javascript.
The second advantage of using the SheetJs library is that it can easily export large HTML tables into excel, an example is provided below.
You can also check my article on how to convert HTML to image on the client-side.
Steps to export HTML table to excel using JavaScript
- HTML Markup: Add table with some data.
- Import SheetJS Library
- Javascript code: Using SheetJS library export table data into an excel file.
HTML Markup: Add table with data and button tag.
Here first we add an HTML table with some dummy data and a button tag. Our table HTML markup looks as written below.
Download and Import SheetJS Library on our webpage
To convert HTML table data into excel, we need to use the SheetJS library. Using SheetJs we can easily convert our table data into an Xls file. We can download the js file from Github or directly use the CDN hosted file.
Import library code as written below:
We are done with HTML markup and import Sheetjs library. Next, we have to add and call javascript function i.e ExportToExcel on button click.
JavaScript code: Using Sheetjs library export table data into an excel file.
Here on the button tag, we add an onclick event and call the js method ie ExportToExcel. Final javascript method as written below:
Here in the above javascript function, tbl_exporttable_to_xls is the id of our HTML table, whose data we want to export. Also, we set type base64, so there would be no problem for older browsers i.e IE browser.
In Internet Explorer ie browser using SheetJS, we can easily export HTML table data to excel. With the sheetjs library, we can export Html table to xlsx with formatting.
Conclusion: Here using SheetJS we can export the Html table into an excel file. Also as other library displays popup message while open excel file, here with Sheetjs it gets open without any popup message. I find this best javascript library for converting data into an excel file.
Thank you for reading, pls keep visiting this blog and share this in your network. Also, I would love to hear your opinions down in the comments.
PS: If you found this content valuable and want to thank me? 👳 Buy Me a Coffee
Subscribe to our newsletter
Get the latest and greatest from Codepedia delivered straight to your inbox.
Your email address will not be published. Required fields are marked *
Источник
Exporting Table Data To Excel in PHP Tutorial
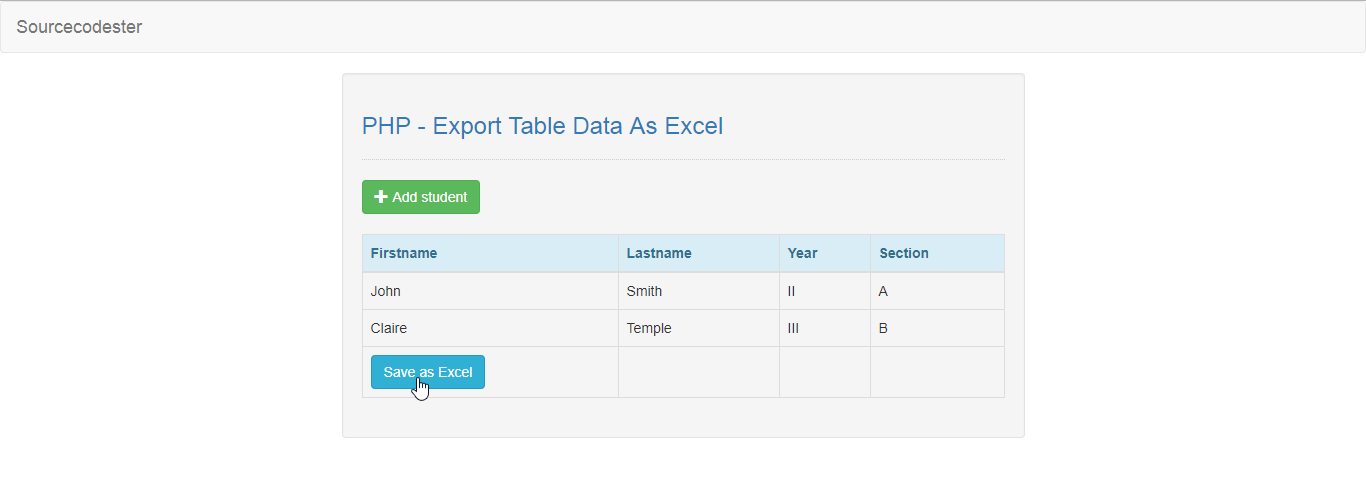
In this tutorial, we will create a Export Table Data As Excel using PHP. This code will export your MySQLi data into a Microsoft Excel document. The code itself uses the header content function to translate the MySQLi data, then to be able to download as an excel format. This is a user-friendly program feel free to modify and use it in your system.
We will be using PHP as a scripting language that interprets in the web server such as XAMPP, WAMP, etc. It is widely used by modern website applications to handle and protect user confidential information.
Getting Started:
First you have to download & install XAMPP or any local server that run PHP scripts. Here’s the link for XAMPP server https://www.apachefriends.org/index.html.
And this is the link for the jquery that i used in this tutorial https://jquery.com/.
Lastly, this is the link for the bootstrap that i used for the layout design https://getbootstrap.com/.
Creating Database
Open your database web server then create a database name in it db_excel, after that click Import then locate the database file inside the folder of the application then click ok.
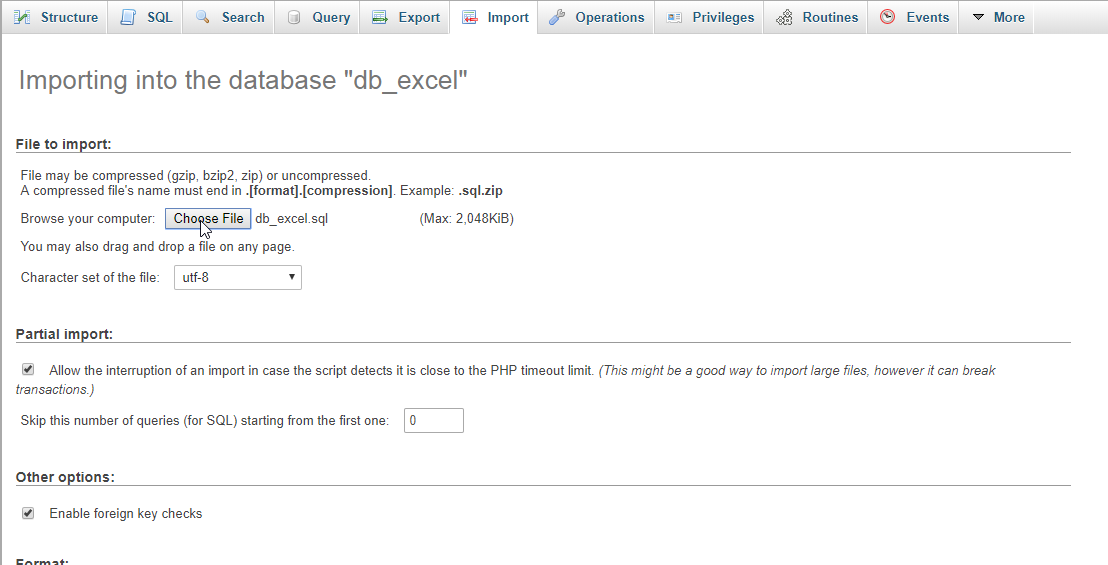
Or, you can simply copy/paste the SQL script below in your PHPMyAdmin SQL Page to create our database table and its column. To do this, navigate your database in PHpMyadmin to the SQL Tab. Then, paste SQL script in the provided text area and click the «Go» button.
Creating the database connection
Open your any kind of text editor(notepad++, etc..). Then just copy/paste the code below then name it conn.php.
Creating The Interface
This is where we will create a simple form for our application. To create the forms simply copy and write it into your text editor, then save it as index.php.
Creating PHP Query
This code contains the php query of the application. This code will store the student information to the MySQLi database server. To do that just copy and write this block of codes inside the text editor, then save it as save.php.
Creating the Main Function
This code contains the main function of the application. This code will convert your html table into a readable excel file when the button is clicked. To make this just copy and write these block of codes below inside the text editor, then save it as export_excel.php
DEMO Video
There you have it we successfully created Export Table Data As Excel using PHP. I hope that this simple tutorial helps you to what you are looking for. For more updates and tutorials just kindly visit this site.
Источник
How to export html table to excel using javascript
My table is in format
I found the following code online. But it doesn’t work if i use «thead» and «tbody» tags

12 Answers 12
Check https://github.com/linways/table-to-excel. Its a wrapper for exceljs/exceljs to export html tables to xlsx.
This creates valid xlsx on the client side. Also supports some basic styling. Check https://codepen.io/rohithb/pen/YdjVbb for a working example.
Only works in Mozilla, Chrome and Safari..


The reason the solution you found on the internet is no working is because of the line that starts var colCount . The variable mytable only has two elements being
Using the Export Wizard, you can export data from an Access database to in a file format that can be read by Excel. This article shows you how to prepare and export your data to Excel, and also gives you some troubleshooting tips for common problems that might occur.
In this article
-
Exporting data to Excel: the basics
-
Prepare for the export operation
-
Run the export operation
-
What else should I know about exporting?
-
Troubleshoot missing and incorrect values
Exporting data to Excel: the basics
When you export data to Excel, Access creates a copy of the selected data, and then stores the copied data in a file that can be opened in Excel. If you copy data from Access to Excel frequently, you can save the details of an export operation for future use, and even schedule the export operation to run automatically at set intervals.
Common scenarios for exporting data to Excel
-
Your department or workgroup uses both Access and Excel to work with data. You store the data in Access databases, but you use Excel to analyze the data and to distribute the results of your analysis. Your team currently exports data to Excel as and when they have to, but you want to make this process more efficient.
-
You are a long-time user of Access, but your manager prefers to work with data in Excel. At regular intervals, you do the work of copying the data into Excel, but you want to automate this process to save yourself time.
About exporting data to Excel
-
Access does not include a “Save As” command for the Excel format. To copy data to Excel, you must use the Export feature described in this article, or you can copy Access data to the clipboard and then paste it into an Excel spreadsheet.
-
You can export a table, query, form, or report. You can also export selected records in a multiple-record view, such as a datasheet.
-
Microsoft Excel includes a command to import data from an Access database. You can use that command instead of the export command in Access; however, the Excel import command only allows you to import tables or queries. For more information, see the Excel Help article Connect to (import) external data.
-
You cannot export macros or modules to Excel. When you export a form, report, or datasheet that contains subforms, subreports, or subdatasheets, only the main form, report, or datasheet is exported. You must repeat the export operation for each subform, subreport, and subdatasheet that you want to export to Excel.
-
You can only export one database object in a single export operation. However, you can merge multiple worksheets in Excel after you complete the individual export operations.
Top of Pge
Prepare for the export operation
Before performing an export procedure, it is a good idea to review the data that you want to export to make sure that it does not contain any error indicators or error values. If there are any errors, try to resolve them before you export the data to Excel. Otherwise, problems can occur during the export operation, and null values might be inserted into cells in the Excel worksheet. For more information about problems that can occur when exporting to Excel, see the section Troubleshoot missing and incorrect values.
If the source object is a table or a query, decide whether you want to export the data with or without its formatting. This decision affects two aspects of the resulting workbook — the amount of data that is exported and the display format of the data. The following table describes the outcome of exporting formatted and unformatted data.
|
Export |
Source Object |
Fields and records |
Formatting |
|
Without formatting |
Table or query Note: Forms and reports cannot be exported without their formatting. |
All fields and records in the underlying object are exported. |
The Format property settings are ignored during the operation. For lookup fields, only the lookup ID values are exported. For hyperlink fields, the contents are exported as a text column that displays the links in the format displaytext#address#. |
|
With formatting |
Table, query, form, or report |
Only fields and records that are displayed in the current view or object are exported. Filtered records, hidden columns in a datasheet, and fields not displayed on a form or report are not exported. |
The wizard respects the Format property settings. For lookup fields, the lookup values are exported. For hyperlink fields, the values are exported as hyperlinks. For rich text fields, the text is exported but the formatting is not. |
-
Choose the destination workbook and file format. Note that reports can only be exported in the older *.xls file format, not in the newer *.xlsx file format.
During the export operation, Access prompts you to specify the name of the destination workbook. The following table summarizes when a workbook is created (if it does not already exist) and when it is overwritten (if it does already exist).
|
If the destination workbook |
And the source object is |
And you want to export |
Then |
|
Does not exist |
A table, query, form, or report |
The data, with or without the formatting |
The workbook is created during the export operation. |
|
Already exists |
A table or query |
The data, but not the formatting |
The workbook is not overwritten. A new worksheet is added to the workbook, and is given the name of the object from which the data is being exported. If a worksheet having that name already exists in the workbook, Access prompts you to either replace the contents of the corresponding worksheet or specify another name for the new sheet. |
|
Already exists |
A table, query, form, or report |
The data, including the formatting |
The workbook is overwritten by the exported data. All existing worksheets are removed, and a new worksheet having the same name as the exported object is created. The data in the Excel worksheet inherits the format settings of the source object. |
The data is always added in a new worksheet. You cannot append the data to any existing worksheet or named range.
Top of Page
Run the export operation
-
If the destination Excel workbook is open, close it before you continue.
-
In the Navigation Pane of the source database, select the object that you want to export.
Export only a portion of the data
If the object is a table, query, or form, and you want to export only a portion of the data, open the object in Datasheet view and select the records you want.
To open a form in Datasheet view:
-
Double-click the form to open it.
-
Right-click the form, and then click Datasheet View. If this option is not available:
-
Click Design View.
-
Press F4 to display the Property Sheet task pane.
-
Select Form from the drop-down list at the top of the Property Sheet.
-
On the Format tab of the Property Sheet, set the Allow Datasheet View property to Yes.
-
On the Design tab, in the Views group, click Datasheet View.
Note: You cannot export a portion of a report. However, you can select or open the table or query that the report is based on, and then export a portion the data in that object.
-
-
-
On the External Data tab, in the Export group, click Excel.
-
In the Export — Excel Spreadsheet dialog box, review the suggested file name for the Excel workbook (Access uses the name of the source object). If you want, you can modify the file name.
-
In the File Format box, select the file format that you want.
-
If you are exporting a table or a query, and you want to export formatted data, select Export data with formatting and layout. For more information, see the section Prepare for the export operation.
Note: If you are exporting a form or report, this option is always selected but unavailable (it appears dimmed).
-
To view the destination Excel workbook after the export operation is complete, select the Open the destination file after the export operation is complete check box.
If the source object is open, and if you selected one or more records in the view before starting the export operation, you can select Export only the selected records. To export all the records displayed in the view, leave this check box cleared.
Note: This check box remains unavailable (dimmed) if no records are selected.
-
Click OK.
If the export operation fails because of an error, Access displays a message that describes the cause of the error. Otherwise, Access exports the data and, depending on your selection in step 7, opens the destination workbook in Excel. Access then displays a dialog box in which you can create a specification that uses the details from the export operation.
Top of Page
What else should I know about exporting?
-
For information on how to save the details of your export into a specification that you can reuse later, see the article Save the details of an import or export operation as a specification.
-
For information on how to run saved export specifications, see the article Run a saved import or export operation.
-
For information on how to schedule specifications to run at specific times, see the article Schedule an import or export operation.
-
For information on how to change a specification name, delete specifications, or update the names of source files in specifications, see the article Manage Data Tasks.
Top of Page
Troubleshoot missing and incorrect values
The following table describes various ways of troubleshooting common errors.
Tip: If you find that just a few values are missing, fix them in the Excel workbook. Otherwise, fix the source object in the Access database, and then repeat the export operation.
|
Issue |
Description and resolution |
|
Calculated fields |
The results of calculated fields are exported; the underlying expressions that perform the calculations are not. |
|
Multivalued fields |
Fields that support multiple values are exported as a list of values separated by semicolons (;). |
|
Pictures, objects, and attachments |
Graphical elements (such as logos, contents of OLE object fields, and attachments that are part of the source data) are not exported. Add them to the worksheet manually after you complete the export operation. |
|
Graph |
When you export a form or report that contains a Microsoft Graph object, the graph object is not exported. |
|
Data in the wrong column |
Null values in the resulting worksheet are sometimes replaced by the data that should be in the next column. |
|
Missing date values |
Date values earlier than Jan 1, 1900 are not exported. The corresponding cells in the worksheet will contain a null value. |
|
Missing expressions |
Expressions that are used to calculate values are not exported to Excel. Only the results of the calculations are exported. Manually add the formula to the Excel worksheet after you complete the export operation. |
|
Missing subforms, subreports, and subdatasheets |
When you export a form, report, or datasheet, only the main form, report, or datasheet is exported. You must repeat the export operation for each subform, subreport, and subdatasheet that you want to export. |
|
Missing or incorrectly formatted columns |
If none of the columns appear to be formatted in the resulting worksheet, repeat the export operation, being sure to select the Export data with formatting and layout check box in the wizard. Conversely, if only some columns appear to be formatted differently from the versions in the source object, apply the formatting that you want manually in Excel. Format a column in Excel
|
|
«#» value in a column |
You might see the value # in a column that corresponds to a Yes/No field in a form. This can be the result of starting the export operation from the Navigation Pane or in Form view. To resolve this issue, open the form in Datasheet view before exporting the data. |
|
Error indicators or error values |
Check the cells for error indicators (green triangles in the corners) or error values (strings that begin with the # character instead of the appropriate data). |
Top of Page
- Home
- JavaScript
- Export HTML Table Data to Excel using JavaScript
By: CodexWorld
|
In: JavaScript
|
Last Updated: Jun 7, 2021
Export data to Excel is very useful on the data list for nearly every web application. The export feature helps to download the data list as a file format for offline use. Excel format is ideal for exporting data in a file. Mostly the server-side method is used for export data to excel using PHP. But if you want a client-side solution to export table data to excel, it can be easily done using JavaScript.
The client-side export functionality makes the web application user-friendly. Using JavaScript, the HTML table data can be easily exported without page refresh. In this tutorial, we will show you how to export HTML table data to excel using JavaScript. The JavaScript export functionality can be used in the member list, product list, or other lists to download the data list in excel file format.
Export HTML Table Data to Excel
JavaScript Code:
The exportTableToExcel() function convert HTML table data to excel and download as XLS file (.xls).
tableID– Required. Specify the HTML table ID to export data from.filename– Optional. Specify the file name to download excel data.
function exportTableToExcel(tableID, filename = ''){
    var downloadLink;
    var dataType = 'application/vnd.ms-excel';
    var tableSelect = document.getElementById(tableID);
    var tableHTML = tableSelect.outerHTML.replace(/ /g, '%20');

    // Specify file name
    filename = filename?filename+'.xls':'excel_data.xls';

    // Create download link element
    downloadLink = document.createElement("a");

    document.body.appendChild(downloadLink);

    if(navigator.msSaveOrOpenBlob){
        var blob = new Blob(['ufeff', tableHTML], {
            type: dataType
        });
        navigator.msSaveOrOpenBlob( blob, filename);
    }else{
        // Create a link to the file
        downloadLink.href = 'data:' + dataType + ', ' + tableHTML;

        // Setting the file name
        downloadLink.download = filename;

        //triggering the function
        downloadLink.click();
    }
}
HTML Table Data:
The HTML table contains some users data with some basic fields like name, email, country.
<table id="tblData">
    <tr>
        <th>Name</th>
        <th>Email</th>
        <th>Country</th>
    </tr>
    <tr>
        <td>John Doe</td>
        <td>john@gmail.com</td>
        <td>USA</td>
    </tr>
    <tr>
        <td>Michael Addison</td>
        <td>michael@gmail.com</td>
        <td>UK</td>
    </tr>
    <tr>
        <td>Sam Farmer</td>
        <td>sam@gmail.com</td>
        <td>France</td>
    </tr>
</table>
The button triggers exportTableToExcel() function to export HTML table data using JavaScript.
<button onclick="exportTableToExcel('tblData')">Export Table Data To Excel File</button>
If you want to export data with the custom file name, pass your desired file name in the exportTableToExcel() function.
<button onclick="exportTableToExcel('tblData', 'members-data')">Export Table Data To Excel File</button>
Export Data to Excel in PHP
Conclusion
Our example code helps you to add export functionality in the HTML table without any third-party jQuery plugin or server-side script. You can easily export the table data using minimal JavaScript code. Also, the functionality of the example code can be enhanced or customized easily as per your needs.
- DataTables
- Excel
- Export
- JavaScript
Are you want to get implementation help, or modify or enhance the functionality of this script? Click Here to Submit Service Request
If you have any questions about this script, submit it to our QA community — Ask Question
RELATED TUTORIALS
Leave a reply

Read time 8 minutes
SQL Server Management Studio (SSMS) is an excellent utility to configure, manage, and administer all Microsoft SQL Server components. There are many advantages of having SQL data in spreadsheet programs like Excel. Spreadsheets are easy to use and flexible compared to SQL. The novice users have a similar query on how they can export the SQL Database to an Excel file. Here is an example-
“I am new to SQL server database and looking for ways to export the database output to excel. I have a few database files that I urgently want to save to .xlsx or .csv. Can anyone with expertise please guide me on how to automate this process?”
Benefits of saving SQL database in an excel file
Although, the Excel file does not have the same protection level as the SQL Server, it has the essential advantages of a backup file. It can help you in the following situations-
- If the user drops a column in a table by mistake, it can be recovered from the excel file.
- You can overcome the hardware or media failure situations.
- It can be used as a secondary backup file useful in several routine administrative needs and valuable when a natural disaster hits the on-premises location.
Now, we are going to discuss ways to export the SQL Server data to Excel. Two manual methods can be employed to achieve this task, which is described below:
Method #1 Export from SQL Table to Excel Using the SQL Server Import and Export Wizard
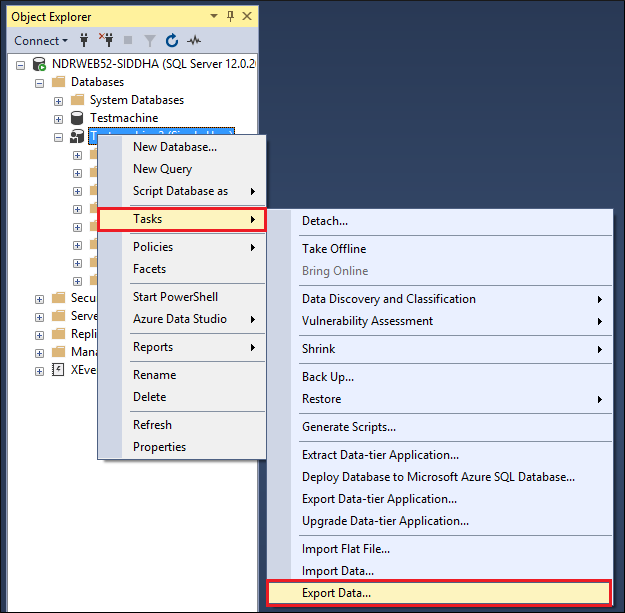
There exists an inbuilt feature in SQL Server Management Studio (SSMS) to export data to Excel. The detailed steps are described below:
- Right-click on the database table that you would like to export. Under the Tasks, click on Export Data.

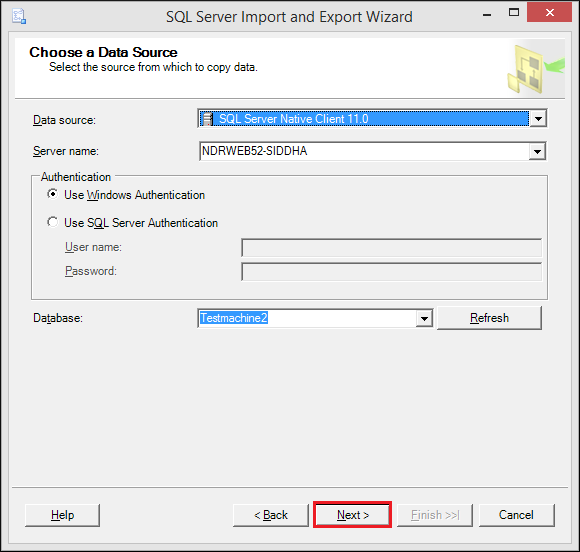
- In SQL Server Import and Export Wizard, click Next. This will open up a new dialog window- Choose a Data Source. From the drop-down menu in Data sources, select SQL Server Native Client 11.0, then click Next.

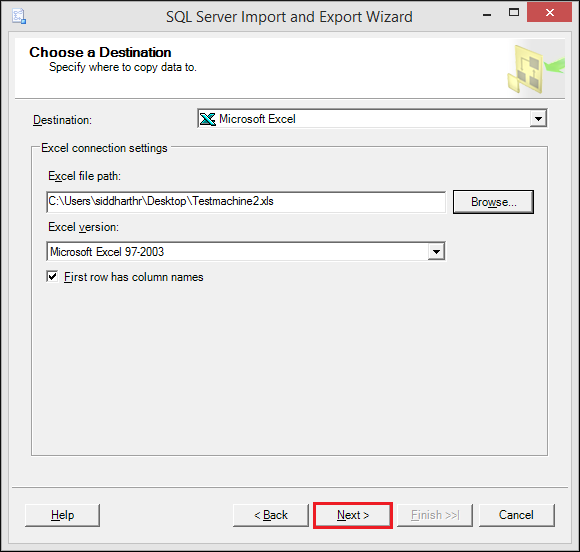
- In the Destination field, choose Microsoft Excel. Next, in the Excel file path field, provide the location and filename by clicking on the Browse button. Click Next to proceed.
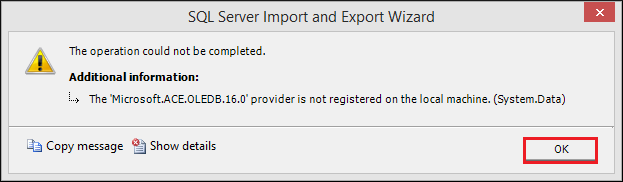
- At this point, you might encounter an error.

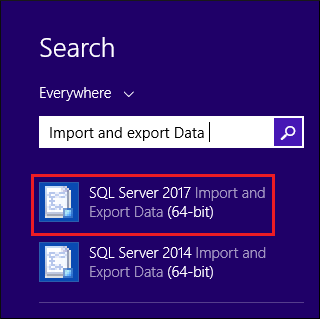
- To solve this issue in the search field, search for the 64-bit version of SQL Server Import and Export Data.

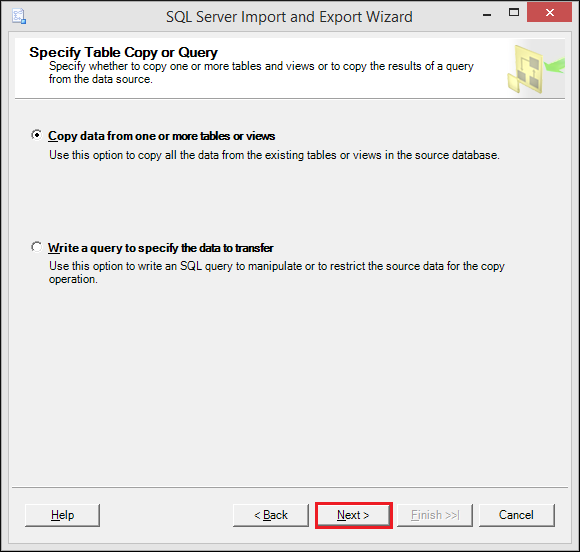
- Next, repeat steps 1-3. In the Specify Table Copy or Query window, select Copy data from one or more tables or views, and hit Next.
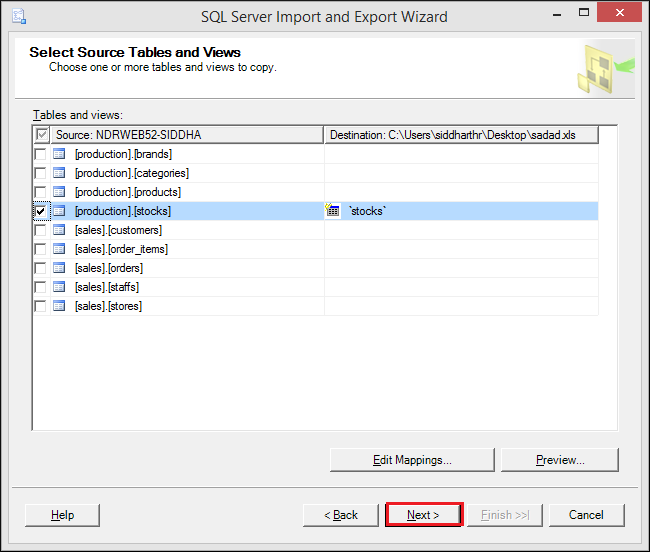
- Next, select the source tables that you would like to export.

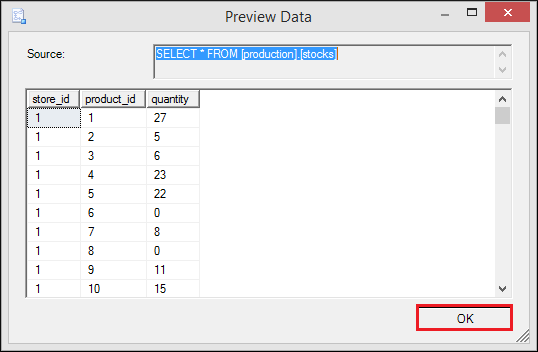
- Click on the table and click on the Preview tab to view the table content. Click OK to exit.

- In the Save and Run package window, make sure Run immediately is checked and then click Next.
- In Complete the Wizard window, click Finish.
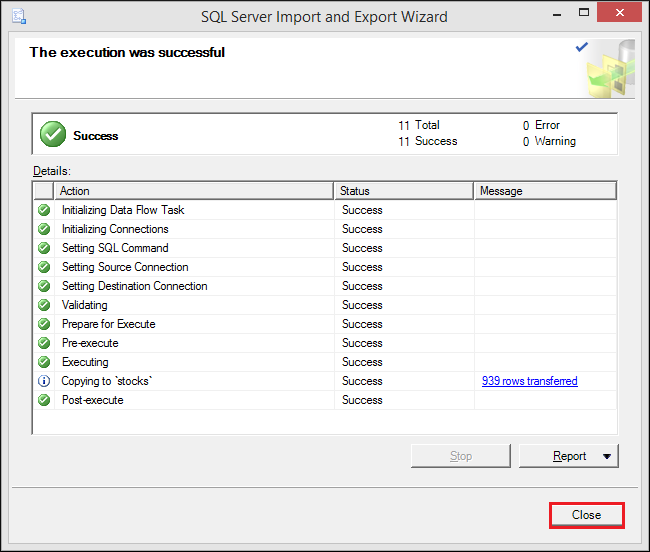
- In the end, you will get a message of successful completion, as shown below:
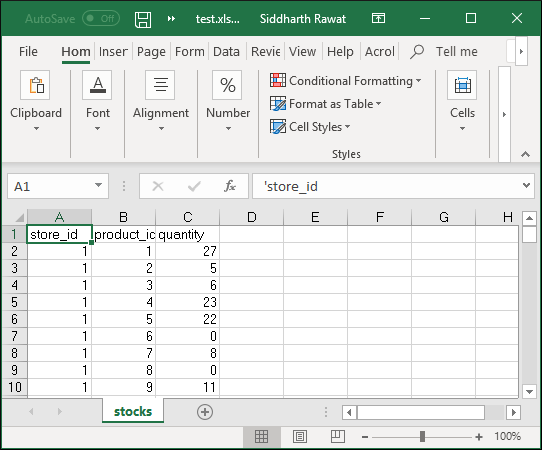
- Next, go to the location where you have exported the SQL database table as an Excel file and open the Excel file.

Method #2 Import from SQL Table to Excel Using Data Connection Wizard Dialog
Another easy way to export the SQL table to Excel is by exploiting the inbuilt Excel feature that enables us to import any SQL table. The detailed steps to do so are outlined below:
- Create a Blank worksheet and open it.
- On the Data tab, click the Get Data icon, select From Database > From SQL Server Database.

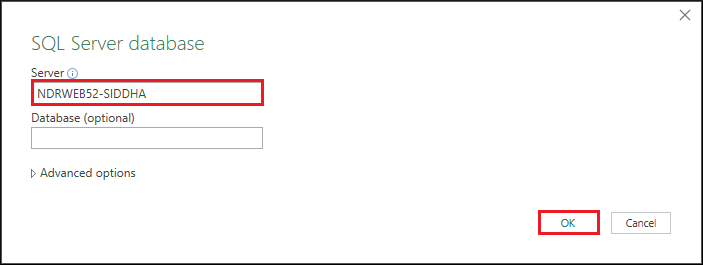
- Enter the name of your SQL Server in the text field and click OK.

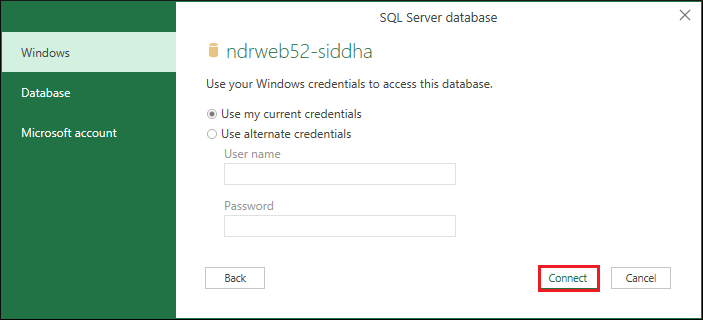
- Select the appropriate option and click Connect.

- Click OK to proceed.

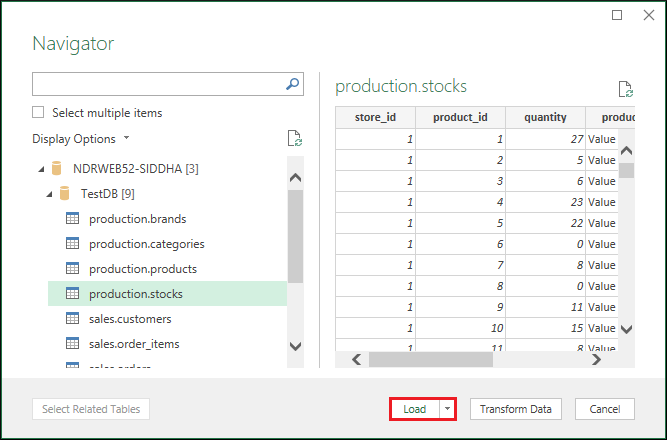
- In the Navigator window, select the database and then the table that you would like to import in Excel and click on Load.

- Next, click on Close & Load icon.

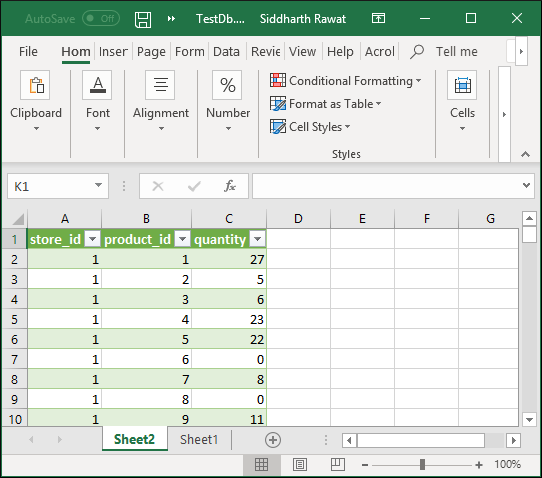
- Congratulations! You have successfully imported the SQL table into Excel.


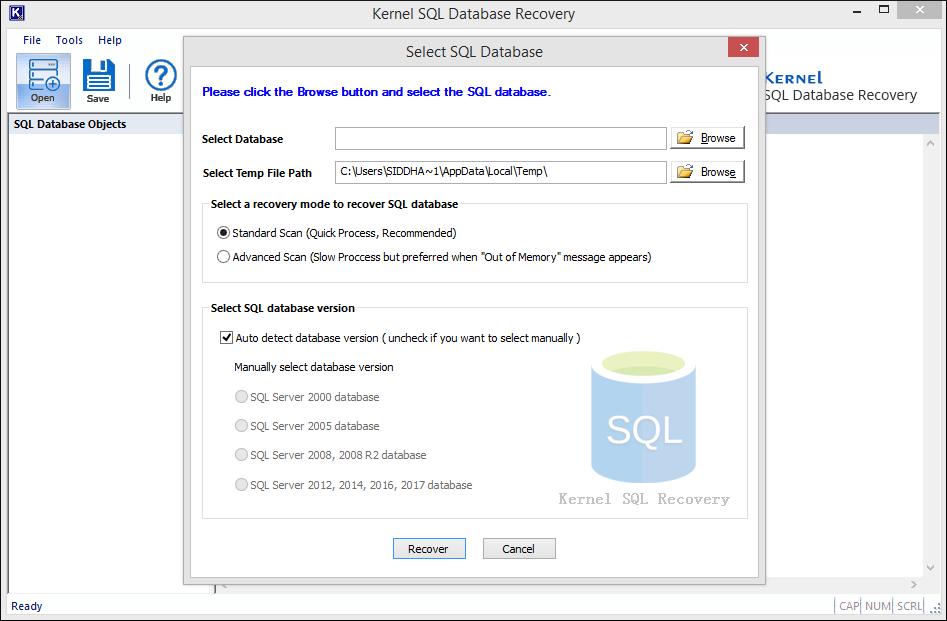
Kernel for SQL Database Recovery
Just like any other database file, SQL database files are also prone to database corruption. In gruesome scenarios like these, one should rely only on professional tools such as Kernel for SQL Database Recovery. It is a feature-rich tool that can quite quickly repair your earlier corrupt/inaccessible database files, irrespective of the server version. It is also possible to create a backup of the restored databases in script form.
Conclusion
Many a time, it is easier to work with spreadsheets in comparison to SQL database tables. Therefore, it becomes necessary to export these SQL tables to Excel. In this post, we have explored two manual ways to achieve this task quickly. A damaged/ corrupted database file can hinder you from exporting from SQL to Excel; hence we recommend the user to rely on advanced tools to repair corrupt SQL databases with ease.
More Information
- Recover deleted records in SQL Server
- Fix SQL database recovery pending state
- Recover SQL database from suspect mode
- Restore SQL Server database with Norecovery
My readers continuously asked me to work on how to export html table data to excel, CSV, PNG, PDF, TXT, Doc, JSON & XML instead of copying the records manually. So I thought to share this wonderful jquery plugin I have come across via google to my readers.
This plugin is very easy to implement it in your projects who wants to export the html table data instantly.
Beauty of this Export HTML table to Excel jQuery plugin is which allows you to download any html table data into all downloadable formats like Excel, CSV, PDF, DOC and many more. This is the must required plugin for any reporting / statistics kind of projects.
Now a days Exporting Table Data into Specific Format is a very common feature in every web application.
Please check my popular post on Top 20 code snippets in jQuery

Contents
- 1 Export HTML Table Data to Excel Plugin Features
- 1.1 Installation
- 2 Export html table data to Excel (XLSX) format
- 3 Export html table data to PNG format
- 4 Export html table data to PDF format
- 4.1 Usage
- 4.2 PDF export using jsPDF
- 4.3 Other Types
- 5 Download HTML Table Data to Excel, CSV, XML, PDF Plugin
Export HTML Table Data to Excel Plugin Features
We can easily export any html tables to the following formats. Not only table to excel instead you can export html table data to CSV, Excel, PNG, JSON, PDF, JSON, SQL & XML etc
- JSON
- XML
- PNG
- CSV
- TXT
- SQL
- MS-Word
- Ms-Excel
- Ms-Powerpoint
Installation
You need an jquery plugin to support this feature
<script type="text/javascript" src="https://code.jquery.com/jquery-3.2.1.min.js"></script>
In order to save the exported files into your machine, please include the below js in your html code
<script type="text/javascript" src="libs/FileSaver/FileSaver.min.js"></script>Export html table data to Excel (XLSX) format
To export the table data in excel 2007 format, please include the below js in your html code
<script type="text/javascript" src="libs/js-xlsx/xlsx.core.min.js"></script>You need an below script to export html table data to PNG format. html2canvas.js.
I have added IE support also to export HTML table to PNG.
<!-- For IE support include es6-promise before html2canvas -->
<script type="text/javascript" src="libs/es6-promise/es6-promise.auto.min.js"></script>
<script type="text/javascript" src="libs/html2canvas/html2canvas.min.js"></script>
Export html table data to PDF format
<script type="text/javascript" src="libs/jsPDF/jspdf.min.js"></script>
<script type="text/javascript" src="libs/jsPDF-AutoTable/jspdf.plugin.autotable.js"></script>
Finally you have to include this table export plugin to work successfully in the html table
<script type="text/javascript" src="tableExport.min.js"></script>
Usage
<a href="#" onClick ="$('#tableID').tableExport({type:'json',escape:'false'});">JSON</a>

<a href="#" onClick ="$('#tableID').tableExport({type:'excel',escape:'false'});">XLS</a>

<a href="#" onClick ="$('#tableID').tableExport({type:'csv',escape:'false'});">CSV</a>

<a href="#" onClick ="$('#tableID').tableExport({type:'pdf',escape:'false'});">PDF</a>
PDF export using jsPDF
please use the below configuration to use jsPDF
$('#tableID').tableExport({

type:'pdf',

jspdf: {

orientation: 'p',

margins: {

left:20, top:10

},

autotable: false

}

});
Other Types
{type:'json',escape:'false'}

{type:'json',escape:'false',ignoreColumn:'[2,3]'}

{type:'json',escape:'true'}

{type:'xml',escape:'false'}

{type:'sql'}

{type:'csv',escape:'false'}

{type:'txt',escape:'false'}

{type:'excel',escape:'false'}

{type:'doc',escape:'false'}

{type:'powerpoint',escape:'false'}

{type:'png',escape:'false'}

{type:'pdf',pdfFontSize:'7',escape:'false'}
View Live Demo
Download HTML Table Data to Excel, CSV, XML, PDF Plugin
Please download this HTML table to EXCEL, CSV Format plugin by sharing this in your social media and support my work
Credit – https://github.com/kayalshri/tableExport.jquery.plugin