
Do you find it difficult to export your data from Oracle SQL Developer to excel and CSV format? Have you ever just banged your hands at the keyboard, closed your eyes, and thought “Is it supposed to be this hard?”. Well, the answer is NO. This post will guide you step by step with necessary screenshots through the whole process of Oracle SQL Developer export to excel & CSV format.
It’s every developer’s dream to be able to manipulate and convert their data into any format. Often this takes a lot of effort and resources just to get the already painstakingly gathered data to the desired format. One such example is exporting your data from Oracle SQL Developer to excel and CSV format.
Introduction To Oracle SQL Developer
Oracle offered a database IDE in the form of Oracle SQL Developer. It supports the graphical user interface i.e. any user or administrator can perform the database activities in fewer clicks. It simplifies Oracle database development and management on a traditional and cloud-based platform. They also provide export and import utilities to their users. You can explore more about the functionalities of Oracle here.
Oracle’s main objective is to save the user’s time and effort in every possible way. So, the process of Oracle SQL Developer export to excel and CSV format should be a painless and ephemeral task. Let’s see how you will conquer this feature of Oracle.
Hevo offers a faster way to move data from databases such as Oracle; SaaS applications and 100+ other data sources into your data warehouse to be visualized in a BI tool. Hevo is fully automated and hence does not require you to code.
Get Started with Hevo for Free
Let’s look at the benefits of using Hevo:
- Secure Data Transfer: Hevo offers two-factor authentication and end to end encryption, which makes sure that the data movement is safe and secure.
- Fully-Automated: Hevo platform requires minimal maintenance and management. This fully automated service is a wise choice for anyone.
- Auto Mapping: It can automatically create the schema by mapping the data from the source to the destination schema. Hevo takes care of the mapping even when there are changes in the latter stage.
- Scalability: Hevo can handle millions of records per minute without any latency. The data pipelines are scaled according to the requirement.
- Friendly Live Support: Hevo team is ready to offer a helping hand at any time through emails, chat, and calls.
Sign up here for a 14-Day Free Trial!

Download the Ultimate Guide on Database Replication
Learn the 3 ways to replicate databases & which one you should prefer.
Let’s see what you will cover here:
- Prerequisites
- Steps For The Exporting Process
Prerequisites
- Oracle SQL Developer installed on your system.
- Knowledge about RDBMS.
Steps For The Exporting Process
The steps involved in creating an excel and CSV file from the data in Oracle SQL Developer are listed below:
- Connect Your Database
- Run Your Query
- Export Your Data
- Select Your Desired Format
- Use Your Data In The Desired Format
Step 1: Connect Your Database
Connect to your database in Oracle SQL Developer by using the correct credentials of your database. This database contains the data that needs to be exported to an Excel or CSV file.
Step 2: Run Your Query
Write the following command in the SQL worksheet and execute it by clicking the run button on the top left corner of the worksheet. You can also use any other query to get your desired output.
SELECT * FROM ACCOUNTS;Step 3: Export Your Data
Right-click on the query result and select Export from the drop-down menu.
Step 4: Select Your Desired Format
In the Export Wizard, select “excel 2003+ (xlsx)” for excel versions above 2003 or “excel 95-2003 (xls)” for excel version between 95 and 2003 or “csv” in the format, and then determine your destination location. Click “Next” and then “Finish”.
Step 5: Use Your Data In The Desired Format
Finally, you can go to your destination location and open the exported data in the specified format.
Conclusion
You have learned the process of Oracle SQL Developer export to excel and CSV format. The data that you have exported is usually needed for backup or to transfer that data to another database or a data warehouse. Extracting complex data from a diverse set of data sources can be a challenging task and this is where Hevo saves the day!
Visit our Website to Explore Hevo
Hevo, a No-code Data Pipeline helps you transfer data from Oracle SQL Developer in a fully automated and secure manner without having to write the code repeatedly. Hevo, with its secure integrations with 100+ sources & BI tools, allows you to export, load, transform, & enrich your data & make it analysis-ready in a jiffy.
Want to take Hevo for a spin? Sign Up for a 14-day free trial and experience the feature-rich Hevo suite first hand. You can also have a look at the unbeatable pricing that will help you choose the right plan for your business needs.
Let us know about your experience of Oracle SQL Developer export to Excel and CSV in the comment section below.
No-code Data Pipeline for Oracle
How do you export a result from an ORACLE database to a excel or txt with only scripting?
for instance like
export to c:file.xls
select * from table1
or something like that?
Best regards!
asked Jan 13, 2012 at 8:29
![]()
You might want to do it from within Excels VBA
Sub DisplayDBATables()

  Dim cn As ADODB.Connection
  Dim rs As ADODB.Recordset

  Set cn = New ADODB.Connection
  Set rs = New ADODB.Recordset

  cn.Open ( _
    "User ID=rene"        & _
    ";Password=my_secret" & _
    ";Data Source=XE"     & _
    ";Provider=MSDAORA.1" )

  rs.Open "select * from dba_tables", cn

  Cells(1, 1).CopyFromRecordset rs

End Sub
MSDN says Copies the contents of an ADO or DAO Recordset object onto a worksheet, beginning at the upper-left corner of the specified range. If the Recordset object contains fields with OLE objects in them, this method fails.
answered Jan 13, 2012 at 8:45
![]()
René NyffeneggerRené Nyffenegger
39.1k32 gold badges158 silver badges288 bronze badges
4
The export (exp) command is used to export data in a binary format (suitable for backup).
Using sqlplus, you can use the spool command to export a query’s result to a text file.
More on using spool info here
That said, it is easier to do it using a tool like toad or sql developer.
answered Jan 13, 2012 at 8:37
![]()
vc 74vc 74
36.8k7 gold badges71 silver badges88 bronze badges
1
Wondering how to copy Oracle data to Excel using Toad?
The problem with exporting Oracle data to Excel
Many business analysts rely heavily upon Microsoft Excel as one of their primary tools for manipulating and reporting upon important business data. You will often hear them make requests such as the following:
- Copying Oracle data to Excel
- Exporting Oracle data to Excel
- Extracting Oracle data to Excel
- Dumping Oracle data to Excel
They key point is that regardless of how the business users ask, the request is essentially the same. Some very common ways they obtain such access to the database data included in an Excel spreadsheet are:
- Business user sending a formal database data extraction requests to their information systems people to perform and then deliver the needed Excel Spreadsheet, or a “comma delimited” text file to load in Excel themselves. However, this process can take time—sometimes more than the business user can wait.
- Business user accessing the database data directly by themselves via Excel’s external data interface capability. However, this requires ODBC connectivity; plus Excel direct database access can be quite slow, a little complicated, and distracts from task at hand. In fact, some companies do not allow or support users accessing database data via ODBC.
- Business user truly self-servicing by extracting the database data themselves using a powerful tool like Toad® by Quest® for Oracle, and then working with that data in Excel. This approach is quick and easy, plus Toad for Oracle integrates easily into the business analyst’s workflow.
The solution to exporting Oracle data to Excel
Many business analysts strongly favor the third choice of using Toad for Oracle to self-service. In this week’s blog I’ll review some common scenarios that facilitate easily copying Oracle data to Excel using Toad. The techniques that I’ll be showing work essentially the same in both of Toad’s two main screens: the SQL Editor and Schema Browser. I’ll demonstrate using the SQL Editor, which is probably the most used screen within Toad.
The technique of moving Oracle data to Excel
Smaller data sets
So in Figure 1 below I’ve opened a Toad for Oracle SQL Editor and executed a query that returns some data. If the amount of data (i.e. the number of rows) that you are copying from Oracle to Excel using Toad is not excessive, then you can simply multi-select the desired rows and do a standard Windows operation to cut (CONTROL-C) and paste (CONTROL-V) the data into Excel.

Figure 1: Cut and paste data from Oracle to Excel
Larger data sets
If the amount of data (i.e. the number of rows) that you are copying from Oracle to Excel using Toad is the entire table, rather than having to vertically scroll to select all of the rows, instead you could do a standard Windows operation to multi-select (CONTROL-A) all of the rows followed by a cut (CONTROL-C) and paste (CONTROL-V). However that would be the hard and potentially slow way, plus that many rows might not fit in your desktop computer’s free memory. A better method would be to invoke the Export Dataset wizard by either pressing the SQL Editor’s toolbar icon for Export Dataset or performing a Right-Hand-Mouse click in the data grid followed by selecting the pop-up menu’s Export Dataset option as shown below in Figure 2.

Figure 2: Invoking the Export Dataset Wizard
Either invocation method will result in displaying the Export Dataset wizard shown below in Figure 3, which is a very powerful facility in Toad for Oracle worthy of its own blog about the many things it permits one to do. For now I’ll simply focus on copying from Oracle to Excel using Toad. There are several Format choices which result in copying from Oracle to Excel, including: Excel File (creates a new Excel file), Excel Instance (creates a new worksheet in currently opened Excel instance), and delimited text which can be imported by Excel.
 Figure 3: Export Dataset Wizard
Note that selecting among the different Formats will result in different options being displayed. So take your time to note and select from the many different options presented.
In my case I wanted all the rows, therefore unchecked the option for Export only selected rows. I wanted the column headers and cell borders both included. On my desktop the process of copying from Oracle to Excel using Toad for one million rows took less than a minute – your mileage will vary.
Conclusion
If you are a business user who wants to copy from Oracle to Excel, use Toad. You can do simple cut and paste, export to Excel file, export to Excel worksheet, and even export to text delimited. Thus you can self-service and get the data you need without requesting help from your information systems people or using slow and problematic interfaces such as ODBC. No other tool makes are copying data from Oracle to Excel easier and quicker than Toad. Plus, no matter you’re whether using the freeware or commercial version of Toad, the process is essentially the same.
Related Toad World posts
Blog: Create and Load Oracle Tables from Excel Spreadsheet using Toad for Oracle
Useful resources
Toad for Oracle general information
Technical brief: Top Five Reasons to Choose Toad Over SQL Developer
Case study: Opening doors and creating opportunities with data insights
Have questions, comments?
Head over to the Toad for Oracle forum on Toad World®! Chat with Toad developers, and lots of experienced users.
Help your colleagues
If you think your colleagues would benefit from this blog, share it now on social media with the buttons located at the top of this blog post. Thanks!
Tags:
Toad for Oracle

Written by Bert Scalzo
Bert Scalzo is a guest-blogger for Quest and a renowned database expert, Oracle® ACE, author, database technology consultant, and formerly a member of Dell Software’s TOAD dev team. With three decades of Oracle® database experience to draw on, Bert’s webcasts garner high attendance and participation rates. His work history includes time at both Oracle Education and Oracle Consulting. Bert holds several Oracle Masters certifications and has an extensive academic background that includes a BS, MS and Ph.D. in computer science, as well as an MBA, and insurance industry designations.
Bert is a highly sought-after speaker who has presented at numerous Oracle conferences and user groups, including OOW, ODTUG, IOUG, OAUG, RMOUG and many others. Bert enjoys sharing his vast knowledge on data modeling, database benchmarking, database tuning and optimization, «star schema» data warehouses, Linux® and VMware®.
As a prolific writer, Bert has produced educational articles, papers and blogs for such well-respected publications as the Oracle Technology Network (OTN), Oracle Magazine, Oracle Informant, PC Week (eWeek), Dell Power Solutions Magazine, The LINUX Journal, LINUX.com, Oracle FAQ, Ask Toad and Toad World.
This popular author is known throughout the industry for his instructive books, which include:
• Oracle DBA Guide to Data Warehousing and Star Schemas
• TOAD Handbook (1st Edition)
• TOAD Handbook (2nd Edition)
• TOAD Pocket Reference (2nd Edition)
• Database Benchmarking: Practical Methods for Oracle & SQL Server
• Advanced Oracle Utilities: The Definitive Reference
• Oracle on VMware: Expert Tips for Database Virtualization
• Introduction to Oracle: Basic Skills for Any Oracle User
• Introduction to SQL Server: Basic Skills for Any SQL Server User
• Toad Unleashed
• Leveraging Oracle Database 12cR2 Testing Tools
• Database Benchmarking and Stress Testing
Drop Bert an email at bertscalzo2@gmail.com and he’ll write you back, and maybe send you an autographed book!
Do you need to export your query output to an Excel file in SQL Developer?
If so, you’ll see the complete steps to accomplish this goal.
Step 1: Run your query
To start, you’ll need to run your query in SQL Developer. You can run any query based on your needs.
Step 2: Open the Export Wizard
Once you’re done running the query in SQL Developer, you’ll see the query output at the bottom of your screen.
Right-click on any cell on the query results, and then select the ‘Export…‘ option from the drop down menu.
You’ll then see the Export Wizard.
Step 3: Select the Excel format and the location to export your file
Now you’ll need to:
- Select the Excel format from the drop-down list. You can choose the xlsx format for recent versions of Excel, or the xls format for previous versions of Excel
- Click on the ‘Browse…‘ button to select the location where the Excel file will be saved
- Press on the ‘Next >‘ button once you are done
Step 4: Export the query output to Excel
For the final step, click on the ‘Finish‘ button to export the query output to Excel.
Conclusion
You just saw how to export your query output to Excel in SQL Developer. You can choose to export your query results to either the xlsx format for newer versions of Excel, or the xls format for previous versions of Excel.
If you need to export your query output to a CSV file, you may then check the following guide that explains the steps to export your query results to CSV in SQL Developer. Alternatively, you may apply spool to accomplish the same goal.
Содержание
- Create an Excel Spreadsheet from a Oracle Database
- 5 Answers 5
- Oracle SQL Developer To Excel & CSV: 5 Steps To Move Data Conveniently
- Table of Contents
- Introduction To Oracle SQL Developer
- 10 Exporting and Importing Metadata and Data
- Using SQL Developer for Exporting and Importing
- Example: Exporting Metadata and Data for a Table
- Example: Importing Metadata and Data Using a Script File
- Example: Exporting Data to a Microsoft Excel File
- Example: Importing Data from a Microsoft Excel File
- Using Other Tools for Exporting and Importing Data
- Choosing the Right Export/Import Utility
- Loading Data with SQL*Loader
- Methods SQL*Loader Uses to Load Data
- SQL*Loader Features
- Example: Using SQL*Loader
- Exporting and Importing Data
- Exporting and Importing with Data Pump Export and Data Pump Import
- Exportin g and Importing Data with the Export and Import Utilities
Create an Excel Spreadsheet from a Oracle Database
I have a table in a Oracle database. I have to create a complex spreadsheet structure from the Oracle table. I am looking for best approach to achieve this. Can I use SSIS or use some Oracle utilities to create the spreadsheet.
Any help would be extremely appreciated.
Thanks in advance.
5 Answers 5
I suppose the problem is, just how complex is your «complex structure»?
Programming IDEs such as Oracle SQL Developer or Quest TOAD have wizards to export data table to CSV files.
If you want to join data from multiple tables you could use a view, or even write a SQL statement
(rembering that columns can often contain data which includes commas, so you may want to use a more unusual character — or set of characters — as your separator.)
Another quick way of doing soemthing is to use SQL*Plus’s HTML reporting function. Many spreadsheet tools can import well-structured HTML and XML without a snatch. Find out more.
If you want to flatten a hierarchical structure or something even more convoluted you’ll probably need to move into PL/SQL. A hand-rolled approach would use a variant of the above statement fitted to use UTL_FILE:
If you want to export specifically to Excel (i.e. a .XLS file) then you’ll need to go beyond Oracle built-ins. The usual solution for exporting straight from PL/SQL to Excel is Tom Kyte’s OWA_SYLK wrapper for the SYLK api. Find out more.
This works with single worksheets. If you want to export to multiple worksheets there are a couple of alternative solutions.
Sanjeev Sapre has his get_xl_xml package. As the name suggests it uses XML to undertake the transformation. Find out more.
Jason Bennett has written a PL/SQL object which generates an Excel XML document. Find out more.
Источник
Oracle SQL Developer To Excel & CSV: 5 Steps To Move Data Conveniently
Table of Contents
Do you find it difficult to export your data from Oracle SQL Developer to excel and CSV format? Have you ever just banged your hands at the keyboard, closed your eyes, and thought “Is it supposed to be this hard?”. Well, the answer is NO. This post will guide you step by step with necessary screenshots through the whole process of Oracle SQL Developer export to excel & CSV format.
Table of Contents
It’s every developer’s dream to be able to manipulate and convert their data into any format. Often this takes a lot of effort and resources just to get the already painstakingly gathered data to the desired format. One such example is exporting your data from Oracle SQL Developer to excel and CSV format.
Introduction To Oracle SQL Developer
Oracle offered a database IDE in the form of Oracle SQL Developer. It supports the graphical user interface i.e. any user or administrator can perform the database activities in fewer clicks. It simplifies Oracle database development and management on a traditional and cloud-based platform. They also provide export and import utilities to their users. You can explore more about the functionalities of Oracle here.
Oracle’s main objective is to save the user’s time and effort in every possible way. So, the process of Oracle SQL Developer export to excel and CSV format should be a painless and ephemeral task. Let’s see how you will conquer this feature of Oracle.
Hevo offers a faster way to move data from databases such as Oracle; SaaS applications and 100+ other data sources into your data warehouse to be visualized in a BI tool. Hevo is fully automated and hence does not require you to code.
Let’s look at the benefits of using Hevo:
- Secure Data Transfer: Hevo offers two-factor authentication and end to end encryption, which makes sure that the data movement is safe and secure.
- Fully-Automated: Hevo platform requires minimal maintenance and management. This fully automated service is a wise choice for anyone.
- Auto Mapping: It can automatically create the schema by mapping the data from the source to the destination schema. Hevo takes care of the mapping even when there are changes in the latter stage.
- Scalability: Hevo can handle millions of records per minute without any latency. The data pipelines are scaled according to the requirement.
- Friendly Live Support: Hevo team is ready to offer a helping hand at any time through emails, chat, and calls.
Sign up here for a 14-Day Free Trial!
Источник
This chapter describes how to export (unload) from and import (load) into Oracle Database XE. You can export and import metadata (database object definitions), data, or both metadata and data. It contains the following topics:
Data can be exported for later importing (loading) into another Oracle database or into a non-Oracle database. Data that has been unloaded from a non-Oracle database can be loaded into an Oracle database, if the data is in a suitable format for loading.
This chapter includes the following topics:
For convenience and the range of features available, you may want to use SQL Developer for export and import operations unless you need to use another tool (command-line utility).
Using SQL Developer for Exporting and Importing
SQL Developer provides convenient wizards for exporting and importing metadata and data:
To export metadata or data, or both, use the Export Wizard: click Tools , then Database Export .
To import metadata or data, or both, use an appropriate method depending on how the material to be imported was created, or the format of the data to be imported. This method might be running a script file, or using the Data Import Wizard to import from a data file (such as a .csv file or a Microsoft Excel .xls file).
See the following examples of using SQL Developer for performing export and import operations:
Example: Exporting Metadata and Data for a Table
Assume that you want to export the REGIONS table, which is part of the HR sample schema, so that it can be created, along with its data, in another schema (either in the same Oracle database or another Oracle database).
To unload the REGIONS table:
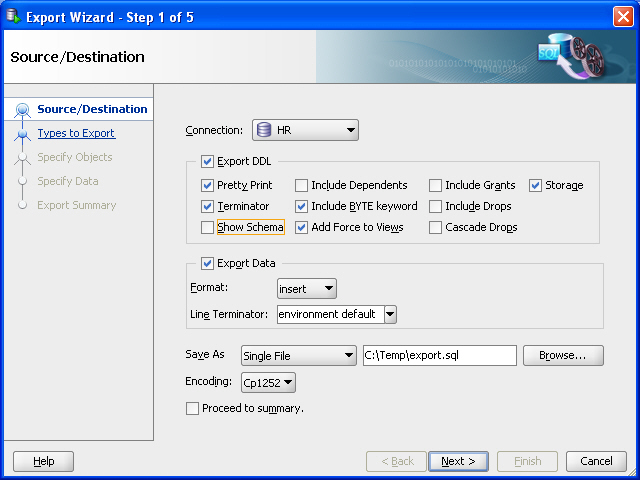
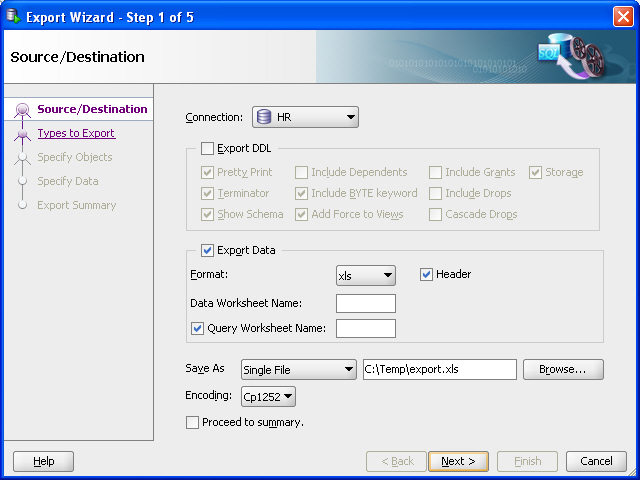
In SQL Developer, click Tools, then Database Export. Figure 10-1 shows the first page of the Export Wizard, but with entries reflecting selections that you will make.
Figure 10-1 Export Wizard: Source/Destination
Description of «Figure 10-1 Export Wizard: Source/Destination»
Accept the default values for the Source/Destination page options, except as follows:
Connection : Select HR .
Show Schema : Deselect (uncheck) this option, so that the HR schema name is not included in CREATE and INSERT statements in the .sql script file that will be created. (This enables you to re-create the table in a schema with any name, such as one not named HR.)
Save As location: Enter or browse to a desired folder on your local hard drive, and specify the file name for the script file. (In the figure, this file is C:tempexport.sql .) The script file containing CREATE and INSERT statements will be created in this location.
For explanations of the options on this or any other wizard page, click the Help button.
For example, Format has other possible values besides the default insert , which causes SQL INSERT statements to be included to insert the data. Other values include loader to cause SQL*Loader files to be created, and xls to cause a Microsoft Excel .xls file to be created.
On the Types to Export page, deselect Toggle All, then select only Tables (because you only want to export a table).
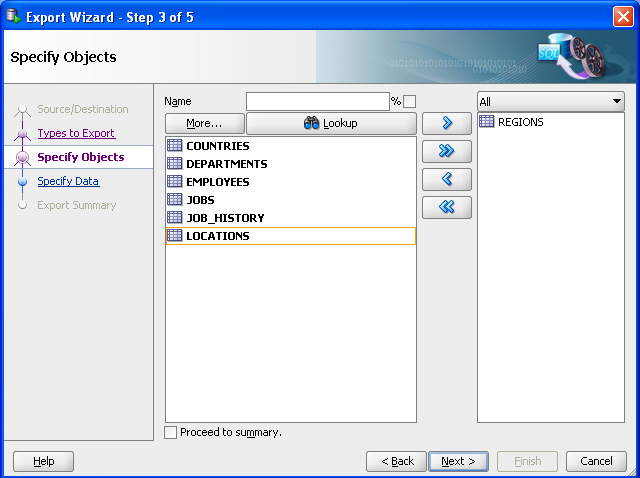
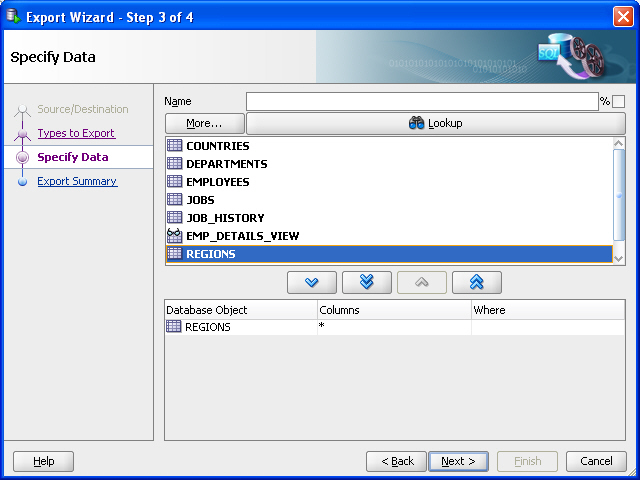
On the Specify Objects page, click Lookup, then double-click the REGIONS table on the left to move it to the right-hand column. Figure 10-2 shows the result of these actions.
Figure 10-2 Export Wizard: Specify Objects
Description of «Figure 10-2 Export Wizard: Specify Objects»
On the Specify Data page, accept the defaults and click Next .
By default, all data from the specified table or tables is exported; however, if you want to limit the data to be exported, you can specify one or more » WHERE clauses» in the bottom part of this page.
On the Summary page, review the information; and if it is what you want, click Finish . (Given what you specified, this causes the export script to be created as C:tempexport.sql .)
If you need to make any changes, go back to the appropriate page or pages and make them, and then move forward to the Summary page again.
Example: Importing Metadata and Data Using a Script File
Assume that you wanted to re-create the REGIONS table that you exported in «Example: Exporting Metadata and Data for a Table», but in a different schema. This other schema can be an existing one or one that you create.
For example, assume that you created a user named NICK following the instructions in «Example: Creating a User». To re-create the REGIONS table in the schema of user NICK by invoking the script in C:tempexport.sql follow these steps using SQL Developer:
If you have not already created a database connection for NICK , create the connection.
Open the NICK connection.
In the SQL Worksheet for the NICK connection, type the following:
Click the Run Script icon.
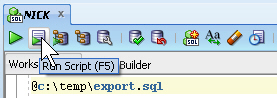
The Script Output pane shows that the REGIONS table has been created and four rows have been inserted.
In the Connections navigator, expand the Tables node under the NICK connection. You now see the REGIONS table.
Optionally, click the REGIONS table in the Connections navigator, and examine the information under the Columns and Data tabs in the main display area.
Example: Exporting Data to a Microsoft Excel File
Assume that you want to export only the data from the REGIONS table, which is part of the HR sample schema, so that the data can be imported into a table with the same column definitions. This might be a REGIONS table in another schema (either in the same Oracle database or another Oracle database).
You use the same Database Export wizard, but export only the data, and not the DDL (Data Definition Language statements for creating database objects).
To export the data the REGIONS table:
In SQL Developer, click Tools, then Database Export. Figure 10-3 shows the first page of the Export Wizard, but with entries reflecting selections that you will make.
Figure 10-3 Export Wizard: Source/Destination Specifying Data Export Only
Description of «Figure 10-3 Export Wizard: Source/Destination Specifying Data Export Only»
Accept the default values for the Source/Destination page options, except as follows:
Connection : Select HR .
Export DDL: Deselect (uncheck) this option. If a .sql script file is generated (which will not happen in this example), it will not contain any CREATE statements, but only INSERT statements.
Format : Select xls to have the data saved to a Microsoft Excel .xls file.
Save As location: Enter or browse to a desired folder on your local hard drive, and specify the file name for the .xls file. (In the figure, this file is C:tempexport.xls .)
On the Types to Export page, deselect Toggle All, then select only Tables (because you only want to export data for a table).
On the Specify Objects page, click Lookup , then double-click the REGIONS table on the left to have it appear in a row in the bottom part of the page. Figure 10-2 shows the result of these actions.
Figure 10-4 Export Wizard: Specify Objects for Exporting Data
Description of «Figure 10-4 Export Wizard: Specify Objects for Exporting Data»
By default, all data from the specified table or tables is exported; however, if you want to limit the data to be exported, you can specify one or more » WHERE clauses» in the bottom part of this page.
On the Summary page, review the information; and if it is what you want, click Finish . (Given what you specified, this causes the data in the REGIONS table to be exported to the file C:tempexport.xls .)
If you need to make any changes, go back to the appropriate page or pages and make them, and then move forward to the Summary page again.
Example: Importing Data from a Microsoft Excel File
Assume that you wanted to import the data that was exported in «Example: Exporting Data to a Microsoft Excel File», into a new table that has the same column definitions as the original ( REGIONS ) table.
For example, assume that you created a user named NICK following the instructions in «Example: Creating a User». This user wants to take the exported data, add one row in the Excel file, and import it into a new table that has the same column definitions as the REGIONS table. (This example is trivial, and adding a row to the Excel file may not be typical, but it is presented merely to illustrate some capabilities.)
To accomplish these goals, follow these steps:
In SQL Developer, if you have not already created a database connection for NICK , create the connection.
Open the NICK connection.
In the SQL Worksheet for the NICK connection, type the following:
Click the Run Script icon.
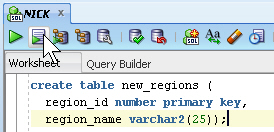
The Script Output pane shows that the NEW_REGIONS table has been created.
In the Connections navigator, expand the Tables node under the NICK connection. You now see the NEW_REGIONS table.
If you do not see the NEW_REGIONS table, disconnect from NICK (right-click NICK in the Connections navigator and select Disconnect) and connect again, and expand the Tables node.
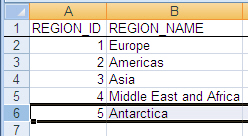
Using Microsoft Excel, open the file containing the exported data (for example, c:tempexport.xls), and optionally add one or more rows.
Figure 10-5 shows the original file with one row added for the Antarctica region.
Figure 10-5 Microsoft Excel File with Exported Data (Modified)
Description of «Figure 10-5 Microsoft Excel File with Exported Data (Modified)»
Save and close the Microsoft Excel .xls file.
In SQL Developer, in the Connections navigator display for NICK , right-lick the NEW_REGIONS table and select Import Data .
In the dialog box that is displayed, navigate to the c:temp folder, select export.xls , and click Open .
In the Data Import Wizard, accept all the defaults; click Next on each page until Summary, and click Finish there. (For information about the options on any wizard page, click the Help button.)
The data from the .xls file is loaded into the NEW_REGIONS table and is committed.
If the SQL Developer export and import wizards are not satisfactory for your needs, you can use one of the command-line utilities available with Oracle Database XE. These other tools are described in the following sections:
Choosing the Right Export/Import Utility
Oracle Database XE provides a number of powerful utilities for exporting and importing data. Table 10-1 provides a summary of these options.
Table 10-1 Summary of Other Export/Import Data Options
Command-line interface, invoked with sqlldr command
Bulk-loads data into the database from external files
Supports numerous input formats, including delimited, fixed record, variable record, and stream
Loads multiple tables simultaneously
Powerful data filtering capabilities
Data Pump Export and Data Pump Import utilities
Command-line interface, invoked with expdp and impdp commands
Exports and imports from one Oracle database to another (proprietary binary format)
Imports/exports all schema object types
Imports/exports entire database, entire schema, multiple schemas, multiple tablespaces, or multiple tables
Powerful data filtering capabilities
Does not support XMLType data
Export and Import utilities
Command-line interface, invoked with exp and imp commands
Exports and imports from one Oracle database to another (proprietary binary format)
Supports XMLType data
Does not support the FLOAT and DOUBLE data types
Capabilities similar to Data Pump; Data Pump is preferred unless you must import or export XMLType data
Table 10-2 provides a number of load/unload/import/export scenarios and suggests the appropriate option to use for each.
Table 10-2 Import/Export Scenarios and Recommended Options
| Feature or Utility | Description |
|---|---|
You have to load data that is not delimited. The records are fixed length, and field definitions depend on column positions.
You have tab-delimited text data to load, and there are more than 10 tables.
You have text data to load, and you want to load only records that meet certain selection criteria (for example, only records for employees in department number 3001).
You want to import or export an entire schema from or to another Oracle database. There is no XMLType data in any of the data.
Data Pump Export and Data Pump Import
You want to import or export data from or to another Oracle database. The data contains XMLType data and contains no FLOAT or DOUBLE data types.
Import ( imp ) and Export ( exp )
Oracle Database Utilities for more information on Data Pump, the Import and Export utilities, and SQL*Loader
Loading Data with SQL*Loader
SQL*Loader loads data from external datafiles into tables of an Oracle database. A particular datafile can be in fixed record format, variable record format, or stream record format (the default).
The input for a typical SQL*Loader session is a contr ol file, which controls the behavior of SQL*Loader, and some data, located either at the end of the control file itself, or in a separate datafile.
The output of a SQL*Loader session is an Oracle database (where the data is loaded), a log file, a «bad» file, and potentially, a discard file. The log file contains a detailed summary of the load, including a description of any errors that occurred during the load. The bad file contains records that were rejected, either by SQL*Loader or by the Oracle database. The discard file contains records that were filtered out of the load because they did not match any reco rd-selection criteria specified in the control file.
Methods SQL*Loader Uses to Load Data
SQL*Loader uses three different methods to load data, depending on the situation: conventional path, direct path, and external tables.
A conventional path load is the default loading method. It executes SQL INSERT statements to populate tables in an Oracle database. This method can sometimes be slower than other methods because extra overhead is added as SQL statements are generated, passed to Oracle, and executed. It can also be slower because when SQL*Loader performs a conventional path load, it competes equally with all other processes for buffer resources.
A direct path load does not compete with other users for database resources. It eliminates much of the Oracle database overhead by formatting Oracle data blocks and writing them directly to the database files, bypassing much of the data processing that normally takes place. Therefore, a direct path load can usually load data faster than conventional path. However, there are several restrictions on direct path loads that may require you to use a conventional path load. For example, direct path load cannot be used on clustered tables or on tables for which there are transactions pending.
See Oracle Database Utilities for a complete discussion of situations in which direct path load should and should not be used.
An external table load creates an external table for data that is contained in a datafile. The load executes INSERT statements to insert the data from the datafile into the target table. An external table load allows modification of the data being loaded by using SQL functions and PL/SQL functions as part of the INSERT statement that is used to create the external table.
See Oracle Database Administrator’s Guide for more information on external tables.
SQL*Loader Features
You can use SQL*Loader to do the following:
Load data across a network. This means that you can run the SQL*Loader client on a different system from the one that is running the SQL*Loader server.
Load data from multiple data files during the same load session.
Load data into multiple tables during the same load session.
Specify the character set of the data.
Selectively load data (you can load records based on the records’ values).
Manipulate the data before loading it, using SQL functions.
Generate unique sequential key values in specified columns.
Use the operating system’s file system to access the datafiles.
Load data from disk, tape, or named pipe.
Generate sophisticated error reports, which greatly aid troubleshooting.
Load arbitrarily complex object-relational data.
Use secondary datafiles for loading LOBs and collections.
Example: Using SQL*Loader
In the following example, a new table named dependents will be created in the HR sample schema. It will contain information about dependents of employees listed in the employees table of the HR schema. After the table is created, SQL*Loader will be used to load data about the dependents from a flat data file into the dependents table.
This example requires a data file and a SQL*Loader control file, which you will create in the first two steps.
Create the data file, dependents.dat , in your current working directory. You can create this file using a variety of methods, such as a spreadsheet application or by simply typing it into a text editor. It should have the following content:
This file is a CSV (comma-separated values) file in which the commas act as delimiters between the fields. The field containing the first name is enclosed in double quotation marks in cases where a variant of the official name is also provided—that is, where the first name field contains a comma.
Create the SQL*Loader control file, dependents.ctl , in your current working directory. You can create this file with any text editor. It should have the following content:
Do one of the following:
On Linux: Start a terminal session and log in to the Oracle Database XE host computer with the oracle user account.
On Windows: Log in to the Oracle Database XE host computer as the user who installed Oracle Database XE, and then open a command window.
On Linux, ensure that environment variables are set according to the instructions in «Setting Environment Variables on the Linux Platform».
Start the SQL Command Line (SQL*Plus) and connect as user hr by entering the following at the command prompt:
At the SQL prompt, create the dependents table, as follows:
The constraint on the last_name column indicates that a value must be provided. The constraint on the relative_id column indicates that it must match a value in the employee_id column of the employees table. The benefits column has a datatype of CLOB so that it can hold large blocks of character data. (In this example, there is not yet any benefits information available so the column is shown as NULL in the data file, dependents.dat .)
After you receive the Table created message, enter exit to exit the SQL Command Line.
From within your current working directory (where you created the control and data files), issue the following SQL*Loader command at the system prompt:
The data in the dependents.dat file is loaded into the dependents table and the following message is displayed:
Information about the load is written to the log file, dependents.log . The content of the log file looks similar to the following:
You can now work with the dependents table, as you would any other table.
Exporting and Importing Data
Oracle Database XE provides the following command-line utilities for exporting and importing data:
Data Pump Export and Data Pump Import
Export and Import
The following sections provide an overview of each utility. For a summary of when you might want to use each utility, see Table 10-2.
Oracle Database Utilities for detailed information on these utilities, including command line parameter descriptions and additional examples.
Exporting and Importing with Data Pump Export and Data Pump Import
The Data Pump Export utility exports data and metadata into a set of operating system files called a dump file set . The Data Pump Import utility imports an export dump file set into a target Oracle database.
A dump file set is made up of one or more disk files that contain table data, database object metadata, and control information. The files are written in a proprietary, binary format, which means that the dump file set can be imported only by the Data Pump Import utility. The dump file set can be imported to the same database or it can be moved to another system and loaded into the Oracle database there.
Because the dump files are written by the database, rather than by the Data Pump client application, you must create directory objects for the directories to which files will be written. A directory object is a da tabase object that is an alias for a directory in the host operating system’s file system.
Data Pump Export and Import enable you to move a subset of the data and metadata. This is done by using Data Pump parameters to specify export and import modes, as well as various filtering criteria.
You can also perform exports and imports over a network. In a network export, the data from the source database instance is written to a dump file set on the connected database instance. In a network import, a target database is loaded directly from a source database with no intervening dump files. This allows export and import operations to run concurrently, minimizing total elapsed time.
Data Pump Export and Import also provide a set of interactive commands so that you can monitor and modify ongoing export and import jobs.
Data Pump Export and Data Pump Import do not support XMLType data. If you need to export and import XMLType data, use the Export and Import options described in «Exporting and Importing Data with the Export and Import Utilities».
Example: Using Data Pump Export and Data Pump Import
In this example, suppose that you want to make some changes to the HR sample schema and then test those changes without affecting the current HR schema. You could export the HR schema and then import it into a new HRDEV schema, where you could perform development work and conduct testing. To do this, take the following steps:
Do one of the following:
On Windows: Log in to the Oracle Database XE host computer as the user who installed Oracle Database XE, and then open a command window.
On Linux: Start a terminal session and log in to the Oracle Database XE host computer with the oracle user account.
On Linux, ensure that environment variables are set according to the instructions in «Setting Environment Variables on the Linux Platform».
At the command prompt, issue the command appropriate to your operating system, to create the directory where the exported files will be placed:
Start the SQL Command Line (SQL*Plus) and connect as user SYSTEM by entering the following at the command prompt:
where password is the password that you specified for the SYS and SYSTEM user accounts upon installation (Windows) or configuration (Linux) of Oracle Database XE.
At the SQL prompt, enter the following commands to create a directory object named dmpdir for the tmp directory that you just created, and to grant read and write access to it for user HR .
Export the HR schema to a dump file named schema.dmp by issuing the following command at the system command prompt:
where password is the password for the SYSTEM user.
As the export operation takes place, messages similar to the following are displayed:
The schema.dmp file and the expschema.log file are written to the dmpdir directory.
Import the dump file, schema.dmp , into another schema, in this case, HRDEV . You use the REMAP_SCHEMA command parameter to indicate that objects are to be imported into a schema other than their original schema. Because the HRDEV user account does not already exist, the import process automatically creates it. In this example, you will import everything except constraints, ref_constraints, and indexes. If a table already exists, it is replaced with the table in the export file.
At the operating system command prompt, issue the following command:
where password is the password for the SYSTEM user.
As the import operation takes place, messages similar to the following are displayed (this output is also written to the impschema.log file in the dmpdir directory):
The HRDEV schema is now populated with data from the HR schema.
Assign a password to the newly created HRDEV user account. To do so, start the SQL Command Line and connect as user SYSTEM (as you did in step 4), and then at the SQL prompt, enter the following ALTER USER statement:
This statement assigns the password hrdev .
You can now work in the HRDEV schema without affecting your production data in the HR schema.
Exportin g and Importing Data with the Export and Import Utilities
The Export and Import utilities provide a simple way for you to transfer data objects between Oracle databases. They are invoked with the exp and imp commands, respectively. These utilities provide support for XMLType data, whereas the Data Pump Export and Import utilities do not.
The Export and Import utilities do not support the FLOAT and DOUBLE data types. If your data contains these types and does not contain XMLType data, you must use Data Pump Export and Import, described in «Exporting and Importing with Data Pump Export and Data Pump Import».
When you run the Export utility against an Oracle database, objects (such as tables) are extracted, followed by their related objects (such as indexes, comments, and grants), if any. The extracted data is written to an export dump file. The dump file is an Oracle binary-format dump file that can be read only by the Import utility. The version of the Import utility cannot be earlier than the version of the Export utility used to create the dump file.
Dump files generated by the Export ( exp ) utility can only be imported by the Import ( imp ) utility; they cannot be imported with the Data Pump Import ( impdp ) utility.
Like Data Pump Import and Export, data exported with the Export utility can be imported with the Import utility into the same or a different Oracle database.
See Oracle Database Utilities for further information about the Export and Import utilities and for examples of how to use them.
Источник
Adblock
detector
| Import/Export Scenario | Recommended Option |
|---|---|