
Maintenance Alert: Saturday, April 15th, 7:00pm-9:00pm CT. During this time, the shopping cart and information requests will be unavailable.
How to Transfer Data from Excel to Word Automatically
Categories: Excel®
Tags: Export Excel Spreadsheets to Word
Excel lives up to its name when crunching numbers or organizing data. However, when you want to convey ideas beyond the table or graph, you will almost certainly turn to Word or PowerPoint. In the examples below, we are going to look at several different ways you can export, or incorporate, spreadsheets into your Word documents.
SAVE $10 AND TRAIN ON THIS TOPIC TODAY
Find out the Variety of Options to Transfer Data
To follow using our example, download ExportWorksheetsToWord.xlsx. You will need a blank Word document open. This feature applies to Excel/Word 2010 and later versions. Images were taken using Excel 2013 on Windows 7.
Solution One: Copy/Paste
The simplest way to display Excel data in a Word document is to use Copy/Paste.
- Open the destination Word document.
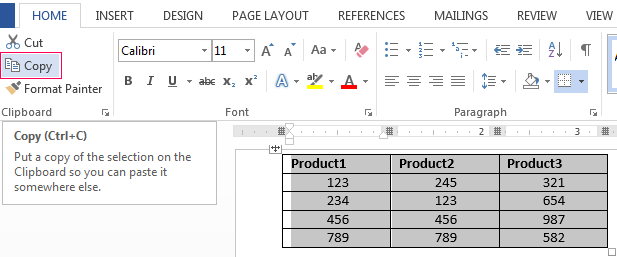
- In the source Excel spreadsheet, select the data you want to copy then hit CTRL-C.
- In the destination Word document, place the cursor where you want the data, then hit CTRL-V.
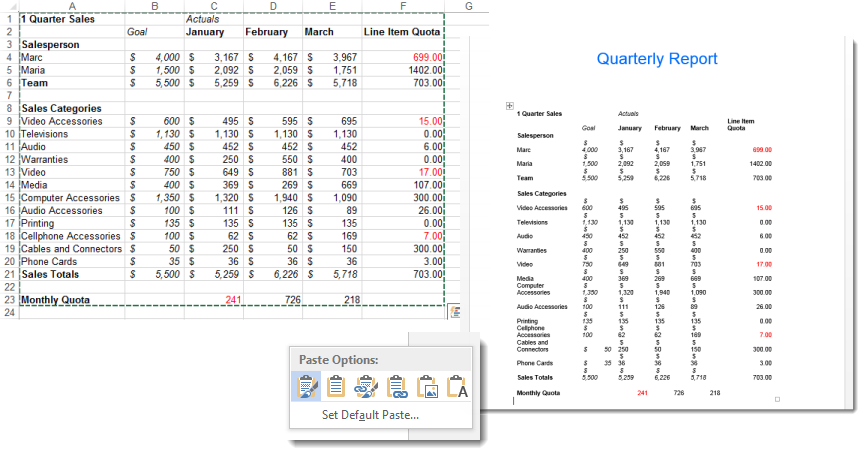
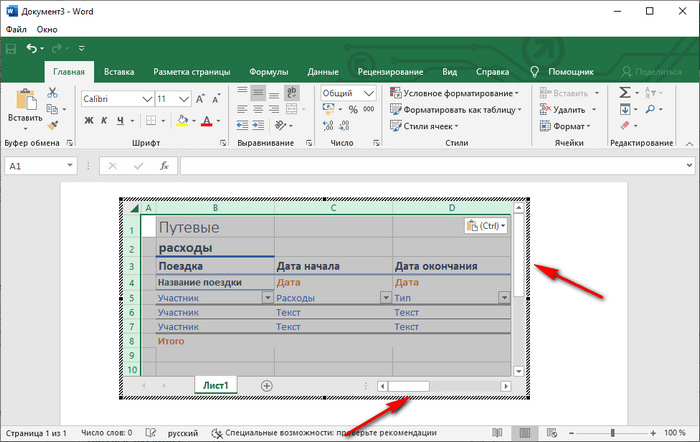
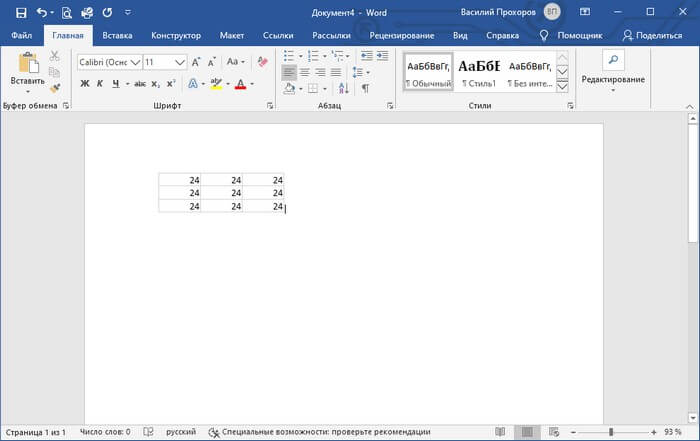
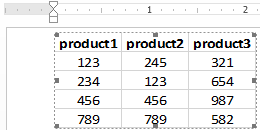
- The default paste will use the Keep Source Formatting (A) paste option. This preserves any formatting you have done in Excel and pastes the data into Word as a table using that same formatting. As you can see, you may need to clean up your table after the paste to make it look correct in the new document.
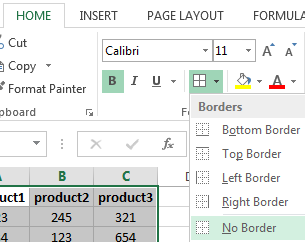
- To change the paste option, click the Ctrl dropdown option in the bottom right corner of your new table after pasting and select a new option. Other Paste options include:
Use Destination Styles (B) – This will paste the data into Word as a table and adapt the display elements into the same formatting as the Word document. Use this to make your fonts and colors consistent in the destination without having to edit in Excel beforehand. Copy as Picture (C) – This will paste the data range as a Word image object. You will be able to resize and edit the image as you would any other picture, but you will not be able to edit the data. The paste will use the original Excel formatting to generate the picture.Keep Text Only (D) – This will paste the data contained within each cell as individual lines of text in the Word document. Data in columns will be separated by a tab, rows will appear as individual paragraphs.
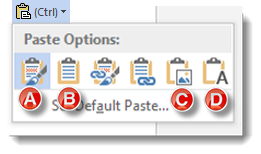 Copy as Picture (C) – This will paste the data range as a Word image object. You will be able to resize and edit the image as you would any other picture, but you will not be able to edit the data. The paste will use the original Excel formatting to generate the picture.Keep Text Only (D) – This will paste the data contained within each cell as individual lines of text in the Word document. Data in columns will be separated by a tab, rows will appear as individual paragraphs.
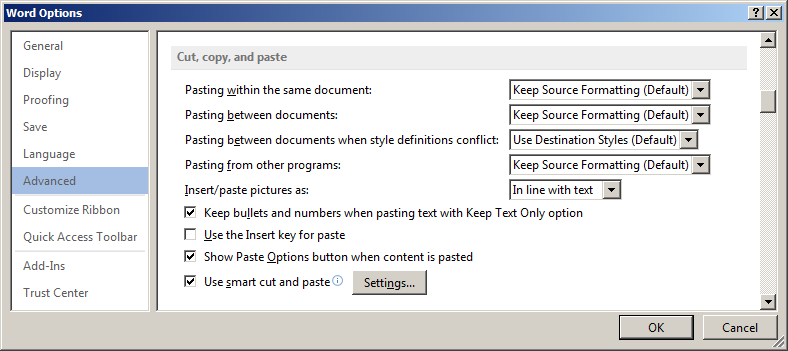
Hint! If you frequently use a paste option that is not Keep Source Formatting, you can click the Set Default Paste link and change the default settings in the Cut, copy and paste section of Word Options.
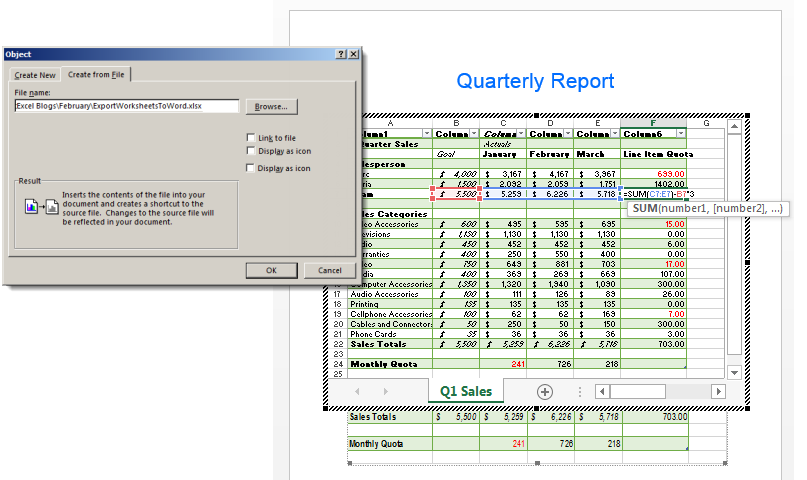
Solution Two: Insert Excel Object
Copy/Paste brings Excel tables or Worksheet data into the Word document by changing it to a Word table or text. Inserting your workbook as an Excel object embeds a mini-version of Excel itself into the middle of your Word document. This Excel object can include multiple sheets, filters and many of Excel’s features.
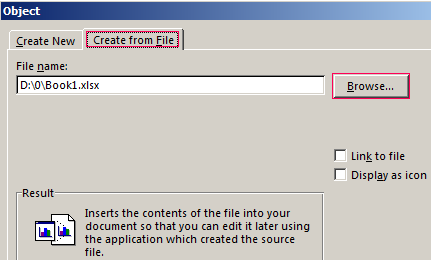
- Click the Insert tab the destination Word document, then select Object from the Insert Embedded Object dropdown button.

- Select the Create from File tab, then browse to the workbook you wish to embed.
- Choose whether you wish the object to be linked or not:
- A linked object will automatically update in the destination Word document if the source Excel spreadsheet is changed.
- An object that is not linked will not be updated automatically in the Word document if the source is changed.
- Click OK to complete the embed.
If your object is not linked, you can edit the data directly – including formulas – from within Word. Double-click on the table and make changes as you would in Excel. If the object is linked, then clicking on the table will open the Excel window.
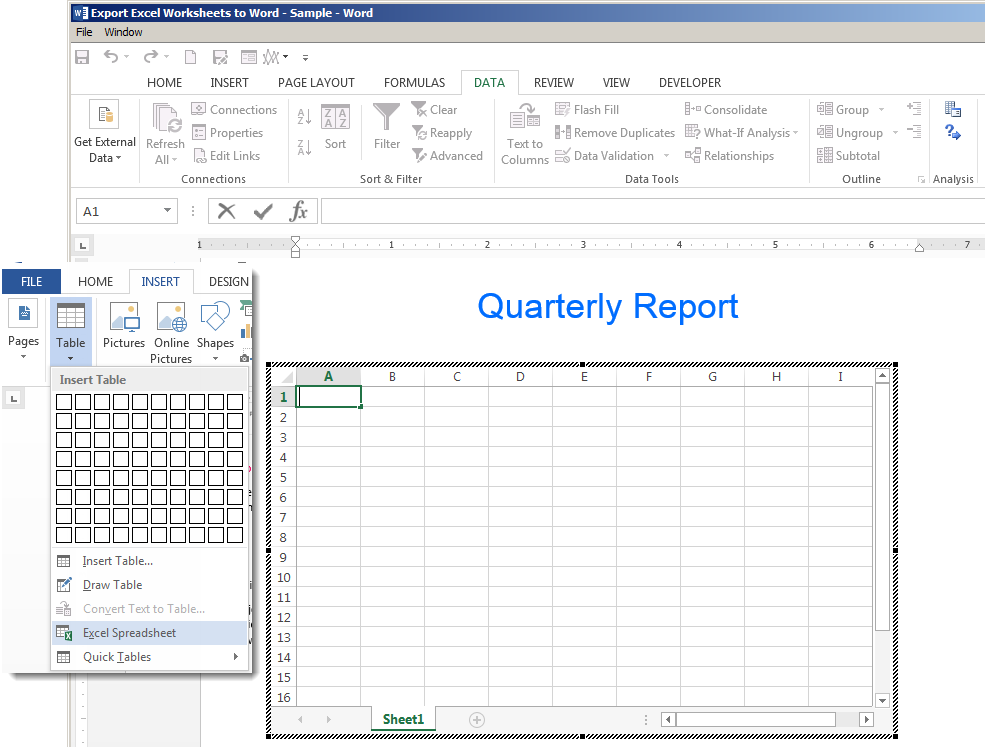
Solution Three: Insert a Blank Excel Table
If you will be creating or entering your data table from scratch within Word, but want the functionality of an Excel spreadsheet, you can embed a blank Excel spreadsheet and work just as you would in Excel.
- Click the Insert tab, then select Excel Spreadsheet from the Table dropdown menu.
- Double-click on the worksheet. The Excel ribbon will appear and you will be able to add your data, insert formulas and filter and display the data as if you were working directly in Excel.
- Click outside the spreadsheet pane or hit Escape to continue editing your Word document.
Learn Excel Basics (Or Go Beyond the Basics) With Courses From Pryor Learning
Would you like to add the line “proficient in Excel” to your resume? Or perhaps you already have your dream job but would like to be more efficient and valuable to your employer. Then, consider enrolling in or downloading one of Pryor Learning’s Excel courses.
Microsoft Excel Basics
This one-day seminar is perfect for beginning or intermediate Excel users.
During this course, learn the basics of producing spreadsheets that communicate. You’ll learn to master an array of Excel formulas and functions that will put useful data at your fingertips. You’ll learn how to edit your worksheet – including how to transfer Excel table to Word. We’ll even teach you simple macros that will help you increase your productivity.
Microsoft Excel: Beyond the Basics
You may already be proficient in Excel, but you would like to learn how to use this program at a more advanced level. If so, consider enrolling in Microsoft Excel: Beyond the Basics, a one-day seminar offered live online.
Here’s the agenda for this course:
- Setup and Editing Success
- Formulas and Functions That Cut Work Down to Size
- How to Make the Most of Macros
- Data Exchange with Other Applications
- The Power of Tables, Databases, and Lists
If you’ve shopped around for technical training, you know that it often comes with a hefty price tag. However, this full-day advanced course is only $149. You won’t find any other technical school offering such affordable, high-value training.
60 Minutes of Excel Secrets
Learn hidden Excel tips and tricks from this helpful one-hour webinar. Besides learning how to transfer data from Excel to Word automatically, you’ll learn how to customize your Excel environment to increase your efficiency.
In addition, you’ll learn how to create time-saving macros and organize your spreadsheet to access the data you need. In short, this hour-long session will teach you how to better customize, organize, and format your spreadsheets.
Excel Dashboard 101
Managers, analysts, and others who spend their time looking at spreadsheet data will benefit from Excel Dashboard 101. This course is for you if you have always thought there would be a better way to view and analyze your business data.
You can download this one-hour webinar today to learn how to make your data more visually appealing and, thus – easier to understand.
You’ll learn to set up a navigational menu and move through the dashboard using only links. In addition, you’ll learn how to do the following:
- Create a key performance indicator stoplight graph
- Create a key performance indicator graph using conditional formatting
- Create a completion percentage graph
- Arrange multiple graphs on a dashboard
- And more!
Microsoft Excel Made Easy
This article has already shown you options on how to transfer Excel to Word. Imagine how more efficient you would be at creating, organizing, and analyzing spreadsheets with an hour-long course called Microsoft Excel Made Easy.
This downloadable course offered by Pryor Learning will help you discover the data analysis tools available in Excel that will make it easy to achieve your information goals. In addition, the information will be presented clearly by a professional instructor – not a frustrated IT person with very little patience dealing with someone who doesn’t have a computer science degree.
This course covers Excel 2010 – as well as previous versions. You’ll learn how to utilize old worksheets and modify new ones to be accessible to everyone.
Depend on Pryor Learning for Quality Software Training
Pryor Learning offers software training for beginning, intermediate, and advanced users. Besides providing training in Excel, Pryor Learning also has courses to help you with QuickBooks, Outlook, PowerPoint, and Word.
Are you a leader of your organization? Then, schedule in-person training for your entire staff to improve the efficiency and effectiveness of your employees. We offer a wide range of courses – including time management seminars that would be helpful to everyone.
Pryor Learning offers several different learning options. While we pioneered the one-day seminar during the 1970s, we have changed with the times. As a result, we currently provide 9,000 live and online training options in various helpful subjects – from software training to personal development training to OSHA and workplace safety training.
To become more proficient at Excel, click on one of the courses highlighted in this article. Or consider purchasing an annual pass to access all of Pryor Learning’s great content.
PRYOR+ 7-DAYS OF FREE TRAINING
Courses in Customer Service, Excel, HR, Leadership,
OSHA and more. No credit card. No commitment. Individuals and teams.
![]()
Download Article
A simple guide to converting Microsoft Excel projects to Word projects
![]()
Download Article
- Inserting an Excel Chart into Word
- Embedding an Excel Worksheet
- Copying and Pasting Excel Data into Word
- Q&A
- Tips
|
|
|
|
Do you want to export an Excel document into a Microsoft Word document? While Excel can’t directly convert files into Word files, you can insert the Excel file as an Object in Word. You can also copy and paste Excel data into a Word document. After doing so, you can save the Word document. You can also copy and paste an entire Excel chart into Word. This wikiHow will show you how to insert Excel data into a Word document on your Windows or Mac computer.
Things You Should Know
- In Word, click the Insert tab, then Object. Click Create from File, locate your Excel project, then Insert.
- Copy Excel data with CTRL + C (Windows) or CMD + C (Mac). Paste it into a Word document using the Paste icon in the Home tab.
- Right-click an Excel chart, then click Copy. Paste it into a Word document using the Paste icon in the Home tab.
-

1
Open a project in Microsoft Excel. You can use an existing project or create a new one.
- Microsoft Excel is available on Windows and Mac. You can also use the online web version at the Microsoft 365 website.
-
2
Copy the Excel chart. Click the chart you want to copy, then press CTRL + C (Windows) or Command + C.
- You can also right-click the chart and click Copy.
Advertisement
-
3
Open Microsoft Word. You can use the web version of Word or the desktop application.
- You’ll need to open a new or existing project.
-
4
Click Paste. This is the clipboard icon in the Home tab. This will paste the Excel chart into Word.
- You can also move the cursor to the location you’d like your data, and then press CTRL + V (Windows) or Command + V (Mac). The chart will be pasted into Word.[1]
- To select different paste options, click the arrow underneath Paste.
- If you want to link to the original Excel chart so updates are reflected in the destination file, select Use Destination Theme & Link Data.
- If you want to embed the original chart to edit it in Word, select Use Designation Theme & Embed Workbook.
- If you want the chart to act as a picture element, select Picture.
- You can also move the cursor to the location you’d like your data, and then press CTRL + V (Windows) or Command + V (Mac). The chart will be pasted into Word.[1]
-
5
Edit your chart. Click your chart to open the Format Chart Area window on the right panel. You can adjust the Fill and Border.
- You can also click the chart to adjust the Layout Options, Chart Elements, Style, and Values.
-
6
Save your Word document. Click File in the top right corner, then Save As. Choose a name and save location for your document.


Advertisement
-
1
-
2
Place your cursor where you want the Excel data. You can move this around later, but be sure to enter your data in an empty space for easy editing.
-
3
Click Insert tab in the top toolbar. This is located between the Home and Draw tab.
-
4
Click Object. This will be in the Text section of the Insert tab. You can find this next to the Symbols section.
- The Object window will open.
-
5
Click Create from File. This allows you to embed an existing Excel file into your Word document.
- You can also choose Create New then select your Object type. This allows you to embed a new object where you can input data.
-
6
Click Browse. This will open the File Explorer (Windows) or the Finder (Mac). You’ll be able to browse your computer for your file.
-
7
Click your file and click Insert. You may have to search for your file depending on its location.
- The file name and path will be displayed in the File name field.
-
8
Click the box next to Link to file. This will embed the content of the file into your Word document and create a link to the original file. If the original Excel document is updated, the changes will transfer over to the data in your Word document.
- You can check the box next to Display as icon if you only want a quick link to your Excel document from Word. This will override Link to file.
-
9
Save your Word document. Click File in the top right corner, then Save As. Choose a name and save location for your document.
- Your Excel data will be embedded in your Word document. Since the data is linked, you can double-click the Excel chart to open the project in Excel or edit directly in Word.


Advertisement
-
1
-
2
Copy the Excel data. In Excel, click and drag to select the content you’d like to put in the Word document, and then press CTRL + C (Windows) or Command + C.[2]
- On Windows, press CTRL + A to select all the data in a chart, and then press CTRL + C to copy.
- On Mac, press CMD + A to select all the data in a chart, and then press Command +C to copy.
-
3
Open Microsoft Word. You can use the web version of Word or the desktop application.
- You’ll need to open a new or existing project.
-
4
Click Paste. This is the clipboard icon in the Home tab. This will paste the Excel data into Word.
- You can also move the cursor to the location you’d like your data, and then press CTRL + V (Windows) or Command + V (Mac). The table will be pasted into Word.
- To select different paste options, click the arrow underneath Paste. You can choose Keep Original Table Formatting, Merge Table, or Keep Text Only.
- If you don’t see the Paste Options button, you don’t have it enabled. To enable it, go to Word Options and click Advanced. Under Cut, Copy, and Paste, check the Show Paste Options buttons box.[3]
-
5


Advertisement
Our Most Loved Articles & Quizzes
Add New Question
-
Question
Can I do this if I don’t have Word?

Yes. Just search for «free online excel to word converter» and use one of the websites that shows up. You could also download OpenOffice for free, which you can use the same way as Word and where you can save documents in Word format.
-
Question
I copied my Excel cells into Word as a picture. How can I remove the cell border lines in this process?
I assume you are using a screen clipping tool to copy the Excel cells into Word. I would recommend either copying the cells (dragging to select) and pasting as a table into Word, or embedding the spreadsheet into Word. Method one works perfectly for basic Excel content and allows you to further format it to suit the structure and styling of your Word document. Method two allows complicated Excel content such as graphs to appear in Word without making screen clippings. It also can be used to preserve all formulas in the embedded sheet so that you can access them directly in Word. Either of these methods should help your Excel cells appear correctly in your Word document.
Ask a Question
200 characters left
Include your email address to get a message when this question is answered.
Submit
Advertisement
-
Looking for money-saving deals on Microsoft Office products? Check out our coupon site for tons of coupons and promo codes on your next subscription.
Thanks for submitting a tip for review!
Advertisement
About This Article
Article SummaryX
1. Select the data to convert.
2. Press Ctrl + C to copy.
3. Open a document in Word.
4. Click the desired location.
5. Click the Paste menu on the Home tab.
6. Select a paste option.
Did this summary help you?
Thanks to all authors for creating a page that has been read 1,447,753 times.
Is this article up to date?
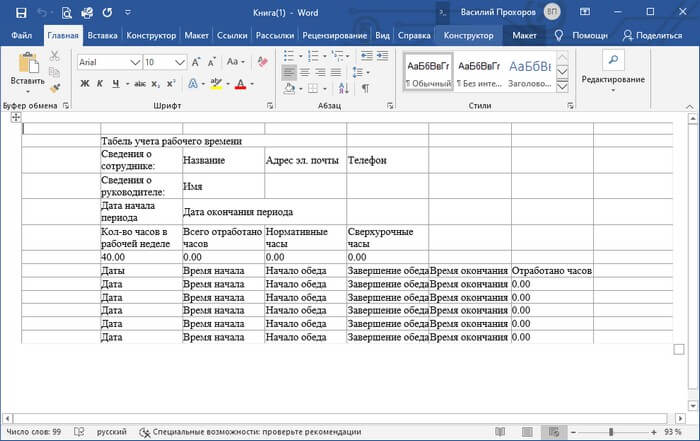
В некоторых ситуациях, у пользователей возникает вопрос, как перенести Excel в Word для того, чтобы вставить данные из табличного редактора в текстовый документ. К сожалению, нет простого ответа на вопрос о том, как Эксель перевести в Ворд, потому что не получится сохранить файл из одного формата в другой формат.
В Microsoft Excel, в основном, используется два типа форматов файлов: «.xlsx» (современный формат) и «.xls» (использовался в версиях Excel 1997-2003). Документы Microsoft Word имеют два основных формата файлов: «.docx» (современный формат) и «.doc» (использовался в версиях Word 1997-2003).
Содержание:
- Как таблицу в Экселе перенести в Ворд — 1 способ
- Как вставить таблицу Эксель в Ворд — 2 способ
- Как вставить Excel в Word — 3 способ
- Уменьшение ширины таблицы Excel после вставки в документ Word
- Как Excel перевести в Word в программе — 4 способ
- Как конвертировать Excel в Word онлайн — 5 способ
- Выводы статьи
Между собой форматы «XLSX», «XLS» или «DOCX», «DOC» никак не связаны из-за разной структуры, поэтому напрямую сохранить файл одного формата в другом формате не получится. Нам придется переносить документ Excel в Word вручную или воспользоваться помощью программ или онлайн сервисов для конвертации файлов.
Сейчас мы разберемся, как вставить Эксель в Ворд разными способами. В этой статье вы найдете инструкции для переноса данных из Excel в Word: вручную (копирование содержимого файла Excel для последующей вставки в документ Word), и конвертированием файла Excel в Word в программе или на онлайн сервисе.
Как таблицу в Экселе перенести в Ворд — 1 способ
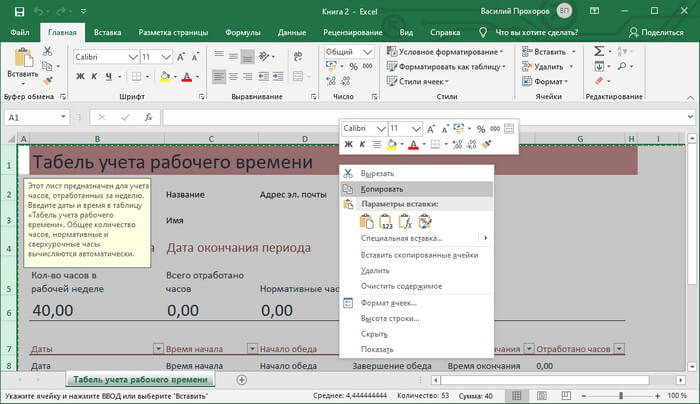
Сначала рассмотрим самый простой способ, как перенести таблицу из Excel в Word вручную: простым копированием содержимого файла. При этом способе мы скопируем содержимое листа Excel, а затем вставим его в документ Word.
Выполните следующие действия:
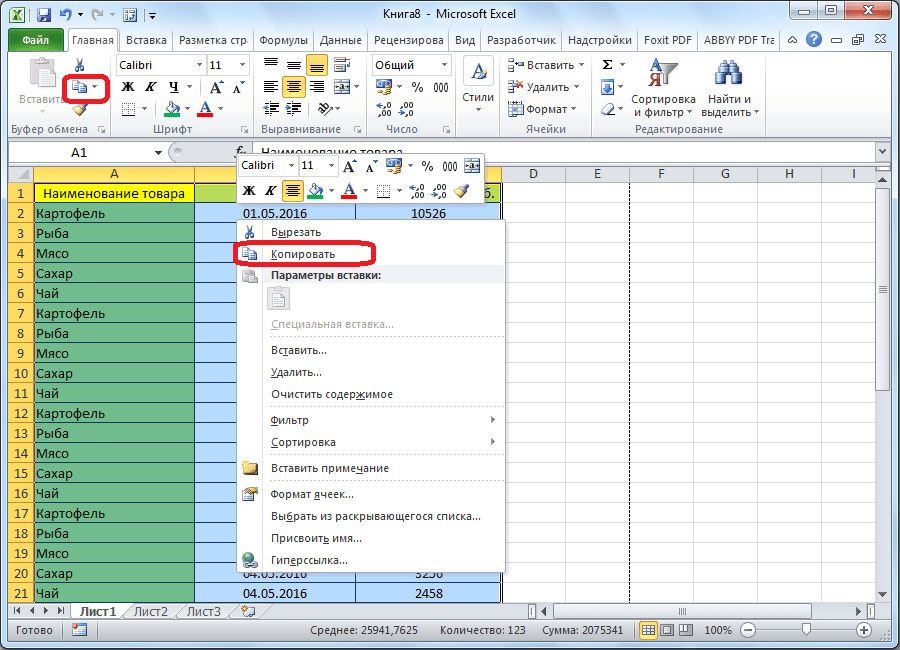
- Откройте книгу Excel.
- На открытом листе Excel выделите диапазон содержимого, который нужно перенести в документ Ворд.
- Щелкните правой кнопкой мыши внутри выделенной таблицы, в контекстном меню выберите «Копировать». Другой вариант для копирования: нажмите на клавиши «Ctrl» + «C».
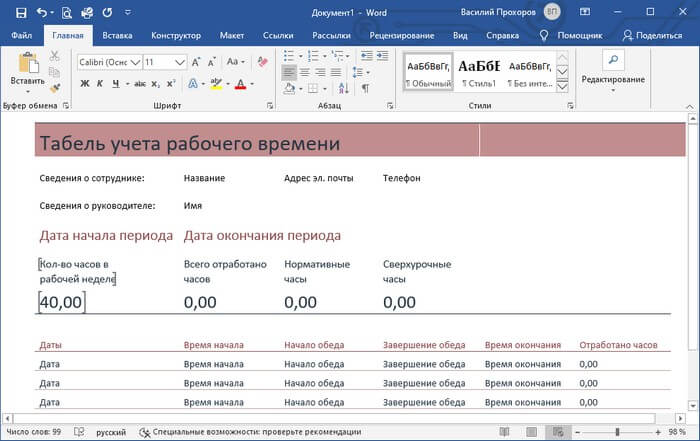
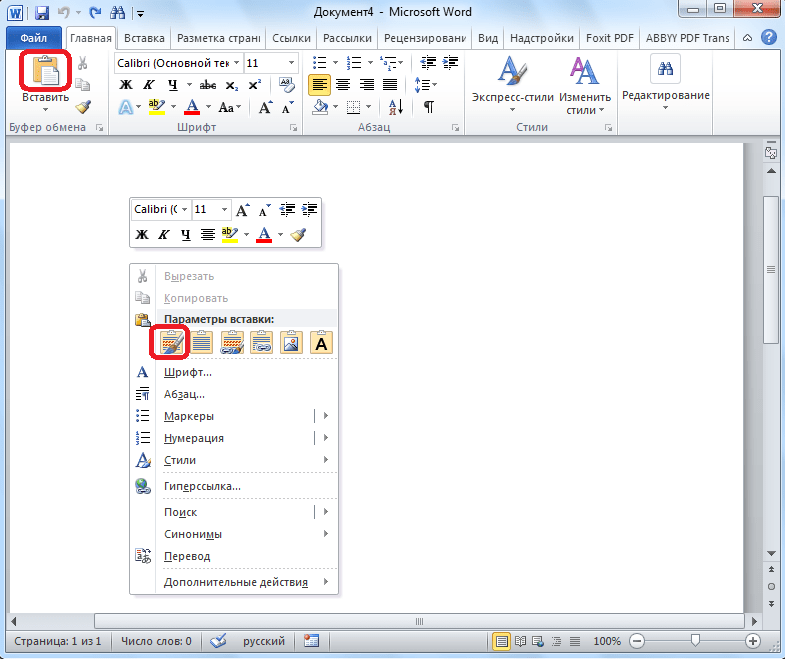
- Откройте документ Word.
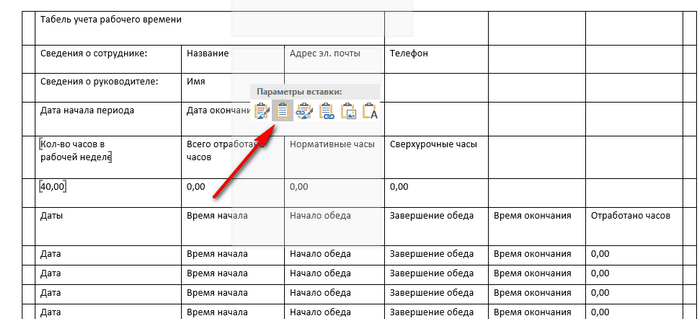
- Щелкните правой кнопкой мыши внутри документа, в контекстном меню в пункте «Параметры вставки:» выберите вариант: «Сохранить исходное форматирование». Другой способ для вставки: кликните мышью в открытом документа Word, а затем нажмите на клавиши «Ctrl» + «V».
При выборе варианта вставки в Word, можно использовать другие способы сохранения таблицы:
- Использовать стили конечного фрагмента — используется стиль таблицы Word.
- Связать и сохранить исходное форматирование — таблица Excel будет связана с документом Word, при изменении данных в исходной таблице Эксель, спросят ваше согласие на изменение связанного содержимого в таблице Ворд.
- Связать и использовать конечные стили — таблица Excel и документ Word будут связаны, при изменении в таблице Excel поменяется содержимое таблицы в Word, будет использован стиль таблицы Word.
- Рисунок — таблица вставится в документ в качестве изображения.
- Сохранить только текст — после копирования каждая строка будет находится в отдельном абзаце, а столбцы разделены пробелами.
При наведении курсора мыши к одному из возможных вариантов вставки, на странице отобразится стиль вставляемой таблицы. Вы можете выбрать самый подходящий вариант.
При использовании данного способа мы сможем отредактировать скопированную таблицу в Word. Можно изменить содержимое таблицы: изменить данные, форматирование, ширину и высоту, шрифт и т. д.
Из минусов этого способа можно отметить то, что если данные на листе Excel занимают больше места, чем на листе Word, то вся таблица не поместится по ширине (особенно это станет заметно при представлении «Разметка страницы»).
Как вставить таблицу Эксель в Ворд — 2 способ
В этом способе мы вставим содержимое таблицы Excel в документ Word, в котором отрыта пустая таблица Excel.
Пройдите следующие шаги:
- В окне программы MS Word войдите во вкладку «Вставка», в группе «Таблицы» нажмите на стрелку внизу кнопки «Таблица».
- В меню «Вставка таблицы» выберите «Таблица Excel».
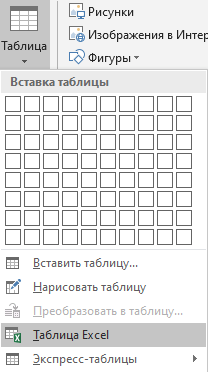
- В окне документа Word откроется пустая таблица Excel.
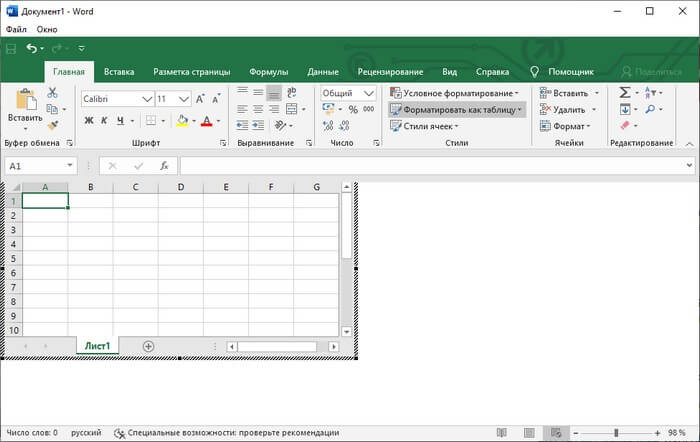
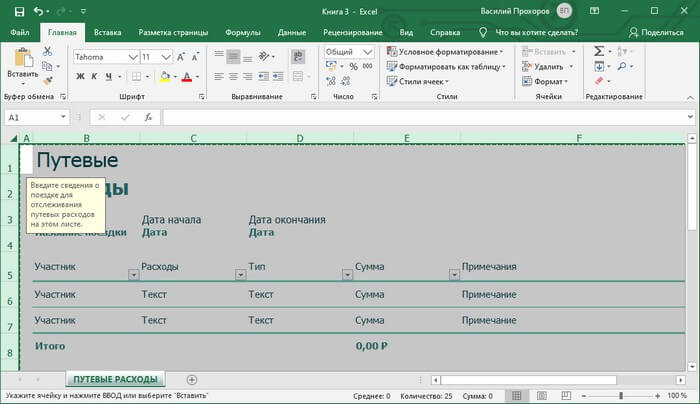
- Откройте книгу MS Excel.
- Выделите содержимое таблицы на листе Excel.
- В меню «Главная» кликните на значок «Копировать», который находится в группе «Буфер обмена».
- В окне программы Word нажмите на кнопку «Вставить».
- Таблица Excel открыта в окне программы Word.
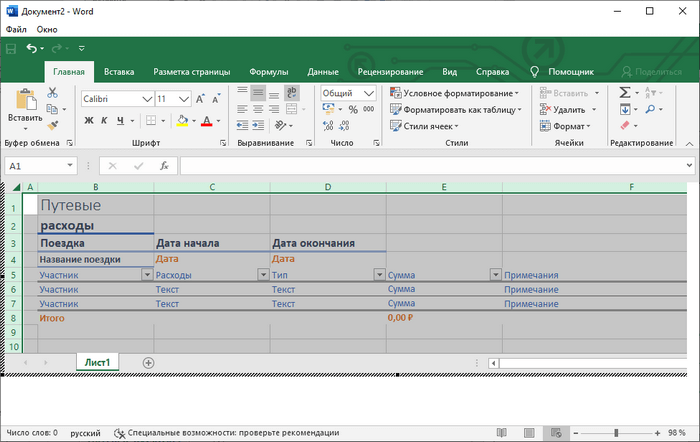
Если таблица не помещается по ширине документа, то можно уменьшить ширину. Для просмотра невидимых областей таблицы используйте колесики прокрутки.
После изменения данных, сохраните документ Word на компьютере. В сохраненном документе форматирование таблицы будет в стиле Word.
Как вставить Excel в Word — 3 способ
Следующий способ предполагает вставку таблицы или другого содержимого из листа Excel на страницу документа Word в качестве графического объекта. Следовательно, изменить содержимое таблицы уже не получится.
Проделайте следующие действия:
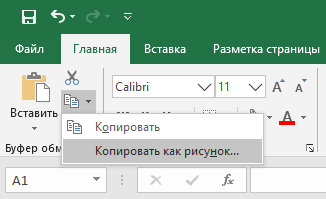
- В окне программы Excel выделите таблицу.
- В меню «Главная», в группе «Буфер обмена» нажмите на треугольничек на кнопке «Копировать».
- В открывшемся меню выберите пункт «Копировать как рисунок…».
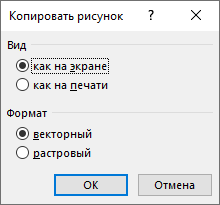
- В окне «Копировать как рисунок» нужно выбрать параметры копирования изображения.
- Откройте страницу документа Word в меню «Главная», а затем нажмите на кнопку «Вставить», находящуюся в группе «Буфер обмена».
При необходимости, изображение таблицы можно увеличить до нужного размера. Если при копировании был выбран векторный формат, то качество картинки не поменяется. При увеличении изображения в растровом формате качество рисунка станет хуже.
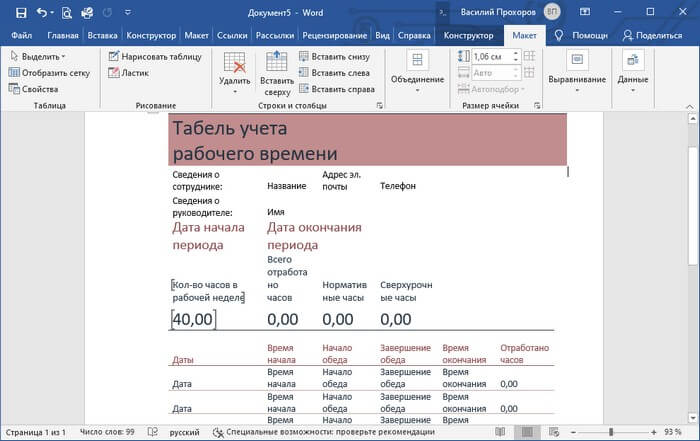
Уменьшение ширины таблицы Excel после вставки в документ Word
Часто бывает, что таблица не помещается по ширине листа документа Word. Если ширина таблицы не очень большая, то таблицу можно слегка модифицировать:
- Выделите вставленную таблицу Excel в документе Word.
- Откройте меню «Макет».
- В группе «Размер ячейки» нажмите на кнопку «Автоподбор», выберите пункт «Автоподбор по содержимому».
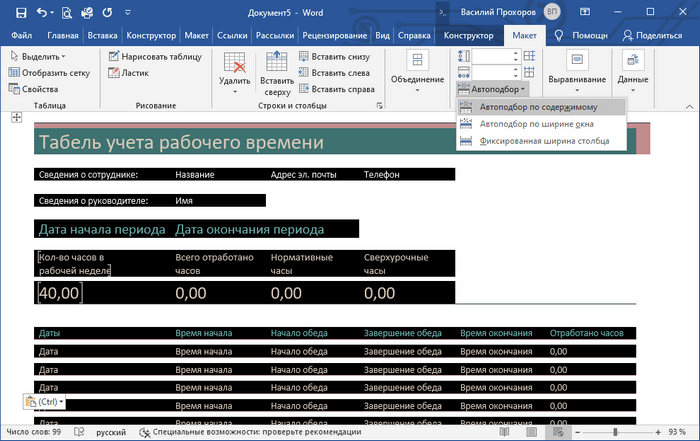
Таблица уменьшилась до требуемого размера и поместилась на странице документа.
Как Excel перевести в Word в программе — 4 способ
Сейчас я расскажу, как вставит таблицу из Excel в Word с помощью программы ABBYY FineReader. Программа ABBYY FineReader предназначена для оптического распознавания символов, приложение переводит изображения документов или PDF файлы в редактируемые форматы.
ABBYY FineReader — платная программа на русском языке от российского разработчика. Компания ABBYY — один из мировых лидеров в своей нише программного обеспечения.
Для конвертирования файла из формата Excel в формат Word, необходимо сделать следующее:
- Запустите программу ABBYY FineReader на компьютере.
- В окне программы в разделе «Просмотр и редактирование PDF-документов» нажмите на кнопку «Открыть PDF-документ» (да-да, именно так).
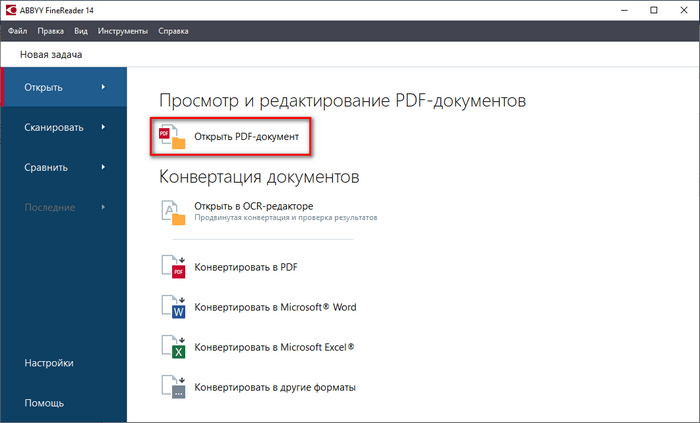
- В окне Проводника на нижней панели вместо «PDF-файлы» выберите «Все файлы».
- Выберите на ПК документ Excel, нажмите на кнопку «Открыть».
- Программа выполнит распознавание файла, а затем откроет его содержимое в окне «Новый — ABBYY FineReader».
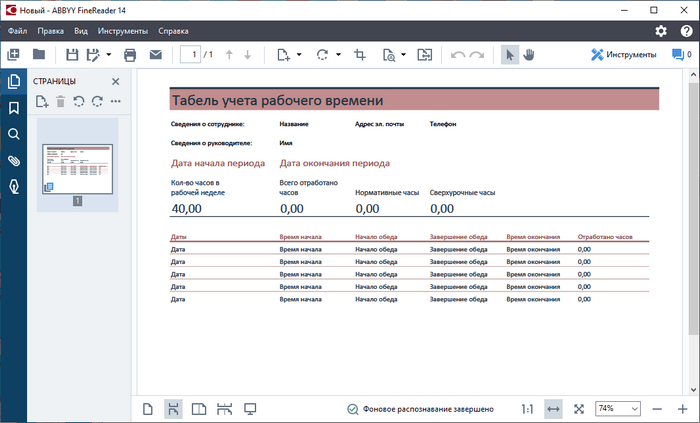
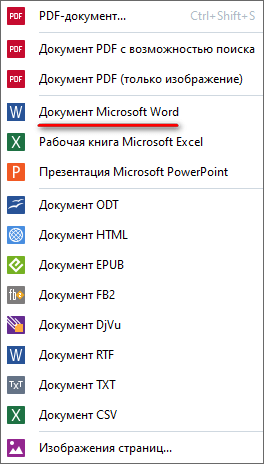
- Нажмите на стрелку кнопки «Сохранить копию документа», а контекстном меню выберите «Документ Microsoft Word».
- В окне Проводника присвойте имя новому документу, нажмите на кнопку «Сохранить».
- После выполнения конвертирования, на Рабочем столе откроется окно программы Word со вставленной таблицей из книги Excel.
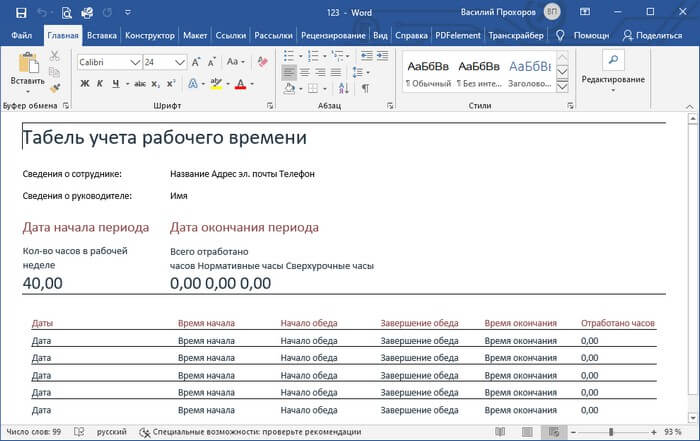
Таблицу после конвертирования в документ Ворд можно редактировать.
Как конвертировать Excel в Word онлайн — 5 способ
Сейчас мы разберемся, как таблицу из Excel перебросить в Word с помощью онлайн сервиса. Мы воспользуемся услугами бесплатного онлайн сервиса CoolUtils.com, на котором можно конвертировать файлы различных форматов между собой.
Преобразование Excel в Word онлайн проходит в следующем порядке:
- Войдите на страницу сервиса CoolUtils.com для загрузки на онлайн сервис файла Excel.
- Нажмите на кнопку «Browse» для выбора файла на своем компьютере. Эта кнопка станет активной после включения в браузере Adobe Flash Player.
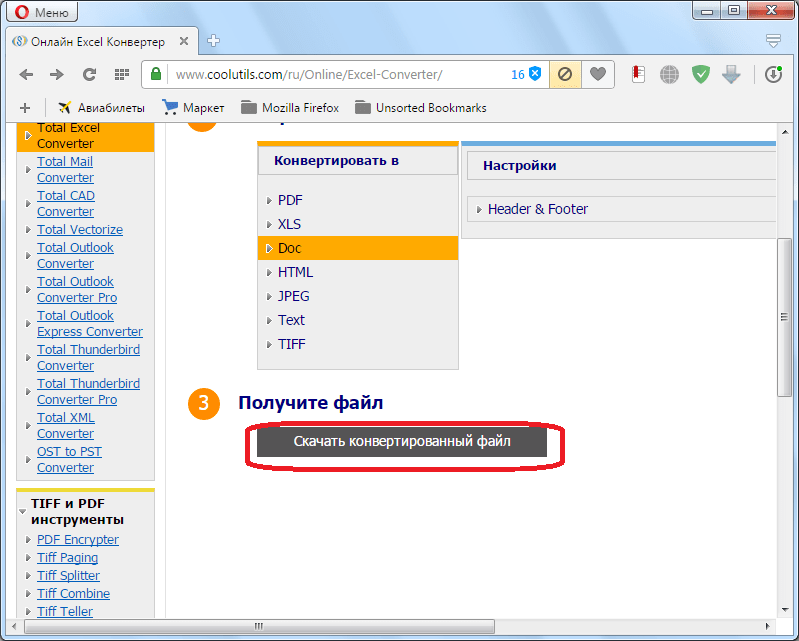
- В пункте «Настройте опции», в настройке «Конвертировать в» выберите формат «Doc».
- В пункте «Получить файл» нажмите на кнопку «Скачать конвертированный файл».
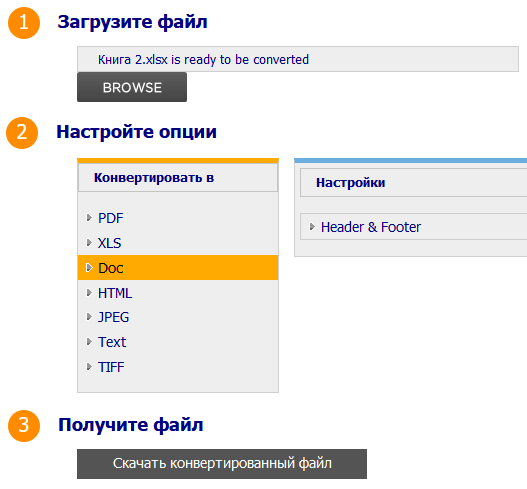
Откройте скачанный файл в программе Word, посмотрите на результат преобразования формата и внешний вид таблицы.
Если нужно, отредактируйте файл, а затем сохраните его в формате Word.
Выводы статьи
Если пользователь не знает, как скопировать содержимое из Экселя в Ворд, существует несколько способов решить эту проблему. Прямого сохранения между форматами не существует. Пользователь может скопировать таблицу Excel в документ Word вручную несколькими способами, воспользоваться программой или онлайн сервисом для конвертирования файла в другой формат.
Похожие публикации:
- Как в Excel снять защиту листа не зная пароль — 2 способа
- Как сделать рамку для оформления текста в Word
- Как сделать нумерацию страниц в Word
- Как удалить нумерацию в Word
- Как убрать водяные знаки в Word — 2 способа
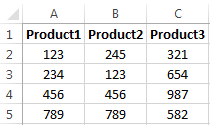
Make calculations and draw up a table more conveniently in Excel if you want to work with numeric data. In fact the program is a table. Word for such work is not quite fit.
But sometimes you have to migrate from an Excel table to Word. Also you may need to convert filled data. Converting from one format to another is unproductive and takes too much time. There should be another way.
How to move a table from Excel to Word?
The first method.
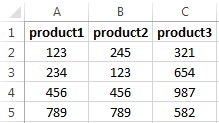
- We have a table with three columns and five rows. The boundaries are set.
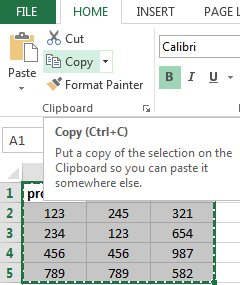
- Select the data range. Click Copy in the main menu. Alternatively use the key combination Ctrl + C. Also you may select table and click the right mouse button. Than choose and click «Copy».
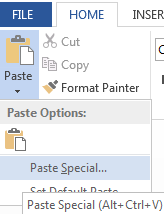
- Open the Word List. In the main menu use «Paste» tool. Select the «Paste Special».
- We set the parameters of a special paste. «Paste Link» — «Microsoft Excel Worksheet Object». Check is the source for insert selected correctly. Click OK.
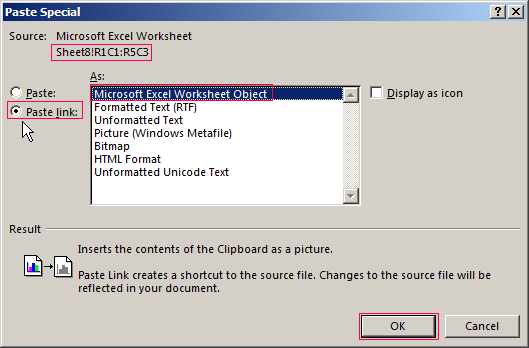
The result of our work:
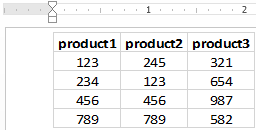
This method has some drawbacks:
- table inserted as a graphic object that is it cannot be edited.
- border spreadsheets may extend beyond the sheet.
The second method.
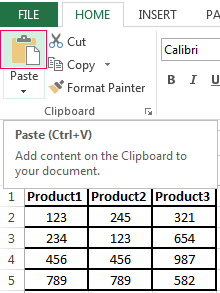
- Select a table in MS Excel. Copy it to the clipboard.
- Open MS Word. Click «Paste» or use the key combination CTRL+V (Shift+Ins). The result is next:
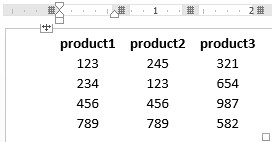
We can edit the data, change borders, font values and format.
This method of insertion has one significant drawback. Table with a large amount of data goes beyond the sheet.
The third method.
- Go to the tab «INSERT» in In Word sheet. We need the menu «Text» and the tool «Object».
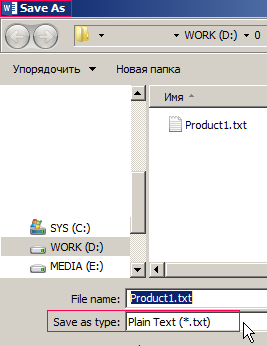
- Select «Create from File» in the dialog box. Click «Browse» to find the text file Prodic1.txt.
- In the «File name:» line will be its data when the desired object will be found. Click OK.
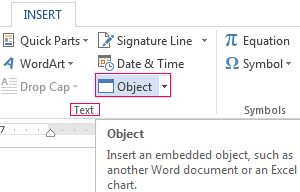
The inserted table is a graphical object. You cannot edit the values in the cells.
You should first remove borders to insert a range of data without boundaries.
In MS Excel:
Or use a combination of keys CTRL + SHIFT + (minus).
In MS Word:

If you want to manipulate the boundaries must be inserted with the 1 and 2 method.
How to convert a table from Word to Excel?
We’ll perform a reverse transfer.
Method 1.
- Select a table in MS Word. Click «Copy» CTRL+C.
- Open MS Excel. Put the mouse in the place where the table should appear. Click «Paste» after right click.
We have a «neat» table. Therefore it inserted smoothly and accurately. If the data were filled ugly with a lot of extra characters (non-printable) so the row and column boundaries may shift. There are 2 outputs to escape from this situation:
- Clean the data manually. If there are a lot of recurring characters you can use AutoCorrect Options.
- Save the spreadsheet as text (in txt format). In this case all the extra characters will be deleted. And then insert the data from the txt to Excel.
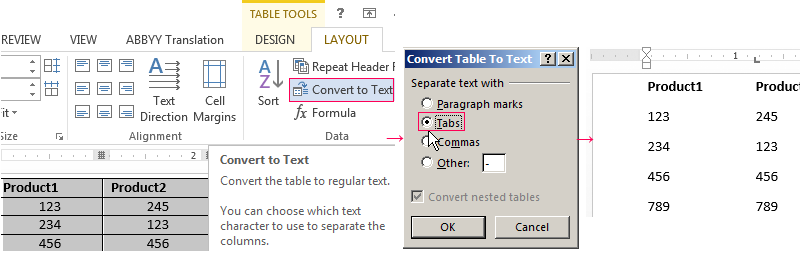
Method 2.
- Select the table in Word. Menu «TABLE TOOL» — «LAYOUT» — the tool «Convert to Text». In the parameters of the transformation choose «Tabs».
- Go to the main menu – «Save as» — «Save as type». Choose file type «Plain Text (*.txt)».
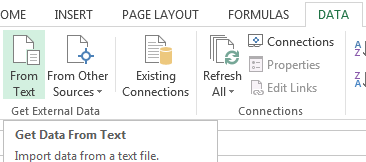
- Open Excel. «DATA» tab. «Get External Data» — «From Text».
- Now find the saved file. Click «Open». And then the «Text Import Wizard» opens.
- Set the desired conversion settings. Choose data format with delimiters. Separator character is a tab character. Done.
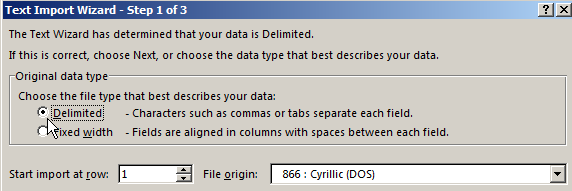
You can edit the data and draw border etc. This method of insertion removes the extra characters and prevents displacement of the cells.
Содержание
- Конвертируем файлы Excel в Word
- Способ 1: Ручное копирование
- Способ 2: Сторонние программы
- Способ 3: Онлайн-сервисы
- Вопросы и ответы

Бывают случаи, когда файлы Excel требуется преобразовать в формат Word, например, если на основе табличного документа нужно составить письмо. К сожалению, просто конвертировать один документ в другой через пункт меню «Сохранить как…» не получится, поскольку эти файлы обладают совершенно разной структурой. Давайте разберемся, какие существуют способы преобразования формата Excel в Word.
Есть сразу несколько методов осуществить задуманное. В этом поможет стороннее ПО, но всегда есть возможность ручного переноса данных. Рассмотрим все варианты по порядку.
Способ 1: Ручное копирование
Один из самых простых способов конвертировать содержимое файла Excel в Word – это просто его скопировать и вставить данные.
- Открываем файл в программе Microsoft Excel и выделяем то содержимое, которое хотим перенести в Word. Правым кликом мыши по этому содержимому вызываем контекстное меню и щелкаем в нем по пункту «Копировать». Как вариант, также можно нажать по кнопке на ленте с точно таким же названием или задействовать сочетание клавиш Ctrl + С.
- После этого запускаем Microsoft Word. Кликаем по листу правой кнопкой мыши и в появившемся меню через параметры вставки выбираем пункт «Сохранить условное форматирование».
- Скопированные данные будут вставлены.
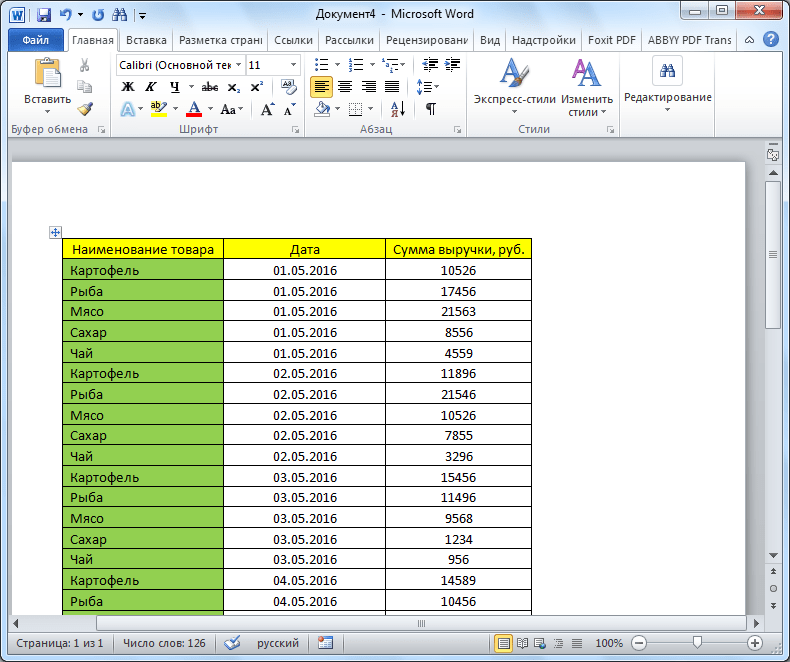
Недостаток этого способа заключается в том, что не всегда преобразование выполняется корректно, особенно при наличии формул. Кроме того, данные на листе Excel должны быть не шире, чем страница Ворда, иначе они просто не влезут.
Способ 2: Сторонние программы
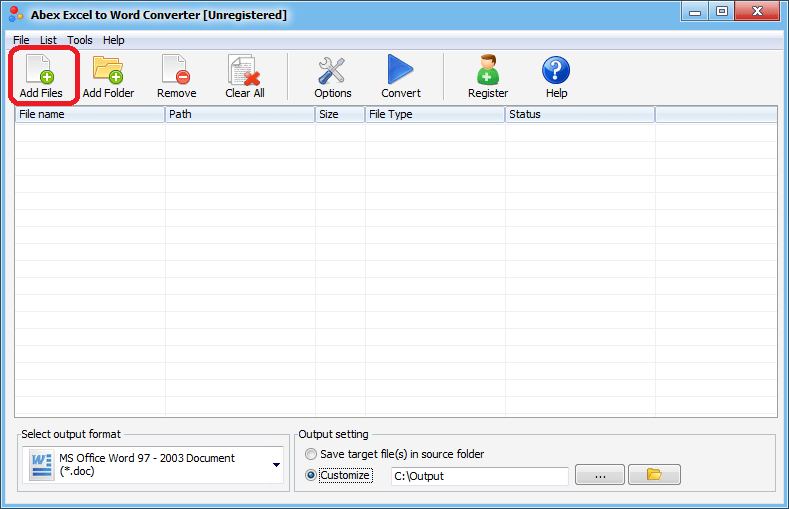
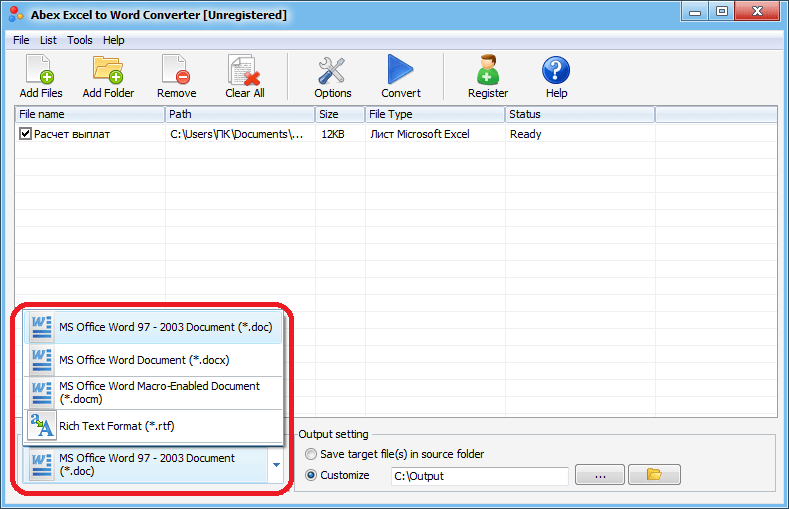
Существует также вариант преобразования файлов из Эксель в Ворд с помощью специальных программ. В этом случае открывать сами программы вообще не обязательно. Одним из самых известных вариантов для преобразования документов из Excel в Word является приложение Abex Excel to Word Converter. Оно полностью сохраняет исходное форматирование данных и структуру таблиц при конвертировании, поддерживает пакетную конвертацию. Единственное неудобство в использовании для отечественного пользователя состоит в том, что интерфейс у программы англоязычный, без возможности русификации. Впрочем, его функциональность очень простая и интуитивно понятная, так что в нем без проблем разберется даже пользователь с минимальными знаниями английского языка.
Скачать Abex Excel to Word Converter с официального сайта
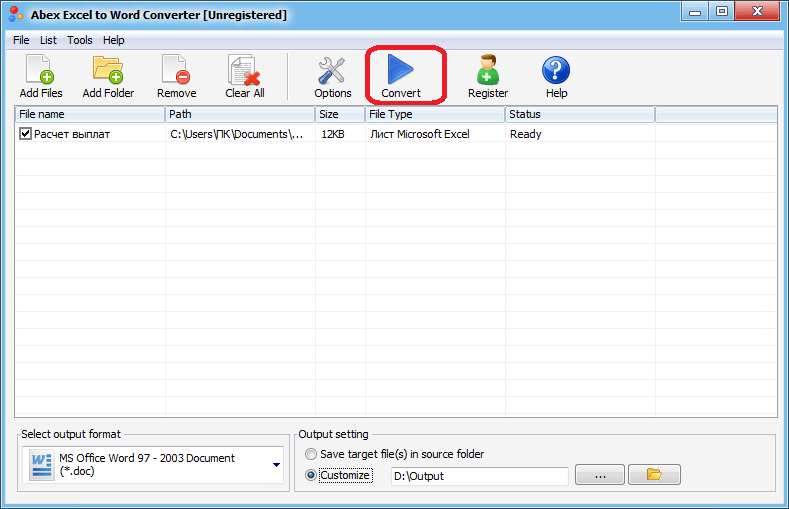
- Устанавливаем и запускаем Abex Excel to Word Converter. Жмем на кнопку «Add Files» («Добавить файлы»).
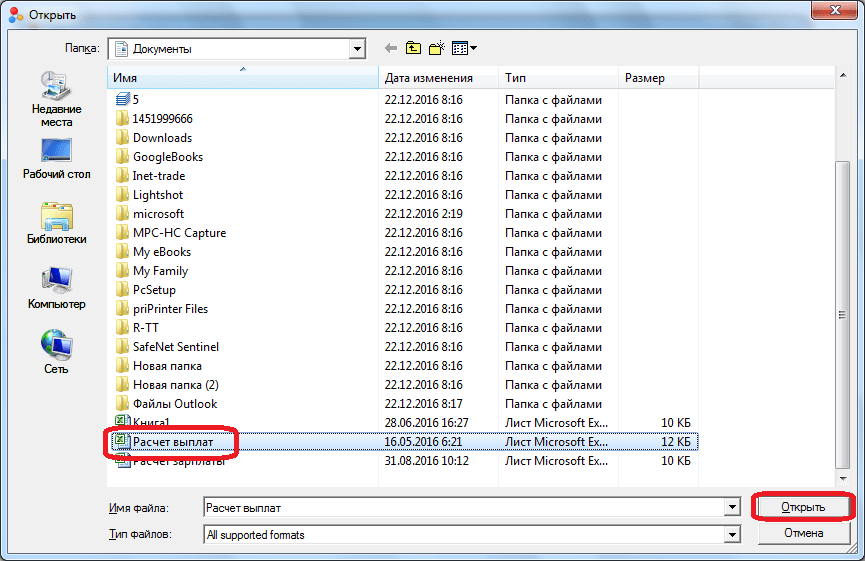
- Открывается окно, где нужно выбрать файл Excel, который мы собираемся конвертировать. При необходимости таким образом можно добавлять сразу несколько файлов.
- Затем в нижней части окна программы выбираем один из четырех форматов, в который будет преобразован файл. Это DOC (Microsoft Word 97-2003), DOCX, DOCM, RTF.
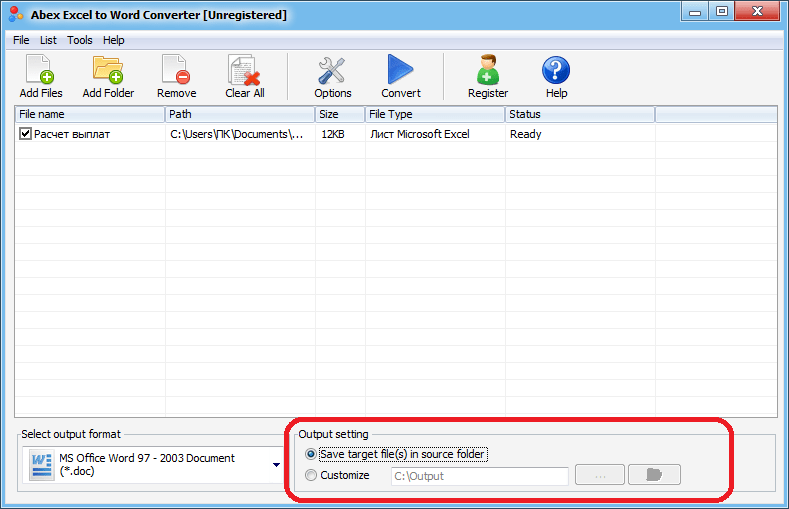
- В группе настроек «Output setting» установите, в какой директории будет сохраняться результат. Когда переключатель выставлен в позицию «Save target file(s) in source folder», сохранение производится в ту же директорию, где размещен исходник.
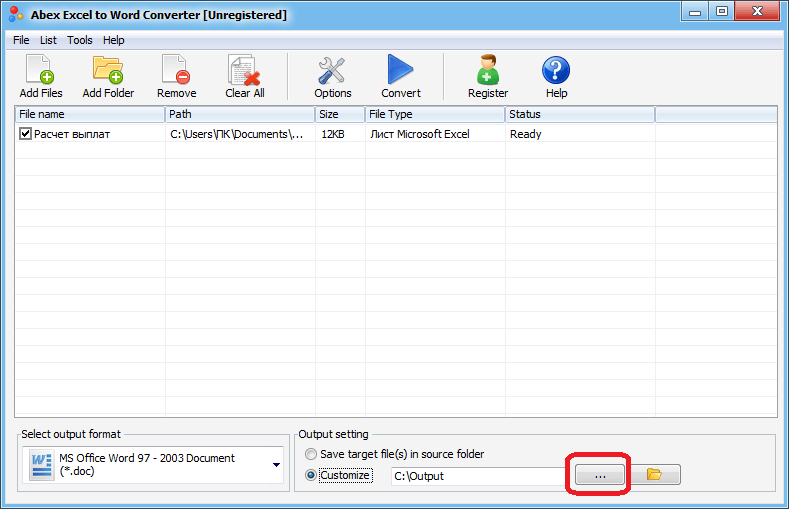
- Если же вам необходимо другое место сохранения, тогда установите переключатель в позицию «Customize». По умолчанию при этом сохранение будет производиться в папку «Output», размещенную в корневой директории на диске C. Для выбора собственного места хранения жмите на кнопку с изображением многоточия, которая располагается справа от поля, указывающего адрес директории.
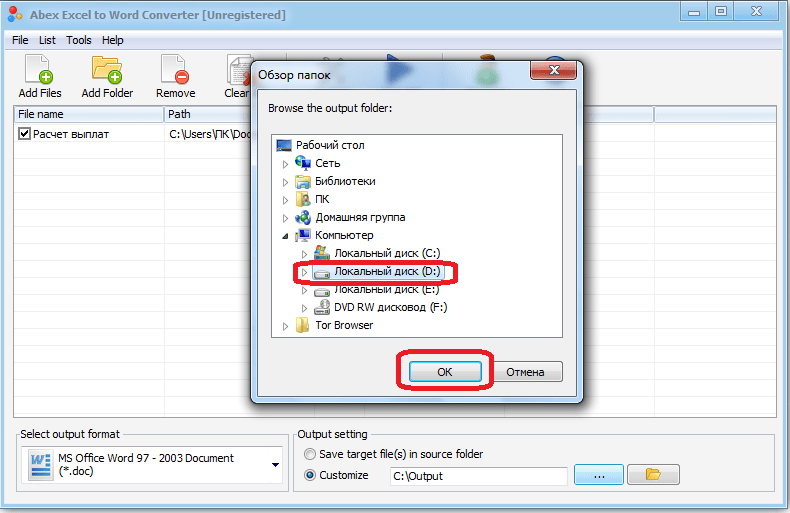
- Откроется окно, где укажите папку на жестком диске или съемном носителе. После того, как директория обозначена, жмите на «OK».
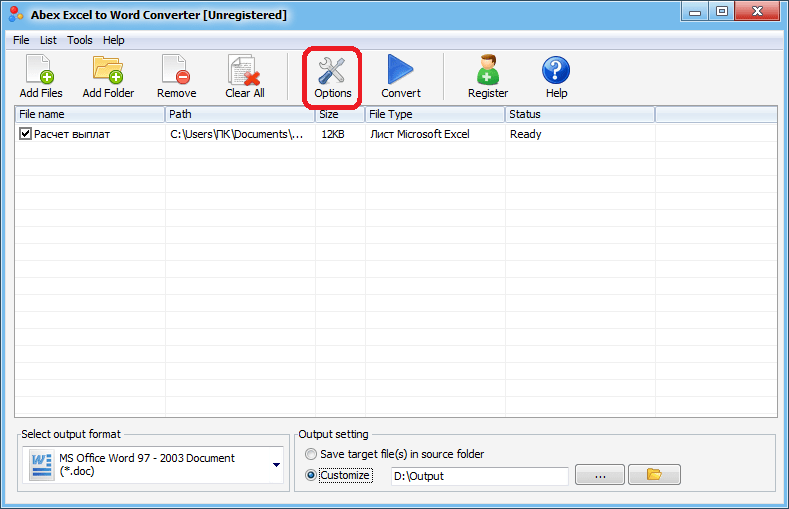
- Чтобы указать более точные настройки конвертирования, кликните по «Options» на панели инструментов. В подавляющем большинстве случаев хватает и тех параметров, о которых мы сказали выше.
- Когда все настройки выполнены, жмем на «Convert», размещенную на панели инструментов справа от «Options».
- Выполняется процедура преобразования. После ее завершения вы сможете открыть готовый файл через Word и работать с ним уже в этой программе.

Способ 3: Онлайн-сервисы
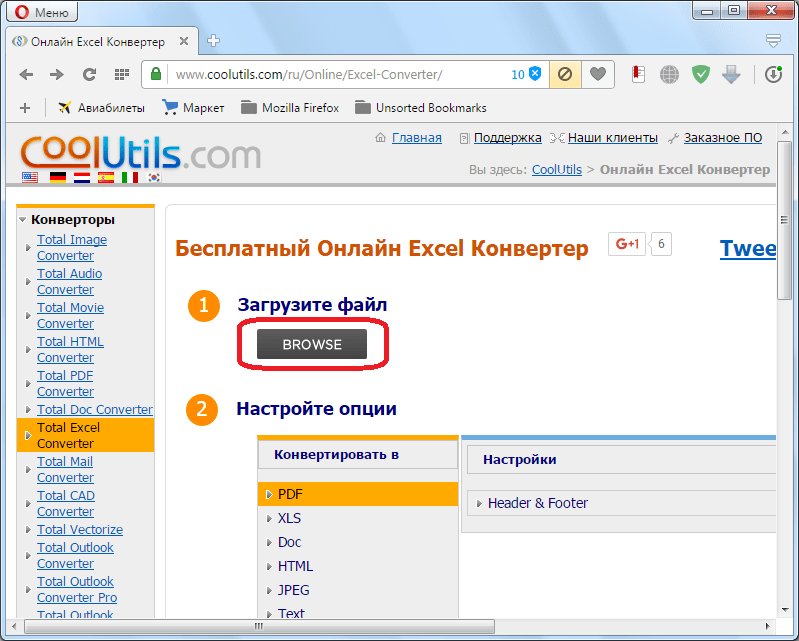
Если же вы не желаете устанавливать программное обеспечение специально для осуществления этой процедуры, есть вариант воспользоваться специальными онлайн-сервисами. Принцип работы всех подобных конвертеров примерно одинаковый, мы опишем его на примере сервиса CoolUtils.
Перейти на официальный сайт CoolUtils
- Используя ссылку выше, откройте страницу сайта, позволяющую выполнить онлайн-конвертирование файлов Excel. В этом разделе имеется возможность преобразовать их в следующие форматы: PDF, HTML, JPEG, TXT, TIFF, а также DOC. В блоке «Загрузите файл» жмем на «BROWSE».
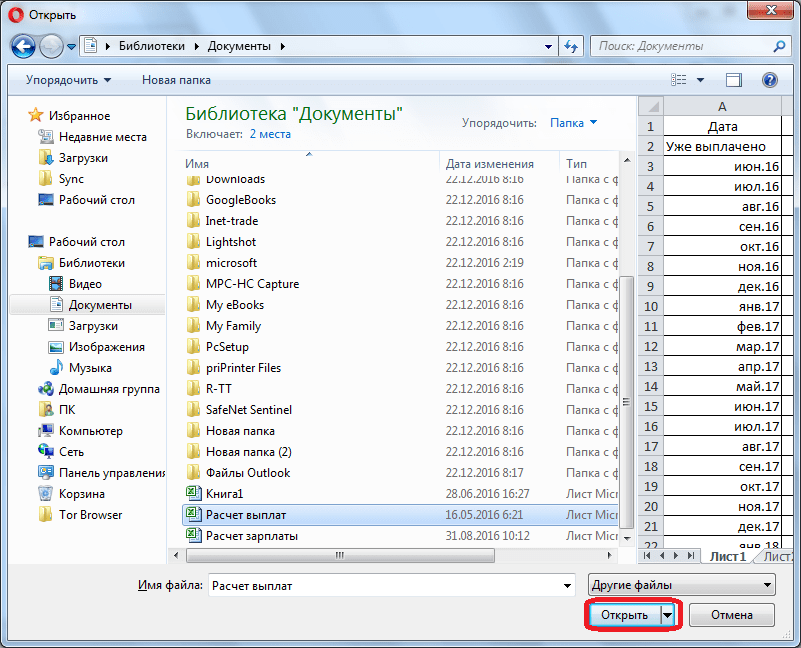
- Открывается окно, в котором выберите файл в формате Excel и кликните по кнопке «Открыть».
- На этапе «Настройте опции» указываем формат, в который нужно конвертировать файл. В нашем случае это формат DOC.
- В разделе «Получить файл» осталось нажать на «Скачать конвертированный файл».
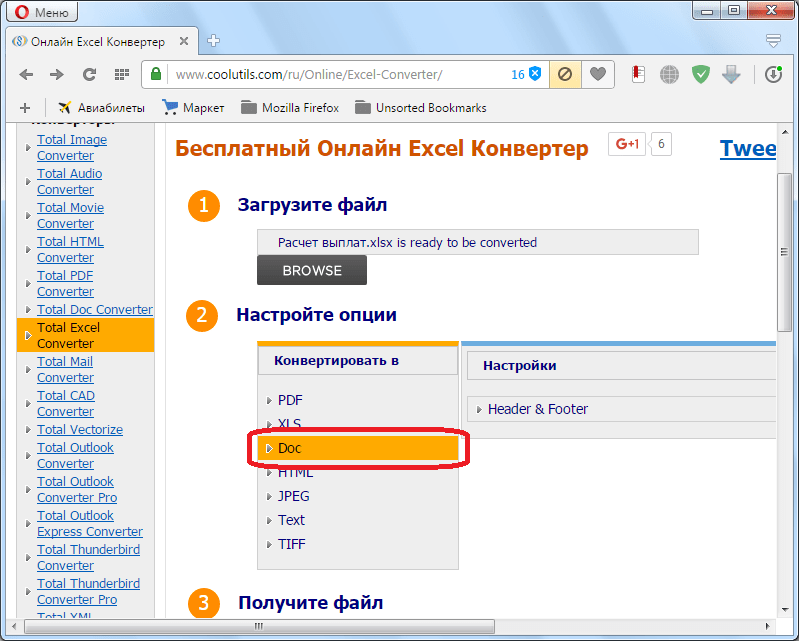
Документ будет загружен на компьютер стандартным инструментом, который установлен в вашем браузере. DOC-файл можно открывать и редактировать в программе Microsoft Word.
Как видим, существует несколько возможностей конвертирования данных из Excel в Word. Первый из них предполагает простой перенос содержимого из одной программы в другую методом копирования. Два других представляют собой полноценное конвертирование файлов с помощью сторонней программы или онлайн-сервиса.
Еще статьи по данной теме: