
I’m trying to get my MySQL data to Excel file, but I’m having problems with Excel cells. All my text goes to one cell, I would like to have each row value in separate Excel cell. Here is my code:
$queryexport = ("
SELECT username,password,fullname FROM ecustomer_users
WHERE fk_customer='".$fk_customer."'
");

$row = mysql_fetch_assoc($queryexport);

$result = mysql_query($queryexport);
$header = '';

for ($i = 0; $i < $count; $i++){
   $header .= mysql_field_name($result, $i)."t";
   }

while($row = mysql_fetch_row($result)){
   $line = '';
   foreach($row as $value){
          if(!isset($value) || $value == ""){
                 $value = "t";
          }else{
                 $value = str_replace('"', '""', $value);
                 $value = '"' . $value . '"' . "t";
                 }
          $line .= $value;
          }
   $data .= trim($line)."n";
   $data = str_replace("r", "", $data);

if ($data == "") {
   $data = "nno matching records foundn";
   }
}
header("Content-type: application/vnd.ms-excel; name='excel'");
header("Content-Disposition: attachment; filename=exportfile.xls");
header("Pragma: no-cache");
header("Expires: 0");

// output data
echo $header."n".$data;

mysql_close($conn);`
![]()
Naresh
2,73110 gold badges45 silver badges78 bronze badges
asked Mar 29, 2013 at 7:40
![]()
3
Just Try With The Following :
PHP Part :
<?php
/*******EDIT LINES 3-8*******/
$DB_Server = "localhost"; //MySQL Server
$DB_Username = "username"; //MySQL Username
$DB_Password = "password";             //MySQL Password
$DB_DBName = "databasename";         //MySQL Database Name
$DB_TBLName = "tablename"; //MySQL Table Name
$filename = "excelfilename";         //File Name
/*******YOU DO NOT NEED TO EDIT ANYTHING BELOW THIS LINE*******/
//create MySQL connection
$sql = "Select * from $DB_TBLName";
$Connect = @mysql_connect($DB_Server, $DB_Username, $DB_Password) or die("Couldn't connect to MySQL:<br>" . mysql_error() . "<br>" . mysql_errno());
//select database
$Db = @mysql_select_db($DB_DBName, $Connect) or die("Couldn't select database:<br>" . mysql_error(). "<br>" . mysql_errno());
//execute query
$result = @mysql_query($sql,$Connect) or die("Couldn't execute query:<br>" . mysql_error(). "<br>" . mysql_errno());
$file_ending = "xls";
//header info for browser
header("Content-Type: application/xls");
header("Content-Disposition: attachment; filename=$filename.xls");
header("Pragma: no-cache");
header("Expires: 0");
/*******Start of Formatting for Excel*******/
//define separator (defines columns in excel & tabs in word)
$sep = "t"; //tabbed character
//start of printing column names as names of MySQL fields
for ($i = 0; $i < mysql_num_fields($result); $i++) {
echo mysql_field_name($result,$i) . "t";
}
print("n");
//end of printing column names
//start while loop to get data
    while($row = mysql_fetch_row($result))
    {
        $schema_insert = "";
        for($j=0; $j<mysql_num_fields($result);$j++)
        {
            if(!isset($row[$j]))
                $schema_insert .= "NULL".$sep;
            elseif ($row[$j] != "")
                $schema_insert .= "$row[$j]".$sep;
            else
                $schema_insert .= "".$sep;
        }
        $schema_insert = str_replace($sep."$", "", $schema_insert);
        $schema_insert = preg_replace("/rn|nr|n|r/", " ", $schema_insert);
        $schema_insert .= "t";
        print(trim($schema_insert));
        print "n";
    }
?>
I think this may help you to resolve your problem.
answered Mar 29, 2013 at 9:06
![]()
John PeterJohn Peter
2,8703 gold badges26 silver badges45 bronze badges
13
Try this code. It’s definitly working.
<?php
// Connection

$conn=mysql_connect('localhost','root','');
$db=mysql_select_db('excel',$conn);

$filename = "Webinfopen.xls"; // File Name
// Download file
header("Content-Disposition: attachment; filename="$filename"");
header("Content-Type: application/vnd.ms-excel");
$user_query = mysql_query('select name,work from info');
// Write data to file
$flag = false;
while ($row = mysql_fetch_assoc($user_query)) {
    if (!$flag) {
        // display field/column names as first row
        echo implode("t", array_keys($row)) . "rn";
        $flag = true;
    }
    echo implode("t", array_values($row)) . "rn";
}
?>
answered Nov 18, 2014 at 5:38
![]()
5
If you just want your query data dumped into excel I have to do this frequently and using an html table is a very simple method. I use mysqli for db queries and the following code for exports to excel:
header("Content-Type: application/xls");
header("Content-Disposition: attachment; filename=filename.xls");
header("Pragma: no-cache");
header("Expires: 0");


echo '<table border="1">';
//make the column headers what you want in whatever order you want
echo '<tr><th>Field Name 1</th><th>Field Name 2</th><th>Field Name 3</th></tr>';
//loop the query data to the table in same order as the headers
while ($row = mysqli_fetch_assoc($result)){
    echo "<tr><td>".$row['field1']."</td><td>".$row['field2']."</td><td>".$row['field3']."</td></tr>";
}
echo '</table>';
answered Jan 27, 2017 at 16:42
![]()
RLytleRLytle
1211 silver badge5 bronze badges
2
This is new version of php code
$servername = "localhost";
$username = "root";
$password = "";
$dbname = "your_dbname";
//mysql and db connection

$con = new mysqli($servername, $username, $password, $dbname);

if ($con->connect_error) {  //error check
    die("Connection failed: " . $con->connect_error);
}
else
{

}


$DB_TBLName = "your_table_name";
$filename = "excelfilename";  //your_file_name
$file_ending = "xls";   //file_extention

header("Content-Type: application/xls");
header("Content-Disposition: attachment; filename=$filename.'.'.$file_ending");
header("Pragma: no-cache");
header("Expires: 0");

$sep = "t";

$sql="SELECT * FROM $DB_TBLName";
$resultt = $con->query($sql);
while ($property = mysqli_fetch_field($resultt)) { //fetch table field name
    echo $property->name."t";
}

print("n");

while($row = mysqli_fetch_row($resultt))  //fetch_table_data
{
    $schema_insert = "";
    for($j=0; $j< mysqli_num_fields($resultt);$j++)
    {
        if(!isset($row[$j]))
            $schema_insert .= "NULL".$sep;
        elseif ($row[$j] != "")
            $schema_insert .= "$row[$j]".$sep;
        else
            $schema_insert .= "".$sep;
    }
    $schema_insert = str_replace($sep."$", "", $schema_insert);
    $schema_insert = preg_replace("/rn|nr|n|r/", " ", $schema_insert);
    $schema_insert .= "t";
    print(trim($schema_insert));
    print "n";
}
answered Apr 11, 2017 at 6:31
![]()
A.A NomanA.A Noman
5,2069 gold badges26 silver badges46 bronze badges
1
I think you should try with this API
http://code.google.com/p/php-excel/source/browse/trunk/php-excel.class.php
With This
Create a quick export from a database table into Excel

Compile some statistical records with a few calculations and deliver
the result in an Excel worksheet

Gather the items off your (web-based) todo list, put them in a
worksheet and use it as a foundation for some more statistics
magic.**
answered Mar 29, 2013 at 8:05
![]()
NareshNaresh
2,73110 gold badges45 silver badges78 bronze badges
Try this code:
<?php
    header("Content-type: application/vnd-ms-excel");

    header("Content-Disposition: attachment; filename=hasil-export.xls");

    include 'view-lap.php';
?>
![]()
Spooky
2,9668 gold badges27 silver badges41 bronze badges
answered Oct 31, 2013 at 21:17
![]()
0
try this code
data.php
    <table border="1">
<tr>
    <th>NO.</th>
    <th>NAME</th>
    <th>Major</th>
</tr>
<?php
//connection to mysql
mysql_connect("localhost", "root", ""); //server , username , password
mysql_select_db("codelution");

//query get data
$sql = mysql_query("SELECT * FROM student ORDER BY id ASC");
$no = 1;
while($data = mysql_fetch_assoc($sql)){
    echo '
    <tr>
        <td>'.$no.'</td>
        <td>'.$data['name'].'</td>
        <td>'.$data['major'].'</td>
    </tr>
    ';
    $no++;
}
?>
code for excel file
export.php
<?php
// The function header by sending raw excel
header("Content-type: application/vnd-ms-excel");
// Defines the name of the export file "codelution-export.xls"
header("Content-Disposition: attachment; filename=codelution-export.xls");
// Add data table
include 'data.php';
?>
if mysqli version
$sql="SELECT * FROM user_details";
$result=mysqli_query($conn,$sql);
if(mysqli_num_rows($result) > 0)
{
    $no = 1;
            while($data = mysqli_fetch_assoc($result))
            {echo '
    <tr>
        <<td>'.$no.'</td>
        <td>'.$data['name'].'</td>
        <td>'.$data['major'].'</td>

    </tr>
    ';
    $no++;
http://codelution.com/development/web/easy-ways-to-export-data-from-mysql-to-excel-with-php/
answered Nov 22, 2015 at 16:41
![]()
You can export the data from MySQL to Excel by using this simple code.
<?php
include('db_con.php');


$stmt=$db_con->prepare('select * from books');
$stmt->execute();


$columnHeader ='';
$columnHeader = "Sr NO"."t"."Book Name"."t"."Book Author"."t"."Book
ISBN"."t";


$setData='';

while($rec =$stmt->FETCH(PDO::FETCH_ASSOC))
{
 $rowData = '';
 foreach($rec as $value)
 {
  $value = '"' . $value . '"' . "t";
  $rowData .= $value;
 }
 $setData .= trim($rowData)."n";
}


header("Content-type: application/octet-stream");
header("Content-Disposition: attachment; filename=Book record
sheet.xls");
header("Pragma: no-cache");
header("Expires: 0");

echo ucwords($columnHeader)."n".$setData."n";

?>
complete code here php export to excel
answered Feb 20, 2018 at 8:46
![]()
Posts by John Peter and Dileep kurahe helped me to develop what I consider as being a simpler and cleaner solution, just in case anyone else is still looking. (I am not showing any database code because I actually used a $_SESSION variable.)
The above solutions invariably caused an error upon loading in Excel, about the extension not matching the formatting type. And some of these solutions create a spreadsheet with the data across the page in columns where it would be more traditional to have column headings and list the data down the rows. So here is my simple solution:
$filename = "webreport.csv";
header("Content-Type: application/xls");
header("Content-Disposition: attachment; filename=$filename");
header("Pragma: no-cache");
header("Expires: 0");
foreach($results as $x => $x_value){
    echo '"'.$x.'",' . '"'.$x_value.'"' . "rn";
}
- Change to .csv (which Excel instantly updates to .xls and there is no error upon loading.)
- Use the comma as delimiter.
- Double quote the Key and Value to escape any commas in the data.
- I also prepended column headers to
$resultsso the spreadsheet looked even nicer.
answered Feb 29, 2016 at 23:24
![]()
TrialsmanTrialsman
3293 silver badges14 bronze badges
Try the Following Code Please.
just only update two values.
1.your_database_name
2.table_name
 <?php
    $host="localhost";
    $username="root";
    $password="";
    $dbname="your_database_name";
    $con = new mysqli($host, $username, $password,$dbname);

        $sql_data="select * from table_name";
        $result_data=$con->query($sql_data);
        $results=array();
    filename = "Webinfopen.xls"; // File Name
    // Download file
    header("Content-Disposition: attachment; filename="$filename"");
    header("Content-Type: application/vnd.ms-excel");

    $flag = false;
    while ($row = mysqli_fetch_assoc($result_data)) {
        if (!$flag) {
            // display field/column names as first row
            echo implode("t", array_keys($row)) . "rn";
            $flag = true;
        }
        echo implode("t", array_values($row)) . "rn";
    }
    ?>
answered Dec 17, 2016 at 18:22
![]()
This is baes on John Peter’s answer above. The code is working perfectly but I needed it for WordPress. So, I did something like this:
<?php

require '../../../wp-load.php';

$file_name = "registered-users";
$args = array( 'role' => 'client',
   'meta_query' => array( array(
       'key' => '_dt_transaction_archived',
       'compare' => 'NOT EXISTS'
   ) ),
   'order' => 'DESC',
   'orderby' => 'ID'
);
$users = get_users( $args );
$file_ending = "xls";

// Header info for browser
header( "Content-Type: application/xls" );
header( "Content-Disposition: attachment; filename=$file_name.$file_ending" );
header( "Pragma: no-cache" );
header( "Expires: 0" );

/*******Start of Formatting for Excel*******/

// define separator (defines columns in excel & tabs in word)
$sep = "t"; //tabbed character
// start of printing column names as names of MySQL fields

print( "First Name" . $sep );
print( "Last Name" . $sep );
print( "E-Mail" . $sep );
print( "n" );
// end of printing column names

// start foreach loop to get data
$schema_insert = "";

foreach ($users as $user) {
    if ( $user ) {
        $schema_insert = "$user->first_name" . $sep;
        $schema_insert .= "$user->last_name" . $sep;
        $schema_insert .= "$user->user_email" . $sep;
        print "n";
        $schema_insert = str_replace( $sep . "$", "", $schema_insert );
        $schema_insert = preg_replace( "/rn|nr|n|r/", " ", $schema_insert );
        $schema_insert .= "t";
        print( trim( $schema_insert ) );
    }
}
answered Apr 16, 2021 at 7:16
![]()
Export data feature is very useful where the data is saved on the local drive for offline uses. Export data to file functionality provides a user-friendly way to maintain a large number of data in the web application. There are various file formats are available to export data and download it as a file. Microsoft Excel is a widely used spreadsheet format that organizes and maintains data.
Generally, export data functionality is used in the data management section of the web application. Excel is the best format to export data in a file and you can easily export data to excel using PHP. In this tutorial, we will show you how to export data to Excel in PHP.
The example PHP script lets you integrate export data to excel functionality. With one click, the user can export data from the MySQL database to Excel and download it in MS Excel file format (.xls/.xlsx).
Export Data to Excel with PHP
In this example script, we will export data from the array (defined in the script) to an excel file.
The $data variable holds the data in array format which will be exported to Excel using PHP.
$data = array(
    array("NAME" => "John Doe", "EMAIL" => "john.doe@gmail.com", "GENDER" => "Male", "COUNTRY" => "United States"),
    array("NAME" => "Gary Riley", "EMAIL" => "gary@hotmail.com", "GENDER" => "Male", "COUNTRY" => "United Kingdom"),
    array("NAME" => "Edward Siu", "EMAIL" => "siu.edward@gmail.com", "GENDER" => "Male", "COUNTRY" => "Switzerland"),
    array("NAME" => "Betty Simons", "EMAIL" => "simons@example.com", "GENDER" => "Female", "COUNTRY" => "Australia"),
    array("NAME" => "Frances Lieberman", "EMAIL" => "lieberman@gmail.com", "GENDER" => "Female", "COUNTRY" => "United Kingdom")
);
The filterData() function is used to filter string before added to the excel sheet row.
function filterData(&$str){
    $str = preg_replace("/t/", "\t", $str);
    $str = preg_replace("/r?n/", "\n", $str);
    if(strstr($str, '"')) $str = '"' . str_replace('"', '""', $str) . '"';
}
The following code helps to export data in excel and download it as a file.
- The
$fileNamevariable defines the name of the excel file. - The Content-Disposition and Content-Type headers force the excel file to download.
- Run the loop through each key/value pair in the
$dataarray. - Display column names as the first row using the
$flagvariable. - The PHP array_walk() function is used to filter the data together with
filterData()function.
// Excel file name for download
$fileName = "codexworld_export_data-" . date('Ymd') . ".xlsx"; // Headers for download
header("Content-Disposition: attachment; filename="$fileName"");
header("Content-Type: application/vnd.ms-excel"); $flag = false;
foreach($data as $row) {
if(!$flag) {
// display column names as first row
echo implode("t", array_keys($row)) . "n";
$flag = true;
}
// filter data
array_walk($row, 'filterData');
echo implode("t", array_values($row)) . "n";
}exit;
Export Data from Database to Excel with PHP and MySQL
In this example script, we will export data from the MySQL database in an excel file using PHP.
Create Database Table:
For this example, we will create a members table with some basic fields in the MySQL database. The members table holds the records which will be exported to excel.
CREATE TABLE `members` (
  `id` int(11) NOT NULL AUTO_INCREMENT,
  `first_name` varchar(25) COLLATE utf8_unicode_ci NOT NULL,
  `last_name` varchar(25) COLLATE utf8_unicode_ci NOT NULL,
  `email` varchar(50) COLLATE utf8_unicode_ci NOT NULL,
  `gender` enum('Male','Female') COLLATE utf8_unicode_ci NOT NULL,
  `country` varchar(20) COLLATE utf8_unicode_ci NOT NULL,
  `created` datetime NOT NULL,
  `status` tinyint(1) NOT NULL DEFAULT 1 COMMENT '1=Active | 0=Inactive',
  PRIMARY KEY (`id`)
) ENGINE=InnoDB DEFAULT CHARSET=utf8 COLLATE=utf8_unicode_ci;
Database Configuration (dbConfig.php):
The following code is used to connect the database using PHP and MySQL. Specify the database host ($dbHost), username ($dbUsername), password ($dbPassword), and name ($dbName) as per your database credentials.
<?php
// Database configuration
$dbHost     = "localhost";
$dbUsername = "root";
$dbPassword = "root";
$dbName     = "codexworld"; // Create database connection
$db = new mysqli($dbHost, $dbUsername, $dbPassword, $dbName); // Check connection
if ($db->connect_error) {
    die("Connection failed: " . $db->connect_error);
}
Export Data from Database:
The following code helps to export data from the MySQL database and download it as an excel file.
- The
filterData()function is used to filter string before added to the excel data row. $fileName– Define the name of the excel file to be downloaded.$fields– Define the column named of the excel sheet.$excelData– Add the first row to the excel sheet as a column name.- Fetch member’s data from the database and add to the row of the excel sheet.
- Define headers to force the file to download.
- Render data of excel sheet.
<?php
// Load the database configuration file
include_once 'dbConfig.php'; // Filter the excel data
function filterData(&$str){
$str = preg_replace("/t/", "\t", $str);
$str = preg_replace("/r?n/", "\n", $str);
if(strstr($str, '"')) $str = '"' . str_replace('"', '""', $str) . '"';
} // Excel file name for download
$fileName = "members-data_" . date('Y-m-d') . ".xls"; // Column names
$fields = array('ID', 'FIRST NAME', 'LAST NAME', 'EMAIL', 'GENDER', 'COUNTRY', 'CREATED', 'STATUS'); // Display column names as first row
$excelData = implode("t", array_values($fields)) . "n"; // Fetch records from database
$query = $db->query("SELECT * FROM members ORDER BY id ASC");
if($query->num_rows > 0){
// Output each row of the data
while($row = $query->fetch_assoc()){
$status = ($row['status'] == 1)?'Active':'Inactive';
$lineData = array($row['id'], $row['first_name'], $row['last_name'], $row['email'], $row['gender'], $row['country'], $row['created'], $status);
array_walk($lineData, 'filterData');
$excelData .= implode("t", array_values($lineData)) . "n";
}
}else{
$excelData .= 'No records found...'. "n";
} // Headers for download
header("Content-Type: application/vnd.ms-excel");
header("Content-Disposition: attachment; filename="$fileName""); // Render excel data
echo $excelData;exit;
Export HTML Table Data to Excel using JavaScript
Conclusion
If you want to add an export option to the data list, the export to excel feature is perfect for it. With the export option, the user can download the data in an excel file and save it in a local drive. You can use this simple code to add export data functionality in the web application using PHP.
- Excel
- Export
- MySQL
- PHP
Are you want to get implementation help, or modify or enhance the functionality of this script? Click Here to Submit Service Request
If you have any questions about this script, submit it to our QA community — Ask Question
I’ll show you how to export grid data to an excel file in this post. Export/Import is a relatively popular functionality for web development; nevertheless, there are times when we need to export entire grid data into an excel file.
in which case we should use the approach described below. In PHP, we simply need to set header information to force the browser to launch the download window.
Video Tutorial
If you are more comfortable in watching a video that explains about Exporting Data to Excel with PHP and MySQL, then you should watch this video tutorial.
You can also check other tutorial of Export Data with PHP,
- Exporting Data to Excel with PHP and MySQL
- Export Data to CSV and Download Using PHP and MySQL
- Import CSV File Into MySql Using PHP
- Export HTML Table Data to Excel, CSV, PNG and PDF using jQuery Plugin
- Export the jQuery Datatable data to PDF,Excel,CSV and Copy
Export MySQL Data To Excel in PHP
Because Excel is the finest format for storing data in a file, exporting data in Excel format is a very important tool that allows users to save data for offline use. You’ll learn how to use PHP and MySQL to export data to Excel.
So the file structure for this example is the following:
- index.php: This is the entry file.
- connection.php: This file is used to connect MySQL with PHP
- generate_excel.php: This is the main PHP file that’ll have an export method to export data into the excel.
Create MySQL Database Table
Let’s create a tasks table that ll all tasks records which will export later on in excel format.
CREATE TABLE `tasks` (
  `id` int(11) NOT NULL,
  `Name` varchar(255) NOT NULL,
  `Status` varchar(255) NOT NULL,
  `Priority` varchar(255) NOT NULL,
  `Date` date NOT NULL
) ENGINE=InnoDB DEFAULT CHARSET=latin1;

--
-- Indexes for table `tasks`
--
ALTER TABLE `tasks`
  ADD PRIMARY KEY (`id`);
--
-- AUTO_INCREMENT for table `tasks`
--
ALTER TABLE `tasks`
  MODIFY `id` int(11) NOT NULL AUTO_INCREMENT, AUTO_INCREMENT=5;
COMMIT;
Now, I’ll insert some sample data into the tasks table.
INSERT INTO `tasks` (`id`, `Name`, `Status`, `Priority`, `Date`) VALUES
(1, 'Task1', 'Completed', 'Low', '2021-09-01'),
(2, 'Task2', 'InProgress', 'High', '2021-03-17'),
(3, 'Mysql', 'Hold', 'Low', '2021-09-22'),
(4, 'API', 'Pending', 'Low', '2021-09-06');
Create MySQL Connection With PHP
We’ll create a connection.php file and add the below code. in this file, We’ll pass the database hostname, database username, database password, and database name.
<?php
Class dbObj{
	/* Database connection start */
	var $dbhost = "localhost";
	var $username = "root";
	var $password = "";
	var $dbname = "test";
	var $conn;
	function getConnstring() {
		$con = mysqli_connect($this->dbhost, $this->username, $this->password, $this->dbname) or die("Connection failed: " . mysqli_connect_error());

		/* check connection */
		if (mysqli_connect_errno()) {
			printf("Connect failed: %sn", mysqli_connect_error());
			exit();
		} else {
			$this->conn = $con;
		}
		return $this->conn;
	}
}
?>
Get the Tasks Data from MySQL Database Table
We’ll receive entries from a MySQL database table tasks and put them in an array so we can show them and export them to an excel file. Added below code into the top of the generate_excel.php file.
include_once("connection.php");
$db = new dbObj();
$connString =  $db->getConnstring();

$sql_query = "SELECT * FROM tasks";
$resultset = mysqli_query($connString, $sql_query) or die("database error:". mysqli_error($conn));
$tasks = array();
while( $rows = mysqli_fetch_assoc($resultset) ) {
	$tasks[] = $rows;
}
Export Data to Excel
Let’s create export features using PHP and export data into excel. We’ll also force the to browser download the file instead of display it. We’ll add the below code into the generate_excel.php file.
if(isset($_POST["ExportType"]))
{

    switch($_POST["ExportType"])
    {
        case "export-to-excel" :
            // Submission from
			$filename = "phpflow_data_export_".date('Ymd') . ".xls";
            header("Content-Type: application/vnd.ms-excel");
			header("Content-Disposition: attachment; filename="$filename"");
			ExportFile($tasks);
			//$_POST["ExportType"] = '';
            exit();
        default :
            die("Unknown action : ".$_POST["action"]);
            break;
    }
}
function ExportFile($records) {
	$heading = false;
		if(!empty($records))
		  foreach($records as $row) {
			if(!$heading) {
			  // display field/column names as a first row
			  echo implode("t", array_keys($row)) . "n";
			  $heading = true;
			}
			echo implode("t", array_values($row)) . "n";
		  }
		exit;
}
the code shown above, The switch case block will execute based on the parameter value and the method invoked.
Browsers are being forced to download an excel file.
Create HTML and Display Records with Export Button
Define html layout for display data in table and button to fire export-to-csv action. Added below code into the index.php file.
<?php
include_once("generate_excel.php");
?>

<meta charset="UTF-8" />
<title>Simple Example of Export Excel file using PHP and MySQL</title>
<link rel="stylesheet" href="https://maxcdn.bootstrapcdn.com/bootstrap/3.3.0/css/bootstrap.min.css" />
<link rel="stylesheet" href="https://maxcdn.bootstrapcdn.com/bootstrap/3.3.0/css/bootstrap-theme.min.css" />
<script src="https://ajax.googleapis.com/ajax/libs/jquery/1.11.1/jquery.min.js"></script>
<script src="https://maxcdn.bootstrapcdn.com/bootstrap/3.3.0/js/bootstrap.min.js"></script>
<title>phpflow.com : Demo of export to excel file</title>

<div id="container">
    <div class="col-sm-6 pull-left">
        <div class="well well-sm col-sm-12">
            <div class="btn-group pull-right">
                <button type="button" class="btn btn-info">Action</button>
                <button type="button" class="btn btn-info dropdown-toggle" data-toggle="dropdown">
                    <span class="caret"></span>
                    <span class="sr-only">Toggle Dropdown</span>
                </button>

                <ul class="dropdown-menu" role="menu" id="export-menu">
                    <li id="export-to-excel"><a href="#">Export to excel</a></li>

                    <li class="divider"></li>

                    <li><a href="#">Other</a></li>
                </ul>
            </div>
        </div>

        <form action="generate_excel.php" method="post" id="export-form">
            <input type="hidden" value="" id="hidden-type" name="ExportType" />
        </form>

        <table id="" class="table table-striped table-bordered">
            <tbody>
                <tr>
                    <th>Name</th>

                    <th>Status</th>

                    <th>Priority</th>

                    <th>Date</th>
                </tr>
            </tbody>
            <tbody>
                <?php foreach($tasks as $row):?>

                <tr>
                    <td><?php echo $row ['Name']?></td>

                    <td><?php echo $row ['Status']?></td>

                    <td><?php echo $row ['Priority']?></td>

                    <td><?php echo $row ['Date']?></td>
                </tr>

                <?php endforeach; ?>
            </tbody>
        </table>
    </div>
</div>
We’ve imported the ‘generate_excel.php’ file at the top of the code, which will yield task data for display in the HTML table. We’ve established a dropwodn with a ‘export to excel’ option. All task data will be displayed in an HTML table.
Submit Form Using jQuery
We’ve included a dropdown and need to catch and fire events so that when a user selects an option, the form is submitted. We’ll paste the code below at the bottom of the index.php file.
<script type="text/javascript">
$(document).ready(function() {
jQuery('#Export to excel').bind("click", function() {
var target = $(this).attr('id');
switch(target) {
	case 'export-to-excel' :
	$('#hidden-type').val(target);
	//alert($('#hidden-type').val());
	$('#export-form').submit();
	$('#hidden-type').val('');
	break
}
});
    });
</script>
Result:

I hope its help you!.
Demo and Download source Code From Below Link
Время на прочтение
16 мин
Количество просмотров 240K
Не редко при разработке некоего проекта, возникает необходимость в формировании отчетной статистики. Если проект разрабатывается на Delphi, C# или к примеру, на С++ и под Windows, то тут проблем нет. Всего лишь необходимо воспользоваться COM объектом. Но дела обстоят иначе, если необходимо сформировать отчет в формате excel на PHP. И чтобы это творение функционировало на UNIX-подобных системах. Но, к счастью, не так все плохо. И библиотек для этого хватает. Я свой выбор остановил на PHPExcel. Я уже пару лет работаю с этой библиотекой, и остаюсь доволен. Поскольку она является кроссплатформенной, то не возникает проблем с переносимостью.
PHPExcel позволяет производить импорт и экспорт данных в excel. Применять различные стили оформления к отчетам. В общем, все на высоте. Даже есть возможность работы с формулами. Только необходимо учитывать, что вся работа (чтение и запись) должна вестись в кодировке utf-8.
Установка библиотеки
Для работы необходима версия PHP 5.2.0 или выше. А также необходимы следующие расширения: php_zip, php_xml и php_gd2. Скачать библиотеку можно отсюда.
С помощью библиотеки PHPExcel можно записывать данные в следующие форматы:
- Excel 2007;
- Excel 97 и поздние версии;
- PHPExcel Serialized Spreadshet;
- HTML;
- PDF;
- CSV.
Импорт данных из PHP в Excel
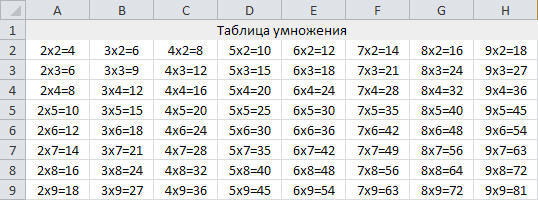
Рассмотрим пример по формированию таблицы умножения.
// Подключаем класс для работы с excel
require_once('PHPExcel.php');
// Подключаем класс для вывода данных в формате excel
require_once('PHPExcel/Writer/Excel5.php');

// Создаем объект класса PHPExcel
$xls = new PHPExcel();
// Устанавливаем индекс активного листа
$xls->setActiveSheetIndex(0);
// Получаем активный лист
$sheet = $xls->getActiveSheet();
// Подписываем лист
$sheet->setTitle('Таблица умножения');

// Вставляем текст в ячейку A1
$sheet->setCellValue("A1", 'Таблица умножения');
$sheet->getStyle('A1')->getFill()->setFillType(
    PHPExcel_Style_Fill::FILL_SOLID);
$sheet->getStyle('A1')->getFill()->getStartColor()->setRGB('EEEEEE');

// Объединяем ячейки
$sheet->mergeCells('A1:H1');

// Выравнивание текста
$sheet->getStyle('A1')->getAlignment()->setHorizontal(
    PHPExcel_Style_Alignment::HORIZONTAL_CENTER);

for ($i = 2; $i < 10; $i++) {
	for ($j = 2; $j < 10; $j++) {
        // Выводим таблицу умножения
        $sheet->setCellValueByColumnAndRow(
                                          $i - 2,
                                          $j,
                                          $i . "x" .$j . "=" . ($i*$j));
	    // Применяем выравнивание
	    $sheet->getStyleByColumnAndRow($i - 2, $j)->getAlignment()->
                setHorizontal(PHPExcel_Style_Alignment::HORIZONTAL_CENTER);
	}
}
Далее нам необходимо получить наш *.xls файл. Здесь можно пойти двумя путями. Если предположим у вас интернет магазин, и клиент хочет скачать прайс лист, то будет лучше прибегнуть к такому выводу:
// Выводим HTTP-заголовки
 header ( "Expires: Mon, 1 Apr 1974 05:00:00 GMT" );
 header ( "Last-Modified: " . gmdate("D,d M YH:i:s") . " GMT" );
 header ( "Cache-Control: no-cache, must-revalidate" );
 header ( "Pragma: no-cache" );
 header ( "Content-type: application/vnd.ms-excel" );
 header ( "Content-Disposition: attachment; filename=matrix.xls" );

// Выводим содержимое файла
 $objWriter = new PHPExcel_Writer_Excel5($xls);
 $objWriter->save('php://output');
Здесь сформированные данные сразу “выплюнутся” в браузер. Однако, если вам нужно файл сохранить, а не “выбросить” его сразу, то не нужно выводить HTTP-заголовки и вместо “php://output” следует указать путь к вашему файлу. Помните что каталог, в котором предполагается создание файла, должен иметь права на запись. Это касается UNIX-подобных систем.
Рассмотрим еще на примере три полезные инструкции:
- $sheet->getColumnDimension(‘A’)->setWidth(40) – устанавливает столбцу “A” ширину в 40 единиц;
- $sheet->getColumnDimension(‘B’)->setAutoSize(true) – здесь у столбца “B” будет установлена автоматическая ширина;
- $sheet->getRowDimension(4)->setRowHeight(20) – устанавливает четвертой строке высоту равную 20 единицам.
Также обратите внимание на следующие необходимые для работы с отчетом методы:
- Методы для вставки данных в ячейку:
- setCellValue([$pCoordinate = ‘A1’ [, $pValue = null [, $returnCell = false]]]) — принимает три параметра: координату ячейки, данные для вывода в ячейку и третий параметр эта одна из констант типа boolean: true или false (если передать значение true, то метод вернет объект ячейки, иначе объект рабочего листа);
- setCellValueByColumnAndRow([$pColumn = 0 [, $pRow = 1 [, $pValue = null [, $returnCell = false]]]]) — принимает четыре параметра: номер столбца ячейки, номер строки ячейки, данные для вывода в ячейку и четвертый параметр действует по аналогии с третьим параметром метода setCellValue().
- Методы для получения ячейки:
- getCell([$pCoordinate = ‘A1’]) — принимает в качестве параметра координату ячейки;
- getCellByColumnAndRow([$pColumn = 0 [, $pRow = 1]]) — принимает два параметра в виде номеров столбца и строки ячейки.
Как мы видим, вышеприведенные методы являются парными. Поэтому мы можем работать с ячейками используя строковое или числовое представление координат. Что конечно же является дополнительным преимуществом в работе.
Оформление отчета средствами PHP в Excel
Очень часто возникает необходимость выделить в отчете некоторые данные. Сделать выделение шрифта или применить рамку с заливкой фона для некоторых ячеек и т.д. Что позволяет сконцентрироваться на наиболее важной информации (правда может и наоборот отвлечь). Для этих целей в библиотеке PHPExcel есть целый набор стилей, которые можно применять к ячейкам в excel. Есть конечно в этой библиотеке небольшой “минус” – нельзя применить стиль к нескольким ячейкам одновременно, а только к каждой индивидуально. Но это не создает дискомфорта при разработке web-приложений.
Назначить стиль ячейке можно тремя способами:
- Использовать метод applyFromArray, класса PHPExcel_Style. В метод applyFromArray передается массив со следующими параметрами:
- fill — массив с параметрами заливки;
- font — массив с параметрами шрифта;
- borders — массив с параметрами рамки;
- alignment — массив с параметрами выравнивания;
- numberformat — массив с параметрами формата представления данных ячейки;
- protection — массив с параметрами защиты ячейки.
- Применить метод duplicateStyle, класса PHPExcel_Style. Этот метод может оказаться весьма полезным, если предстоит работа с заранее загруженным файлом (шаблоном), где удобнее будет продублировать стиль некой ячейки, чем самостоятельно его определять. Данный метод принимает два параметра:
- pCellStyle – данный параметр является экземпляром класса PHPExcel_Style;
- pRange – диапазон ячеек.
- Использовать методы класса PHPExcel_Style для каждого из стилей в отдельности. К примеру, назначить ячейке шрифт можно так: $sheet->getStyle(‘A1’)->getFont()->setName(‘Arial’) .
Заливка
Значением параметра fill является массив со следующими необязательными параметрами:
- type — тип заливки;
- rotation — угол градиента;
- startcolor — значение в виде массива с параметром начального цвета в формате RGB;
- endcolor — значение в виде массива с параметром конечного цвета в формате ARGB;
- color — значение в виде массива с параметром начального цвета в формате RGB.
Стили заливки
| FILL_NONE | none |
| FILL_SOLID | solid |
| FILL_GRADIENT_LINEAR | linear |
| FILL_GRADIENT_PATH | path |
| FILL_PATTERN_DARKDOWN | darkDown |
| FILL_PATTERN_DARKGRAY | darkGray |
| FILL_PATTERN_DARKGRID | darkGrid |
| FILL_PATTERN_DARKHORIZONTAL | darkHorizontal |
| FILL_PATTERN_DARKTRELLIS | darkTrellis |
| FILL_PATTERN_DARKUP | darkUp |
| FILL_PATTERN_DARKVERTICAL | darkVertical |
| FILL_PATTERN_GRAY0625 | gray0625 |
| FILL_PATTERN_GRAY125 | gray125 |
| FILL_PATTERN_LIGHTDOWN | lightDown |
| FILL_PATTERN_LIGHTGRAY | lightGray |
| FILL_PATTERN_LIGHTGRID | lightGrid |
| FILL_PATTERN_LIGHTHORIZONTAL | lightHorizontal |
| FILL_PATTERN_LIGHTTRELLIS | lightTrellis |
| FILL_PATTERN_LIGHTUP | lightUp |
| FILL_PATTERN_LIGHTVERTICAL | lightVertical |
| FILL_PATTERN_MEDIUMGRAY | mediumGray |
Пример указания настроек для заливки:
array(
	'type'       => PHPExcel_Style_Fill::FILL_GRADIENT_LINEAR,
	'rotation'   => 0,
	'startcolor' => array(
		'rgb' => '000000'
	),
	'endcolor'   => array(
		'argb' => 'FFFFFFFF'
	),
	'color'   => array(
		'rgb' => '000000'
	)
);
Или можно использовать следующие методы:
$PHPExcel_Style->getFill()->setFillType(PHPExcel_Style_Fill::FILL_GRADIENT_LINEAR);
$PHPExcel_Style->getFill()->setRotation(0);
$PHPExcel_Style->getFill()->getStartColor()->applyFromArray(array(‘rgb’ => ‘C2FABD’));
$PHPExcel_Style->getFill()->getEndColor()->applyFromArray(array(‘argb’ => ‘FFFFFFFF’)).
Вставка изображений
Довольно редко, но бывает полезным произвести вставку изображения в отчет. Это может быть логотип, схема и т.д. Для работы нам понадобятся следующие методы:
- setPath([$pValue = », [$pVerifyFile = true]]) — данный метод принимает два параметра. В качестве первого параметра указывается путь к файлу с изображением. А второй параметр имеет смысл указывать, если необходимо осуществлять проверку существования файла (может принимать одно из значений true или false).
- setCoordinates([$pValue = ‘A1’])) — принимает на вход один параметр в виде строки с координатой ячейки.
- setOffsetX([$pValue = 0]) — принимает один параметр со значением смещения по X от левого края ячейки.
- setOffsetY([$pValue = 0]) — принимает один параметр со значением смещения по Y от верхнего края ячейки.
- setWorksheet([$pValue = null, [$pOverrideOld = false]]) — этот метод принимает на вход два параметра. Первый является обязательным, а второй нет. В качестве первого параметра указывается экземпляр класса PHPExcel_Worksheet (текущий активный лист). Если в качестве значения второго параметра передать true, то если лист уже был назначен ранее – произойдет его перезапись и соответственно изображение удалится.
Код демонстрирующий алгоритм вставки изображения приведен ниже:
...

$sheet->getColumnDimension('B')->setWidth(40);

$imagePath = dirname ( __FILE__ ) . '/excel.png';


if (file_exists($imagePath)) {
	$logo = new PHPExcel_Worksheet_Drawing();
	$logo->setPath($imagePath);
	$logo->setCoordinates("B2");
	$logo->setOffsetX(0);
	$logo->setOffsetY(0);
	$sheet->getRowDimension(2)->setRowHeight(190);
	$logo->setWorksheet($sheet);
}

...
Вот так выглядит отчет со вставленным изображением:
Шрифт
В качестве значения параметра font указывается массив, который содержит следующие необязательные параметры:
- name — имя шрифта;
- size — размер шрифта;
- bold — выделять жирным;
- italic — выделять курсивом;
- underline — стиль подчеркивания;
- strike — перечеркнуть;
- superScript — надстрочный знак;
- subScript — подстрочный знак;
- color — значение в виде массива с параметром цвета в формате RGB.
Стили подчеркивания
| UNDERLINE_NONE | нет |
| UNDERLINE_DOUBLE | двойное подчеркивание |
| UNDERLINE_SINGLE | одиночное подчеркивание |
Пример указания параметров настроек для шрифта:
array(
	'name'      	=> 'Arial',
	'size'     	=> 12,
	'bold'      	=> true,
	'italic'    	=> false,
	'underline' 	=> PHPExcel_Style_Font::UNDERLINE_DOUBLE,
	'strike'    	=> false,
	'superScript' 	=> false,
	'subScript' 	=> false,
	'color'     	=> array(
		'rgb' => '808080'
	)
);
Или воспользоваться следующими методами:
$PHPExcel_Style->getFont()->setName(‘Arial’);
$PHPExcel_Style->getFont()->setBold(true);
$PHPExcel_Style->getFont()->setItalic(false);
$PHPExcel_Style->getFont()->setSuperScript(false);
$PHPExcel_Style->getFont()->setSubScript(false);
$PHPExcel_Style->getFont()->setUnderline(PHPExcel_Style_Font::UNDERLINE_DOUBLE);
$PHPExcel_Style->getFont()->setStrikethrough(false);
$PHPExcel_Style->getFont()->getColor()->applyFromArray(array(‘rgb’ => ‘808080’));
$PHPExcel_Style->getFont()->setSize(12).
Рамка
В качестве значения параметра borders указывается массив, который содержит следующие необязательными параметры:
- тип рамки — (top|bootom|left|right|diagonal|diagonaldirection);
- style — стиль рамки;
- color — значение в виде массива с параметром цвета в формате RGB.
Стили линий
| BORDER_NONE | нет |
| BORDER_DASHDOT | пунктирная с точкой |
| BORDER_DASHDOTDOT | пунктирная с двумя точками |
| BORDER_DASHED | пунктирная |
| BORDER_DOTTED | точечная |
| BORDER_DOUBLE | двойная |
| BORDER_HAIR | волосная линия |
| BORDER_MEDIUM | средняя |
| BORDER_MEDIUMDASHDOT | пунктирная с точкой |
| BORDER_MEDIUMDASHDOTDOT | утолщенная пунктирная линия с двумя точками |
| BORDER_MEDIUMDASHED | утолщенная пунктирная |
| BORDER_SLANTDASHDOT | наклонная пунктирная с точкой |
| BORDER_THICK | утолщенная |
| BORDER_THIN | тонкая |
Пример указания параметров настроек для рамки:
array(
	'bottom'     => array(
		'style' => PHPExcel_Style_Border::BORDER_DASHDOT,
		'color' => array(
		'	rgb' => '808080'
		)
	),
	'top'     => array(
		'style' => PHPExcel_Style_Border::BORDER_DASHDOT,
		'color' => array(
			'rgb' => '808080'
		)
	)
);
Так же можно прибегнуть к использованию следующих методов:
$PHPExcel_Style->getBorders()->getLeft()->applyFromArray(array(‘style’ =>PHPExcel_Style_Border::BORDER_DASHDOT,’color’ => array(‘rgb’ => ’808080′)));
$PHPExcel_Style->getBorders()->getRight()->applyFromArray(array(‘style’ =>PHPExcel_Style_Border::BORDER_DASHDOT,’color’ => array(‘rgb’ => ’808080′)));
$PHPExcel_Style->getBorders()->getTop()->applyFromArray(array(‘style’ =>PHPExcel_Style_Border::BORDER_DASHDOT,’color’ => array(‘rgb’ => ’808080′)));
$PHPExcel_Style->getBorders()->getBottom()->applyFromArray(array(‘style’ =>PHPExcel_Style_Border::BORDER_DASHDOT,’color’ => array(‘rgb’ => ’808080′)));
$PHPExcel_Style->getBorders()->getDiagonal()->applyFromArray(array(‘style’ => PHPExcel_Style_Border::BORDER_DASHDOT,’color’ => array(‘rgb’ => ’808080′)));
$PHPExcel_Style->getBorders()->setDiagonalDirection(array(‘style’ =>PHPExcel_Style_Border::BORDER_DASHDOT,’color’ => array(‘rgb’ => ’808080′))).
Выравнивание
Значением параметра alignment является массив, который принимает на вход четыре необязательных параметра:
- horizontal — константа горизонтального выравнивания;
- vertical — константа вертикального выравнивания;
- rotation — угол поворота текста;
- wrap — разрешить перенос текста;
- shrinkToFit — изменять ли размер шрифта при выходе текста за область ячейки;
- indent — отступ от левого края.
Выравнивание по горизонтали
| HORIZONTAL_GENERAL | основное |
| HORIZONTAL_LEFT | по левому краю |
| HORIZONTAL_RIGHT | по правому краю |
| HORIZONTAL_CENTER | по центру |
| HORIZONTAL_CENTER_CONTINUOUS | по центру выделения |
| HORIZONTAL_JUSTIFY | по ширине |
Выравнивание по вертикали
| VERTICAL_BOTTOM | по нижнему краю |
| VERTICAL_TOP | по верхнему краю |
| VERTICAL_CENTER | по центру |
| VERTICAL_JUSTIFY | по высоте |
Пример параметров настройки стилей выравнивания:
array(
	'horizontal' 	=> PHPExcel_Style_Alignment::HORIZONTAL_CENTER,
	'vertical'   	=> PHPExcel_Style_Alignment::VERTICAL_CENTER,
	'rotation'   	=> 0,
	'wrap'       	=> true,
	'shrinkToFit'	=> false,
	'indent'	=> 5
)
Или использовать следующие методы:
$PHPExcel_Style->getAlignment()->setHorizontal(PHPExcel_Style_Alignment::HORIZONTAL_CENTER);
$PHPExcel_Style->getAlignment()->setVertical(PHPExcel_Style_Alignment::VERTICAL_JUSTIFY);
$PHPExcel_Style->getAlignment()->setTextRotation(10);
$PHPExcel_Style->getAlignment()->setWrapText(true);
$PHPExcel_Style->getAlignment()->setShrinkToFit(false);
$PHPExcel_Style->getAlignment()->setIndent(5).
Формат представления данных
Параметр numberformat представляет собой массив, который включает только один параметр: code — формат данных ячейки.
Список возможных форматов
| FORMAT_GENERAL | General |
| FORMAT_TEXT | @ |
| FORMAT_NUMBER | 0 |
| FORMAT_NUMBER_00 | 0.00 |
| FORMAT_NUMBER_COMMA_SEPARATED1 | #,##0.00 |
| FORMAT_NUMBER_COMMA_SEPARATED2 | #,##0.00_- |
| FORMAT_PERCENTAGE | 0% |
| FORMAT_PERCENTAGE_00 | 0.00% |
| FORMAT_DATE_YYYYMMDD2 | yyyy-mm-dd |
| FORMAT_DATE_YYYYMMDD | yy-mm-dd |
| FORMAT_DATE_DDMMYYYY | dd/mm/yy |
| FORMAT_DATE_DMYSLASH | d/m/y |
| FORMAT_DATE_DMYMINUS | d-m-y |
| FORMAT_DATE_DMMINUS | d-m |
| FORMAT_DATE_MYMINUS | m-y |
| FORMAT_DATE_XLSX14 | mm-dd-yy |
| FORMAT_DATE_XLSX15 | d-mmm-yy |
| FORMAT_DATE_XLSX16 | d-mmm |
| FORMAT_DATE_XLSX17 | mmm-yy |
| FORMAT_DATE_XLSX22 | m/d/yy h:mm |
| FORMAT_DATE_DATETIME | d/m/y h:mm |
| FORMAT_DATE_TIME1 | h:mm AM/PM |
| FORMAT_DATE_TIME2 | h:mm:ss AM/PM |
| FORMAT_DATE_TIME3 | h:mm |
| FORMAT_DATE_TIME4 | h:mm:ss |
| FORMAT_DATE_TIME5 | mm:ss |
| FORMAT_DATE_TIME6 | h:mm:ss |
| FORMAT_DATE_TIME7 | i:s.S |
| FORMAT_DATE_TIME8 | h:mm:ss |
| FORMAT_DATE_YYYYMMDDSLASH | yy/mm/dd; @ |
| FORMAT_CURRENCY_USD_SIMPLE | «$»#,##0.00_-;@ |
| FORMAT_CURRENCY_USD | $#,##0_- |
| FORMAT_CURRENCY_EUR_SIMPLE | [$EUR ]#,##0.00_- |
Пример настройки для формата данных ячейки:
array(
	'code' => PHPExcel_Style_NumberFormat::FORMAT_CURRENCY_EUR_SIMPLE
);
А можно и воспользоваться методом:
$PHPExcel_Style->getNumberFormat()->setFormatCode(PHPExcel_Style_NumberFormat::FORMAT_CURRENCY_EUR_SIMPLE);
Защита ячеек
В качестве значения параметра protection выступает массив, который содержит два необязательных параметра:
- locked — защитить ячейку;
- hidden — скрыть формулы.
Пример настройки параметров для защиты ячейки:
array(
	'locked' => true,
	'hidden' => false
);
Или использовать следующие методы:
$PHPExcel_Style->getProtection()->setLocked(true);
$PHPExcel_Style->getProtection()->setHidden(false);
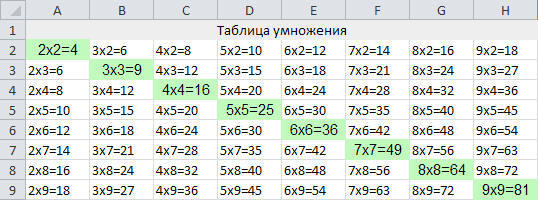
Теперь мы знаем, какие есть настройки стилей и какие присутствуют параметры у каждого стиля. Сейчас мы к ячейкам таблицы применим стиль оформления, но проделаем это тремя способами. Первый способ заключается в создании массива настроек, который в качестве параметра мы передадим в метод applyFromArray, класса PHPExcel_Style.
$style = array(
	'font' => array(
		'name' => 'Arial',
	),
	'fill' => array(
		'type' => PHPExcel_Style_Fill::FILL_SOLID,
		'color' => array (
				'rgb' => 'C2FABD'
		)
	),
	'alignment' => array (
			'horizontal' => PHPExcel_Style_Alignment::HORIZONTAL_CENTER
	)
);
Далее мы применим созданный нами стиль к ячейкам excel.
$sheet->getStyleByColumnAndRow($i - 2, $j)->applyFromArray($style);Сейчас применим тот же стиль, но используя другую методику.
//Устанавливаем выравнивание
$sheet->getStyleByColumnAndRow($i - 2, $j)->getAlignment()->setHorizontal(
    PHPExcel_Style_Alignment::HORIZONTAL_CENTER);
// Устанавливаем шрифт
$sheet->getStyleByColumnAndRow($i - 2, $j)->getFont()->setName('Arial');
// Применяем заливку
$sheet->getStyleByColumnAndRow($i - 2, $j)->getFill()->
    setFillType(PHPExcel_Style_Fill::FILL_SOLID);
$sheet->getStyleByColumnAndRow($i - 2, $j)->getFill()->
    getStartColor()->applyFromArray(array('rgb' => 'C2FABD'));
Вот что у нас получилось:
Для получения данных о стиле конкретной ячейки необходимо использовать один из следующих методов, который вернет экземпляра класса PHPExcel_Style:
- getStyleByColumnAndRow([$pColumn = 0 [, $pRow = 1]]) – применяется если требуется обратиться к ячейке по числовым координатам. Методу необходимо передать два параметра в виде номеров столбца и строки ячейки;
- getStyle([pCellCoordinate = ‘A1’]) – используется для обращения по строковой координате ячейки. Методу требуется передать один параметр, это строковое представление координаты.
А теперь рассмотрим третий способ назначения стиля ячейкам путем дублирования стиля. Пример использования представлен ниже (предполагается, что к ячейке “B2” применен некий стиль и мы его хотим продублировать для диапазона ячеек “F2:F10”):
$sheet->duplicateStyle($sheet->getStyle('B2'), 'F2:F10');
Добавление комментариев
Я думаю, что не часто кто-то пользуется возможностью добавления комментариев к ячейкам, но это сугубо мое личное мнение, однако такая возможность имеется. Добавить комментарий к ячейке довольно просто, что видно из примера ниже:
...

// Стили шрифтов
$fBold = array('name' => 'Tahoma',  'size' => 10, 'bold' => true);
$fNormal = array('name' => 'Tahoma',  'size' => 10);

$richText = $sheet->getComment('B2')->getText();

$richText->createTextRun("Lorem ipsum ")->getFont()->
   applyFromArray($fNormal);
$richText->createTextRun("dolor sit")->getFont()->
   applyFromArray($fBold);
$richText->createTextRun(" amet consectetuer")->getFont()->
   applyFromArray($fNormal);
// Ширина поля комментария
$sheet->getComment('B2')->setWidth('250');
// Высота поля комментария
$sheet->getComment('B2')->setHeight('25');

...
Следует заметить, что при повторном вызове метода createTextRun() новый комментарий добавится к уже существующему, а не заменит его. Следует отметить, что данный метод возвращает объект класса PHPExcel_RichText_Run, у которого имеются методы для установки и получения параметров шрифта:
- getFont() – возвращает объект класса для работы со шрифтами PHPExcel_Style_Font.
- setFont([$pFont = null]))]) – данному методу требуется передать в качестве параметра объект класса PHPExcel_Style_Font.
Вот какой комментарий мы должны получить:

Вставка ссылки
Вставка ссылок в ячейку тоже не вызывает каких-либо затруднений, что можно видеть из нижеописанного примера:
...

// Ссылка на веб-ресурс
$sheet->getCell('A2')->getHyperlink()->setUrl('http://www.phpexcel.net');
// Ссылка на ячейку листа с названием Sheet2
$sheet->getCell('A2')->getHyperlink()->setUrl("sheet://'Sheet2'!D5");

...
Так же в виде ссылки может быть использован, к примеру, email адрес: mailto:example@mail.com.
Чтение данных из Excel
Формировать отчеты и применять к ним стили это конечно отлично. Но на этом возможности библиотеки PHPExcel не заканчиваются. Ну что же, посмотрим на что она еще способна. А способна она еще и читать данные из файлов формата *.xls / *.xlsx.
С помощью библиотеки PHPExcel можно читать следующие форматы:
- Excel 2007;
- Excel 5.0/Excel 95;
- Excel 97 и поздние версии;
- PHPExcel Serialized Spreadshet;
- Symbolic Link;
- CSV.
Для работы нам понадобятся объекты двух классов:
- PHPExcel_Worksheet_RowIterator – используется для перебора строк;
- PHPExcel_Worksheet_CellIterator – используется для перебора ячеек.
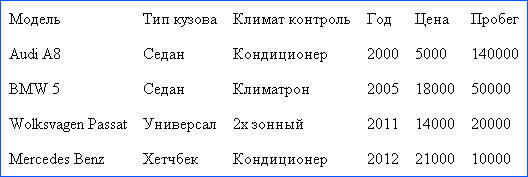
Для демонстрации выведем данные из таблицы с информацией об автомобилях.

Пример чтения файла представлен ниже:
require_once ('PHPExcel/IOFactory.php');

// Открываем файл
$xls = PHPExcel_IOFactory::load('xls.xls');
// Устанавливаем индекс активного листа
$xls->setActiveSheetIndex(0);
// Получаем активный лист
$sheet = $xls->getActiveSheet();
Первый вариант
...

echo "<table>";

// Получили строки и обойдем их в цикле
$rowIterator = $sheet->getRowIterator();
foreach ($rowIterator as $row) {
	// Получили ячейки текущей строки и обойдем их в цикле
	$cellIterator = $row->getCellIterator();

	echo "<tr>";

	foreach ($cellIterator as $cell) {
		echo "<td>" . $cell->getCalculatedValue() . "</td>";
	}

	echo "</tr>";
}
echo "</table>";
Второй вариант
...

echo "<table>";

for ($i = 1; $i <= $sheet->getHighestRow(); $i++) {
    echo "<tr>";

	$nColumn = PHPExcel_Cell::columnIndexFromString(
		$sheet->getHighestColumn());

	for ($j = 0; $j < $nColumn; $j++) {
		$value = $sheet->getCellByColumnAndRow($j, $i)->getValue();
		echo "<td>$value</td>";
	}

    echo "</tr>";
}
echo "</table>";
В первом варианте мы производим чтение данных, из ячеек используя итераторы. А во втором, мы используем индексную адресацию для обращения и получения данных из ячеек листа. Получить данные о количестве строк и столбцов, можно воспользовавшись следующими методами класса PHPExcel_Worksheet:
- getHighestColumn() – возвращает символьное представление последнего занятого столбца в активном листе. Обратите внимание: не индекс столбца, а его символьное представление (A, F и т.д.);
- getHighestRow() – возвращает количество занятых строк в активном листе.
Другие полезные методы
Возможностей по работе с отчетами формата excel с использованием PHP как мы видим, достаточно много. Но мы рассмотрим еще несколько полезных методов, которые могут оказаться весьма полезны в работе:
- getMergeCells() – с помощью данного метода принадлежащего классу PHPExcel_Worksheet можно получить информацию обо всех объединенных ячейках в листе;
- setPreCalculateFormulas([$pCellStyle = true]) – данный метод необходимо использовать если требуется произвести расчет формул в листе (он имеется у двух классов: PHPExcel_Writer_Excel5 и PHPExcel_Writer_Excel2007). В рассматриваемый метод передается параметр типа boolean: true или false (если передать значение true, то расчет формул произойдет перед сохранением файла автоматически, иначе расчета формул не последует). Использование данного метода может оказаться полезным если созданный файл потребуется загрузить, к примеру на Google Drive. Ведь в таком случае расчет формул не будет произведен автоматически указанным сервисом и здесь вся ответственность ложиться на нас;
- stringFromColumnIndex([$pColumnIndex = 0]) – данный метод позволяет определить по номеру столбца его символьное представление, для этого в качестве параметра необходимо передать его номер;
- columnIndexFromString([$pString = ‘A’]) – с помощью данного метода можно определить номер столбца по его символьному представлению, для этого в качестве единственного параметра необходимо передать его обозначение.
Примечание: Методы stringFromColumnIndex и columnIndexFromString примечательны тем, что их можно использовать без создания объекта класса. Пример использования представлен ниже:
PHPExcel_Cell::stringFromColumnIndex(15);
PHPExcel_Cell::columnIndexFromString('A1');
С помощью продемонстрированных возможностей, можно формировать и считывать любые отчеты в виде файлов, формата excel. А также были продемонстрированы почти все возможные методы для работы со стилями.
Export Data to Excel is a popular feature of web applications to allow dynamic data export to Excel file to save locally for further use. If you’re a PHP developer and thinking to implement data export to excel, then you’re here at right place. You will learn here how to implement data export to excel using PHP & MySQL.
In our previous tutorial you have learned how to export data to excel in CodeIgniter, now in this tutorial we will explain how to export data to excel with PHP and MySQL.
We will cover this tutorial step by step to create live demo to implement data export to excel with PHP and MySQL. You can also download complete source code of live.
Also, read:
- Export Data to Excel with PhpSpreadsheet using CodeIgniter
- Export Data to CSV File with PHP and MySQL
- Export HTML Table Data to Excel, CSV and Text with jQuery, PHP and MySQL
So let’s start implementing data export to excel with PHP and MySQL. Before we begin, take a look on files structure for this example.
- index.php:
- export.php:
Step1: Create MySQL Database Table
As we will cover this tutorial with example to export data to Excel file, so first we will create MySQL database table developers to store developer records.
CREATE TABLE `developers` (
  `id` int(11) NOT NULL,
  `name` varchar(255) NOT NULL,
  `skills` varchar(255) NOT NULL,
  `address` varchar(255) NOT NULL,
  `gender` varchar(255) NOT NULL,
  `designation` varchar(255) NOT NULL,
  `age` int(11) NOT NULL,
  `image` varchar(255) NOT NULL
) ENGINE=InnoDB DEFAULT CHARSET=latin1;
We will also insert few records to this table.
INSERT INTO `developers` (`id`, `name`, `skills`, `address`, `gender`, `designation`, `age`, `image`) VALUES
(1, 'Smith', 'Java', 'Newyork', 'Male', 'Software Engineer', 34, 'image_1.jpg'),
(2, 'David', 'PHP', 'London', 'Male', 'Web Developer', 28, 'image_2.jpg'),
(3, 'Rhodes', 'jQuery', 'New Jersy', 'Male', 'Web Developer', 30, 'image_2.jpg'),
(4, 'Sara', 'JavaScript', 'Delhi', 'Female', 'Web Developer', 25, 'image_2.jpg'),
(5, 'Shyrlin', 'NodeJS', 'Tokiyo', 'Female', 'Programmer', 35, 'image_2.jpg'),
(6, 'Steve', 'Angular', 'London', 'Male', 'Web Developer', 28, 'image_2.jpg'),
(7, 'Cook', 'MySQL', 'Paris', 'Male', 'Web Developer', 26, 'image_2.jpg'),
(8, 'Root', 'HTML', 'Paris', 'Male', 'Web Developer', 28, 'image_2.jpg'),
(9, 'William', 'jQuery', 'Sydney', 'Male', 'Web Developer', 23, 'image_2.jpg'),
(10, 'Nathan', 'PHP', 'London', 'Male', 'Web Developer', 28, 'image_2.jpg'),
(11, 'Shri', 'PHP', 'Delhi', 'Male', 'Web Developer', 38, 'image_2.jpg'),
(12, 'Jay', 'PHP', 'Delhi, India', 'Male', 'Web Developer', 30, 'image_3.jpg');
Step2: Get Records from MySQL Database Table
In export.php file, we will get developer records from MySQL database table developers and store into an array.
include_once("db_connect.php");
$sqlQuery = "SELECT name, gender, age, skills, address, designation FROM developers LIMIT 10";
$resultSet = mysqli_query($conn, $sqlQuery) or die("database error:". mysqli_error($conn));
$developersData = array();
while( $developer = mysqli_fetch_assoc($resultSet) ) {
	$developersData[] = $developer;
}
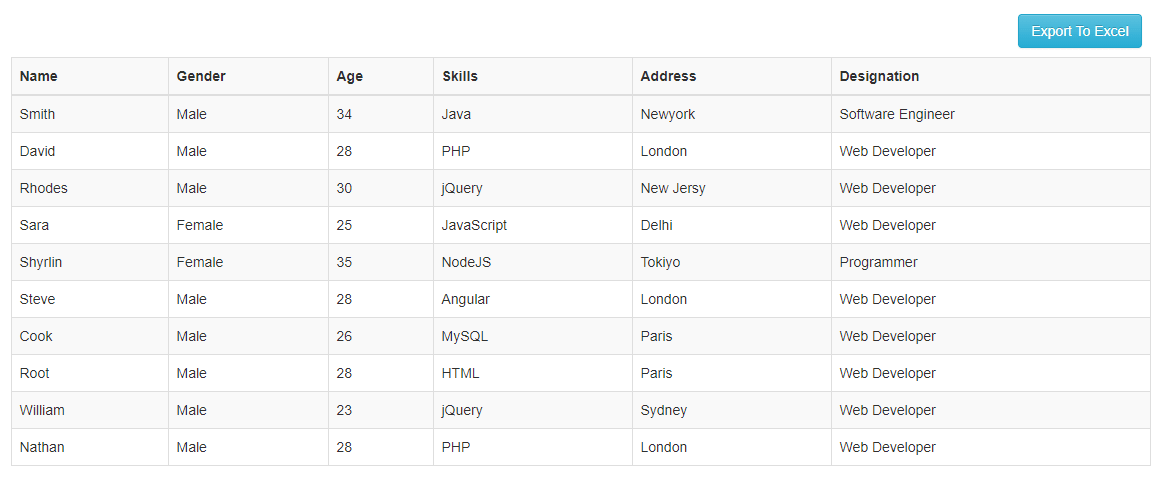
Step3: Display Records with Export to Excel Button
In index.php file, we will display developer records from $developersData array. We will also add data export button to export data.
<div class="container">
	<div class="well-sm col-sm-12">
		<div class="btn-group pull-right">
			<form action="<?php echo $_SERVER["PHP_SELF"]; ?>" method="post">
				<button type="submit" id="dataExport" name="dataExport" value="Export to excel" class="btn btn-info">Export To Excel</button>
			</form>
		</div>
	</div>
	<table id="" class="table table-striped table-bordered">
		<tr>
			<th>Name</th>
			<th>Gender</th>
			<th>Age</th>
			<th>Skills</th>
			<th>Address</th>
			<th>Designation</th>
		</tr>
		<tbody>
			<?php foreach($developersData as $developer) { ?>
			   <tr>
			   <td><?php echo $developer ['name']; ?></td>
			   <td><?php echo $developer ['gender']; ?></td>
			   <td><?php echo $developer ['age']; ?></td>
				<td><?php echo $developer ['skills']; ?></td>
			   <td><?php echo $developer ['address']; ?></td>
			   <td><?php echo $developer ['designation']; ?></td>
			   </tr>
			<?php } ?>
		</tbody>
    </table>
</div>
Step4: Implement Data Export to Excel
Now we will implement export data to excel when export button clicked. We will use $developersData array for data exported and saved into an xlsx file.
<?php
if(isset($_POST["dataExport"])) {
	$fileName = "webdamn_export_".date('Ymd') . ".xls";
	header("Content-Type: application/vnd.ms-excel");
	header("Content-Disposition: attachment; filename="$fileName"");
	$showColoumn = false;
	if(!empty($developersData)) {
	  foreach($developersData as $developerInfo) {
		if(!$showColoumn) {
		  echo implode("t", array_keys($developerInfo)) . "n";
		  $showColoumn = true;
		}
		echo implode("t", array_values($developerInfo)) . "n";
	  }
	}
	exit;
}
?>
You may also like:
- User Management System with PHP & MySQL
- Datatables Add Edit Delete with Ajax, PHP & MySQL
- Build Helpdesk System with jQuery, PHP & MySQL
- Build Online Voting System with PHP & MySQL
- School Management System with PHP & MySQL
- DataTables Add Edit Delete with CodeIgniter
- Create RESTful API using CodeIgniter
- Build Reusable Captcha Script with PHP
- Product Search Filtering using Ajax, PHP & MySQL
- Image Upload and Crop in Modal with jQuery, PHP & MySQL
- Build Push Notification System with PHP & MySQL
- Project Management System with PHP and MySQL
- Hospital Management System with PHP & MySQL
- Build Newsletter System with PHP and MySQL
- Skeleton Screen Loading Effect with Ajax and PHP
- Build Discussion Forum with PHP and MySQL
- Customer Relationship Management (CRM) System with PHP & MySQL
- Online Exam System with PHP & MySQL
- Expense Management System with PHP & MySQL
You can view the live demo from the Demo link and can download the script from the Download link below.
Demo Download