
Excel for Microsoft 365 Excel 2021 Excel 2019 Excel 2016 Excel 2013 Excel 2010 Excel 2007 More…Less
After you’ve imported XML data, mapped the data to cells in your worksheet, and made changes to the data, you often want to export or save the data to an XML file.
Important:
-
Before exporting XML data, you will need to enable the Developer tab on the ribbon. See Show the Developer tab.
-
When creating XML Maps and exporting data in Excel to XML data files, there’s a limit on the number of rows that can be exported. Export to XML from Excel will save a maximum of 65,536 rows. If your file has more than 65,536 rows, Excel will export the first (#ROWS mod 65537) rows. For example, if your worksheet has 70,000 rows, Excel will export 70000 mod 65537 = 4464 rows. Our recommendation is to 1) use xlsx instead or 2) save the file as XML Spreadsheet 2003 (.xml), which will lose the mappings, or 3) delete all rows after 65,536 and then export again which will keep the mappings but lose the data at the end of the file.
Export XML data (with no more than 65,536 rows)
-
Click Developer > Export.
If you don’t see the Developer tab, see Show the Developer tab.
-
If a small Export XML dialog box appears, click the XML Map you want to use, and click OK.
This dialog box only appears if an XML table isn’t selected and if the workbook has more than one XML Map.
-
In the large Export XML dialog box, in the File name box, type a name for the XML data file.
-
Click Export.
Note: If your worksheet has headings or labels that are different from the XML element names in the XML Map, Excel will use the XML element names when you export or save XML data from the worksheet.
Export XML data (for more than 65,536 rows)
-
Subtract 65537 from the total number of rows in your file. This will give you x number of rows.
-
Delete x rows from the beginning of the Excel worksheet.
-
Export the worksheet as an XML data file (see the previous section for the procedure).
-
Click Close but do not save the sheet. Then reopen the Excel worksheet.
-
Delete everything after the total x, and then export as an XML data file (see the previous section for the procedure).
This procedure will give you remainder of the rows. At that point, you will have two XML export files, which you can combine to create a duplicate of your original worksheet.
For backward compatibility with earlier XML functionality, you might want to save the file to an XML data file (.xml) instead of using the Export command.
-
Press Ctrl+S to save your file.
This step ensures that any changes you made to your workbook won’t be lost when the workbook is saved as an XML data file.
-
Click File > Save As, and select the location where you want to save the file.
In Excel 2007 only, click the Microsoft Office Button
 , point to the arrow next to Save As, and then click Other Formats.
 -
In the File name box, type a name for the XML data file.
-
In the Save as type list, click XML Data, and click Save.
-
If you get a message stating that saving the file as XML data may result in the loss of features, click Continue.
-
If a small Export XML dialog box appears, click the XML Map you want to use, and click OK.
This dialog box only appears if an XML table isn’t selected and the workbook has more than one XML Map.
-
In the large Export XML dialog box, in the File name box, type a name for the XML data file.
-
Click Export.
 , point to the arrow next to Save As, and then click Other Formats.
Note: If your worksheet has headings or labels that are different from the XML element names in the XML Map, Excel will use the XML element names when you export or save XML data from the worksheet.
When you export XML data, you may get messages like the ones below.
There may be several reasons for this message:
-
The XML Map that is associated with this XML table has one or more required elements that aren’t mapped to the XML table.
The hierarchical list of elements in the XML source task pane indicates required elements by placing a red asterisk on the top-right corner of the icon to the left of each element. To map a required element, drag it to the worksheet location where you want it to appear.
-
The element is a recursive structure.
A common example of a recursive structure is a hierarchy of employees and managers in which the same XML elements are nested several levels. Although you may have mapped all of the elements in the XML Source task pane, Excel doesn’t support recursive structures that are more than one level deep and therefore can’t map all of the elements.
-
The XML table contains mixed content.
Mixed content occurs when an element has a child element and simple text outside of a child element. One common case is where formatting tags (such as the bold tags) are used to mark up data within an element. Although the child element (if Excel supports it) can be displayed, the text content will be lost when the data is imported, isn’t available when the data is exported, and therefore can’t be round-tripped.
An XML Map can’t be exported if the mapped element’s relationship with other elements can’t be preserved. This relationship may not be preserved for the following reasons:
-
The schema definition of a mapped element is contained within a sequence with the following attributes:
-
The maxoccurs attribute isn’t equal to 1.
-
The sequence has more than one direct child element defined, or has another compositor as a direct child.
-
-
Nonrepeating sibling elements with the same repeating parent element are mapped to different XML tables.
-
Multiple repeating elements are mapped to the same XML table, and the repetition isn’t defined by an ancestor element.
-
Child elements from different parents are mapped to the same XML table.
Additionally, the XML Map can’t be exported if it has one of the following XML schema constructs:
-
List of lists One list of items has a second list of items.
-
Denormalized data An XML table has an element that has been defined in the schema to occur once (the maxoccurs attribute is set to 1). When you add such an element to an XML table, Excel fills the table column with multiple instances of the element.
-
Choice A mapped element is part of a <choice> schema construct.
Excel can’t save your workbook in the XML Data file unless you create one or more mapped ranges.
If you added an XML Map to your workbook, follow these steps to map XML elements to your worksheet:
-
Click Developer > Source.
If you don’t see the Developer tab, see Show the Developer tab.
-
In the XML Source task pane, select the elements you want to map to your worksheet.
To select nonadjacent elements, click one element, hold down CTRL, and then click each element.
-
Drag the selected elements to the worksheet location where you want them to appear.
If you haven’t yet added an XML Map to your workbook, or if your data isn’t in an XML table, save your workbook in the Excel Macro-Enabled Workbook file format (.xlsm).
Need more help?
You can always ask an expert in the Excel Tech Community or get support in the Answers community.
See Also
Overview of XML in Excel
Map XML elements to cells in an XML Map
Need more help?
Microsoft Excel is a useful instrument for organizing and structuring very different data. It can be used to process information by various methods and edit data arrays.
Let us see its tools for generation and processing web applications files. Using a particular example, we will learn the basics of work with XML in Excel.
How to create XML-file in Excel
XML is a file standard for transferring files over the Internet. Excel supports its export and import.
We are going to look through the process of creation an XML-file using factory calendar as a particular example.
- Create a table on which you want to create an XML file in Excel and fill it with data.
- Create and insert a map with the required XML document structure.
- Export the table data in XML format.
Altogether.
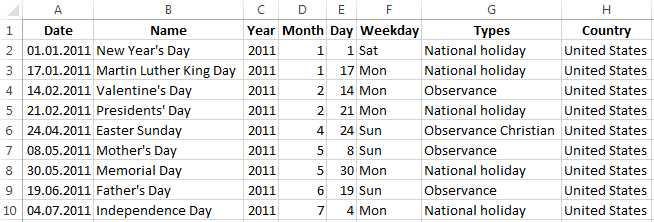
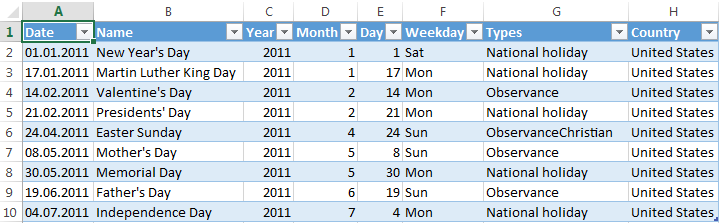
- Our table is a Holiday calendar.
- Create any text editor (such as «Notepad») the desired XML structure to generate a map file is saved. In this example, use the map structure:
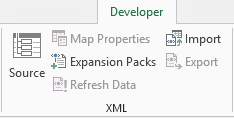
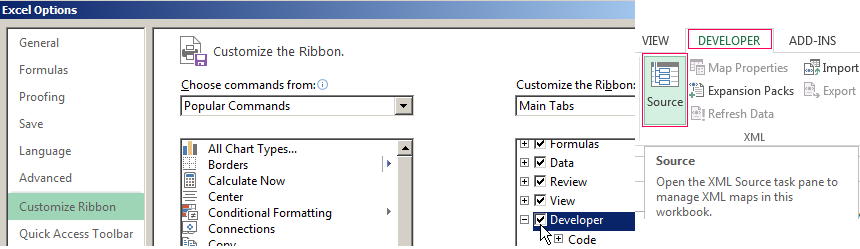
- Open the tool «DEVELOPER». Choose the dialog box «Source» in the XML tab.
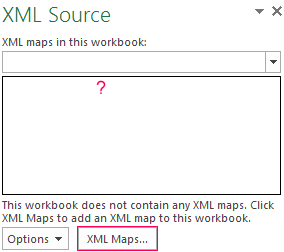
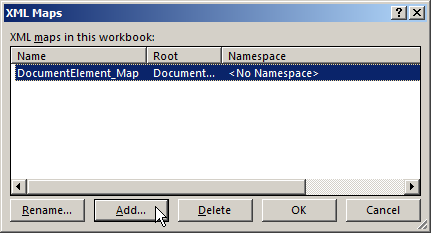
- If Excel cannot see XML maps, they have to be added. Press «XML Maps» button.
- Press «Add». Find your XML file – press ОК.
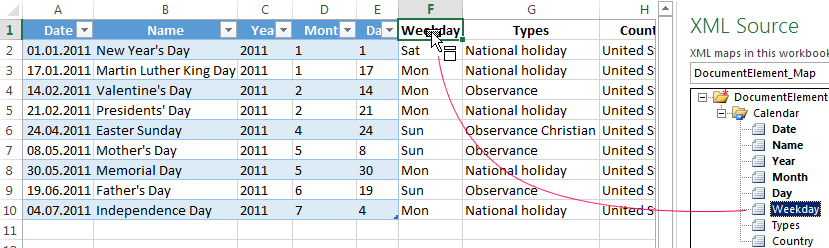
- Elements of the schema will appear in the right column. They have to be dragged to the corresponding column names of the table.
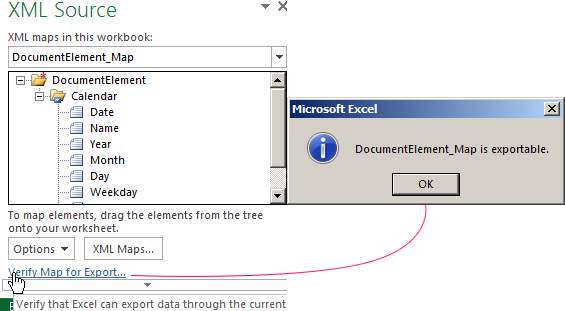
- Check whether the export is possible.
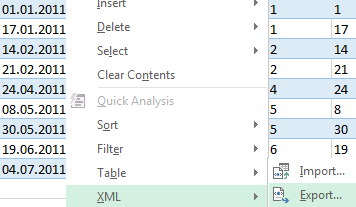
- When all of the elements will be associated, right click any cell on the table and choose XML – Export.
Save the file.
How to save an Excel file in XML format
One of the options:
- Press CTRL+S, choose «Save as» — «Other formats».
- Set the name. Choose the file destination and type – XML.
Press «Save» button.
If you get any errors, try to save the workbook as XML 2003 table or web page. Usually, there are no problems with these formats.
Other options:
- Download XLC to XML converter, or find a service, which exports files online.
- Download XML Tools Add-in from the official Microsoft web site. It is available free of charge.
- Open a new workbook. Press CTRL+O «Open».
How to open an XML file in Excel
- Change the format to XML file. Choose the desired file. Press CTRL+O.
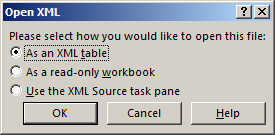
- Open it as an XML-table. Press OK.
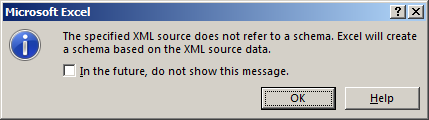
- Similar notification will appear.
- Press OK. You can work with this table the same way as with any Excel file.
How to convert XML file to Excel
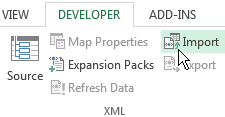
- Open the tool «DEVELOPER». Choose the dialog box «Import».
- Choose a file in the dialog box, that you want to convert.
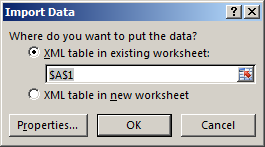
- Press «Import». Excel will offer to create a scheme automatically based on the data received. Press OK. A window will open, where you will need to choose a destination for the importing file.
- Set the range for import. It is better to add extra cells for future entries. Press «OK».
From now on, the created table is being edited and saved in Excel format.
How to collect data from XML-files to Excel
The principle of collecting data from several XML-files is the same as the principle of conversion. When we import data to Excel, the XML map transfers at the same time. You can also transfer other data in this schema.
Each new file will be linked to the existing map. Every element of the table structure binds to an element from XML map. Only one data link is allowed.
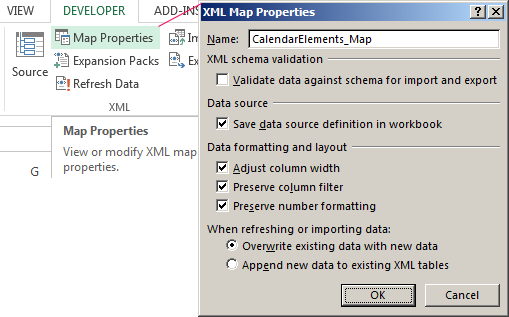
In order to configure binding settings, in the «DEVELOPER» menu choose the «Map Proparties» instrument.
Features:
- Excel will check every new file for compliance with the existing map (if you check the box next to this line).
- The data can be update. Also, new information can be added to the existing table (it makes sense, if you need to collect data from similar files).
Other ways to get structure data (schema):
- Download it from a database of a specialized business application. Commercial sites and services may provide schemas. Simple options are in the public domain.
- Use prepared examples in order to validate the maps. Examples contain the basic elements and structure data. Copy and paste it into the program «Notepad» – and save it with the desired extension.
These are all manual methods of import and export files structure data.
![]()
Download Article
![]()
Download Article
Do you need to convert an XML file to the XLSX or CSV format? Converting XML data files to Excel is super easy—you’ll just need to import the data into a workbook and save the file. As long as you’re using a recent version of Excel (2016 & later for Windows, or 2019 & later for Mac), you can also use Power Query to transform your XML data before making a conversion. This wikiHow will teach you two simple ways to convert any XML file in Excel, including a quick trick you can use if you don’t have Microsoft Excel on your computer.
Things You Should Know
- You can use Excel’s Power Query tool to transform XML data before saving the file in the XLSX format.
- If you’re using Windows, you can import XML files from the web in addition to files already on your computer.
- If Microsoft Excel isn’t installed on your PC or Mac, you can copy and paste the contents of an XML file from a text editor into a web-based converter.
-
1
Open a new blank workbook in Microsoft Excel. You’ll find Excel in your Windows Start menu or your Mac’s Applications. Click Blank workbook on the welcome screen to start fresh.
-
2
Click the Data tab. You’ll see it at the top of Excel.
Advertisement
-
3
Click Get Data. This icon is on the left side of the toolbar at the top of Excel for Windows.
-
4
Select From File (Windows) or Text/CSV (Mac). Choosing this option allows you to select an XML file from your computer or any connected network and cloud drives.
- If you’re using Windows, you can import an XML file from the web instead. Instead of choosing From File, select From Other Sources > From Web, enter the direct URL to the XML file, and then click OK. Then, skip to Step 7.
- If you’re using a Mac, make sure the XML file you want to convert is already saved to your computer. Unlike in Windows, you won’t be able to open XML files from the web in Excel.
-
5
Select From XML (Windows only). This opens your file browser.
-
6
Select the XML file and click Import (Windows) or Next (Mac). The Navigator window will expand.
-
7
Select the XML table name click Load. Choose the file name that has a table icon to its left—you’ll see a preview of the data from that table. When you click Load, the data from the XML file will appear in a brand new sheet in your workbook.
- Windows: If you want to modify anything about the data first, such as column headers, you can click Transform Data instead. Then, make your changes in the Power Query window and click Close & Load at the top-left corner to add the data to a new worksheet.
- Mac: If you want to modify anything about the XML data, click Load first, then launch Power Query by clicking the down-arrow next to the «Get Data» icon in the toolbar and selecting Launch Power Query Editor…. Make changes to your data, then click Close & Load on the Home tab.
-
8
Save the file. You can save the file as an XLSX (Excel Workbook), CSV, or other format. Here’s how:
- Click the File menu and choose Save As.
- Click Browse (Windows) or On My Mac (Mac), then choose a folder.[1]
- Type a name for your workbook.
- If you want to save the file as an Excel XLSX file, choose Excel Workbook from the «Save as type» or «File Format» menu. You can choose any of the formats in the list, including CSV (Comma Delimited).
- Click Save to save the file.


Advertisement
-
1
Go to https://wtools.io/convert-xml-to-excel in a web browser. This free tool makes it easy to convert XML files to the Excel XLSX format even if you don’t have Microsoft Excel installed.
-
2
Open the contents of your XML file in a text editor. To use the online converter, you’ll need to copy the data from the XML file into the form in your browser. Double-clicking the XML file will open it in your default web browser, but the info may not copy correctly this way. To open the file in a text editor, right-click the file, select Open With, then choose a text editor like Notepad (Windows) or TextEdit (Mac).
-
3
Copy the contents of the XML file. To do this, click anywhere in the text editor, then press Control + A (PC) or Command + A (Mac) to highlight everything in the file. Then, press Control + C (PC) or Command + C (Mac) to copy.
-
4
Paste the copied data into the web form. You can do this easily by right-clicking the form and selecting Paste.
-
5
Click the CONVERT & DOWNLOAD button below the form. This creates an XLSX file and downloads the file to your computer.
- Depending on your settings, you might have to select a save location and click Save or OK to start the download.


Advertisement
Our Most Loved Articles & Quizzes
Ask a Question
200 characters left
Include your email address to get a message when this question is answered.
Submit
Advertisement
Video
Thanks for submitting a tip for review!
About This Article
Article SummaryX
1. Open the file in Excel.
2. Click File.
3. Click Save As.
4. Change the file type to .CSV.
5. Click Save.
Did this summary help you?
Thanks to all authors for creating a page that has been read 247,430 times.
Is this article up to date?
Добавить это приложение в закладки
Нажмите Ctrl + D, чтобы добавить эту страницу в избранное, или Esc, чтобы отменить действие.
Отправьте ссылку для скачивания на
Отправьте нам свой отзыв
Ой! Произошла ошибка.
Недопустимый файл. Убедитесь, что загружается правильный файл.
Ошибка успешно зарегистрирована.
Вы успешно сообщили об ошибке. Вы получите уведомление по электронной почте, когда ошибка будет исправлена.
Нажмите эту ссылку, чтобы посетить форумы.
Немедленно удалите загруженные и обработанные файлы.
Вы уверены, что хотите удалить файлы?
Введите адрес
Итак, прежде чем узнать, как открыть, создать или перевести файл XML в Excel и обратно, давайте поближе познакомимся с типами этих файлов. Здесь нужно сразу отметить, что документы Excel имеют множество форматов, в то время, как XML — и есть формат файла. Поэтому не стоит путать эти два понятия.

Microsoft Excel является мощной программой для вычислений с множеством полезных функций
Программа Microsoft Excel является специальной утилитой, предназначенной для создания и редактирования таблиц. С ними вы уже можете делать всё что угодно: создавать базы, диаграммы, формулы и другие типы данных. Это очень мощный инструмент, поэтому все его возможности мы обсуждать не будем. Сегодня наша цель несколько другая, и мы не станем отходить от темы сегодняшней дискуссии.
Файлы XML, для более простого понимания, предназначены для хранения, обмена различных данных между утилитами. Особенно часто пользуются этим языком разметки при передаче информации через интернет. И когда вам нужно перенести табличные данные из Экселя на сайт, например, то вам нужно будет преобразовать свой документ, чтобы он правильно отображался. Поэтому давайте не будем оттягивать момент истины и сразу приступим к выполнению операции.
Предназначение конвертера XLS в XML
Конвертер предназначен для розничных продавцов алкогольных напитков и пива, которым поставщики присылают таблицы с объемами продаж в EXCEL-файлах, а, как известно, в программу Декларант-Алко можно загрузить информацию только из файлов XML.
Главная цель конвертера – облегчить работу сотруднику, подготавливающему декларации №11 и №12. Его использование дает следующие преимущества:
- исключена необходимость в монотонной работе по ручному набору строк в таблицу №2;
- многократный рост скорости подготовки деклараций;
- отсутствуют механические ошибки, возможные при ручном наборе.
Автор конвертера использовал его в течение 2 лет вплоть до закрытия предприятия в 2020 году, что позволяло легко отчитываться перед Росалкогольрегулированием.
Как преобразовать Excel в XML
Дорогие друзья, на самом деле преобразование файлов является достаточно простым занятием. Однако, у некоторых пользователей могут возникнуть проблемы при переносе данных, поэтому сегодня мы с вами рассмотрим несколько способов для осуществления нашего замысла. Поэтому набираемся терпения и приступаем к действиям:
- Самый простой способ, который может не сработать в некоторых случаях, это сохранение файла в нужном формате в самой программе Microsoft Excel. Для этого откройте необходимый документ в этом приложении. Затем нажмите на кнопку «Файл» (рассматривается на примере Office 2013, в других версиях процесс сохранения может несколько отличаться) в верхнем левом углу окна Экселя, затем пункт «Сохранить как», после чего выберите место сохранения документа, дайте ему имя и во вкладке типа файла укажите «XML данные». После этого проверьте, правильно ли всё у вас получилось. Если нет, то пробуем следующие способы.
- Итак, если возникает ошибка в предыдущем случае, то, возможно, в вашей копии программы не предусмотрена поддержка и соответствующие надстройки. Чтобы их установить перейдите на сайт компании Microsoft https://www.microsoft.com/en-us/download/details.aspx?displaylang=en&id=3108, скачайте и инсталлируйте этот файл к себе на компьютер или ноутбук. Далее, запустите программу Microsoft Excel и нажмите на большую цветную кнопку в левом верхнем углу окна приложения (здесь мы уже смотрим пример на версии 2007-го года). В появившемся блоке кликните по параметрам, слева от выхода из утилиты. Теперь зайдите в пункт надстроек и нажмите на кнопку «Перейти» напротив пункта «Управление». Выскочит диалоговое окно, где нужно кликнуть по обзору и найти документ, который вы скачали с сайта Майкрософта ранее. Теперь кликаем ОК и переходим в основное окно программы, где у вас теперь есть вкладка XML Tools — с помощью него теперь вы спокойно можете создать файл XML из существующей таблицы. Сохранять его нужно аналогично предыдущему пункту.
- Если вам совсем не хочется загружать и себя, и свой компьютер такой информацией, то можете прибегнуть к помощи специальных утилит-конвертеров или онлайн-версий этих программ. К примеру, вы можете загрузить приложение Format Factory, которое позволит вам совершить все необходимые действия. Но стоит помнить, что сохранённые и преобразованные таким образом файлы не всегда работают в дальнейшем. То есть во время операции могут повредиться сектора или области в памяти документа, что негативно скажется на нём — он попросту может не открыться в XML-редакторе, например. Поэтому рекомендуется использовать либо профессиональные программы, либо сам Microsoft Excel.

Семинар «Серверные технологии» — разработка AI(All Inclusive)-проекта Упражнение 6. Экспорт таблиц Excel в формат XML
1. Создайте в Excel 2007 таблицу, как показано на рис.1

Рис.1 Данные для экспорта в формат XML
2. Перейдите на закладку РАЗРАБОТЧИК и в списках элементов управления формы выберите и разместите в левом верхнем углу таблицы элемент ActiveX КНОПКА — рис.2

Рис.2 Выбираем элемент ActiveX КНОПКА
3. Правой кнопкой мыши откройте окно СВОЙСТВА элемента и в строке Caption впишите новое наименование кнопки: Экспорт в XML — рис.3

Рис.3 Меняем наименование кнопки в окне свойств
4. Правой кнопкой мыши откройте ИСХОДНЫЙ ТЕКСТ элемента и скопируйте туда следующий код:
Private Sub CommandButton1_Click() Dim Заголовок As Range, Данные As Range Set Заголовок = Range(«A1:F1») Set Данные = Range([A2], Range(«A» & Rows.Count).End(xlUp)).Resize(, Заголовок.Columns.Count)
arrHeaders = Application.Transpose(Application.Transpose(Заголовок.Value)) ПутьКФайлуXML = ThisWorkbook.Path & «result.xml»
‘ формируем DOMDocument, и сохраняем XML в файл result.xml Array2XML(Данные.Value, arrHeaders, «Root»).Save ПутьКФайлуXML
If Err = 0 Then MsgBox «Создан XML файл» & vbNewLine & ПутьКФайлуXML, vbInformation, «Готово» End Sub
Function Array2XML(ByVal arrData, ByVal arrHeaders, ByVal strHeading$) As DOMDocument ‘надо в Tools — References подключить библиотеки Microsoft HTML Object Library ‘и Microsoft XML version 3.0. ‘ получает в качестве параметров: ‘ двумерный массив arrData с данными для выгрузки, ‘ одномерный массив arrHeaders, содержащий заголовки столбцов, ‘ и strHeading$ — XML-константу объекта Dim xmlDoc As DOMDocument, xmlFields As IXMLDOMElement, xmlField As IXMLDOMElement Set xmlDoc = CreateObject(«Microsoft.XMLDOM») ‘ создаём новый DOMDocument
DataColumnsCount% = UBound(arrData, 2) — LBound(arrData, 2) + 1 HeadersCount% = UBound(arrHeaders) — LBound(arrHeaders) + 1 If DataColumnsCount% <> HeadersCount% Then MsgBox «Количество заголовков в массиве arrHeaders» & _ «не соответствует количеству столбцов массива», vbCritical, «Ошибка создания XML»: End
xmlDoc.LoadXML Replace(«<» + strHeading + «/>», » «, «_») ‘ записываем XML-константу объекта
For i = LBound(arrData) To UBound(arrData) ‘ создание нового узла Set xmlFields = xmlDoc.DocumentElement.appendChild(xmlDoc.createElement(«Row»))
For j = LBound(arrHeaders) To UBound(arrHeaders) ‘ добавление полей в узел Set xmlField = xmlFields.appendChild(xmlDoc.createElement(Replace(arrHeaders(j), » «, «_»))) xmlField.Text = arrData(i, j + LBound(arrData, 2) — LBound(arrHeaders)) Next j Next i
Set Array2XML = xmlDoc End Function
ОБЯЗАТЕЛЬНО.Надо в Tools — References подключить библиотекиMicrosoft XML version 3.0. и Microsoft HTML Object Library — рис.5
Рис.4 Подключаем библиотеку HTML
Закройте редактор Visual Basic: File -> Close and Return to Microsoft Excel
5. Сохраните файл в формате XLSM, поддерживающем исполнение макросов — рис.5

Рис.5 Сохраняем файл с поддержкой макросов
6. Выключите РЕЖИМ КОНСТРУКТОРА и нажмите кнопку [Экспорт в XML] — таблица Excel будет выведена в файл RESULT.XML. Откройте файл с помощью браузера IE. Содержимое файла будет представлено в виде, как на рис.6

Рис.6. Просмотр файла XML в браузере IE
Обратите внимание на теги — внутри строки таблицы (Row и /Row) перечисляются строки с названиями столбцов (полей таблицы). В свою очередь, внутри строк c наименованиями столбцов содержатся значения полей таблицы.
6. Обратная конвертация файлов XML в XLS уже предусмотрена в Excel — достаточно в операционной системе правой кнопкой мыши открыть файл *.XML с помощью Excel.
Как перевести XML в Excel
Прежде чем перевести XML в Excel, нужно его для начала открыть. Рассмотрим весь этот непродолжительный процесс ниже. Итак, приступаем:
- Запустите программу Microsoft Excel с помощью ярлыка на рабочем столе или через меню проводника.
- Нажмите на «Открыть другие книги» внизу главной страницы, если вы используете Office В других версиях процесс может несколько отличаться.
- Далее, нажимаем на «Компьютер» или другое место, где расположен ваш XML-файл, затем кликните «Обзор» и смените в появившемся окне тип данных на «Файлы XML».
- Теперь ищем необходимый файл и открываем его в нашей программе с помощью одноимённой кнопки.
- Далее, обсудим то, как преобразовать наш документ. Перейдите во вкладку разработчика, затем нажмите на кнопку импорта.
- В открывшемся окне нужно будет снова найти и выбрать наш документ, над которым вы и хотите произвести действие, затем кликаем на кнопку «Импорт».
- Затем настраиваете всё под себя: область для импорта, место сохранения и другие параметры. После чего вы получите таблицу, которую позже можно сохранить в нужном для вас формате. Как видите, ничего сложного нет.
Создаем фид для Google Merchant Center
Если у вас уже есть созданный YML из CMS, из него можно будет взять все значения нужных нам тегов товаров (названия, цены, ссылки, картинки и другие). Также подойдут те же файлы, которые были сделаны вручную по инструкции выше. Открываем файл for-merchant из папки merchant в Excel и заполняем все необходимые поля. После этого между тегами и добавляем этот фрагмент: Где:
- title — название магазина
- link — ссылка на сайт;
- description — описание магазина;
- language — язык;
- lastBuildDate — время генерации.
В конце документа добавляем два закрывающих тега: Далее в NotePad++ потребуется открыть функцию «Найти и заменить», ввести ggggg и заменить на g:.

Подведём итоги
Дорогие читатели, сегодня мы с вами узнали не только как преобразовать файлы XML в Excel и обратно, но и как создать и открыть их при несовместимости версий. Надеемся, что у вас всё получилось и больше не осталось никаких вопросов. Не забываем делиться в комментариях своим мнением и опытом: возможно, вы знаете простой способ конвертации. Расскажите другим пользователям, получилось ли у вас перевести один тип документа. Если сработало, то поделитесь тем, каким способом воспользовались вы.
Как создать XML-файл из Excel
XML – стандарт файла для передачи данных в Сети. Excel поддерживает его экспорт и импорт.
Рассмотрим создание XML-файла на примере производственного календаря.
- Сделаем таблицу, по которой нужно создать XML файл в Excel и заполним ее данными.
- Создадим и вставим карту XML с необходимой структурой документа.
- Экспортируем данные таблицы в XML формат.
Итак.
- Наша таблица – производственный календарь.
- Создаем в любом текстовом редакторе (например, «Блокнот») желаемую карту XML структуры для генерации файла сохраним. В данном примере буде использовать следующую карту структуры:
- Открываем инструмент «Разработчик». Диалоговое окно «Источник» на вкладке XML.
- Если программа Excel не видит карт XML, их нужно добавить. Жмем «карты XML». И указываем путь к нашему файлу с выше указанной схемой карты созданной в текстовом редакторе.
- Добавить ОК.
- В правой колонке появляются элементы схемы. Их нужно перетащить на соответствующие названия столбцов таблицы.
- Проверяем возможен ли экспорт.
- Когда все элементы будут сопоставлены, щелкаем правой кнопкой мыши по любой ячейке в таблице – XML – экспорт.
Сохраняем в XML файл.
Другие способы получения XML-данных (схемы):
- Скачать из базы данных, специализированного бизнес-приложения. Схемы могут предоставляться коммерческими сайтами, службами. Простые варианты находятся в открытом доступе.
- Использовать готовые образцы для проверки карт XML. В образцах – основные элементы, структура XML. Копируете – вставляете в программу «Блокнот» — сохраняете с нужным расширением.
Краткая справка:
Microsoft Excel — Программа для работы с электронными таблицами. Она предоставляет возможности экономико-статистических расчетов, графические инструменты и язык макропрограммирования VBA (Visual Basic for Application).
Visual Basic for Applications (VBA, Visual Basic для приложений) — немного упрощённая реализация языка программирования Visual Basic, встроенная в линейку продуктов Microsoft Office, а также во многие другие программные пакеты.
XML(англ. eXtensible Markup Language — расширяемый язык разметки). XML — язык с простым формальным синтаксисом, удобный для создания и обработки документов программами и одновременно удобный для чтения и создания документов человеком. Разработчик волен создать разметку в соответствии с потребностями к конкретной области, будучи ограниченным лишь синтаксическими правилами языка.
( 2 оценки, среднее 5 из 5 )