
Export data to Excel with ASP.NET Core
A while ago I had to export some data to Excel from an ASP.NET Core website. I have implemented a lot of exporting in the past with ASP.NET and C# in general, it was fun to explore different options and port them to ASP.NET Core. In this post, I’ll show you how you can generate Excel files using the ClosedXML library.
When needing to export data to Excel, you have a couple of different options. If you need simple tabular data, generating a CSV file may be sufficient. If you need to embed colors, hyperlinks, and formulas, you will need something more advanced. Let’s start simple with CSV files.
For the examples in this post, I’ll be using ASP.NET Core on .NET 5, with some hard-coded data. In a real-world application, this data would come from user input, or a database, etc. To keep things simple, I’ll walk you through some code snippets, you can find the complete code on Github.
The Data Model
Say we have a User model with the following properties:
public class User
{
  public int Id { get; set; }

  public string Username { get; set; }

  public string Email { get; set; }

  public string SerialNumber { get; set; }

  public DateTime JoinedOn { get; set; }
}
And let’s say we have a HomeController where we’ll hard-code a collection of users to work with:
public class HomeController : Controller
{
private readonly List<User> users = new()
{
new User
{
Id = 1,
Username = "ArminZia",
Email = "armin.zia@gmail.com",
SerialNumber = "NX33-AZ47",
JoinedOn = new DateTime(1988, 04, 20)
},
new User
{
Id = 2,
Username = "DoloresAbernathy",
Email = "dolores.abernathy@gmail.com",
SerialNumber = "CH1D-4AK7",
JoinedOn = new DateTime(2021, 03, 24)
},
new User
{
Id = 3,
Username = "MaeveMillay",
Email = "maeve.millay@live.com",
SerialNumber = "A33B-0JM2",
JoinedOn = new DateTime(2021, 03, 23)
},
new User
{
Id = 4,
Username = "BernardLowe",
Email = "bernard.lowe@hotmail.com",
SerialNumber = "H98M-LIP5",
JoinedOn = new DateTime(2021, 03, 10)
},
new User
{
Id = 5,
Username = "ManInBlack",
Email = "maininblack@gmail.com",
SerialNumber = "XN01-UT6C",
JoinedOn = new DateTime(2021, 03, 9)
}
};
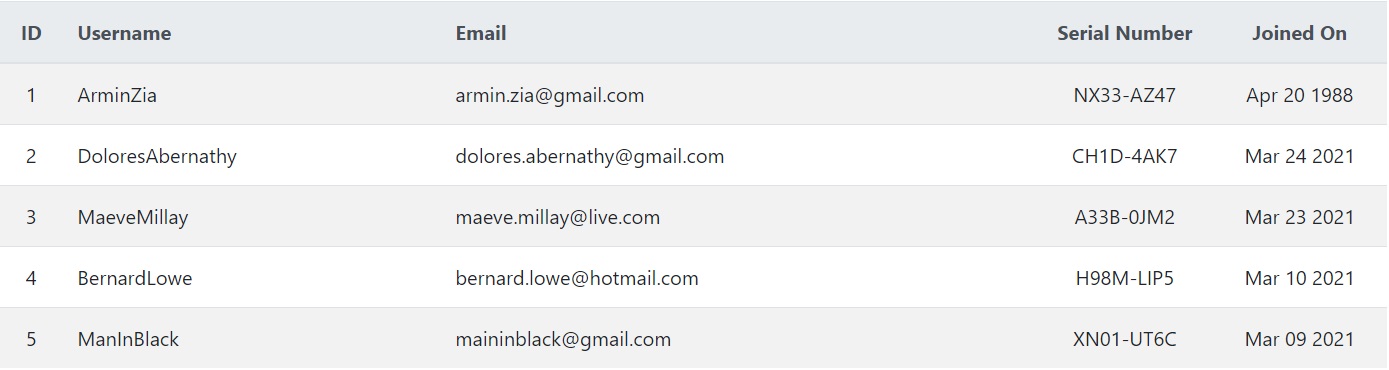
}The users’ collection looks like this:
Export to CSV
The simplest way to export data is to generate a comma-separated values (CSV) file. There are NuGet packages to help you with that — like CsvHelper — but in this post, I’ll create the CSV file manually. Consider the following action method:
public IActionResult Csv()
{
var builder = new StringBuilder();
builder.AppendLine("Id,Username,Email,JoinedOn,SerialNumber");
foreach (var user in users)
{
builder.AppendLine($"{user.Id},{user.Username},{user.Email},{user.JoinedOn.ToShortDateString()},{user.SerialNumber}");
}
return File(Encoding.UTF8.GetBytes(builder.ToString()), "text/csv", "users.csv");
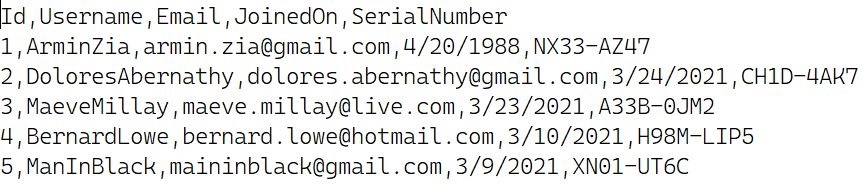
}First, we create a StringBuilder, available in the System.Text namespace. In CSV files, the first line defines the headers. Then we iterate through the users’ collection, and for each user, we write a line. Finally, we return a File result with the resulting string as the file content, text/csv as the MIME type, and users.csv as the filename. This action method is a GET method, so the browser will automatically download the content as a CSV file named users.csv.
The CSV file (opened in Notepad) looks like this:
Export to Excel (XLSX)
CSV files are great because they’re text files, easy to work with, and they work everywhere. But if you need more features like embedding colors and hyperlinks, creating sheets, etc. you’d need another file format. Since XLSX files are XML-based, you can generate the content yourself. That’s not recommended though, XLSX is a huge specification and there are many NuGet packages to help you. I’ll use ClosedXML because I like the API and its ease of use, but there are other packages like EPPlus and DocumentFormat.OpenXml too.
First, you need to install the NuGet package:
Install-Package ClosedXMLNext, we’ll create an action method to generate an XLSX file. ClosedXML provides a rich set of features, make sure to check out the documentation to learn more. The following code formats the output like in the CSV example. Later in this post, I’ll show you how you can format the output with more options.
public IActionResult Excel()
{
using var workbook = new XLWorkbook();
var worksheet = workbook.Worksheets.Add("Users");
var currentRow = 1;
worksheet.Cell(currentRow, 1).Value = "Id";
worksheet.Cell(currentRow, 2).Value = "Username";
worksheet.Cell(currentRow, 3).Value = "Email";
worksheet.Cell(currentRow, 4).Value = "Serial Number";
worksheet.Cell(currentRow, 5).Value = "Joined On";
foreach (var user in users)
{
currentRow++;
worksheet.Cell(currentRow, 1).Value = user.Id;
worksheet.Cell(currentRow, 2).Value = user.Username;
worksheet.Cell(currentRow, 3).Value = user.Email;
worksheet.Cell(currentRow, 4).Value = user.SerialNumber;
worksheet.Cell(currentRow, 5).Value = user.JoinedOn.ToShortDateString();
}
using var stream = new MemoryStream();
workbook.SaveAs(stream);
var content = stream.ToArray();
return File(content, "application/vnd.openxmlformats-officedocument.spreadsheetml.sheet", "users.xlsx");
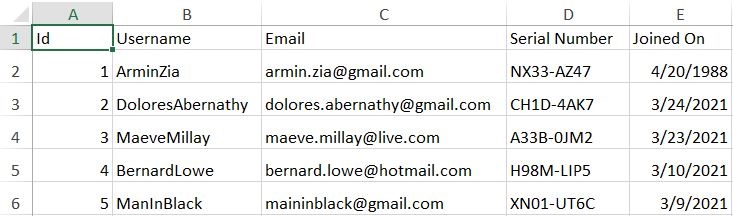
}Let’s examine the code and see what we’re doing here. To create an Excel document, we first create an XLWorkbook instance. On line 4, we create a worksheet named Users. The code is pretty simple and straightforward, first, we create the header row. Similar to the CSV example, we output the columns in the header row. Then we iterate through the users’ collection and for each user, we create a new row. You access rows and columns using the worksheet instance. Finally, we save the workbook to a MemoryStream, and return the content as a File result. The MIME type is application/vnd.openxmlformats-officedocument.spreadsheetml.sheet and the filename is users.xlsx.
The XLSX document (opened in Microsoft Office Excel) looks like this:
Formatting the XLSX document
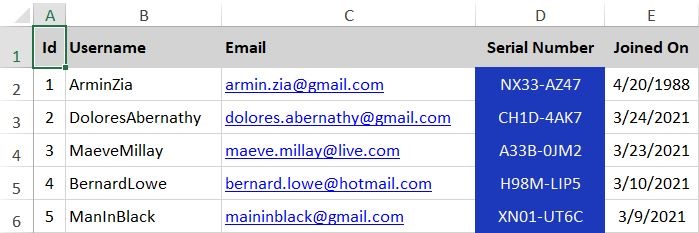
You’ll notice that the Excel document is not formatted, we’re just writing the values to the file. ClosedXML is a .NET library with an intuitive and user-friendly interface for dealing with the underlying OpenXML API. You could create advanced spreadsheets with charts and formulas, basically, everything (almost everything) that Microsoft Excel offers. Be sure to read the wiki on Github, you can find FAQs and guides about everything you can do with ClosedXML, a great time saver. In the following section, I’ll show you a basic example of how you can format the document with colors and styling. Here’s what we’re going to achieve:
- Format the headers row with a background color, and a bold font
- Format the Id, Serial Number, and Joined On columns to be center-aligned horizontally
- Format the Serial Number column with a background and font color
- Add hyperlinks to the Email values
Here’s the updated code for the Excel action method:
public IActionResult Excel()
{
  using var workbook = new XLWorkbook();
  var worksheet = workbook.Worksheets.Add("Users");
  var currentRow = 1;

  worksheet.Row(currentRow).Height = 25.0;
  worksheet.Row(currentRow).Style.Font.Bold = true;
  worksheet.Row(currentRow).Style.Fill.BackgroundColor = XLColor.LightGray;
  worksheet.Row(currentRow).Style.Alignment.Vertical = XLAlignmentVerticalValues.Center;

  worksheet.Cell(currentRow, 1).Value = "Id";
  worksheet.Cell(currentRow, 1).Style.Alignment.Horizontal = XLAlignmentHorizontalValues.Center;

  worksheet.Cell(currentRow, 2).Value = "Username";
  worksheet.Cell(currentRow, 3).Value = "Email";

  worksheet.Cell(currentRow, 4).Value = "Serial Number";
  worksheet.Cell(currentRow, 4).Style.Alignment.Horizontal = XLAlignmentHorizontalValues.Center;

  worksheet.Cell(currentRow, 5).Value = "Joined On";
  worksheet.Cell(currentRow, 5).Style.Alignment.Horizontal = XLAlignmentHorizontalValues.Center;

  foreach (var user in users)
  {
    currentRow++;

    worksheet.Row(currentRow).Height = 20.0;
    worksheet.Row(currentRow).Style.Alignment.Vertical = XLAlignmentVerticalValues.Center;

    worksheet.Cell(currentRow, 1).Value = user.Id;
    worksheet.Cell(currentRow, 1).Style.Alignment.Horizontal = XLAlignmentHorizontalValues.Center;

    worksheet.Cell(currentRow, 2).Value = user.Username;

    worksheet.Cell(currentRow, 3).Value = user.Email;
    worksheet.Cell(currentRow, 3).Hyperlink.ExternalAddress = new Uri($"mailto:{user.Email}");

    worksheet.Cell(currentRow, 4).Value = user.SerialNumber;
    worksheet.Cell(currentRow, 4).Style.Alignment.Horizontal = XLAlignmentHorizontalValues.Center;
    worksheet.Cell(currentRow, 4).Style.Fill.BackgroundColor = XLColor.PersianBlue;
    worksheet.Cell(currentRow, 4).Style.Font.FontColor = XLColor.WhiteSmoke;

    worksheet.Cell(currentRow, 5).Value = user.JoinedOn.ToShortDateString();
    worksheet.Cell(currentRow, 5).DataType = XLDataType.DateTime;
    worksheet.Cell(currentRow, 5).Style.Alignment.Horizontal = XLAlignmentHorizontalValues.Center;

    worksheet.Columns().AdjustToContents();
  }

  using var stream = new MemoryStream();
  workbook.SaveAs(stream);
  var content = stream.ToArray();

  return File(content, "application/vnd.openxmlformats-officedocument.spreadsheetml.sheet", "users.xlsx");
}
The code is self-explanatory, make sure to checkout ClosedXML’s documentation though, but let’s see what’s going on.
Formatting the headers row
worksheet.Row(currentRow).Height = 25.0;
worksheet.Row(currentRow).Style.Font.Bold = true;
worksheet.Row(currentRow).Style.Fill.BackgroundColor = XLColor.LightGray;
worksheet.Row(currentRow).Style.Alignment.Vertical = XLAlignmentVerticalValues.Center;

worksheet.Cell(currentRow, 1).Value = "Id";
worksheet.Cell(currentRow, 1).Style.Alignment.Horizontal = XLAlignmentHorizontalValues.Center;

worksheet.Cell(currentRow, 2).Value = "Username";
worksheet.Cell(currentRow, 3).Value = "Email";

worksheet.Cell(currentRow, 4).Value = "Serial Number";
worksheet.Cell(currentRow, 4).Style.Alignment.Horizontal = XLAlignmentHorizontalValues.Center;

worksheet.Cell(currentRow, 5).Value = "Joined On";
worksheet.Cell(currentRow, 5).Style.Alignment.Horizontal = XLAlignmentHorizontalValues.Center;
The rows (IXLRow) and cells (IXLCell) allow you to change the styling options and configure each instance. Setting vertical/horizontal alignments, changing font properties, etc. is as easy as setting a few properties.
Adding hyperlinks to email addresses
To add a hyperlink to a cell value, you create a Uri instance and assign it to the Hyperlink.ExternalAddress property of the cell.
worksheet.Cell(currentRow, 3).Value = user.Email;
worksheet.Cell(currentRow, 3).Hyperlink.ExternalAddress = new Uri($"mailto:{user.Email}");
Adjusting columns to content
The first example had an issue. The columns weren’t adjusted to fit their contents. That’s easy to fix with ClosedXML:
worksheet.Columns().AdjustToContents();This line adjusts all columns to fit their contents. The end result looks like the following:
ClosedXML Extensions
ClosedXML has several extension projects, make sure to check them out:
- ClosedXML.Report
- ClosedXML.Extensions.AspNet
- ClosedXML.Extensions.Mvc
- ClosedXML.Extensions.WebApi
Sample project on Github
You can find the source code for this post on Github. The project was created with Visual Studio 2019 Community Edition running .NET 5. You can run the project using Visual Studio, or the dotnet CLI.
Updated at Wed Mar 24, 2021
Table of Contents
- Introduction
- Configuration and Process
- Using the Code
- Download
Introduction
This article introduces how to export data to an Excel file. Most of the back-end applications have report functionality that shows the data in the grid. So, we are required to export this grid data into an Excel file. The export to Excel functionality is
implemented using the EPPlus NuGet package, as shown in this example.
Configuration and Process
We install EPPlus NuGet package in the application. The EPPlus is a library to manage Excel spreadsheets using OOXML. The OOXML stands for Office Open Extended Markup Language and is also called Open XML. The OOXML is developed by Microsoft. It has by default
target file formats for Microsoft office.
The EPPlus is a NuGet package and can be installed from Manage NuGet Packages window, as shown in figure 1. The package is available
here also.

Figure 1: Install EPPlus NuGet
When we use ORM in our application, we keep most of the data in the collection which easily converts it into a list. The list can’t be exported to the Excel directly. That’s why we need to convert this list into a data table first. After that, this data
table can be exported in the Excel file as shown in figure 2.

Figure 2: Process Export to Excel
Using the Code
As per the above process, we need four operations here. These are as follows,
- Data: We use static data to keep this example simple.
- List: Static data store in a List.
- Data Table : Convert List in to DataTable.
- Export: DataTable exports to excel file.
First of all, we create a class, so that we can have a collection of similar data. The following code snippet is for Technology class.
namespace
ExportExcel.Code
{
public
class
Technology
{
public
string
Name { get;
set; }
public
int
Project { get;
set; }
public
int
Developer { get;
set; }
public
int
TeamLeader { get;
set; }
}
}
Now, we create a static data list of Technology types in that StaticData class, as per the following code snippet.
using
System.Collections.Generic;
namespace
ExportExcel.Code
{
public
class
StaticData
{
public
static
List<Technology> Technologies
{
get
{
return
new
List<Technology>{
new
Technology{Name="ASP.NET", Project=12,Developer=50, TeamLeader=6},
new
Technology{Name="Php", Project=40,Developer=60, TeamLeader=9},
new
Technology{Name="iOS", Project=11,Developer=5, TeamLeader=1},
new
Technology{Name="Android", Project=20,Developer=26, TeamLeader=2}
};
}
}
}
}
This data will be used to export to Excel. After that, we create export to excel functionality helper class which has the following features.
- Convert List to DataTable method
- Customize the columns which need to export means dynamically choose columns which will be export from list to Excel.
- Serial number in Excel sheet.
- Add and Remove functionality for the custom heading in Excel sheet.
- Excel sheet heading with colors.
- Dynamic name for worksheet.
The following code snippet is used for the class ExcelExportHelper
using
OfficeOpenXml;
using
OfficeOpenXml.Style;
using
System;
using
System.Collections.Generic;
using
System.ComponentModel;
using
System.Data;
using
System.Linq;
namespace
ExportExcel.Code
{
public
class
ExcelExportHelper
{
public
static
stringExcelContentType
{
get
{
return
"application/vnd.openxmlformats-officedocument.spreadsheetml.sheet"; }
}
public
static
DataTable ListToDataTable<T>(List<T> data)
{
PropertyDescriptorCollection properties = TypeDescriptor.GetProperties(typeof(T));
DataTable dataTable =
new
DataTable();
for
(int
i = 0; i < properties.Count; i++)
{
PropertyDescriptor property = properties[i];
dataTable.Columns.Add(property.Name, Nullable.GetUnderlyingType(property.PropertyType) ?? property.PropertyType);
}
object[] values =
new
object[properties.Count];
foreach
(T item in
data)
{
for
(int
i = 0; i < values.Length; i++)
{
values[i] = properties[i].GetValue(item);
}
dataTable.Rows.Add(values);
}
return
dataTable;
}
public
static
byte[] ExportExcel(DataTable dataTable, string
heading = "",
bool
showSrNo = false,
params
string[] columnsToTake)
{
byte[] result =
null;
using
(ExcelPackage package = new
ExcelPackage())
{
ExcelWorksheet workSheet = package.Workbook.Worksheets.Add(String.Format("{0} Data",heading));
int
startRowFrom = String.IsNullOrEmpty(heading) ? 1 : 3;
if
(showSrNo)
{
DataColumn dataColumn = dataTable.Columns.Add("#",
typeof(int));
dataColumn.SetOrdinal(0);
int
index = 1;
foreach
(DataRow item in
dataTable.Rows)
{
item[0] = index;
index++;
}
}
// add the content into the Excel file
workSheet.Cells["A"
+ startRowFrom].LoadFromDataTable(dataTable, true);
// autofit width of cells with small content
int
columnIndex = 1;
foreach
(DataColumn column in
dataTable.Columns)
{
ExcelRange columnCells = workSheet.Cells[workSheet.Dimension.Start.Row, columnIndex, workSheet.Dimension.End.Row,

 columnIndex];
int maxLength = columnCells.DefaultIfEmpty().Max(cell => cell.Value == null ? 0 :
cell.Value.ToString().Count());
if
(maxLength < 150)
{
workSheet.Column(columnIndex).AutoFit();
}
columnIndex++;
}
// format header - bold, yellow on black
using
(ExcelRange r = workSheet.Cells[startRowFrom, 1, startRowFrom, dataTable.Columns.Count])
{
r.Style.Font.Color.SetColor(System.Drawing.Color.White);
r.Style.Font.Bold =
true;
r.Style.Fill.PatternType = OfficeOpenXml.Style.ExcelFillStyle.Solid;
r.Style.Fill.BackgroundColor.SetColor(System.Drawing.ColorTranslator.FromHtml("#1fb5ad"));
}
// format cells - add borders
using
(ExcelRange r = workSheet.Cells[startRowFrom + 1, 1, startRowFrom + dataTable.Rows.Count, dataTable.Columns.Count])
{
r.Style.Border.Top.Style = ExcelBorderStyle.Thin;
r.Style.Border.Bottom.Style = ExcelBorderStyle.Thin;
r.Style.Border.Left.Style = ExcelBorderStyle.Thin;
r.Style.Border.Right.Style = ExcelBorderStyle.Thin;
r.Style.Border.Top.Color.SetColor(System.Drawing.Color.Black);
r.Style.Border.Bottom.Color.SetColor(System.Drawing.Color.Black);
r.Style.Border.Left.Color.SetColor(System.Drawing.Color.Black);
r.Style.Border.Right.Color.SetColor(System.Drawing.Color.Black);
}
// removed ignored columns
for
(int
i = dataTable.Columns.Count - 1; i >= 0; i--)
{
if
(i == 0 && showSrNo)
{
continue;
}
if
(!columnsToTake.Contains(dataTable.Columns[i].ColumnName))
{
workSheet.DeleteColumn(i + 1);
}
}
if
(!String.IsNullOrEmpty(heading))
{
workSheet.Cells["A1"].Value = heading;
workSheet.Cells["A1"].Style.Font.Size = 20;
workSheet.InsertColumn(1, 1);
workSheet.InsertRow(1, 1);
workSheet.Column(1).Width = 5;
}
result = package.GetAsByteArray();
}
return
result;
}
public
static
byte[] ExportExcel<T>(List<T> data, string
Heading = "",
bool
showSlno = false,
params
string[] ColumnsToTake)
{
return
ExportExcel(ListToDataTable<T>(data), Heading, showSlno, ColumnsToTake);
}
}
}
Now, we do front-end development and create Model, View, and Controller. We create TechnologyViewModel view model that binds to the View, as per the following code snippet.
using
ExportExcel.Code;
using
System.Collections.Generic;
namespace
ExportExcel.Models
{
public
class
TechnologyViewModel
{
public
List<Technology> Technologies
{
get
{
return
StaticData.Technologies;
}
}
}
}
After this, we create a controller, HomeController, which has an Index action method. It returns View with Model in the browser.
using
ExportExcel.Code;
using
ExportExcel.Models;
using
System.Collections.Generic;
using
System.Web.Mvc;
namespace
ExportExcel.Controllers
{
public
class
HomeController : Controller
{
[HttpGet]
public
ActionResult Index()
{
TechnologyViewModel model =
new
TechnologyViewModel();
return
View(model);
}
}
}
Now, we create a view that shows the data in the listing and has a button linked to export to Excel functionality. The following code snippet is for the Index view.
@model ExportExcel.Models.TechnologyViewModel
@{
ViewBag.Title = "Export To Excel";
}
<div
class="panel">
<div
class="panel-heading">
<a
href="@Url.Action("ExportToExcel")"
class="btn btn-primary">Export</a>
</div>
<div
class="panel-body">
<table
class="table table-striped table-bordered">
<thead>
<tr>
<th>Name</th>
<th>Project</th>
<th>Team Leader</th>
<th>Developer</th>
</tr>
</thead>
<tbody>
@foreach (var item in Model.Technologies)
{
<tr>
<td>@item.Name</td>
<td>@item.Project</td>
<td>@item.TeamLeader</td>
<td>@item.Developer</td>
</tr>
}
</tbody>
</table>
</div>
</div>
The application runs and shows results as follows.

Figure 3: Listing for Data
Now, we write the action method to call the export to Excel functionality. This action method returns an exported Excel file. The action method returns FileContentResult which is used when we have a byte array and return as a file. The following code snippet
is used for the same.
[HttpGet]
public
FileContentResult ExportToExcel()
{
List<Technology> technologies = StaticData.Technologies;
string[] columns = {"Name","Project","Developer"};
byte[] filecontent = ExcelExportHelper.ExportExcel(technologies,
"Technology",
true,columns );
return
File(filecontent, ExcelExportHelper.ExcelContentType,
"Technologies.xlsx");
}
Now, click The Export button. The button calls the above action method and the result is as shown in the figure.

Figure 4: Dialog for Excel
The resulted Excel file has the data. It has only those columns that we exported rather than all the columns of the collection.

Figure 5: Excel with Data
Download
You can download the complete solution source code from the code gallery using the following URL.
https://gallery.technet.microsoft.com/Export-To-Excel-In-ASPNET-cf17ea0d
In this article, we will see different ways to export data to Excel from a web application. It is very common task for web developers. Here are different approaches to do it in ASP.NET – C#:
Approach 1:
Using the Excel PIA (primary interop assemblies) to generate a spreadsheet server-side.
It needs Microsoft Office suite installed on your server which is not good. So it is NOT recommended.
Approach 2:
Using CSV/TSV content and save it to a file with a .xls extension.
If you don’t need control over formatting, styles, or workbook structure, only need data in excel, this approach is good for you.
To convert Generic data to TSV (Tab Separated Values) Format, use following method:
  public void WriteTsv<T>(IEnumerable<T> data, TextWriter output)
        {
            PropertyDescriptorCollection props = TypeDescriptor.GetProperties(typeof(T));
            foreach (PropertyDescriptor prop in props)
            {
                output.Write(prop.DisplayName); // header
                output.Write("t");
            }
            output.WriteLine();
            foreach (T item in data)
            {
                foreach (PropertyDescriptor prop in props)
                {
                    output.Write(prop.Converter.ConvertToString(
                         prop.GetValue(item)));
                    output.Write("t");
                }
                output.WriteLine();
            }
        }
and use following ASP.NET MVC action to generate excel:
 public void ExportListFromTsv()
        {
            var data = new[]{
                                new{ Name="Ram", Email="ram@techbrij.com", Phone="111-222-3333" },
                                new{ Name="Shyam", Email="shyam@techbrij.com", Phone="159-222-1596" },
                                new{ Name="Mohan", Email="mohan@techbrij.com", Phone="456-222-4569" },
                                new{ Name="Sohan", Email="sohan@techbrij.com", Phone="789-456-3333" },
                                new{ Name="Karan", Email="karan@techbrij.com", Phone="111-222-1234" },
                                new{ Name="Brij", Email="brij@techbrij.com", Phone="111-222-3333" }
                       };

			Response.ClearContent();
            Response.AddHeader("content-disposition", "attachment;filename=Contact.xls");
            Response.AddHeader("Content-Type", "application/vnd.ms-excel");
            WriteTsv(data, Response.Output);
            Response.End();
        }
For simplicity, I am using hard-coded sample data.

Read Also: Upload and Read Excel File (.xls, .xlsx) in ASP.NET MVC
Approach 3:
Generating HTML content and save it to a file with a .xls extension.
To convert Generic data to HTML Format with Table control, use following method:
        public void WriteHtmlTable<T>(IEnumerable<T> data, TextWriter output)
        {
            //Writes markup characters and text to an ASP.NET server control output stream. This class provides formatting capabilities that ASP.NET server controls use when rendering markup to clients.
            using (StringWriter sw = new StringWriter())
            {
                using (HtmlTextWriter htw = new HtmlTextWriter(sw))
                {

                    //  Create a form to contain the List
                    Table table = new Table();
                    TableRow row = new TableRow();
                    PropertyDescriptorCollection props = TypeDescriptor.GetProperties(typeof(T));
                    foreach (PropertyDescriptor prop in props)
                    {
                        TableHeaderCell hcell = new TableHeaderCell();
                        hcell.Text = prop.Name;
                        hcell.BackColor = System.Drawing.Color.Yellow;
                        row.Cells.Add(hcell);
                    }

                    table.Rows.Add(row);

                    //  add each of the data item to the table
                    foreach (T item in data)
                    {
                        row = new TableRow();
                        foreach (PropertyDescriptor prop in props)
                        {
                            TableCell cell = new TableCell();
                            cell.Text = prop.Converter.ConvertToString(prop.GetValue(item));
                            row.Cells.Add(cell);
                        }
                        table.Rows.Add(row);
                    }

                    //  render the table into the htmlwriter
                    table.RenderControl(htw);

                    //  render the htmlwriter into the response
                    output.Write(sw.ToString());
                }
            }

        }
In above method, we defined yellow header background color. use the above method to export data like below
 public void ExportListFromTable()
        {
            var data = new[]{
                                new{ Name="Ram", Email="ram@techbrij.com", Phone="111-222-3333" },
                                new{ Name="Shyam", Email="shyam@techbrij.com", Phone="159-222-1596" },
                                new{ Name="Mohan", Email="mohan@techbrij.com", Phone="456-222-4569" },
                                new{ Name="Sohan", Email="sohan@techbrij.com", Phone="789-456-3333" },
                                new{ Name="Karan", Email="karan@techbrij.com", Phone="111-222-1234" },
                                new{ Name="Brij", Email="brij@techbrij.com", Phone="111-222-3333" }
                       };

            Response.ClearContent();
            Response.AddHeader("content-disposition", "attachment;filename=Contact.xls");
            Response.AddHeader("Content-Type", "application/vnd.ms-excel");
            WriteHtmlTable(data, Response.Output);
            Response.End();
        }

You can use ASP.NET GridView directly(instead of table).
        public void ExportListFromGridView()
        {

            var data = new[]{
                                new{ Name="Ram", Email="ram@techbrij.com", Phone="111-222-3333" },
                                new{ Name="Shyam", Email="shyam@techbrij.com", Phone="159-222-1596" },
                                new{ Name="Mohan", Email="mohan@techbrij.com", Phone="456-222-4569" },
                                new{ Name="Sohan", Email="sohan@techbrij.com", Phone="789-456-3333" },
                                new{ Name="Karan", Email="karan@techbrij.com", Phone="111-222-1234" },
                                new{ Name="Brij", Email="brij@techbrij.com", Phone="111-222-3333" }
                       };


            Response.ClearContent();
            Response.AddHeader("content-disposition", "attachment;filename=Contact.xls");
            Response.AddHeader("Content-Type", "application/vnd.ms-excel");
            using (System.IO.StringWriter sw = new System.IO.StringWriter())
            {
                using (System.Web.UI.HtmlTextWriter htw = new System.Web.UI.HtmlTextWriter(sw))
                {
                    GridView grid = new GridView();
                    grid.DataSource = data;
                    grid.DataBind();
                    grid.RenderControl(htw);
                    Response.Write(sw.ToString());
                }
            }

            Response.End();
        }

If you want to export to excel from ASP.NET Razor View then use following action:
        public ActionResult ExportView()
        {
            Response.AddHeader("content-disposition", "attachment;filename=Report1.xls");
            Response.AddHeader("Content-Type", "application/vnd.ms-excel");
            return View(data);
        }
add a razor view of above action and use following code:
@model IEnumerable<ImportExcel.Models.Contact>
@{
    Layout = null;
}

<!DOCTYPE html>

<html>
<head>
    <meta name="viewport" content="width=device-width" />
    <title>ExportView</title>
</head>
<body>
    <div>
        <table>
            <tr>
                <th>
                    @Html.DisplayNameFor(model => model.Name)
                </th>
                <th>
                    @Html.DisplayNameFor(model => model.Email)
                </th>
             <th>
                    @Html.DisplayNameFor(model => model.Phone)
                </th>
           </tr>

            @foreach (var item in Model)
            {
                <tr>
                    <td>
                        @Html.DisplayFor(modelItem => item.Name)
                    </td>
                    <td>
                        @Html.DisplayFor(modelItem => item.Email)
                    </td>
                     <td>
                        @Html.DisplayFor(modelItem => item.Phone)
                    </td>
                </tr>
            }

        </table>
    </div>
</body>
</html>
In this approach, the logic is same to generate HTML, but the ways are different.
Approach 4:
When you open .xls file generated with Approach 2 & 3, you will get warning because of format difference. It is a bit annoyance.
EPPlus for .XLS
In this Approach, we will use free open source library EPPlus to export the content. It writes Excel 2007/2010 files using the Open Office Xml format (xlsx) only.
Run following command in the Package Manager Console to install EPPlus:
install-package epplus
Use following method for exporting data:
 public void ExportListUsingEPPlus()
        {
            var data = new[]{
                                new{ Name="Ram", Email="ram@techbrij.com", Phone="111-222-3333" },
                                new{ Name="Shyam", Email="shyam@techbrij.com", Phone="159-222-1596" },
                                new{ Name="Mohan", Email="mohan@techbrij.com", Phone="456-222-4569" },
                                new{ Name="Sohan", Email="sohan@techbrij.com", Phone="789-456-3333" },
                                new{ Name="Karan", Email="karan@techbrij.com", Phone="111-222-1234" },
                                new{ Name="Brij", Email="brij@techbrij.com", Phone="111-222-3333" }
                       };

            ExcelPackage excel = new ExcelPackage();
            var workSheet = excel.Workbook.Worksheets.Add("Sheet1");
            workSheet.Cells[1, 1].LoadFromCollection(data, true);
            using (var memoryStream = new MemoryStream())
            {
                Response.ContentType = "application/vnd.openxmlformats-officedocument.spreadsheetml.sheet";
                Response.AddHeader("content-disposition", "attachment;  filename=Contact.xlsx");
                excel.SaveAs(memoryStream);
                memoryStream.WriteTo(Response.OutputStream);
                Response.Flush();
                Response.End();
            }
        }
You can see how easy it is in .xlsx format. This library allows you to set worksheet properties, custom and conditional formatting, Cell Ranges and Cell styling (Border, Color, Fill, Font, Number, Alignments),Formula calculation ..etc.
If you have datatable as datasource, use following to load it
workSheet.Cells[1, 1].LoadFromDataTable(myDataTable, true);
NPOI for .XLS & .XLSX
If you want to generate both .xls and .xlsx files from single library then use NPOI library. This project is the .NET version of POI from Apache Foundation. NPOI can read and write xls (Excel 97-2003), xlsx(Excel 2007+). To install NPOI, run the following command in the Package Manager Console:
Install-Package NPOI
Add following method:
  public void WriteExcelWithNPOI(DataTable dt, String extension)
        {

            IWorkbook workbook;

            if (extension == "xlsx") {
                workbook = new XSSFWorkbook();
            }
            else if (extension == "xls")
            {
                workbook = new HSSFWorkbook();
            }
            else {
                throw new Exception("This format is not supported");
            }

            ISheet sheet1 = workbook.CreateSheet("Sheet 1");

            //make a header row
            IRow row1 = sheet1.CreateRow(0);

            for (int j = 0; j < dt.Columns.Count; j++)
            {

                ICell cell = row1.CreateCell(j);
                String columnName = dt.Columns[j].ToString();
                cell.SetCellValue(columnName);
            }

            //loops through data
            for (int i = 0; i < dt.Rows.Count; i++)
            {
                IRow row = sheet1.CreateRow(i + 1);
                for (int j = 0; j < dt.Columns.Count; j++)
                {

                    ICell cell = row.CreateCell(j);
                    String columnName = dt.Columns[j].ToString();
                    cell.SetCellValue(dt.Rows[i][columnName].ToString());
                }
            }

            using (var exportData = new MemoryStream())
            {
                Response.Clear();
                workbook.Write(exportData);
                if (extension == "xlsx") //xlsx file format
                {
                    Response.ContentType = "application/vnd.openxmlformats-officedocument.spreadsheetml.sheet";
                    Response.AddHeader("Content-Disposition", string.Format("attachment;filename={0}", "ContactNPOI.xlsx"));
                    Response.BinaryWrite(exportData.ToArray());
                }
                else if (extension == "xls")  //xls file format
                {
                    Response.ContentType = "application/vnd.ms-excel";
                    Response.AddHeader("Content-Disposition", string.Format("attachment;filename={0}", "ContactNPOI.xls"));
                    Response.BinaryWrite(exportData.GetBuffer());
                }
                Response.End();
            }
        }
Note: In above method, It is clearly visible response syntax differences (ContentType, Header and Write) between xls and xlsx.
Consider following datatable as datasource:
			DataTable dt = new DataTable();

            dt.Columns.Add("UserId", typeof(Int32));
            dt.Columns.Add("Name", typeof(string));
            dt.Columns.Add("Email", typeof(string));
            dt.Columns.Add("Phone", typeof(string));

            dt.Rows.Add(1, "Ram", "ram@techbrij.com", "111-222-3333");
            dt.Rows.Add(2, "Shyam", "shyam@techbrij.com", "159-222-1596");
            dt.Rows.Add(3, "Mohan", "mohan@techbrij.com", "456-222-4569");
            dt.Rows.Add(4, "Sohan", "sohan@techbrij.com", "789-456-3333");
            dt.Rows.Add(5, "Karan", "karan@techbrij.com", "111-222-1234");
            dt.Rows.Add(6, "Brij", "brij@techbrij.com", "111-222-3333");
To export in .xls format:
WriteExcelWithNPOI(dt, "xls");
To export in .xlsx format:
WriteExcelWithNPOI(dt, "xlsx");
Conclusion:
This post explains the different ways to export data in excel (.xls and .xlsx) format and their pros and cons. If you want your plain data in spreadsheet then approach 2 is good. If you are exporting data from any HTML element or you need some data formatting then approach 3 is good. If you need xlsx format then I recommend EPPlus. If you have to do a lot of operations on Excel and need support of both formats then NPOI is the best option for you, but it is very heavy.
Hope, It helps. Feel free to share your opinion in comment box.
I am working on an ASP.NET MVC application where I need to export data to an excel spreadsheet. Previously, in webforms apps, I used some code I found to render a GridView as an excel-compatible file. This was quite handy. I was wondering what the quickest/most effective method would be to do this in MVC. Thanks.
asked Nov 19, 2008 at 14:15
![]()
answered Nov 19, 2008 at 16:34
![]()
BigJoe714BigJoe714
6,7127 gold badges46 silver badges50 bronze badges
6
One simple option would be to create a view to render an XML-version of an Excel File. You could either use the new Office 2007 version, or the older 2003 version. We chose the 2003 version so that more people could use it, but that’s up to you, of course.
XML 2003 ref on MSDN
XML 2007 ref on MSDN
answered Nov 19, 2008 at 14:19
![]()
sgwillsgwill
9,6648 gold badges34 silver badges40 bronze badges
2
This article explains how to export data to excel using the EPPlus package with examples in simple steps.

Table of Contents
- Getting Started
- Project structure
- Installing NuGet Package Microsoft.EntityFrameworkCore
- Installing NuGet Package Microsoft.EntityFrameworkCore.SqlServer
- Installing NuGet Package EPPlus
- Setting License Property of EPPlus Via code
- Configuring Connection string in appsettings.json
- appsettings.json file
- Adding DbContext
- Added UserMasterModel
- Adding Dbset to DbContext
- Registering AddDbContext in ConfigureServices Method
- Adding Interface and Concrete Class
- Adding IReporting Interface
- Adding ReportingConcrete Class
- Registering Service with DI Container
- Adding Controller
- Adding Method Private Method ExporttoExcel
- Adding ExporttoExcel Feature in Reporting Controller
- Adding View DownloadReport
- Run and Test
- Output
Getting Started
We are going to create a new application, as shown below.

Next, we are going to set Project Name DemoExportApp and location. In the last part, we will choose the .Net Core framework and ASP.NET Core Version 5.0 as the framework for application and a few advanced settings for such as configuring HTTPS and enabling docker; we are not going to enable docker settings for this project.

Project structure
The project structure is generated according to the configuration.

After creating the project next, we are going to install NuGet Packages.
Installing NuGet Package
- Microsoft.EntityFrameworkCore
- Microsoft.EntityFrameworkCore.SqlServer
- EPPlus
Installing Microsoft.EntityFrameworkCore

Installing Microsoft.EntityFrameworkCore.SqlServer

Installing EPPlus Package from NuGet Package

Next after installing the EPPlus package next, we need to set the license parameter.
There are 2 types of licenses
- Commercial
- Non-Commercial
For this demo, we are going to use a Non-Commercial License if you want a commercial License then click on https://www.epplussoftware.com/en/LicenseOverview/.
We are going to add this Property Via appSettings.json
"EPPlus": {
    "ExcelPackage": {
      "LicenseContext": "NonCommercial" //The license context used
    }
  }
Setting License Property Via code
// If you are a commercial business and have
// purchased commercial licenses use the static property
// LicenseContext of the ExcelPackage class :
ExcelPackage.LicenseContext = LicenseContext.Commercial;

// If you use EPPlus in a noncommercial context
// according to the Polyform Noncommercial license:
ExcelPackage.LicenseContext = LicenseContext.NonCommercial;
After setting license Property next we need to get data from the database to export for that we are going to configure the connection string in the appsettings.json file.
Configuring Connection string in appsettings.json
Here in ASP.NET core, we don’t have a web.config file which was there in the older version of ASP.NET and ASP.NET MVC here we have an appsettings.json file where we are going to keep application-level settings, and this file is Json based.
appsettings.json file
In this file, we have added the ConnectionStrings section inside that we have added DatabaseConnection key and other is value.
Notice: – here I am using SQL based authentication for database connection that why I have added the User Id and password of the SQL server.
{
  "Logging": {
    "LogLevel": {
      "Default": "Information",
      "Microsoft": "Warning",
      "Microsoft.Hosting.Lifetime": "Information"
    }
  },
  "EPPlus": {
    "ExcelPackage": {
      "LicenseContext": "NonCommercial" //The license context used
    }
  },
  "ConnectionStrings": {
    "DatabaseConnection": "Data Source=DESKTOP-DUM6D15\MSSQLSERVERSTD; initial catalog=OneFitnessVueDB; user id=sa; password=Pass$123"
  },
  "AllowedHosts": "*"
}
Adding DbContext
using Microsoft.EntityFrameworkCore;

namespace DemoExportApp.EFContext
{
    public class DatabaseContext: DbContext
    {
        public DatabaseContext(DbContextOptions<DatabaseContext> options) : base(options)
        {

        }
    }
}
Added UserMasterModel
In this part, we are going to add Model UserMaster.
using System;
using System.ComponentModel.DataAnnotations;
using System.ComponentModel.DataAnnotations.Schema;

namespace DemoExportApp.Models
{
    [Table("Usermaster")]
    public class UserMasterModel
    {
        [Key]
        public int UserId { get; set; }
        public string UserName { get; set; }
        public string FirstName { get; set; }
        public string LastName { get; set; }
        public string EmailId { get; set; }
        public string MobileNo { get; set; }
        public string Gender { get; set; }
        public bool Status { get; set; }
        public string PasswordHash { get; set; }
        public bool IsFirstLogin { get; set; } = false;
        public DateTime IsFirstLoginDate { get; set; }
        public DateTime? CreatedOn { get; set; } = DateTime.Now;
        public DateTime? ModifiedOn { get; set; }
        public int? CreatedBy { get; set; }
        public int? ModifiedBy { get; set; }
        public int DesignationId { get; set; }
    }
}

Adding Dbset to DbContext
DbSet corresponds to a table or view in your database.
using DemoExportApp.Models;
using Microsoft.EntityFrameworkCore;

namespace DemoExportApp.EFContext
{
    public class DatabaseContext : DbContext
    {
        public DatabaseContext(DbContextOptions<DatabaseContext> options) : base(options)
        {
        }
        public DbSet<UserMasterModel> UserMasters { get; set; }
    }
}
Registering AddDbContext in ConfigureServices Method
public void ConfigureServices(IServiceCollection services)
  {
      var connection = Configuration.GetConnectionString("DatabaseConnection");
      services.AddDbContext<DatabaseContext>(options => options.UseSqlServer(connection));
      services.AddControllersWithViews();
  }
After Registering next, we are going to add a Repository Folder.
Adding Interface and Concrete Class
In this part, we are adding Interface with Name IReporting and Concrete Class with Name ReportingConcrete.

ReportingConcrete class will inherit IReporting Interface. In ReportingConcrete class we are going to write a method for getting data from a database which we are going to pass to the excel library to export as Excel.
Same time we need to Add ViewModel with Name UserViewModel where we are going to Add only that property which we are going to export.
using System;

namespace DemoExportApp.Models
{
    public class UserMasterViewModel
    {
        public string UserName { get; set; }
        public string FirstName { get; set; }
        public string LastName { get; set; }
        public string EmailId { get; set; }
        public string MobileNo { get; set; }
        public string Gender { get; set; }
        public DateTime? CreatedOn { get; set; }
        public string Status { get; set; }
    }
}
Adding IReporting Interface
we have added the IReporting interface and declared GetUserwiseReport method init.
using DemoExportApp.Models;
using System.Collections.Generic;

namespace DemoExportApp.Repository
{
    public interface IReporting
    {
        List<UserMasterViewModel> GetUserwiseReport();
    }
}
Adding ReportingConcrete Class
Here we are going to Add Class ReportingConcrete Class which will inherit the IReporting interface and implement GetUserwiseReport Methods in it.
using DemoExportApp.EFContext;
using DemoExportApp.Models;
using Microsoft.EntityFrameworkCore;
using Microsoft.Extensions.Configuration;
using System;
using Microsoft.Data.SqlClient;
using System.Collections.Generic;
using System.Linq;

namespace DemoExportApp.Repository
{
    public class ReportingConcrete : IReporting
    {
        private readonly DatabaseContext _databaseContext;
        private readonly IConfiguration _configuration;
        public ReportingConcrete(DatabaseContext databaseContext, IConfiguration configuration)
        {
            _databaseContext = databaseContext;
            _configuration = configuration;
        }
        public List<UserMasterViewModel> GetUserwiseReport()
        {
            try
            {
                var listofusers = (from usermaster in _databaseContext.UserMasters.AsNoTracking()
                                   select new UserMasterViewModel()
                                   {
                                       UserName = usermaster.UserName,
                                       FirstName = usermaster.FirstName,
                                       LastName = usermaster.LastName,
                                       CreatedOn = usermaster.CreatedOn,
                                       EmailId = usermaster.EmailId,
                                       Gender = usermaster.Gender == "M" ? "Male" : "Female",
                                       MobileNo = usermaster.MobileNo,
                                       Status = usermaster.Status == true ? "Active" : "InActive",

                                   }).ToList();

                return listofusers;
            }
            catch (Exception ex)
            {
                throw;
            }
        }
    }
}
After Adding the Interface and Concrete class next we are going to register them in ConfigureServices Method.
Registering Service with DI Container
public void ConfigureServices(IServiceCollection services)
{
    var connection = Configuration.GetConnectionString("DatabaseConnection");
    services.AddDbContext<DatabaseContext>(options => options.UseSqlServer(connection));
    services.AddTransient<IReporting, ReportingConcrete>();
    services.AddControllersWithViews();
}
Adding Controller
We are going to add a controller with the name Report. In this controller, we are going to add the Action method which will be used to export Excel.

After adding the controller next, we are going to add 2 Action methods with the name “DownloadReport”.
using DemoExportApp.Repository;
using Microsoft.AspNetCore.Http;
using Microsoft.AspNetCore.Mvc;
using OfficeOpenXml;
using OfficeOpenXml.Table;
using System.Collections.Generic;

namespace DemoExportApp.Controllers
{
    public class ReportController : Controller
    {
        readonly IReporting IReporting;

        public ReportController(IReporting iReporting)
        {
            IReporting = iReporting;
        }


        [HttpGet]
        public IActionResult DownloadReport()
        {
            return View();
        }

        [HttpPost]
        public IActionResult DownloadReport(IFormCollection obj)
        {
            return View();
        }

    }
}
Adding Method Private Method ExporttoExcel
ExporttoExcel Method will take 2 input List of Collection (List<UserMasterViewModel>) and filename and it will return Bytes.
 private byte[] ExporttoExcel<T>(List<T> table, string filename)
 {
     using ExcelPackage pack = new ExcelPackage();
     ExcelWorksheet ws = pack.Workbook.Worksheets.Add(filename);
     ws.Cells["A1"].LoadFromCollection(table, true, TableStyles.Light1);
     return pack.GetAsByteArray();
 }
Adding ExporttoExcel Feature in Reporting Controller
In Reporting Controller, we are going to use constructor injection to inject IReporting Interface.
Using IReporting we can access the GetUserwiseReport method which will return the List of Usermaster which we are going to pass to the ExporttoExcel Method along with filename which will return us bytes that bytes we are going to pass to FileContentResult and other 2 parameters such as content type, file download name.
File(exportbytes, "application/vnd.openxmlformats-officedocument.spreadsheetml.sheet", reportname);using DemoExportApp.Models;
using DemoExportApp.Repository;
using Microsoft.AspNetCore.Http;
using Microsoft.AspNetCore.Mvc;
using OfficeOpenXml;
using OfficeOpenXml.Table;
using System;
using System.Collections.Generic;
namespace DemoExportApp.Controllers
{
public class ReportController : Controller
{
readonly IReporting _IReporting;
public ReportController(IReporting iReporting)
{
_IReporting = iReporting;
}
[HttpGet]
public IActionResult DownloadReport()
{
return View();
}
[HttpPost]
public IActionResult DownloadReport(IFormCollection obj)
{
string reportname = $"User_Wise_{Guid.NewGuid():N}.xlsx";
var list = _IReporting.GetUserwiseReport();
if (list.Count > 0)
{
var exportbytes = ExporttoExcel<UserMasterViewModel>(list, reportname);
return File(exportbytes, "application/vnd.openxmlformats-officedocument.spreadsheetml.sheet", reportname);
}
else
{
TempData["Message"] = "No Data to Export";
return View();
}
}
private byte[] ExporttoExcel<T>(List<T> table, string filename)
{
using ExcelPackage pack = new ExcelPackage();
ExcelWorksheet ws = pack.Workbook.Worksheets.Add(filename);
ws.Cells["A1"].LoadFromCollection(table, true, TableStyles.Light1);
return pack.GetAsByteArray();
}
}
}
Adding View DownloadReport
In this part, we are going to add View and on View, we are going to add a Form tag with submit button in it. On click on Submit button, it will call DownloadReport Post Method which will export data to excel.
@{
    ViewData["Title"] = "Export Excel";
}


<div class="col-md-12">
    <div class="card">
        <div class="card-header">
            <h3 class="card-title">Download Report</h3>
        </div>
        <form autocomplete="off" asp-controller="Report" asp-antiforgery="true" asp-action="DownloadReport" method="post">
            <div class="card-body register-card-body">
                <div class="form-row">
                    <button type="submit" id="btnsubmit" class="btn btn-success">Export to Excel</button>
                </div>

            </div>
            <div class="card-footer">
            </div>
        </form>
    </div>
</div>
Lets Run and Test

Output

Summary
We have learned how to export data to excel in ASP.NET Core using the EPPlus package in simple steps.
When needing to export data to Excel, you have a couple of different options. If you need simple tabular data, generating a CSV file may be sufficient. If you need to embed colors, hyperlinks, and formulas, you will need something more advanced. Let’s start simple with CSV files.

For the examples in this post, I’ll be using ASP.NET Core on .NET 5, with some hard-coded data. In a real-world application, this data would come from user input, or a database, etc. To keep things simple, I’ll walk you through some code snippets, you can find the complete code on Github.
The Data Model
Say we have a User model with the following properties:
public class User
{
    public int Id { get; set; }

    public string Username { get; set; }

    public string Email { get; set; }

    public string SerialNumber { get; set; }

    public DateTime JoinedOn { get; set; }
}
And let’s say we have a HomeController where we’ll hard-code a collection of users to work with:
public class HomeController : Controller
{
    private readonly List<User> users = new()
    {
        new User{
            Id = 1,
            Username = "ArminZia",
            Email = "armin.zia@gmail.com",
            SerialNumber = "NX33-AZ47",
            JoinedOn = new DateTime(1988, 04, 20)
        },
        new User{
            Id = 2,
            Username = "DoloresAbernathy",
            Email = "dolores.abernathy@gmail.com",
            SerialNumber = "CH1D-4AK7",
            JoinedOn = new DateTime(2021, 03, 24)
        },
        new User{
            Id = 3,
            Username = "MaeveMillay",
            Email = "maeve.millay@live.com",
            SerialNumber = "A33B-0JM2",
            JoinedOn = new DateTime(2021, 03, 23)
        },
        new User{
            Id = 4,
            Username = "BernardLowe",
            Email = "bernard.lowe@hotmail.com",
            SerialNumber = "H98M-LIP5",
            JoinedOn = new DateTime(2021, 03, 10)
        },
        new User{
            Id = 5,
            Username = "ManInBlack",
            Email = "maininblack@gmail.com",
            SerialNumber = "XN01-UT6C",
            JoinedOn = new DateTime(2021, 03, 9)
        }
    };
}
The users’ collection looks like this:

Export to CSV
The simplest way to export data is to generate a comma-separated values (CSV) file. There are NuGet packages to help you with that — like CsvHelper — but in this post, I’ll create the CSV file manually. Consider the following action method:
public IActionResult Csv()
{
    var builder = new StringBuilder();

    builder.AppendLine("Id,Username,Email,JoinedOn,SerialNumber");

    foreach (var user in users)
    {
        builder.AppendLine($"{user.Id},
                            {user.Username},
                            {user.Email},
                            {user.JoinedOn.ToShortDateString()},
                            {user.SerialNumber}"
        );
    }

    return File(Encoding.UTF8.GetBytes(builder.ToString()), "text/csv", "users.csv");
}
First, we create a StringBuilder, available in the System.Text namespace. In CSV files, the first line defines the headers. Then we iterate through the users’ collection, and for each user, we write a line. Finally, we return a File result with the resulting string as the file content, text/csv as the MIME type, and users.csv as the filename. This action method is a GET method, so the browser will automatically download the content as a CSV file named users.csv.
The CSV file (opened in Notepad) looks like this:

Export to Excel (XLSX)
CSV files are great because they’re text files, easy to work with, and they work everywhere. But if you need more features like embedding colors and hyperlinks, creating sheets, etc. you’d need another file format. Since XLSX files are XML-based, you can generate the content yourself. That’s not recommended though, XLSX is a huge specification and there are many NuGet packages to help you. I’ll use ClosedXML because I like the API and its ease of use, but there are other packages like EPPlus and DocumentFormat.OpenXml too.
First, you need to install the NuGet package:
Install-Package ClosedXML
Next, we’ll create an action method to generate an XLSX file. ClosedXML provides a rich set of features, make sure to check out the documentation to learn more. The following code formats the output like in the CSV example. Later in this post, I’ll show you how you can format the output with more options.
public IActionResult Excel()
{
    using var workbook = new XLWorkbook();
    var worksheet = workbook.Worksheets.Add("Users");
    var currentRow = 1;

    worksheet.Cell(currentRow, 1).Value = "Id";
    worksheet.Cell(currentRow, 2).Value = "Username";
    worksheet.Cell(currentRow, 3).Value = "Email";
    worksheet.Cell(currentRow, 4).Value = "Serial Number";
    worksheet.Cell(currentRow, 5).Value = "Joined On";

    foreach (var user in users)
    {
        currentRow++;

        worksheet.Cell(currentRow, 1).Value = user.Id;
        worksheet.Cell(currentRow, 2).Value = user.Username;
        worksheet.Cell(currentRow, 3).Value = user.Email;
        worksheet.Cell(currentRow, 4).Value = user.SerialNumber;
        worksheet.Cell(currentRow, 5).Value = user.JoinedOn.ToShortDateString();
    }

    using var stream = new MemoryStream();
    workbook.SaveAs(stream);
    var content = stream.ToArray();

    return File(content, "application/vnd.openxmlformats-officedocument.spreadsheetml.sheet", "users.xlsx");
}
Let’s examine the code and see what we’re doing here. To create an Excel document, we first create an XLWorkbook instance. On line 4, we create a worksheet named Users. The code is pretty simple and straightforward, first, we create the header row. Similar to the CSV example, we output the columns in the header row. Then we iterate through the users’ collection and for each user, we create a new row. You access rows and columns using the worksheet instance. Finally, we save the workbook to a MemoryStream, and return the content as a File result. The MIME type is application/vnd.openxmlformats-officedocument.spreadsheetml.sheet and the filename is users.xlsx.
Tip If you’re generating small documents, using a MemoryStream would do just fine. But if you’re expecting a large number of concurrent users and large documents, it’s better to save the generated document on disk and return a Json result with a URL to the file. Another important thing to consider is that if you’re returning the file content as a blob if the connection is lost for whatever reason (internet disconnects, the connection is interrupted, etc.) users will lose their downloads. But if you save the generated file on disk and return a URL, users will be able to download the file without a problem, pause/resume downloads, etc.
The XLSX document (opened in Microsoft Office Excel) looks like this:

Formatting the XLSX document
You’ll notice that the Excel document is not formatted, we’re just writing the values to the file. ClosedXML is a .NET library with an intuitive and user-friendly interface for dealing with the underlying OpenXML API. You could create advanced spreadsheets with charts and formulas, basically, everything (almost everything) that Microsoft Excel offers. Be sure to read the wiki on Github, you can find FAQs and guides about everything you can do with ClosedXML, a great time saver. In the following section, I’ll show you a basic example of how you can format the document with colors and styling. Here’s what we’re going to achieve:
-
Format the headers row with a background color, and a bold font
-
Format the Id, Serial Number, and Joined On columns to be center-aligned horizontally
-
Format the Serial Number column with a background and font color
-
Add hyperlinks to the Email values
Here’s the updated code for the Excel action method:
public IActionResult Excel()
{
    using var workbook = new XLWorkbook();
    var worksheet = workbook.Worksheets.Add("Users");
    var currentRow = 1;

    worksheet.Row(currentRow).Height = 25.0;
    worksheet.Row(currentRow).Style.Font.Bold = true;
    worksheet.Row(currentRow).Style.Fill.BackgroundColor = XLColor.LightGray;
    worksheet.Row(currentRow).Style.Alignment.Vertical = XLAlignmentVerticalValues.Center;

    worksheet.Cell(currentRow, 1).Value = "Id";
    worksheet.Cell(currentRow, 1).Style.Alignment.Horizontal = XLAlignmentHorizontalValues.Center;

    worksheet.Cell(currentRow, 2).Value = "Username";
    worksheet.Cell(currentRow, 3).Value = "Email";

    worksheet.Cell(currentRow, 4).Value = "Serial Number";
    worksheet.Cell(currentRow, 4).Style.Alignment.Horizontal = XLAlignmentHorizontalValues.Center;

    worksheet.Cell(currentRow, 5).Value = "Joined On";
    worksheet.Cell(currentRow, 5).Style.Alignment.Horizontal = XLAlignmentHorizontalValues.Center;

    foreach (var user in users)
    {
        currentRow++;

        worksheet.Row(currentRow).Height = 20.0;
        worksheet.Row(currentRow).Style.Alignment.Vertical = XLAlignmentVerticalValues.Center;

        worksheet.Cell(currentRow, 1).Value = user.Id;
        worksheet.Cell(currentRow, 1).Style.Alignment.Horizontal = XLAlignmentHorizontalValues.Center;

        worksheet.Cell(currentRow, 2).Value = user.Username;

        worksheet.Cell(currentRow, 3).Value = user.Email;
        worksheet.Cell(currentRow, 3).Hyperlink.ExternalAddress = new Uri($"mailto:{user.Email}");

        worksheet.Cell(currentRow, 4).Value = user.SerialNumber;
        worksheet.Cell(currentRow, 4).Style.Alignment.Horizontal = XLAlignmentHorizontalValues.Center;
        worksheet.Cell(currentRow, 4).Style.Fill.BackgroundColor = XLColor.PersianBlue;
        worksheet.Cell(currentRow, 4).Style.Font.FontColor = XLColor.WhiteSmoke;

        worksheet.Cell(currentRow, 5).Value = user.JoinedOn.ToShortDateString();
        worksheet.Cell(currentRow, 5).DataType = XLDataType.DateTime;
        worksheet.Cell(currentRow, 5).Style.Alignment.Horizontal = XLAlignmentHorizontalValues.Center;

        worksheet.Columns().AdjustToContents();
    }

    using var stream = new MemoryStream();
    workbook.SaveAs(stream);
    var content = stream.ToArray();

    return File(content, "application/vnd.openxmlformats-officedocument.spreadsheetml.sheet", "users.xlsx");
}
The code is self-explanatory, make sure to checkout ClosedXML’s documentation though, but let’s see what’s going on.
Formatting the headers row
worksheet.Row(currentRow).Height = 25.0; worksheet.Row(currentRow).Style.Font.Bold = true; worksheet.Row(currentRow).Style.Fill.BackgroundColor = XLColor.LightGray; worksheet.Row(currentRow).Style.Alignment.Vertical = XLAlignmentVerticalValues.Center;

worksheet.Cell(currentRow, 1).Value = "Id";
worksheet.Cell(currentRow, 1).Style.Alignment.Horizontal = XLAlignmentHorizontalValues.Center;

worksheet.Cell(currentRow, 2).Value = "Username"; worksheet.Cell(currentRow, 3).Value = "Email";

worksheet.Cell(currentRow, 4).Value = "Serial Number";
worksheet.Cell(currentRow, 4).Style.Alignment.Horizontal = XLAlignmentHorizontalValues.Center;

worksheet.Cell(currentRow, 5).Value = "Joined On";
worksheet.Cell(currentRow, 5).Style.Alignment.Horizontal = XLAlignmentHorizontalValues.Center;
The rows (IXLRow) and cells (IXLCell) allow you to change the styling options and configure each instance. Setting vertical/horizontal alignments, changing font properties, etc. is as easy as setting a few properties.
Adding hyperlinks to email addresses
To add a hyperlink to a cell value, you create a Uri instance and assign it to the Hyperlink.ExternalAddress property of the cell.
worksheet.Cell(currentRow, 3).Value = user.Email; worksheet.Cell(currentRow, 3).Hyperlink.ExternalAddress = new Uri($"mailto:{user.Email}");
Adjusting columns to content
The first example had an issue. The columns weren’t adjusted to fit their contents. That’s easy to fix with ClosedXML:
worksheet.Columns().AdjustToContents();
This line adjusts all columns to fit their contents. The end result looks like the following:

ClosedXML Extensions
ClosedXML has several extension projects, make sure to check them out:
-
ClosedXML.Report
-
ClosedXML.Extensions.AspNet
-
ClosedXML.Extensions.Mvc
-
ClosedXML.Extensions.WebApi
Sample project on Github
You can find the source code for this post on Github. The project was created with Visual Studio 2019 Community Edition running .NET 5. You can run the project using Visual Studio, or the dotnet CLI.
Source: ARMIN ZIA
The Tech Platform
www.thetechplatform.com