
Using the Export Wizard, you can export data from an Access database to in a file format that can be read by Excel. This article shows you how to prepare and export your data to Excel, and also gives you some troubleshooting tips for common problems that might occur.
In this article
-
Exporting data to Excel: the basics
-
Prepare for the export operation
-
Run the export operation
-
What else should I know about exporting?
-
Troubleshoot missing and incorrect values
Exporting data to Excel: the basics
When you export data to Excel, Access creates a copy of the selected data, and then stores the copied data in a file that can be opened in Excel. If you copy data from Access to Excel frequently, you can save the details of an export operation for future use, and even schedule the export operation to run automatically at set intervals.
Common scenarios for exporting data to Excel
-
Your department or workgroup uses both Access and Excel to work with data. You store the data in Access databases, but you use Excel to analyze the data and to distribute the results of your analysis. Your team currently exports data to Excel as and when they have to, but you want to make this process more efficient.
-
You are a long-time user of Access, but your manager prefers to work with data in Excel. At regular intervals, you do the work of copying the data into Excel, but you want to automate this process to save yourself time.
About exporting data to Excel
-
Access does not include a “Save As” command for the Excel format. To copy data to Excel, you must use the Export feature described in this article, or you can copy Access data to the clipboard and then paste it into an Excel spreadsheet.
-
You can export a table, query, form, or report. You can also export selected records in a multiple-record view, such as a datasheet.
-
Microsoft Excel includes a command to import data from an Access database. You can use that command instead of the export command in Access; however, the Excel import command only allows you to import tables or queries. For more information, see the Excel Help article Connect to (import) external data.
-
You cannot export macros or modules to Excel. When you export a form, report, or datasheet that contains subforms, subreports, or subdatasheets, only the main form, report, or datasheet is exported. You must repeat the export operation for each subform, subreport, and subdatasheet that you want to export to Excel.
-
You can only export one database object in a single export operation. However, you can merge multiple worksheets in Excel after you complete the individual export operations.
Top of Pge
Prepare for the export operation
Before performing an export procedure, it is a good idea to review the data that you want to export to make sure that it does not contain any error indicators or error values. If there are any errors, try to resolve them before you export the data to Excel. Otherwise, problems can occur during the export operation, and null values might be inserted into cells in the Excel worksheet. For more information about problems that can occur when exporting to Excel, see the section Troubleshoot missing and incorrect values.
If the source object is a table or a query, decide whether you want to export the data with or without its formatting. This decision affects two aspects of the resulting workbook — the amount of data that is exported and the display format of the data. The following table describes the outcome of exporting formatted and unformatted data.
|
Export |
Source Object |
Fields and records |
Formatting |
|
Without formatting |
Table or query Note: Forms and reports cannot be exported without their formatting. |
All fields and records in the underlying object are exported. |
The Format property settings are ignored during the operation. For lookup fields, only the lookup ID values are exported. For hyperlink fields, the contents are exported as a text column that displays the links in the format displaytext#address#. |
|
With formatting |
Table, query, form, or report |
Only fields and records that are displayed in the current view or object are exported. Filtered records, hidden columns in a datasheet, and fields not displayed on a form or report are not exported. |
The wizard respects the Format property settings. For lookup fields, the lookup values are exported. For hyperlink fields, the values are exported as hyperlinks. For rich text fields, the text is exported but the formatting is not. |
-
Choose the destination workbook and file format. Note that reports can only be exported in the older *.xls file format, not in the newer *.xlsx file format.
During the export operation, Access prompts you to specify the name of the destination workbook. The following table summarizes when a workbook is created (if it does not already exist) and when it is overwritten (if it does already exist).
|
If the destination workbook |
And the source object is |
And you want to export |
Then |
|
Does not exist |
A table, query, form, or report |
The data, with or without the formatting |
The workbook is created during the export operation. |
|
Already exists |
A table or query |
The data, but not the formatting |
The workbook is not overwritten. A new worksheet is added to the workbook, and is given the name of the object from which the data is being exported. If a worksheet having that name already exists in the workbook, Access prompts you to either replace the contents of the corresponding worksheet or specify another name for the new sheet. |
|
Already exists |
A table, query, form, or report |
The data, including the formatting |
The workbook is overwritten by the exported data. All existing worksheets are removed, and a new worksheet having the same name as the exported object is created. The data in the Excel worksheet inherits the format settings of the source object. |
The data is always added in a new worksheet. You cannot append the data to any existing worksheet or named range.
Top of Page
Run the export operation
-
If the destination Excel workbook is open, close it before you continue.
-
In the Navigation Pane of the source database, select the object that you want to export.
Export only a portion of the data
If the object is a table, query, or form, and you want to export only a portion of the data, open the object in Datasheet view and select the records you want.
To open a form in Datasheet view:
-
Double-click the form to open it.
-
Right-click the form, and then click Datasheet View. If this option is not available:
-
Click Design View.
-
Press F4 to display the Property Sheet task pane.
-
Select Form from the drop-down list at the top of the Property Sheet.
-
On the Format tab of the Property Sheet, set the Allow Datasheet View property to Yes.
-
On the Design tab, in the Views group, click Datasheet View.
Note: You cannot export a portion of a report. However, you can select or open the table or query that the report is based on, and then export a portion the data in that object.
-
-
-
On the External Data tab, in the Export group, click Excel.
-
In the Export — Excel Spreadsheet dialog box, review the suggested file name for the Excel workbook (Access uses the name of the source object). If you want, you can modify the file name.
-
In the File Format box, select the file format that you want.
-
If you are exporting a table or a query, and you want to export formatted data, select Export data with formatting and layout. For more information, see the section Prepare for the export operation.
Note: If you are exporting a form or report, this option is always selected but unavailable (it appears dimmed).
-
To view the destination Excel workbook after the export operation is complete, select the Open the destination file after the export operation is complete check box.
If the source object is open, and if you selected one or more records in the view before starting the export operation, you can select Export only the selected records. To export all the records displayed in the view, leave this check box cleared.
Note: This check box remains unavailable (dimmed) if no records are selected.
-
Click OK.
If the export operation fails because of an error, Access displays a message that describes the cause of the error. Otherwise, Access exports the data and, depending on your selection in step 7, opens the destination workbook in Excel. Access then displays a dialog box in which you can create a specification that uses the details from the export operation.
Top of Page
What else should I know about exporting?
-
For information on how to save the details of your export into a specification that you can reuse later, see the article Save the details of an import or export operation as a specification.
-
For information on how to run saved export specifications, see the article Run a saved import or export operation.
-
For information on how to schedule specifications to run at specific times, see the article Schedule an import or export operation.
-
For information on how to change a specification name, delete specifications, or update the names of source files in specifications, see the article Manage Data Tasks.
Top of Page
Troubleshoot missing and incorrect values
The following table describes various ways of troubleshooting common errors.
Tip: If you find that just a few values are missing, fix them in the Excel workbook. Otherwise, fix the source object in the Access database, and then repeat the export operation.
|
Issue |
Description and resolution |
|
Calculated fields |
The results of calculated fields are exported; the underlying expressions that perform the calculations are not. |
|
Multivalued fields |
Fields that support multiple values are exported as a list of values separated by semicolons (;). |
|
Pictures, objects, and attachments |
Graphical elements (such as logos, contents of OLE object fields, and attachments that are part of the source data) are not exported. Add them to the worksheet manually after you complete the export operation. |
|
Graph |
When you export a form or report that contains a Microsoft Graph object, the graph object is not exported. |
|
Data in the wrong column |
Null values in the resulting worksheet are sometimes replaced by the data that should be in the next column. |
|
Missing date values |
Date values earlier than Jan 1, 1900 are not exported. The corresponding cells in the worksheet will contain a null value. |
|
Missing expressions |
Expressions that are used to calculate values are not exported to Excel. Only the results of the calculations are exported. Manually add the formula to the Excel worksheet after you complete the export operation. |
|
Missing subforms, subreports, and subdatasheets |
When you export a form, report, or datasheet, only the main form, report, or datasheet is exported. You must repeat the export operation for each subform, subreport, and subdatasheet that you want to export. |
|
Missing or incorrectly formatted columns |
If none of the columns appear to be formatted in the resulting worksheet, repeat the export operation, being sure to select the Export data with formatting and layout check box in the wizard. Conversely, if only some columns appear to be formatted differently from the versions in the source object, apply the formatting that you want manually in Excel. Format a column in Excel
|
|
«#» value in a column |
You might see the value # in a column that corresponds to a Yes/No field in a form. This can be the result of starting the export operation from the Navigation Pane or in Form view. To resolve this issue, open the form in Datasheet view before exporting the data. |
|
Error indicators or error values |
Check the cells for error indicators (green triangles in the corners) or error values (strings that begin with the # character instead of the appropriate data). |
Top of Page
How to Export Data to Excel
Learn to make reporting much easier
Updated on October 28, 2022
What to Know
- To export, select File > Export > choose Excel-compatible file (CSV or text format).
- To import, make sure exported data is in order > open or create worksheet > Data tab > choose import format/option.
- Import Access database: Select Get Data > From Database > From Microsoft Access Database > choose file.
This article explains how to export data from other applications into Excel for Microsoft 365, Excel 2019, and Excel 2016.
How to Export Data to Excel
Excel can grab data from a variety of sources, from other Excel workbooks, to text files, Facebook, other tables and data ranges, and any web URL you input. If you have ready access to the data, you can import straight from that source, which is what we’ll address here.
For some applications, you may need to Export the data from that application first, or even have the options to export directly to Excel. That goes beyond the scope of this article as there are too many applications to list individually. But as a rule of thumb, it can be achieved by going to File > Export and selecting a file type that is compatible with Excel, or Excel itself if exporting directly to it. Microsoft Excel supports long list of file formats, but you typically want the data represented in either a Comma Separated Value (CSV) or text format.
How to Import Data to Excel
To import data to Excel, follow these steps:
-
Before you begin your export/import process, it’s a good idea to give your data a quick look to make sure everything is in order. You’re only wasting your time if you import incorrect or incomplete data, because you may need to redo the entire import/export operation.
-
When you’re ready, export the data if necessary with your particular application or source, and then open (or create) the Excel worksheet that you want to import the data to.
-
Select the Data tab in the top menu.
-
Above the Get and Transform Data subheading are a number of options you can select, but if none of them apply, select the generalized Get Data.
-
To import an Access database, select Get Data > From Database > From Microsoft Access Database.
-
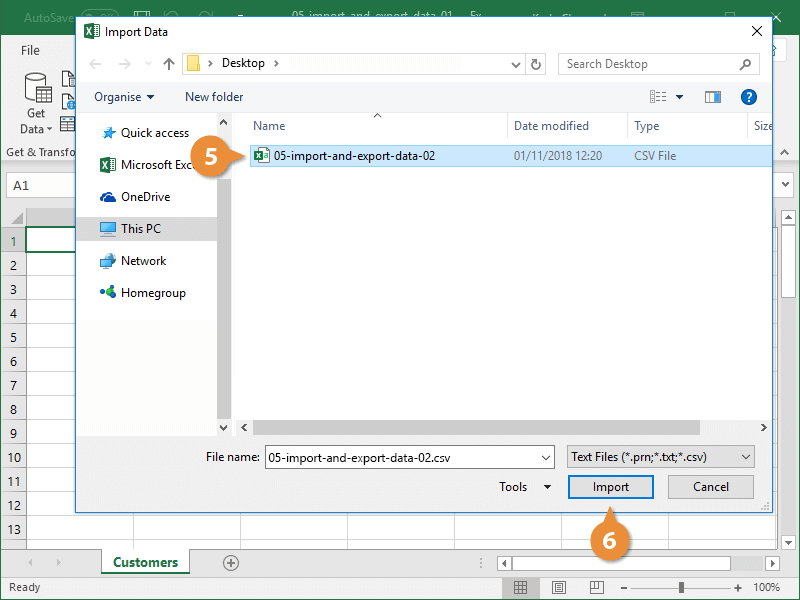
In the subsequent File Explorer window, select the database (or other file type) that you want to import the data from and select OK.
-
If your Access file has a number of databases, the Navigator window will provide a number of import options. In this case, import qrySalesbyCategory by selecting it and then selecting Load. To make any changes to the data before importing it, select Transform Data instead.
Excel can only import the datasheet, form, and report. Extras like macros and modules will not be imported into your Excel worksheet.
Depending on the size of your database and the speed of your PC, importing the data can take some time, so wait for it to complete. But, if all has gone to plan, when it’s finished you should now see your data fully imported into Excel and displayed in a useful format. You can continue to import data if you need more, or get to work on applying functions, formulas, and other useful tools that Excel has to offer.
In some compatible applications, like Access, data can simply be copied from an active Access database and pasted it into Excel.
Thanks for letting us know!
Get the Latest Tech News Delivered Every Day
Subscribe
Excel can import and export many different file types aside from the standard .xslx format. If your data is shared between other programs, like a database, you may need to save data as a different file type or bring in files of a different file type.
Export Data
When you have data that needs to be transferred to another system, export it from Excel in a format that can be interpreted by other programs, such as a text or CSV file.
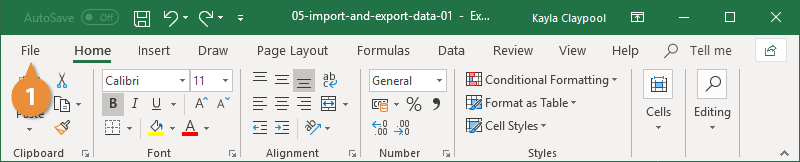
- Click the File tab.

- At the left, click Export.
- Click the Change File Type.
- Under Other File Types, select a file type.
- Text (Tab delimited): The cell data will be separated by a tab.
- CSV (Comma delimited): The cell data will be separated by a comma.
- Formatted Text (space delimited): The cell data will be separated by a space.
- Save as Another File Type: Select a different file type when the Save As dialog box appears.
The file type you select will depend on what type of file is required by the program that will consume the exported data.
- Click Save As.

- Specify where you want to save the file.
- Click Save.
A dialog box appears stating that some of the workbook features may be lost.
- Click Yes.

Import Data
Excel can import data from external data sources including other files, databases, or web pages.
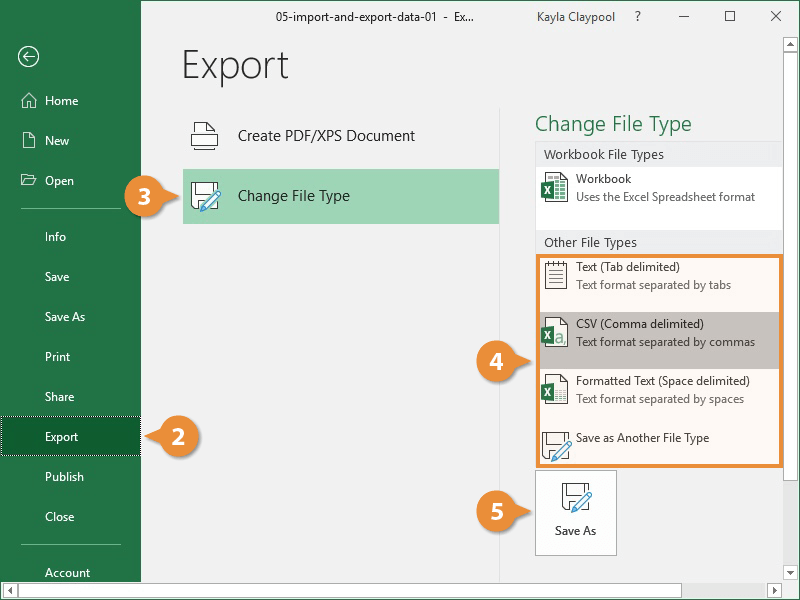
- Click the Data tab on the Ribbon..
- Click the Get Data button.
Some data sources may require special security access, and the connection process can often be very complex. Enlist the help of your organization’s technical support staff for assistance.
- Select From File.
- Select From Text/CSV.
If you have data to import from Access, the web, or another source, select one of those options in the Get External Data group instead.
- Select the file you want to import.
- Click Import.
If, while importing external data, a security notice appears saying that it is connecting to an external source that may not be safe, click OK.
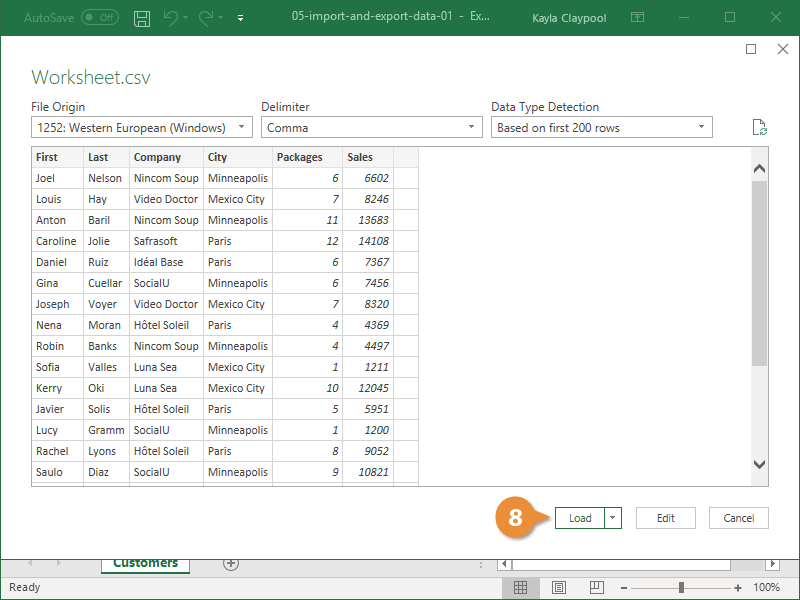
- Verify the preview looks correct.
Because we’ve specified the data is separated by commas, the delimiter is already set. If you need to change it, it can be done from this menu.
- Click Load.

FREE Quick Reference
Click to Download
Free to distribute with our compliments; we hope you will consider our paid training.
17 авг. 2022 г.
читать 2 мин
Часто вас может заинтересовать экспорт фрейма данных pandas в Excel. К счастью, это легко сделать с помощью функции pandas to_excel() .
Чтобы использовать эту функцию, вам нужно сначала установить openpyxl , чтобы вы могли записывать файлы в Excel:
pip install openpyxl
В этом руководстве будет объяснено несколько примеров использования этой функции со следующим фреймом данных:
import pandas as pd
#create DataFrame
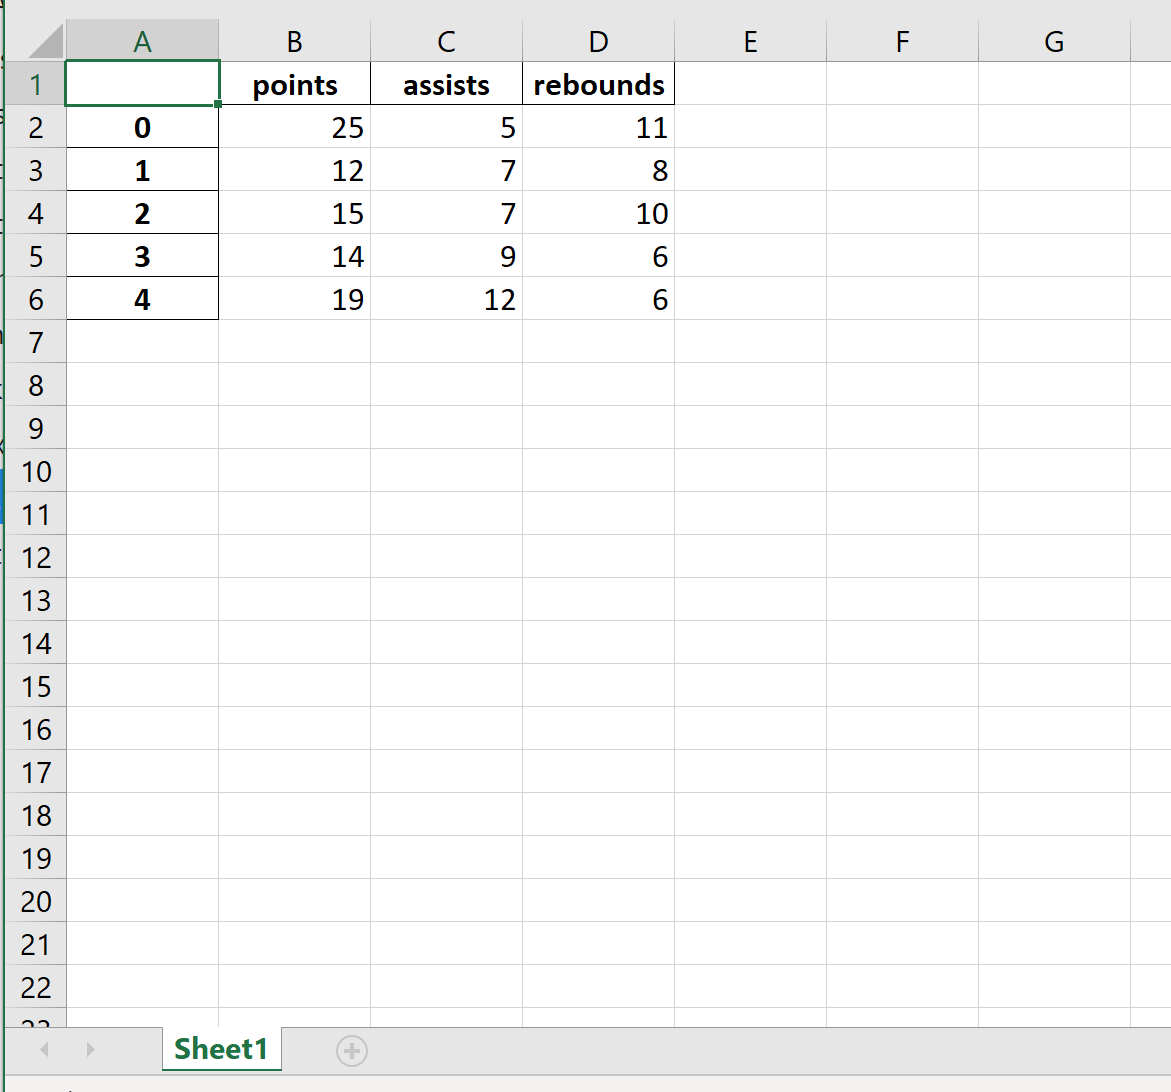
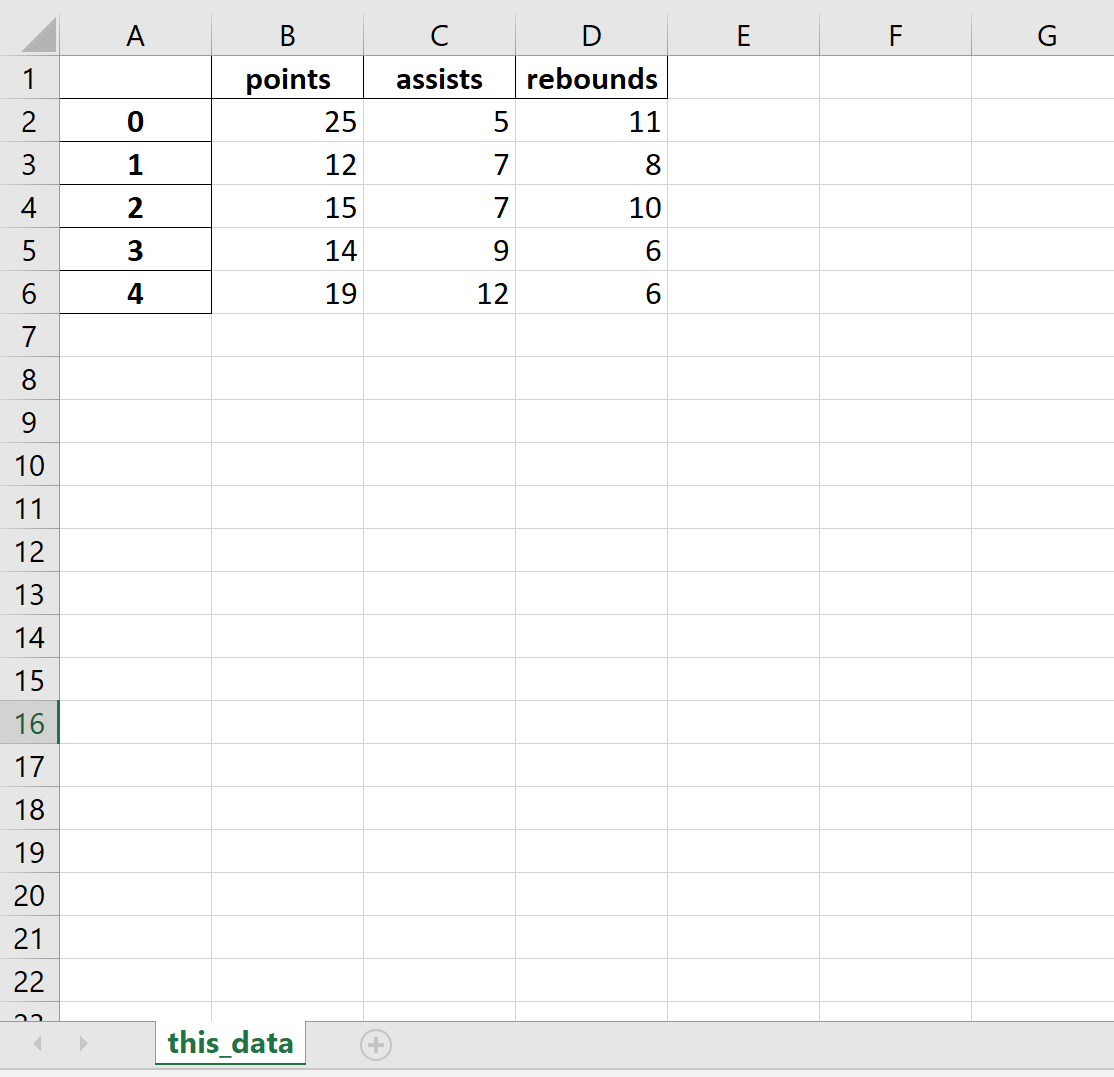
df = pd.DataFrame({'points': [25, 12, 15, 14, 19],
'assists': [5, 7, 7, 9, 12],
'rebounds': [11, 8, 10, 6, 6]})
#view DataFrame
df
points assists rebounds
0 25 5 11
1 12 7 8
2 15 7 10
3 14 9 6
4 19 12 6
Пример 1: базовый экспорт
В следующем коде показано, как экспортировать DataFrame по определенному пути к файлу и сохранить его как mydata.xlsx :
df.to_excel (r'C:UsersZachDesktopmydata.xlsx')
Вот как выглядит фактический файл Excel:
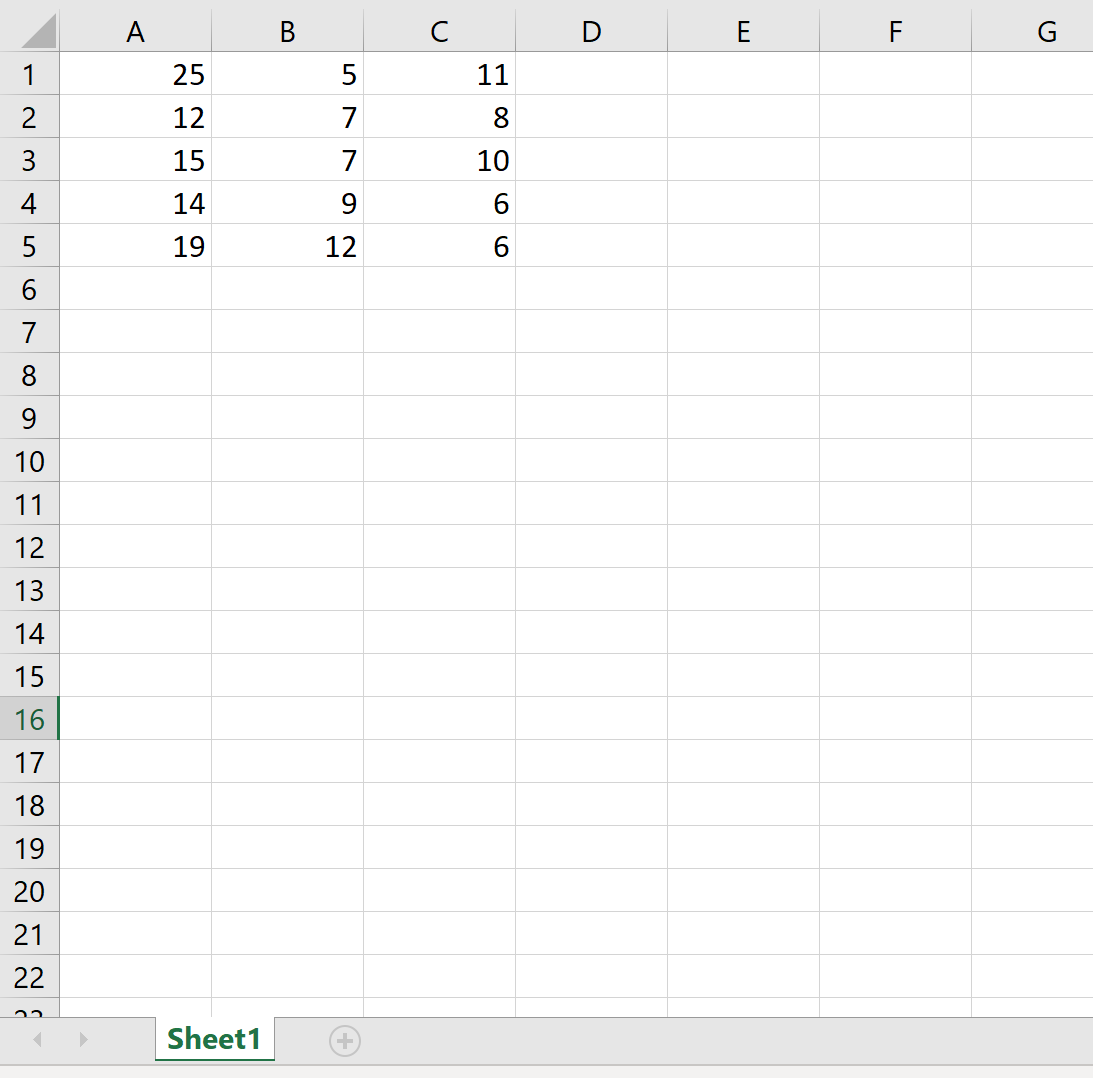
Пример 2: Экспорт без индекса
В следующем коде показано, как экспортировать DataFrame в определенный путь к файлу и удалить столбец индекса:
df.to_excel (r'C:UsersZachDesktopmydata.xlsx', index= False )
Вот как выглядит фактический файл Excel:

Пример 3: Экспорт без индекса и заголовка
В следующем коде показано, как экспортировать DataFrame в определенный путь к файлу и удалить столбец индекса и строку заголовка:
df.to_excel (r'C:UsersZachDesktopmydata.xlsx', index= False, header= False )
Вот как выглядит фактический файл Excel:
Пример 4: Экспорт и имя листа
В следующем коде показано, как экспортировать DataFrame в определенный путь к файлу и назвать рабочий лист Excel:
df.to_excel (r'C:UsersZachDesktopmydata.xlsx', sheet_name='this_data')
Вот как выглядит фактический файл Excel:
Полную документацию по функции to_excel() можно найти здесь .
В этой статье Вы найдёте 2 простых способа преобразовать файл CSV в Excel. Кроме того, Вы узнаете, как импортировать в Excel несколько файлов CSV и как справиться с ситуациями, когда часть данных из файла CSV не отображается корректно на листе Excel.
Недавно мы начали изучать особенности формата CSV (Comma-Separated Values – значения, разделённые запятой) и различные способы преобразования файла Excel в CSV. Сегодня мы займёмся обратным процессом – импортом CSV в Excel.
Эта статья покажет Вам, как открывать CSV в Excel и как импортировать одновременно несколько файлов CSV. Мы также обозначим возможные подводные камни и предложим наиболее эффективные решения.
- Как преобразовать CSV в Excel
- Преобразование CSV в Excel: проблемы и решения
Содержание
- Как преобразовать CSV в Excel
- Как открыть файл CSV в Excel
- Как открыть файл CSV при помощи Проводника Windows
- Как импортировать CSV в Excel
- Преобразование CSV в Excel: проблемы и решения
- Файл CSV отображается в Excel неправильно
- Первые нули теряются при открытии файла CSV в Excel
- Excel преобразует некоторые значения в даты при открытии файла CSV
- Как импортировать в Excel несколько файлов CSV
Как преобразовать CSV в Excel
Если Вам нужно вытащить какую-то информацию на лист Excel из базы данных Вашей компании, то первая же идея, что приходит на ум, – экспортировать базу данных в файл CSV, а затем импортировать файл CSV в Excel.
Существует 3 способа преобразования CSV в Excel: Вы можете открыть файл с расширением .csv непосредственно в Excel, дважды кликнуть по файлу в Проводнике Windows либо импортировать CSV в Excel, как внешний источник данных. Далее я подробно расскажу об этих трёх способах и укажу преимущества и недостатки каждого из них.
- Способ 1: Открываем файл CSV в Excel
- Способ 2: Открываем файл CSV в Excel при помощи Проводника Windows
- Способ 3: Импортируем CSV в Excel
Как открыть файл CSV в Excel
Даже если файл CSV создан в другой программе, Вы всегда можете открыть его как книгу Excel при помощи команды Open (Открыть).
Замечание: Открытие файла CSV в Excel не изменяет формат файла. Другими словами, файл CSV при этом не будет преобразован в файл Excel (формат .xls или .xlsx), он сохранит свой изначальный тип (.csv или .txt).
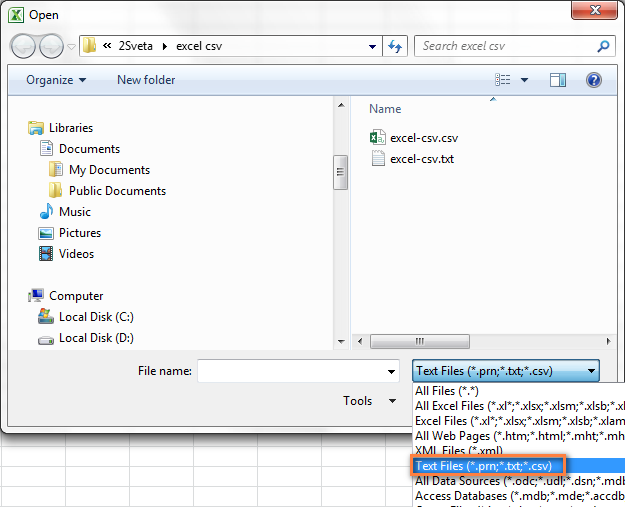
- Запустите Microsoft Excel, на вкладке Home (Главная) нажмите Open (Открыть).
- Появится диалоговое окно Open (Открытие документа), в выпадающем списке в нижнем правом углу выберите Text Files (Текстовые файлы).

- Найдите в Проводнике Windows файл CSV и откройте его, дважды кликнув по нему.
Если Вы открываете файл CSV, то Excel откроет его сразу же вставив данные в новую книгу Excel. Если Вы открываете текстовый файл (.txt), то Excel запустит Мастер импорта текстов. Подробнее об этом читайте в разделе Импортируем CSV в Excel.
Замечание: Когда Microsoft Excel открывает файл CSV, то для того, чтобы понять, как именно импортировать каждый столбец данных, он использует настройки форматирования, заданные по умолчанию.
Если данные соответствуют хотя бы одному из следующих пунктов, то воспользуйтесь Мастером импорта текстов:
- В файле CSV использованы различные разделители;
- В файле CSV использованы различные форматы даты;
- Вы преобразуете данные, среди которых есть числа с нулём в начале, и Вы хотите сохранить этот ноль;
- Вы хотите предварительно просмотреть, как будут импортированы данные из файла CSV в Excel;
- Вам хочется большей гибкости в работе.
Чтобы заставить Excel запустить Мастер импорта текстов, Вы можете либо изменить расширение фала с .csv на .txt (прежде чем открывать файл), либо импортировать CSV в Excel так, как это будет описано далее.
Как открыть файл CSV при помощи Проводника Windows
Это самый быстрый способ открыть CSV в Excel. В Проводнике Windows дважды кликните по файлу .csv, и он откроется как новая книга Excel.
Однако, этот способ сработает только в том случае, если приложение Microsoft Excel установлено как программа, заданная по умолчанию, для открытия файлов .csv. Если это так, то Вы будете видеть знакомую иконку в Проводнике Windows рядом с именем файла.
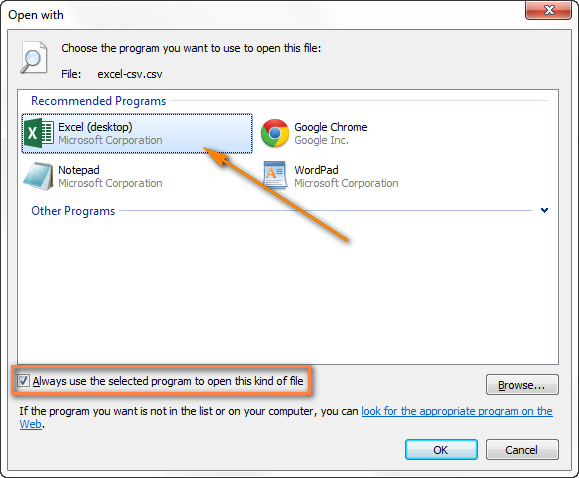
Если Excel не является программой по умолчанию, вот как Вы можете это исправить:
- Кликните правой кнопкой мыши по любому файлу .csv в Проводнике Windows и в открывшемся контекстном меню нажмите Open with (Открыть с помощью) > Choose default program (Выбрать программу).
- Выберите Excel в списке рекомендованных программ, убедитесь, что стоит галочка для параметра Always use the selected program to open this kind of file (Всегда использовать выбранное приложение для такого типа файлов) и нажмите ОК.
Как импортировать CSV в Excel
Этим способом Вы можете импортировать данные из файла .csv в существующий или в новый лист Excel. В отличие от предыдущих двух способов, он не просто открывает CSV в Excel, а именно конвертирует формат .csv в .xlsx (если Вы используете Excel 2007, 2010 или 2013) или .xls (в версиях Excel 2003 и более ранних).
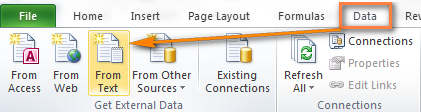
- Откройте нужный лист Excel и кликните по ячейке, куда нужно импортировать данные из файла .csv или .txt.
- На вкладке Data (Данные) в разделе Get External Data (Получение внешних данных) кликните From Text (Из текста).
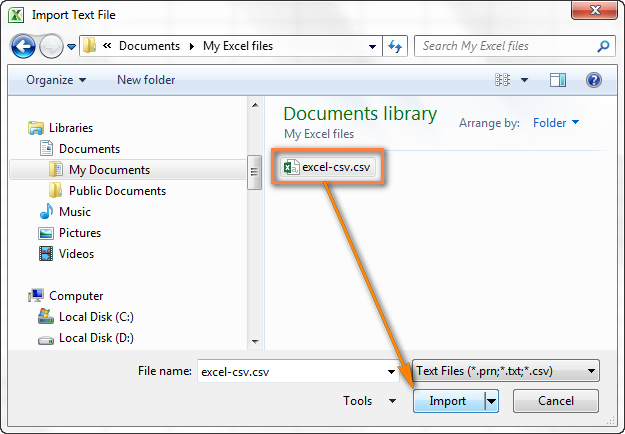
- Найдите файл .csv, который требуется импортировать, выберите его и нажмите кнопку Import (Импорт), или просто дважды кликните по нужному CSV файлу.
- Откроется Мастер импорта текстов, Вам нужно просто выполнить его шаги.
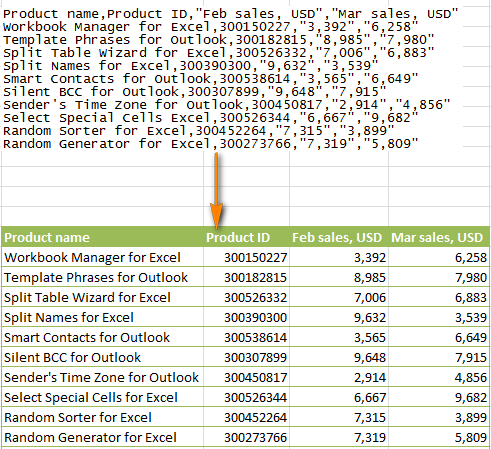
Прежде, чем мы двинемся дальше, пожалуйста, посмотрите на снимок экрана ниже, на нем показан исходный файл CSV и желаемый результат в Excel. Надеюсь, это поможет Вам лучше понять, почему мы выбираем те или иные параметры настроек в последующем примере.
-
- Шаг 1. Выберите формат данных и номер строки, с которой нужно начинать импорт. Чаще всего выбирают Delimited (С разделителями) и со строки 1. Область предварительного просмотра в нижней части диалогового окна мастера показывает первые несколько записей импортируемого файла CSV.
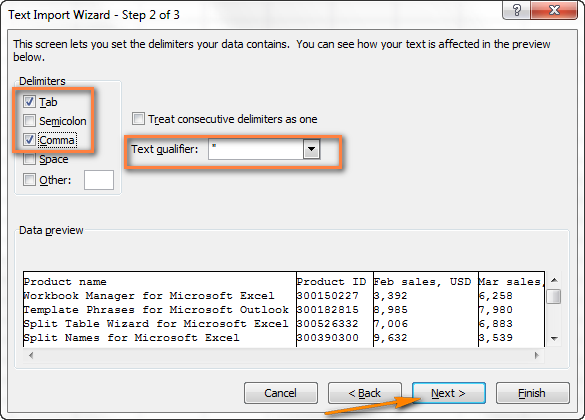
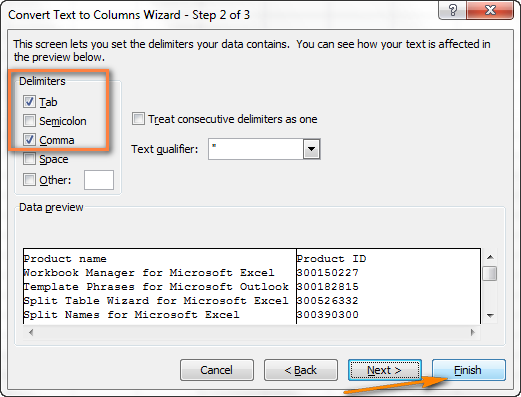
- Шаг 2. На этом шаге нужно выбрать разделители и ограничитель строк. Delimiter (Разделитель) – это символ, который разделяет значения в файле CSV. Если в Вашем файле CSV использован какой-то символ, которого нет в предложенном списке, то поставьте галочку в варианте Other (Другой) и введите нужный символ. В нашем примере мы указали Tab (Знак табуляции) и Comma (Запятая), чтобы каждый товар (они разделены табуляцией) начинался с новой строки, а информация о товаре, например, ID и данные о продажах (они разделены запятыми), были помещены в разные ячейки.Text qualifier (Ограничитель строк) – это символ, в который заключены отдельные значения. Весь текст, заключённый между такими символами, например, «текст1, текст2», будет импортирован как одно значение, даже если в этом тексте содержится символ, указанный Вами как разделитель.В этом примере мы указали запятую как разделитель, и кавычки как ограничитель строк. В результате, все числа с разделителем десятичных разрядов (которым тоже в нашем случае служит запятая!) будут импортированы в одну ячейку, как это видно в области предпросмотра на рисунке ниже. Если мы не укажем кавычки как ограничитель строк, то все числа будут импортированы в разные ячейки.
- Шаг 3. Посмотрите в область Data preview (Образец разбора данных). Если Вы довольны тем, как выглядят Ваши данные, тогда жмите кнопку Finish (Готово).
- Шаг 1. Выберите формат данных и номер строки, с которой нужно начинать импорт. Чаще всего выбирают Delimited (С разделителями) и со строки 1. Область предварительного просмотра в нижней части диалогового окна мастера показывает первые несколько записей импортируемого файла CSV.

Совет: Если в Вашем файле CSV используется последовательно более одной запятой или другого символа-разделителя, то поставьте галочку для параметра Treat consecutive delimiters as one (Считать последовательные разделители одним), чтобы избежать появления пустых ячеек.
- Выберите, куда вставлять импортированные данные, на существующий или на новый лист, и нажмите ОК, чтобы завершить импорт файла CSV в Excel.
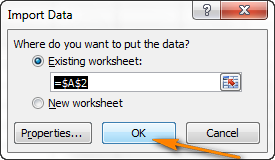
Совет: Вы можете нажать кнопку Properties (Свойства), чтобы настроить дополнительные параметры, такие как обновление, разметка и форматирование для импортированных данных.
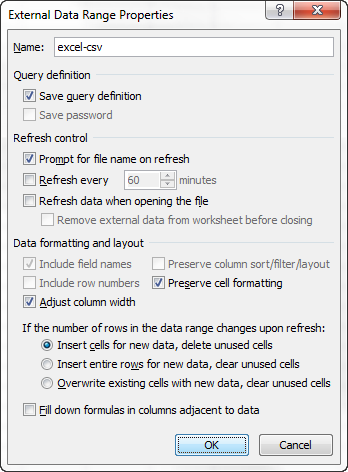
Замечание: Если Ваш файл CSV содержит численные данные или даты, Excel может преобразовать их с ошибками. Чтобы изменить формат импортированных данных, выберите столбец (столбцы), в которых возникли ошибки, кликните по ним правой кнопкой мыши и в контекстном меню выберите Format cells (Формат ячеек).
Преобразование CSV в Excel: проблемы и решения
Формат CSV используется уже более 30 лет, но несмотря на его длительную историю, он никогда не был официально задокументирован. Название CSV (Comma-Separated Values) возникло из-за использования запятых для разделения полей данных. Но это в теории. На самом деле, множество так называемых CSV-файлов используют другие символы для разделения данных, например:
- Табуляция – TSV-файлы (tab-separated values)
- Точка с запятой – SCSV-файлы (semicolon separated values)
Некоторые вариации файлов CSV разделяют поля данных одинарными или двойными кавычками, другие требуют маркер последовательности байтов из Юникода (BOM), например, UTF-8, для корректной интерпретации Юникода.
Это отсутствие стандартов порождает разнообразные проблемы, с которыми Вы можете столкнуться, пытаясь преобразовать файл Excel в CSV, и особенно, когда импортируете файл CSV в Excel. Давайте разберёмся с известными проблемами, начиная с самой распространённой.
- Файл CSV отображается в Excel неправильно (все данные помещены в первый столбец)
- Первые нули потеряны при открытии файла CSV в Excel
- Значения преобразованы в даты при импорте файла CSV в Excel
Файл CSV отображается в Excel неправильно
Признаки: Вы пытаетесь открыть файл CSV в Excel, и все данные попадают в первый столбец.
Причина: Корень проблемы кроется в том, что в Ваших региональных и языковых настройках Windows и в Вашем файле CSV установлены различные разделители. В Северной Америке и некоторых других странах разделителем полей списка по умолчанию является запятая. В то время как в Европейских странах запятая используется как разделитель десятичных разрядов, а разделителем полей списка является точка с запятой.
Решение: Есть несколько возможных решений этой проблемы. Вы можете быстро просмотреть приведённые ниже рекомендации и выбрать наиболее подходящие для конкретно Вашей задачи.
- Укажите правильный разделитель непосредственно в файле CSV. Откройте файл CSV в любом текстовом редакторе (подойдёт даже обычный блокнот) и в первой строке вставьте следующий текст. Обратите внимание, что это должна быть отдельная строка перед любыми другими данными:
- Чтобы установить разделитель запятую: sep=,
- Чтобы установить разделитель точку с запятой: sep=;
Как Вы уже догадались, таким образом можно установить в качестве разделителя любой другой символ, просто указав его сразу после знака равенства.
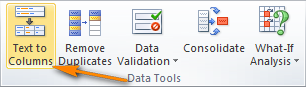
- Выберите нужный разделитель в Excel. В Excel 2013 или 2010 на вкладке Data (Данные) в разделе Data Tools (Работа с данными) нажмите Text To Columns (Текст по столбцам).Когда запустится Мастер распределения текста по столбцам, на первом шаге выберите формат данных Delimited (С разделителями) и нажмите Next (Далее). На втором шаге выберите нужный разделитель и нажмите Finish (Готово).
- Измените расширение с .csv на .txt. Открытие файла .txt в Excel приведёт к запуску Мастера импорта текстов, и Вы сможете выбрать нужный разделитель, как это было описано в разделе Как импортировать CSV в Excel.
- Откройте файл CSV с точкой с запятой в качестве разделителя при помощи VBA. Вот пример кода VBA, который открывает в Excel файл CSV, где в качестве разделителя используется точка с запятой. Код был написан несколько лет назад для более ранних версий Excel (2000 и 2003), но если Вы достаточно хорошо знакомы с VBA, то у Вас не должно возникнуть проблем с его обновлением или изменением для работы с файлами CSV с запятой в качестве разделителя.
 Когда запустится Мастер распределения текста по столбцам, на первом шаге выберите формат данных Delimited (С разделителями) и нажмите Next (Далее). На втором шаге выберите нужный разделитель и нажмите Finish (Готово).
Замечание: Все показанные решения изменяют разделитель только для данного файла CSV. Если Вы хотите раз и навсегда изменить разделитель, заданный по умолчанию, то Вам подойдёт следующее решение.
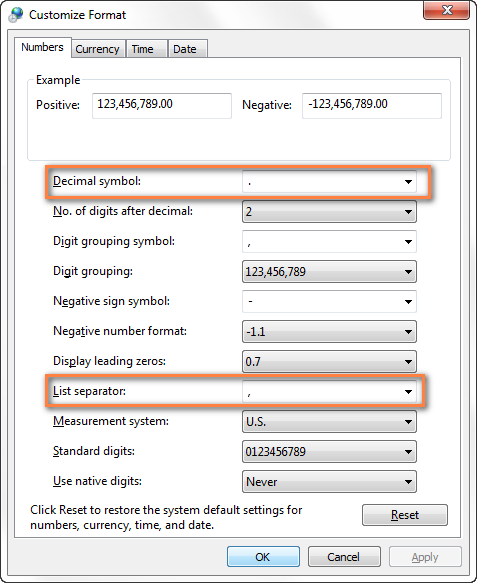
- Изменяем разделители в настройках региональных стандартов. Нажмите кнопку Start (Пуск) и запустите Control Panel (Панель управления), кликните пункт Region and Language (Региональные стандарты) > Additional Settings (Дополнительные параметры). Откроется диалоговое окно Customize Format (Настройка формата), в котором Вам нужно выбрать точку (.) для параметра Decimal symbol (Разделитель целой и дробной части), и установить запятую (,) для параметра List separator (Разделитель элементов списка).
Примечание переводчика: Данные настройки приведены для английской локализации Excel (и ряда других стран). Для русской локализации привычнее будет использовать запятую в качестве разделителя целой и дробной части и точку с запятой для разделения элементов списка.
- Дважды нажмите ОК, чтобы закрыть диалоговые окна – всё готово! С этого момента Microsoft Excel будет открывать и отображать все файлы CSV (с разделителем запятой) корректно.
 Дважды нажмите ОК, чтобы закрыть диалоговые окна – всё готово! С этого момента Microsoft Excel будет открывать и отображать все файлы CSV (с разделителем запятой) корректно.
Замечание: Установка в Панели управления Windows символов-разделителей целой и дробной части и элементов списка изменит настройки символов, заданные по умолчанию, для всех программ на Вашем компьютере, а не только в Microsoft Excel.
Первые нули теряются при открытии файла CSV в Excel
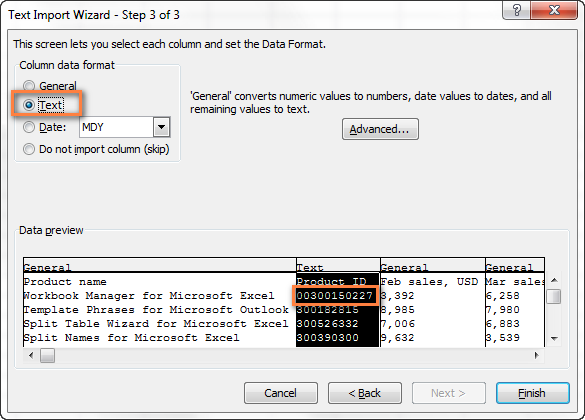
Признаки: Ваш файл CSV содержит значения с первыми нулями, и эти нули теряются при открытии файла CSV в Excel.
Причина: По умолчанию, Microsoft Excel отображает файл CSV в формате General (Общий), в котором первые нули отсекаются.
Решение: Вместо того, чтобы открывать файл .csv в Excel, запустите, как мы это делали ранее, Мастер импорта текстов, чтобы конвертировать файл CSV в Excel.
На шаге 3 мастера выберите столбцы, содержащие значения с первыми нулями и измените формат этих столбцов на текстовый. Так Вы конвертируете Ваш файл CSV в Excel, сохранив нули на своих местах.
Excel преобразует некоторые значения в даты при открытии файла CSV
Признаки: Некоторые значения в Вашем файле CSV похожи на даты, и Excel автоматически преобразует такие значения из текстового формата в формат даты.
Причина: Как упоминалось выше, Excel открывает файл CSV в формате General (Общий), при этом значения, похожие на даты, преобразует из текстового формата в формат даты. Например, если Вы открываете файл CSV, содержащий логины пользователей, то запись «апр23» будет преобразована в дату.
Решение: Преобразуйте файл CSV в Excel при помощи Мастера импорта текстов. На шаге 3 мастера выберите столбцы с записями, похожими на даты, и измените формат столбца на текстовый.
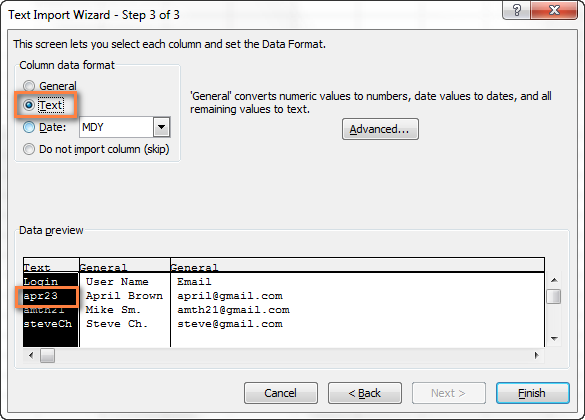
Если Вам нужно достичь противоположного результата, то есть в определённом столбце преобразовать значения в даты, тогда установите формат Date (Дата) и выберите подходящий формат даты в выпадающем списке.
Как импортировать в Excel несколько файлов CSV
Думаю, Вы знаете, что Microsoft Excel позволяет открывать несколько файлов CSV при помощи команды Open (Открыть).
- На вкладке File (Файл) нажмите Open (Открыть) и в выпадающем списке в нижней правой части диалогового окна выберите Text Files (Текстовые файлы).
- Чтобы выделить несколько файлов подряд, кликните по первому файлу, затем нажав и удерживая клавишу Shift, кликните по крайнему файл. Оба эти файла, а также все, что находятся между ними, будут выделены.Чтобы выделить файлы, расположенные не подряд, удерживайте клавишу Ctrl и щелкайте по каждому файлу .csv, который хотите открыть.
- Когда выделены все нужные файлы CSV, нажмите кнопку Open (Открыть).
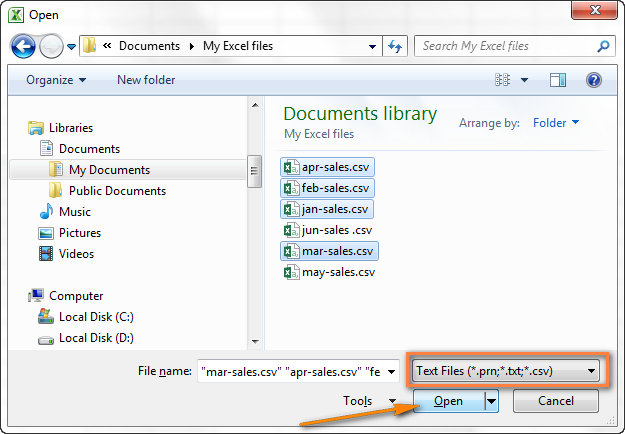
Этот способ простой и быстрый, и мы могли бы назвать его отличным, если бы не одно обстоятельство – каждый файл CSV открывается таким образом как отдельная книга Excel. На практике переключение туда-сюда между несколькими открытыми файлами Excel может быть крайне неудобным и обременительным.
Надеюсь, теперь Вы легко сможете преобразовать любой файл CSV в Excel. Если у Вас возникают какие-либо вопросы или сложности, смело пишите мне в комментариях. И благодарю за терпение каждого, кто осилил чтение этой длинной статьи до самого конца! 🙂
Оцените качество статьи. Нам важно ваше мнение: