
tableExport.jquery.plugin
Export HTML Table to
- CSV
- DOC
- JSON
- PNG
- SQL
- TSV
- TXT
- XLS (Excel 2000 HTML format)
- XLSX (Excel 2007 Office Open XML format)
- XML (Excel 2003 XML Spreadsheet format)
- XML (Raw xml)
Installation
To save the generated export files on client side, include in your html code:
<script type="text/javascript" src="libs/FileSaver/FileSaver.min.js"></script>
To export the table in XLSX (Excel 2007+ XML Format) format, you need to include additionally SheetJS/js-xlsx:
<script type="text/javascript" src="libs/js-xlsx/xlsx.core.min.js"></script>
In case you still want to support IE11, you need to include jsPDF’s polyfills.umd.js.
Please do this before you include jspdf.umd.min.js and html2canvas.min.js
<script type="text/javascript" src="../libs/jsPDF/polyfills.umd.js"></script>
To export an html table to a PDF file, you can use jsPDF as a PDF producer:
<script type="text/javascript" src="libs/jsPDF/jspdf.umd.min.js"></script>
Many HTML stylings can be converted to PDF with jsPDF, but support for non-western character sets is almost non-existent. Especially if you want to export Arabic or Chinese characters to your PDF file, you can use pdfmake as an alternative PDF producer. The disadvantage compared to jspdf is that using pdfmake has a reduced styling capability. To use pdfmake enable the pdfmake option and instead of the jsPDF files include
<script type="text/javascript" src="libs/pdfmake/pdfmake.min.js"></script>
<script type="text/javascript" src="libs/pdfmake/vfs_fonts.js"></script>

<!-- To export arabic characters include mirza_fonts.js _instead_ of vfs_fonts.js
<script type="text/javascript" src="libs/pdfmake/mirza_fonts.js"></script>
-->

<!-- For a chinese font include either gbsn00lp_fonts.js or ZCOOLXiaoWei_fonts.js _instead_ of vfs_fonts.js
<script type="text/javascript" src="libs/pdfmake/gbsn00lp_fonts.js"></script>
-->
To export the table in PNG format, you need to include:
<script type="text/javascript" src="libs/html2canvas/html2canvas.min.js"></script>
Regardless of the desired format, finally include:
<script type="text/javascript" src="tableExport.min.js"></script>
Please keep this include order.
Dependencies
| Library | Version |
|---|---|
| jQuery | >= 3.2.1 |
| FileSaver | >= 2.0.1 |
| html2canvas | >= 1.0.0 |
| jsPDF | >=2.0.0 |
| pdfmake | 0.1.71 |
| SheetJS | >= 0.16.0 |
Examples
// CSV format

$('#tableID').tableExport({type:'csv'});
// Excel 2000 html format

$('#tableID').tableExport({type:'excel'});
// XML Spreadsheet 2003 file format with multiple worksheet support

$('table').tableExport({type:'excel',
                        mso: {fileFormat:'xmlss',
                              worksheetName: ['Table 1','Table 2', 'Table 3']}});
// PDF export using jsPDF only

$('#tableID').tableExport({type:'pdf',
                           jspdf: {orientation: 'p',
                                   margins: {left:20, top:10},
                                   autotable: false}
                          });
// PDF format using jsPDF and jsPDF Autotable

$('#tableID').tableExport({type:'pdf',
                           jspdf: {orientation: 'l',
                                   format: 'a3',
                                   margins: {left:10, right:10, top:20, bottom:20},
                                   autotable: {styles: {fillColor: 'inherit',
                                                        textColor: 'inherit'},
                                               tableWidth: 'auto'}
                                  }
                          });
// PDF format with callback example

function DoCellData(cell, row, col, data) {}
function DoBeforeAutotable(table, headers, rows, AutotableSettings) {}

$('table').tableExport({fileName: sFileName,
                        type: 'pdf',
                        jspdf: {format: 'bestfit',
                                margins: {left:20, right:10, top:20, bottom:20},
                                autotable: {styles: {overflow: 'linebreak'},
                                            tableWidth: 'wrap',
                                            tableExport: {onBeforeAutotable: DoBeforeAutotable,
                                                          onCellData: DoCellData}}}
                       });
// PDF export using pdfmake

$('#tableID').tableExport({type:'pdf',
                           pdfmake:{enabled:true,
                                    docDefinition:{pageOrientation:'landscape'}}
                          });
Options (Default settings)
csvEnclosure: '"'
csvSeparator: ','
csvUseBOM: true
date: html: 'dd/mm/yyyy'
exportHiddenCells: false
fileName: 'tableExport'
htmlContent: false
htmlHyperlink: 'content'
ignoreColumn: []
ignoreRow: []
jsonScope: 'all'
jspdf: orientation: 'p'
       unit:'pt'
       format: 'a4'
       margins: left: 20
                right: 10
                top: 10
                bottom: 10
       onDocCreated: null
       autotable: styles: cellPadding: 2
                          rowHeight: 12
                          fontSize: 8
                          fillColor: 255
                          textColor: 50
                          fontStyle: 'normal'
                          overflow: 'ellipsize'
                          halign: 'inherit'
                          valign: 'middle'
                  headerStyles: fillColor: [52, 73, 94]
                                textColor: 255
                                fontStyle: 'bold'
                                halign: 'inherit'
                                valign: 'middle'
                  alternateRowStyles: fillColor: 245
                  tableExport: doc: null
                               onAfterAutotable: null
                               onBeforeAutotable: null
                               onAutotableText: null
                               onTable: null
                               outputImages: true
mso: fileFormat: 'xlshtml'
     onMsoNumberFormat: null
     pageFormat: 'a4'
     pageOrientation: 'portrait'
     rtl: false
     styles: []
     worksheetName: ''
     xlsx: formatId: date: 14
                     numbers: 2
                     currency: 164
           format: currency: '$#,##0.00;[Red]-$#,##0.00'
           onHyperlink: null
numbers: html: decimalMark: '.'
               thousandsSeparator: ','
         output: decimalMark: '.'
                 thousandsSeparator: ','
onAfterSaveToFile: null
onBeforeSaveToFile: null
onCellData: null
onCellHtmlData: null
onCellHtmlHyperlink: null
onIgnoreRow: null
onTableExportBegin: null
onTableExportEnd: null
outputMode: 'file'
pdfmake: enabled: false
         docDefinition: pageSize: 'A4'
                        pageOrientation: 'portrait'
                        styles: header: background: '#34495E'
                                        color: '#FFFFFF'
                                        bold: true
                                        alignment: 'center'
                                        fillColor: '#34495E'
                        alternateRow: fillColor: '#f5f5f5'
                        defaultStyle: color: '#000000'
                                      fontSize: 8
                                      font: 'Roboto'
         fonts: {}
preserve: leadingWS: false
          trailingWS: false
preventInjection: true
sql: tableEnclosure:  '`'
     columnEnclosure: '`'
tbodySelector: 'tr'
tfootSelector: 'tr'
theadSelector: 'tr'
tableName: 'myTableName'
type: 'csv'
Notes on options that apply to all formats
The option ignoreColumn can be either an array of indexes (i.e. [0, 2]) or field names (i.e. [«id», «name»]), where
- Indexes correspond to the position of the header elements
thin the DOM starting at 0. (If thethelements are removed or added to the DOM, the indexes will be shifted so use the functionality wisely!) - Field names should correspond to the values set on the «data-field» attribute of the header elements
thin the DOM. - «Nameless» columns without data-field attribute will be named by their index number (converted to a string)
To disable formatting of numbers in the exported output, which can be useful for csv and excel format, set the option numbers: output to false.
There is an option preventInjection (enabled by default) that prevents the injection of formulas when exporting in CSV or Excel format. To achieve this, a single quote is appended to cell strings starting with =,+,- or @
There are a couple of format-independent and format-specific callback functions that can be used to control the output result during export. All callback functions have a name starting with on and are initialized with null.
Notes for Excel formats
Set the option mso.fileFormat to 'xmlss' if you want to export in XML Spreadsheet 2003 file format. Use this format if multiple tables should be exported into a single file.
Excel 2000 html format is the default excel file format which has better support of exporting table styles.
The mso.styles option lets you define the css attributes of the original html table cells, that should be taken over when exporting to an excel worksheet (Excel 2000 html format only).
To export in XSLX format SheetJS/js-xlsx is used. Please note that with this format the amount of exportable styling information of the HTML table is limited compared to other formats.
When exporting in Excel 2000 html format (xlshtml), the default extension of the output file is XLS, although the type of the file content is HTML. When you open a file in Microsoft Office Excel 2007 or later that contains content that does not match the extensionof the file, you receive the following warning message:
The file you are trying to open, 'name.ext', is in a different format than specified by the file extension. Verify that the file is not corrupted and is from a trusted source before opening the file. Do you want to open the file now?
According to a Knowledge base article the warning message can help prevent unexpected problems that might occur because of possible incompatibility between the actual content of the file and the file name extension. The article also gives you some hints to disable the warning message.
PDF format related options
For jsPDF options see the documentation of jsPDF. To generate tables with jsPDF this plugin uses a specific modified version (2.0.17) of jsPDF-AutoTable. Due to compatibility reasons the source code of this version has been integrated and was adapted.
There is an extended setting for the jsPDF option format. If you set the value of the option to bestfit, the tableExport plugin will try to choose the minimum required paper size and orientation in which the table (or tables in multitable mode) can be displayed without column adjustment.
Also there is an extended setting for the jsPDF-AutoTable options 'fillColor', 'textColor' and 'fontStyle'. When setting these option values to 'inherit' the original css values for background and text color will be used as fill and text color while exporting to pdf. A css font-weight >= 700 results in a bold fontStyle and the italic css font-style will be used as italic fontStyle.
When exporting to pdf the option outputImages lets you enable or disable the output of images that are located in the original html table.
Optional html data attributes
(can be applied while generating the table that you want to export)
data-tableexport-cellformat
<td data-tableexport-cellformat="">...</td> -> An empty data value preserves format of cell content. E.g. no number seperator conversion

                                               More cell formats to be come...
data-tableexport-colspan
<td colspan="2" data-tableexport-colspan="3">...</td> -> Overwrites the colspan attribute of the table cell during export.
                                                         This attribute can be used if there follow hidden cells, that will be exported by using the "data-tableexport-display" attribute.
data-tableexport-display
<table style="display:none;" data-tableexport-display="always">...</table> -> A hidden table will be exported

<td style="display:none;" data-tableexport-display="always">...</td> -> A hidden cell will be exported

<td data-tableexport-display="none">...</td> -> This cell will not be exported

<tr data-tableexport-display="none">...</tr> -> All cells of this row will not be exported
data-tableexport-msonumberformat
<td data-tableexport-msonumberformat="@">...</td> -> Data value will be used to style excel cells with mso-number-format (Excel 2000 html format only)
                                                      Format                      Description
                                                      ===================================================================================
                                                      "@"                        Excel treats cell content always as text, even numbers
                                                      "0"                         Excel will display no decimals for numbers
                                                      "0.000"                    Excel displays numbers with 3 decimals
                                                      "0%"                        Excel will display a number as percent with no decimals
                                                      "Percent"                   Excel will display a number as percent with 2 decimals
                                                      "#,##0.000"            Comma with 3 decimals
                                                      "mm/dd/yy"                Date7
                                                      "mmmm d, yyyy"           Date9
                                                      "m/d/yy h:mm AM/PM"   D -T AMPM
                                                      "Short Date"                01/03/1998
                                                      "Medium Date"               01-mar-98
                                                      "d-mmm-yyyy"              01-mar-1998
                                                      "Short Time"                5:16
                                                      "Medium Time"               5:16 am
                                                      "Long Time"                 5:16:21:00
                                                      "0.E+00"                   Scientific Notation
                                                      "# ???/???"              Fractions - up to 3 digits
                                                      "022£022#,##0.00"  £12.76
                                                      "#,##0.00_ ;[Red]-#,##0.00 "  2 decimals, negative red numbers
data-tableexport-rowspan
<td rowspan="2" data-tableexport-rowspan="3">...</td> -> Overwrites the rowspan attribute of the table cell during export.
                                                         This attribute can be used if there follow hidden rows, that will be exported by using the "data-tableexport-display" attribute.
data-tableexport-value
<th data-tableexport-value="export title">title</th> -> "export title" instead of "title" will be exported

<td data-tableexport-value="export content">content</td> -> "export content" instead of "content" will be exported
data-tableexport-xlsxformatid
<td data-tableexport-xlsxformatid="14">...</td> -> The data value represents a format id that will be used to format the content of a cell in Excel. This data attribute overwrites the default setting of defaults.mso.xslx.formatId.
                                                   This attribute is for Excel 2007 Office Open XML format only.

                                                   Format id                    Description
                                                   ===============================================================
                                                   "1"                          0
                                                   "2"                          0.00
                                                   "3"                          #,##0
                                                   "4"                          #,##0.00
                                                   "9"                          0%
                                                   "10"                         0.00%
                                                   "11"                         0.00E+00
                                                   "12"                         # ?/?
                                                   "13"                         # ??/??
                                                   "14"                         m/d/yy (will be localized by Excel)
                                                   "15"                         d-mmm-yy
                                                   "16"                         d-mmm
                                                   "17"                         mmm-yy
                                                   "18"                         h:mm AM/PM
                                                   "19"                         h:mm:ss AM/PM
                                                   "20"                         h:mm
                                                   "21"                         h:mm:ss
                                                   "22"                         m/d/yy h:mm
                                                   "37"                         #,##0 ;(#,##0)
                                                   "38"                         #,##0 ;[Red](#,##0)
                                                   "39"                         #,##0.00;(#,##0.00)
                                                   "40"                         #,##0.00;[Red](#,##0.00)
                                                   "45"                         mm:ss
                                                   "46"                         [h]:mm:ss
                                                   "47"                         mmss.0
                                                   "48"                         ##0.0E+0
                                                   "49"                         @
                                                   "56"                         上午/下午 hh時mm分ss秒
                                                   {mso.xlsx.formatid.currency} {mso.xlsx.format.currency}
Improve Article
Save Article
Like Article
Improve Article
Save Article
Like Article
Any HTML table that you have created can be converted into an Excel Spreadsheet by using jQuery and it is compatible with all browsers. There are two simple approaches that require basic HTML and jQuery knowledge to achieve this.
- Approach 1: Using jQuery plugin: A simple jQuery plugin ‘table2excel’ can be used for converting an HTML table to an excel sheet.
Syntax:
$("#table-id").table2excel({
    filename: "excel_sheet-name.xls"
});
- Example:
html
<table id="studtable">
<tr>
<th>ID</th>
<th>Name</th>
<th>Age</th>
<th>Address</th>
</tr>
<tr>
<td>101</td>
<td>Alex</td>
<td>15</td>
<td>Maldives</td>
</tr>
<tr>
<td>102</td>
<td>Chris</td>
<td>14</td>
<td>Canada</td>
</tr>
<tr>
<td>103</td>
<td>Jay</td>
<td>15</td>
<td>Toronto</td>
</tr>
</table>
<script>
$(document).ready(function () {
$("#studtable").table2excel({
filename: "Students.xls"
});
});
</script>
- Output:
ID    Name    Age    Address
101    Alex    15    Maldives
102    Chris    14    Canada
103    Jay    15    Toronto
- The above output gets converted into an Excel spreadsheet in the exact same manner the HTML table is. About ‘table2excel’: The ‘table2excel’ is a simple yet useful jQuery plugin that allows for exporting HTML table data to an Excel file. The ‘table2excel’ also has a feature to exclude cells that contain a specified class. Syntax for noExport:
$(document).ready(function() {
    $("#table-id").table2excel({
        exclude: ".noExport",
        filename: "name-of-the-file",
    });
});
- Example code for excluding some specified cells:
html
<script src=
"//ajax.googleapis.com/ajax/libs/jquery/2.2.4/jquery.min.js">
</script>
<script src=
"//cdn.rawgit.com/rainabba/jquery-table2excel/1.1.0/dist/jquery.table2excel.min.js">
</script>
<button>Export</button>
<table>
<thead>
<tr>
<td class="noExport">
This cell will not be exported.
</td>
<td>
This cell will get exported.
</td>
</tr>
</thead>
<tbody>
<tr>
<td>Alex</td>
<td class="noExport">Maldives</td>
</tr>
<tr>
<td>Chris</td>
<td>Canada</td>
</tr>
</tbody>
</table>
- Note: In the above sample code, the class ‘.noExport’ has been used to exclude those specified cells from the HTML table data. Therefore the exported Excel Spreadsheet also does not include those cells from the HTML table data.
- Approach 2: Using simple HTML: Consider the same students table above to understand the below. Let’s use a button in our code which when clicked to converts the HTML data table into an Excel spreadsheet. Note that the ‘export’ button below does not actually convert the HTML table to an excel sheet. This has to used in a proper and already existing HTML code to get the Excel spreadsheet and will not work in this IDE.
html
<!DOCTYPE html>
<html>
<head>
<title>
HTML Table To Excel
spreadsheet using
HTML only
</title>
</head>
<body>
<table id="studtable">
<tr>
<th>ID</th>
<th>Name</th>
<th>Age</th>
<th>Address</th>
</tr>
<tr>
<td>101</td>
<td>Alex</td>
<td>15</td>
<td>Maldives</td>
</tr>
<tr>
<td>102</td>
<td>Chris</td>
<td>14</td>
<td>Canada</td>
</tr>
<tr>
<td>103</td>
<td>Jay</td>
<td>15</td>
<td>Toronto</td>
</tr>
</table>
<button onclick="tableToExcel(
'studtable', 'Students')">
Click to Export
</button>
</body>
</html>
- Output:

HTML is the foundation of webpages, is used for webpage development by structuring websites and web apps. jQuery is an open source JavaScript library that simplifies the interactions between an HTML/CSS document, It is widely famous with it’s philosophy of “Write less, do more“.
- HTML Tutorial and HTML Examples.
- jQuery Tutorial and jQuery Examples.
Like Article
Save Article
The reason the solution you found on the internet is no working is because of the line that starts var colCount. The variable mytable only has two elements being <thead> and <tbody>. The var colCount line is looking for all the elements within mytable that are <tr>. The best thing you can do is give an id to your <thead> and <tbody> and then grab all the values based on that. Say you had <thead id='headers'> :
function write_headers_to_excel()
{
  str="";

  var myTableHead = document.getElementById('headers');
  var rowCount = myTableHead.rows.length;
  var colCount = myTableHead.getElementsByTagName("tr")[0].getElementsByTagName("th").length;

var ExcelApp = new ActiveXObject("Excel.Application");
var ExcelSheet = new ActiveXObject("Excel.Sheet");
ExcelSheet.Application.Visible = true;

for(var i=0; i<rowCount; i++)
{
    for(var j=0; j<colCount; j++)
    {
        str= myTableHead.getElementsByTagName("tr")[i].getElementsByTagName("th")[j].innerHTML;
        ExcelSheet.ActiveSheet.Cells(i+1,j+1).Value = str;
    }
}

}
and then do the same thing for the <tbody> tag.
EDIT: I would also highly recommend using jQuery. It would shorten this up to:
function write_to_excel()
{
 var ExcelApp = new ActiveXObject("Excel.Application");
 var ExcelSheet = new ActiveXObject("Excel.Sheet");
 ExcelSheet.Application.Visible = true;

  $('th, td').each(function(i){
    ExcelSheet.ActiveSheet.Cells(i+1,i+1).Value = this.innerHTML;
  });
}
Now, of course, this is going to give you some formatting issues but you can work out how you want it formatted in Excel.
EDIT: To answer your question about how to do this for n number of tables, the jQuery will do this already. To do it in raw Javascript, grab all the tables and then alter the function to be able to pass in the table as a parameter. For instance:
var tables = document.getElementsByTagName('table');
for(var i = 0; i < tables.length; i++)
{
  write_headers_to_excel(tables[i]);
  write_bodies_to_excel(tables[i]);
}
Then change the function write_headers_to_excel() to function write_headers_to_excel(table). Then change var myTableHead = document.getElementById('headers'); to var myTableHead = table.getElementsByTagName('thead')[0];. Same with your write_bodies_to_excel() or however you want to set that up.
Introduction
This example shows how to export an HTML table to an Excel sheet using jquery table2excel plugin.
What is table2excel?
table2excel is a jQuery Plugin. it is used to export HTML tables to Excel sheets.
How to Include table2excel jQuery Plugin Within HTML File
- <script type=«text/javascript» src=«https://ajax.googleapis.com/ajax/libs/jquery/1.8.3/jquery.min.js»></script>
- <script src=«table2excel.js» type=«text/javascript»></script>
table2excel.js Markup
Create one text document within the root directory of your project and save that document with name table2excel.js
After this, write the following code in table2excel.js file and save it.
- ;
- (function($, window, document, undefined) {
- var pluginName = «table2excel»,
- defaults = {
- exclude: «.noExl»,
- name: «Table2Excel»,
- filename: «table2excel»,
- fileext: «.xls»,
- exclude_img: true,
- exclude_links: true,
- exclude_inputs: true
- };
- function Plugin(element, options) {
- this.element = element;
- this.settings = $.extend({}, defaults, options);
- this._defaults = defaults;
- this._name = pluginName;
- this.init();
- }
- Plugin.prototype = {
- init: function() {
- var e = this;
- var utf8Heading = «<meta http-equiv=»content-type» content=»application/vnd.ms-excel; charset=UTF-8″>»;
- e.template = {
- head: «<html xmlns:o=»urn:schemas-microsoft-com:office:office» xmlns:x=»urn:schemas-microsoft-com:office:excel» xmlns=»http://www.w3.org/TR/REC-html40″>» + utf8Heading + «<head><!—[if gte mso 9]><xml><x:ExcelWorkbook><x:ExcelWorksheets>»,
- sheet: {
- head: «<x:ExcelWorksheet><x:Name>»,
- tail: «</x:Name><x:WorksheetOptions><x:DisplayGridlines/></x:WorksheetOptions></x:ExcelWorksheet>»
- },
- mid: «</x:ExcelWorksheets></x:ExcelWorkbook></xml><![endif]—></head><body>»,
- table: {
- head: «<table>»,
- tail: «</table>»
- },
- foot: «</body></html>»
- };
- e.tableRows = [];
- $(e.element).each(function(i, o) {
- var tempRows = «»;
- $(o).find(«tr»).not(e.settings.exclude).each(function(i, p) {
- tempRows += «<tr>»;
- $(p).find(«td,th»).not(e.settings.exclude).each(function(i, q) {
- var rc = {
- rows: $(this).attr(«rowspan»),
- cols: $(this).attr(«colspan»),
- flag: $(q).find(e.settings.exclude)
- };
- if (rc.flag.length > 0) {
- tempRows += «<td> </td>»;
- } else {
- if (rc.rows & rc.cols) {
- tempRows += «<td>» + $(q).html() + «</td>»;
- } else {
- tempRows += «<td»;
- if (rc.rows > 0) {
- tempRows += » rowspan='» + rc.rows + «‘ «;
- }
- if (rc.cols > 0) {
- tempRows += » colspan='» + rc.cols + «‘ «;
- }
- tempRows += «/>» + $(q).html() + «</td>»;
- }
- }
- });
- tempRows += «</tr>»;
- console.log(tempRows);
- });
- if (e.settings.exclude_img) {
- tempRows = exclude_img(tempRows);
- }
- if (e.settings.exclude_links) {
- tempRows = exclude_links(tempRows);
- }
- if (e.settings.exclude_inputs) {
- tempRows = exclude_inputs(tempRows);
- }
- e.tableRows.push(tempRows);
- });
- e.tableToExcel(e.tableRows, e.settings.name, e.settings.sheetName);
- },
- tableToExcel: function(table, name, sheetName) {
- var e = this,
- fullTemplate = «»,
- i, link, a;
- e.format = function(s, c) {
- return s.replace(/{(w+)}/g, function(m, p) {
- return c[p];
- });
- };
- sheetName = typeof sheetName === «undefined» ? «Sheet» : sheetName;
- e.ctx = {
- worksheet: name || «Worksheet»,
- table: table,
- sheetName: sheetName
- };
- fullTemplate = e.template.head;
- if ($.isArray(table)) {
- for (i in table) {
- fullTemplate += e.template.sheet.head + sheetName + i + e.template.sheet.tail;
- }
- }
- fullTemplate += e.template.mid;
- if ($.isArray(table)) {
- for (i in table) {
- fullTemplate += e.template.table.head + «{table» + i + «}» + e.template.table.tail;
- }
- }
- fullTemplate += e.template.foot;
- for (i in table) {
- e.ctx[«table» + i] = table[i];
- }
- delete e.ctx.table;
- var isIE = false || !!document.documentMode;
- if (isIE) {
- if (typeof Blob !== «undefined») {
- fullTemplate = e.format(fullTemplate, e.ctx);
- fullTemplate = [fullTemplate];
- var blob1 = new Blob(fullTemplate, {
- type: «text/html»
- });
- window.navigator.msSaveBlob(blob1, getFileName(e.settings));
- } else {
- txtArea1.document.open(«text/html», «replace»);
- txtArea1.document.write(e.format(fullTemplate, e.ctx));
- txtArea1.document.close();
- txtArea1.focus();
- sa = txtArea1.document.execCommand(«SaveAs», true, getFileName(e.settings));
- }
- } else {
- var blob = new Blob([e.format(fullTemplate, e.ctx)], {
- type: «application/vnd.ms-excel»
- });
- window.URL = window.URL || window.webkitURL;
- link = window.URL.createObjectURL(blob);
- a = document.createElement(«a»);
- a.download = getFileName(e.settings);
- a.href = link;
- document.body.appendChild(a);
- a.click();
- document.body.removeChild(a);
- }
- return true;
- }
- };
- function getFileName(settings) {
- return (settings.filename ? settings.filename : «table2excel»);
- }
- function exclude_img(string) {
- var _patt = /(s+alts*=s*«([^»]*)»|s+alts*=s*‘([^’]*)’)/i;
- return string.replace(/<img[^>]*>/gi, function myFunction(x) {
- var res = _patt.exec(x);
- if (res !== null && res.length >= 2) {
- return res[2];
- } else {
- return «»;
- }
- });
- }
- function exclude_links(string) {
- return string.replace(/<a[^>]*>|</a>/gi, «»);
- }
- function exclude_inputs(string) {
- var _patt = /(s+values*=s*«([^»]*)»|s+values*=s*‘([^’]*)’)/i;
- return string.replace(/<input[^>]*>|</input>/gi, function myFunction(x) {
- var res = _patt.exec(x);
- if (res !== null && res.length >= 2) {
- return res[2];
- } else {
- return «»;
- }
- });
- }
- $.fn[pluginName] = function(options) {
- var e = this;
- e.each(function() {
- if (!$.data(e, «plugin_» + pluginName)) {
- $.data(e, «plugin_» + pluginName, new Plugin(this, options));
- }
- });
- return e;
- };
- })(jQuery, window, document);
HTML Markup
Now, create another text document within the root directory of your project and save it with the name of «Example.html».
After this, write the following code within your created Example.html file and save it.
- <html
- xmlns=«http://www.w3.org/1999/xhtml»>
- <head>
- <title></title>
- <style type=«text/css»>
- body
- {
- font-family: Arial;
- font-size: 10pt;
- }
- table
- {
- border: 1px solid #ccc;
- border-collapse: collapse;
- }
- table th
- {
- background-color: #ff7f00;
- color: #fff;
- font-weight: bold;
- }
- table th, table td
- {
- padding: 5px;
- border: 1px solid #ccc;
- }
- </style>
- </head>
- <body>
- <table id=«tblEmployee» cellspacing=«0» cellpadding=«0»>
- <tr>
- <th>Employee Id</th>
- <th>Employee Name</th>
- <th>Department</th>
- </tr>
- <tr>
- <td>1</td>
- <td>Nikunj Satasiya</td>
- <td>Asp.Net</td>
- </tr>
- <tr>
- <td>2</td>
- <td>Hiren Dobariya</td>
- <td>PHP</td>
- </tr>
- <tr>
- <td>3</td>
- <td>Vivek Ghadiya</td>
- <td>Android</td>
- </tr>
- <tr>
- <td>4</td>
- <td>Pratik Pansuriya</td>
- <td>SEO</td>
- </tr>
- </table>
- <br />
- <input type=«button» id=«btnExporttoExcel» value=«Export To Excel» />
- <script type=«text/javascript» src=«https://ajax.googleapis.com/ajax/libs/jquery/2.2.4/jquery.min.js»></script>
- <script src=«table2excel.js» type=«text/javascript»></script>
- <script type=«text/javascript»>
- $(function () {
- $(«#btnExporttoExcel»).click(function () {
- $(«#tblEmployee»).table2excel({
- filename: «Your_File_Name.xls»
- });
- });
- });
- </script>
- </body>
- </html>
NOTE
At the end of table tag </table>, you need to add the following script.
- $(«#yourHtmTable»).table2excel({
- exclude: «.excludeThisClass»,
- name: «Worksheet Name»,
- filename: «SomeFile»
- });
Screenshots/Output

The screen after exporting HTML table to Excel sheet.

Summary
When the Export to Excel button is clicked, the jQuery table2excel plugin is applied to the created HTML table. The jQuery table2excel plugin accepts the file name as a parameter which sets the name of the Excel file.
- Posted: 15 Sep 2017
- Modified: 29 Oct 2022
- Author:
-
- Comments: 0
- Views: 51285
- Excel
- jQuery
- jQuery Plugins
- HTML
- Table
Here Mudassar Khan has explained with an example, how to convert (export) HTML Table to Excel file using jQuery.
This article will explain how to convert (export) HTML Table to Excel file with the help of the jQuery table2excel plugin.
-
Download Code -
Demo

In this article I will explain with an example, how to convert (export) HTML Table to Excel file using jQuery.
This article will explain how to convert (export) HTML Table to Excel file with the help of the jQuery table2excel plugin.
HTML Markup
The following HTML Markup consists of an HTML Table and a Button.
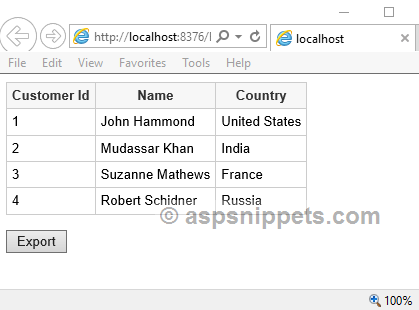
<table id=»tblCustomers» cellspacing=»0″ cellpadding=»0″>
<tr>
<th>Customer Id</th>
<th>Name</th>
<th>Country</th>
</tr>
<tr>
<td>1</td>
<td>John Hammond</td>
<td>United States</td>
</tr>
<tr>
<td>2</td>
<td>Mudassar Khan</td>
<td>India</td>
</tr>
<tr>
<td>3</td>
<td>Suzanne Mathews</td>
<td>France</td>
</tr>
<tr>
<td>4</td>
<td>Robert Schidner</td>
<td>Russia</td>
</tr>
</table>
<br />
<input type=»button» id=»btnExport» value=»Export» />
<script type=»text/javascript» src=»https://ajax.googleapis.com/ajax/libs/jquery/1.8.3/jquery.min.js»></script>
<script src=»table2excel.js» type=»text/javascript»></script>
<script type=»text/javascript»>
$(function () {
$(«#btnExport»).click(function () {
$(«#tblCustomers»).table2excel({
filename: «Table.xls»
});
});
});
</script>
Explanation:
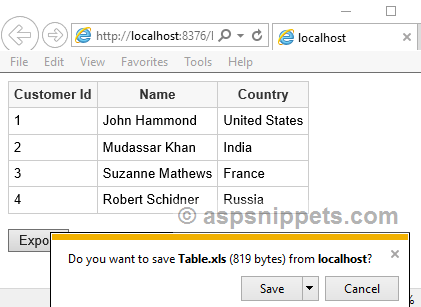
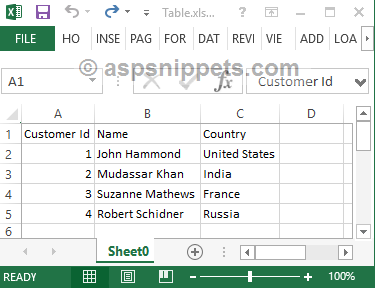
Note: You will get a Warning message from Microsoft Excel application when you try to open the generated Excel file. This Warning is shown because the generated file is not a valid Excel format as the plugin simply exports the HTML content to an Excel file.
Screenshots
The HTML Table
Excel file being downloaded when Export Button is clicked
The generated Excel file
Browser Compatibility
The above code has been tested in the following browsers.
* All browser logos displayed above are property of their respective owners.
Demo
Downloads
Download Free Word/PDF/Excel API
YouTube Video
Comments
Comments not available for this article.
jQuery Datatables provides a convenient way to export data to Excel format. This jQuery Datatables tutorial help to create export datatable to excel format using HTML5 and buttons table tools. The excel file format are using .xls and .xlsx extension.
Excel is one of the most popular file formats used to store tabular data in spreadsheets. We can use Excel format data to import and export data and store into an excel file.
You can use this functionality only latest browsers and above IE8. The Buttons extension for DataTables provides three plug-ins that provide overlapping functionality for data export.
- HTML5 export buttons – makes use of HTML5 APIs to create files client-side
- Flash export buttons – uses Adobe Flash for legacy browsers
- Print button
You can also check other tutorials of export table data,
- Exporting a DataTable into PDF File
- Exporting a DataTable to CSV
- DataTables Export to Excel using HTML5
- Popular JavaScript and jQuery PDF Viewer Plugins
I am extending excelHtml5 so that you can use export to excel only on the latest browser, not on a legacy browser. I am explaining step by step jQuery datatable export to excel tutorial.
I am extending the previous tutorial that’s why I will change the extension format and label from the previous Export jQuery datatable to pdf tutorial.
We have learned Export Datatable to CSV and Export Datatable to PDF in earlier datatables tutorials, Now I am extending this datatables tutorial and adding export datatable to Excel file.
Exporting jQuery Datatables data to Excel File
Step 1: We need to include all datatables library files in the head section of index.html file. Let’s include the jQuery library, jQuery Datatables library, and the Buttons extension library.
<link rel="stylesheet" href="https://maxcdn.bootstrapcdn.com/bootstrap/3.3.5/css/bootstrap.min.css">
<script src="https://ajax.googleapis.com/ajax/libs/jquery/2.1.3/jquery.min.js"></script>
<link rel="stylesheet" type="text/css" href="https://cdn.datatables.net/r/dt/jq-2.1.4,jszip-2.5.0,pdfmake-0.1.18,dt-1.10.9,af-2.0.0,b-1.0.3,b-colvis-1.0.3,b-html5-1.0.3,b-print-1.0.3,se-1.0.1/datatables.min.css">
<script type="text/javascript" src="https://cdn.datatables.net/r/dt/jq-2.1.4,jszip-2.5.0,pdfmake-0.1.18,dt-1.10.9,af-2.0.0,b-1.0.3,b-colvis-1.0.3,b-html5-1.0.3,b-print-1.0.3,se-1.0.1/datatables.min.js"></script>
Step 2: Created HTML layout for jQuery datatables listing in index.html file.
<table id="listing" class="display" cellspacing="0" width="100%">
    <thead>
        <tr>
            <th>User ID</th>

            <th>Title</th>

            <th>Body</th>
        </tr>
    </thead>
</table>
Step 3: Fetched data from restful web service and processed data as required for jQuery datatables.
var arrayReturn = [];
            $.ajax({
                url: "http://jsonplaceholder.typicode.com/posts",
                async: true,
                dataType: 'json',
                success: function (data) {
					for (var i = 0, len = data.length; i < len; i++) {
						var desc = data[i].body;
						var title = data[i].title;
						var id = (data[i].id).toString();
						arrayReturn.push([id, '<a href="http://google.com" target="_blank">'+title.substring(0, 20)+'</a>', desc.substring(0, 120)]);
					}
				inittable(arrayReturn);
                }
            });
Step 4: Now I will pass formatted data to the jQuery datatables "aaData" property.
function inittable(data) {
		$('#listing').DataTable({
			"aaData": data,
			"dom": 'lBfrtip',
			buttons: [
            {
                extend: 'excelHtml5',
                text: 'Export to Excel',
				title: 'js-tutorials.com : Export to datatable data to Excel',
				 download: 'open',
				 orientation:'landscape',
				  exportOptions: {
				  columns: ':visible'
				}
            }]
		} );
	}
in the above code, I am using excelHtml5 plugin to overlap excel export functionality using html5 api. I have added the title and button text as well.
You can download the source code and Demo from the below link.
1. Introduction
TableHTMLExport jQuery plugin that exports an HTML table to JSON, CSV, TXT, or PDF and force the browser to download the generated file. The plugin without additionally server requests can export HTML table and download its content. Using this plugin is a simple way to reduce the costs of running applications because for every request is resource-hungry.
2. Plugin Overview
Demo
3. How to install and use TableHTMLExport jQuery plugin
Follow below steps in order to install TableHTMLExport jQuery plugin.
1. first of all load jQuery JavaScript library:
<!-- jQuery -->
<script src="https://code.jquery.com/jquery-3.4.1.min.js"></script>
2. second step is to include TableHTMLExport plugin:
<!-- Table HTML Export Js -->
<script src="js/tableHTMLExport.js"></script>
3. next, create a sample HTML table with export button:
  <table id="myTable">
  <thead>
    <tr>
      <th>Customer</th>
      <th>Contact</th>
      <th>Country</th>
  </tr>
  </thead>
  <tbody>
    <tr>
      <td>FrontBackend</td>
      <td>Martin Wojtus</td>
      <td>France</td>
    </tr>
    <tr>
      <td>Ernst Handel</td>
      <td>Roland Mendel</td>
      <td>Austria</td>
    </tr>
    <tr>
      <td>Island Trading</td>
      <td>Helen Bennett</td>
      <td>UK</td>
    </tr>
    <tr>
      <td>Magazzini Alimentari Riuniti</td>
      <td>Giovanni Rovelli</td>
      <td>Italy</td>
    </tr>
  </tbody>
</table>

<button class="export-btn"><i class="fa fa-file-excel-o"></i> Export to Excel</button>
4. final step is to initialize the tableHTMLExport plugin:
$(document).ready(function(){
   $(".export-btn").click(function(){
     $("#tableCustomers").tableHTMLExport({
      type:'csv',
      filename:'frontbackend-html-table-to-excel.csv',
    });
  });
});
tableHTMLExport plugin is used ad hoc, at the moment when we need to export the table and download file.
4. Conclusion
In this article, we showcased tableHTMLExport jQuery plugin that allows you to export any HTML table to CSV/PDF/TXT/JSON file. The plugin is a great way to download table reports without involving the backend side of the application. tableHTMLExport plugin is simple to use, just select a table using jQuery selectors, choose the result file type (you can choose between CSV, PDF, text, and JSON) and a filename and run the plugin.