
The reason the solution you found on the internet is no working is because of the line that starts var colCount. The variable mytable only has two elements being <thead> and <tbody>. The var colCount line is looking for all the elements within mytable that are <tr>. The best thing you can do is give an id to your <thead> and <tbody> and then grab all the values based on that. Say you had <thead id='headers'> :
function write_headers_to_excel()
{
  str="";

  var myTableHead = document.getElementById('headers');
  var rowCount = myTableHead.rows.length;
  var colCount = myTableHead.getElementsByTagName("tr")[0].getElementsByTagName("th").length;

var ExcelApp = new ActiveXObject("Excel.Application");
var ExcelSheet = new ActiveXObject("Excel.Sheet");
ExcelSheet.Application.Visible = true;

for(var i=0; i<rowCount; i++)
{
    for(var j=0; j<colCount; j++)
    {
        str= myTableHead.getElementsByTagName("tr")[i].getElementsByTagName("th")[j].innerHTML;
        ExcelSheet.ActiveSheet.Cells(i+1,j+1).Value = str;
    }
}

}
and then do the same thing for the <tbody> tag.
EDIT: I would also highly recommend using jQuery. It would shorten this up to:
function write_to_excel()
{
 var ExcelApp = new ActiveXObject("Excel.Application");
 var ExcelSheet = new ActiveXObject("Excel.Sheet");
 ExcelSheet.Application.Visible = true;

  $('th, td').each(function(i){
    ExcelSheet.ActiveSheet.Cells(i+1,i+1).Value = this.innerHTML;
  });
}
Now, of course, this is going to give you some formatting issues but you can work out how you want it formatted in Excel.
EDIT: To answer your question about how to do this for n number of tables, the jQuery will do this already. To do it in raw Javascript, grab all the tables and then alter the function to be able to pass in the table as a parameter. For instance:
var tables = document.getElementsByTagName('table');
for(var i = 0; i < tables.length; i++)
{
  write_headers_to_excel(tables[i]);
  write_bodies_to_excel(tables[i]);
}
Then change the function write_headers_to_excel() to function write_headers_to_excel(table). Then change var myTableHead = document.getElementById('headers'); to var myTableHead = table.getElementsByTagName('thead')[0];. Same with your write_bodies_to_excel() or however you want to set that up.
- Home
- JavaScript
- Export HTML Table Data to Excel using JavaScript
By: CodexWorld
|
In: JavaScript
|
Last Updated: Jun 7, 2021
Export data to Excel is very useful on the data list for nearly every web application. The export feature helps to download the data list as a file format for offline use. Excel format is ideal for exporting data in a file. Mostly the server-side method is used for export data to excel using PHP. But if you want a client-side solution to export table data to excel, it can be easily done using JavaScript.
The client-side export functionality makes the web application user-friendly. Using JavaScript, the HTML table data can be easily exported without page refresh. In this tutorial, we will show you how to export HTML table data to excel using JavaScript. The JavaScript export functionality can be used in the member list, product list, or other lists to download the data list in excel file format.
Export HTML Table Data to Excel
JavaScript Code:
The exportTableToExcel() function convert HTML table data to excel and download as XLS file (.xls).
tableID– Required. Specify the HTML table ID to export data from.filename– Optional. Specify the file name to download excel data.
function exportTableToExcel(tableID, filename = ''){
    var downloadLink;
    var dataType = 'application/vnd.ms-excel';
    var tableSelect = document.getElementById(tableID);
    var tableHTML = tableSelect.outerHTML.replace(/ /g, '%20');

    // Specify file name
    filename = filename?filename+'.xls':'excel_data.xls';

    // Create download link element
    downloadLink = document.createElement("a");

    document.body.appendChild(downloadLink);

    if(navigator.msSaveOrOpenBlob){
        var blob = new Blob(['ufeff', tableHTML], {
            type: dataType
        });
        navigator.msSaveOrOpenBlob( blob, filename);
    }else{
        // Create a link to the file
        downloadLink.href = 'data:' + dataType + ', ' + tableHTML;

        // Setting the file name
        downloadLink.download = filename;

        //triggering the function
        downloadLink.click();
    }
}
HTML Table Data:
The HTML table contains some users data with some basic fields like name, email, country.
<table id="tblData">
    <tr>
        <th>Name</th>
        <th>Email</th>
        <th>Country</th>
    </tr>
    <tr>
        <td>John Doe</td>
        <td>john@gmail.com</td>
        <td>USA</td>
    </tr>
    <tr>
        <td>Michael Addison</td>
        <td>michael@gmail.com</td>
        <td>UK</td>
    </tr>
    <tr>
        <td>Sam Farmer</td>
        <td>sam@gmail.com</td>
        <td>France</td>
    </tr>
</table>
The button triggers exportTableToExcel() function to export HTML table data using JavaScript.
<button onclick="exportTableToExcel('tblData')">Export Table Data To Excel File</button>
If you want to export data with the custom file name, pass your desired file name in the exportTableToExcel() function.
<button onclick="exportTableToExcel('tblData', 'members-data')">Export Table Data To Excel File</button>
Export Data to Excel in PHP
Conclusion
Our example code helps you to add export functionality in the HTML table without any third-party jQuery plugin or server-side script. You can easily export the table data using minimal JavaScript code. Also, the functionality of the example code can be enhanced or customized easily as per your needs.
- DataTables
- Excel
- Export
- JavaScript
Are you want to get implementation help, or modify or enhance the functionality of this script? Click Here to Submit Service Request
If you have any questions about this script, submit it to our QA community — Ask Question
RELATED TUTORIALS
Leave a reply
Table to Excel 2

Export HTML table to valid excel file effortlessly.
This library uses exceljs/exceljs under the hood to create the excel.
(Initial version of this library was using protobi/js-xlsx, it can be found here)
Installation
Browser
Just add a script tag:
<script type="text/javascript" src="../dist/tableToExcel.js"></script>
Node
npm install @linways/table-to-excel --save
import TableToExcel from "@linways/table-to-excel";
Usage
Create your HTML table as normal.
To export content of table #table1 run:
TableToExcel.convert(document.getElementById("table1"));
or
TableToExcel.convert(document.getElementById("table1"), {
  name: "table1.xlsx",
  sheet: {
    name: "Sheet 1"
  }
});
Check this pen for working example.
Cell Types
Cell types can be set using the following data attributes:
| Attribute | Description | Possible Values |
|---|---|---|
data-t |
To specify the data type of a cell | s : String (Default)n : Number b : Boolean d : Date |
data-hyperlink |
To add hyper link to cell | External URL or hyperlink to another sheet |
data-error |
To add value of a cell as error |
Example:
<!-- for setting a cell type as number -->
<td data-t="n">2500</td>
<!-- for setting a cell type as date -->
<td data-t="d">05-23-2018</td>
<!-- for setting a cell type as boolean. String "true/false" will be accepted as Boolean-->
<td data-t="b">true</td>
<!-- for setting a cell type as boolean using integer. 0 will be false and any non zero value will be true -->
<td data-t="b">0</td>
<!-- For adding hyperlink -->
<td data-hyperlink="https://google.com">Google</td>
Cell Styling
All styles are set using data attributes on td tags.
There are 5 types of attributes: data-f-*, data-a-*, data-b-*, data-fill-* and data-num-fmt which corresponds to five top-level attributes font, alignment, border, fill and numFmt.
| Category | Attribute | Description | Values |
|---|---|---|---|
| font | data-f-name |
Font name | «Calibri» ,»Arial» etc. |
data-f-sz |
Font size | «11» // font size in points | |
data-f-color |
Font color | A hex ARGB value. Eg: FFFFOOOO for opaque red. | |
data-f-bold |
Bold | true or false |
|
data-f-italic |
Italic | true or false |
|
data-underline |
Underline | true or false |
|
data-f-strike |
Strike | true or false |
|
| Alignment | data-a-h |
Horizontal alignment | left, center, right, fill, justify, centerContinuous, distributed |
data-a-v |
Vertical alignment | bottom, middle, top, distributed, justify |
|
data-a-wrap |
Wrap text | true or false |
|
data-a-indent |
Indent | Integer | |
data-a-rtl |
Text direction: Right to Left | true or false |
|
data-a-text-rotation |
Text rotation | 0 to 90 | |
| -1 to -90 | |||
| vertical | |||
| Border | data-b-a-s |
Border style (all borders) | Refer BORDER_STYLES |
data-b-t-s |
Border top style | Refer BORDER_STYLES |
|
data-b-b-s |
Border bottom style | Refer BORDER_STYLES |
|
data-b-l-s |
Border left style | Refer BORDER_STYLES |
|
data-b-r-s |
Border right style | Refer BORDER_STYLES |
|
data-b-a-c |
Border color (all borders) | A hex ARGB value. Eg: FFFFOOOO for opaque red. | |
data-b-t-c |
Border top color | A hex ARGB value. | |
data-b-b-c |
Border bottom color | A hex ARGB value. | |
data-b-l-c |
Border left color | A hex ARGB value. | |
data-b-r-c |
Border right color | A hex ARGB value. | |
| Fill | data-fill-color |
Cell background color | A hex ARGB value. |
| numFmt | data-num-fmt |
Number Format | «0» |
| «0.00%» | |||
| «0.0%» // string specifying a custom format | |||
| «0.00%;(0.00%);-;@» // string specifying a custom format, escaping special characters |
BORDER_STYLES: thin, dotted, dashDot, hair, dashDotDot, slantDashDot, mediumDashed, mediumDashDotDot, mediumDashDot, medium, double, thick
Exclude Cells and rows
To exclude a cell or a row from the exported excel add data-exclude="true" to the corresponding td or tr.
Example:
<!-- Exclude entire row -->
<tr data-exclude="true">
  <td>Excluded row</td>
  <td>Something</td>
</tr>

<!-- Exclude a single cell -->
<tr>
  <td>Included Cell</td>
  <td data-exclude="true">Excluded Cell</td>
  <td>Included Cell</td>
</tr>
Column Width
Column width’s can be set by specifying data-cols-width in the <table> tag.
data-cols-width accepts comma separated column widths specified in character count .
data-cols-width="10,20" will set width of first coulmn as width of 10 charaters and second column as 20 characters wide.
Example:
<table data-cols-width="10,20,30">
  ...
</table>
Row Height
Row Height can be set by specifying data-height in the <tr> tag.
Example:
<tr data-height="42.5">
  <td>Cell 1</td>
  <td>Cell 2</td>
</tr>
Release Changelog
1.0.0
Migration Guide for migrating from V0.2.1 to V1.0.0
- Changed the backend to Exceexceljs/exceljslJS
- Added border color
- Option to set style and color for all borders
- Exclude row
- Added text underline
- Added support for hyperlinks
- Text intent
- RTL support
- Extra alignment options
- String «true/false» will be accepted as Boolean
- Changed border style values
- Text rotation values changed
1.0.2
- Fixed bug in handling multiple columns merges in a sheet
1.0.3
- Option to specify row height
Exporting data to Excel is very useful for every enterprise on data list web application. Every time , export data using custom export feature helps to download table data list for offline use as excel file like csv format. As a web Developer, I was required to do that in various live project. Excel format for exporting data in file is ideal in every enterprises. Mostly we used server-side method to export data to excel using php. But if you want to download table data to excel using client-side view then it can be easily done using javascript.
Looking for assistance with Excel assignments?
You should visit https://assignmentcore.com/excel-homework/ and get MS Excel homework help online from a team of experts.
In this tutorials, we will learn about how to export HTML table data to excel using client-side JavaScript. The Client-side export data functionality makes any web application more user-friendly. Using JavaScript, we can export or download HTML table data in excel format without page refresh.
HTMl Table Data:
The Following below HTML Table contains some user data with some basic fields like Name, Email, Age, Mobile.
|
2 3 4 5 6 7 8 9 10 11 12 13 14 15 16 17 18 19 20 21 22 23 24 25 26 27 28 29 30 31 32 33 34 35 36 37 |
<table id=«tblexportData»> <tr> <th>Name</th> <th>Email</th> <th>Age</th> <th>Mobile</th> </tr> <tr> <td>Robert</td> <td>robert@gmail.com</td> <td>26</td> <td>9999999999</td> </tr> <tr> <td>Michael</td> <td>michael@gmail.com</td> <td>24</td> <td>9999999999</td> </tr> <tr> <td>Julie</td> <td>julie@gmail.com</td> <td>36</td> <td>9999999999</td> </tr> <tr> <td>Trevor</td> <td>trevor@gmail.com</td> <td>28</td> <td>9999999999</td> </tr> </table> |
JavaScript Code:
The exportToExcel() function will use convert HTML table data to excel and download as xls file(.xls).
|
2 3 4 5 6 7 8 9 10 11 12 13 14 15 16 17 18 19 20 21 22 23 24 25 26 27 28 29 30 31 32 33 34 35 36 37 38 |
<script type=«text/javascript»> function exportToExcel(tableID, filename = »){ var downloadurl; var dataFileType = ‘application/vnd.ms-excel’; var tableSelect = document.getElementById(tableID); var tableHTMLData = tableSelect.outerHTML.replace(/ /g, ‘%20’); // Specify file name filename = filename?filename+‘.xls’:‘export_excel_data.xls’; // Create download link element downloadurl = document.createElement(«a»); document.body.appendChild(downloadurl); if(navigator.msSaveOrOpenBlob){ var blob = new Blob([‘ufeff’, tableHTMLData], { type: dataFileType }); navigator.msSaveOrOpenBlob( blob, filename); }else{ // Create a link to the file downloadurl.href = ‘data:’ + dataFileType + ‘, ‘ + tableHTMLData; // Setting the file name downloadurl.download = filename; //triggering the function downloadurl.click(); } } </script> |
tableID – Required. Specify the HTML table ID to export data from.
filename – Optional. Specify the file name to download excel data.
|
<button onclick=«exportToExcel(‘tblexportData’)»>Export Table Data To Excel File</button> |
The above button triggers exportToExcel() function to download HTML table data using javascript
If you want to download or export data with custom file name then you can pass your file name in the exportToExcel() function, see below button code:
|
<button onclick=«exportToExcel(‘tblexportData’, ‘user-data’)»>Export Table Data To Excel File</button> |
Complete Code:
|
2 3 4 5 6 7 8 9 10 11 12 13 14 15 16 17 18 19 20 21 22 23 24 25 26 27 28 29 30 31 32 33 34 35 36 37 38 39 40 41 42 43 44 45 46 47 48 49 50 51 52 53 54 55 56 57 58 59 60 61 62 63 64 65 66 67 68 69 70 71 72 73 74 75 76 77 78 79 80 81 82 83 84 85 86 |
<html> <head> <title>Export HTML Table Data to Excel using JavaScript | Tutorialswebsite</title> <link rel=«stylesheet» href=«https://maxcdn.bootstrapcdn.com/bootstrap/4.0.0/css/bootstrap.min.css» > <script type=«text/javascript»> function exportToExcel(tableID, filename = »){ var downloadurl; var dataFileType = ‘application/vnd.ms-excel’; var tableSelect = document.getElementById(tableID); var tableHTMLData = tableSelect.outerHTML.replace(/ /g, ‘%20’); // Specify file name filename = filename?filename+‘.xls’:‘export_excel_data.xls’; // Create download link element downloadurl = document.createElement(«a»); document.body.appendChild(downloadurl); if(navigator.msSaveOrOpenBlob){ var blob = new Blob([‘ufeff’, tableHTMLData], { type: dataFileType }); navigator.msSaveOrOpenBlob( blob, filename); }else{ // Create a link to the file downloadurl.href = ‘data:’ + dataFileType + ‘, ‘ + tableHTMLData; // Setting the file name downloadurl.download = filename; //triggering the function downloadurl.click(); } } </script> </head> <body> <div class=«container»> <table id=«tblexportData» class=«table»> <thead> <tr> <th>Name</th> <th>Email</th> <th>Age</th> <th>Mobile</th> </tr> </thead> <tbody> <tr> <td>Robert</td> <td>robert@gmail.com</td> <td>26</td> <td>9999999999</td> </tr> <tr> <td>Michael</td> <td>michael@gmail.com</td> <td>24</td> <td>9999999999</td> </tr> <tr> <td>Julie</td> <td>julie@gmail.com</td> <td>36</td> <td>9999999999</td> </tr> <tr> <td>Trevor</td> <td>trevor@gmail.com</td> <td>28</td> <td>9999999999</td> </tr> </tbody> </table> <button onclick=«exportToExcel(‘tblexportData’, ‘user-data’)» class=«btn btn-success»>Export Table Data To Excel File</button> </div> </body> </html> |
Conclusion
Our example code will help you to easily export the table data using minimal javascript code.
Are you want to get implementation help, or modify or extend the functionality of this script? Submit paid service request

Pradeep Maurya is the Professional Web Developer & Designer and the Founder of “Tutorials website”. He lives in Delhi and loves to be a self-dependent person. As an owner, he is trying his best to improve this platform day by day. His passion, dedication and quick decision making ability to stand apart from others. He’s an avid blogger and writes on the publications like Dzone, e27.co
JavaScript Convert Html Table to Excel XLS: Here in this tutorial, we can create an excel file from our HTML table data on the client side. i.e Export HTML table to Excel (.xlsx) using javascript.
There are many libraries available that create CSV files or Xlsx files from the HTML table, but all are giving a prompt message. That is when we open that excel file it prompts a message as «The file format and extension of the filename don’t match». The file could be corrupted or unsafe.
Today this article will use SheetJS, which allow us to create and open excel file without any prompt message and that’s pure in javascript.
The second advantage of using the SheetJs library is that it can easily export large HTML tables into excel, an example is provided below.
You can also check our article on how to convert HTML to image on the client side.
Steps to export HTML table to excel using JavaScript
- HTML Markup: Add a table with some data.
- Import SheetJS Library
- Javascript code: Using the SheetJS library export table data into an excel file.
Video:
HTML Markup: Add table with data and button tag.
Here first we add an HTML table with some dummy data and a button tag. Our table HTML markup looks as written below.
<table id="tbl_exporttable_to_xls" border="1">
	<thead>
		<th>Sr</th>
		<th>Name</th>
		<th>Location</th>
		<th>Job Profile</th>
	</thead>
	<tbody>
		<tr>
			<td>1</td>
			<td><p>Amit Sarna</p></td>
			<td>Florida</td>
			<td>Data Scientist</td>
		</tr>
		<tr>
			<td>2</td>
			<td><p>Sagar Gada</p></td>
			<td>California</td>
			<td>Sr FullStack Dev</td>
		</tr>
		<tr>
			<td>3</td>
			<td><p>Ricky Marck</p></td>
			<td>Nevada</td>
			<td>Sr .Net Dev</td>
		</tr>
	</tbody>
</table>
<button onclick="ExportToExcel('xlsx')">Export table to excel</button>
Download and Import SheetJS Library on our webpage
To convert HTML table data into excel, we need to use the SheetJS library. Using SheetJs we can easily convert our table data into an Xls file. We can download the js file from Github or directly use the CDN hosted file.
Import library code as written below:
<script type="text/javascript" src="https://unpkg.com/xlsx@0.15.1/dist/xlsx.full.min.js"></script>We are done with HTML markup and importing the Sheetjs library. Next, we have to add and call the javascript function i.e ExportToExcel on button click.
JavaScript code: Using the SheetJs library export table data into an excel file.
Here on the button tag, we add an on-click event and call the js method ie ExportToExcel. Final javascript method as written below:
function ExportToExcel(type, fn, dl) {
       var elt = document.getElementById('tbl_exporttable_to_xls');
       var wb = XLSX.utils.table_to_book(elt, { sheet: "sheet1" });
       return dl ?
         XLSX.write(wb, { bookType: type, bookSST: true, type: 'base64' }):
         XLSX.writeFile(wb, fn || ('MySheetName.' + (type || 'xlsx')));
    }
View Demo
Here in the above javascript function, tbl_exporttable_to_xls is the id of our HTML table, whose data we want to export. Also, we set type base64, so there would be no problem for older browsers i.e IE browser.
In Internet Explorer ie browser using SheetJS, we can easily export HTML table data to excel. With the SheetJs library, we can export the Html table to Xlsx with formatting.
Conclusion: Here using SheetJS we can export the Html table into an excel file. Also as other library displays a popup message while opening the excel file, here with Sheetjs it gets open without any popup message. I find it the best javascript library for converting data into an excel file.
Thank you for reading, pls keep visiting this blog and share this in your network. Also, I would love to hear your opinions down in the comments.
PS: If you found this content valuable and want to thank me? 👳 Buy Me a Coffee
Subscribe to our newsletter
Get the latest and greatest from Codepedia delivered straight to your inbox.
Contents
- 1 HTML table
- 2 Javascript array
- 2.1 Example : Download the HTML table in Excel (.csv) format
- 2.1.1 Step 1 : Create the HTML table
- 2.1.2 Step 2 : Add CSS properties to style the table
- 2.1.3 Step 3 : Create the download button
- 2.1.4 Step 4 : Implement Javascript function to download the HTML table in CSV file.
- 2.1.5 Step 5 : Call the Javascript function using onclick event
- 2.2 Complete code for reference :
- 2.1 Example : Download the HTML table in Excel (.csv) format
HTML providing the <table> tag to show the data in row and column format. We might have seen those tables in several web pages. Example: Stock Price list,Employee salary reports, Student marks report and so on. The below image is showing the corona cases report in HTML table format.

If we have the option to download those tables in excel, It would be helpful to analyze the data. Lets create the sample table using HTML and enable the download option using Javascript.
Javascript array
Javascript array is used to store collection of values in a single variable. As we know, the HTML table has a collection of rows and columns. We can add those values into array. Then the delimiters will be added for each row and column values to create the excel record.
var result = [‘Company’,’Group’,’Previous Value’,’Current Value’]
- Each row in a table delimited by new line character (n)
- Each column in a table delimited by comma character (,)
Example : Download the HTML table in Excel (.csv) format
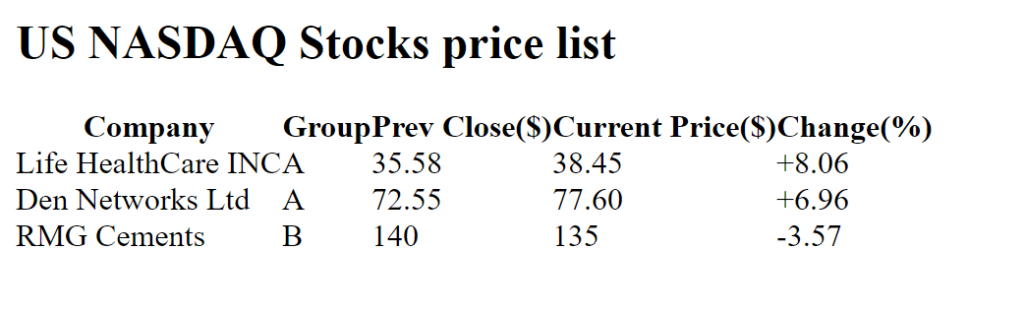
In this example, we are going to create the stock price list table with the download button – To export the table in csv file.
Step 1 : Create the HTML table
The below HTML code creates the stock price list table.
- <table> – Defines HTML table which contains set of rows and column values
- <tr> – It creates row element in the table.
- <th> – The header cell value created in this tag.
- <td> – Defines data cell/column of the table.
|
1 2 3 4 5 6 7 8 9 10 11 12 13 14 15 16 17 18 19 20 21 22 23 24 25 26 27 28 29 30 31 32 33 34 35 36 37 38 39 |
<html> <head> <title>Export HTML data to excel </title> <h2>US NASDAQ Stocks price list </h2> </head> <body> <table id=«tblStocks» cellpadding=«0» cellspacing=«0»> <tr> <th>Company</th> <th>Group</th> <th>Prev Close($)</th> <th>Current Price($)</th> <th>Change(%)</th> </tr> <tr> <td>Life HealthCare INC</td> <td>A</td> <td>35.58</td> <td>38.45</td> <td>+8.06</td> </tr> <tr> <td>Den Networks Ltd</td> <td>A</td> <td>72.55</td> <td>77.60</td> <td>+6.96</td> </tr> <tr> <td>RMG Cements</td> <td>B</td> <td>140</td> <td>135</td> <td>—3.57</td> </tr> </table> <br /> </body> </html> |
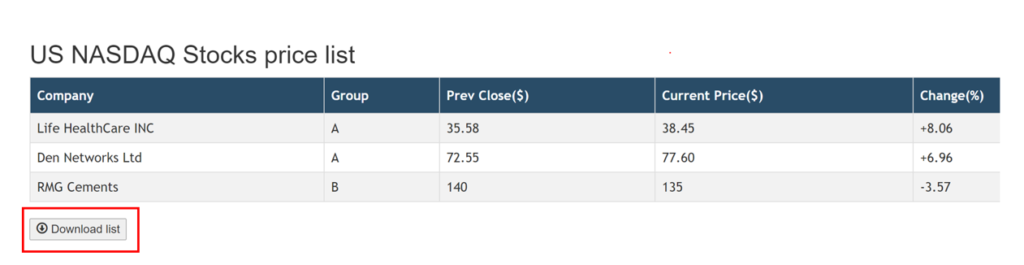
Step 2 : Add CSS properties to style the table
In the HTML code, id (tblStocks) is defined for the <table> tag. For that id, We can add the CSS properties (margin,colour,font style) which will change the table style.
|
1 2 3 4 5 6 7 8 9 10 11 12 13 14 15 16 17 18 19 20 21 22 23 24 |
<style> #tblStocks { font-family: «Trebuchet MS», Arial, Helvetica, sans-serif; border-collapse: collapse; width: 100%; } #tblStocks td, #tblStocks th { border: 1px solid #ddd; padding: 8px; } #tblStocks tr:nth-child(even){background-color: #f2f2f2;} #tblStocks tr:hover {background-color: #ddd;} #tblStocks th { padding-top: 12px; padding-bottom: 12px; text-align: left; background-color: #294c67;; color: white; } </style> |

Step 3 : Create the download button
Bootstrap providing the graphical icons from the Glyphicon Halflings set. Lets create the button with download icon using Glypicons.
|
<link rel=«stylesheet» href=«https://maxcdn.bootstrapcdn.com/bootstrap/3.4.0/css/bootstrap.min.css»> <button> <span class=«glyphicon glyphicon-download»></span> Download list </button> |
Step 4 : Implement Javascript function to download the HTML table in CSV file.
- Get the HTML table into Javascript variable using id “tblStocks” which is assigned for <table> tag.
- Loop through the variable to fetch cell values and add those values into javascript array. Here we are having array inside a array which means the outer array contains number of rows and each inner array contains number of columns for each row.
|
rows = [ [column1,column2,column3,column4,column5], [column1,column2,column3,column4,column5],... ] |
- Create <a> tag element with download attribute which used to download the data when user clicks the button. Here we are specifying data format as csv.
|
1 2 3 4 5 6 7 8 9 10 11 12 13 14 15 16 17 18 19 20 21 22 23 24 25 26 27 28 29 30 31 32 33 34 35 36 37 38 39 40 41 42 43 44 45 |
function exportData(){ /* Get the HTML data using Element by Id */ var table = document.getElementById(«tblStocks»); /* Declaring array variable */ var rows =[]; //iterate through rows of table for(var i=0,row; row = table.rows[i];i++){ //rows would be accessed using the «row» variable assigned in the for loop //Get each cell value/column from the row column1 = row.cells[0].innerText; column2 = row.cells[1].innerText; column3 = row.cells[2].innerText; column4 = row.cells[3].innerText; column5 = row.cells[4].innerText; /* add a new records in the array */ rows.push( [ column1, column2, column3, column4, column5 ] ); } csvContent = «data:text/csv;charset=utf-8,»; /* add the column delimiter as comma(,) and each row splitted by new line character (n) */ rows.forEach(function(rowArray){ row = rowArray.join(«,»); csvContent += row + «rn»; }); /* create a hidden <a> DOM node and set its download attribute */ var encodedUri = encodeURI(csvContent); var link = document.createElement(«a»); link.setAttribute(«href», encodedUri); link.setAttribute(«download», «Stock_Price_Report.csv»); document.body.appendChild(link); /* download the data file named «Stock_Price_Report.csv» */ link.click(); } |
Step 5 : Call the Javascript function using onclick event
Here we have created the javascript function in different file which named as “downloadFile.js”. Include that file in HTML using <script> tag. This script tag should be placed inside the <head> tag.
|
<script type=«text/javascript» src=«downloadFile.js»></script> |
Finally create the onclick event for the Download List button to call the javascript function exportData().
|
<button onclick=«exportData()»> <span class=«glyphicon glyphicon-download»></span> Download list </button> |
As you can see below, the HTML table downloaded in the csv file(Stock_Price_Report.csv) when user clicks the Download list button
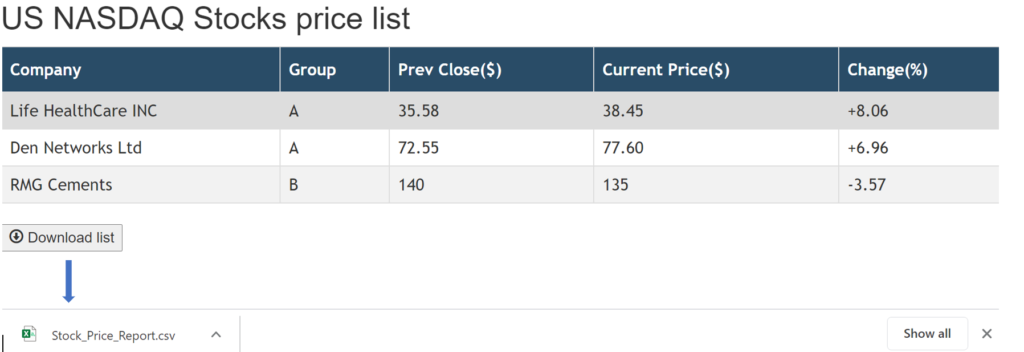
HTML table downloaded in CSV file (Stock_Price_Report.csv)

Complete code for reference :
|
1 2 3 4 5 6 7 8 9 10 11 12 13 14 15 16 17 18 19 20 21 22 23 24 25 26 27 28 29 30 31 32 33 34 35 36 37 38 39 40 41 42 43 44 45 46 47 48 49 50 51 52 53 54 55 56 57 58 59 60 61 62 63 64 65 66 67 68 |
<html> <head> <title>Export HTML data to excel </title> <h2>US NASDAQ Stocks price list </h2> <link rel=«stylesheet» href=«https://maxcdn.bootstrapcdn.com/bootstrap/3.4.0/css/bootstrap.min.css»> <script type=«text/javascript» src=«downloadFile.js»></script> <style> #tblStocks { font-family: «Trebuchet MS», Arial, Helvetica, sans-serif; border-collapse: collapse; width: 100%; } #tblStocks td, #tblStocks th { border: 1px solid #ddd; padding: 8px; } #tblStocks tr:nth-child(even){background-color: #f2f2f2;} #tblStocks tr:hover {background-color: #ddd;} #tblStocks th { padding-top: 12px; padding-bottom: 12px; text-align: left; background-color: #294c67;; color: white; } </style> </head> <body> <table id=«tblStocks» cellpadding=«0» cellspacing=«0»> <tr> <th>Company</th> <th>Group</th> <th>Prev Close($)</th> <th>Current Price($)</th> <th>Change(%)</th> </tr> <tr> <td>Life HealthCare INC</td> <td>A</td> <td>35.58</td> <td>38.45</td> <td>+8.06</td> </tr> <tr> <td>Den Networks Ltd</td> <td>A</td> <td>72.55</td> <td>77.60</td> <td>+6.96</td> </tr> <tr> <td>RMG Cements</td> <td>B</td> <td>140</td> <td>135</td> <td>—3.57</td> </tr> </table> <br /> <button onclick=«exportData()»> <span class=«glyphicon glyphicon-download»></span> Download list</button> </body> </html> |
Javascript file : downloadFile.js
|
1 2 3 4 5 6 7 8 9 10 11 12 13 14 15 16 17 18 19 20 21 22 23 24 25 26 27 28 29 30 31 32 33 34 35 36 37 38 39 40 41 42 43 44 45 |
function exportData(){ /* Get the HTML data using Element by Id */ var table = document.getElementById(«tblStocks»); /* Declaring array variable */ var rows =[]; //iterate through rows of table for(var i=0,row; row = table.rows[i];i++){ //rows would be accessed using the «row» variable assigned in the for loop //Get each cell value/column from the row column1 = row.cells[0].innerText; column2 = row.cells[1].innerText; column3 = row.cells[2].innerText; column4 = row.cells[3].innerText; column5 = row.cells[4].innerText; /* add a new records in the array */ rows.push( [ column1, column2, column3, column4, column5 ] ); } csvContent = «data:text/csv;charset=utf-8,»; /* add the column delimiter as comma(,) and each row splitted by new line character (n) */ rows.forEach(function(rowArray){ row = rowArray.join(«,»); csvContent += row + «rn»; }); /* create a hidden <a> DOM node and set its download attribute */ var encodedUri = encodeURI(csvContent); var link = document.createElement(«a»); link.setAttribute(«href», encodedUri); link.setAttribute(«download», «Stock_Price_Report.csv»); document.body.appendChild(link); /* download the data file named «Stock_Price_Report.csv» */ link.click(); } |
Recommended Articles
- How to make blinking text using HTML and CSS?
- How to show the Text letter by letter using CSS?