
Содержание
- Import or export text (.txt or .csv) files
- Import a text file by opening it in Excel
- Import a text file by connecting to it (Power Query)
- Export data to a text file by saving it
- Import a text file by connecting to it
- Export data to a text file by saving it
- Need more help?
- How to export Excel data: from one sheet to another
- Example
- Solution
- Export ranges from Excel to CSV with any delimiter and any character encoding
- Before you begin, add Export to CSV to Excel
- How to export a selected range from Excel to CSV
- How to export one or multiple worksheets as CSV files at once
- How to set processing options for exporting from Excel to CSV
- How to export from Excel to CSV with a semicolon, tab or pipe delimiter
Import or export text (.txt or .csv) files
There are two ways to import data from a text file with Excel: you can open it in Excel, or you can import it as an external data range. To export data from Excel to a text file, use the Save As command and change the file type from the drop-down menu.
There are two commonly used text file formats:
Delimited text files (.txt), in which the TAB character (ASCII character code 009) typically separates each field of text.
Comma separated values text files (.csv), in which the comma character (,) typically separates each field of text.
You can change the separator character that is used in both delimited and .csv text files. This may be necessary to make sure that the import or export operation works the way that you want it to.
Note: You can import or export up to 1,048,576 rows and 16,384 columns.
Import a text file by opening it in Excel
You can open a text file that you created in another program as an Excel workbook by using the Open command. Opening a text file in Excel does not change the format of the file — you can see this in the Excel title bar, where the name of the file retains the text file name extension (for example, .txt or .csv).
Go to File > Open and browse to the location that contains the text file.
Select Text Files in the file type dropdown list in the Open dialog box.
Locate and double-click the text file that you want to open.
If the file is a text file (.txt), Excel starts the Import Text Wizard. When you are done with the steps, click Finish to complete the import operation. See Text Import Wizard for more information about delimiters and advanced options.
If the file is a .csv file, Excel automatically opens the text file and displays the data in a new workbook.
Note: When Excel opens a .csv file, it uses the current default data format settings to interpret how to import each column of data. If you want more flexibility in converting columns to different data formats, you can use the Import Text Wizard. For example, the format of a data column in the .csv file may be MDY, but Excel’s default data format is YMD, or you want to convert a column of numbers that contains leading zeros to text so you can preserve the leading zeros. To force Excel to run the Import Text Wizard, you can change the file name extension from .csv to .txt before you open it, or you can import a text file by connecting to it (for more information, see the following section).
Import a text file by connecting to it (Power Query)
You can import data from a text file into an existing worksheet.
On the Data tab, in the Get & Transform Data group, click From Text/CSV.
In the Import Data dialog box, locate and double-click the text file that you want to import, and click Import.
In the preview dialog box, you have several options:
Select Load if you want to load the data directly to a new worksheet.
Alternatively, select Load to if you want to load the data to a table, PivotTable/PivotChart, an existing/new Excel worksheet, or simply create a connection. You also have the choice of adding your data to the Data Model.
Select Transform Data if you want to load the data to Power Query, and edit it before bringing it to Excel.
If Excel doesn’t convert a particular column of data to the format that you want, then you can convert the data after you import it. For more information, see Convert numbers stored as text to numbers and Convert dates stored as text to dates.
Export data to a text file by saving it
You can convert an Excel worksheet to a text file by using the Save As command.
Go to File > Save As.
In the Save As dialog box, under Save as type box, choose the text file format for the worksheet; for example, click Text (Tab delimited) or CSV (Comma delimited).
Note: The different formats support different feature sets. For more information about the feature sets that are supported by the different text file formats, see File formats that are supported in Excel.
Browse to the location where you want to save the new text file, and then click Save.
A dialog box appears, reminding you that only the current worksheet will be saved to the new file. If you are certain that the current worksheet is the one that you want to save as a text file, click OK. You can save other worksheets as separate text files by repeating this procedure for each worksheet.
You may also see an alert below the ribbon that some features might be lost if you save the workbook in a CSV format.
For more information about saving files in other formats, see Save a workbook in another file format.
Import a text file by connecting to it
You can import data from a text file into an existing worksheet.
Click the cell where you want to put the data from the text file.
On the Data tab, in the Get External Data group, click From Text.
In the Import Data dialog box, locate and double-click the text file that you want to import, and click Import.
Follow the instructions in the Text Import Wizard. Click Help  on any page of the Text Import Wizard for more information about using the wizard. When you are done with the steps in the wizard, click Finish to complete the import operation.
In the Import Data dialog box, do the following:
Under Where do you want to put the data?, do one of the following:
To return the data to the location that you selected, click Existing worksheet.
To return the data to the upper-left corner of a new worksheet, click New worksheet.
Optionally, click Properties to set refresh, formatting, and layout options for the imported data.
Excel puts the external data range in the location that you specify.
If Excel does not convert a column of data to the format that you want, you can convert the data after you import it. For more information, see Convert numbers stored as text to numbers and Convert dates stored as text to dates.
Export data to a text file by saving it
You can convert an Excel worksheet to a text file by using the Save As command.
Go to File > Save As.
The Save As dialog box appears.
In the Save as type box, choose the text file format for the worksheet.
For example, click Text (Tab delimited) or CSV (Comma delimited).
Note: The different formats support different feature sets. For more information about the feature sets that are supported by the different text file formats, see File formats that are supported in Excel.
Browse to the location where you want to save the new text file, and then click Save.
A dialog box appears, reminding you that only the current worksheet will be saved to the new file. If you are certain that the current worksheet is the one that you want to save as a text file, click OK. You can save other worksheets as separate text files by repeating this procedure for each worksheet.
A second dialog box appears, reminding you that your worksheet may contain features that are not supported by text file formats. If you are interested only in saving the worksheet data into the new text file, click Yes. If you are unsure and would like to know more about which Excel features are not supported by text file formats, click Help for more information.
For more information about saving files in other formats, see Save a workbook in another file format.
The way you change the delimiter when importing is different depending on how you import the text.
If you use Get & Transform Data > From Text/CSV, after you choose the text file and click Import, choose a character to use from the list under Delimiter. You can see the effect of your new choice immediately in the data preview, so you can be sure you make the choice you want before you proceed.
If you use the Text Import Wizard to import a text file, you can change the delimiter that is used for the import operation in Step 2 of the Text Import Wizard. In this step, you can also change the way that consecutive delimiters, such as consecutive quotation marks, are handled.
See Text Import Wizard for more information about delimiters and advanced options.
If you want to use a semi-colon as the default list separator when you Save As .csv, but need to limit the change to Excel, consider changing the default decimal separator to a comma — this forces Excel to use a semi-colon for the list separator. Obviously, this will also change the way decimal numbers are displayed, so also consider changing the Thousands separator to limit any confusion.
Clear Excel Options > Advanced > Editing options > Use system separators.
Set Decimal separator to , (a comma).
Set Thousands separator to . (a period).
When you save a workbook as a .csv file, the default list separator (delimiter) is a comma. You can change this to another separator character using Windows Region settings.
Caution: Changing the Windows setting will cause a global change on your computer, affecting all applications. To only change the delimiter for Excel, see Change the default list separator for saving files as text (.csv) in Excel.
In Microsoft Windows 10, right-click the Start button, and then click Settings.
Click Time & Language, and then click Region in the left panel.
In the main panel, under Regional settings, click Additional date, time, and regional settings.
Under Region, click Change date, time, or number formats.
In the Region dialog, on the Format tab, click Additional settings.
In the Customize Format dialog, on the Numbers tab, type a character to use as the new separator in the List separator box.
In Microsoft Windows, click the Start button, and then click Control Panel.
Under Clock, Language, and Region, click Change date, time, or number formats.
In the Region dialog, on the Format tab, click Additional settings.
In the Customize Format dialog, on the Numbers tab, type a character to use as the new separator in the List separator box.
Note: After you change the list separator character for your computer, all programs use the new character as a list separator. You can change the character back to the default character by following the same procedure.
Need more help?
You can always ask an expert in the Excel Tech Community or get support in the Answers community.
Источник
How to export Excel data: from one sheet to another

Exporting data from one Excel spreadsheet to another spreadsheet is always a problem if you want to have the same content in the second too. We sill see how to solve this problem with an example.
Example
I have a query. Whenever I export a file from the internet the data gets saved into a new Excel file instead of the Excel sheet I am working in. As a result I have to copy the data from that file to the Excel file I am working in. This is very time consuming. Is there a shorter method to directly export the data into the working Excel file?
Another example problem: I have recorded a macro for a particular worksheet. That macro does two things:
- 1. There are two cols. Column A and Column B. In col C it subtracts Col A from B.
- 2. It finds the weighted average between col A and C.
Now I want to run this macro in all worksheets except the first worksheet. What is the code to do that?
Solution
To solve the firs problem:
- Copy the webpage address in Excel clipboard.
- Go to your sheet.
- Select any cell from where you want the file to be copied. e.g. A1.
- Click data-import external data (or something like this depending upon the version) — new web query.
- In the new web query window paste the address of the webpage at the top against «address».
- Click on Go
- You will get the whole webpage. Whatever table you want, click the tick mark and the whole table will be marked
- Click «import» at the bottom right
- It will ask where you want to park it. If it is already A1 click ok
To solve the second issue:
Источник
Export ranges from Excel to CSV with any delimiter and any character encoding
Widespread use of plain text CSV files is easily explained – this format is supported by the majority of applications. So saving Excel spreadsheets as comma-delimited CSV files is a familiar operation. But what if you need to export all worksheets at once, or apply a different delimiter? Besides, saving as CSV automatically closes the source Excel file – and it becomes tiresome when you have to export data repeatedly.
The Export to CSV feature simplifies the conversion of XLSX (XLS) tables to CSV format:
Before you begin, add Export to CSV to Excel
Export to CSV is one of the 20+ features within XLTools Add-in for Excel. Works in Excel 2019, 2016, 2013, 2010, desktop Office 365.


How to export a selected range from Excel to CSV
On XLTools tab, click the Export button ![]() Choose Export to CSV from the drop-down list
Choose Export to CSV from the drop-down list ![]() A window will open.
A window will open.
Choose Selected range ![]() Select the range you want to export.
Select the range you want to export.
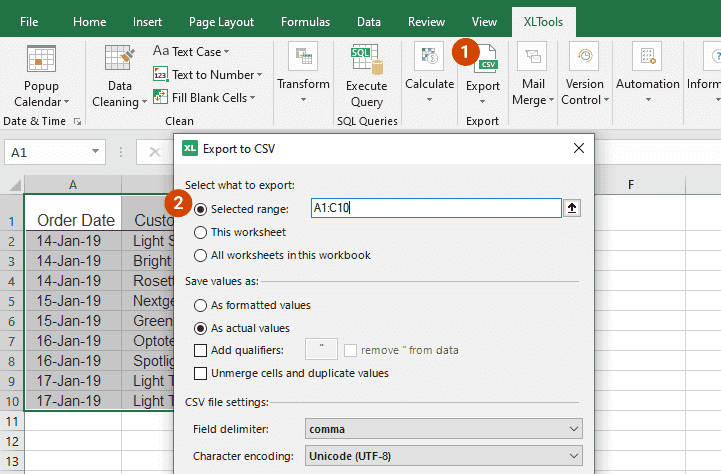
Check the box Open file after export , if you want to see the result immediately.

Click OK ![]() Save the CSV file to your computer
Save the CSV file to your computer ![]() Done.
Done.
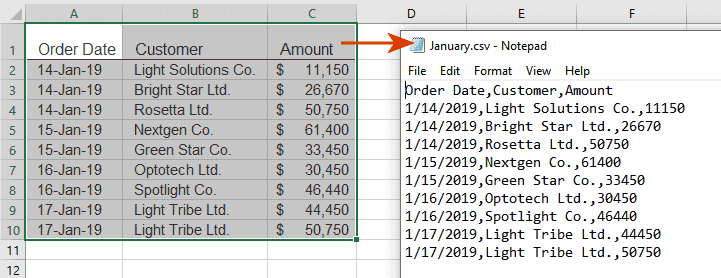
See that the source Excel file remains open and unchanged. Learn more.
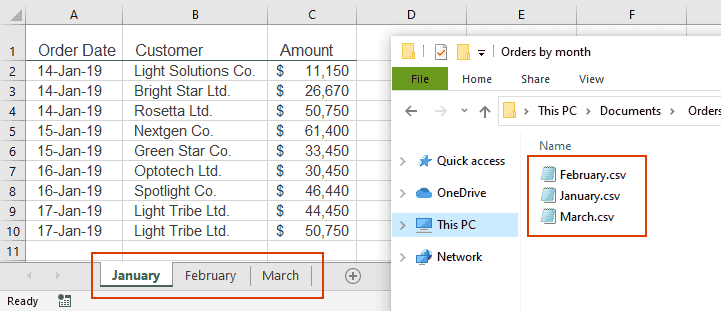
How to export one or multiple worksheets as CSV files at once
On XLTools tab, click the Export button ![]() Choose Export to CSV from the drop-down list
Choose Export to CSV from the drop-down list ![]() A window will open.
A window will open.
Choose This worksheet or All worksheets in this workbook .
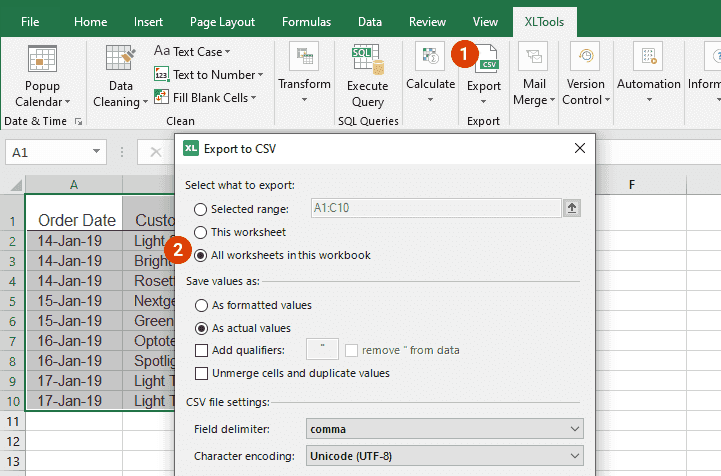
Сheck the box Open file (folder) after export , if you want to see the result immediately.
Click OK ![]() Save the CSV file(s) to your computer
Save the CSV file(s) to your computer ![]() Done.
Done.
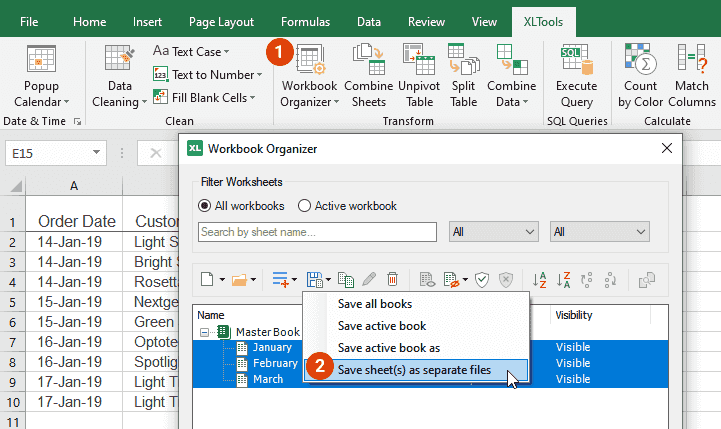
Another approach to save multiple worksheets as CSV files, is to use XLTools Workbook Organizer.
On XLTools tab, click the Workbook Organizer button ![]() A window will open.
A window will open.
See the list of all worksheets in all open workbooks ![]() Select one, all or just a few worksheets you want to export.
Select one, all or just a few worksheets you want to export.
Click the Save icon ![]() From the drop-down list select Save sheet(s) as separate files .
From the drop-down list select Save sheet(s) as separate files .
The window will open ![]() Choose to save as comma-separated values *.csv files
Choose to save as comma-separated values *.csv files ![]() Set the processing options.
Set the processing options.
Click OK ![]() Save the CSV file(s) to your computer
Save the CSV file(s) to your computer ![]() Done.
Done.
How to set processing options for exporting from Excel to CSV
You can define how to process and export values to CSV format:
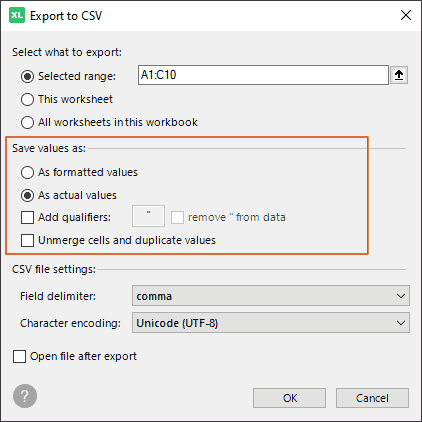
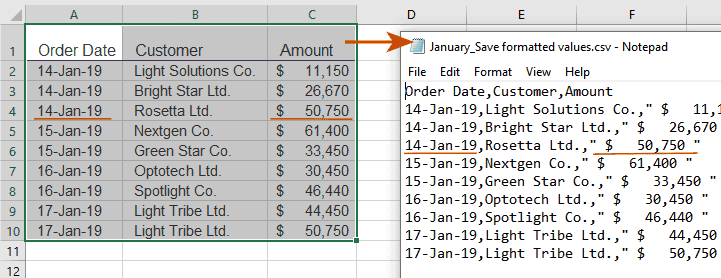
Save values As formatted values
Select this option, if you want to export values in the format that matches Excel formatting – as displayed in cells. For example, 10%, 12-Mar-2016, $40.
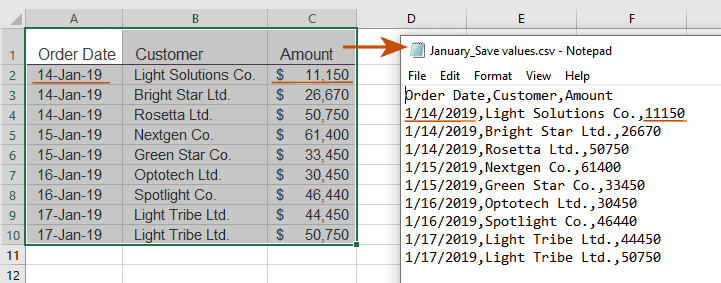
Save values As actual values
Select this option, if you want to export values in default format – as displayed in Excel formula bar. For example, 0.1, 3/12/2016, 40.00.
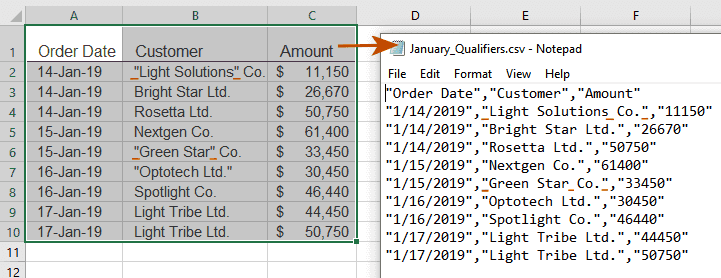
Check the box With qualifiers
Check this option, if you need to set field qualifiers. You can type » (double quote), or ‘ (single quote), or any other character. The add-in will add the qualifiers to every field in the resulting CSV file. This option would be helpful if you process CSV files in legacy systems.
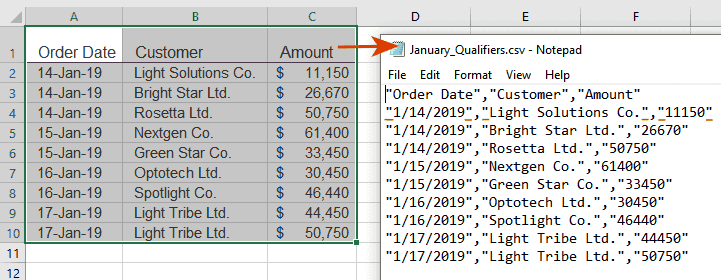
Additionally, you can check the box remove _ from data . This will keep the qualifier qualifier character only in the beginning and end of the field and remove it from all other instances.
For example, if you add ‘ (single quotes) as field qualifiers, while some cells in your source Excel table already contain ‘ (single quotes or apostrophes), this will obscure the field limits in the CSV file. So, you can choose to remove any other single quote characters that are not qualifiers from the resulting CSV file. The source Excel file will remain intact.
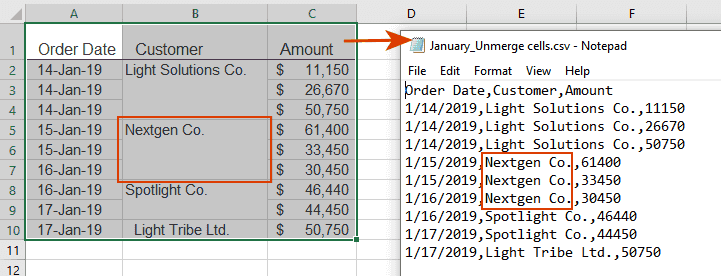
Check the box Unmerge cells and duplicate values
Check this option, if your source table has merged cells. The add-in will duplicate values from merged cells into the corresponding places of the resulting CSV text string.
How to export from Excel to CSV with a semicolon, tab or pipe delimiter
You can save an Excel table as a CSV file with a standard comma delimiter, or choose a different suitable separator between values in the output CSV file:
Источник
Let’s assume the following situation: You have created an Excel file and want to export one sheet from it – many times with different settings. For example: Each sales person should receive their own sales numbers. The problem is that you have many sheets to export. And in practice the following happens: You have just finished saving all files separately when you have to incorporate a small change. What do you do? So, let’s explore in this article, how to mass export single (or multiple) worksheets with changing one variable.
Summary for mass export
In this article you learn how to mass export the same worksheet(s) multiple times – changing one variable/cell from a list each time.
- If you want to export your worksheet only a couple of times (~less than 6), use the manual way.
- If you feel comfortable editing a basic VBA macro, go with method 2.
- All other times, use method 3 with Professor Excel Tools (you can use it for free for 7 days).
General steps to export the same sheet with different variable in bulk
Mass export example in this article
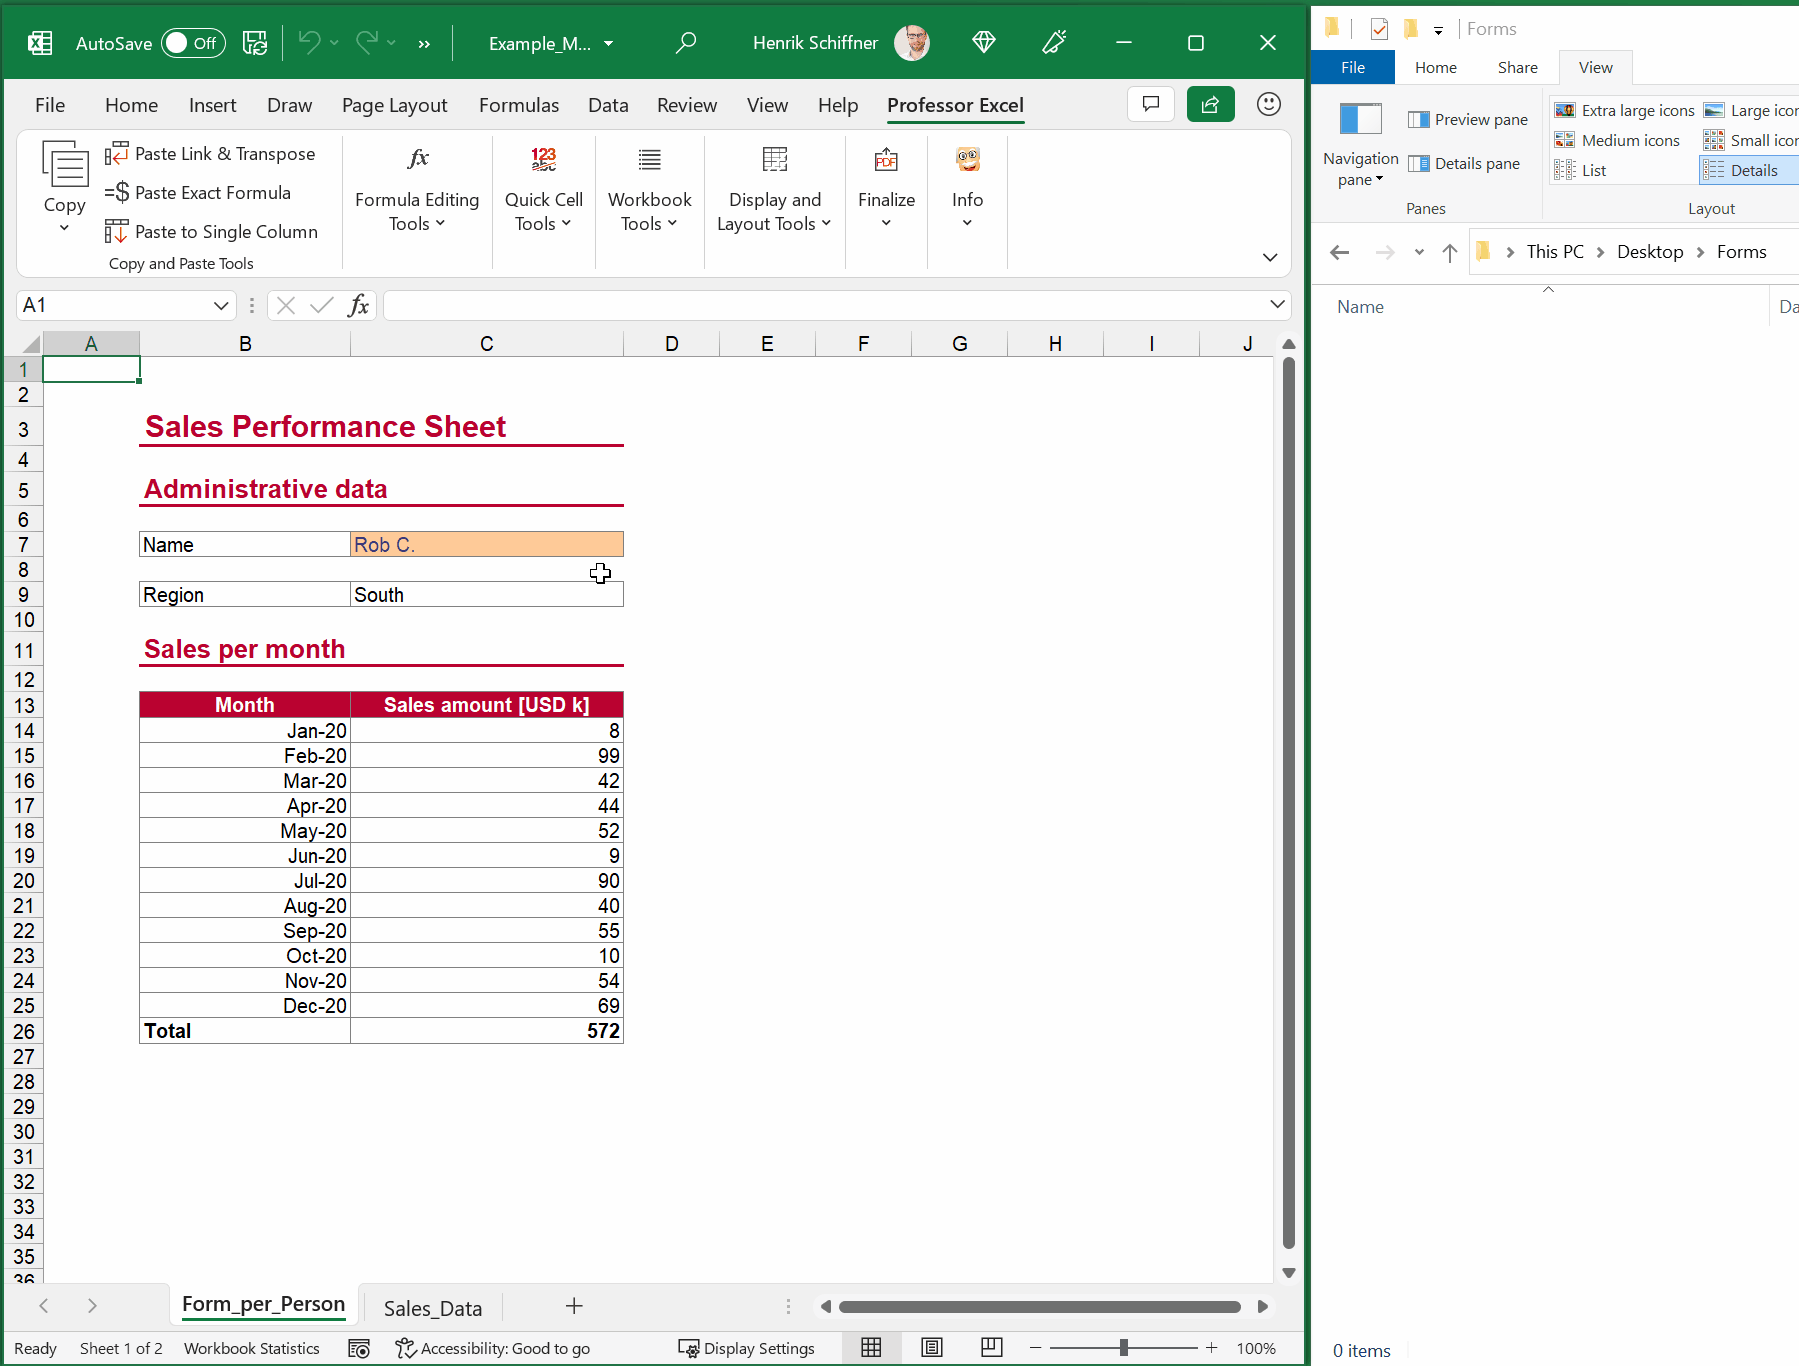
Before we start, let’s take a look at the general example: You have prepared a small form containing the sales numbers for each sales person.
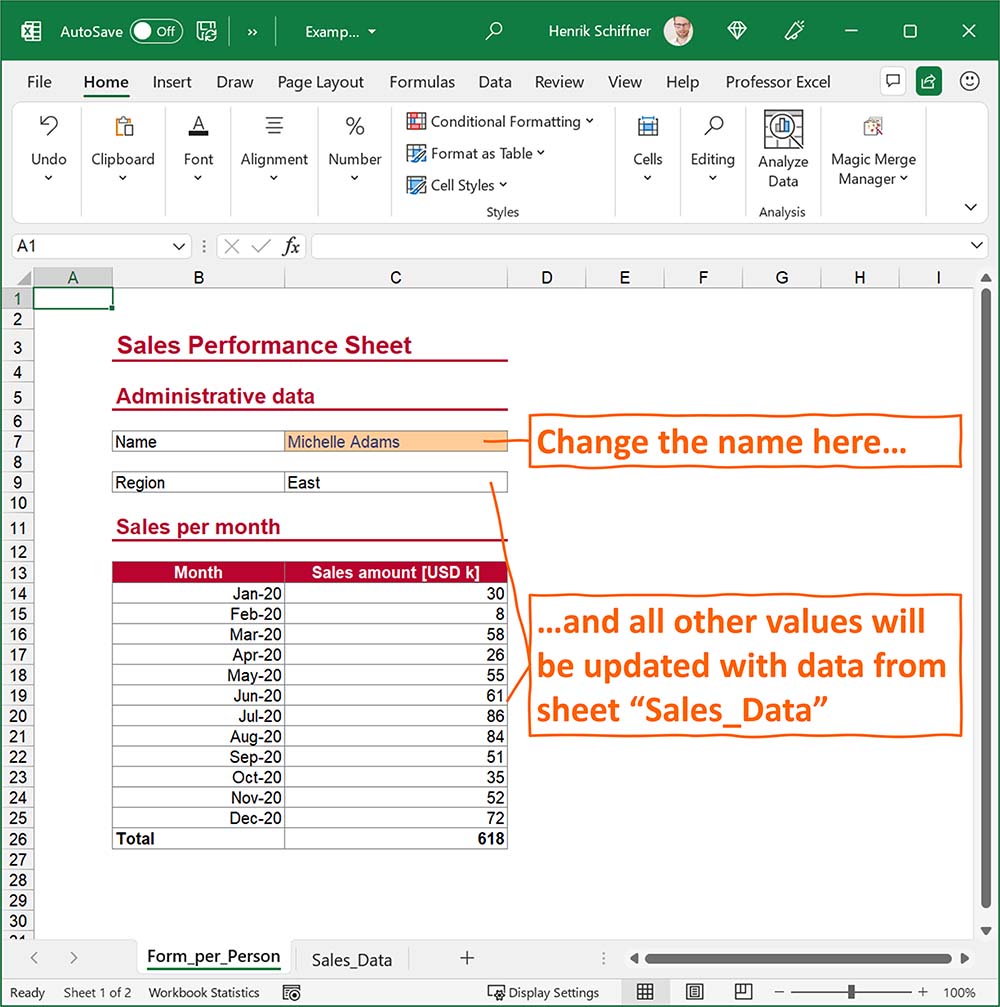
When you change the name in cell C7 from the drop down list, all values on the worksheet change accordingly. The sheet is filled with SUMIFS / VLOOKUP / INDEX/MATCH functions from the second worksheet “Sales_Data” containing all the data.
The problem: Because each sales person is only allowed to see his or her numbers, you have to split the file.
General steps for exporting worksheet
All following methods will apply these steps more or less automatically.
- Set your variable so that your sheet contains the correct values.
- Copy the worksheet or sheets to a new Excel workbook.
- Break the links to the original Excel file.
- Save the file under a new name.
- Start again with number one…
Method 1: Do it manually with these steps
In this section you learn how to mass export the same worksheet step-by-step. It’s not especially fast but it summarizes all steps for you. If you only have to do it five or less than five times, maybe this is even the fastest method.
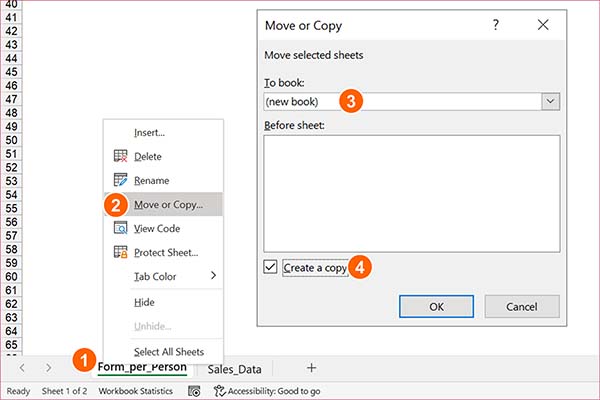
- Select all worksheets you want to export and right-click on one of them.
- Click on “Move or Copy…”
- In the Move or Copy window, select “(new book)” in the “To book” field.
- Important: Check “Create a copy”. Otherwise the original worksheet(s) will be moved. Confirm with OK.
Now you will see a new workbook. It probably still contains links to the original workbook which – in most cases – need to be broken.
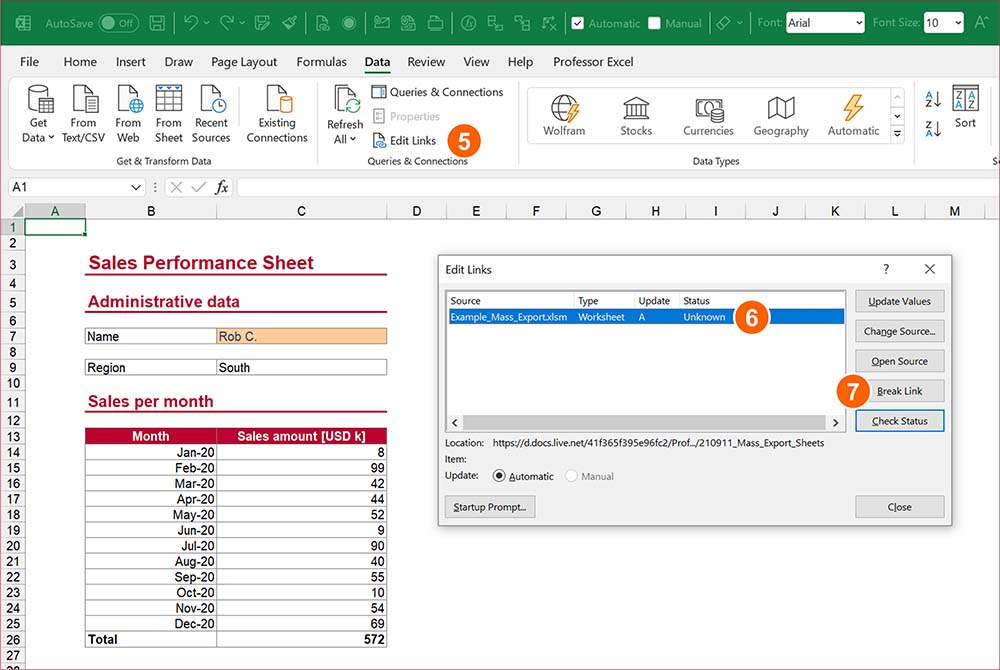
- Go to the Data ribbon and click on “Edit Links”.
- Select the link to your original Excel file.
- Click on “Break Link” and then Close. If you have problems breaking all links, please refer to this article.
After that, you can save the file and proceed with the next export.
Method 2: Use this VBA macro to save the same worksheet over and over again to hard drive
Especially if you have to work on many worksheets to export, the first method above takes a long time. That is usually the moment, when we start to consider other options, namely using a VBA macro.
Please find a VBA macro below. Copy and paste it into a new module (here is how to do that).
Before you just go ahead and run the module, you need to slightly adapt it. You have to fill in your sheet names and ranges, for both the list and the cell that is supposed to be changed:
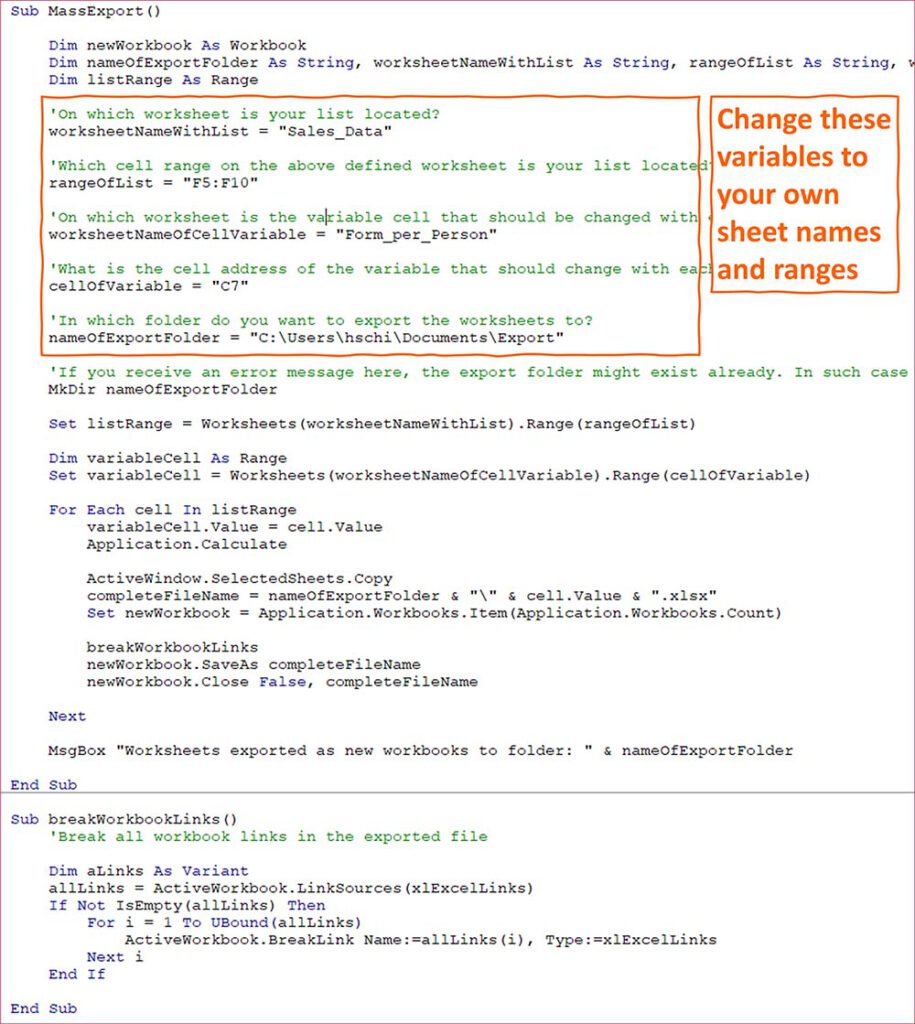
Here is the code for you to copy and paste:
Sub MassExport()

    Dim newWorkbook As Workbook
    Dim nameOfExportFolder As String, worksheetNameWithList As String, rangeOfList As String, worksheetNameOfCellVariable As String, cellOfVariable As String, completeFileName As String
    Dim listRange As Range

    'On which worksheet is your list located?
    worksheetNameWithList = "Sales_Data"

    'Which cell range on the above defined worksheet is your list located?
    rangeOfList = "F5:F10"

    'On which worksheet is the variable cell that should be changed with each export?
    worksheetNameOfCellVariable = "Form_per_Person"

    'What is the cell address of the variable that should change with each export?
    cellOfVariable = "C7"

    'In which folder do you want to export the worksheets to?
    nameOfExportFolder = "C:UsershschiDocumentsExport"

    'If you receive an error message here, the export folder might exist already. In such case either delete or rename it. Or choose a different name above
    MkDir nameOfExportFolder

    Set listRange = Worksheets(worksheetNameWithList).Range(rangeOfList)

    Dim variableCell As Range
    Set variableCell = Worksheets(worksheetNameOfCellVariable).Range(cellOfVariable)

    For Each cell In listRange
        variableCell.Value = cell.Value
        Application.Calculate

        ActiveWindow.SelectedSheets.Copy
        completeFileName = nameOfExportFolder & "" & cell.Value & ".xlsx"
        Set newWorkbook = Application.Workbooks.Item(Application.Workbooks.Count)

        breakWorkbookLinks
        newWorkbook.SaveAs completeFileName
        newWorkbook.Close False, completeFileName

    Next

    MsgBox "Worksheets exported as new workbooks to folder: " & nameOfExportFolder

End Sub

Sub breakWorkbookLinks()
    'Break all workbook links in the exported file

    Dim aLinks As Variant
    allLinks = ActiveWorkbook.LinkSources(xlExcelLinks)
    If Not IsEmpty(allLinks) Then
        For i = 1 To UBound(allLinks)
            ActiveWorkbook.BreakLink Name:=allLinks(i), Type:=xlExcelLinks
        Next i
    End If

End Sub
Do you want to boost your productivity in Excel?
Get the Professor Excel ribbon!

Add more than 120 great features to Excel!
The most comfortable method: Use an Excel add-in. Our add-in “Professor Excel Tools” can do all that for you. It comes with a powerful Export feature.
Here is the demo:
The steps in detail:
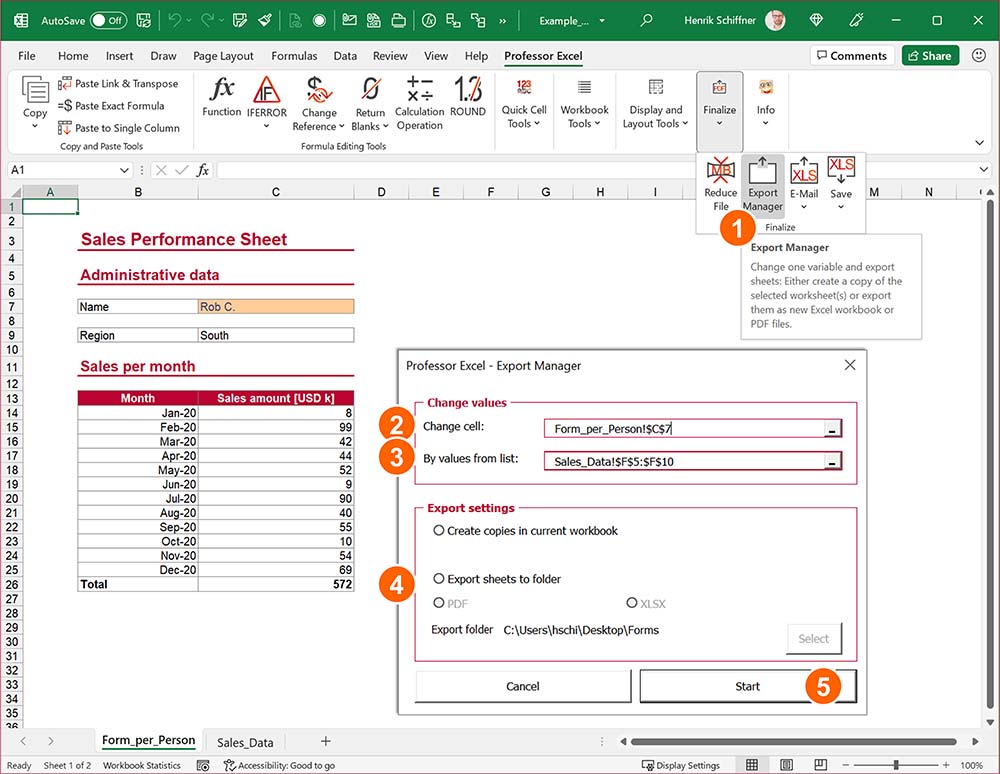
- Make sure that all worksheets that should be exported multiple times are selected (for example, if each file should have 2 or 3 worksheets, select them).
- Click on “Export Manager” on the Professor Excel ribbon.
- Select the cell to change. In this case it is cell C7.
- Select the list of variables.
- Export settings: You can either create copies in the current workbook or export the selected sheets into separate Excel- or PDF files.
- Click on Start.

This function is included in our Excel Add-In ‘Professor Excel Tools’
(No sign-up, download starts directly)
Download
Please feel free to download the example from this article here.
Image by WorldInMyEyes from Pixabay

Henrik Schiffner is a freelance business consultant and software developer. He lives and works in Hamburg, Germany. Besides being an Excel enthusiast he loves photography and sports.
![]()
Download Article
Easy ways to convert Excel to PDF
![]()
Download Article
Converting an Excel file to a PDF makes it easier for people to open the and view the file on various platforms—even if they don’t have Microsoft Office. PDFs are also easier to print and distribute than Excel spreadsheets. If you have Microsoft Excel, you can easily convert your spreadsheet to a PDF by saving or exporting it within the app. If you don’t have Excel, you can use Google Sheets, a tool on Google Drive, to make the conversion for free.
-

1
Select the part of the Excel spreadsheet you want to convert to PDF (optional). If there’s only a certain part of the Excel file that you want to turn into PDF format, select it now. Otherwise, move on to the next step.
- Note that PDF conversions cannot be easily reverted back into an Excel sheet, but this method will preserve your original copy.
-
2
Click the File menu. It’s at the top-left corner.
Advertisement
-
3
Click Export on the menu. This opens the Export panel.
-
4
Click Create PDF/XPS. Look for the icon that looks like a sheet of paper wearing a belt.
-
5
Click the Options… button. This will allow you to adjust the settings for the PDF file you are about to create.
-
6
Choose your PDF options and click OK.
- If you selected an area of your spreadsheet to save as a PDF, choose Selection under «Publish what.» This ensures that only that selected area is saved as a PDF.
- If you’d rather save the entire visible worksheet as a PDF, choose Active sheet(s) instead.
- If you want to choose specific pages from the workbook to save as a PDF, use the «Page(s)» drop-down menus to define the first and last pages.
- Click OK to continue.
-
7
Choose your optimization (optional). Above the «Options» button, you can select how you want to optimize the PDF. Most people can stick with «Standard» unless the spreadsheet is very large. «Minimum size» will reduce the size of a larger file to something more manageable.
- If you want to change the location to which you’re saving the file, you can navigate to that folder in the window now.
-
8
Name the file and click Publish. This exports the selected information to a new PDF file with the name you’ve entered.
-
9
Review the PDF. By default, the PDF file will open automatically for your review. If it doesn’t open by automatically, just double-click the name of the file in the folder to which you saved it..
- It’s not really possible to edit the PDF now, so if you need to make changes you’ll want to make them in the Excel document and then create a new PDF.


Advertisement
-
1
Go to https://drive.google.com. If you need to convert an Excel spreadsheet to PDF but don’t have Excel, don’t fret—you can use tools built in to your Google account to do the conversion for free.
- If you’re not already signed in to your Google account, sign in when prompted.
-
2
Click +New. It’s at the top-left corner of your Google Drive.
-
3
Click File upload. This opens your computer’s file browser.
-
4
Select your Excel spreadsheet and click Open. This uploads the spreadsheet to your Google Drive.
-
5
Click the Excel spreadsheet in your Google Drive. This opens the spreadsheet in Google Sheets, Google’s free spreadsheet editor.
-
6
Click the File menu and select Download. A list of download options will expand.
-
7
Click PDF document (.pdf). This displays a preview of your PDF in the Google Sheets printing window.
-
8
Adjust the layout of your PDF. If the print preview doesn’t look the way you want, use the right panel to make any changes you need before you continue.
- The PDF will save in the same orientation as the spreadsheet (usually landscape mode). If you’d rather it be in portrait (vertical) mode, select Portrait under «Page orientation.»
- Change the scale (the size/fit on the page) and margin size if necessary.
- Click Formatting to choose whether to display gridlines and/or notes, adjust the page order, and change the alignment.
- To add headers and footers to the tops and bottoms of pages, click Headers & footers, and then check the boxes to choose which information to display.
- If your spreadsheet contains a lot of data and cuts off in odd places, click SET CUSTOM PAGE BREAKS in the right panel. Here, you can drag the blue lines to adjust where each page begins and ends. Click CONFIRM BREAKS at the top-right to save your changes.
-
9
Click EXPORT. It’s the blue button at the top-right. This prompts you to save your new PDF to your computer.
- If the download doesn’t begin automatically, choose a location to which you’ll save the PDF, and then click Save to download it.


Advertisement
-
1
Ensure that the headers and footers on all of your sheets are the same (optional). If you’re using Excel 2011 and want to save multiple worksheets in a single PDF, each worksheet will need to have identical headers and footers. If they aren’t, each sheet will be created as a separate PDF document, but you can also easily merge these afterwards.
- Select all of the worksheets in your entire workbook. To do this, click the tab for the first sheet at the bottom of excel, hold down the Shift key, and then click the last sheet’s tab to select all.
- Click the Layout tab and then click Header & Footer.
- Click the Customize Header… and Customize Footer… buttons to edit the headers and footers for all of the sheets.
-
2
Select the part of the Excel spreadsheet you want to convert to PDF (optional). If there’s only a certain part of the spreadsheet that you want to turn into a PDF, select it now. Otherwise, go to the next step.
- PDF conversions cannot be easily converted back into an Excel sheet, but this method will preserve your original copy.
-
3
Click the File menu and select Save As. You could also press Command + Shift + S to open the Save As option.[1]
- If you want to save the PDF to a new folder, you can select that folder now. # Type a different name for the file. The name of the current Excel file appears in the «Save As» field. You will need to enter a different name (even if it’s just slightly different) to avoid accidentally overwriting the spreadsheet file.[2]
- If you want to save the PDF to a new folder, you can select that folder now. # Type a different name for the file. The name of the current Excel file appears in the «Save As» field. You will need to enter a different name (even if it’s just slightly different) to avoid accidentally overwriting the spreadsheet file.[2]
-
4
Click the «Format» or «File Format» menu and select PDF. This menu may have a slightly different name depending on your version of Excel.
-
5
Select what gets included in the PDF. At the bottom of the window, you can select Workbook (to convert the entire workbook), Sheet (to save only the active sheet as a PDF), or Selection (to save just the selected area as a PDF).
-
6
Click Save or Export. You’ll see a different option depending on your version of Excel.
- If the headers don’t match on a multi-sheet file, a separate file will be created for each sheet.
-
7
Join the separate PDF files (if necessary). If saving the Excel file as a PDF resulted in multiple PDF files, you can quickly join them together using Preview. Here’s how:
- Open the first PDF file by double-clicking its name in its folder.
- Click the View menu and select Thumbnails.[3]
- Click the last thumbnail to select it. This tells Preview to add the next PDF to the end of the current document.
- Click the Edit menu and select Insert > Page from File.
- Select the next PDF in the range and click Open.
- Repeat this process until you’ve added all PDFs.
- Click File and select Export as PDF.


Advertisement
Add New Question
-
Question
How can I send a large Excel spreadsheet if I don’t want to convert it to a PDF?

Luigi Oppido is the Owner and Operator of Pleasure Point Computers in Santa Cruz, California. Luigi has over 25 years of experience in general computer repair, data recovery, virus removal, and upgrades. He is also the host of the Computer Man Show! broadcasted on KSQD covering central California for over two years.
Computer & Tech Specialist
Expert Answer
If you’re sending a large Excel sheet, or if you want to send multiple files at once, you can compress the files as a zip folder. Then, the other person can unzip the folder and see all of the original files.
-
Question
How do I get a one-page worksheet as a one-page PDF? It keeps trying to save as several pages.
In Excel go to Page Layout. In the Scale to Fit section, make sure Width and Height are both set to one page, then save the Excel document as a PDF.
-
Question
How can I get full xlsx worksheets to convert to PDF?
In Microsoft Office Suite 2016. There’s an option to export under File. From there, you can choose the Export to PDF option.

See more answers
Ask a Question
200 characters left
Include your email address to get a message when this question is answered.
Submit
Advertisement
-
If you’re sending a large Excel sheet to someone who also has Microsoft Excel, or if you need to send multiple files, try compressing the files instead of converting them to a PDF.
Advertisement
About This Article
Article SummaryX
1. Click the File menu and select Export.
2. Click Create PDF/XPS.
3. Click Options.
4. Choose your options and select OK.
5. Select an optimization level.
6. Name the file and click Publish.
Did this summary help you?
Thanks to all authors for creating a page that has been read 1,553,124 times.
Is this article up to date?
I am creating a spread sheet to help ease the entry of data into one of our systems. They are entering inventory items into this spread sheet to calculate the unit cost of the item (item cost + tax + S&H). The software we purchased cannot do this.
Aan invoice can have one or more lines (duh!) and I calculate the final unit cost. This is working fine. I then want to take that data and create a CSV from that so they can load it into our inventory system. I currently have a second tab that is laid out like I want the CSV, and I do an equal cell (=Sheet!A3) to get the values on the «export sheet». The problem is when they save this to a CSV, there are many blank lines that need to be deleted before they can upload it. I want a file that only contains the data that is needed.
I am sure this could be done in VBA, but I don’t know where to start or know how to search for an example to start. Any direction or other options would be appreciated.
asked Apr 21, 2010 at 21:27
![]()
Mike WillsMike Wills
20.9k28 gold badges91 silver badges148 bronze badges
Look at Range.SpecialCells(xlBlanks).EntireRow.Delete, I think this is what you are looking for!
answered Apr 21, 2010 at 21:34
![]()
1
expanding on @dwo’s answer — this code will allow you to both remove the blank rows and export to CSV:
Sub export_to_csv(sheetname As String, OutDir As String)
    Sheets(sheetname).Select
    Set wb = ActiveWorkbook
    Set newwb = Workbooks.Add()
    wb.ActiveSheet.Copy newwb.ActiveSheet 'copy sheet to new workbook
    newwb.ActiveSheet.Activate
    ActiveSheet.UsedRange 'refresh the used range
    Range("A1:A" & ActiveSheet.Cells.SpecialCells(xlCellTypeLastCell).Row).Select 'select relevant cells
    Selection.SpecialCells(xlBlanks).EntireRow.Delete 'remove empty rows
    Application.DisplayAlerts = False 'avoid warning message when overwriting existing files
    newwb.SaveAs OutDir & sheetname, xlCSVWindows 'save as CSV
    newwb.Close 'close new workbook
    Application.DisplayAlerts = True 'reset warning messages
End Sub

Sub test()
    export_to_csv sheetname:="Sheet1", OutDir:="C:temp"
End Sub
answered Nov 21, 2012 at 18:21
![]()
Allan BoweAllan Bowe
12.3k19 gold badges75 silver badges123 bronze badges
The solution on this page worked best for me. I just had to modify it to allow it to work for what I needed.
answered Apr 22, 2010 at 14:22
![]()
Mike WillsMike Wills
20.9k28 gold badges91 silver badges148 bronze badges
Exporting data from one Excel spreadsheet to another spreadsheet is always a problem if you want to have the same content in the second too. We sill see how to solve this problem with an example.
Example
I have a query. Whenever I export a file from the internet the data gets saved into a new Excel file instead of the Excel sheet I am working in. As a result I have to copy the data from that file to the Excel file I am working in. This is very time consuming. Is there a shorter method to directly export the data into the working Excel file?
Another example problem: I have recorded a macro for a particular worksheet. That macro does two things:
- 1. There are two cols. Column A and Column B. In col C it subtracts Col A from B.
- 2. It finds the weighted average between col A and C.
Now I want to run this macro in all worksheets except the first worksheet. What is the code to do that?
Solution
To solve the firs problem:
- Copy the webpage address in Excel clipboard.
- Go to your sheet.
- Select any cell from where you want the file to be copied. e.g. A1.
- Click data-import external data (or something like this depending upon the version) — new web query.
- In the new web query window paste the address of the webpage at the top against «address».
- Click on Go
- You will get the whole webpage. Whatever table you want, click the tick mark and the whole table will be marked
- Click «import» at the bottom right
- It will ask where you want to park it. If it is already A1 click ok
To solve the second issue:
Sub test1()
Dim j As Integer, k As Integer
j = Worksheets.Count
'MsgBox j
For k = 1 To j
'MsgBox Sheets(k).Name
If Sheets(k).Name = "Sheet1" Then GoTo nnext
Sheets(k).Activate
NAME OF THE MACRO
nnext:
Next k
End Sub
any more excel questions? Check out our forum!
Сохранение листов книги как отдельных файлов
Про сборку листов из нескольких книг в одну текущую я уже писал здесь. Теперь разберем решение обратной задачи: есть одна книга Excel, которую нужно «разобрать», т.е. сохранить каждый лист как отдельный файл для дальнейшего использования.

Примеров подобного из реальной жизни можно привести массу. Например, файл-отчет с листами-филиалами нужно разделить на отдельные книги по листам, чтобы передать затем данные в каждый филиал и т.д.
Если делать эту процедуру вручную, то придется для каждого листа выполнить немаленькую цепочку действий (выбрать лист, правой кнопкой по ярлычку листа, выбрать Копировать, указать отдельный предварительно созданный пустой файл и т.д.) Гораздо проще использовать короткий макрос, автоматизирующий эти действия.
Способ 1. Простое разделение
Нажмите сочетание Alt+F11 или выберите в меню Сервис — Макрос — Редактор Visual Basic (Tools — Macro — Visual Basic Editor), вставьте новый модуль через меню Insert — Module и скопируйте туда текст этого макроса:
Sub SplitSheets1()
    Dim s As Worksheet
    For Each s In ActiveWorkbook.Worksheets    'проходим по всем листам в активной книге
        s.Copy       'копируем каждый лист в новый файл
    Next
End Sub
Если теперь выйти из редактора Visual Basic и вернуться в Excel, а затем запустить наш макрос (Alt+F8), то все листы из текущей книги будут разбиты по отдельным новым созданным книгам.
Способ 2. Разделение с сохранением
При необходимости, можно созданные книги сразу же сохранять под именами листов. Для этого макрос придется немного изменить, добавив команду сохранения в цикл:
Sub SplitSheets2()
    Dim s As Worksheet
    Dim wb as Workbook
    Set wb = ActiveWorkbook
    For Each s In wb.Worksheets                                 'проходим во всем листам активной книги
        s.Copy                                                  'сохраняем лист как новый файл
        ActiveWorkbook.SaveAs wb.Path & "" & s.Name & ".xlsx"  'сохраняем файл
    Next
End Sub
Этот макрос сохраняет новые книги-листы в ту же папку, где лежал исходный файл. При необходимости сохранения в другое место, замените wb.Path на свой путь в кавычках, например «D:Отчеты2012» и т.п.
Если нужно сохранять файлы не в стандартном формате книги Excel (xlsx), а в других (xls, xlsm, xlsb, txt и т.д.), то кроме очевидного изменения расширения на нужное, потребуется добавить еще и уточнение формата файла — параметр FileFormat:
ActiveWorkbook.SaveAs wb.Path & "" & s.Name & ".xlsb", FileFormat:=50
Для основных типов файлов значения параметра FileFormat следующие:
- XLSX = 51
- XLSM = 52
- XLSB = 50
- XLS = 56
- TXT = 42
Полный список всех вариантов можно посмотреть в справке MSDN.
Способ 3. Сохранение в новые книги только выделенных листов
Если вы хотите раскидать по файлам не все листы в вашей книге, а только некоторые, то макрос придется немного изменить. Выделите нужные вам листы в книге, удерживая на клавиатуре клавишу Ctrl или Shift и запустите приведенный ниже макрос:
Sub SplitSheets3()
    Dim AW As Window
    Set AW = ActiveWindow
    For Each s In AW.SelectedSheets
        Set TempWindow = AW.NewWindow    'создаем отдельное временное окно
        s.Copy                           'копируем туда лист из выделенного диапазона
        TempWindow.Close                 'закрываем временное окно
    Next
End Sub
Создавать новое окно и копировать через него, а не напрямую, приходится потому, что Excel не умеет копировать группу листов, если среди них есть листы с умными таблицами. Копирование через новое окно позволяет такую проблему обойти.
Способ 4. Сохранение только выделенных листов в новый файл
Во всех описанных выше способах каждый лист сохранялся в свой отдельный файл. Если же вы хотите сохранить в отдельный новый файл сразу группу выделенных предварительно листов, то нам потребуется слегка видоизменить наш макрос:
Sub SplitSheets4()
    Dim CurW As Window
    Dim TempW As Window
    Set CurW = ActiveWindow
    Set TempW = ActiveWorkbook.NewWindow
    CurW.SelectedSheets.Copy
    TempW.Close
End Sub
Способ 5. Сохранение листов как отдельных PDF-файлов
Этот способ чем-то похож на второй, но листы сохраняются не как отдельные книги Excel, а в формате PDF, что часто требуется, если никто не должен менять документ и увидеть ваши формулы. Обратите внимание, что:
- для этого используется уже другой метод (ExportAsFixedFormat а не Copy)
- листы выводятся в PDF с параметрами печати, настроенными на вкладке Разметка страницы (Page Layout)
- книга должна быть сохранена на момент экспорта
Нужный нам код будет выглядеть следующим образом:
Sub SplitSheets5()
    Dim s As Worksheet

    For Each s In ActiveWorkbook.Worksheets
        s.ExportAsFixedFormat Filename:=ThisWorkbook.Path & "" & s.Name & ".pdf", Type:=xlTypePDF
    Next
End Sub
Способ 6. Готовый макрос из надстройки PLEX
Если лень или нет времени внедрять все вышеописанное, то можно воспользоваться готовым макросом из моей надстройки PLEX:

Ссылки по теме
- Сборка листов из нескольких книг в одну
- Что такое макросы, куда вставлять код на Visual Basic, как их использовать.