
The reason the solution you found on the internet is no working is because of the line that starts var colCount. The variable mytable only has two elements being <thead> and <tbody>. The var colCount line is looking for all the elements within mytable that are <tr>. The best thing you can do is give an id to your <thead> and <tbody> and then grab all the values based on that. Say you had <thead id='headers'> :
function write_headers_to_excel()
{
  str="";

  var myTableHead = document.getElementById('headers');
  var rowCount = myTableHead.rows.length;
  var colCount = myTableHead.getElementsByTagName("tr")[0].getElementsByTagName("th").length;

var ExcelApp = new ActiveXObject("Excel.Application");
var ExcelSheet = new ActiveXObject("Excel.Sheet");
ExcelSheet.Application.Visible = true;

for(var i=0; i<rowCount; i++)
{
    for(var j=0; j<colCount; j++)
    {
        str= myTableHead.getElementsByTagName("tr")[i].getElementsByTagName("th")[j].innerHTML;
        ExcelSheet.ActiveSheet.Cells(i+1,j+1).Value = str;
    }
}

}
and then do the same thing for the <tbody> tag.
EDIT: I would also highly recommend using jQuery. It would shorten this up to:
function write_to_excel()
{
 var ExcelApp = new ActiveXObject("Excel.Application");
 var ExcelSheet = new ActiveXObject("Excel.Sheet");
 ExcelSheet.Application.Visible = true;

  $('th, td').each(function(i){
    ExcelSheet.ActiveSheet.Cells(i+1,i+1).Value = this.innerHTML;
  });
}
Now, of course, this is going to give you some formatting issues but you can work out how you want it formatted in Excel.
EDIT: To answer your question about how to do this for n number of tables, the jQuery will do this already. To do it in raw Javascript, grab all the tables and then alter the function to be able to pass in the table as a parameter. For instance:
var tables = document.getElementsByTagName('table');
for(var i = 0; i < tables.length; i++)
{
  write_headers_to_excel(tables[i]);
  write_bodies_to_excel(tables[i]);
}
Then change the function write_headers_to_excel() to function write_headers_to_excel(table). Then change var myTableHead = document.getElementById('headers'); to var myTableHead = table.getElementsByTagName('thead')[0];. Same with your write_bodies_to_excel() or however you want to set that up.
In this tutorial you can find the solution of How to Export or Download the HTML Table Data in Excel Sheet by using JavaScript. Exporting Data to Excel is required feature in our web application. Because by export data functionality will helps to download data from web application to different file format for offline use of data and for this excel format is an ideal for exporting data in file for offline use. There many tutorial we have published for export data to excel at server side scripting using PHP. But if we can perform at client-side for export data into Excel sheet, so it will reduce load on server. So for this for export data to excel , here we will use JavaScript for perform client-side export data to excel sheet.
The client-side export feature will makes our web application more user-friendly. So with the help of JavaScript, we can export HTML table data to Excel format without refresh of web page. Under this tutorial, you can learn How to export HTML table data to excel using JavaScript. In this tutorial, we will use SheetJS JavaScript Library for export HTML table data to Excel.

- HTML Table Data:
- JavaScript Code:
1. HTML Table Data
For Export HTML data to Excel, here first we have to load some data in HTML table. So here we have make fetch employee table data and load in HTML table with table column like name, address, gender, designation and age. Here we have create HTML table with id employee_data. So this id we will use for fetch this HTML table data in JavaScript code. Under this HTML code we have make one button tag with id export_button, so when use has click on this button, then HTML table data will be download in Excel file format without refresh of web page using JavaScript.
<?php

$connect = new PDO("mysql:host=localhost;dbname=testing", "root", "");

$query = "SELECT * FROM tbl_employee ORDER BY name ASC";

$result = $connect->query($query);

?>

<!DOCTYPE HTML>
<html>
<head>
	<meta charset="utf-8" />
	<title>Export HTML table data to excel using JavaScript</title>
	<meta name="viewport" content="width=device-width, initial-scale=1" />
    <link rel="stylesheet" href="https://maxcdn.bootstrapcdn.com/bootstrap/4.0.0/css/bootstrap.min.css" integrity="sha384-Gn5384xqQ1aoWXA+058RXPxPg6fy4IWvTNh0E263XmFcJlSAwiGgFAW/dAiS6JXm" crossorigin="anonymous">

    <script type="text/javascript" src="https://unpkg.com/xlsx@0.15.1/dist/xlsx.full.min.js"></script>
</head>
<body>
    <div class="container">
    	<h2 class="text-center mt-4 mb-4">Export HTML table data to excel using JavaScript</h2>
    	<div class="card">
    		<div class="card-header">
    			<div class="row">
    				<div class="col col-md-6">Sample Data</div>
    				<div class="col col-md-6 text-right">
    					<button type="button" id="export_button" class="btn btn-success btn-sm">Export</button>
    				</div>
    			</div>
    		</div>
    		<div class="card-body">
    			<table id="employee_data" class="table table-striped table-bordered">
                    <tr>
                        <th>Name</th>
                        <th>Address</th>
                        <th>Gender</th>
                        <th>Designation</th>
                        <th>Age</th>
                    </tr>
                    <?php
                    foreach($result as $row)
                    {
                        echo '
                        <tr>
                            <td>'.$row["name"].'</td>
                            <td>'.$row["address"].'</td>
                            <td>'.$row["gender"].'</td>
                            <td>'.$row["designation"].'</td>
                            <td>'.$row["age"].'</td>
                        </tr>
                        ';
                    }
                    ?>
                </table>
    		</div>
    	</div>
    </div>
</body>
</html>
2. JavaScript Code
In this tutorial, we have use SheetJS JavaScript Library for export HTML table data to Excel using JavaScript. So first we have to include following SheetJS library link at header of this HTML web page.
<script type="text/javascript" src="https://unpkg.com/xlsx@0.15.1/dist/xlsx.full.min.js"></script>
In JavaScript code part, first we have make html_table_to_excel(type) function. This function has use SheetJS Library function and convert or Write HTML table data to Excel format and download in browser without refresh of web page.
Once function is ready then we have to called html_table_to_excel(type) function on button click event, so for trigger button click event, we have use addEventListener method. So when user has click on button then html_table_to_excel(type) function has been called with xlsx file type. So it will download HTML table data in .xlsx format Excel file in browser without refresh of web page at client-side.
function html_table_to_excel(type)
    {
        var data = document.getElementById('employee_data');

        var file = XLSX.utils.table_to_book(data, {sheet: "sheet1"});

        XLSX.write(file, { bookType: type, bookSST: true, type: 'base64' });

        XLSX.writeFile(file, 'file.' + type);
    }

    const export_button = document.getElementById('export_button');

    export_button.addEventListener('click', () =>  {
        html_table_to_excel('xlsx');
    });
Conclusion
This tutorial will helps you to add export feature of download HTML table data in Excel sheet without using third-party jQuery plugin or any server-side script. By follow this tutorial you can easily export HTML table data to Excel using minimal JavaScript code.
If you want to get complete source with .sql file, so please write your email address in comment box. We will send you complete source code file at your define email address.
- Home
- JavaScript
- Export HTML Table Data to Excel using JavaScript
By: CodexWorld
|
In: JavaScript
|
Last Updated: Jun 7, 2021
Export data to Excel is very useful on the data list for nearly every web application. The export feature helps to download the data list as a file format for offline use. Excel format is ideal for exporting data in a file. Mostly the server-side method is used for export data to excel using PHP. But if you want a client-side solution to export table data to excel, it can be easily done using JavaScript.
The client-side export functionality makes the web application user-friendly. Using JavaScript, the HTML table data can be easily exported without page refresh. In this tutorial, we will show you how to export HTML table data to excel using JavaScript. The JavaScript export functionality can be used in the member list, product list, or other lists to download the data list in excel file format.
Export HTML Table Data to Excel
JavaScript Code:
The exportTableToExcel() function convert HTML table data to excel and download as XLS file (.xls).
tableID– Required. Specify the HTML table ID to export data from.filename– Optional. Specify the file name to download excel data.
function exportTableToExcel(tableID, filename = ''){
    var downloadLink;
    var dataType = 'application/vnd.ms-excel';
    var tableSelect = document.getElementById(tableID);
    var tableHTML = tableSelect.outerHTML.replace(/ /g, '%20');

    // Specify file name
    filename = filename?filename+'.xls':'excel_data.xls';

    // Create download link element
    downloadLink = document.createElement("a");

    document.body.appendChild(downloadLink);

    if(navigator.msSaveOrOpenBlob){
        var blob = new Blob(['ufeff', tableHTML], {
            type: dataType
        });
        navigator.msSaveOrOpenBlob( blob, filename);
    }else{
        // Create a link to the file
        downloadLink.href = 'data:' + dataType + ', ' + tableHTML;

        // Setting the file name
        downloadLink.download = filename;

        //triggering the function
        downloadLink.click();
    }
}
HTML Table Data:
The HTML table contains some users data with some basic fields like name, email, country.
<table id="tblData">
    <tr>
        <th>Name</th>
        <th>Email</th>
        <th>Country</th>
    </tr>
    <tr>
        <td>John Doe</td>
        <td>john@gmail.com</td>
        <td>USA</td>
    </tr>
    <tr>
        <td>Michael Addison</td>
        <td>michael@gmail.com</td>
        <td>UK</td>
    </tr>
    <tr>
        <td>Sam Farmer</td>
        <td>sam@gmail.com</td>
        <td>France</td>
    </tr>
</table>
The button triggers exportTableToExcel() function to export HTML table data using JavaScript.
<button onclick="exportTableToExcel('tblData')">Export Table Data To Excel File</button>
If you want to export data with the custom file name, pass your desired file name in the exportTableToExcel() function.
<button onclick="exportTableToExcel('tblData', 'members-data')">Export Table Data To Excel File</button>
Export Data to Excel in PHP
Conclusion
Our example code helps you to add export functionality in the HTML table without any third-party jQuery plugin or server-side script. You can easily export the table data using minimal JavaScript code. Also, the functionality of the example code can be enhanced or customized easily as per your needs.
- DataTables
- Excel
- Export
- JavaScript
Are you want to get implementation help, or modify or enhance the functionality of this script? Click Here to Submit Service Request
If you have any questions about this script, submit it to our QA community — Ask Question
RELATED TUTORIALS
Leave a reply
Table to Excel 2

Export HTML table to valid excel file effortlessly.
This library uses exceljs/exceljs under the hood to create the excel.
(Initial version of this library was using protobi/js-xlsx, it can be found here)
Installation
Browser
Just add a script tag:
<script type="text/javascript" src="../dist/tableToExcel.js"></script>
Node
npm install @linways/table-to-excel --save
import TableToExcel from "@linways/table-to-excel";
Usage
Create your HTML table as normal.
To export content of table #table1 run:
TableToExcel.convert(document.getElementById("table1"));
or
TableToExcel.convert(document.getElementById("table1"), {
  name: "table1.xlsx",
  sheet: {
    name: "Sheet 1"
  }
});
Check this pen for working example.
Cell Types
Cell types can be set using the following data attributes:
| Attribute | Description | Possible Values |
|---|---|---|
data-t |
To specify the data type of a cell | s : String (Default)n : Number b : Boolean d : Date |
data-hyperlink |
To add hyper link to cell | External URL or hyperlink to another sheet |
data-error |
To add value of a cell as error |
Example:
<!-- for setting a cell type as number -->
<td data-t="n">2500</td>
<!-- for setting a cell type as date -->
<td data-t="d">05-23-2018</td>
<!-- for setting a cell type as boolean. String "true/false" will be accepted as Boolean-->
<td data-t="b">true</td>
<!-- for setting a cell type as boolean using integer. 0 will be false and any non zero value will be true -->
<td data-t="b">0</td>
<!-- For adding hyperlink -->
<td data-hyperlink="https://google.com">Google</td>
Cell Styling
All styles are set using data attributes on td tags.
There are 5 types of attributes: data-f-*, data-a-*, data-b-*, data-fill-* and data-num-fmt which corresponds to five top-level attributes font, alignment, border, fill and numFmt.
| Category | Attribute | Description | Values |
|---|---|---|---|
| font | data-f-name |
Font name | «Calibri» ,»Arial» etc. |
data-f-sz |
Font size | «11» // font size in points | |
data-f-color |
Font color | A hex ARGB value. Eg: FFFFOOOO for opaque red. | |
data-f-bold |
Bold | true or false |
|
data-f-italic |
Italic | true or false |
|
data-underline |
Underline | true or false |
|
data-f-strike |
Strike | true or false |
|
| Alignment | data-a-h |
Horizontal alignment | left, center, right, fill, justify, centerContinuous, distributed |
data-a-v |
Vertical alignment | bottom, middle, top, distributed, justify |
|
data-a-wrap |
Wrap text | true or false |
|
data-a-indent |
Indent | Integer | |
data-a-rtl |
Text direction: Right to Left | true or false |
|
data-a-text-rotation |
Text rotation | 0 to 90 | |
| -1 to -90 | |||
| vertical | |||
| Border | data-b-a-s |
Border style (all borders) | Refer BORDER_STYLES |
data-b-t-s |
Border top style | Refer BORDER_STYLES |
|
data-b-b-s |
Border bottom style | Refer BORDER_STYLES |
|
data-b-l-s |
Border left style | Refer BORDER_STYLES |
|
data-b-r-s |
Border right style | Refer BORDER_STYLES |
|
data-b-a-c |
Border color (all borders) | A hex ARGB value. Eg: FFFFOOOO for opaque red. | |
data-b-t-c |
Border top color | A hex ARGB value. | |
data-b-b-c |
Border bottom color | A hex ARGB value. | |
data-b-l-c |
Border left color | A hex ARGB value. | |
data-b-r-c |
Border right color | A hex ARGB value. | |
| Fill | data-fill-color |
Cell background color | A hex ARGB value. |
| numFmt | data-num-fmt |
Number Format | «0» |
| «0.00%» | |||
| «0.0%» // string specifying a custom format | |||
| «0.00%;(0.00%);-;@» // string specifying a custom format, escaping special characters |
BORDER_STYLES: thin, dotted, dashDot, hair, dashDotDot, slantDashDot, mediumDashed, mediumDashDotDot, mediumDashDot, medium, double, thick
Exclude Cells and rows
To exclude a cell or a row from the exported excel add data-exclude="true" to the corresponding td or tr.
Example:
<!-- Exclude entire row -->
<tr data-exclude="true">
  <td>Excluded row</td>
  <td>Something</td>
</tr>

<!-- Exclude a single cell -->
<tr>
  <td>Included Cell</td>
  <td data-exclude="true">Excluded Cell</td>
  <td>Included Cell</td>
</tr>
Column Width
Column width’s can be set by specifying data-cols-width in the <table> tag.
data-cols-width accepts comma separated column widths specified in character count .
data-cols-width="10,20" will set width of first coulmn as width of 10 charaters and second column as 20 characters wide.
Example:
<table data-cols-width="10,20,30">
  ...
</table>
Row Height
Row Height can be set by specifying data-height in the <tr> tag.
Example:
<tr data-height="42.5">
  <td>Cell 1</td>
  <td>Cell 2</td>
</tr>
Release Changelog
1.0.0
Migration Guide for migrating from V0.2.1 to V1.0.0
- Changed the backend to Exceexceljs/exceljslJS
- Added border color
- Option to set style and color for all borders
- Exclude row
- Added text underline
- Added support for hyperlinks
- Text intent
- RTL support
- Extra alignment options
- String «true/false» will be accepted as Boolean
- Changed border style values
- Text rotation values changed
1.0.2
- Fixed bug in handling multiple columns merges in a sheet
1.0.3
- Option to specify row height
Exporting data to Excel is very useful for every enterprise on data list web application. Every time , export data using custom export feature helps to download table data list for offline use as excel file like csv format. As a web Developer, I was required to do that in various live project. Excel format for exporting data in file is ideal in every enterprises. Mostly we used server-side method to export data to excel using php. But if you want to download table data to excel using client-side view then it can be easily done using javascript.
Looking for assistance with Excel assignments?
You should visit https://assignmentcore.com/excel-homework/ and get MS Excel homework help online from a team of experts.
In this tutorials, we will learn about how to export HTML table data to excel using client-side JavaScript. The Client-side export data functionality makes any web application more user-friendly. Using JavaScript, we can export or download HTML table data in excel format without page refresh.
HTMl Table Data:
The Following below HTML Table contains some user data with some basic fields like Name, Email, Age, Mobile.
|
2 3 4 5 6 7 8 9 10 11 12 13 14 15 16 17 18 19 20 21 22 23 24 25 26 27 28 29 30 31 32 33 34 35 36 37 |
<table id=«tblexportData»> <tr> <th>Name</th> <th>Email</th> <th>Age</th> <th>Mobile</th> </tr> <tr> <td>Robert</td> <td>robert@gmail.com</td> <td>26</td> <td>9999999999</td> </tr> <tr> <td>Michael</td> <td>michael@gmail.com</td> <td>24</td> <td>9999999999</td> </tr> <tr> <td>Julie</td> <td>julie@gmail.com</td> <td>36</td> <td>9999999999</td> </tr> <tr> <td>Trevor</td> <td>trevor@gmail.com</td> <td>28</td> <td>9999999999</td> </tr> </table> |
JavaScript Code:
The exportToExcel() function will use convert HTML table data to excel and download as xls file(.xls).
|
2 3 4 5 6 7 8 9 10 11 12 13 14 15 16 17 18 19 20 21 22 23 24 25 26 27 28 29 30 31 32 33 34 35 36 37 38 |
<script type=«text/javascript»> function exportToExcel(tableID, filename = »){ var downloadurl; var dataFileType = ‘application/vnd.ms-excel’; var tableSelect = document.getElementById(tableID); var tableHTMLData = tableSelect.outerHTML.replace(/ /g, ‘%20’); // Specify file name filename = filename?filename+‘.xls’:‘export_excel_data.xls’; // Create download link element downloadurl = document.createElement(«a»); document.body.appendChild(downloadurl); if(navigator.msSaveOrOpenBlob){ var blob = new Blob([‘ufeff’, tableHTMLData], { type: dataFileType }); navigator.msSaveOrOpenBlob( blob, filename); }else{ // Create a link to the file downloadurl.href = ‘data:’ + dataFileType + ‘, ‘ + tableHTMLData; // Setting the file name downloadurl.download = filename; //triggering the function downloadurl.click(); } } </script> |
tableID – Required. Specify the HTML table ID to export data from.
filename – Optional. Specify the file name to download excel data.
|
<button onclick=«exportToExcel(‘tblexportData’)»>Export Table Data To Excel File</button> |
The above button triggers exportToExcel() function to download HTML table data using javascript
If you want to download or export data with custom file name then you can pass your file name in the exportToExcel() function, see below button code:
|
<button onclick=«exportToExcel(‘tblexportData’, ‘user-data’)»>Export Table Data To Excel File</button> |
Complete Code:
|
2 3 4 5 6 7 8 9 10 11 12 13 14 15 16 17 18 19 20 21 22 23 24 25 26 27 28 29 30 31 32 33 34 35 36 37 38 39 40 41 42 43 44 45 46 47 48 49 50 51 52 53 54 55 56 57 58 59 60 61 62 63 64 65 66 67 68 69 70 71 72 73 74 75 76 77 78 79 80 81 82 83 84 85 86 |
<html> <head> <title>Export HTML Table Data to Excel using JavaScript | Tutorialswebsite</title> <link rel=«stylesheet» href=«https://maxcdn.bootstrapcdn.com/bootstrap/4.0.0/css/bootstrap.min.css» > <script type=«text/javascript»> function exportToExcel(tableID, filename = »){ var downloadurl; var dataFileType = ‘application/vnd.ms-excel’; var tableSelect = document.getElementById(tableID); var tableHTMLData = tableSelect.outerHTML.replace(/ /g, ‘%20’); // Specify file name filename = filename?filename+‘.xls’:‘export_excel_data.xls’; // Create download link element downloadurl = document.createElement(«a»); document.body.appendChild(downloadurl); if(navigator.msSaveOrOpenBlob){ var blob = new Blob([‘ufeff’, tableHTMLData], { type: dataFileType }); navigator.msSaveOrOpenBlob( blob, filename); }else{ // Create a link to the file downloadurl.href = ‘data:’ + dataFileType + ‘, ‘ + tableHTMLData; // Setting the file name downloadurl.download = filename; //triggering the function downloadurl.click(); } } </script> </head> <body> <div class=«container»> <table id=«tblexportData» class=«table»> <thead> <tr> <th>Name</th> <th>Email</th> <th>Age</th> <th>Mobile</th> </tr> </thead> <tbody> <tr> <td>Robert</td> <td>robert@gmail.com</td> <td>26</td> <td>9999999999</td> </tr> <tr> <td>Michael</td> <td>michael@gmail.com</td> <td>24</td> <td>9999999999</td> </tr> <tr> <td>Julie</td> <td>julie@gmail.com</td> <td>36</td> <td>9999999999</td> </tr> <tr> <td>Trevor</td> <td>trevor@gmail.com</td> <td>28</td> <td>9999999999</td> </tr> </tbody> </table> <button onclick=«exportToExcel(‘tblexportData’, ‘user-data’)» class=«btn btn-success»>Export Table Data To Excel File</button> </div> </body> </html> |
Conclusion
Our example code will help you to easily export the table data using minimal javascript code.
Are you want to get implementation help, or modify or extend the functionality of this script? Submit paid service request

Pradeep Maurya is the Professional Web Developer & Designer and the Founder of “Tutorials website”. He lives in Delhi and loves to be a self-dependent person. As an owner, he is trying his best to improve this platform day by day. His passion, dedication and quick decision making ability to stand apart from others. He’s an avid blogger and writes on the publications like Dzone, e27.co
My readers continuously asked me to work on how to export html table data to excel, CSV, PNG, PDF, TXT, Doc, JSON & XML instead of copying the records manually. So I thought to share this wonderful jquery plugin I have come across via google to my readers.
This plugin is very easy to implement it in your projects who wants to export the html table data instantly.
Beauty of this Export HTML table to Excel jQuery plugin is which allows you to download any html table data into all downloadable formats like Excel, CSV, PDF, DOC and many more. This is the must required plugin for any reporting / statistics kind of projects.
Now a days Exporting Table Data into Specific Format is a very common feature in every web application.
Please check my popular post on Top 20 code snippets in jQuery

Contents
- 1 Export HTML Table Data to Excel Plugin Features
- 1.1 Installation
- 2 Export html table data to Excel (XLSX) format
- 3 Export html table data to PNG format
- 4 Export html table data to PDF format
- 4.1 Usage
- 4.2 PDF export using jsPDF
- 4.3 Other Types
- 5 Download HTML Table Data to Excel, CSV, XML, PDF Plugin
Export HTML Table Data to Excel Plugin Features
We can easily export any html tables to the following formats. Not only table to excel instead you can export html table data to CSV, Excel, PNG, JSON, PDF, JSON, SQL & XML etc
- JSON
- XML
- PNG
- CSV
- TXT
- SQL
- MS-Word
- Ms-Excel
- Ms-Powerpoint
Installation
You need an jquery plugin to support this feature
<script type="text/javascript" src="https://code.jquery.com/jquery-3.2.1.min.js"></script>
In order to save the exported files into your machine, please include the below js in your html code
<script type="text/javascript" src="libs/FileSaver/FileSaver.min.js"></script>Export html table data to Excel (XLSX) format
To export the table data in excel 2007 format, please include the below js in your html code
<script type="text/javascript" src="libs/js-xlsx/xlsx.core.min.js"></script>You need an below script to export html table data to PNG format. html2canvas.js.
I have added IE support also to export HTML table to PNG.
<!-- For IE support include es6-promise before html2canvas -->
<script type="text/javascript" src="libs/es6-promise/es6-promise.auto.min.js"></script>
<script type="text/javascript" src="libs/html2canvas/html2canvas.min.js"></script>
Export html table data to PDF format
<script type="text/javascript" src="libs/jsPDF/jspdf.min.js"></script>
<script type="text/javascript" src="libs/jsPDF-AutoTable/jspdf.plugin.autotable.js"></script>
Finally you have to include this table export plugin to work successfully in the html table
<script type="text/javascript" src="tableExport.min.js"></script>
Usage
<a href="#" onClick ="$('#tableID').tableExport({type:'json',escape:'false'});">JSON</a>

<a href="#" onClick ="$('#tableID').tableExport({type:'excel',escape:'false'});">XLS</a>

<a href="#" onClick ="$('#tableID').tableExport({type:'csv',escape:'false'});">CSV</a>

<a href="#" onClick ="$('#tableID').tableExport({type:'pdf',escape:'false'});">PDF</a>
PDF export using jsPDF
please use the below configuration to use jsPDF
$('#tableID').tableExport({

type:'pdf',

jspdf: {

orientation: 'p',

margins: {

left:20, top:10

},

autotable: false

}

});
Other Types
{type:'json',escape:'false'}

{type:'json',escape:'false',ignoreColumn:'[2,3]'}

{type:'json',escape:'true'}

{type:'xml',escape:'false'}

{type:'sql'}

{type:'csv',escape:'false'}

{type:'txt',escape:'false'}

{type:'excel',escape:'false'}

{type:'doc',escape:'false'}

{type:'powerpoint',escape:'false'}

{type:'png',escape:'false'}

{type:'pdf',pdfFontSize:'7',escape:'false'}
View Live Demo
Download HTML Table Data to Excel, CSV, XML, PDF Plugin
Please download this HTML table to EXCEL, CSV Format plugin by sharing this in your social media and support my work
Credit – https://github.com/kayalshri/tableExport.jquery.plugin
You May Also Like
Contents
- 1 HTML table
- 2 Javascript array
- 2.1 Example : Download the HTML table in Excel (.csv) format
- 2.1.1 Step 1 : Create the HTML table
- 2.1.2 Step 2 : Add CSS properties to style the table
- 2.1.3 Step 3 : Create the download button
- 2.1.4 Step 4 : Implement Javascript function to download the HTML table in CSV file.
- 2.1.5 Step 5 : Call the Javascript function using onclick event
- 2.2 Complete code for reference :
- 2.1 Example : Download the HTML table in Excel (.csv) format
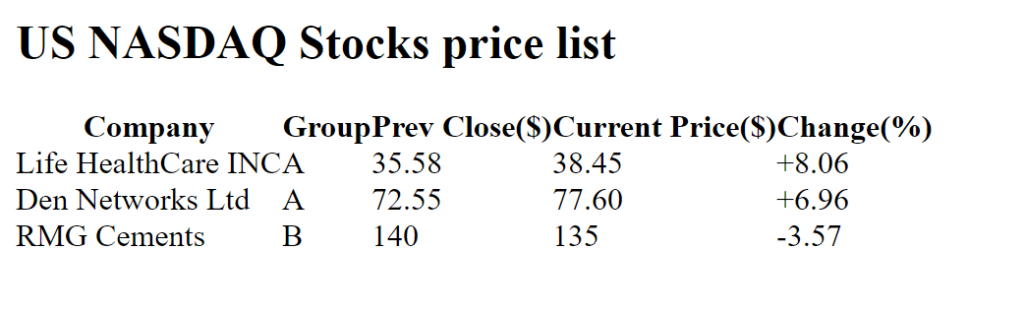
HTML providing the <table> tag to show the data in row and column format. We might have seen those tables in several web pages. Example: Stock Price list,Employee salary reports, Student marks report and so on. The below image is showing the corona cases report in HTML table format.

If we have the option to download those tables in excel, It would be helpful to analyze the data. Lets create the sample table using HTML and enable the download option using Javascript.
Javascript array
Javascript array is used to store collection of values in a single variable. As we know, the HTML table has a collection of rows and columns. We can add those values into array. Then the delimiters will be added for each row and column values to create the excel record.
var result = [‘Company’,’Group’,’Previous Value’,’Current Value’]
- Each row in a table delimited by new line character (n)
- Each column in a table delimited by comma character (,)
Example : Download the HTML table in Excel (.csv) format
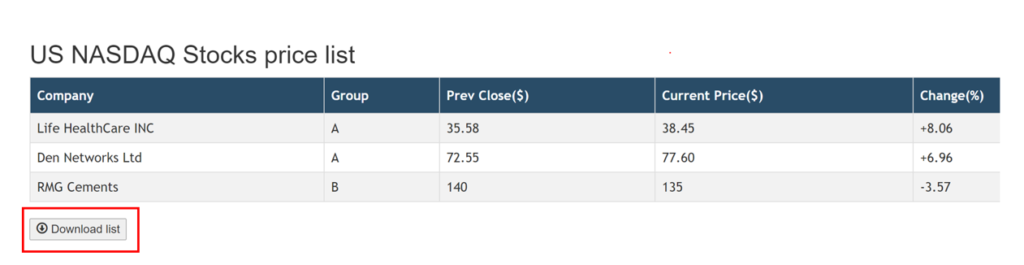
In this example, we are going to create the stock price list table with the download button – To export the table in csv file.
Step 1 : Create the HTML table
The below HTML code creates the stock price list table.
- <table> – Defines HTML table which contains set of rows and column values
- <tr> – It creates row element in the table.
- <th> – The header cell value created in this tag.
- <td> – Defines data cell/column of the table.
|
1 2 3 4 5 6 7 8 9 10 11 12 13 14 15 16 17 18 19 20 21 22 23 24 25 26 27 28 29 30 31 32 33 34 35 36 37 38 39 |
<html> <head> <title>Export HTML data to excel </title> <h2>US NASDAQ Stocks price list </h2> </head> <body> <table id=«tblStocks» cellpadding=«0» cellspacing=«0»> <tr> <th>Company</th> <th>Group</th> <th>Prev Close($)</th> <th>Current Price($)</th> <th>Change(%)</th> </tr> <tr> <td>Life HealthCare INC</td> <td>A</td> <td>35.58</td> <td>38.45</td> <td>+8.06</td> </tr> <tr> <td>Den Networks Ltd</td> <td>A</td> <td>72.55</td> <td>77.60</td> <td>+6.96</td> </tr> <tr> <td>RMG Cements</td> <td>B</td> <td>140</td> <td>135</td> <td>—3.57</td> </tr> </table> <br /> </body> </html> |
Step 2 : Add CSS properties to style the table
In the HTML code, id (tblStocks) is defined for the <table> tag. For that id, We can add the CSS properties (margin,colour,font style) which will change the table style.
|
1 2 3 4 5 6 7 8 9 10 11 12 13 14 15 16 17 18 19 20 21 22 23 24 |
<style> #tblStocks { font-family: «Trebuchet MS», Arial, Helvetica, sans-serif; border-collapse: collapse; width: 100%; } #tblStocks td, #tblStocks th { border: 1px solid #ddd; padding: 8px; } #tblStocks tr:nth-child(even){background-color: #f2f2f2;} #tblStocks tr:hover {background-color: #ddd;} #tblStocks th { padding-top: 12px; padding-bottom: 12px; text-align: left; background-color: #294c67;; color: white; } </style> |

Step 3 : Create the download button
Bootstrap providing the graphical icons from the Glyphicon Halflings set. Lets create the button with download icon using Glypicons.
|
<link rel=«stylesheet» href=«https://maxcdn.bootstrapcdn.com/bootstrap/3.4.0/css/bootstrap.min.css»> <button> <span class=«glyphicon glyphicon-download»></span> Download list </button> |
Step 4 : Implement Javascript function to download the HTML table in CSV file.
- Get the HTML table into Javascript variable using id “tblStocks” which is assigned for <table> tag.
- Loop through the variable to fetch cell values and add those values into javascript array. Here we are having array inside a array which means the outer array contains number of rows and each inner array contains number of columns for each row.
|
rows = [ [column1,column2,column3,column4,column5], [column1,column2,column3,column4,column5],... ] |
- Create <a> tag element with download attribute which used to download the data when user clicks the button. Here we are specifying data format as csv.
|
1 2 3 4 5 6 7 8 9 10 11 12 13 14 15 16 17 18 19 20 21 22 23 24 25 26 27 28 29 30 31 32 33 34 35 36 37 38 39 40 41 42 43 44 45 |
function exportData(){ /* Get the HTML data using Element by Id */ var table = document.getElementById(«tblStocks»); /* Declaring array variable */ var rows =[]; //iterate through rows of table for(var i=0,row; row = table.rows[i];i++){ //rows would be accessed using the «row» variable assigned in the for loop //Get each cell value/column from the row column1 = row.cells[0].innerText; column2 = row.cells[1].innerText; column3 = row.cells[2].innerText; column4 = row.cells[3].innerText; column5 = row.cells[4].innerText; /* add a new records in the array */ rows.push( [ column1, column2, column3, column4, column5 ] ); } csvContent = «data:text/csv;charset=utf-8,»; /* add the column delimiter as comma(,) and each row splitted by new line character (n) */ rows.forEach(function(rowArray){ row = rowArray.join(«,»); csvContent += row + «rn»; }); /* create a hidden <a> DOM node and set its download attribute */ var encodedUri = encodeURI(csvContent); var link = document.createElement(«a»); link.setAttribute(«href», encodedUri); link.setAttribute(«download», «Stock_Price_Report.csv»); document.body.appendChild(link); /* download the data file named «Stock_Price_Report.csv» */ link.click(); } |
Step 5 : Call the Javascript function using onclick event
Here we have created the javascript function in different file which named as “downloadFile.js”. Include that file in HTML using <script> tag. This script tag should be placed inside the <head> tag.
|
<script type=«text/javascript» src=«downloadFile.js»></script> |
Finally create the onclick event for the Download List button to call the javascript function exportData().
|
<button onclick=«exportData()»> <span class=«glyphicon glyphicon-download»></span> Download list </button> |
As you can see below, the HTML table downloaded in the csv file(Stock_Price_Report.csv) when user clicks the Download list button
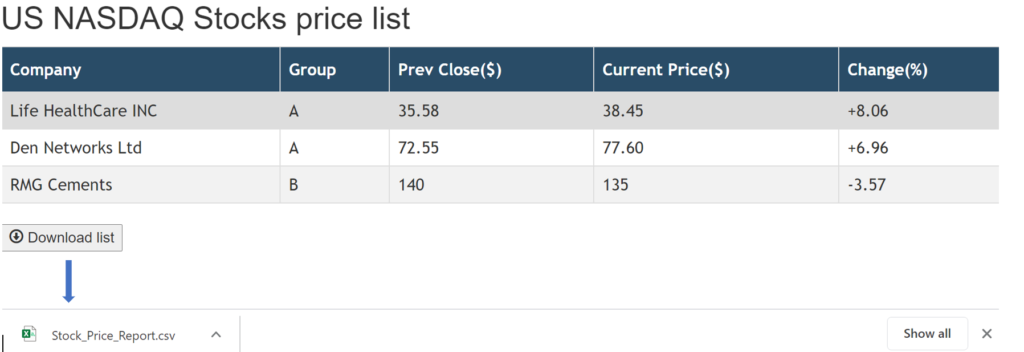
HTML table downloaded in CSV file (Stock_Price_Report.csv)

Complete code for reference :
|
1 2 3 4 5 6 7 8 9 10 11 12 13 14 15 16 17 18 19 20 21 22 23 24 25 26 27 28 29 30 31 32 33 34 35 36 37 38 39 40 41 42 43 44 45 46 47 48 49 50 51 52 53 54 55 56 57 58 59 60 61 62 63 64 65 66 67 68 |
<html> <head> <title>Export HTML data to excel </title> <h2>US NASDAQ Stocks price list </h2> <link rel=«stylesheet» href=«https://maxcdn.bootstrapcdn.com/bootstrap/3.4.0/css/bootstrap.min.css»> <script type=«text/javascript» src=«downloadFile.js»></script> <style> #tblStocks { font-family: «Trebuchet MS», Arial, Helvetica, sans-serif; border-collapse: collapse; width: 100%; } #tblStocks td, #tblStocks th { border: 1px solid #ddd; padding: 8px; } #tblStocks tr:nth-child(even){background-color: #f2f2f2;} #tblStocks tr:hover {background-color: #ddd;} #tblStocks th { padding-top: 12px; padding-bottom: 12px; text-align: left; background-color: #294c67;; color: white; } </style> </head> <body> <table id=«tblStocks» cellpadding=«0» cellspacing=«0»> <tr> <th>Company</th> <th>Group</th> <th>Prev Close($)</th> <th>Current Price($)</th> <th>Change(%)</th> </tr> <tr> <td>Life HealthCare INC</td> <td>A</td> <td>35.58</td> <td>38.45</td> <td>+8.06</td> </tr> <tr> <td>Den Networks Ltd</td> <td>A</td> <td>72.55</td> <td>77.60</td> <td>+6.96</td> </tr> <tr> <td>RMG Cements</td> <td>B</td> <td>140</td> <td>135</td> <td>—3.57</td> </tr> </table> <br /> <button onclick=«exportData()»> <span class=«glyphicon glyphicon-download»></span> Download list</button> </body> </html> |
Javascript file : downloadFile.js
|
1 2 3 4 5 6 7 8 9 10 11 12 13 14 15 16 17 18 19 20 21 22 23 24 25 26 27 28 29 30 31 32 33 34 35 36 37 38 39 40 41 42 43 44 45 |
function exportData(){ /* Get the HTML data using Element by Id */ var table = document.getElementById(«tblStocks»); /* Declaring array variable */ var rows =[]; //iterate through rows of table for(var i=0,row; row = table.rows[i];i++){ //rows would be accessed using the «row» variable assigned in the for loop //Get each cell value/column from the row column1 = row.cells[0].innerText; column2 = row.cells[1].innerText; column3 = row.cells[2].innerText; column4 = row.cells[3].innerText; column5 = row.cells[4].innerText; /* add a new records in the array */ rows.push( [ column1, column2, column3, column4, column5 ] ); } csvContent = «data:text/csv;charset=utf-8,»; /* add the column delimiter as comma(,) and each row splitted by new line character (n) */ rows.forEach(function(rowArray){ row = rowArray.join(«,»); csvContent += row + «rn»; }); /* create a hidden <a> DOM node and set its download attribute */ var encodedUri = encodeURI(csvContent); var link = document.createElement(«a»); link.setAttribute(«href», encodedUri); link.setAttribute(«download», «Stock_Price_Report.csv»); document.body.appendChild(link); /* download the data file named «Stock_Price_Report.csv» */ link.click(); } |
Recommended Articles
- How to make blinking text using HTML and CSS?
- How to show the Text letter by letter using CSS?
Improve Article
Save Article
Like Article
Improve Article
Save Article
Like Article
Any HTML table that you have created can be converted into an Excel Spreadsheet by using jQuery and it is compatible with all browsers. There are two simple approaches that require basic HTML and jQuery knowledge to achieve this.
- Approach 1: Using jQuery plugin: A simple jQuery plugin ‘table2excel’ can be used for converting an HTML table to an excel sheet.
Syntax:
$("#table-id").table2excel({
    filename: "excel_sheet-name.xls"
});
- Example:
html
<table id="studtable">
<tr>
<th>ID</th>
<th>Name</th>
<th>Age</th>
<th>Address</th>
</tr>
<tr>
<td>101</td>
<td>Alex</td>
<td>15</td>
<td>Maldives</td>
</tr>
<tr>
<td>102</td>
<td>Chris</td>
<td>14</td>
<td>Canada</td>
</tr>
<tr>
<td>103</td>
<td>Jay</td>
<td>15</td>
<td>Toronto</td>
</tr>
</table>
<script>
$(document).ready(function () {
$("#studtable").table2excel({
filename: "Students.xls"
});
});
</script>
- Output:
ID    Name    Age    Address
101    Alex    15    Maldives
102    Chris    14    Canada
103    Jay    15    Toronto
- The above output gets converted into an Excel spreadsheet in the exact same manner the HTML table is. About ‘table2excel’: The ‘table2excel’ is a simple yet useful jQuery plugin that allows for exporting HTML table data to an Excel file. The ‘table2excel’ also has a feature to exclude cells that contain a specified class. Syntax for noExport:
$(document).ready(function() {
    $("#table-id").table2excel({
        exclude: ".noExport",
        filename: "name-of-the-file",
    });
});
- Example code for excluding some specified cells:
html
<script src=
"//ajax.googleapis.com/ajax/libs/jquery/2.2.4/jquery.min.js">
</script>
<script src=
"//cdn.rawgit.com/rainabba/jquery-table2excel/1.1.0/dist/jquery.table2excel.min.js">
</script>
<button>Export</button>
<table>
<thead>
<tr>
<td class="noExport">
This cell will not be exported.
</td>
<td>
This cell will get exported.
</td>
</tr>
</thead>
<tbody>
<tr>
<td>Alex</td>
<td class="noExport">Maldives</td>
</tr>
<tr>
<td>Chris</td>
<td>Canada</td>
</tr>
</tbody>
</table>
- Note: In the above sample code, the class ‘.noExport’ has been used to exclude those specified cells from the HTML table data. Therefore the exported Excel Spreadsheet also does not include those cells from the HTML table data.
- Approach 2: Using simple HTML: Consider the same students table above to understand the below. Let’s use a button in our code which when clicked to converts the HTML data table into an Excel spreadsheet. Note that the ‘export’ button below does not actually convert the HTML table to an excel sheet. This has to used in a proper and already existing HTML code to get the Excel spreadsheet and will not work in this IDE.
html
<!DOCTYPE html>
<html>
<head>
<title>
HTML Table To Excel
spreadsheet using
HTML only
</title>
</head>
<body>
<table id="studtable">
<tr>
<th>ID</th>
<th>Name</th>
<th>Age</th>
<th>Address</th>
</tr>
<tr>
<td>101</td>
<td>Alex</td>
<td>15</td>
<td>Maldives</td>
</tr>
<tr>
<td>102</td>
<td>Chris</td>
<td>14</td>
<td>Canada</td>
</tr>
<tr>
<td>103</td>
<td>Jay</td>
<td>15</td>
<td>Toronto</td>
</tr>
</table>
<button onclick="tableToExcel(
'studtable', 'Students')">
Click to Export
</button>
</body>
</html>
- Output:

HTML is the foundation of webpages, is used for webpage development by structuring websites and web apps. jQuery is an open source JavaScript library that simplifies the interactions between an HTML/CSS document, It is widely famous with it’s philosophy of “Write less, do more“.
- HTML Tutorial and HTML Examples.
- jQuery Tutorial and jQuery Examples.
Like Article
Save Article
If you want to Export HTML Table Data to Excel file using javascript for offline use. You can quickly do it with my javascript source code. I have provided a general script to use multiple times. This script is explained with a simple example. But you can easily implement it with any type of HTML table.
Exporting HTML Table to Excel is the most popular & common feature. Every Web application needs this feature to export the largest table data to excel format. Even It will work with dynamic table data coming from the database.
What is HTML Table?
An HTML table is a group of rectangle cells that is used to store data in the form of rows & columns.
You can create an HTML table using the following elements –
- <table></table> – for creating a table
- <theader></theader> – to create a table header
- <tbody></tbody> – for creating a table body
- <tr></tr> – to create a table row
- <th></th> – to create a table heading
- <td></td> – for creating a table data/cell
- <tfooter></tfooter> – to create a table footer
What is Excel File?
Excel File is a spreadsheet that is created by Microsoft for different operating systems like Windows, Mac & Linux.
Using Excel File, You can easily calculate, edit, view, modify data. Even you can quickly manage & share the largest data in the form of a table.
Excel File has lots of features that help us to perform complex & largest tasks quickly. You can know more from its official website. To get the best information, you can search ‘excel’ on the google.
I’m going to learn you how to export HTML table data to excel using javascript. But before starting the next steps, You should have knowledge of basic HTML. Even Excel software must be installed on your computer.
You can convert HTML Table data to excel format by clicking an HTML button. Whenever you click the HTML button, Table data will begin to converted automatically on an excel file. After that, then you can view & edit table data in an excel file.
Read Also –
Convert HTML to PDF Using javaScript
Now, configure the following steps. It is very simple to understand & learn.
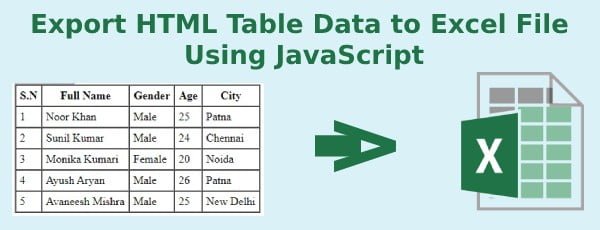
1. Create HTML Table With Data
Create an HTML table with a few data. Even declare table id="tableData" within opening HTML tag. Table id will be used to access for exporting its data using javascript.
Also, create an HTML button with id="export" . This button will be used to execute javascript code exporting table tada.
You must include an external javascript file custom.js in the following HTML file.
File Name – index.php
<!DOCTYPE html>
<html>
<body>
<button id="export">Export Now</button>
<table id="tableData" border="1" cellpadding="5" cellspacing="0">
    <tr>
        <th>S.N</th>
        <th>Full Name</th>
        <th>Gender</th>
        <th>Age</th>
        <th>City</th>
    </tr>
    <tr>
        <td>1</td>
        <td>Noor Khan</td>
        <td>Male</td>
        <td>25</td>
        <td>Patna</td>
    </tr>
 <tr>
        <td>2</td>
        <td>Sunil Kumar</td>
        <td>Male</td>
        <td>24</td>
        <td>Chennai</td>
    </tr>
 <tr>
        <td>3</td>
        <td>Monika Kumari</td>
        <td>Female</td>
        <td>20</td>
        <td>Noida</td>
    </tr>
     <tr>
        <td>4</td>
        <td>Ayush Aryan</td>
        <td>Male</td>
        <td>26</td>
        <td>Patna</td>
    </tr>
     <tr>
        <td>5</td>
        <td>Avaneesh Mishra</td>
        <td>Male</td>
        <td>25</td>
        <td>New Delhi</td>
    </tr>
</table>
<script src="custom.js" type="text/javascript"></script>
</body>
</html>
2. Export HTML Table Data to Excel using Javascript
You have to do the following works for exporting HTML table data to excel.
- Select the HTML button through its id and create
onclickfunction with it. - Get the value of the table
idand store it in a variabletableId. - call custom function
htmlTableToExcel(tableId, filename = '')and pass the value of the table idtableIdor filename as a parameter. This function will convert Table data to excel on the HTML button click.
File Name – custom.js
    document.getElementById('export').onclick=function(){
        var tableId= document.getElementById('tableData').id;
        htmlTableToExcel(tableId, filename = '');
    }


   var htmlTableToExcel= function(tableId, fileName = ''){

    var excelFileName='excel_table_data';
    var TableDataType = 'application/vnd.ms-excel';
    var selectTable = document.getElementById(tableId);
    var htmlTable = selectTable.outerHTML.replace(/ /g, '%20');

    filename = filename?filename+'.xls':excelFileName+'.xls';
    var excelFileURL = document.createElement("a");
    document.body.appendChild(excelFileURL);

    if(navigator.msSaveOrOpenBlob){
        var blob = new Blob(['ufeff', htmlTable], {
            type: TableDataType
        });
        navigator.msSaveOrOpenBlob( blob, fileName);
    }else{

        excelFileURL.href = 'data:' + TableDataType + ', ' + htmlTable;
        excelFileURL.download = fileName;
        excelFileURL.click();
    }
}
My Suggestion
Dear Developer, I hope you have understood the above javascript code. Now, you are able to quickly export another largest & complex table data. If you like my tutorial, share it with your friends.
If you have any queries or suggestions related to web development coding. you can ask me through the comment box. I will definitely reply as soon as possible.