
To export WordPress data to CSV, Excel, or XML, go to All Export › New Export and select the type of data you want to export. Use the Drag & Drop interface to select your export columns, then run the export and download your file.
![]()
This documentation covers how to export from WordPress using WP All Export. For a broader look at exporting from WordPress, check out:
Export from WordPress
![]()
Step 1: Select a Post Type for Your WordPress Export
First, navigate to All Export › New Export and choose the type of data that you want to export.
WordPress separates data into different post types like posts, pages, WooCommerce products, real estate properties, etc. You can export any custom post type or taxonomy by selecting it here.
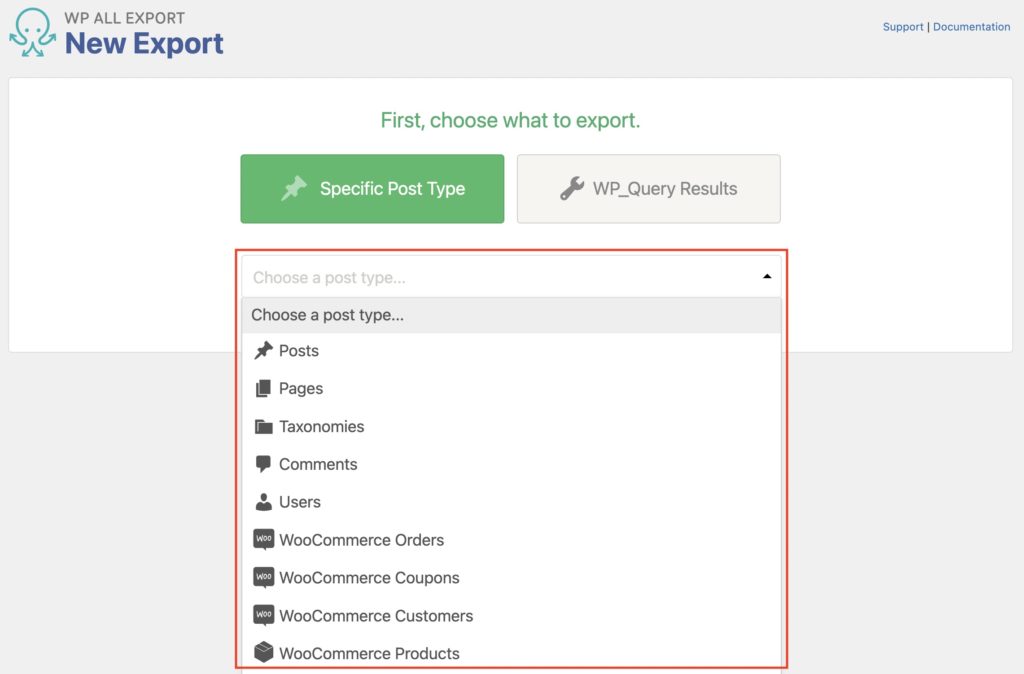
Once you’ve chosen a post type, click Customize Export File at the end to continue (not shown).
Step 2: Customize Your WordPress Export
The fields available to export are listed on the right. Drag and drop individual fields from there to the column selection area, or click Add All to export everything.
All data is available for export, including media, images, categories and tags, custom fields, etc. Add-ons like WooCommerce, real estate plugins, Yoast, and ACF have custom data that can be exported, too.
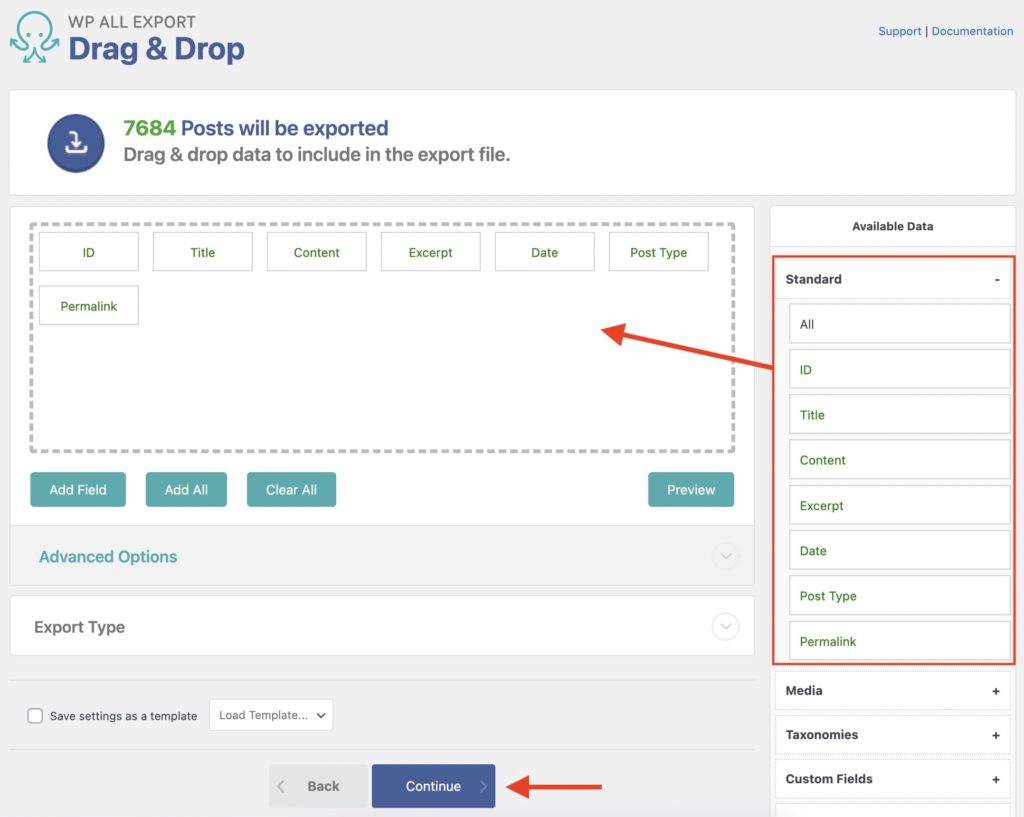
Once you’ve selected your export fields, you can move them around to reorder them. Click to rename individual elements, combine multiple fields, and more.
When your export columns are the way you want them, click Continue.
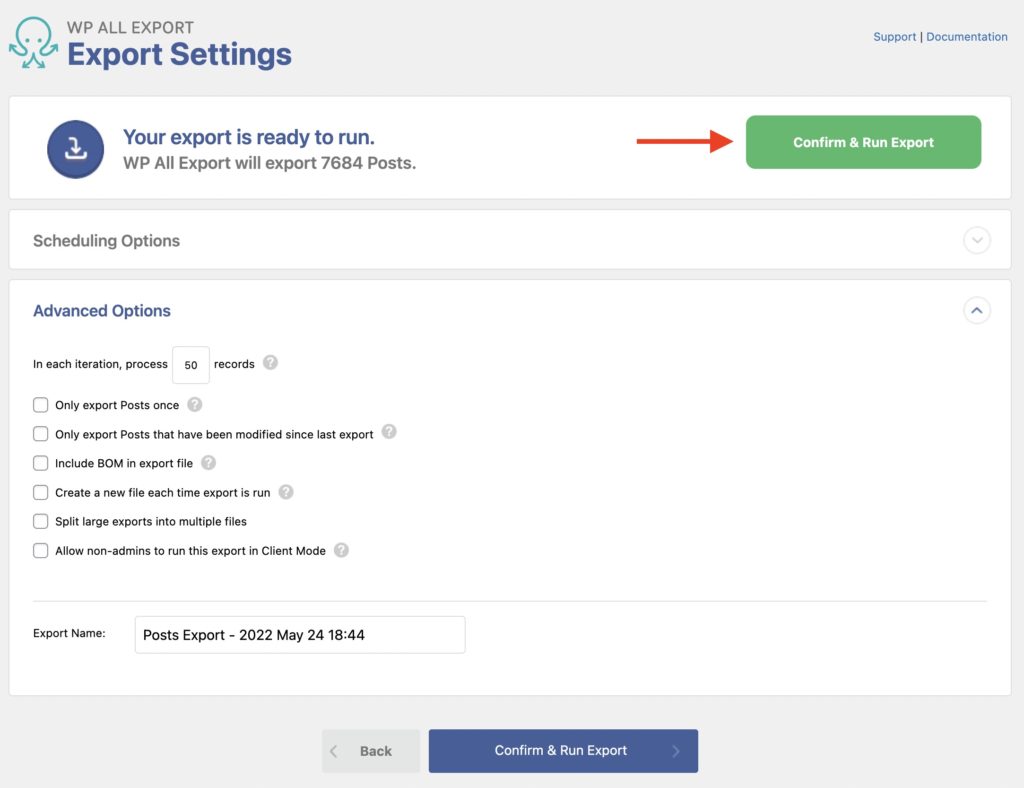
Step 3: Confirm and Run Your WordPress Export
You can now configure your WordPress export settings. This includes the ability to schedule your export and set advanced options. We’ll leave these settings alone for now. Instead, click Confirm & Run Export to run your export.
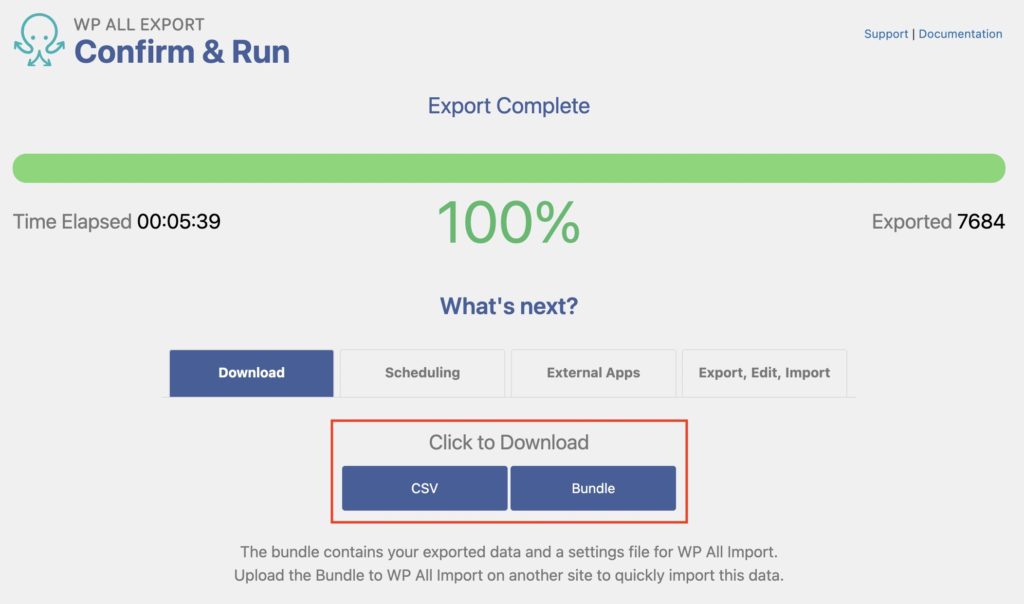
Step 4: Download Your WordPress Export
After the export finishes, download the generated export file. At this point, you can choose to migrate this data to another WordPress site, edit it in Excel and import it back into WordPress, or send it to Dropbox, Google Drive, email, and over 1000+ other external apps via Zapier.
You can review previous exports via All Export › Manage Exports.
Export WordPress – Advanced Topics
Select a Different WordPress Export Type
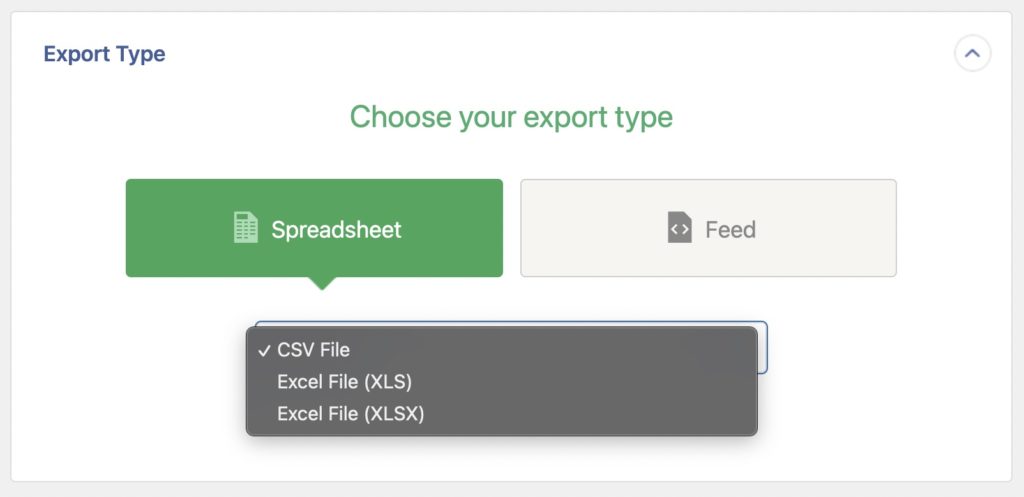
To export WordPress data in a different format, expand the Export Type section in the Drag & Drop interface. Here are the available options:
- Spreadsheet
- CSV File: creates a .CSV file.
- Excel File (XLS): creates a .XLS file.
- Excel File (XLSX): creates a .XLSX file.
- Feed
- Simple XML Feed: creates a .XML file.
- Custom XML Feed creates a .XML file.
When you export WooCommerce products, there will be another Feed option: Google Merchant Center Product Feed. That export type is specific to products and generates a .TXT file.
Export WordPress Automatically with Scheduling
You can schedule your WordPress export using the following options:
- Cron jobs: this allows you to manually create cron jobs in your server (via cPanel, Plesk, or similar) and then run the export on a schedule. To learn more, see Manual Scheduling.
- Our Automatic Scheduling Service: this is an optional and monthly paid service that allows you to schedule exports directly from within our plugin’s interface. See Automatic Scheduling Service.
The scheduling options can be defined by expanding the Scheduling Options section of the Export Settings screen (Step 3 above), or after the export has been created in All Export › Manage Exports › Scheduling Options.
Use PHP Code or Custom PHP Code when Exporting WordPress Data
In addition to exporting WordPress data easily, our software allows you to use PHP code or custom PHP code on the exported data.
This is useful for modifying your WordPress data on-the-fly while exporting. You can learn more about this in our documentation, How to Pass Exported WordPress Data Through PHP Functions. This technique allows you to apply a function to a single export element.
If you need to pass more than one export element through a function, you can use custom export fields instead. See Combine and Process Multiple Data Elements into a Custom Export Field for more information.
Export WordPress – Frequently Asked Questions
How Do I Completely Export a WordPress Site?
You can export the post types or custom post types available on your WordPress site, but you can’t export your full site at once. You have to export one post type at a time.
By default, WordPress offers a native tool to export all WordPress data (see Tools Export Screen). However, to export a WordPress site entirely and manually, you can export the WordPress database and then download the WordPress files from your server via SFTP or FTP.
How Do I Export and Import a WordPress Site?
- Go to the export site and use WP All Export to migrate all of your desired data.
- Download the generated bundles for each post type or custom post type that was exported.
- Go to the import site and use WP All Import to import each bundle.
- Review to confirm that your migration was successful.
This process is explained in more detail in our Migrate quickstart guide.
How Do I Export WordPress Media?
You cannot export the media library out of the box. To export media from your WordPress site, you need to export the post type or custom post type associated with the media that you wish to export.
For example, if you have multiple images attached to posts, you need to export the WordPress posts to obtain those images.
However, there’s a workaround that allows using a WP_Query export (see documentation) to generate an export file with all of the media that exists on your site. Here’s the query that you can use:
'post_type' => 'attachment',
'post_status' => 'inherit'
How Do I Import Data into WordPress?
- Go to All Import > New Import in the WordPress main menu.
- Choose how you want to load your data (i.e., upload file, use a URL, etc.).
- Select your import file and your import target (i.e., Posts, Pages, etc.).
- Map incoming data elements to your WordPress fields.
- Run the import.
For more information, see How to Import Any CSV, XML, or Excel File into WordPress.
Related Docs
Learn how to import any CSV or XML file to WordPress.
Describes how to migrate data between sites.
Shows you how to bulk edit your WordPress data.
Do you want to export your WordPress form entries into Excel? Using an XLSX file to export your data makes it super easy, and WPForms lets you do this in just a few clicks. You’ll be organizing your data in Microsoft Excel in no time.
So in this tutorial, we’ll show you the simple and pain-free way to export your WordPress form entries to Excel.
In This Article
- Step 1: Install the WPForms Plugin
- Step 2: Create Your Form
- Step 3: Export Form Entries to Excel
- Step 4: Export a Single Entry (Optional)
- Step 5: Open Your File in Excel
- How to Auto-Send Entries to a Spreadsheet
Create Your WordPress Contact Form Now
To export your WordPress form entries into an XLSX file for Excel, follow these simple steps.
Step 1: Install the WPForms Plugin
Before you can export your form entries to Excel, you’ll need to have a form that receives entries.
First, let’s install and activate the WPForms plugin. To export entries to Excel, you’ll need the WPForms Basic license or higher. You won’t be able to do this with the free version of the plugin.
WPForms is the best WordPress Form Builder plugin. Get it for free!

After buying the plugin, click the download link in your WPForms account. You’ll just need to download the zip file to your computer.
Then, in the WordPress admin area, navigate to Plugins » Add New. Upload the zip file to complete the installation.
If you need more help getting WPForms installed, here’s a beginner’s guide to installing a plugin in WordPress that will help walk you through setup.
Wonderful job. Next, let’s jump right into the plugin and create your website form.
Step 2: Create Your Form
Next up, you’ll need to create a form and publish it on your site. Once it’s live, you’ll be able to start collecting entries so that you have some to export.
So to do that, check out how to create a simple contact form. This tutorial will show you how to publish a contact form on a WordPress page in less than 5 minutes.
And don’t worry, you don’t need to know how to code and it’s very easy, even for beginners.

Now once your form is complete, use the Embed button to embed it onto a new or existing page. You can also publish your form in the sidebar if you’d like.
Now, we’ll just need to wait until we have a few entries in WordPress. You can go ahead and submit a few test entries so that you can move forward with this tutorial, or wait for a few visitors to fill out your form.
Once you have some entries, it’s time to export them to Excel.
Step 3: Export Form Entries to Excel
To get started exporting your form entries to Excel, head to your WordPress dashboard. Navigate to WPForms » Entries and then hover over the form you want to export entries from into Excel and click on Entries.

Now you’ll see all of the entries for your form. To get started with the export, click Export All.

On the next screen, you’ll see the name of the form in the dropdown. You’ll be able to select all the fields on your form that you want to export.
If you want to see more details on some of the advanced information you can export, check out our comprehensive documentation on how to export form entries in WPForms.

To export your form data to Excel, scroll down the page and click on the checkbox next to Export in Microsoft Excel (.xlsx).

You can even select a custom date range and Search specific form fields.
When you’re ready to export your info, click on the orange Download Export File button under Export Options.

You’ll see a prompt letting you know the file was generated and then your download will start.

Most browsers will save downloaded files to your computer’s Downloads folder, so you can find your file there.
That’s it! You’ve exported your form entries to an Excel file.
Step 4: Export a Single Entry (Optional)
Do you want to export just one entry? This might be extra helpful if you have a longer form (like a multi-step form) and just need the data from one lead. For whatever reason you may need it, it’s super simple to export just a single form entry in WPForms.
To do this, navigate to WPForms » Entries and select the name of your form.

Next, click on View to open the entry you want to export.

On the entry page, you’ll see the Export options on the right-hand side. Click on Export (XLSX).

The download should start right away as soon as you click on that button. And now you’ve successfully exported a single form entry to XLSX so that you can open it in Excel.
Step 5: Open Your File in Excel
Simply open your downloaded file and if Excel is the default program for that file type, it will open your data.
That’s it! You’ve now successfully exported WordPress form entries to Excel from WPForms.
How to Auto-Send Entries to a Spreadsheet
Want your form entries to automatically get sent over to your Google Sheets?
It’s easy to do. You can use the WPForms Google Sheets addon to automatically add new form entries to Google Sheets with only a few steps.
To get started connecting Google Sheets with WPForms, check out our guide on how to save contact form entries from WordPress to Google Sheets.
Well, that does just about does it, folks. We hope this post helped you learn how easy it is to export your WordPress forms to Excel.
Next, Export Your Web Forms to WPForms
Still using Contact Form 7? You can easily export your forms from the Contact Form 7 plugin and use them with WPForms.
WPForms includes tons of built-in features and capabilities in the core plugin lacking in other form builders like Contact Form 7. For instance, printing your form entries to PDF in WordPress is a breeze using WPForms.
Ready to build your form? Get started today with the easiest WordPress form builder plugin. WPForms Pro includes the Excel export tool for free and offers a 14-day money-back guarantee.
And if this article helped you out, please follow us on Facebook and Twitter for more free WordPress guides and tutorials.
Содержание
- How to Export WordPress Form Entries to Excel (Step by Step)
- How to Export a WordPress Form to Excel
- Step 1: Install the WPForms Plugin
- Step 2: Create Your Form
- Step 3: Export Form Entries to Excel
- Step 4: Export a Single Entry (Optional)
- Step 5: Open Your File in Excel
- How to Auto-Send Entries to a Spreadsheet
- Next, Export Your Web Forms to WPForms
- Using WordPress and want to get WPForms for free?
- Simple CSV/XLS Exporter
- Description
- Questions?
- Simple CSV/XLS Exporter
- Описание
- Questions?
- Lifetime licenses are only available for a short time!
- Wait, Don’t Miss Your Chance for a Lifetime License!
- Yes! I Want a Lifetime License for Only
- 90-Day Guarantee
- Free Updates For Life
- World Class Support
- Your Last Chance for a Lifetime License!
- Yes! I want to checkout now to secure my lifetime license!
- 90-Day Guarantee
- Free Updates For Life
- World Class Support
- How To Export WordPress Users to CSV, Excel, or XML
- Step 1: Create a New WordPress Users Export
- Step 2: Define Your WordPress User Export Columns
- Export WordPress Users — Data Categories and Fields
- WordPress Users — Standard Data
- WordPress Users — Custom Fields
- WooCommerce Address Fields
- WordPress Users — Other Data
- Exporting WordPress User Passwords
- Step 3: Configure Your User Export Settings
- Step 4: Download Your WordPress User Export File
- Export WordPress Users — Advanced Topics
- Exporting Users to Other File Types
- Export WordPress Users — Advanced Options
- Filtering User Exports
- Export WordPress Users — Frequently Asked Questions
- How to Export All WordPress Users?
- How to Import WordPress Users?
- How to Migrate WordPress Users to Another Website?
- Can I Export WordPress User Passwords? Is That Secure?
- Can I Export WordPress User Data From Other Plugins or WooCommerce Extensions?
- How Do I Schedule My WordPress User Exports?
- Related Docs
How to Export WordPress Form Entries to Excel (Step by Step)
Do you want to export your WordPress form entries into Excel? Using an XLSX file to export your data makes it super easy, and WPForms lets you do this in just a few clicks. You’ll be organizing your data in Microsoft Excel in no time.
So in this tutorial, we’ll show you the simple and pain-free way to export your WordPress form entries to Excel.
In This Article
How to Export a WordPress Form to Excel
To export your WordPress form entries into an XLSX file for Excel, follow these simple steps.
Step 1: Install the WPForms Plugin
Before you can export your form entries to Excel, you’ll need to have a form that receives entries.
First, let’s install and activate the WPForms plugin. To export entries to Excel, you’ll need the WPForms Basic license or higher. You won’t be able to do this with the free version of the plugin.
After buying the plugin, click the download link in your WPForms account. You’ll just need to download the zip file to your computer.
Then, in the WordPress admin area, navigate to Plugins » Add New. Upload the zip file to complete the installation.
If you need more help getting WPForms installed, here’s a beginner’s guide to installing a plugin in WordPress that will help walk you through setup.
Wonderful job. Next, let’s jump right into the plugin and create your website form.
Step 2: Create Your Form
Next up, you’ll need to create a form and publish it on your site. Once it’s live, you’ll be able to start collecting entries so that you have some to export.
So to do that, check out how to create a simple contact form. This tutorial will show you how to publish a contact form on a WordPress page in less than 5 minutes.
And don’t worry, you don’t need to know how to code and it’s very easy, even for beginners.
Now once your form is complete, use the Embed button to embed it onto a new or existing page. You can also publish your form in the sidebar if you’d like.
Now, we’ll just need to wait until we have a few entries in WordPress. You can go ahead and submit a few test entries so that you can move forward with this tutorial, or wait for a few visitors to fill out your form.
Once you have some entries, it’s time to export them to Excel.
Step 3: Export Form Entries to Excel
To get started exporting your form entries to Excel, head to your WordPress dashboard. Navigate to WPForms » Entries and then hover over the form you want to export entries from into Excel and click on Entries.
Now you’ll see all of the entries for your form. To get started with the export, click Export All.
On the next screen, you’ll see the name of the form in the dropdown. You’ll be able to select all the fields on your form that you want to export.
If you want to see more details on some of the advanced information you can export, check out our comprehensive documentation on how to export form entries in WPForms.
To export your form data to Excel, scroll down the page and click on the checkbox next to Export in Microsoft Excel (.xlsx).
You can even select a custom date range and Search specific form fields.
When you’re ready to export your info, click on the orange Download Export File button under Export Options.
You’ll see a prompt letting you know the file was generated and then your download will start.
Most browsers will save downloaded files to your computer’s Downloads folder, so you can find your file there.
That’s it! You’ve exported your form entries to an Excel file.
Step 4: Export a Single Entry (Optional)
Do you want to export just one entry? This might be extra helpful if you have a longer form (like a multi-step form) and just need the data from one lead. For whatever reason you may need it, it’s super simple to export just a single form entry in WPForms.
To do this, navigate to WPForms » Entries and select the name of your form.
Next, click on View to open the entry you want to export.
On the entry page, you’ll see the Export options on the right-hand side. Click on Export (XLSX).
The download should start right away as soon as you click on that button. And now you’ve successfully exported a single form entry to XLSX so that you can open it in Excel.
Step 5: Open Your File in Excel
Simply open your downloaded file and if Excel is the default program for that file type, it will open your data.
That’s it! You’ve now successfully exported WordPress form entries to Excel from WPForms.
How to Auto-Send Entries to a Spreadsheet
Want your form entries to automatically get sent over to your Google Sheets?
It’s easy to do. You can use the WPForms Google Sheets addon to automatically add new form entries to Google Sheets with only a few steps.
To get started connecting Google Sheets with WPForms, check out our guide on how to save contact form entries from WordPress to Google Sheets.
Well, that does just about does it, folks. We hope this post helped you learn how easy it is to export your WordPress forms to Excel.
Next, Export Your Web Forms to WPForms
WPForms includes tons of built-in features and capabilities in the core plugin lacking in other form builders like Contact Form 7. For instance, printing your form entries to PDF in WordPress is a breeze using WPForms.
Ready to build your form? Get started today with the easiest WordPress form builder plugin. WPForms Pro includes the Excel export tool for free and offers a 14-day money-back guarantee.
And if this article helped you out, please follow us on Facebook and Twitter for more free WordPress guides and tutorials.
Using WordPress and want to get WPForms for free?
Enter the URL to your WordPress website to install.
Источник
Simple CSV/XLS Exporter
Description
This plugin allows you to export your posts to CSV or XLS file, through a simple link/button, from either backend or frontend.
Make sure you are using PHP 7.3+, if you see any errors, older versions will not be supported anymore. The plugin has been tested up to PHP 8.1.
Supports
- any custom post type
- custom post status
- custom taxonomies
- custom fields
- WooCommerce products, orders, status, categories and fields
- export only current user posts
- export specific user ID posts
- export specific post IDs
You can set the default post type, with its taxonomies and custom fields, that you wish to export, from the Settings page.
After that, anytime you will use the urls https://yoursite.com/?export=csv for a CSV file, or https://yoursite.com/?export=xls , you will get that post type data.
“You must choose the post type and save the settings before you can see the taxonomies or custom fields for a custom post type. Once the page reloads, you will see the connected taxonomies and custom fields for the post type.”
If you want to export from a different post type than the one saved in these settings, also from frontend, use the url https://yoursite.com/?export=csv&post_type=your_post_type_slug for a CSV file, or https://yoursite.com/?export=xls&post_type=your_post_type_slug to get a XLS.
Please check the Plugin’s FAQ for all possible options and available custom parameters you can use.
When opening the exported xls, Excel will prompt the user with a warning, but the file is perfectly fine and can then be opened. Unfortunately this can’t be avoided, read more here.
Questions?
Check the FAQ before opening new threads in the forum!
Источник
Simple CSV/XLS Exporter
Описание
This plugin allows you to export your posts to CSV or XLS file, through a simple link/button, from either backend or frontend.
Make sure you are using PHP 7.3+, if you see any errors, older versions will not be supported anymore. The plugin has been tested up to PHP 8.1.
Supports
- any custom post type
- custom post status
- custom taxonomies
- custom fields
- WooCommerce products, orders, status, categories and fields
- export only current user posts
- export specific user ID posts
- export specific post IDs
You can set the default post type, with its taxonomies and custom fields, that you wish to export, from the Settings page.
After that, anytime you will use the urls https://yoursite.com/?export=csv for a CSV file, or https://yoursite.com/?export=xls , you will get that post type data.
«You must choose the post type and save the settings before you can see the taxonomies or custom fields for a custom post type. Once the page reloads, you will see the connected taxonomies and custom fields for the post type.»
If you want to export from a different post type than the one saved in these settings, also from frontend, use the url https://yoursite.com/?export=csv&post_type=your_post_type_slug for a CSV file, or https://yoursite.com/?export=xls&post_type=your_post_type_slug to get a XLS.
Please check the Plugin’s FAQ for all possible options and available custom parameters you can use.
When opening the exported xls, Excel will prompt the user with a warning, but the file is perfectly fine and can then be opened. Unfortunately this can’t be avoided, read more here.
Questions?
Check the FAQ before opening new threads in the forum!
Источник
Lifetime licenses are only available for a short time!

Wait, Don’t Miss Your Chance for a Lifetime License!

Yes! I Want a Lifetime License for Only
90-Day Guarantee
Free Updates For Life
World Class Support
Your Last Chance for a Lifetime License!
Yes! I want to checkout now to secure my lifetime license!
90-Day Guarantee
Free Updates For Life
World Class Support
How To Export WordPress Users to CSV, Excel, or XML
To export WordPress users, go to All Export › New Export and select Users. Configure your export using our convenient Drag & Drop interface, then run the export and download your file.
![]()
Step 1: Create a New WordPress Users Export
Go to All Export › New Export:
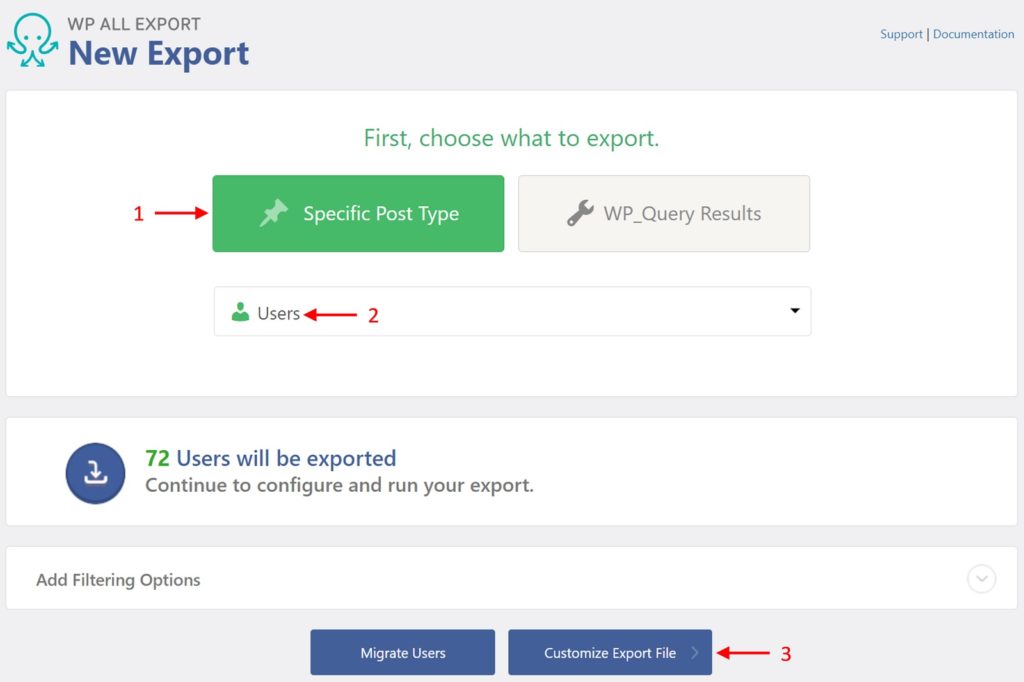
- Choose Specific Post Type.
- Select Users.
- Click Customize Export File. This will bring you to the Drag & Drop screen.
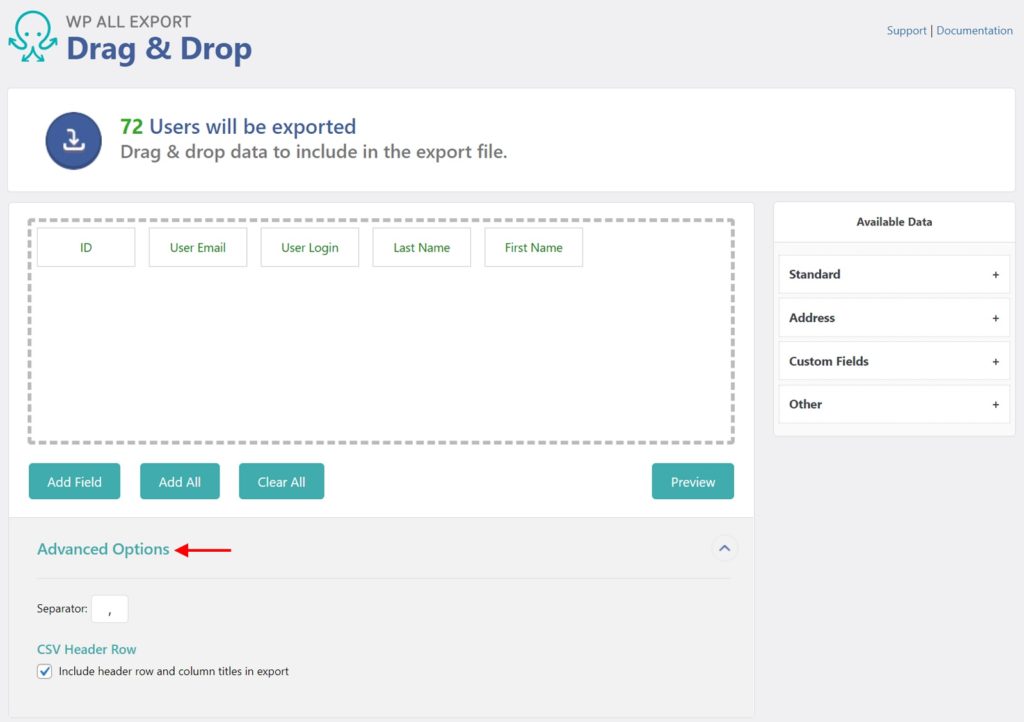
Step 2: Define Your WordPress User Export Columns
Most WordPress user exports only consist of a few data columns. You can select these columns using our Drag & Drop interface.
The Available Data section on the right contains all the available data elements organized by categories.
To include a data element in an export, simply drag it from the Available Data section and drop it in the column selection area:
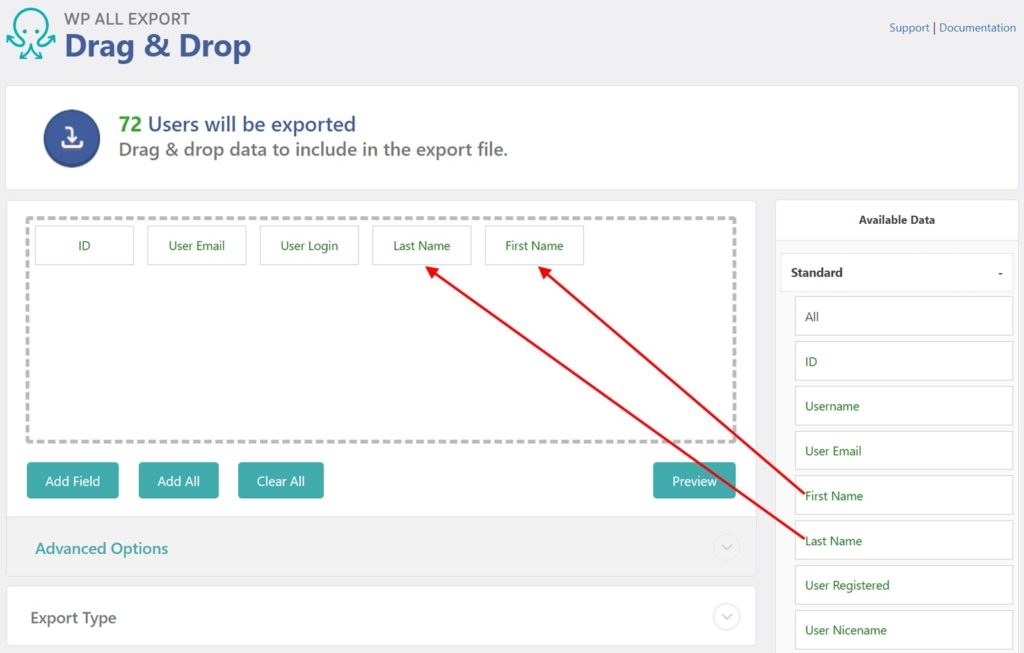
To remove a column from the user export, drag & drop it outside the column selection area.
Export WordPress Users — Data Categories and Fields
User data is divided by default into three categories: Standard, Custom Fields, and Other. However, if WooCommerce is installed, our plugin will add a fourth category for WooCommerce customer billing and shipping address data, which it labels as Address. See the relevant sections below for more information.
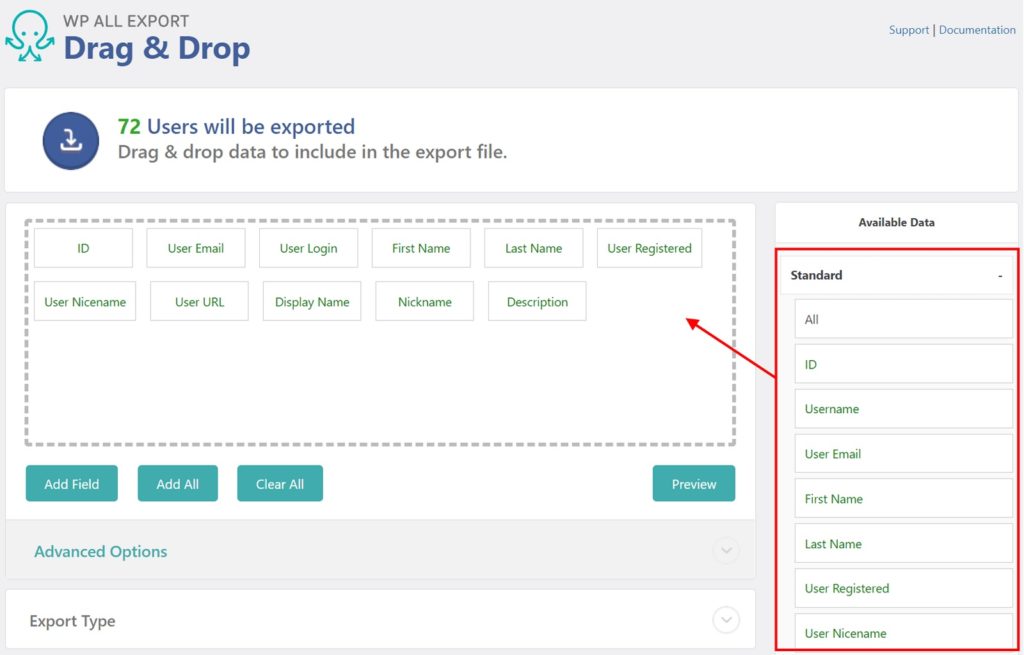
WordPress Users — Standard Data
Data describing the WordPress user’s account are located in Available Data › Standard:
- ID: The user ID, assigned by WordPress
- Username: The username the user chose when creating their account
- User Email: Email address associated with the user account
- First Name: User’s first name
- Last Name: User’s last name
- User Registered: Date that the user registered
- User Nicename: Sanitized version of the username
- User URL: Website associated with the user account
- Display Name: The name to be displayed publicly, which is selected in WordPress as either the username, first/last, or nickname
- Nickname: A name chosen by the user to be displayed on the frontend
- Description: A description of the user, also labeled as Biographical Info in WordPress
WordPress Users — Custom Fields
Custom fields are extra information attached to the users on your WordPress site. They’re also known as metadata. Many pieces of data are stored as custom fields, such as a product’s price or a real estate property’s address. You can find this data in Available Data › Custom Fields.
By default, users will not have any custom fields. However, plugins and themes will add them. Because they depend entirely on which plugins or themes have been installed, we do not have a predefined list of custom fields. Also, since many of these fields tend to be used for internal purposes, their names may not be meaningful at first glance:
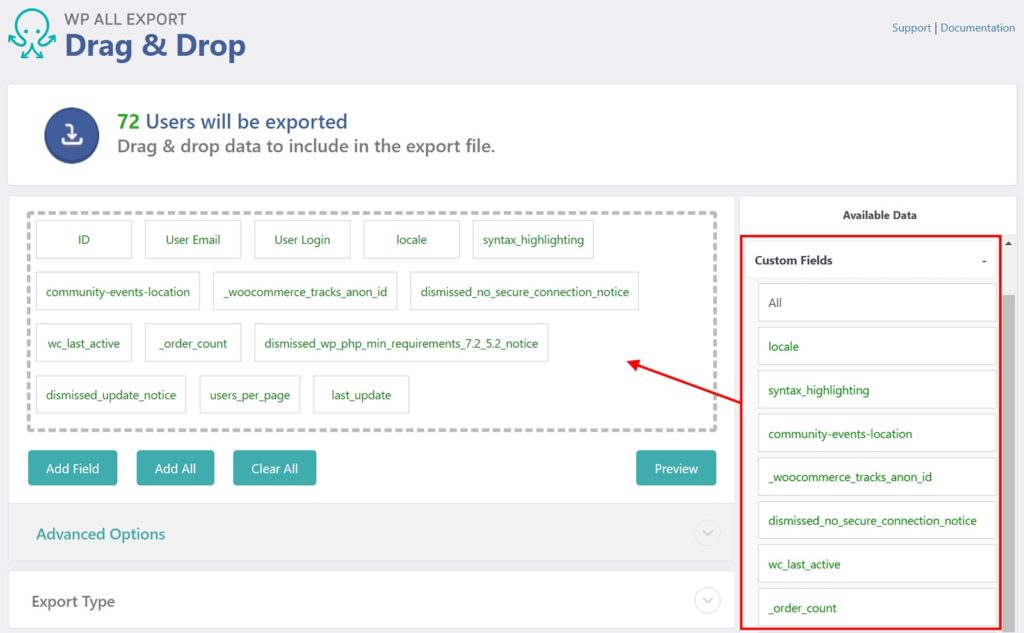
However, having access to these fields may make the difference between a successful vs. unsuccessful user export.
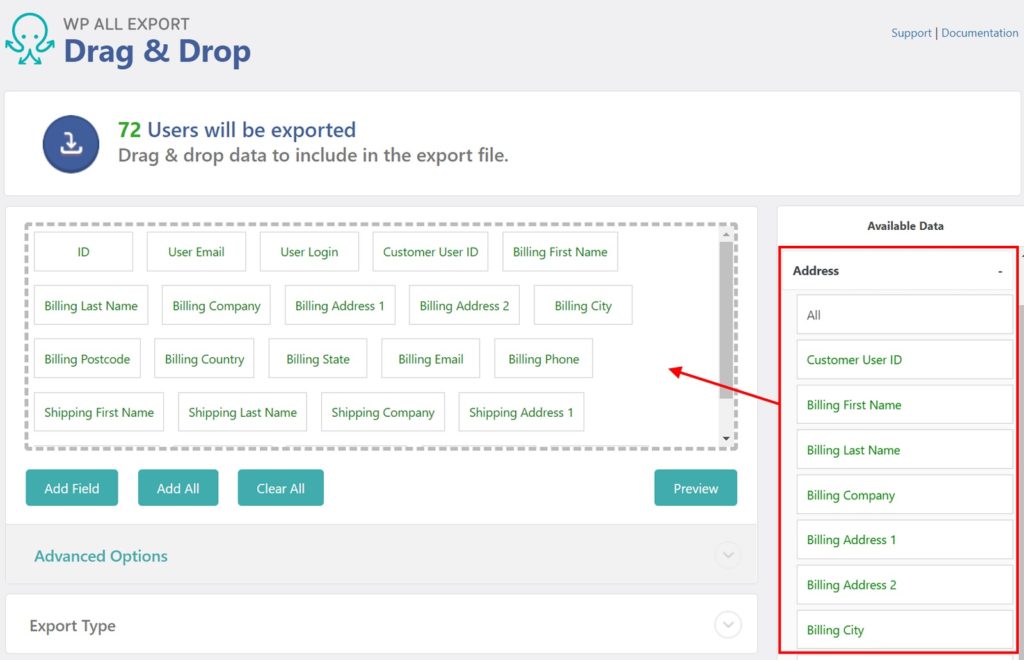
WooCommerce Address Fields
The billing and shipping address fields that WooCommerce attaches to users are also custom fields. However, to make these fields more accessible, we create a separate section for them in Available Data -> Address.
These fields include:
- Billing First Name
- Billing Last Name
- Billing Company
- Billing Address 1
- Billing Address 2
- Billing City
- Billing Postcode
- Billing Country
- Billing State
- Billing Email
- Billing Phone
- Shipping First Name
- Shipping Last Name
- Shipping Company
- Shipping Address 1
- Shipping Address 2
- Shipping City
- Shipping Postcode
- Shipping Country
- Shipping State
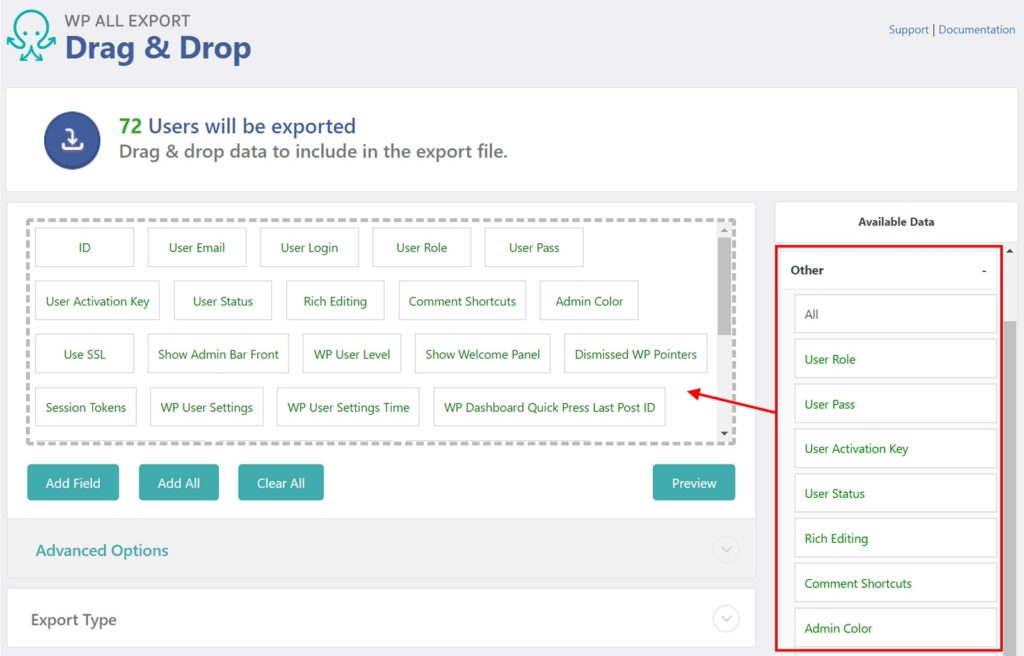
WordPress Users — Other Data
You can find other, less common user fields in Available Data-> Other. These include:
- User Role: All users have a role that determines what they can do when logged in. You can read more about user roles here: https://wordpress.org/support/article/roles-and-capabilities/
- User Pass: A hash of the user’s password. Read the next section for more information on user passwords.
- Everything else. There’s a lot of WordPress user data that the vast majority of people will never need to export. In case you do, it’s all here.
Exporting WordPress User Passwords
To export a WordPress user password, drag the User Pass field from Available Data -> Other into the column selection area.
These are hashes of the passwords, not the passwords themselves. Hashing is a one-way action that irreversibly scrambles a string of text. It is not possible to reverse the hashing process and reveal the original password. You can, however, import the hashed passwords back into WordPress, and users will be able to log in with their old password.
Once your WordPress user export columns have been defined, click Continue to configure the export settings.
Step 3: Configure Your User Export Settings
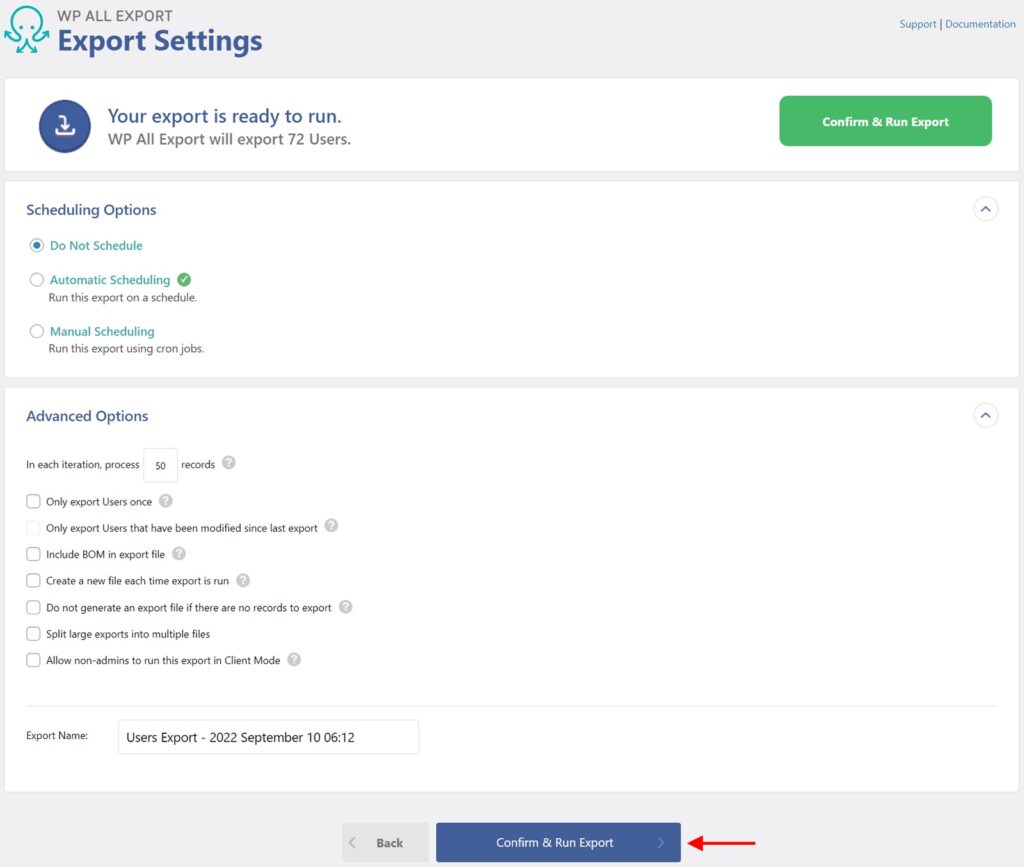
In the Schedule Options section of this screen, you can configure your user export to run automatically on either a weekly or monthly schedule. This is ideal if you wish to export users to another system on a regular basis.
In the Advanced Options section, you can configure important settings, such as how to handle users that were exported previously using the same export template, and what kind of file size and batch processing settings should be applied to avoid exceeding server file and resource limitations.
Leave all these settings alone for now.
To run your export, click Confirm & Run Export.
Step 4: Download Your WordPress User Export File
When the export finishes, click CSV to download your user data:
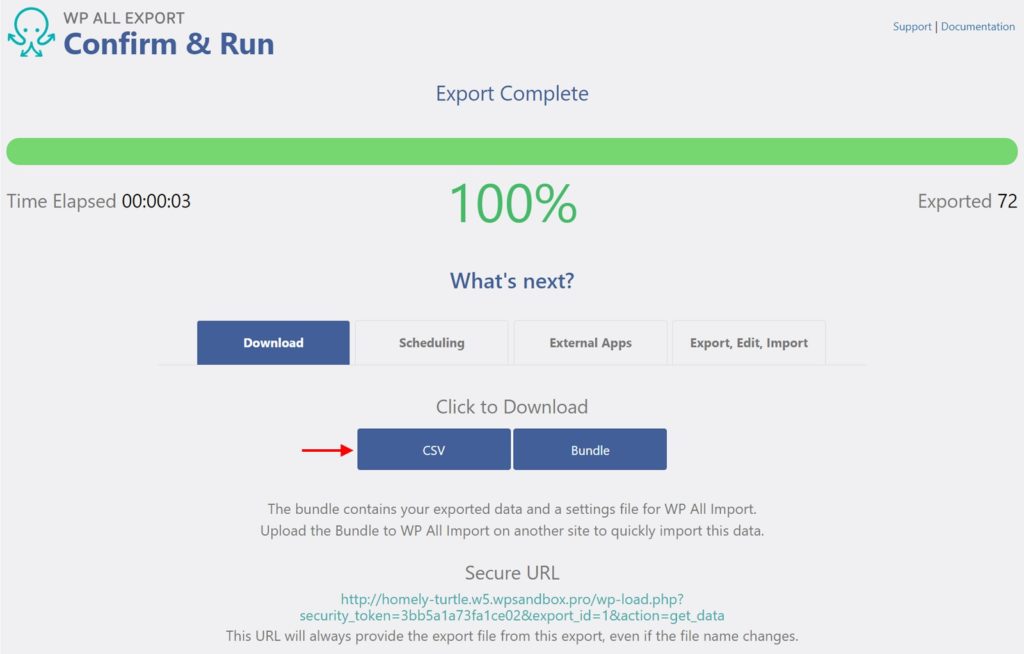
Another option is to click Bundle, which downloads a zip file containing both the export file and an import template. WP All Import can use this template to import WordPress users on another site, which is a very convenient way to migrate users from one site to another.
Export WordPress Users — Advanced Topics
Exporting Users to Other File Types
In the preceding tutorial, we exported our WordPress Users to a CSV file by default. Our plugin can also export users to Excel or XML.
To use Excel, do the following in the Drag & Drop interface:
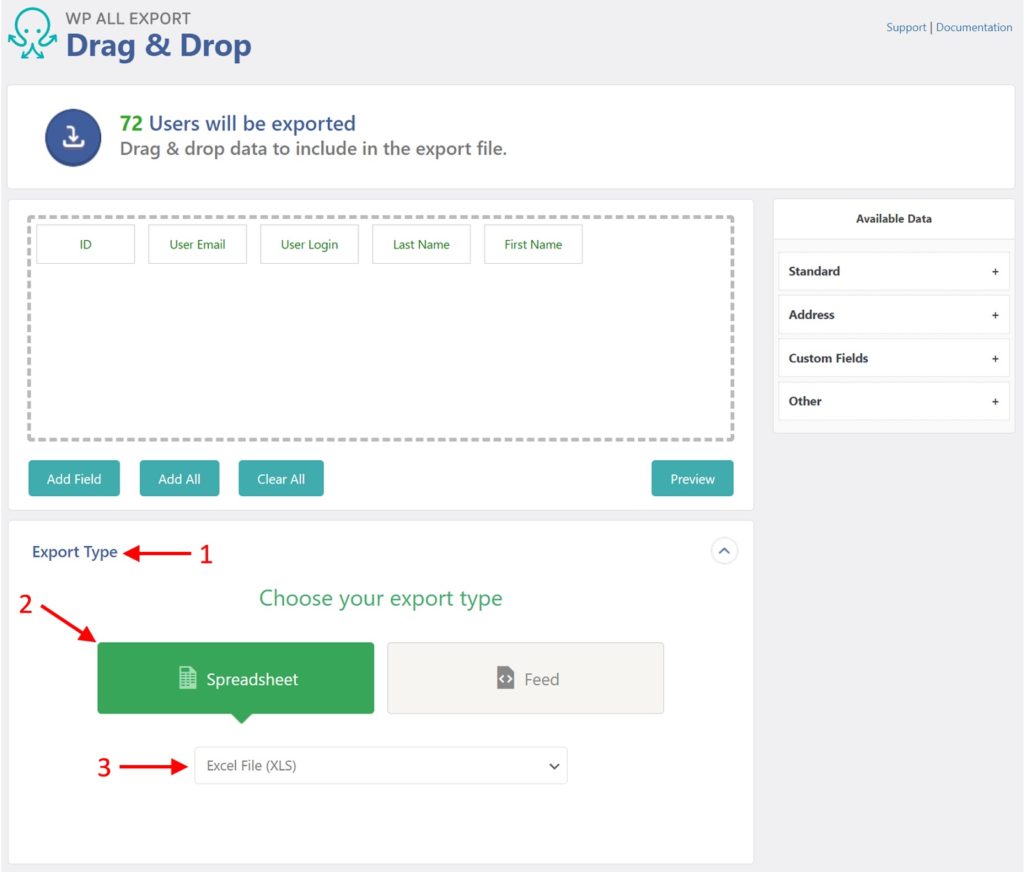
- Expand the Export Type panel below the column selection area.
- Choose Spreadsheet.
- Select Excel File XLS or Excel File XLSX.
Want to export to XML instead?
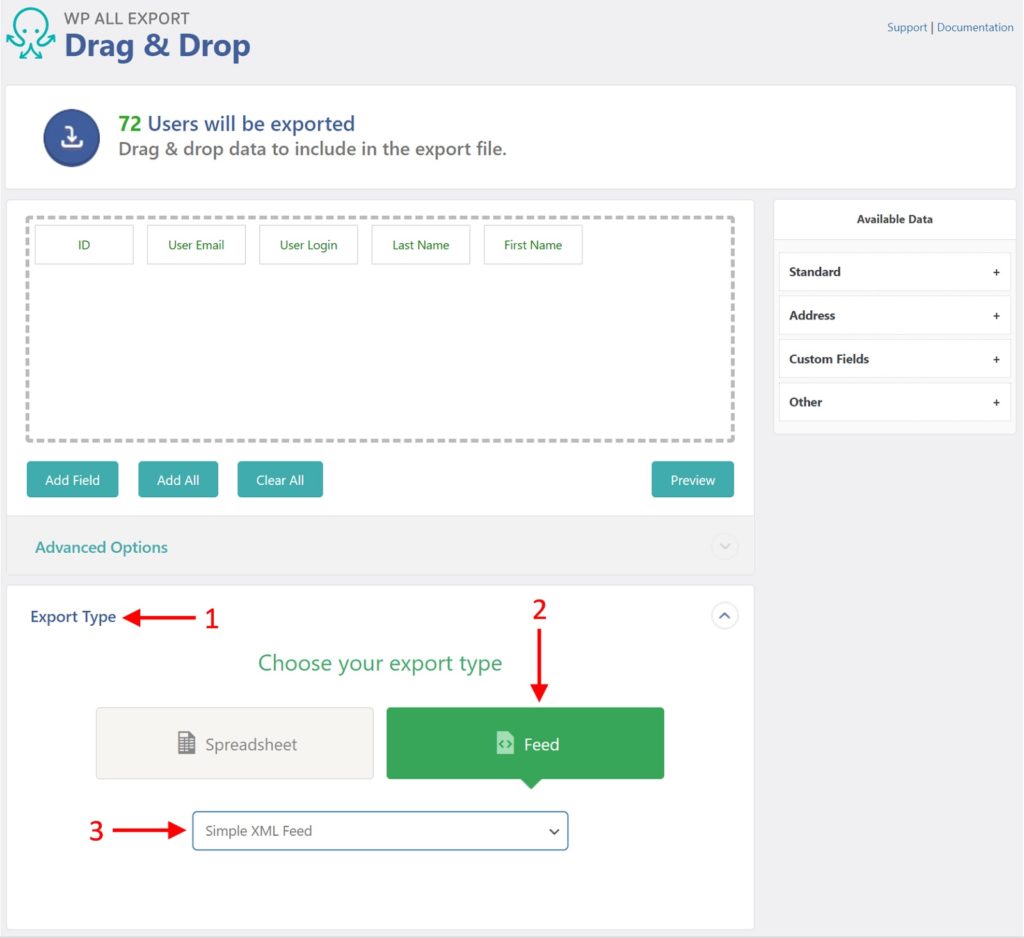
- Expand the Export Type panel.
- Choose Feed.
- Select Simple XML Feed or Custom XML Feed.
Export WordPress Users — Advanced Options
The Advanced Options panel is found just above the Export Type panel when exporting to CSV or XML. It is not present when exporting to Excel. Here is what it looks like when exporting to CSV:
With CSV files, there are only two options:
- Separator, which defines the character to be used to separate one column from another. The default option is to use a comma (,). Another popular option is to use a pipe character (|).
- Include header row and column titles in export: When selected, the first row is a header row with column titles. If not selected, the first row simply contains the data for the first user with no header or column titles.
To understand the XML options, read our guide on exporting WordPress data to XML.
Filtering User Exports
Sometimes, you may want to export only a subset of WordPress users.
To do this, expand the Add Filtering Options panel near the bottom of the New Export screen. A filter rule requires an Element, a Rule, and a Value:
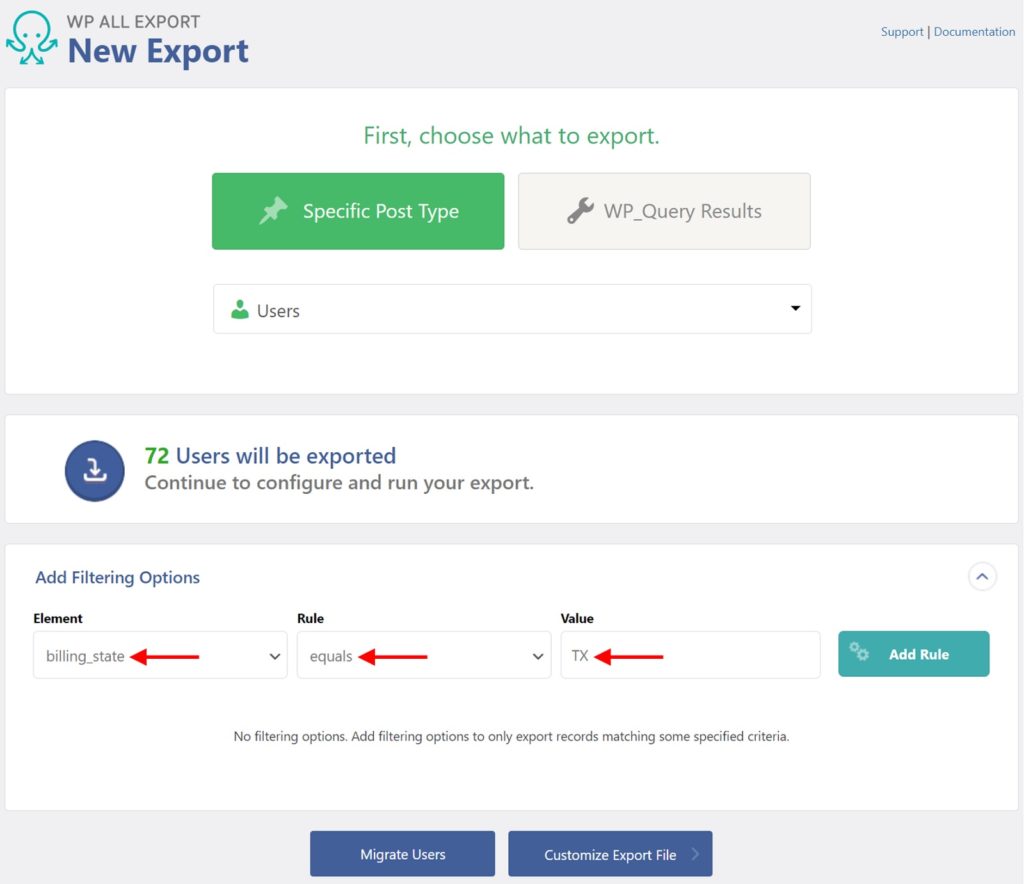
In this case, we are filtering for:
Element = billing state
Value = «TX» for Texas
Expressed verbally, this says, “Export WordPress Users with a billing address in Texas.”
You can also combine multiple filter rules. For example, you can add an «Or» condition to include users from Florida, too:
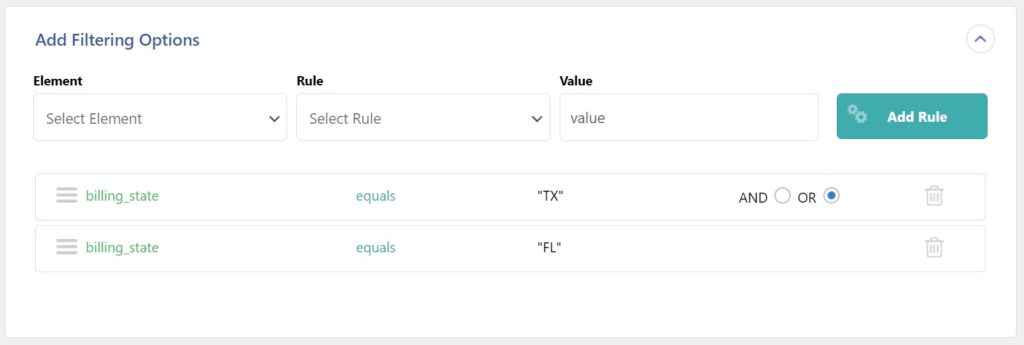
You can create whatever combination of filters that you require.
Export WordPress Users — Frequently Asked Questions
How to Export All WordPress Users?
Run a standard export as described in this document. Select your export columns as usual but do not apply any filters. When you export WordPress users without filters, this will automatically export all users in the WordPress database.
How to Import WordPress Users?
- In the WordPress main menu, navigate to All Import > New Import.
- Choose how you want to load your data (i.e., upload file, use a URL, etc.).
- Select your import file and your import target (i.e., Users).
- Use the Drag & Drop interface to map incoming fields to your WordPress user fields.
- Run the import.
See Import WordPress Users for relevant features and a video overview.
How to Migrate WordPress Users to Another Website?
- Export the users that you wish to migrate. When you do this, download the Bundle option instead of a CSV file. The bundle file contains an import template in addition to the export data file.
- Install WP All Import on the target site.
- Import the bundle file. WP Import will know what to do from there, allowing you to just accept the import default settings.
- Check the imported users.
See Migration Overview for more information.
Can I Export WordPress User Passwords? Is That Secure?
WordPress only stores hashed passwords, which are completely encrypted and secure when you export them elsewhere. You can then import them back into WordPress, and users will still be able to use their old passwords without ever exposing them to others.
Can I Export WordPress User Data From Other Plugins or WooCommerce Extensions?
Yes. WP All Export automatically detects custom data added by other plugins. You can export this custom user data the same way that you export any other type of WordPress data. This is just one of the ways that our software makes your import/export tasks easier.
How Do I Schedule My WordPress User Exports?
You can schedule your WordPress user exports to run automatically using either cron jobs on your server, or our automatic scheduling service to set your user export schedule directly from our interface. Talk about convenience!
![]()
Use WP All Export to obtain WooCommerce customers in a CSV or XML file.
![]()
Use WP All Export to obtain WooCommerce orders in a CSV or XML file.
![]()
Export WooCommerce products into a CSV or XML file with WP All Export.
![]()
Export your WooCommerce reviews using WP All Export.
Источник
- Details
- Reviews
- Installation
- Development
WP All Export – Simple & Powerful XML / CSV Export Plugin
WP All Export features a three step export process and an intuitive drag & drop interface that makes complicated export tasks simple and fast.
With WP All Export you can: export data for easy editing, migrate content from WordPress to another site, create a WooCommerce affiliate feed, generate filtered lists of WooCommerce orders, export the email addresses of new customers, create and publish customized WordPress RSS feeds – and much more.
Click here to try WP All Export right now.
-
Turn your WordPress data into a customized CSV or XML
-
Choose which data to export: WP All Export’s drag and drop interface makes it easy to select exactly which data you’d like to export
-
Structure your export file however you like: Rename CSV columns and XML elements, rearrange them, whatever you want to do.
-
Export any custom post type, any custom field: Lots of plugins and themes store custom data in WordPress. You can export all of it with WP All Export.
-
Easy integration with WP All Import: WP All Export will generate your WP All Import settings for you so importing your data back into WordPress is easy, simple, and fast.
Wish you could edit your WordPress data in Excel? Now you can – export it with WP All Export, edit it, and then import it again with WP All Import.
For technical support from the developers, please consider purchasing WP All Export Pro.
WP All Export Professional Edition
WP All Export Pro is a paid upgrade that includes premium support and adds the following features:
-
Send your data to 500+ apps: Full integration with Zapier allows you to send your exported WordPress data to services like Dropbox and Google Drive, to create and update reports in Google Sheets, send email updates, or anything else you can think of. This is especially useful when you export WooCommerce orders to CSV.
Read more about WP All Export Pro and Zapier.
-
Schedule exports to run automatically: Exports can be configured to run on any schedule you like. You can export new sales every week, recent user sign ups, new affiliate products added to your site, daily product stock reports, etc. Scheduled exports are very powerful when combined with Zapier.
-
Add rules to filter data: WP All Export Pro makes it easy to export the exact posts/products/orders you need. Want to export all WooCommerce orders over $100? Want to export all of the green shirts from your WooCommerce store? Want to export all new posts from 2014, except the ones added by Steve?
You can with a simple to use interface on the ‘New Export’ page in WP All Export Pro.
-
Export WordPress users: WP All Export Pro adds the ability to export WordPress users and all custom data associated with them. Available data is organized and cleaned up so you don’t need to know anything about how WordPress stores users in order to export them.
-
Export WooCommerce orders: Export WooCommerce Order item data with WP All Export Pro. Just as with any other custom post type, you can export WooCommerce orders with the free version of WP All Export. However, the order item data is stored by WooCommerce in several custom database tables and this custom data is only accessible with WP All Export Pro.
-
Pass data through custom PHP functions: With WP All Export Pro you can pass your data through a custom function before it is added to your export file. This will allow you to manipulate your data any way you see fit.
-
Guaranteed technical support via e-mail.
Upgrade to the Pro edition of WP All Export.
Automatic Scheduling
A new service from Soflyy, Automatic Scheduling provides a simple interface for setting exports to run on a schedule. The service will make sure that your exports start on time and that they successfully complete without the need to set up individual cron jobs.
It costs $9/mo and can be used with WP All Export and WP All Import. You can set up as many exports and imports on as many sites as you like.
What information is shared with Soflyy? If you set an export to run on a schedule, WP All Export will open an encrypted connection to Soflyy servers. It will send the license key, site URL, ID of the export you want to run, export security key, and times that you want the export to run.
WordPress CSV Exports
A CSV is a very simple type of spreadsheet file where each column is separated by a comma. With WP All Export you can very easily set up a WordPress CSV export and control the order and title of the columns.
Very often you’ll want to edit your data with Microsoft Excel, Google Sheets, Numbers, or maybe something else. This is why a CSV export is so powerful – all spreadsheet software can read, edit, and save CSV files. WP All Export allows you edit your WordPress data using whatever spreadsheet software you are most comfortable with.
WordPress XML Exports
Sometimes you’ll want to export your data so that some other tool, software, or service can use it. Very often they will require your data to be formatted as an XML file. XML is very similar to HTML, but you don’t need to know anything about that in order to set up an XML export with WP All Export.
If you want to set up a WordPress XML export all you need to do is select ‘XML’ when configuring your export template. And just like a CSV export, an XML export will allow you to customize the element names and put them in any order you wish.
Related Plugins
Import any XML or CSV File to WordPress
Import Products from any XML or CSV to WooCommerce
Export Products to CSV/XML for WooCommerce
Custom Product Tabs for WooCommerce WP All Import Add-on
Export Orders to CSV/XML for WooCommerce
Export WordPress Users to CSV/XML
Related Tutorials
How to Export WooCommerce Products to Google Merchant Center (Google Shopping)
How to Export Gravity Forms Entries
Export Toolset Types to CSV, XML, or Excel
How to Export WooCommerce Variable Products
How to Export Blogs, Articles, Posts, Standard Post Data, Permalinks, Excerpts, Captions, Menus, Subscriptions, and Other Details From Your Websites
How To Export WordPress Comments
How To Export WooCommerce Coupons
How To Export WooCommerce Reviews
How to Schedule Your Exports to Run Automatically
How to Migrate WooCommerce and WordPress From One Host to Another
Premium Support
Upgrade to the Pro edition of WP All Export for premium support.
E-mail: support@wpallimport.com
Either: –
- Upload the plugin from the Plugins page in WordPress
- Unzip wp-all-export.zip and upload the contents to /wp-content/plugins/, and then activate the plugin from the Plugins page in WordPress


Sure, I’m able to export my custom post type Calendar items and bring them into my subdomain. I see them there. But, the values are wrong. Dates are showing only today’s date.

WP All Export and All Import are perhaps the greatest WP plugins of all time. Use them in concert with ACF Pro and prepare to be astonished.

An essential time-saving plugin.

WP All Export is the master plugin for all exporting data from WordPress. There are many export plugins, including both the hobby projects and the half-measures that never quite do what’s needed. They may be a bit cheaper, but I prefer the plugin that does it all and does it well. WP All Export is that plugin. No more plugin testing or accepting half measures. Just get the plugin and you’re all set.

I’ve been using WP All Export for years. I have synchronized e-commerce and catalogs of all kinds with different management systems. Everything works perfectly. Furthermore, the customizations via functions.php make it an indispensable tool for my work.
Read all 345 reviews
“Export any WordPress data to XML/CSV” is open source software. The following people have contributed to this plugin.
Contributors
1.3.9
- improvement: remove deprecated jQuery functions
- bug fix: resolve various PHP notices and warnings
- bug fix: error on Step 1 when ‘Disable syntax highlighting when editing code’ User option is enabled
1.3.8
- improvement: only contact Scheduling service if a Scheduling license is set
- bug fix: enable use of ‘s’, ‘LIKE’ and ‘NOT LIKE’ in WP_Query exports
1.3.7
- bug fix: cannot save Scheduling service license key
1.3.6
- security improvement
- bug fix: encoded ampersand showing in ‘Confirm & Run’ text
- improvement: UI enhancements
- improvement: use CodeMirror library from WordPress Core.
- improvement: only check Scheduling Service connectivity if a Scheduling license has been saved
1.3.5
- security improvements
- improvement: update autoloader to support paths containing underscores
1.3.4
- improvement: UI updates
- bug fix: PHP 8 compatibility
1.3.3
- new feature: compatibility with the Gravity Forms Export Add-On
- improvement: fallback to PclZip if ZipArchive isn’t available
- bugfix: some output not correctly escaped
1.3.2
- improvement: add support for exporting non-WooCommerce ‘product’ CPTs
- improvement: initial PHP 8 support
- improvement: only set max_execution_time on WPAE pages
- bug fix
1.3.1
- improvement: only set max_execution_time on export pages
- bugfix: error when using the ACF Export Add-On Pro
1.3.0
- improvement: added plugin version when loading tipsy JS file
- improvement: moved ACF and WooCommerce support to add-ons
1.2.10
- bugfix: WP_Query Results export only works with the User Export Add-On active
1.2.9
- maintenance: compatibility with Elementor v3.3 JavaScript changes
1.2.8
- improvement: add more info about client mode on the settings page
- improvement: remove unused deprecated function add_contextual_help()
- improvement: use wp_salt() when AUTH_SALT is not available
- bugfix: Google Merchants export notice appears and then immediately disappears
- bugfix: warning in PHP 7.3 when using continue in switch statements
1.2.7
- maintenance: compatibility with WordPress v5.5 jQuery changes
1.2.6
- improvement: disable scheduled exports via Automatic Scheduling UI
- API: add new filter wp_all_export_no_cache to avoid server cache for export files
- bug fix: saving scheduling license not working
1.2.5
- bug fix: preserve existing admin body classes
1.2.4
- improvement: add support for User Export Add-On
- improvement: better local timezone detection for Automatic Scheduling
- improvement: more consistent “Add New Field” user interface
- bugfix: ACF repeater fields broken in ACF 5.7.10+
- bugfix: when using migrate posts, only the image fields are added to the import template
1.2.3
- bugfix: compatibility with ACF 5.7.11
1.2.2
- bugfix: support exports scheduled at 12am and 12pm
- bugfix: fix JS error when editing export template
1.2.1
- new filter: added pmxe_after_iteration action
- bugfix: increase custom query meta limit
- bugfix: remove deprecated function calls for PHP 7.2 compatibility
- bugfix: address various PHP warnings and notices
- bugfix: graceful failure for non:writable uploads folder
- bugfix: warning when exporting WooCommerce orders using Automatic Scheduling
- bugfix: WooCommerce product variations exported as separate products when adding product attributes to custom export fields
- bugfix: small UI and spacing issues
- bugfix: prices with more than two decimal places are not exported correctly
- bugfix: exporting empty ACF values shifts rows in CSV exports
- bugfix: Australia missing from scheduling timezones
- bugfix: unable to filter or export WooCommerce product visibility data
- bugfix: Automatic scheduling UI spacing issues
- bugfix: unrelated errors are reported in functions.php file
1.2.0
- new feature: Automatic Scheduling – A new, optional service from Soflyy that makes scheduling exports incredibly easy.
- improvement: Support migrating users & keeping passwords
- improvement: Better error reporting for errors in custom functions
- improvement: Support for WooCommerce Short Description
- improvement: Better price formatting
- improvement: Add author information to Available Data
- improvement: Add Featured Image to Available Data › Media
- new filter: Disable price formatting – wp_all_export_raw_prices
- new filter: Called before each order item – wp_all_export_order_item
- new filter: Use custom CSV writer when default affected by https://bugs.php.net/bug.php?id=43225 – wp_all_export_use_csv_compliant_line_endings
- new filter: Output content before CSV headers – wp_all_export_pre_csv_headers
- bugfix: Error thrown when uploads folder is not writable
- bugfix: Autoloading broken when class names contain “_”
- bugfix: Error when activating Pro version and Free version
- bugfix: moment.js causes false positives for virus scanners
- bugfix: Comment status updated by default and causes problems
- bugfix: CSV Writer can’t handle slash double quote – https://bugs.php.net/bug.php?id=43225
- bugfix: WPAE prevents Jetpack from connecting to WordPress.com
- bugfix: Exported Excel files are corrupted in some cases
- bugfix: Plugin conflicts change the post order
- bugfix: CSV headers broken when field names contain quotes
- bugfix: Product visibility broken for old WooCommerce versions
- bugfix: Preview is broken for date fields
- bugfix: Custom Export Field values not saved in some cases
- bugfix: Headers broken when Custom Export Fields contain special characters
- bugfix: Loading order for styles optimized to reduce conflicts
- bugfix: Available Data broken when there’s more than 500 data elements
1.1.5
- improvement: removed autoload=true from wp_options
- improvement: WPML options in separate section
- bug fix: allow underscores in main xml tags
- bug fix: prevent uploading import template into wpae
- bug fix: ID column in CSV
- bug fix: ACF repeater headers
1.1.4
- improvement: removed autoload=true from wp_options
- improvement: WPML options in separate section
- bug fix: allow underscores in main xml tags
- bug fix: prevent uploading import template into wpae
- bug fix: ID column in CSV
- bug fix: ACF repeater headers
1.1.3
- improvement: added post_modified field
- bug fix: export attributes for simple products
- bug fix: db schema updating
- bug fix: variations with trashed parents shouldn’t be included in the export
1.1.2
- improvement: choose WPML language in export options
- bug fix: export ACF message field
- bug fix: export product categories with AFC repeater fields
- bug fix: export duplicate images from gallery
- bug fix: export search
- bug fix: export product variation attribute names
- bug fix: migrating hierarchical posts and pages
1.1.1
- improvement: compatibility with PHP 7.x
1.1.0
- improvement: added ACF fields to ‘migrate’ & ‘add all fields’ features
- improvement: added new filter ‘wp_all_export_field_name’
- improvement: changed default date export to Y/m/d
- bug fix: export shipping class for product variations
- bug fix: import template for ACF relationship fields
- bug fix: export empty images metadata
- bug fix: import template for ACF gallery
- bug fix: import template for variation_description
- bug fix: import template for default product attributes
- bug fix: automatically adding parent_id column on products export
1.0.9
- bug fix: fixed compatibility with PHP 5.3
1.0.8
- improvement: pull the parent taxonomy data when exporting variations
- improvement: remove spaces from export filename
- improvement: new filter wp_all_export_after_csv_line
- improvement: date options for sale price dates from/to
- improvement: possibility to use tab as csv delimiter
- improvement: new filter ‘wp_all_export_csv_headers’
- bug fix: db schema on multisite
- bug fix: import template for media items
- bug fix: export ACF repeater in XML format
- bug fix: export in CSV format when ‘Main XML Tag’ & ‘Record XML Tag’ option are blank
- bug fix: export ACF date_time_picker
1.0.7
- fixed db schema for multisite
- fixed export order items date
- fixed media items export ordering
- fixed import template for media items
- fixed export ACF repeater in XML format
- added new filter ‘wp_all_export_csv_headers’
- added possibility to use tab as csv delimiter “t”
- updated french translation
1.0.6
- added new filters ‘wp_all_export_is_wrap_value_into_cdata’, ‘wp_all_export_add_before_element’, ‘wp_all_export_add_after_element’
- added ‘WPML Translation ID’ element to available data
- modified preview to show first 10 records
- fixed csv export with non comma delimiter
- fixed conflict with WP Google Maps Pro plugin
1.0.5
- fixed misaligned columns on exporting product attributes
- fixed export nested repeaters field in CSV format
- fixed live records counting for advanced export mode
- fixed Events Calendar conflict
- added new filters ‘wp_all_export_add_before_node’, ‘wp_all_export_add_after_node’
- added possibility export repeater rows one per line
- exclude orphaned variations from exprt file
- changed UI for export media data ( images & attachments )
1.0.4
- fixed export attachment meta alt
- fixed export manually stored ACF
- fixed export repeater field for users in csv format
- fixed import export templates
- fixed ajaxurl conflict with WPML
- added French & Latvian translations
- added ‘Variation Description’ field
1.0.3
- fixed manage exports screen: “Info and options” disappears when WPAI plugin is disabled
- fixed css for WordPress 4.4
- fixed export ACF repeater field
- updated re-run export screen
- added hidden post types to the dropdown list on step 1
- added export templates
- added possibility to control main xml tag names & put additional info into xml file: apply_filters(‘wp_all_export_additional_data’, array(), $exportOptions)
- added ‘pmxe_exported_post’ action: do_action(‘pmxe_exported_post’, $record->ID );
- added option ‘Create a new export file each time export is run’
- added option ‘Only export posts once’
- added option ‘Split large exports into multiple files’
- added possibility to change export field name ( related to export WooCommerce orders )
- added es_ES translation
- added possibility to add NS to field names
1.0.2
- fixed download bundle
- fixed export repeater fields for ACF 4.x
- fixed import template for custom product attributes
- added new option ‘include BOM to export file
- added RU translation
- removed hidden post types from dropdown in step 1
1.0.1
- fixed export taxonomy: name instead of slug
- fixed pass data through php function
- added advanced (custom fields) section to export woo orders
- added draggable element deletion
- added auto-generate product export fields
- added ‘attributes’ field to product data
- added button to download bundle for WP All Import
- updated export file name
- changed export files destination to /exports
1.0.0
- WP All Export exits beta
0.9.1
- critical security fix – stopping non-logged in users from accessing adminInit http://www.wpallimport.com/2015/02/wp-import-4-1-1-mandatory-security-update/
0.9
- Initial release on WordPress.org.
Do you want to export your form responses to a spreadsheet?
If you have a lot of form entries, then exporting them to a CSV or Excel file helps you analyze them. You can even use the form data in other applications.
In this article, we’ll show you how to export WordPress form entries to CSV and Excel formats.

Why Export WordPress Form Entries to CSV and Excel?
WordPress forms are a great way of staying connected with your audience. They help you collect customer leads, get valuable feedback, resolve customer queries, find new product suggestions, conduct surveys, and more.
However, analyzing the data can be difficult if you have a lot of form entries. This is where exporting your data in the form of CSV (comma-separated values) and Excel files comes in handy.
For example, you can find out which products or features your users want the most or uncover common issues people face while using your WordPress site.
Another benefit of exporting WordPress form entries to CSV and Excel is that you can use the data with other applications.
Besides spreadsheet software like Google Sheets and Microsoft Excel, you can upload your form entries to analytics software. For instance, you can use Microsoft Power BI with a CSV or Excel file to create dashboards and other visualizations for your form entries.
That being said, let’s look at how you can create a WordPress form and export form entries to CSV and Excel.
Creating a WordPress Form to Collect Data
Before you can export form entries to CSV and Excel, you’ll need a WordPress form.
The best way of creating a WordPress form is by using WPForms. It’s the best contact form plugin for WordPress and is used by over 5 million websites.
WPForms offers a drag and drop form builder, which makes it effortless to create and customize WordPress forms. Plus, you get pre-built form templates to start quickly and customize the form according to your needs.

You can follow our step-by-step guide on how to create a contact form in WordPress.
WPForms also comes with powerful addons that help you collect online payments, integrate with email marketing services, store users’ geolocation, reduce form abandonment, and more.
For this tutorial, we’ll use the WPForms Pro version because it includes the option to export form entries and offers more features. There’s also a WPForms Lite version that you can try for free.
Exporting WordPress Form Entries to CSV and Excel
Once you’ve added a contact form on your WordPress blog and started getting form submissions, the next step is to export your form entries.
To start, simply head to WPForms » Entries in your WordPress admin panel, and then select a WordPress form to export its entries.

After that, you will see all the entries for the form you selected.
Go ahead and click the ‘Export All’ option.

Next, WPForms will show you different export options for your form entries.
You can choose which form fields to export, as well. By default, the export will include name, email address, and message fields.
However, there are also options to export additional information such as entry ID, date, user agent, user IP, payment status, and more.

From here, simply scroll down to the ‘Export Options’ section.
You can click the ‘Export in Microsoft Excel (.xlsx)’ checkbox to export the data in Excel format. If the box is left unchecked, WPForms will export as a CSV file.

There’s also a custom date range selector to help you export data from a specific time.
Plus, you can use the search feature to filter form entries. For example, you can export forms that only contain or don’t contain a specific name, email, message, ID, and more.
Next, go ahead and click the ‘Download Export File’ button and save the file to your computer.
You’ll now see a message that your export file was successfully generated.

How to Export a Single WordPress Form Entry
WPForms also lets you export a single form entry instead of downloading all the submissions. This is helpful if you have a multi-step form and only require information about a particular lead.
To start, simply go to WPForms » Entries from your WordPress dashboard and select a form to view its entries.
You should now be able to see all your forms. From here, click on the form that contains the single entry you need.
On the next screen, find the entry you want to export, and then go ahead and click the ‘View’ button.

After that, you’ll see details of your form entry.
Simply click the ‘Export (CSV)’ or ‘Export (XLSX)’ options in the Actions metabox on the right-hand side to download the file.

You can now save the CSV or Excel file on your computer and open it in spreadsheet software.
Bonus: Connect WordPress Forms to Google Sheets
Did you know that you can automate the process of gathering form entries and showing them in Google Sheets?
Connecting your WordPress forms with Google Sheets automatically collects the data in a spreadsheet. This makes it easier for team members to access form entries without creating a new WordPress login.
Plus, you don’t have to manually export form entries or collect data to share it with other people. It helps save time and reduces any errors that may occur when manually exporting data.
The best way to set up automation is by using Uncanny Automator. It is the best WordPress automation plugin and helps connect WordPress plugins and third-party apps.

You can follow our detailed guide on how to connect any WordPress forms to Google Sheets for more information.
We hope this article helped you learn how to export WordPress form entries to CSV and Excel. You may also want to see our ultimate guide on WordPress SEO, and our expert pick of the best WooCommerce plugins.
If you liked this article, then please subscribe to our YouTube Channel for WordPress video tutorials. You can also find us on Twitter and Facebook.
Disclosure: Our content is reader-supported. This means if you click on some of our links, then we may earn a commission. See how WPBeginner is funded, why it matters, and how you can support us.
Editorial Staff at WPBeginner is a team of WordPress experts led by Syed Balkhi with over 16 years of experience building WordPress websites. We have been creating WordPress tutorials since 2009, and WPBeginner has become the largest free WordPress resource site in the industry.
CSVs not cutting it? Wasting hours with manual data entry? You can now export WordPress form submissions to Excel with zero effort!
Data collection and analysis is one of the greatest necessary evils of all businesses. Looking at who is using your site and what information you have collected is a must when growing your site and building strategies. That information has to be presented in a way that’s easy to read and parse by the people that depend on that data. Getting it into that state can be a challenge.
The formatting of CSV exports often leave a lot to be desired. They can get clunky and hard to read, especially so the more information you have to share.
Excel is the obvious next answer. Trying to manually move data from form submissions into Excel can tie you up for hours each week, though.
There are plenty of plugins on WordPress.org, and plenty of paid plugins too, that offer this as a feature. You may have already tried a few and found the quality of what they can do… lacking.
Fortunately, there is an easy and organized way to export WordPress form submissions to Excel. One that won’t just not leave your data a garbled mess, but sort neatly into rows and columns exactly like you need it to. Find it below!
Do this to organize and export submissions from any WordPress form to an Excel spreadsheet.
This is as easy as installing the Excel Export add-on. Once you have Excel Export downloaded and installed, it is instantly ready to start exporting all of your data. There’s not even any addition steps to take on your forms. No additional fields to set up. Nothing to add to Emails & Actions. Any form data that has been submitted is ready to go! It couldn’t be easier!
Once installed, you can find Excel Export under the Ninja forms dashboard:

Selecting it will open the page where you can choose exactly what data you are after and looking to export.
From the Excel Export page, simply select from the drop down menus:
-
- What form you are needing to export into an Excel spreadsheet.
- Filter through the submissions of any one form for specific data (e.g. any submissions containing a specific email address, or response to a specific question on the form, etc)
- Which fields you want included or excluded.
- XLS or XLSX file types.

Once everything is set simply download the file and you are set!…unless you’re like me and don’t have Excel, but you can still save the file and upload it to a Google spreadsheet! Versatile and ready to share!

Get setup with Excel Export today and start saving countless hours that you can put to better things.
Excel Export is the fastest and easiest way to take your site data and place it in an easy to understand spreadsheet. You’ve already taken the time and effort to create your form and organize everything you need. You shouldn’t have to do that again once you export your data. Excel Export keeps everything sorted, sharable, and ready.
Comments are below. Have questions about a feature? Other data export headaches we can help you solve?
The formatting of CSV exports often leave a lot to be desired. They can get clunky and hard to read the more data you’re trying to export. Here’s a better way to export data from WordPress into an Excel spreadsheet!Click To Tweet
BE THE FIRST TO KNOW
Get exclusive content, tips and offers delivered straight to your inbox.
WordPress Export to Excel Made Simple
Pull your WordPress stats into Excel, with no coding, on a chosen schedule.


Why export WordPress posts and more to Excel
Enhance your WordPress stats
Use the power of Excel to get more out of your data. Export WordPress blog posts to Excel and compare what worked and what didn’t. Fetch other available data and demonstrate on charts the performance of your blog. Build traffic forecasts and analyze the marketing funnels with ease. Run content experiments and monitor the results.
Merge data from different marketing channels
Pull data from other apps, such as Hubspot, Salesforce, or Pipedrive, and merge it all together in an Excel workbook. Build dashboards demonstrating vital marketing metrics of your business and share them with your teammates. Compare the traffic sources, and analyze the conversion funnels. Have a better overview of what drives your business.
Visualize your WordPress data
Use the built-in Excel functions to group, filter, and transform your WordPress data. Build charts and customize them to your needs. Alternatively, plug your data into business intelligence tools, such as Microsoft Power BI or Tableau for advanced analysis. Use built-in AI capabilities to gain further insights into your content strategy.
What to fetch with WordPress export to Excel
01.
Summary
Get a daily, weekly, or monthly report on the performance of your blog. See the number of views and visitors, monitor the number of comments, and track the growth of the follower base.
02.
Top posts
From WordPress, export custom post type to Excel along with all the posts published on your site. Pull the corresponding stats for each and compare what worked well and what underperformed.
03.
Referrers
Get a complete list of sites referring traffic to your blog. Monitor mentions in the media and track the links on partner sites. Compare and monitor the traffic coming from common search engines.
04.
Outbound clicks
Keep track of each outbound link placed in your article. Control how much traffic you drive to external sites and use it to your advantage. Optimize the conversion with the clicks data.
How to connect WordPress to an external Excel file
-
Step 1. Pick WordPress as the source app for your import and connect your account
30 seconds
-
Step 2. Choose the type of data to import from WordPress
15 seconds
-
Step 3. Select Microsoft Excel as the destination app
10 seconds
-
Step 4. Connect your Microsoft account and choose the workbook for your import
30 seconds
-
Step 5. Decide on the schedule for automated data refresh and run the importer
25 seconds
Why export WordPress posts to Excel with Coupler.io
As a content manager, marketer, or growth specialist, you need an easy way to monitor how your blog performs. Plenty of stats are available in WordPress itself but the reporting capabilities are rather limited. To get the most out of the data, you want to fetch it outside of the platform for further analysis.
Pulling data from WordPress to Excel is a breeze with Coupler.io. It takes a few minutes to set up an importer. From then onwards, the data will be pulled automatically into your WordPress workbook, on a schedule you choose.
Forget about manual exports from WordPress. Automate the process with Coupler.io and always work with fresh data.
WordPress

Excel

Manage, Share, Analyze
Looking to import data from
Shopify,
Clockify,
Jira,
or any other app? Not a problem. Use Coupler.io to link a data source to Excel to automate workflows and leverage the power of spreadsheets across all your projects!


See more integrations
Focus on your business goals while we take care of your data
Try Coupler.io
I recently built a Customer Relationship Management system (CRM) for myself using WordPress. I had experimented with a few existing solutions like Salesforce and Sugar, but none worked for me. I spent about 10 minutes creating this solution (screenshot) with custom taxonomies and custom meta boxes. In a few months I might review it in more detail after using it for a while.
One feature I’d like to share now is my method of exporting to a spreadsheet. This technique should work for all of the major spreadsheet programs (Microsoft Excel, Google Docs, OpenOffice).
I knew I wanted a way to get my data into Excel for analyzing it, but didn’t want to figure out how to dynamically generate an .xls file. So an easy workaround is to render your content in a simple table, then copy/paste it into your spreadsheet.
Create the Template
First you’ll need to build a template page for the table (if you’re using Thesis see my note below). Here’s a start:
Instead of calling get_header(), which would’ve rendered the actual header, I called wp_head(), which is the hook that runs some essential WordPress code in the header. The goal here is to only display the table so you don’t get any extra text coming across to your spreadsheet.
Create a page called “Download”, set it to Private, and set the page template to Download. Now you’ll be able to see the results of your work on this page.
Before we build the loop that renders all the content, I like to put in the table headers. Inside <table> put the titles of all the fields you’d like exported like this:
Now for the code that actually lists the data. I’m going to do a simple query that just lists all posts. You could customize this query to do whatever you’d like (see query_posts in the Codex for options). You could even make a custom field on your Download page to define the query variables if you will be changing it often and don’t want to edit code.
Inside the <tr> you’ll put <td>’s for each of your variables. Here’s some tips:
- To list the value of a custom field, use
<td><?php echo get_post_meta($post->ID,'field_name',true);?></td>where field_name is the actual name of the field. - To display the publish date, use
<td><?php the_time('m.d.y');?></td> - To list the values of a custom taxonomy in a comma-separated list and without having it link to the taxonomy page, use
<td><?php $poc = get_the_terms( $post->ID, 'poc', '', ', ', '' ); $list = ''; if ($poc) { foreach ($poc as $data) $list .= $data->name.', '; echo $list; } ?></td>where ‘poc’ is the name of the taxonomy. You could just usethe_terms()but then you’ll have links in your spreadsheet. - To list the categories as a comma-separated list and without links, use
<td><?php $cats = get_the_category(', '); $list = ''; if ($cats) { foreach ($cats as $data) $list .= $data->cat_name.', '; echo $list; } ?></td> - To display the post content without having it break your table (which
the_content()would do), use<td><?php echo get_the_content();?></td>
That covers all the major types of data that I used. Let me know if I missed anything.
Using it with Thesis
Thesis is a little different, in that you can’t create template pages like normal themes. Based on Kristarella’s great post on Creating Thesis Squeeze and Landing Pages, I used filters to remove the header, sidebars, footer and headline area. I then created a function that rendered the table and attached it after the post content. Here’s the code to put in custom_functions.php (note that I excluded everything inside the table – that’s the same as the code above).
WordPress Development

Bill Erickson
Bill Erickson is a freelance WordPress developer and a contributing developer to the Genesis framework. For the past 14 years he has worked with attorneys, publishers, corporations, and non-profits, building custom websites tailored to their needs and goals.
Ready to upgrade your website?
I build custom WordPress websites that look great and are easy to manage.
Let’s Talk
I have created PHP scripts before to export a database table to .xls format like this:
$select = "SELECT * FROM tracking";
$export = mysql_query ( $select ) or die ( "Sql error : " . mysql_error( )  );
$fields = mysql_num_fields ( $export );
$file = 'export';
for ( $i = 0; $i < $fields; $i++ )
{
$header .= mysql_field_name( $export , $i ) . "t";
}
while( $row = mysql_fetch_row( $export ) )
{
$line = '';
foreach( $row as $value )
{
    if ( ( !isset( $value ) ) || ( $value == "" ) )
    {
        $value = "t";
    }
        else
    {
        $value = str_replace( '"' , '""' , $value );
        $value = '"' . $value . '"' . "t";
    }
        $line .= $value;
 }
 $data .= trim( $line ) . "n";
 }
 $data = str_replace( "r" , "" , $data );
 if ( $data == "" )
 {
 $data = "n(0) Records Found!n";
 }

$filename = $file."_".date("M-d-Y");

header("Content-type: application/octet-stream");
header( "Content-disposition: filename=".$filename.".xls");
header("Pragma: no-cache");
header("Expires: 0");
print "$headern$data";
What I’d like to know is how to «convert» this to wordpress format using the $wpdb class? I can get the initial query down to actually select the data from the table I want, but I get lost in some of the semantics of the wpdb class. I also wanted to know where I would put this code in wordpress, so if say a user clicks on a link, it would run this query and download the .xls file?
Any help is greatly appreciated! This site is great!
asked Feb 26, 2011 at 3:19
![]()
1
Why not use the SELECT INTO OUTFILE syntax:
$wpdb->query("SELECT * INTO OUTFILE '/path/to/file'
 FIELDS TERMINATED BY 't'
 LINES TERMINATED BY 'n'
 FROM tracking");
answered Feb 26, 2011 at 16:09
![]()
create this as a ‘export_data.php’ file.
Then call this php from the link
<?php
    $host = 'localhost';
    $user = 'mysqlUser';
    $pass = 'myUserPass';
    $db = 'myDatabase';
    $table = 'products_info';
    $file = 'export';

    $link = mysql_connect($host, $user, $pass) or die("Can not connect." . mysql_error());
mysql_select_db($db) or die("Can not connect.");

    $result = mysql_query("SHOW COLUMNS FROM ".$table."");
    $i = 0;
    if (mysql_num_rows($result) > 0) {
        while ($row = mysql_fetch_assoc($result)) {
            $csv_output .= $row['Field']."; ";
            $i++;
        }
    }
    $csv_output .= "n";

    $values = mysql_query("SELECT * FROM ".$table."");
    while ($rowr = mysql_fetch_row($values)) {
        for ($j=0;$j<$i;$j++) {
            $csv_output .= $rowr[$j]."; ";
        }
        $csv_output .= "n";
    }

    $filename = $file."_".date("Y-m-d_H-i",time());
    header("Content-type: application/vnd.ms-excel");
    header("Content-disposition: csv" . date("Y-m-d") . ".csv");
    header( "Content-disposition: filename=".$filename.".csv");
    print $csv_output;
    exit;
?>
![]()
xxx
2391 silver badge4 bronze badges
answered May 20, 2011 at 9:04
![]()
I am definitely late to help out with my answer .. I hope  , but I am aiming to anyone else who needs an updated WordPress function to export custom table to a nice and clean row display CSV file
    function ns_contact_form_csv_pull() {

       global $wpdb;

       $table = 'ns_contact_form';// table name
       $file = 'ns_contact_form_csv'; // csv file name
       $results = $wpdb->get_results("SELECT * FROM $wpdb->prefix$table",ARRAY_A );

       if(count($results) > 0){
          foreach($results as $result){
          $result = array_values($result);
          $result = implode(", ", $result);
          $csv_output .= $result."n";
        }
      }

      $filename = $file."_".date("Y-m-d_H-i",time());
      header("Content-type: application/vnd.ms-excel");
      header("Content-disposition: csv" . date("Y-m-d") . ".csv");
      header( "Content-disposition: filename=".$filename.".csv");
      print $csv_output;
      exit;

    }
   add_action('wp_ajax_csv_pull','ns_contact_form_csv_pull');
Download the CSV ( need to be logged in ) just add this URL to your browser http://example.com/wp-admin/admin-ajax.php?action=csv_pull … change domain with yours
You can call it anywhere in WordPress by using:
$ajax_url = admin_url('admin-ajax.php?action=csv_pull');
![]()
fuxia♦
106k35 gold badges249 silver badges448 bronze badges
answered Feb 24, 2017 at 0:21
![]()
3
If you have phpmyadmin, then just go to export and select Excel instead of SQL.
answered Feb 26, 2011 at 5:59
![]()
AshfameAshfame
3,6952 gold badges30 silver badges45 bronze badges
1
Something like this:
$results = $wpdb->get_results('SELECT * FROM tracking;');
See SELECT generic results in Codex for details.
Not sure on how to best implement link to this, page with custom named template might do the trick.
answered Feb 26, 2011 at 19:21
![]()
RarstRarst
98.7k10 gold badges153 silver badges292 bronze badges