
The ImportExcel is a PowerShell module that allows you import to or export data directly from Excel spreadsheets without having Microsoft Excel installed on your computer. In this tutorial, you’ll learn to work with Import-Excel and Export-Excel. The ImportExcel module runs on Windows, Linux, or Mac and now can be used in Azure functions and GitHub Actions. Simply put, if you need to generate reports for work, you must learn this module.
Contents
- Importing data from Excel
- Export data to Excel
- Adding data to an existing spreadsheet
- Exporting data with formatting
- Creating charts
- Editing existing data in an Excel spreadsheet
- Conclusion and links
- Author
- Recent Posts

Mike Kanakos is a Cloud and Datacenter Microsoft MVP, tech blogger and PowerShell community leader. He writes about infrastructure management and cloud automation. You can follow Mike on his blog https://www.commandline.ninja or on Twitter at @MikeKanakos.
Doug Finke, a Microsoft MVP since 2009, builds and maintains the module. Doug is constantly improving the module and releases new module updates frequently. As of this writing, the module is at v7.1.3 and is continually being developed. His module is nearing 1 million downloads since its first release! Installing the module is a simple task with PowerShell code.
Install-Module -Name ImportExcel
Excel is not required to be installed for this module to work. The module installs a .net DLL named epplus.dll that allows the module to import Excel data or export to Excel format. This allows you to install the module on a server without having to install Office on the server.
Importing data from Excel
Getting started with the module is very easy. Let’s start by importing some data from Excel. In this first demo, I’ll be importing some simple data I have from a table in Excel.

Sample Excel table data for import
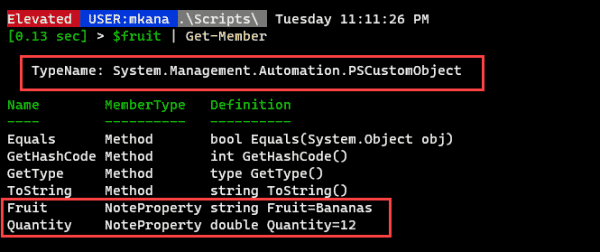
To import data, I use the Import-Excel cmdlet and specify the path. In this example, I will also save the data to a variable called «Fruit» for later use.
Import-Excel "c:tempExcelDemo.xlsx" -OutVariable Fruit

Excel data import in PowerShell
Now, we have a simple table with data organized in columns and rows. The table properties reveal that PowerShell has created a PSCustomObject with two note properties for the two columns.
Excel table properties
But what if I have a large table of data? I can specify which data gets imported without having to pull in the entire table. Let’s look at how that works.
I have created a new tab in my spreadsheet that contains all the process info from my machine. I have named the tab «Processes.» The spreadsheet has 69 columns of data. I could import all these columns and filter the data, but for this demonstration I just want the Name, ProcessName, CPU, and Memory columns.

Process info data in Excel
Using the Import-Excel cmdlet, I can pull in just the data I am interested in. Let’s pull in the columns I mentioned earlier (Name, ProcessName, CPU, and Memory). For this demo, I only want 6 rows of data. To accomplish this, I use the -ImportColumns, -StartRow and -EndRow parameters.
To pick the columns, I simply count columns from left to right in my spreadsheet starting at 1. I know you can’t see the full spreadsheet, but I have already counted out the columns that I need. To select the columns I want, I will need columns 1, 6, 12, and 46. But if I want to keep them in the order I mentioned above, then the order would have to be 1, 46, 12, and 6.
import-excel C:tempExcelDemo.xlsx -WorksheetName Processes -ImportColumns @(1, 46, 12, 6) -startrow 1 -endrow 7
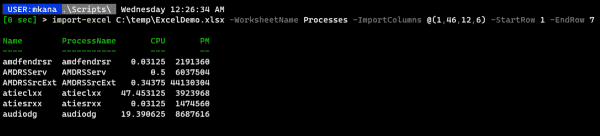
Process info imported into PowerShell
Export data to Excel
As with the process of importing data, I can also export data to Excel easily with just one line of code. Let’s go back to my previous example: getting the process data. If I want to export all the process info on my machine, all I need to do is type one line:
Get-process | Export-Excel
This results in the Export-Excel cmdlet creating a spreadsheet. If I have Excel installed, it launches Excel and presents the file output to me.

Exporting data to Excel using default values
Notice that I didn’t specify a filename or any other formatting information. However, the Export-Excel cmdlet created the spreadsheet and applied some default formatting (see callout 2) and created a temporary file for me (callout 1).
Of course, I can choose a filename and path on export, if I so desire, by using the -path parameter and inputting a value like so:
Get-process | Export-Excel C:tempProcessList.xlsx
Adding data to an existing spreadsheet
At some point, you will need to add data to an existing spreadsheet. The -Append parameter adds data to an existing spreadsheet. I can specify a worksheet to add to with the -worksheet parameter or I can start a new worksheet with the same parameter but picking a new tab name.
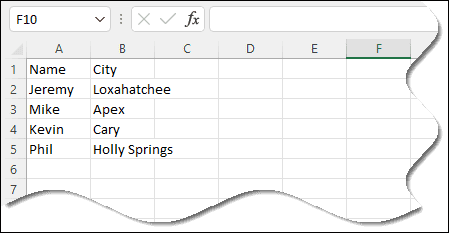
So far, I have been working on a spreadsheet named «ExcelDemo.xlsx,» which contains the Fruit and Processes worksheets. I want to add a new tab named «People» and copy in data from a small table I created.

Table of person and city info saved to the People variable
Exporting this data to my existing Excel spreadsheet and creating a new worksheet would look like this:
$People | Export-Excel c:tempExcelDemo.xlsx -Append -WorksheetName "People"
People table export
This is easy and doesn’t require much code. Below, we can see the worksheet tabs that have been created from Export-Excel.
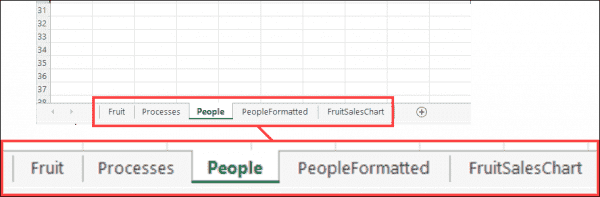
Excel worksheet tabs created by Export Excel
When you look at the table, you’ll see that it has none of the familiar Excel spreadsheet formatting. I would like to add some formatting to my data. Let me show you how this can be done.
Exporting data with formatting
The Export-Excel cmdlet offers many options for formatting my data on export. I’ll highlight a few options, but make sure you review the parameters available for the Export-Excel cmdlet for a full list of formatting options.
I would like to export the data again. This time, however, I will add a table style and a title for my table, and I would like the table title to be bold. This is possible with Export-Excel. The code used to do this is slightly different from the previous example:
$People | Export-Excel c:tempExcelDemo.xlsx -Append -WorksheetName "PeopleFormatted" -TableStyle Medium16 -title "Demo of Table Formatting" -TitleBold

Formatted version of the People table in Excel
You might wonder what the table style I selected (Medium16) in the last example is. The Export-Excel cmdlet has table styles built in that correspond to the table styles you see in Excel.

Export Excel table styles available
The table styles in Excel are the same. In the screen cap below, I clicked on the «Format As Table» at the top of the spreadsheet, which then displays the table styles. If you hover your mouse over a style, you’ll see some text that provides you the style details. The #1 callout is the style I hovered over. Notice that it says Medium16. This is how I got the name that I used in my previous code example for the table style parameter.
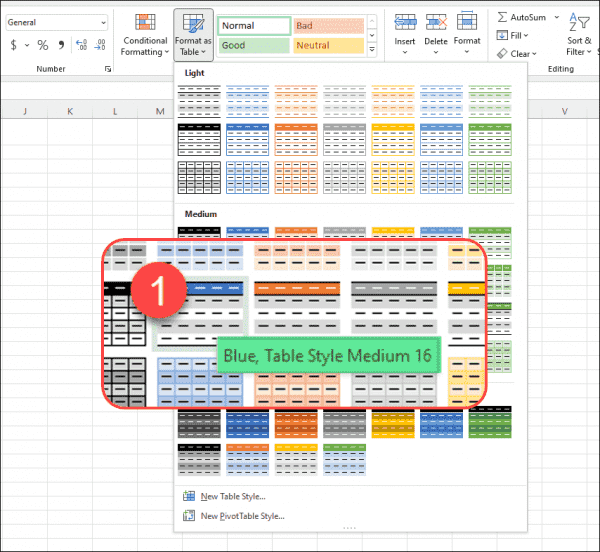
Corresponding Excel table styles
Creating charts
Export-Excel does more than just make spreadsheets. The cmdlet can export table data and turn that data into a chart inside an Excel spreadsheet. For my next example, I have created a table of some simple inventory items and sales data.

Sales data
I would like to chart these sales in a simple bar graph that depicts units sold. To do this, I need to define the properties I want for my table. To do this, I use the New-ExcelChartDefinition cmdlet.
$ChartData = New-ExcelChartDefinition -XRange Item -YRange TotalSold -ChartType ColumnClustered -Title "Total Fruit Sales"
This line of code defines my table properties, and it tells Excel what to use for the xValue in the chart. I first use the Item column, then, I define the yValue (I am using the TotalSold column). Then, I specify a chart type. There are 69 chart types available in the cmdlet, all of which correspond to the chart types in Excel. I chose the «ColumnClustered» type for my example.
I then add a chart title, although this is not required. These values are saved to a variable named $ChartData. The next piece to add to the export cmdlet is this chart definition:
$data | Export-Excel C:tempExcelDemo.xlsx -Append -WorksheetName FruitSalesChart -ExcelChartDefinition $ChartData -AutoNameRange -show -Title "Fruit Sales"
Let’s walk through this example. First, I send the $data variable to the Export-Excel cmdlet. The $data variable is our sales data. The syntax for Export-Excel is a continuation from my previous example. I export and append this to a spreadsheet named «ExcelDemo.xlsx.» I create new worksheet tab named FruitSalesChart. This is all code we saw in the previous examples.
Then, I am add in the chart definition I created earlier by calling the $ChartData variable. Finally, I tell Excel that I want an auto name range. The -show parameter auto opens the spreadsheet after I create it.

Fruit Sales exported to Excel as a table and chart
Editing existing data in an Excel spreadsheet
I find it so easy to export data from PowerShell to Excel that I default to the Export-Excel cmdlet for much of my work. However, you can also update individual data values in an existing spreadsheet. I will connect to the spreadsheet that I used in the previous examples. To connect, use the Open-ExcelPackage cmdlet.
$ExcelPkg = Open-ExcelPackage -Path "C:tempExcelDemo.xlsx"
I can start to work with the data after opening the file.

Spreadsheet info in PowerShell
The first five rows constitute the worksheet tabs I created earlier in the spreadsheet. I can view the data in any of the tabs with some simple code.
#Let's access the data in the "PeopleFormatted" worksheet
$WorkSheet = $ExcelPkg.Workbook.Worksheets["PeopleFormatted"].Cells
$WorkSheet[3,1] | select value

Value
-----
Jeremy

$WorkSheet[3,2] | select value

Value
-----
Loxahatchee
The code above probably doesn’t make much sense without a visual reference. Have a look at this screen cap below, which should help explain the code.
In the first code example, I called $WorkSheet[3,1] . If you look at the Excel spreadsheet, «3» represents the 3rd row. «1» represents the first column (starting from left of column A).
In the second code example, I called $WorkSheet[3,2] which is Row 3, Column2 (column B in spreadsheet).
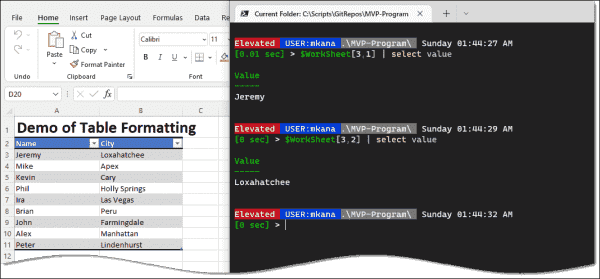
Example of accessing Excel data values
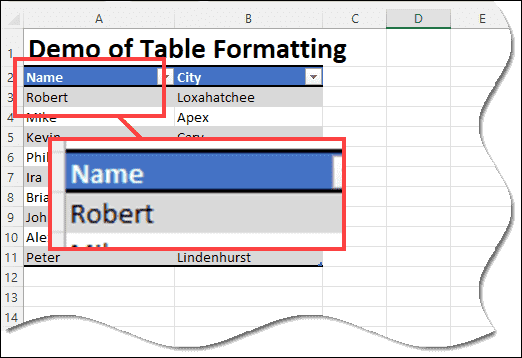
Inserting a new value into the Excel data cell is done with a similar set of code. I will replace the name «Jeremy» with the name «Robert».
$WorkSheet[3,1].Value = "Robert"

$WorkSheet[3,1] | select value

Value
-----
Robert
It’s that easy to update a field in Excel! However, there’s one catch. This change I just made is still in memory inside PowerShell. The file needs to «closed» for the data to be written back into the file.
Close-ExcelPackage $ExcelPkg
Updated spreadsheet value
Conclusion and links
Today, I showed you how to import data from an Excel spreadsheet, create a spreadsheet, create a simple chart, and manipulate the imported data in an existing Excel spreadsheet. The ImportExcel module makes these tasks and others operations simple to complete.
I have touched upon a just few of the many complex tasks you can perform with this module. If you would like to learn more, please visit Doug Finke’s GitHub page for many more examples of demo code you can try for yourself. He has a page dedicated to FAQs and a thorough analysis on examples that you should definitely check out.
Subscribe to 4sysops newsletter!
Many of the code examples in Doug’s module come from community members looking to use Excel in unique ways. If you have ideas for new ways to use his module, please submit a pull request to his repo so that others can learn from your use case.
![]()
I’m trying to export a complete CSV to Excel by using Powershell. I stuck at a point where static column names are used. But this doesn’t work if my CSV has generic unknown header names.
Steps to reproduce
Open your PowerShell ISE and copy & paste the following standalone code. Run it with F5
«C:Windowssystem32WindowsPowerShellv1.0powershell_ise.exe»
Get-Process | Export-Csv -Path $env:tempprocess.csv -NoTypeInformation

$processes = Import-Csv -Path $env:tempprocess.csv
$Excel = New-Object -ComObject excel.application
$workbook = $Excel.workbooks.add()

$i = 1
foreach($process in $processes)
{
 $excel.cells.item($i,1) = $process.name
 $excel.cells.item($i,2) = $process.vm
 $i++
}
Remove-Item $env:tempprocess.csv
$Excel.visible = $true
What it does
- The script will export a list of all active processes as a CSV to your temp folder. This file is only for our example. It could be any CSV with any data
- It reads in the newly created CSV and saves it under the
$processesvariable - It creates a new and empty Excel workbook where we can write data
- It iterates through all rows (?) and writes all values from the
nameandvmcolumn to Excel
My questions
- What if I don’t know the column headers? (In our example
nameandvm). How do I address values where I don’t know their header names? - How do I count how many columns a CSV has? (after reading it with
Import-Csv)
I just want to write an entire CSV to Excel with Powershell
asked Jul 16, 2013 at 23:09
![]()
nixdanixda
2,59711 gold badges48 silver badges82 bronze badges
Ups, I entirely forgot this question. In the meantime I got a solution.
This Powershell script converts a CSV to XLSX in the background
Gimmicks are
- Preserves all CSV values as plain text like
=B1+B2or0000001.
You don’t see#Nameor anything like that. No autoformating is done. - Automatically chooses the right delimiter (comma or semicolon) according to your regional setting
- Autofit columns
PowerShell Code
### Set input and output path
$inputCSV = "C:somefolderinput.csv"
$outputXLSX = "C:somefolderoutput.xlsx"

### Create a new Excel Workbook with one empty sheet
$excel = New-Object -ComObject excel.application
$workbook = $excel.Workbooks.Add(1)
$worksheet = $workbook.worksheets.Item(1)

### Build the QueryTables.Add command
### QueryTables does the same as when clicking "Data » From Text" in Excel
$TxtConnector = ("TEXT;" + $inputCSV)
$Connector = $worksheet.QueryTables.add($TxtConnector,$worksheet.Range("A1"))
$query = $worksheet.QueryTables.item($Connector.name)

### Set the delimiter (, or ;) according to your regional settings
$query.TextFileOtherDelimiter = $Excel.Application.International(5)

### Set the format to delimited and text for every column
### A trick to create an array of 2s is used with the preceding comma
$query.TextFileParseType  = 1
$query.TextFileColumnDataTypes = ,2 * $worksheet.Cells.Columns.Count
$query.AdjustColumnWidth = 1

### Execute & delete the import query
$query.Refresh()
$query.Delete()

### Save & close the Workbook as XLSX. Change the output extension for Excel 2003
$Workbook.SaveAs($outputXLSX,51)
$excel.Quit()
![]()
answered Jan 16, 2014 at 18:01
![]()
nixdanixda
2,59711 gold badges48 silver badges82 bronze badges
7
I am using excelcnv.exe to convert csv into xlsx and that seemed to work properly.
You will have to change the directory to where your excelcnv is. If 32 bit, it goes to Program Files (x86)
Start-Process -FilePath 'C:Program FilesMicrosoft OfficerootOffice16excelcnv.exe' -ArgumentList "-nme -oice ""$xlsFilePath"" ""$xlsToxlsxPath"""
answered May 16, 2019 at 0:06
![]()
WinstonKyuWinstonKyu
2012 silver badges9 bronze badges
4
Why would you bother? Load your CSV into Excel like this:
$csv = Join-Path $env:TEMP "process.csv"
$xls = Join-Path $env:TEMP "process.xlsx"

$xl = New-Object -COM "Excel.Application"
$xl.Visible = $true

$wb = $xl.Workbooks.OpenText($csv)

$wb.SaveAs($xls, 51)
You just need to make sure that the CSV export uses the delimiter defined in your regional settings. Override with -Delimiter if need be.
Edit: A more general solution that should preserve the values from the CSV as plain text. Code for iterating over the CSV columns taken from here.
$csv = Join-Path $env:TEMP "input.csv"
$xls = Join-Path $env:TEMP "output.xlsx"

$xl = New-Object -COM "Excel.Application"
$xl.Visible = $true

$wb = $xl.Workbooks.Add()
$ws = $wb.Sheets.Item(1)

$ws.Cells.NumberFormat = "@"

$i = 1
Import-Csv $csv | ForEach-Object {
  $j = 1
  foreach ($prop in $_.PSObject.Properties) {
    if ($i -eq 1) {
      $ws.Cells.Item($i, $j++).Value = $prop.Name
    } else {
      $ws.Cells.Item($i, $j++).Value = $prop.Value
    }
  }
  $i++
}

$wb.SaveAs($xls, 51)
$wb.Close()

$xl.Quit()
[System.Runtime.Interopservices.Marshal]::ReleaseComObject($xl)
Obviously this second approach won’t perform too well, because it’s processing each cell individually.
answered Jul 16, 2013 at 23:49
![]()
Ansgar WiechersAnsgar Wiechers
190k23 gold badges244 silver badges319 bronze badges
8
This topic really helped me, so I’d like to share my improvements.
All credits go to the nixda, this is based on his answer.
For those who need to convert multiple csv’s in a folder, just modify the directory. Outputfilenames will be identical to input, just with another extension.
Take care of the cleanup in the end, if you like to keep the original csv’s you might not want to remove these.
Can be easily modifed to save the xlsx in another directory.
$workingdir = "C:data*.csv"
$csv = dir -path $workingdir
foreach($inputCSV in $csv){
$outputXLSX = $inputCSV.DirectoryName + "" + $inputCSV.Basename + ".xlsx"
### Create a new Excel Workbook with one empty sheet
$excel = New-Object -ComObject excel.application
$excel.DisplayAlerts = $False
$workbook = $excel.Workbooks.Add(1)
$worksheet = $workbook.worksheets.Item(1)

### Build the QueryTables.Add command
### QueryTables does the same as when clicking "Data » From Text" in Excel
$TxtConnector = ("TEXT;" + $inputCSV)
$Connector = $worksheet.QueryTables.add($TxtConnector,$worksheet.Range("A1"))
$query = $worksheet.QueryTables.item($Connector.name)

### Set the delimiter (, or ;) according to your regional settings
### $Excel.Application.International(3) = ,
### $Excel.Application.International(5) = ;
$query.TextFileOtherDelimiter = $Excel.Application.International(5)

### Set the format to delimited and text for every column
### A trick to create an array of 2s is used with the preceding comma
$query.TextFileParseType  = 1
$query.TextFileColumnDataTypes = ,2 * $worksheet.Cells.Columns.Count
$query.AdjustColumnWidth = 1

### Execute & delete the import query
$query.Refresh()
$query.Delete()

### Save & close the Workbook as XLSX. Change the output extension for Excel 2003
$Workbook.SaveAs($outputXLSX,51)
$excel.Quit()
}
## To exclude an item, use the '-exclude' parameter (wildcards if needed)
remove-item -path $workingdir -exclude *Crab4dq.csv
answered Aug 30, 2016 at 12:24
![]()
obiwankobanobiwankoban
1432 silver badges6 bronze badges
3
If you want to convert CSV to Excel without Excel being installed, you can use the great .NET library EPPlus (under LGPL license) to create and modify Excel Sheets and also convert CSV to Excel really fast!
Preparation
- Download the latest stable EPPlus version
- Extract EPPlus to your preferred location (e.g. to
$HOMEDocumentsWindowsPowerShellModulesEPPlus) - Right Click EPPlus.dll, select Properties and at the bottom of the General Tab click «Unblock» to allow loading of this dll. If you don’t have the rights to do this, try
[Reflection.Assembly]::UnsafeLoadFrom($DLLPath) | Out-Null
Detailed Powershell Commands to import CSV to Excel
# Create temporary CSV and Excel file names
$FileNameCSV = "$HOMEDownloadstest.csv"
$FileNameExcel = "$HOMEDownloadstest.xlsx"

# Create CSV File (with first line containing type information and empty last line)
Get-Process | Export-Csv -Delimiter ';' -Encoding UTF8 -Path $FileNameCSV

# Load EPPlus
$DLLPath = "$HOMEDocumentsWindowsPowerShellModulesEPPlusEPPlus.dll"
[Reflection.Assembly]::LoadFile($DLLPath) | Out-Null

# Set CSV Format
$Format = New-object -TypeName OfficeOpenXml.ExcelTextFormat
$Format.Delimiter = ";"
# use Text Qualifier if your CSV entries are quoted, e.g. "Cell1","Cell2"
$Format.TextQualifier = '"'
$Format.Encoding = [System.Text.Encoding]::UTF8
$Format.SkipLinesBeginning = '1'
$Format.SkipLinesEnd = '1'

# Set Preferred Table Style
$TableStyle = [OfficeOpenXml.Table.TableStyles]::Medium1

# Create Excel File
$ExcelPackage = New-Object OfficeOpenXml.ExcelPackage
$Worksheet = $ExcelPackage.Workbook.Worksheets.Add("FromCSV")

# Load CSV File with first row as heads using a table style
$null=$Worksheet.Cells.LoadFromText((Get-Item $FileNameCSV),$Format,$TableStyle,$true)

# Load CSV File without table style
#$null=$Worksheet.Cells.LoadFromText($file,$format)

# Fit Column Size to Size of Content
$Worksheet.Cells[$Worksheet.Dimension.Address].AutoFitColumns()

# Save Excel File
$ExcelPackage.SaveAs($FileNameExcel)

Write-Host "CSV File $FileNameCSV converted to Excel file $FileNameExcel"
answered Dec 29, 2014 at 15:37
![]()
Florian FeldhausFlorian Feldhaus
5,4322 gold badges39 silver badges45 bronze badges
1
This is a slight variation that worked better for me.
$csv = Join-Path $env:TEMP "input.csv"
$xls = Join-Path $env:TEMP "output.xlsx"

$xl = new-object -comobject excel.application
$xl.visible = $false
$Workbook = $xl.workbooks.open($CSV)
$Worksheets = $Workbooks.worksheets

$Workbook.SaveAs($XLS,1)
$Workbook.Saved = $True

$xl.Quit()
answered Jan 16, 2014 at 16:04
![]()
mackmack
2,6238 gold badges39 silver badges66 bronze badges
2
I had some problem getting the other examples to work.
EPPlus and other libraries produces OpenDocument Xml format, which is not the same as you get when you save from Excel as xlsx.
macks example with open CSV and just re-saving didn’t work, I never managed to get the ‘,’ delimiter to be used correctly.
Ansgar Wiechers example has some slight error which I found the answer for in the commencts.
Anyway, this is a complete working example. Save this in a File CsvToExcel.ps1
param (
[Parameter(Mandatory=$true)][string]$inputfile,
[Parameter(Mandatory=$true)][string]$outputfile
)

$excel = New-Object -ComObject Excel.Application
$excel.Visible = $false

$wb = $excel.Workbooks.Add()
$ws = $wb.Sheets.Item(1)

$ws.Cells.NumberFormat = "@"

write-output "Opening $inputfile"

$i = 1
Import-Csv $inputfile | Foreach-Object {
    $j = 1
    foreach ($prop in $_.PSObject.Properties)
    {
        if ($i -eq 1) {
            $ws.Cells.Item($i, $j) = $prop.Name
        } else {
            $ws.Cells.Item($i, $j) = $prop.Value
        }
        $j++
    }
    $i++
}

$wb.SaveAs($outputfile,51)
$wb.Close()
$excel.Quit()
write-output "Success"
Execute with:
.CsvToExcel.ps1 -inputfile "C:TempXdata.csv" -outputfile "C:TempXdata.xlsx"
answered May 22, 2016 at 14:04
![]()
Gil RoittoGil Roitto
3252 silver badges8 bronze badges
I found this while passing and looking for answers on how to compile a set of csvs into a single excel doc with the worksheets (tabs) named after the csv files. It is a nice function. Sadly, I cannot run them on my network  so i do not know how well it works.
Function Release-Ref ($ref)
{
    ([System.Runtime.InteropServices.Marshal]::ReleaseComObject(
    [System.__ComObject]$ref) -gt 0)
    [System.GC]::Collect()
    [System.GC]::WaitForPendingFinalizers()
    }
    Function ConvertCSV-ToExcel
    {
    <#
    .SYNOPSIS
    Converts     one or more CSV files into an excel file.

    .DESCRIPTION
    Converts one or more CSV files into an excel file. Each CSV file is imported into its own worksheet with the name of the
    file being the name of the worksheet.

    .PARAMETER inputfile
    Name of the CSV file being converted

    .PARAMETER output
    Name of the converted excel file

    .EXAMPLE
    Get-ChildItem *.csv | ConvertCSV-ToExcel -output ‘report.xlsx’

    .EXAMPLE
    ConvertCSV-ToExcel -inputfile ‘file.csv’ -output ‘report.xlsx’

    .EXAMPLE
    ConvertCSV-ToExcel -inputfile @(“test1.csv”,”test2.csv”) -output ‘report.xlsx’

    .NOTES
    Author:     Boe Prox
    Date Created: 01SEPT210
    Last Modified:

    #>

    #Requires -version 2.0
    [CmdletBinding(
    SupportsShouldProcess = $True,
    ConfirmImpact = ‘low’,
    DefaultParameterSetName = ‘file’
    )]
    Param (
    [Parameter(
    ValueFromPipeline=$True,
    Position=0,
    Mandatory=$True,
    HelpMessage=”Name of CSV/s to import”)]
    [ValidateNotNullOrEmpty()]
    [array]$inputfile,
    [Parameter(
    ValueFromPipeline=$False,
    Position=1,
    Mandatory=$True,
    HelpMessage=”Name of excel file output”)]
    [ValidateNotNullOrEmpty()]
    [string]$output
    )

    Begin {
    #Configure regular expression to match full path of each file
    [regex]$regex = “^w:\”

    #Find the number of CSVs being imported
    $count = ($inputfile.count -1)

    #Create Excel Com Object
    $excel = new-object -com excel.application

    #Disable alerts
    $excel.DisplayAlerts = $False

    #Show Excel application
    $excel.V    isible = $False

    #Add workbook
    $workbook = $excel.workbooks.Add()

    #Remove other worksheets
    $workbook.worksheets.Item(2).delete()
    #After the first worksheet is removed,the next one takes its place
    $workbook.worksheets.Item(2).delete()

    #Define initial worksheet number
    $i = 1
    }

    Process {
    ForEach ($input in $inputfile) {
    #If more than one file, create another worksheet for each file
    If ($i -gt 1) {
    $workbook.worksheets.Add() | Out-Null
    }
    #Use the first worksheet in the workbook (also the newest created worksheet is always 1)
    $worksheet = $workbook.worksheets.Item(1)
    #Add name of CSV as worksheet name
    $worksheet.name = “$((GCI $input).basename)”

    #Open the CSV file in Excel, must be converted into complete path if no already done
    If ($regex.ismatch($input)) {
    $tempcsv = $excel.Workbooks.Open($input)
    }
    ElseIf ($regex.ismatch(“$($input.fullname)”)) {
    $tempcsv = $excel.Workbooks.Open(“$($input.fullname)”)
    }
    Else {
    $tempcsv = $excel.Workbooks.Open(“$($pwd)$input”)
    }
    $tempsheet = $tempcsv.Worksheets.Item(1)
    #Copy contents of the CSV file
    $tempSheet.UsedRange.Copy() | Out-Null
    #Paste contents of CSV into existing workbook
    $worksheet.Paste()

    #Close temp workbook
    $tempcsv.close()

    #Select all used cells
    $range = $worksheet.UsedRange

    #Autofit the columns
    $range.EntireColumn.Autofit() | out-null
    $i++
    }
    }

    End {
    #Save spreadsheet
    $workbook.saveas(“$pwd$output”)

    Write-Host -Fore Green “File saved to $pwd$output”

    #Close Excel
    $excel.quit()

    #Release processes for Excel
    $a = Release-Ref($range)
    }
}
![]()
answered Oct 14, 2020 at 13:44
![]()
1
I have found the custom lists in a particular site and I want to print the names to Excel. How do I do it?
![]()
asked Jun 16, 2014 at 11:27
![]()
2
Use the following Command:
$spWeb = Get-SPWeb SiteUrl
$spWeb.Lists | select Title | Export-CSV c:Lists.csv
answered Jun 16, 2014 at 11:39
![]()
AanchalAanchal
7,8651 gold badge14 silver badges20 bronze badges
You can pipe the output from your command to an .csv file:
FileToExecute.ps1 | Out-File C:output.csv
Make sure you in your script file uses Write-Outputand not Write-Host when printing your output.
answered Jun 16, 2014 at 11:31
![]()
Robert LindgrenRobert Lindgren
24.5k12 gold badges52 silver badges79 bronze badges
0
You can export any output of the powershell to a CSV. This is a built in function.
Export-CSV
answered Jun 16, 2014 at 11:31
![]()
Stefan BauerStefan Bauer
2,74615 silver badges19 bronze badges
Try if this works:
Install-Module importexcel
If it works, then after that you can use export-excel command.
![]()
Ganesh Sanap
37.1k19 gold badges30 silver badges54 bronze badges
answered Jan 22, 2021 at 9:56
![]()
You wanna use the Export-Csv parameter. I also found this easy example.
SharePoint list to .csv file
Export-Csv
$MyWeb = WebUrl
$MyList = MyWeb.Lists["ListName"]
$MyItems = $MyList.Items
$MyItems | Select Fields.. | Export-Csv -path C:exampleexcel.csv
$MyWeb.Dispose()
answered Jun 16, 2014 at 11:34
![]()
ChristofferChristoffer
9,5712 gold badges35 silver badges53 bronze badges
Using the Export-CSV as usual way we can export the SharePoint list items to a csv file, and using the below code we can convert the particular csv file to excel file:
### Set input and output path
$inputCSV = "C:somefolderinput.csv"
$outputXLSX = "C:somefolderoutput.xlsx"

### Create a new Excel Workbook with one empty sheet
$excel = New-Object -ComObject excel.application
$workbook = $excel.Workbooks.Add(1)
$worksheet = $workbook.worksheets.Item(1)

### Build the QueryTables.Add command
### QueryTables does the same as when clicking "Data » From Text" in Excel
$TxtConnector = ("TEXT;" + $inputCSV)
$Connector = $worksheet.QueryTables.add($TxtConnector,$worksheet.Range("A1"))
$query = $worksheet.QueryTables.item($Connector.name)

### Set the delimiter (, or ;) according to your regional settings
$query.TextFileOtherDelimiter = $Excel.Application.International(5)

### Set the format to delimited and text for every column
### A trick to create an array of 2s is used with the preceding comma
$query.TextFileParseType  = 1
$query.TextFileColumnDataTypes = ,2 * $worksheet.Cells.Columns.Count
$query.AdjustColumnWidth = 1

### Execute & delete the import query
$query.Refresh()
$query.Delete()

### Save & close the Workbook as XLSX. Change the output extension for Excel 2003
$Workbook.SaveAs($outputXLSX,51)
$excel.Quit()
Reference URL:
How to export a CSV to Excel using Powershell
Note:
- There is no direct inbuilt function to export in excel using PowerShell as like Export-CSV, so first we need to export to csv file, then we have to convert that file to excel.
answered Jan 14, 2020 at 18:19
![]()
SP 2022SP 2022
3,9432 gold badges10 silver badges25 bronze badges
As of now, there is no built-in command like CSV (Export-CSV) to export output to the excel file but we can use the Out-File command to export data to excel or any other file format.
Let’s use Out-File to export the output of the Get-Processes command to an excel file.
Get-Process | Out-File C:Tempprocesses.xls
The above command will get all the running processes on the local system to the excel file. Let’s check the output of the excel file. You can see that the output is not in the proper excel format.

One other way is to install the ImportExcel module for excel. It is a very popular module to work with excel files.
To install the ImportExcel module, you need to run the below command to get it installed from the PowerShell gallery.
Install-Module ImportExcel -AllowClobber -Force
Once you install it, you need to import the module in the current PowerShell session if not imported.
Get-Module ImportExcel -ListAvailable | Import-Module -Force -Verbose
Once you have this module loaded in PowerShell, you can run the below command to export output into the excel format.
Get-Process | Export-Excel -Path C:TempProcesses.xlsx
Output
Содержание
- PowerShell and Excel: Seize the Power!
- Prerequisites
- Installing the ImportExcel Module
- Using PowerShell and Excel to Export to a Worksheet
- Using PowerShell to Import to Excel
- Using PowerShell to Get (and Set) Excel Cell Values
- Converting Worksheets to CSV Files with PowerShell and Excel
- Converting Multiple Worksheets
- Conclusion
- More from ATA Learning & Partners
- Recommended Resources!
- Get Paid to Write!
- ATA Learning Guidebooks
- Экспорт данных из оболочки Windows PowerShell в Excel
PowerShell and Excel: Seize the Power!
Published:22 December 2019 — 5 min. read
Read more tutorials by Adam Bertram!
Table of Contents
Microsoft Excel is one of those ubiquitous tools most of us can’t escape even if we tried. Many IT professionals use Excel as a little database storing tons of data in various automation routines. What’s the best scenario for automation and Excel? PowerShell and Excel!
Excel spreadsheets have always been notoriously hard to script and automate. Unlike its less-featured (and simpler) CSV file counterpart, Excel workbooks aren’t just simple text files. Excel workbooks required PowerShell to manipulate complicated Component Object Model (COM) objects thus you had to have Excel installed. Not anymore.
Thankfully, an astute PowerShell community member, Doug Finke, created a PowerShell module called ImportExcel for us mere mortals. The ImportExcel module abstracts away all of that complexity. It makes it possible to easily manage Excel workbooks and get down to PowerShell scripting!
In this article, let’s explore what you can do with PowerShell and Excel using the ImportExcel module and a few popular use cases.
Prerequisites
When running the ImportExcel module on a Windows system, no separate dependencies are necessary. However, if you’re working on macOS, you will need to install the mono-libgdiplus package using brew install mono-libgdiplus . All examples in this article will be built using macOS but all examples should work cross-platform.
If you’re using macOS, be sure to restart your PowerShell session before continuing.
Installing the ImportExcel Module
Start by downloading and installing the module via the PowerShell Gallery by running Install-Module ImportExcel -Scope CurrentUser . After a few moments, you’ll be good to go.
Using PowerShell and Excel to Export to a Worksheet
You may be familiar with the standard PowerShell cmdlets Export-Csv and Import-Csv . These cmdlets allow you to read and export PowerShell objects to CSV files. Unfortunately, there’s no Export-Excel and Import-Excel cmdlets. But using the ImportExcel module, you can build your own functionality.
One of the most common requests a sysadmin has is exporting PowerShell objects to an Excel worksheet. Using the Export-Excel cmdlet in the ImportExcel module, you can easily make it happen.
For example, perhaps you need to find some processes running on your local computer and get them into an Excel workbook.
The Export-Excel cmdlet accepts any object exactly the way Export-Csv does. You can pipe any kind of object to this cmdlet.
To find processes running on a system with PowerShell, use the Get-Process cmdlet which returns each running process and various information about each process. To export that information to Excel, use the Export-Excel cmdlet providing the file path to the Excel workbook that will be created. You can see an example of the command and screenshot of the Excel file generated below.
Congrats! You’ve now exported all the information just like Export-Csv but, unlike Export-Csv , we can make this data a lot fancier. Let’s make sure the worksheet name is called Processes, the data is in a table and rows are auto-sized.
By using the AutoSize switch parameter to autosize all rows, TableName to specify the name of the table that will include all the data and the WorksheetName parameter name of Processes, you can see in the screenshot below what can be built.
The Export-Excel cmdlet has a ton of parameters you can use to create Excel workbooks of all kinds. For a full rundown on everything Export-Excel can do, run Get-Help Export-Excel .
Using PowerShell to Import to Excel
So you’ve exported some information to a file called processes.xlsx in the previous section. Perhaps now you need to move this file to another computer and import/read this information with PowerShell and Excel. No problem. You have Import-Excel at your disposal.
At its most basic usage, you only need to provide the path to the Excel document/workbook using the Path parameter as shown below. You’ll see that it reads the first worksheet, in this case, the Processes worksheet, and returns PowerShell objects.
Maybe you have multiple worksheets in an Excel workbook? You can read a particular worksheet using the WorksheetName parameter.
Do you need to only read certain columns from the Excel worksheet? Use the HeaderName parameter to specify only those parameters you’d like to read.
The Import-Excel cmdlet has other parameters you can use to read Excel workbooks of all kinds. For a full rundown on everything Import-Excel can do, run Get-Help Import-Excel .
Using PowerShell to Get (and Set) Excel Cell Values
You now know how to read an entire worksheet with PowerShell and Excel but what if you only need a single cell value? You technically could use Import-Excel and filter out the value you need with Where-Object but that wouldn’t be too efficient.
Instead, using the Open-ExcelPackage cmdlet, you can “convert” an Excel workbook into a PowerShell object which can then be read and manipulated. To find a cell value, first, open up the Excel workbook to bring it into memory.
The Open-ExcelPackage is similar to using New-Object -comobject excel.application if working directly with COM objects.
Next, pick the worksheet inside of the workbook.
This process is similar to the COM object way of opening workbooks with excel.workbooks.open .
Once you have the worksheet assigned to a variable, you can now drill down to individual rows, columns, and cells. Perhaps you need to find all cell values in the A1 row. You simply need to reference the Cells property providing an index of A1 as shown below.
You can also change the value of cells in a worksheet by assigning a different value eg. $worksheet.Cells[‘A1’] = ‘differentvalue’
Once in memory, it’s important to release the Excel package using the Close-ExcelPackage cmdlet.
Converting Worksheets to CSV Files with PowerShell and Excel
Once you have the contents of an Excel worksheet represented via PowerShell objects, “converting” Excel worksheets to CSV simply requires sending those objects to the Export-Csv cmdlet.
Using the processes.xlsx workbook created earlier, read the first worksheet which gets all of the data into PowerShell objects, and then export those objects to CSV using the command below.
If you now open up the resulting CSV file, you’ll see the same data inside of the Processes worksheet (in this example).
Converting Multiple Worksheets
If you have an Excel workbook with multiple worksheets, you can also create a CSV file for each worksheet. To do so, you can find all the sheets in a workbook using the Get-ExcelSheetInfo cmdlet. Once you have the worksheet names, you can then pass those names to the WorksheetName parameter and also use the sheet name as the name of the CSV file.
Below you can the example code needed using PowerShell and Excel.
Conclusion
Using PowerShell and Excel, you can import, export, and manage data in Excel workbooks exactly like you would CSVs without having to install Excel!
In this article, you learned the basics of reading and writing data in an Excel workbook but this just scratches the surface. Using PowerShell and the ImportExcel module, you can create charts, pivot tables, and leverage other powerful features of Excel!
Hate ads? Want to support the writer? Get many of our tutorials packaged as an ATA Guidebook.
More from ATA Learning & Partners

Recommended Resources!
Recommended Resources for Training, Information Security, Automation, and more!

Get Paid to Write!
ATA Learning is always seeking instructors of all experience levels. Regardless if you’re a junior admin or system architect, you have something to share. Why not write on a platform with an existing audience and share your knowledge with the world?

ATA Learning Guidebooks
ATA Learning is known for its high-quality written tutorials in the form of blog posts. Support ATA Learning with ATA Guidebook PDF eBooks available offline and with no ads!
Источник
Экспорт данных из оболочки Windows PowerShell в Excel


 Посетителей: 9805 | Просмотров: 15298 (сегодня 0) Шрифт:

![]()
Через сорок минут мы наконец-то добрались до красивого ресторана с видом на гавань Сиднея и на здание оперного театра, блестящее, как огромная морская раковина, выброшенная волной на разноцветный пляж. Мост через гавань, самый длинный в мире безопорный пролет, скрепляет два полуострова вместе подобно тому, как массивная скоба держит две изогнутые доски.
Дома в Америке 40 минут ходьбы считаются не короткой прогулкой перед ужином, а полноценной ежедневной тренировкой с пятнадцатиминутной разминкой перед ней.
Одна из причин, по которым вашему сценаристу так понравилась эта поездка, — это совсем другой взгляд на жизнь, который я увидел у моих австралийских коллег. Их уникальный взгляд на жизнь часто противоречил моим заранее сложившимся представлениям.
Разрабатывая скрипты, легко попасть в привычную колею и пользоваться только проверенными жизнью методами. Надо сказать, что довольно часто требуется просто получать одни и те же результаты, используя один и тот же подход.
Рассмотрим, например, задачу мониторинга. Оболочка Windows PowerShell позволяет легко получить моментальный снимок процессов, запущенных на вашем компьютере. С помощью командлета Get-Process получается удобный отсортированный набор выходных данных, как показано на рис. 1.
Рис. 1 Список процессов, запущенных на компьютере, полученный с помощью командлета Get-Process
С помощью командлета Get-Process во многих случаях можно получить полезные результаты: количество открытых дескрипторов, пару разных представлений расхода памяти и картину использования центрального процессора. Когда же выйдет версия оболочки Windows PowerShell 2.0, командлету Get-Process можно будет передавать параметр –computername, что позволит получать такую же информацию с удаленного компьютера. Кому со всей этой информацией может понадобиться исследовать что-то еще?
Проблема заключается в том, что эти длинные столбцы данных часто маскируют все действительно важные детали. И хотя в будущей версии Windows PowerShell 2.0 будет поддерживать параметр –computername, в настоящее время сетевому администратору не предоставлено никаких дополнительных возможностей. В результате для того, чтобы наблюдать за состоянием удаленных систем и представлять информацию в пригодном для использования виде, приходится использовать инструментарий WMI, в частности, класс Win32_Process. Если вам казался достаточным объем данных, получаемых с помощью команды Get-Process, то посмотрите на выходные данных класса Win32_Process, которые показаны на рис. 2.
Рис. 2 Просмотр информации о процессах с помощью инструментария WMI
Что же делать бедному сетевому администратору, если все, чего он хочет — это получить удобный для понимания отчет об использовании памяти? Прежде всего — отказаться от стереотипов мышления, выйти из своей оболочки и овладеть мастерством автоматизации Excel. Почти наверняка на вашем компьютере установлен Microsoft Office Excel. Вы, как и мы, не являетесь экспертом по работе в нем, но Excel — это часть системы Microsoft Office, которую можно использовать для своих задач.
Насколько тяжело автоматизировать Excel? Как выясняется, довольно просто: корпорация Майкрософт создала модель автоматизации специально для работы с Excel. Код программы — Excel.Application, который является COM-объектом. Когда создается экземпляр объекта Excel.Application, то запускается Excel, который по умолчанию остается невидимым; тем не менее, его можно сделать видимым при помощи свойства visible.
Приведенный ниже код создает объект Excel.Application, выводит на экран значение свойства visible, а затем присваивает ему значение $true:
Проделав это, на экране появится приложение Excel довольно странного вида, напоминающее скорее пустую оболочку вместо привычного вида Excel (см. рис. 3). В нем нет ни рабочих книг, ни листов электронной таблицы — ничего, только голый Excel.
Рис. 3 Голый Excel — без рабочих книг и электронных таблиц
К запущенному приложению нужно добавить рабочую книгу. Воспользуемся методом Add объекта «Рабочая книга». К объекту «Рабочая книга» можно обратиться из объекта Excel.Application object, и, как видно из приведенного кода, полученный объект сохраняется в переменную $workbook:
Теперь нужно получить ссылку на какую-нибудь нужную нам электронную таблицу. Когда к Excel добавляется рабочая книга, то в ней по умолчанию создаются три электронных таблицы. К ним можно обратиться по номеру. В данной строчке кода будет получена и сохранена в переменной $sheet ссылка на первую электронную таблицу:
Теперь электронную таблицу можно заполнять данными. В электронных таблицах Excel информация хранится в ячейках. Ячейки находятся в таблице, следовательно, для доступа к необходимой ячейке нужно воспользоваться объектом, сохраненным в переменной $sheet. Для доступа к ячейкам вместо ссылок на столбец и строку применяются индексы. В приложении Excel строки обозначаются числами, а столбцы — буквами. В модели автоматизации числами обозначаются и столбцы, и строки. Первое число указывает на строку, второе — на столбец. Записать данные в ячейку можно простым присваиванием значения нужной ячейке:
После того как к Excel.Application была добавлена рабочая книга, а в ячейку помещены данные, приложение Excel выглядит так: рис. 4.
Рис. 4 Присвоение значения ячейке
Теперь с помощью всех этих знаний давайте попробуем сделать что-нибудь полезное. Соберем информацию о работающих процессах посредством инструментария WMI, запишем названия процессов и занимаемую ими память в электронную таблицу Excel, а затем построим диаграмму, чтобы наглядно показать использование памяти. Именно это делает скрипт WriteProcessInformationToExcel.ps1. Полный текст скрипта находится на веб-сайте журнала TechNet.
Наш скрипт начинается вызовом командлета Get-WmiObject, с помощью которого собирается информация о процессах. Для доступа к ней используется класс инструментария WMI Win32_Process, а полученные данные сохраняются в переменную $processes:
Затем создается экземпляр объекта Excel.Application, ссылка на него сохраняется в переменной $excel, приложение Excel становится видимым и к нему добавляется рабочая книга. Обычно эти шаги выполняются при любой автоматизации Excel. Вот соответствующий код:
В автоматизации Excel неудобно то, что вместе с каждой рабочей книгой всегда создается три электронных таблицы. В нашем случае это приводит к бессмысленной трате ресурсов, потому что нам нужна всего лишь одна таблица, а не три, да и ту мы задействуем лишь частично. К счастью, модель автоматизации Excel позволяет просто стереть ненужные электронные таблицы; для этого нужно получить ссылку на третью таблицу из коллекции открытых листов и вызвать метод delete. Вторая электронная таблица удаляется так же:
Теперь переименуем оставшуюся таблицу. Дело в том, что если вы решите использовать объекты данных ActiveX (ADO) для запросов к таблицам Excel, то название таблицы нужно будет передавать в строке подключения. Чтобы облегчить создание интуитивно понятного и надежного кода, необходимо выбрать логически обоснованное название для электронной таблицы. Чтобы переименовать нужную таблицу, достаточно присвоить новое значение свойству name. Переименуем первую электронную таблицу в «Processes», как показано ниже:
Теперь нужно получить ссылку на переименованную таблицу. Для этого используется метод Item объекта worksheets. В качестве параметра передается название таблицы:
В первой строчке таблицы будет находиться заголовок. Выделим жирным названия свойств и нарисуем рамку заголовка. Данные, таким образом, будут записаны со второй строки, поэтому установим значение счетчика $x равным двум:
Следующие четыре строчки кода определяют четыре типа перечисления. Типы перечислений нужны для того, чтобы задать множество величин, допустимых для определенных настроек программы Excel. Например, при помощи типа перечислений xlLineStyle задается тип выводимой линии: двойная, пунктирная и так далее. Значения типов перечислений описаны в MSDN.
Чтобы облегчить чтение кода, можно создать псевдонимы для каждого из четырех используемых типов перечислений. Для этого нужно преобразовать строку, представляющую собой название типа перечисления, в тип ([type]). Вообще-то это довольно хитрый прием:
Теперь нужно отформатировать первую строку. Зададим жирный шрифт, присвоим типу линии значение xlDashDot, воспользуемся автоматическим выбором цвета и установим среднюю ширину рамки:
Затем значения ячеек в первой строке можно будет задать с помощью метода item и координат, состоящих из номера строки и столбца. Заголовки столбцов устанавливаются прямым присваиванием:
Теперь нужно поместить информацию о процессах, полученную запросом инструментария WMI и сохраненную в переменной $processes, в соответствующие ячейки таблицы. Организуем цикл foreach для обхода коллекции сведений о процессах. В переменной цикла $process будет храниться текущий элемент коллекции; из него мы поместим в первый столбец название процесса, а во второй — значение свойства workingSetSize.
И здесь нам понадобится переменная $x. Начиная со второй строки мы будем увеличивать значение переменной $x по мере продвижения по коллекции. Таким образом, в этой переменной всегда будет находиться индекс текущей строки таблицы, куда переносятся данные из коллекции. Таким образом будет обработан весь набор данных о процессах, хранящийся в переменной $processes:
Заполнив электронную таблицу, можно отрегулировать размер столбцов в соответствии с размером находящихся в ячейках данных. Для этого можно было бы создать диапазон, указав координаты используемых столбцов; а можно просто воспользоваться свойством электронной таблицы usedRange. Когда объект типа диапазон создан, свойство EntireColumn и метод AutoFit помогут изменить размер столбцов. Поскольку этот метод всегда возвращает какие-то данные, перенаправим его вывод в командлет Out-Null. В результате ненужная информация не будет выводиться в окно командной строки. Вот этот код:
Здесь можно было бы остановиться: у нас уже есть удобная электронная таблица с названиями процессов и количеством потребляемой ими памяти. Но мы сделаем еще и диаграмму. Это просто. Воспользуемся методом Add объекта диаграмма, чтобы добавить ее к рабочей книге. Поскольку этот метод тоже возвращает ненужную информацию, пропустим результат через командлет Out-Null, как показано здесь:
Приведенная выше команда добавляет график. Чтобы получить диаграмму нужного типа, нужно задать значение типа перечисления, определяющего тип диаграммы. Выберем одно из значений типа перечисления microsoft.office.interop.excel.xlChartType, скажем, xl3DPieExploded. Выбор этого типа диаграммы создает трехмерную разрезанную круговую диаграмму. Это значение типа перечисления нужно присвоить свойству chartType объекта ActiveChart. В качестве источника данных для диаграммы будет установлен диапазон, определенный в переменной $range. В результате вы увидите, как появившийся график меняется на разорванную трехмерную круговую диаграмму. Вот код:
А теперь давайте покрутим круговую диаграмму. Свойство rotation объекта ActiveChart позволяет нам сделать это. Счетчик увеличивается в цикле до 360 с шагом 15. В окружности 360 градусов; диаграмма поворачивается на 15 секунд. Выглядит неплохо. Вот код, с помощью которого это было сделано:
Наконец электронную таблицу нужно сохранить. Проверим наличие таблицы с помощью командлета Test-Path. Если да, то удалим старый файл через командлет Remove-Item, а потом сохраним текущую рабочую книгу туда, куда указывает переменная $strPath. Использовались объект ActiveWorkbook объекта Excel.Application и метод SaveAs рабочей книги. Если сохраненной раньше копии электронной таблицы нет, то метод SaveAs объекта ActiveWorkbook производит сохранение таблицы:
После работы скрипта на экране появляется разорванная круговая диаграмма, как показано на рис. 5.
Рис. 5 Разорванная круговая диаграмма процессов
Сама таблица находится на закладке Processes. На рис. 6 показаны заголовки столбцов, стиль линии, который был выбран для заголовков, и сами заголовки, выделенные жирным. Выводятся данные из двух столбцов: размер рабочей области памяти и название процесса.
Рис. 6 Законченная электронная таблица
Источник
Microsoft Excel is one of those ubiquitous tools most of us can’t escape even if we tried. Many IT professionals use Excel as a little database storing tons of data in various automation routines. What’s the best scenario for automation and Excel? PowerShell and Excel!
Excel spreadsheets have always been notoriously hard to script and automate. Unlike its less-featured (and simpler) CSV file counterpart, Excel workbooks aren’t just simple text files. Excel workbooks required PowerShell to manipulate complicated Component Object Model (COM) objects thus you had to have Excel installed. Not anymore.
Thankfully, an astute PowerShell community member, Doug Finke, created a PowerShell module called ImportExcel for us mere mortals. The ImportExcel module abstracts away all of that complexity. It makes it possible to easily manage Excel workbooks and get down to PowerShell scripting!
In this article, let’s explore what you can do with PowerShell and Excel using the ImportExcel module and a few popular use cases.
Prerequisites
When running the ImportExcel module on a Windows system, no separate dependencies are necessary. However, if you’re working on macOS, you will need to install the mono-libgdiplus package using brew install mono-libgdiplus. All examples in this article will be built using macOS but all examples should work cross-platform.
If you’re using macOS, be sure to restart your PowerShell session before continuing.
Installing the ImportExcel Module
Start by downloading and installing the module via the PowerShell Gallery by running Install-Module ImportExcel -Scope CurrentUser. After a few moments, you’ll be good to go.
Using PowerShell and Excel to Export to a Worksheet
You may be familiar with the standard PowerShell cmdlets Export-Csv and Import-Csv. These cmdlets allow you to read and export PowerShell objects to CSV files. Unfortunately, there’s no Export-Excel and Import-Excel cmdlets. But using the ImportExcel module, you can build your own functionality.
One of the most common requests a sysadmin has is exporting PowerShell objects to an Excel worksheet. Using the Export-Excel cmdlet in the ImportExcel module, you can easily make it happen.
For example, perhaps you need to find some processes running on your local computer and get them into an Excel workbook.
The
Export-Excelcmdlet accepts any object exactly the wayExport-Csvdoes. You can pipe any kind of object to this cmdlet.
To find processes running on a system with PowerShell, use the Get-Process cmdlet which returns each running process and various information about each process. To export that information to Excel, use the Export-Excel cmdlet providing the file path to the Excel workbook that will be created. You can see an example of the command and screenshot of the Excel file generated below.
Get-Process | Export-Excel -Path './processes.xlsx'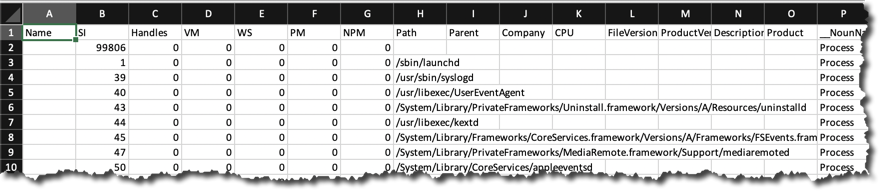
Congrats! You’ve now exported all the information just like Export-Csv but, unlike Export-Csv, we can make this data a lot fancier. Let’s make sure the worksheet name is called Processes, the data is in a table and rows are auto-sized.
By using the AutoSize switch parameter to autosize all rows, TableName to specify the name of the table that will include all the data and the WorksheetName parameter name of Processes, you can see in the screenshot below what can be built.
Get-Process | Export-Excel -Path './processes.xlsx' -AutoSize -TableName Processes -WorksheetName Proccesses
The
Export-Excelcmdlet has a ton of parameters you can use to create Excel workbooks of all kinds. For a full rundown on everythingExport-Excelcan do, runGet-Help Export-Excel.
Using PowerShell to Import to Excel
So you’ve exported some information to a file called processes.xlsx in the previous section. Perhaps now you need to move this file to another computer and import/read this information with PowerShell and Excel. No problem. You have Import-Excel at your disposal.
At its most basic usage, you only need to provide the path to the Excel document/workbook using the Path parameter as shown below. You’ll see that it reads the first worksheet, in this case, the Processes worksheet, and returns PowerShell objects.
Import-Excel -Path './processes.xlsx'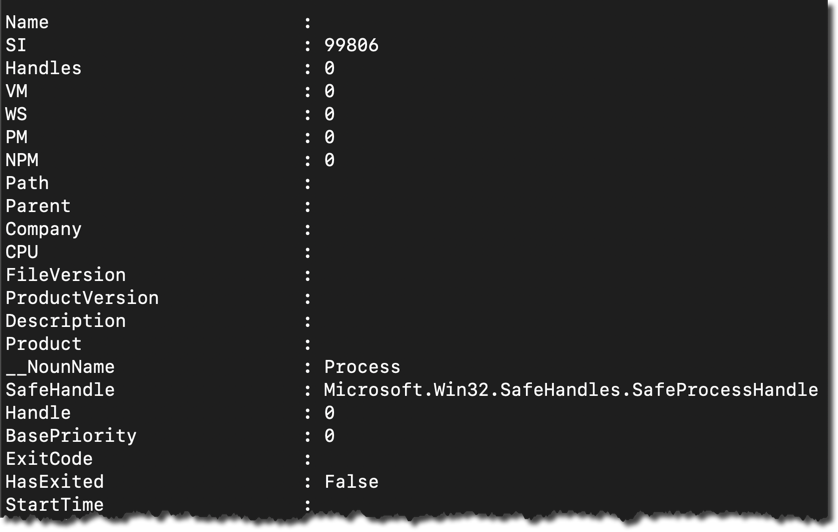
Maybe you have multiple worksheets in an Excel workbook? You can read a particular worksheet using the WorksheetName parameter.
Import-Excel -Path './processes.xlsx' -WorkSheetname SecondWorksheetDo you need to only read certain columns from the Excel worksheet? Use the HeaderName parameter to specify only those parameters you’d like to read.
Import-Excel -Path './processes.xlsx' -WorkSheetname Processes -HeaderName 'CPU','Handle'The
Import-Excelcmdlet has other parameters you can use to read Excel workbooks of all kinds. For a full rundown on everythingImport-Excelcan do, runGet-Help Import-Excel.
Using PowerShell to Get (and Set) Excel Cell Values
You now know how to read an entire worksheet with PowerShell and Excel but what if you only need a single cell value? You technically could use Import-Excel and filter out the value you need with Where-Object but that wouldn’t be too efficient.
Instead, using the Open-ExcelPackage cmdlet, you can “convert” an Excel workbook into a PowerShell object which can then be read and manipulated. To find a cell value, first, open up the Excel workbook to bring it into memory.
$excel = Open-ExcelPackage -Path './processes.xlsx'The
Open-ExcelPackageis similar to usingNew-Object -comobject excel.applicationif working directly with COM objects.
Next, pick the worksheet inside of the workbook.
$worksheet = $excel.Workbook.Worksheets['Processes']This process is similar to the COM object way of opening workbooks with
excel.workbooks.open.
Once you have the worksheet assigned to a variable, you can now drill down to individual rows, columns, and cells. Perhaps you need to find all cell values in the A1 row. You simply need to reference the Cells property providing an index of A1 as shown below.
$worksheet.Cells['A1'].ValueYou can also change the value of cells in a worksheet by assigning a different value eg.
$worksheet.Cells['A1'] = 'differentvalue'
Once in memory, it’s important to release the Excel package using the Close-ExcelPackage cmdlet.
Close-ExcelPackage $excelConverting Worksheets to CSV Files with PowerShell and Excel
Once you have the contents of an Excel worksheet represented via PowerShell objects, “converting” Excel worksheets to CSV simply requires sending those objects to the Export-Csv cmdlet.
Using the processes.xlsx workbook created earlier, read the first worksheet which gets all of the data into PowerShell objects, and then export those objects to CSV using the command below.
Import-Excel './processes.xlsx' | Export-Csv -Path './processes.csv' -NoTypeInformationIf you now open up the resulting CSV file, you’ll see the same data inside of the Processes worksheet (in this example).
Converting Multiple Worksheets
If you have an Excel workbook with multiple worksheets, you can also create a CSV file for each worksheet. To do so, you can find all the sheets in a workbook using the Get-ExcelSheetInfo cmdlet. Once you have the worksheet names, you can then pass those names to the WorksheetName parameter and also use the sheet name as the name of the CSV file.
Below you can the example code needed using PowerShell and Excel.
## find each sheet in the workbook
$sheets = (Get-ExcelSheetInfo -Path './processes.xlsx').Name
## read each sheet and create a CSV file with the same name
foreach ($sheet in $sheets) {
	Import-Excel -WorksheetName $sheet -Path './processes.xlsx' | Export-Csv "./$sheet.csv" -NoTypeInformation
}
Conclusion
Using PowerShell and Excel, you can import, export, and manage data in Excel workbooks exactly like you would CSVs without having to install Excel!
In this article, you learned the basics of reading and writing data in an Excel workbook but this just scratches the surface. Using PowerShell and the ImportExcel module, you can create charts, pivot tables, and leverage other powerful features of Excel!
В PowerShell для экспорта массивов данных в CSV файлы можно использовать командлет Export-CSV. В этой статье мы покажем, как экспортировать данные в CSV файл и добавить в него дополнительные строки.
CSV формат представляет собой текстовый файл для хранения табличных данных, в котором значения разделены специальным символом-разделителем. Командлет Export-CSV преобразует полученный объект PowerShell в список строк с разделителями и сохраняет эти строки в указанный файл.
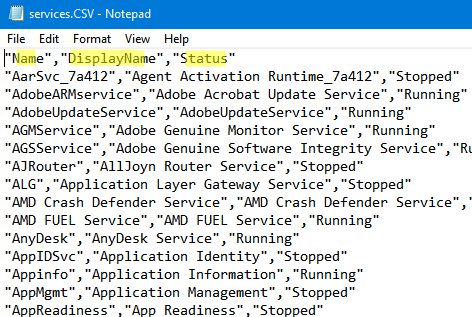
Следующая команда экспортирует список служб Windows в CSV файл:
Get-Service |select-object Name,DisplayName,Status | Export-CSV "C:PSservices.CSV" -NoTypeInformation -Encoding UTF8
Откройте полученный CSV файл с помощью любого текстового редактора. Как вы видите, в первой строке указаны названия столбцов (атрибуты объекта PowerShell, в нашем примере вы выбрали определенные поля с помощью select-object), и далее построчно идут данные, разделенные запятыми.
По-умолчанию в качестве разделителя (делиметера) в CSV используется запятая. Вы можете задать другой разделитель (точку с запятой, двоеточие и т.д.) с помощью параметра –Delimiter.
Например, укажем что в качестве разделителя нужно использовать точку с запятой:
Get-Service | Export-CSV "C:PSservices.CSV" -NoTypeInformation -Encoding UTF8 -Delimiter ";"
Вы можете использовать разделитель в зависимости от региональных настроек Windows. Для этого используется параметр -UseCulture.
Get-Process | Export-Csv "c:psprocess.csv" -UseCulture
Вы можете также получить разделитель по-умолчанию из региональных настроек Windows:
(Get-Culture).TextInfo.ListSeparator
По умолчанию командлет Export-CSV создает новый CSV файл (если файл уже существует, он перезаписывается/заменяется новым). Если вы хотите добавить новые строки в уже существующий CSV файл, нужно использовать параметр -Append.
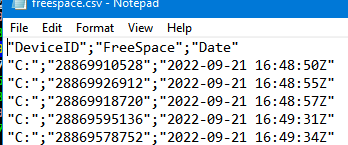
Например, вы хотите по расписанию запускать PowerShell скрипт, который проверяет свободное место на диске и добавляет текущее значение в CSV файл:
$cur_time=get-date -Format u
$freedisksize=Get-CimInstance -Class Win32_LogicalDisk |Where-Object {$_.DeviceID -eq "C:"} |select DeviceID,FreeSpace
Теперь нужно добавить дату в таблицу (объект) в качестве одного из полей:
$freedisksize| add-member -membertype NoteProperty -name Date -value $cur_time
Экспорт объекта PowerShell в CSV файл:
$freedisksize| Export-Csv -Path C:psfreespace.csv -Delimiter ";" -NoTypeInformation -Append
Также вы можете использовать следующие дополнительные параметры Export-CSV:
- -Encoding – позволяет указать кодировку CSV файла (по умолчанию используется utf8NOBOM). В большинстве случае я указываю тут UTF8;
- -Force – перезапишет доступный на чтение файл;
- -NoClobber – не перезаписывать файл, если он существует;
- -Header – добавить заголовок в CSV файл (если он отсутствует);
- -IncludeTypeInformation/-NoTypeInformation –добавить/не добавлять в заголовок файла строку #TYPE с информацией о типе объекта (например,
#TYPE System.Diagnostics.Process
или
#TYPE System.Service.ServiceController
). Начиная с PowerShell 6 информация TYPE в заголовке не выводится по-умолчанию; - —UseQuotes (появился в версии PowerShell Core 7.x) – нужно ли заключать значения в кавычки или нет (AsNeeded/ Always (default)/Never)
В дальнейшем вы можете обрабатывать полученный CSV файл в Excel или других программах.
Командлет Export-CSV часто используется для построения различных табличных выгрузок и отчетов. Ниже несколько примеров полезных отчетов для системного администратора, которые можно сформировать с помощью Export-CSV:
- Сформировать список компьютеров в AD c помощью Get-ADComputer
- Получить информацию о пользователях через Get-ADUser
- Найти неактивных пользователей/компьютеры в домене
- Выгрузить информацию о входах пользователей в Azure
- Экспортировать историю (логи) RDP подключений
- Создать отчет со статусом активации Windows на компьютерах в домене.
Для загрузки (импорта) данных из CSV файла в PowerShell используется командлет Import-CSV.
If you handle any sort of data in your job you’ve likely run into the common PowerShell cmdlets for dealing with data; Import-CSV, Export-CSV, Import-CliXML, and Export-Clixml. Sometimes, automation requires the processing of data. CSV and XML are both great ways to store and send data. The only thing is, no human chooses to manipulate data in CSV or XML. That is, for better or for worse, in the realm of Excel.
Opening in Excel
Excel has the ability to natively open CSV files, the text import wizard can handle copy and pasting of delimited information, and Power Query offers the ability to use as CSV as a data source. The process from PowerShell to Excel is simple. Use the Export-CSV cmdlet to export your data and if you’re lazy, have PowerShell invoke the file to start up Excel.
Get-Process | Export-Csv -Path ~Desktopjunk.csv
Invoke-Item ~Desktopjunk.csv
There is a better way.
Import Excel
Doug Finke has written a PowerShell module for exporting information directly into Excel. Not simply data but charts, conditional text, Pivot Tables, and much more.
A quick way to tell if there are services you need to look into?
Get-Service |
    Select-Object -Property DisplayName,Name,Status,StartType |
    Export-Excel -show -Path ~DesktopJunk.xlsx -AutoFilter -AutoSize -BoldTopRow -ConditionalText $( New-ConditionalText stop New-ConditionalText auto yellow )
Check out the GitHub page for ImportExcel to get all of of the installation instructions as well as demonstrations on exactly how to use it. Automate the Excel reports you’ve been manipulating by hand for all of these years.
- Remove From My Forums
-
Вопрос
-
Добрый день.
Выполняю парсинг с помощью Powershell+Selenium.
С помощью команды$fullstory =
$ie.FindElementByClassName("comment")Получаю вывод:
Исполнитель: Pink Floyd Название альбома: Dark Side Of the Moon Стиль: Rock Год выпуска: 2016
Как сделать вывод Excel чтобы соответственно "Исполнитель:", "Название
альбома:" и.т.д стали столбцами, а то что после двоеточия - значениями
столбцом?Спасибо заранее.
Ответы
-
Добавить столбцы в $h:
$h = Write-Output Стиль,Формат,"Год выпуска",Размер,"Название альбома",Исполнитель,Треклист,Ссылка
$data = $fullstory.text.split("`n") -replace ": ","=" | Where {$_.Trim()} | Out-String | ConvertFrom-StringData | Foreach {[pscustomobject]$_} | Select $h
$data.Ссылка = "http://uploadboy.me/wdmg7nqd30wy/Synapsyche.rar.html"
$data.Треклист = @"
1. Negativa
2. We All Suck
3. Venereal
4. The Flesh Party
5. Backup Of An Empty Folder
6. Hate And Psyche
7. Self-Worship Doctrine
8. Angel On Vicodin
9. In Apocalypse We Trust
10. Trauma In Mi Minore
11. Tabula Rasa
"@
$data | Export-Excel file.xlsx -AutoSize
Вывод:
PS (STA) > Import-Excel .file.xlsx Стиль : Dark Electro, EBM, Industrial Формат : CBR 320kbps Год выпуска : 2016 Размер : 121 Mb Название альбома : The Abyss Effect Исполнитель : Synapsyche (Italy) Треклист : 1. Negativa 2. We All Suck 3. Venereal 4. The Flesh Party 5. Backup Of An Empty Folder 6. Hate And Psyche 7. Self-Worship Doctrine 8. Angel On Vicodin 9. In Apocalypse We Trust 10. Trauma In Mi Minore 11. Tabula Rasa Ссылка : http://uploadboy.me/wdmg7nqd30wy/Synapsyche.rar.html-
Помечено в качестве ответа
2 марта 2017 г. 16:29
-
Помечено в качестве ответа
-
Проверил, работает:

-
Помечено в качестве ответа
[technoir]
2 марта 2017 г. 19:03
-
Помечено в качестве ответа
-
PS > $PSVersionTable.PSVersion

Major  Minor  Build  Revision
-----  -----  -----  --------
5      1      14393  693

PS > $PSVersionTable.PSVersion

Major  Minor  Build  Revision
-----  -----  -----  --------
5      0      10586  117
-
Помечено в качестве ответа
[technoir]
2 марта 2017 г. 19:03
-
Помечено в качестве ответа
-
Модуль для Excel: https://github.com/dfinke/ImportExcel
Код для экспорта:
$h = Write-Output Стиль,Формат,"Год выпуска",Размер,"Название альбома",Исполнитель
$data = $fullstory.text.split("`n") -replace ": ","=" | Where {$_.Trim()} | Out-String | ConvertFrom-StringData | Foreach {[pscustomobject]$_}
$data | Select $h | Export-Excel file.xlsx -AutoSize
Вывод:
PS (STA) > $fullstory.text
Исполнитель: Synapsyche (Italy)

Название альбома: The Abyss Effect

Стиль: Dark Electro, EBM, Industrial

Год выпуска: 2016

Формат: CBR 320kbps

Размер: 121 Mb

PS (STA) > $data

Стиль            : Dark Electro, EBM, Industrial
Формат           : CBR 320kbps
Год выпуска      : 2016
Размер           : 121 Mb
Название альбома : The Abyss Effect
Исполнитель      : Synapsyche (Italy)

PS (STA) > Import-Excel .file.xlsx

Стиль            : Dark Electro, EBM, Industrial
Формат           : CBR 320kbps
Год выпуска      : 2016
Размер           : 121 Mb
Название альбома : The Abyss Effect
Исполнитель      : Synapsyche (Italy)
-
Помечено в качестве ответа
[technoir]
2 марта 2017 г. 13:23
-
Помечено в качестве ответа