
Excel for Microsoft 365 Excel 2021 SharePoint Server Subscription Edition Excel 2019 SharePoint Server 2019 Excel 2016 SharePoint Server 2016 Excel 2013 SharePoint Server 2013 SharePoint in Microsoft 365 Excel 2010 SharePoint Server 2010 Excel 2007 More…Less
You can export data from an Excel table to a SharePoint list. When you export the list, Excel will create a new SharePoint list on the site. You can then work with the data on the site, just like you would for any other SharePoint list.
Note: Exporting a table as a list does not create a data connection to the SharePoint list. If you were to update the table in Excel after exporting it, the updates will not be reflected in the SharePoint list.
To export a table in an Excel spreadsheet to a list on a SharePoint site, you need:
-
A SharePoint site where you are creating the list.
-
Permissions to create lists on the site. If you are not sure, contact your SharePoint site administrator.
To view the list in datasheet view on the SharePoint site you need:
-
Excel or Access. These programs are required for using the datasheet view on the SharePoint site.
Note: Datasheet view is not supported in 64-bit version of Microsoft Office. It is recommended that you install 32-bit version of Office in order to be able to use Datasheet view in a list on a SharePoint site.
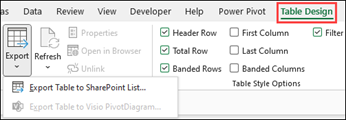
Export a table to a SharePoint list
-
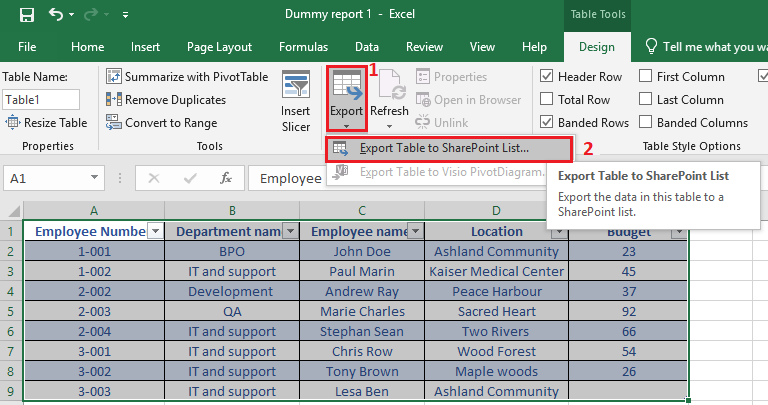
Click inside the table.
-
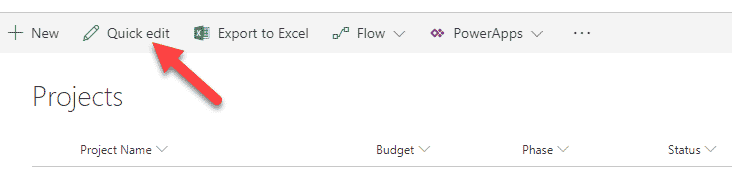
Click Table Design > Export > Export Table to SharePoint List.

-
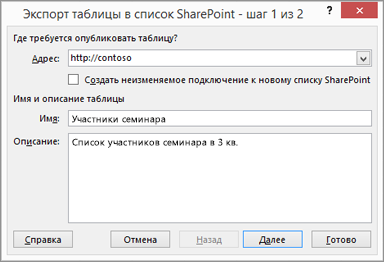
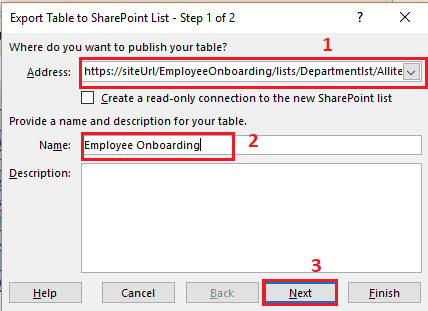
In the Address box, type the address, or URL of the SharePoint site.
Important: Type everything that’s in your Web address before the “/default.aspx”. For example, if the address is http://contoso/default.aspx, type http://contoso. If the address is http://contoso/teams/accounting/sitepages/home.aspx, type http://contoso/teams/accounting.
-
In the Name box, type a unique name for the list.
-
Optionally, enter a description in the Description box.
-
Click Next.
Note: You may be asked to enter your Microsoft 365 credentials, or organizational domain credentials, or both.
-
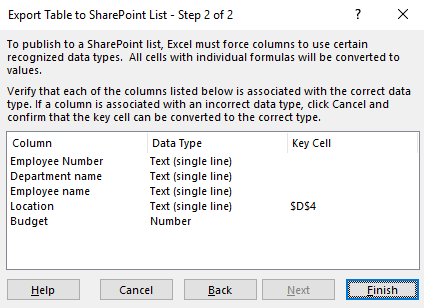
Review the information given in Columns and Data Types and then click Finish.
-
Click OK.

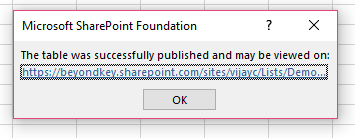
A message indicating that your table is published, along with the Uniform Resource Locator (URL) appears. Click on the URL to go to the list. Add the URL as a favorite in your browser.
Note: Another way to open the list is to go the SharePoint site, click the gear icon on the upper-right corner, and click Site Contents.
Supported data types
Some Excel data types cannot be exported to a list on the SharePoint site. When unsupported data types are exported, these data types are converted to data types that are compatible with SharePoint lists. For example, formulas that you create in Excel are converted to values in a SharePoint list. After the data is converted, you can create formulas for the columns on the SharePoint site.
When you export an Excel table to a SharePoint site, each column in a SharePoint list is assigned one of the following data types:
-
Text (single line)
-
Text (multiple lines)
-
Currency
-
Date/time
-
Number
-
Hyperlink (URL)
If a column has cells with different data types, Excel applies a data type that can be used for all of the cells in the column. For example, if a column contains numbers and text, the data type in the SharePoint list will be text.
Need more help?
Want more options?
Explore subscription benefits, browse training courses, learn how to secure your device, and more.
Communities help you ask and answer questions, give feedback, and hear from experts with rich knowledge.
Excel для Microsoft 365 Excel 2021 SharePoint Server по подписке Excel 2019 SharePoint Server 2019 Excel 2016 SharePoint Server 2016 Excel 2013 SharePoint Server 2013 SharePoint в Microsoft 365 Excel 2010 SharePoint Server 2010 Excel 2007 Еще…Меньше
Данные из таблицы Excel можно экспортировать в список SharePoint. При экспорте списка Excel создает на сайте новый список SharePoint. После этого вы можете работать с данными на сайте, как с любым другим списком SharePoint.
Примечание: При экспорте таблицы в список не создается подключение к данным списка SharePoint. Если обновить таблицу в Excel после экспорта, изменения не отразятся в списке SharePoint.
Для экспорта таблицы Excel в список на сайте SharePoint вам необходимы:
-
Сайт SharePoint, на котором создается список.
-
Разрешение на создание списков на этом сайте. Если вы сомневаетесь, что оно у вас есть, обратитесь к администратору сайта SharePoint.
Для просмотра списка в режиме таблицы на сайте SharePoint вам необходимы:
-
Excel или Access. Эти приложения нужны для использования режима таблицы на сайте SharePoint.
Примечание: Режим таблицы не поддерживается в 64-разрядной версии Microsoft Office. Если вам нужно использовать режим таблицы для списка на сайте SharePoint, установите 32-разрядную версию Office.
Экспорт таблицы в список SharePoint
-
Щелкните внутри таблицы.
-
Щелкните Конструктор таблиц > Экспорт > Экспорт таблицы в список SharePoint.
-
В поле Адрес введите URL-адрес сайта SharePoint.
Важно: Введите все, что находится в веб-адресе, перед параметром «/default.aspx». Например, если адрес http://contoso/default.aspx, введите http://contoso. Если адрес http://contoso/teams/accounting/sitepages/home.aspx, введите http://contoso/teams/accounting.
-
В поле Имя введите уникальное название списка.
-
При желании можете ввести описание в поле Описание.
-
Нажмите кнопку Далее.
Примечание: Вам может быть предложено ввести Microsoft 365 учетные данные, учетные данные домена организации или и то, и другое.
-
Проверьте данные в разделах Столбцы и Типы данных, затем нажмите кнопку Готово.
-
Нажмите кнопку ОК.

Появится сообщение о том, что ваша таблица опубликована, а также унифицированный указатель ресурсов (URL-адрес). Чтобы перейти к списку, щелкните URL-адрес. Добавьте URL-адрес в избранное в своем браузере.
Примечание: Можно открыть список и другим способом. Перейдите на сайт SharePoint, в правом верхнем углу щелкните значок шестеренки и выберите элемент Контент сайта.
Поддерживаемые типы данных
Некоторые типы данных Excel невозможно экспортировать в список на сайте SharePoint. При экспорте таких данных они преобразуются в типы, совместимые со списками SharePoint. Например, формулы, созданные в Excel, преобразуются в значения списка SharePoint. После преобразования данных вы можете создать формулы для столбцов на сайте SharePoint.
При экспорте таблицы Excel на сайт SharePoint каждому столбцу в списке SharePoint назначается один из следующих типов данных:
-
Текст (однострочный)
-
Текст (многострочный)
-
Денежный
-
Дата и время
-
Числовой
-
Гиперссылка (URL-адрес)
Если столбец содержит ячейки с разными типами данных, применяется тип данных, который может использоваться для всех ячеек. Например, если столбец содержит числа и текст, в списке SharePoint будет использоваться текстовый тип.
Нужна дополнительная помощь?
How to Import and Export Data from Excel to SharePoint Lists and Vice Versa
Many users who use SharePoint Online like to use lists because SharePoint lists look just like Excel tables. For better integration, Microsoft allows you to export Excel tables to SharePoint lists and vice versa. Users usually ask: How do I import data from SharePoint to Excel? How do I extract data from SharePoint? How do I create a SharePoint list in Excel? This blog post can help you answer these questions and explains how to export tables from Excel to SharePoint lists and vice versa. Four methods of exporting data from Excel and one method of exporting data from SharePoint lists are covered.
Method 1 – How to Export Data from Excel to SharePoint Lists Manually
The idea of the first method is that you should create an empty list that contains the same columns as in the Excel table. The data format of columns must be the same to preserve data consistency. Then you should manually copy data from each column of the Excel table and paste this data to the appropriate column of the SharePoint list.
Open an XLS, XLSX, CSV file, or a file of another format that contains a table in Microsoft Excel that is installed on your computer. In my example, I’ve created a simple table for demonstration. You can see this table opened in Excel in the screenshot below.

Open a web browser and log into your Office 365 account (Microsoft 365 account). Open your team site in SharePoint Online, and create a new list. Let’s call our test list List02 and enter a description, for example, Import Excel into SharePoint list. You can also read this blog post about SharePoint Online to learn more about sites, lists, and libraries.

Once you have created a new SharePoint list, create the appropriate columns by clicking +Add column. The columns must have the same names and data format as the columns in the source Excel table.

In the window that opens, enter a name, description, and type, and define other needed parameters for a column. Then hit Save.

The list now contains all the needed columns but remains empty. To start copying data to a SharePoint list, you have to view the list as a table. To do this, click Edit in grid view. You are ready to copy data from Excel to SharePoint list.

Select data in a column of an Excel table, and press Ctrl+C to copy the selected data to clipboard. On the screenshot below you can see the data in the Name column selected.

You can move columns (left and right) after creating them in a SharePoint list. Select the empty cell in the needed column (the Names column in our case), and press Ctrl+V to paste data you have copied to the clipboard. The Name column now contains all the needed data in our example. Similarly copy paste data for the other columns.

Once you have transferred data to all columns of your SharePoint list, you can exit grid view. We have finished copying data from an Excel table to a SharePoint list. On the screenshot below you can see how our list looks after copying all the data.

The advantage of this method is that it’s easy to use when you don’t have that many tables or columns.
The disadvantage is that it’s time-consuming and inconvenient when you have too many columns and tables to copy.
Method 2 – How to Export Data Directly from Excel to a SharePoint List
The idea of this method is that you should export your table to a SharePoint list directly from Excel installed on your computer. Excel must be able to connect to your SharePoint site. You should provide your credentials, and your Office 365 account must have sufficient permissions to create a SharePoint list on a SharePoint site.
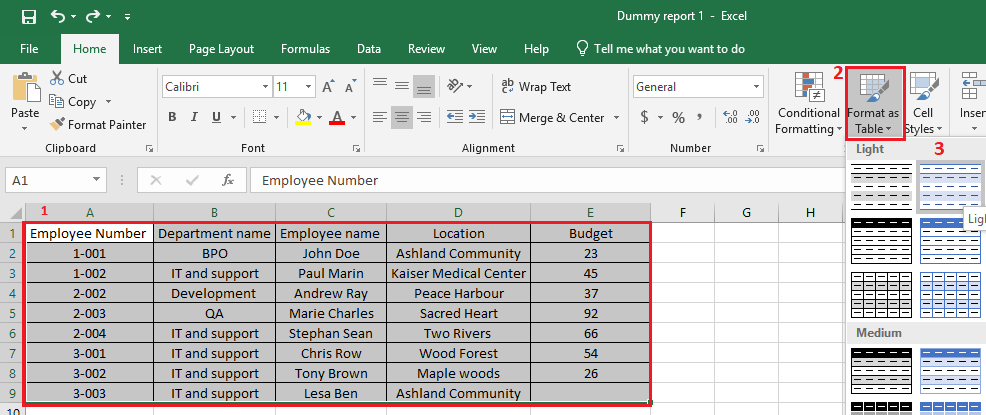
Open Microsoft Excel installed on your computer, and open the table you want to export to SharePoint Online. Let’s create a test table for our blog post with some equipment items and create columns with vendors who manufactured these items, users who are owners of the appropriate item, and the price for each item.
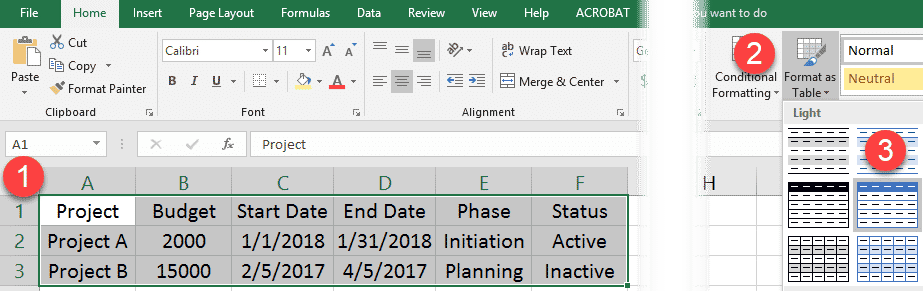
Convert a spreadsheet to a table before you start exporting. Click Insert > Table.

In the Create Table window, you can leave default values and hit OK.

Now the view of the table is a little bit different, as headers are marked with another color.
Select any column name in your table, go to the Design tab (Table Tools), and enter a table name, for example, TestTable01. There should be no spaces in the name.
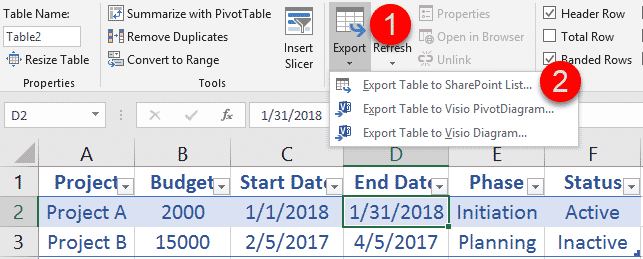
Select the Design tab, click Export, then click Export Table to SharePoint List…

A pop-up window is displayed. There are two steps to complete.
Enter the address of your team site in SharePoint, which is the destination for the Excel table that you want to export. In my case, I’m using the following address: https://nakivo.sharepoint.com/sites/BlogTeamSite
Enter a name for your table, for example: Excel to SharePoint list. This name will be used as the SharePoint list name after export.
Enter a description, for example: Import Excel to SharePoint list.
Hit Next to continue.

Define the correct data types for each column of the exported table, then hit Finish.

Now Microsoft Excel connects to your SharePoint site you have selected as destination to export the Excel table into a SharePoint list. Excel needs to pass authentication in Office 365 to export a table to a SharePoint list. You should enter the username and password for your Office 365 account.

If everything is correct, the export process will be completed successfully, and you should see the message:
The table was successfully published and may be viewed on: <address>

Open the link provided in the window in a web browser.
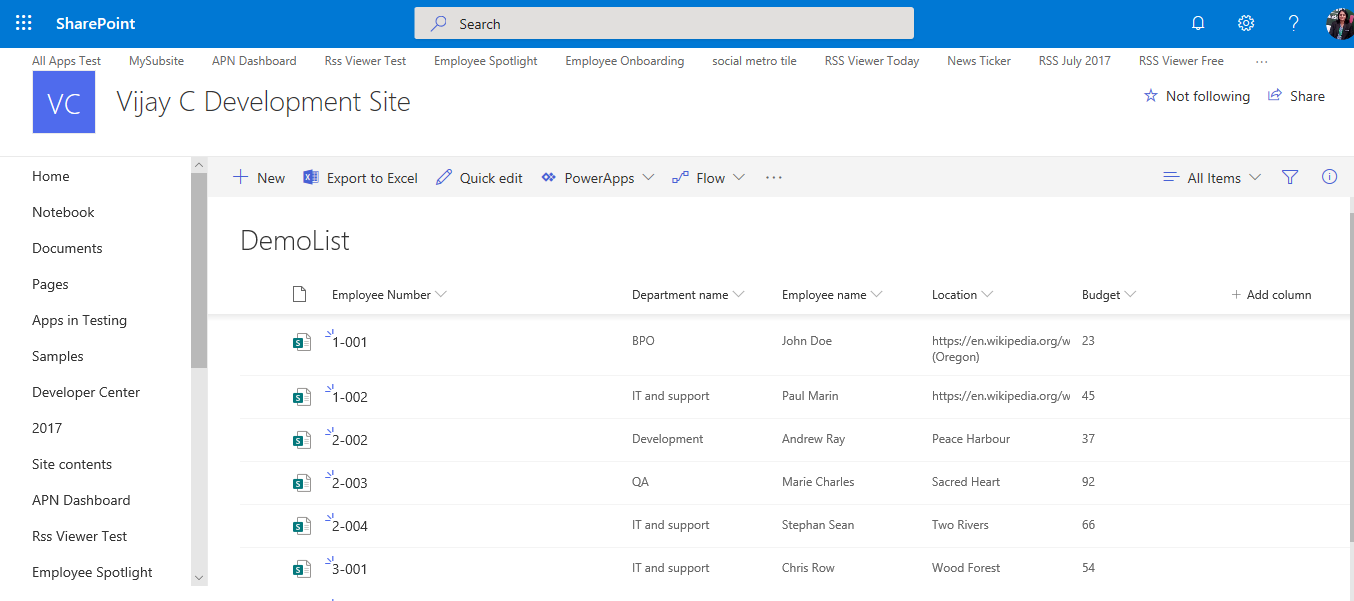
Now you can see the exported Excel table as a list in SharePoint Online.

You can open this list manually in SharePoint Online by opening your team site and going to the Site Contents section in the navigation pane of the web interface.

The advantage of this method is that it’s convenient to export data directly from Excel to a SharePoint list. All you need is Excel and access to SharePoint Online. No third-party apps are required.
Method 3 – How to Export Data from Excel to a SharePoint List with an App
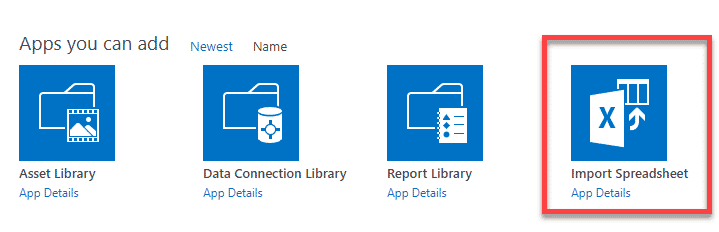
The idea of the third method is that you should use a special SharePoint App to import spreadsheets from Excel to SharePoint lists. You need the Import Spreadsheet app and a web browser that supports ActiveX controls, for example, Internet Explorer.
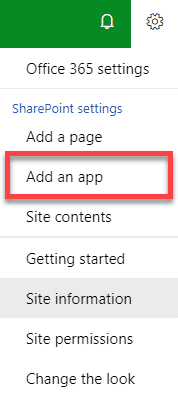
Open your team site in SharePoint Online, click the Settings icon, and, in the menu that opens, hit Add an app.

In the window that opens, you can see a list of different SharePoint apps. Type “import” in the search field on this page. When the Import Spreadsheet app is found, click it.

On the page that opens, you should enter a name and description of the new SharePoint list that is created after import with the app.
Name: Excel to SharePoint list
Description: Import Excel to SharePoint list
Click Browse, and select the XLSX file (or another Excel file format that is supported by the app) that you want to import to SharePoint as a list.
Hit Import.

ActiveX controls must be enabled in your web browser. If ActiveX controls is not enabled, you will see a warning message in your web browser. Refer to documentation for your web browser to learn how to enable ActiveX controls. ActiveX controls is a piece of software allowing you to interact with content you browse in the web. They can have access to your computer and may lead security issues. ActiveX controls are also known as plug-ins for Internet Explorer.
The advantage of this method is that it doesn’t take much manual intervention.
The disadvantages of the method are that you need to configure ActiveX controls that can be difficult or not supported in your web browser and that you need to use a special web app for SharePoint.
Method 4 – How to Export Data from Excel when Creating a New SharePoint List
There is one more method that allows you to import an Excel table to a SharePoint list when creating a new list in SharePoint Online. You don’t need Excel or other applications to use this method. Just open your web browser and log in to SharePoint Online with your Office 365 account (Microsoft 365) credentials.
Open you team site in SharePoint Online, click the Settings icon, and hit Site contents.

On the Site contents page that opens, click New > List.

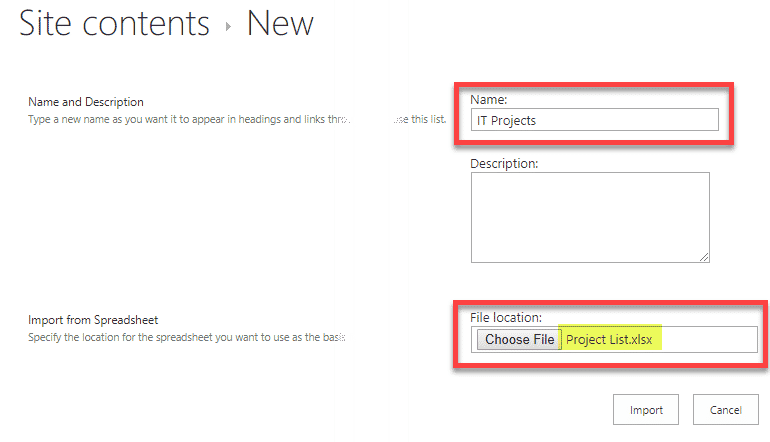
A new page opens suggesting that you create a list. On the left side of the page, select From Excel to create a list from Excel. Enter a name for your new list, for example, SharePoint import Excel. Click Upload file, and select an Excel file (XLS, XLSX, or other supported formats) you want to import as a SharePoint list to SharePoint Online. As an alternative, you can select a file that has been already uploaded to a SharePoint site. Hit Next to continue.

A table in the file we have uploaded is recognized. Check the column types and make sure that the data format is correct to preserve consistency. Hit Create when ready to finish.

A SharePoint list has been created successfully and data has been exported from an Excel table to a SharePoint list.

The advantages of this method is that you don’t need to install Excel on your computer to export a table to SharePoint as a list and you don’t need to use a SharePoint app.
How to Export SharePoint List to Excel
You can export a SharePoint list to an Excel table with a few clicks by using a web interface of SharePoint Online.
Open your team site in SharePoint Online, then open the SharePoint list you want to export. Click Export to Excel.

A window notifies you that query.iqy must be opened in Excel. Select Excel as an application to open the downloaded query.iqy file, and hit OK. A Microsoft Excel security notice is displayed when you open a file downloaded from the internet in Microsoft Excel. The purpose of this notification message is to reduce risks of ransomware attacks and infection with other viruses. Click Enable to open the SharePoint list you are exporting to an Excel table.

Now a table opens in Excel and the export of the SharePoint list is finished. Save the table as a file in the needed format, for example, XLS or XLSX.

Refreshing data in Excel
If changes are written to your SharePoint list stored on a team site in SharePoint Online, you can refresh data in the table you have imported to Excel and update your table without the need to perform a new export/import operation. The data in Excel is not refreshed automatically right after changes are saved in a SharePoint list; you should perform one manual operation to do this. You should know how to connect Excel to SharePoint lists in this case.
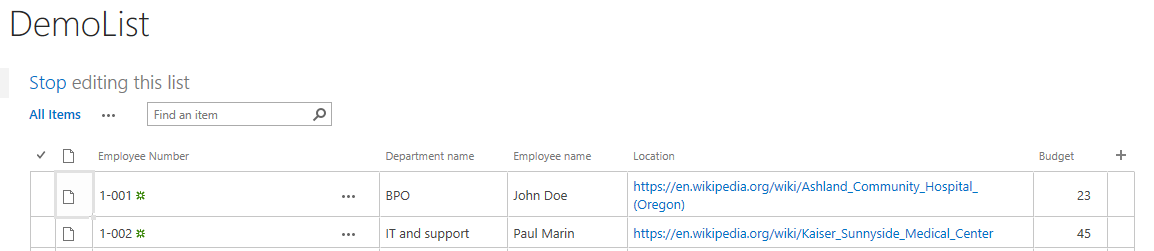
Let’s add a new Switches line in the SharePoint list.

As you can see, the Excel table we have imported before is not updated automatically with the data we added to our SharePoint list (the Switches line). We need to update it by going to the Data tab and clicking Connections in Excel.

The Workbook Connections window opens. Click Refresh to refresh the data in your Excel table, then you can close this window.

Data has been updated in Excel, and the Switches line is added in the bottom of our Excel table without the need to re-export all data.

Be aware that data is refreshed only in one direction. If you change data in your Excel table and click Refresh, the SharePoint list is not updated.
If you don’t need to update data in the current Excel table, go to Data > Connections, select a query, and click Remove.

Conclusion
Microsoft provides good integration between SharePoint Online and Excel as they both are Microsoft products. There are at least four methods to export data from Excel tables to SharePoint lists. Methods covered in this blog post have advantages and disadvantages you should be aware of when selecting a method that is suitable for you. Select the right method depending on whether you want to do it manually, use Excel, or use another app. Data export from a SharePoint list to Excel is straightforward and affordable for all SharePoint Online users.
When you use SharePoint Online and Office 365 in general, don’t forget to back up your data. NAKIVO Backup & Replication supports Office 365 data backup for Exchange Online, OneDrive for Business, and SharePoint Online. Download the latest version of the product, and back up all needed data in your environment.
A while back, I published a post where I explained how to export SharePoint lists from SharePoint to Excel. Today, I am going to cover the opposite of this – how to import Excel to SharePoint. Say, you have an Excel list/table and want to bring it to SharePoint (because SharePoint custom list kicks ass!). How do you achieve this? Well, let me explain. You have a few options to choose from!
July 2020 Update – READ THIS FIRST!
Below techniques describe the “old way” of importing Excel to SharePoint. If you are in SharePoint on-premises, below tips are the only options you have. However, if you are in SharePoint Online (Office 365), we now have a new and easier way to import Excel data, which would be the easiest and preferred option to use. Please reference this most recent post for instructions.
Option 1: Import using Quick Edit
The first option assumes that you already have a SharePoint list with all the corresponding columns, and just need to copy/paste the content from Excel to SharePoint. Here is what you need to do to achieve this:
- Build out all the columns exactly as they appear in Excel

- Make sure columns in a view are in the same order as in Excel (otherwise when you do copy/paste, you will get a mismatch)

- If you are taking advantage of metadata (drop-downs), make sure to populate all the possible choices into respective columns (otherwise, when you paste, and pasted text does not match the drop-down choice, the row will be rejected)
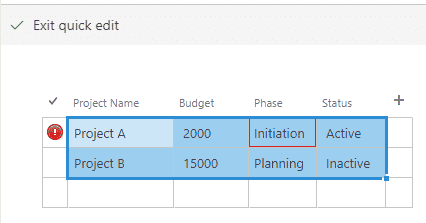
- Open your list in Quick Edit (Datasheet view for those in SharePoint 2010)

- Copy the rows you want to copy from Excel
- Paste into Quick Edit View
- You will notice the rows being pasted one by one. You might need to give it some time if you have lots of rows. In case you get a mismatch in data being imported, you will get a red warning just like in the image below

- When all data is successfully pasted/mismatches resolved, just click on Exit Quick Edit. You are all set!
Pros
- Allows to take advantage of metadata and different types of columns in the existing list (i.e., Text, Choice, Date, Currency, etc.)
Cons
- It takes time to set up the list and view before you can import/paste
- Might not be a good technique for importing large data sets
- Error handling capabilities are limited (if you have a row that fails, might take time to figure out the issue/field causing the issue and you might need to redo the whole import)
- Import will not work if you set up metadata drop-down using Term Store (managed metadata). Click here to read more about this issue

Option 2: Import Spreadsheet Web part
Another option that is available to import Excel to SharePoint is to use a Web Part called “Import Spreadsheet.” These are the steps to follow:
- Gear Icon > Add an App

- Scroll down to Import Spreadsheet App. Click on it.

- On the next screen, give your new app/list a name, then choose an Excel file. Click Import

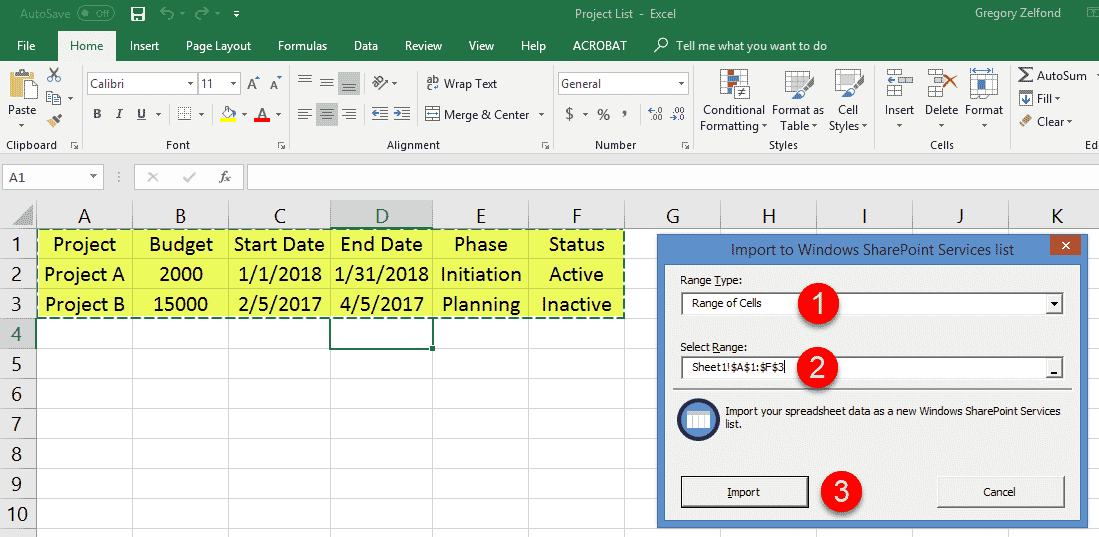
- You will now notice an Excel file open up with a pop-up window where you need to select a range of cells to import. Once you choose the range of cells in the pop-up, click Import.

- The table will now be imported to SharePoint. It will go ahead and create a custom list with proper column headers and values.


Pros
- Relatively easy to use
- Does not require much prep time like Option 1
Cons

Option 3: Import directly from Excel
Another great option is to import data right from within Excel. This is what you have to do:
- In Excel spreadsheet, select the data range and Format it as a Table

- While still in Excel, highlight the table, then choose Export from the top ribbon, then Export Table to SharePoint list

- From the pop-up that appears, specify the URL of the site you are importing to, then give the list a name, then hit Next. You can also (optionally) check the box next to Create a read-only connection to the new SharePoint list. What it does is make your Excel physically linked to SharePoint list. Any changes in the SharePoint list will propagate down to Excel when you refresh the data there.

- On the next screen, you will see all the columns with corresponding recognized column types (Currency, Date, etc.). Just click Finish
- You should be getting a success message/pop-up.

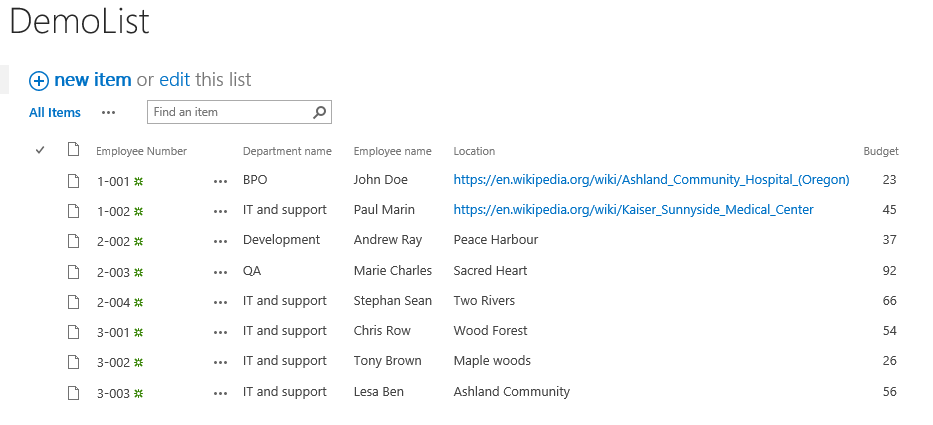
- You should now see your list created in SharePoint. It will default to Datasheet view, just click Stop to view it as a normal list.


Pros
Same as Option 2
Cons
- Same as with Option 2, some drop-down choices are recognized as Text.
- The list created is a classic list and not a modern one (for those who are in SharePoint Online)
- By default, the list opens up in Datasheet view. You always have to click Stop Editing to see a “normal” list

Table of Contents
- Introduction
- Problem
- Solutions
- 1. From Excel Sheet
- 2. Using Import SpreadSheet App
- Summary
- Other languages
Introduction
In many organizations the management people in any department use Excel to maintain their records, data, history etc. And nowadays SharePoint based applications are often used to share and collaborate these files. Many organizations use SharePoint sites as
their portal sites for the purpose of sharing information, data within department or organization.
Problem
So now let’s say your manager or client has an Excel sheet with valuable records and now he/she wants to put it on the SharePoint as a list, and asked you to do that. Now what will you do? You cannot use
Excel services nor upload excel sheet as it is (even though you can J ) because manager wants SharePoint list only. As a SharePoint developer you will think: first create a SharePoint List and then write one tool which will read Excel sheet records one by
one and add it to the SharePoint list. Right? But is it really needed if SharePoint and Office provides it itself?
Solutions
1. From Excel Sheet
Yes you can quickly create SharePoint List out of Excel sheet without writing any single line of code. Let’s see how we can do. Note: I have performed these steps on SharePoint 2013 with Microsoft office 2010.
Steps:
- Open the Excel 2010 application.
- Insert/create the table.

I have created this table as an example here. You can have it ready made.
3. Now click on any cell of table and go to the ‘Table Tools’.
4. Click on the Export and then ‘Export table to SharePoint List’.
5. You will see a popup where you need to provide the URL of SharePoint site, list name and description.

6. Then click on next, it will ask for credentials. On the next screen you will see columns with data types which are going to create in SharePoint list.

7. Now click finish and wait until the operation gets finished. You will see that list gets created in SharePoint site with the records.

2. Using Import SpreadSheet App
SharePoint 2013 provides ‘Import SpreadSheet App’ to do the same thing. Follow below steps to import SpreadSheet.
1. Go to Site Contents -> add an app, and search for ‘Import SpreadSheet’ app.

2. Add ‘Import SpreadSheet’ app and provide information as shown in below screen. You need to select the excel file.

3. Click on the import, wait for few seconds and your spreadsheet gets imported in list.

Summary
Both ways represent a time saving approach to creating a SharePoint list from the Excel sheet.
Other languages
This article is also available in the following languages :
- fr-FR : SharePoint 2013: Comment exporter une feuille Excel vers une liste
SharePoint (fr-FR)
This blog explains different methods to export data from Excel to a SharePoint List. To export data to a list, make sure you have necessary permissions in SharePoint Site. Also, make sure you have added the sites as Trusted sites.
There are cases where after you create the excel sheet, you would like to share it the team or set of peoples. Exporting Excel to SharePoint can be easier for viewing as well as for editing the data. Once the data is analyzed in SharePoint, it can be brought back into Excel.
Approach 1: Using Import Spreadsheet App.
- Go to SharePoint. Click on Add an app and look for Import Spreadsheet

- Give it a name, browse the file and click on Import

Approach 2: Using Excel “Export Table to SharePoint List” option.
- Under Design—Export, click on “Export Table to SharePoint”

- Provide the SharePoint URL and the Name.

With approach 1 and 2, you will see number issues in SharePoint.
Most of the columns in SharePoint list maps to a single line of text. Like dropdown columns are converted to single line of text. There is no way to change this during the import process.
Second issue is, the views are completely messed up. Views always takes you to quick edit mode. Also, the views show additional columns like icon.

Approach 3:
This is a much better way to import Excel data. This uses combination of Microsoft Access along with Excel. In this approach, you create a list with all the necessary schema and use MS Access to map the data from Excel to SharePoint List.
- Create a custom list. In my case, I am going to create it from Contacts List as it contains most of the columns which I need.
- Remove the columns which are not required. Add drop down and other columns taking values from Excel dropdown.
You can follow the below steps to get unique dropdown values from Excel. Click on any cell and select ‘’Summarize with Pivot Table”

- This creates a new worksheet. Add the dropdown column in Rows section. In my case it is State This will display all the unique dropdown values in ascending order. Copy the values and paste it in SharePoint drop down list column.
- Once the List is ready. Click on “Open with Access” from the ribbon.

- This creates new local Access database, Give it a name. Make sure to select radio button ‘’Link to data on the SharePoint site” and click on Ok.
- Next, we need to get the data from Excel and the map it to each column in SharePoint. Click on ‘’Excel’’ under “External Data’’ tab. Look for the Excel file and make sure you select last radio option “Link to the data source by creating linked table”.

- Check “First Row Contains Columns Headings”

- Give it a name to the Linked table and click on Finish
- Click on Query Design under Create tab, Select the Excel source, in my case it is called “Excel Data”. Click on Add followed by Close

- Click on “Append” under Design tab, select SharePoint List under Append to Dropdown.

- Select the Excel column and map it to equivalent SharePoint List column (under Append To). Repeat the procedure for all the columns.

- Below is the final screen after all the mappings.

- You are almost done. Click on Run from the ribbon. This step will insert all the rows to SharePoint List. Once completed, you will see the SharePoint list is populated with values along with the same schema as Excel file.

Hope this helps someone out there.Also, there is a very good video tutorial from Peter Kalmström available in YouTube.
Ravi
Many of our SharePoint add-in customers keep asking us that is it possible to easily export an already prepared excel sheet into a SharePoint list?
And we say- yes, it is possible and extremely simple!
Our SharePoint add-in users who are using our Employee Onboarding solution want to quickly bring their already prepared excel sheet with master data on departments, employee details, and standard tasks into the add-in without much hassle. We have a solution that can be extremely helpful. Let’s see the step-by-step process for making this happen.
Option 1- When you have to create a completely new SharePoint list.
We assume that you have an excel sheet with all your master data in the format or corresponding columns as you would like to see in the new SharePoint list. You can export this whole data from within excel by following these simple steps.
1. Open your excel sheet and select the data to be copied. Then click on the Format as a Table option.
2. While still selecting the data table, choose an Export option from the ribbon and select the ‘Export table to SharePoint List’ option.
3. A pop-up appears as below where you will have to specify the URL of the site you are importing to, then provide your list name. Click on Next.
4. You will find all the columns with corresponding recognized column types (Currency, Date, etc.). Just click Finish.
5. You will be getting a success message/pop-up and your list would be published at the SharePoint site you provided.
6. It will default to Datasheet view, just click Stop to view it as a normal list.
7. Your Published list will appear here.
Option 2: When you already have a SharePoint list and want to add more data/ records below the existing list.
We assume that you have an excel sheet with all your master data in the format. You also have a SharePoint list at a site/ subsite which has some records already there and you want to add more data in the same list through the above excel sheet. Let’s check how we can do this by following these simple steps:
1. Open the link where you want to add your updated data in the SharePoint list and click on the “edit” button.
2. Select the last row of the list where you want to add the data or table.
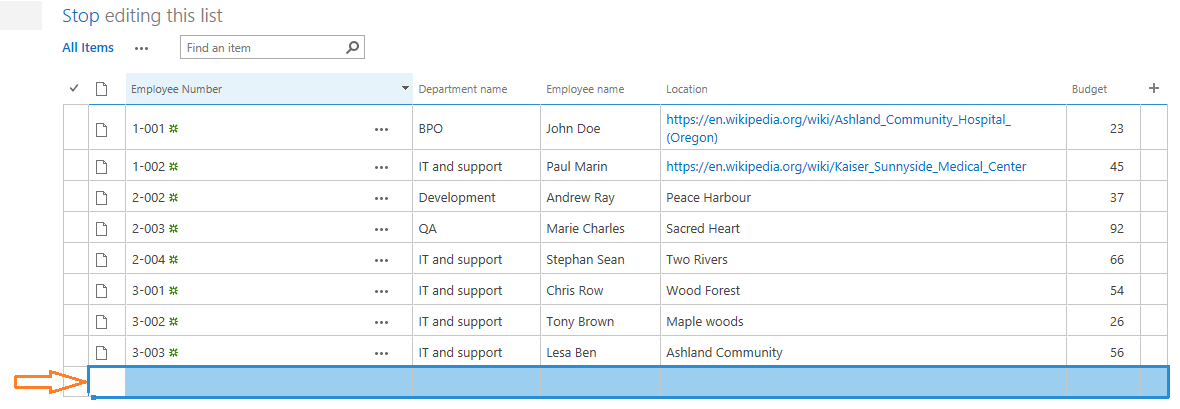
3. Now select all the values in excel that you want to copy into your SharePoint list.
4. Paste the data on the selected row in your SharePoint list.

5. Click on stop button to stop editing once you have added all the excel data.
6. Refresh the list to check out if you have successfully imported all excel data into the list.
So, I believe, now you can easily import your excel data into a new or already made SharePoint list without any difficulty. Still, if you have any questions or run into an error, feel free to contact us at [email protected] and we will be able to revert you in less than one business day.
At Beyond Intranet, we have a team of SharePoint expert developers who can help you with such and more issues on SharePoint or help you with answering your other questions as well. Just connect to us and leverage SharePoint benefits for your own use case.
I recently started a consulting job for a construction company to fix their Excel quotation template. But even the best Excel based template in the world wasn’t going to solve all their problems.
After a bit of investigation, I came to the conclusion that what they really needed was a custom quote app which could be built fairly easily with Microsoft PowerApps.
PowerApps can easily connect to and save data to many different data sources, so after a bit more investigating, I decided I would use SharePoint lists to store all the quote data from the app.
I had heard about SharePoint before, but I never really knew what it was.
I had also come across it in Excel since Excel Tables have the ability to export to SharePoint.
In this post, I’m going to share with you what I found out about SharePoint and Excel.
What is SharePoint?
As the name might suggest, it’s a place to share stuff.
It’s a browser based platform from Microsoft that can house all the content (data, files, folders, photos, documents etc.) related to your work to make it easier to share and collaborate with others on the same work.
You can think of it as an internal company website (intranet) that can help improve your organization’s data management. A sort of Wikipedia style server or information portal. It’s also a bit like OneDrive in that it can store and manage your files in the cloud, but with some more advanced collaboration features.
I set up my SharePoint site quickly and didn’t bother to edit or customize anything. This is what you get straight out of the box.
There’s a lot of customization possible, but I’m just using it to store a couple data lists so didn’t think it was worth spending any time on.
How Do I Get SharePoint?
SharePoint doesn’t come with any of the Office 365 Home products. It’s really only intended for business use so it’s only available with an Office 365 Business account subscription.
In fact, you’ll have to shell out for the Office 365 Business Premium account if you want to use SharePoint. It’s not available with the regular business account.
What is a SharePoint List?
A SharePoint list is similar to an Excel Table, it’s a container for data.
SharePoint lists allow you to store data in list format with rows and columns.
You can use a list to house all your customer contact details, employee details, product pricing etc. If you can organize the data into a table structure, then it can be stored in a SharePoint list.
Unlike Excel tables, the columns in a SharePoint list allow you to set a column as a certain type of data like text, number, date, hyperlink etc… A SharePoint list can even contain attachments so you could attach a photo to each employee in your employee details list.
Creating a New List in SharePoint
Creating a new list in SharePoint is easy.
From the homepage of your SharePoint site, press the New button then choose List from the options. Give the list a name and description and press the Create button.
You will now have a blank SharePoint list!
All SharePoint lists contain a Title column, and this should usually be reserved for a field that contains unique values.
You can customize your new list by adding columns, assigning data types to each column and then adding data to the list.
The new list might appear in your site navigation menu, but if not you can use the Site Contents menu item to navigate back to the list from any place on your SharePoint site.
Exporting an Excel Table to a SharePoint List
If your data already exists in Excel, then there is an easier way to create a new SharePoint list.
You can export data from Excel to SharePoint. This way, you can avoid the tedious task of creating and assigning data types to columns.
If your data already has column names in Excel, then these are also exported to your new SharePoint list. The Export wizard will also guess what SharePoint data types to use for the columns based on the data.
Create an Excel Table for the Data
First, the data is going to need to be in a table format.
Select the data then go to the Insert tab and choose Table. Another way to turn your data into a table is to use the Ctrl + T keyboard shortcut.
Make sure you name the table after by going to the Table Tools Design tab and giving it a new name in the Properties section.
Export the Excel Table to a SharePoint List
Select the table and go to the Table Tools Design tab and select the Export command then choose Export Table to SharePoint List.
The first step in the Export to SharePoint List wizard.
- Enter the URL for your SharePoint site.
- Check the box if you want to create a read-only connection to the SharePoint list. This means when you add data to the list on your SharePoint site, the new data will show up in your Excel table when you right click and refresh the table.
- Enter a Name for the new list.
- Enter a Description for the new list. This is an optional entry.
- Press the Next button to review the data types selected before exporting.
Your SharePoint URL should be something like https://yourcompany.sharepoint.com/sites/yoursitename.
In step 2 of the export wizard, review the data types for each of the columns in the data. If a selected data type is incorrect, you’ll need to cancel the export and either fix the key cell in the table or change the entire column of data in the table.
When you’re happy with the data types in the export wizard, press the Finish button to complete the export.
How big the list is will affect how long the export takes. A handful of rows will be near instant but a couple thousand rows can take several minutes to export.
When the export process completes successfully, you’ll get a pop up notification with a link to the location of the new list.
You can click on this link and the SharePoint list will open in your default browser. Alternatively, you can find the list from the Site Contents navigation menu.
Refreshing an Excel Table with a Read-Only Connection to a SharePoint List
In the export table wizard there was an option to create a read-only connection to the new SharePoint list.
If you select this option then you’ll be able to refresh your Excel table with any new or changed data from the SharePoint list.
Select the table and go to the Table Tools Design tab and press the Refresh button or right click on the table and select Refresh from the menu.
The data in the Excel table will be updated with the latest data from the SharePoint list.
Exporting a SharePoint List to an Excel Table
You can also move data the other way by exporting from SharePoint to Excel.
There’s a big Export to Excel button in each list.
Press this button and the browser will download a query.iqy file.
Open this file and Excel will launch and prompt you to choose where to load the data (Table, Pivot Table or Pivot Chart) and choose the location to load it (an existing worksheet, new worksheet or new workbook).
This is actually the exact same read-only setup that was an option when exporting from Excel. If you missed enabling that option, no worries because you can achieve the same thing by exporting from your SharePoint list.
Importing a SharePoint List to Excel with Power Query
Power query can be used to connect to all sorts of data sources and SharePoint lists are one of them.
This will give you more control over which data in the list you import as compared to creating a read-only connection to the SharePoint list.
Create a SharePoint Power Query
To create a new SharePoint list query, go to the Data tab ➜ select Get Data ➜ choose From Online Services ➜ choose From SharePoint Online List.
This option is also available under the From Other Sources menu as From SharePoint List.
You will be prompted to enter the URL to the SharePoint site. This should be of the format https://yourcompany.sharepoint.com/sites/yoursitename. Then you can press the OK button.
This will open the power query navigator preview where you can select the list you want to import. Once selected, a preview of the list will show on the right.
A large number of columns in the data preview will look unfamiliar. This is because SharePoint lists contain a lot of extra columns even if they aren’t being used.
For example, every SharePoint list will have an ID column which is a unique identifier automatically created for each row in the list.
You will need to edit the query slightly to avoid importing all these unfamiliar columns. Press the Transform Data button to open the power query editor.
There are a lot of extra columns, so it will usually be easier to select the columns you want to keep (hold the Ctrl key to select multiple columns). Then right click on any of the selected column headings and choose Remove Other Columns from the menu.
You can also do any other type of data transformation available with power query if you would like.
Once you’re finished with the query, you can save it and load the data into Excel. Go to the Home tab in the power query editor and press the Close & Load command to save the query and load the data into an Excel table in your workbook.
Importing Files from a SharePoint Document Library or Folder with Power Query
SharePoint can store more than just lists, it can also store all types of files in a document library.
You can use use power query to import and combine data from multiple data files like Excel workbooks or CSV’s.
What is a SharePoint Document Library or Folder?
A SharePoint document library is very similar to a folder on your computers hard drive. It’s a place to store all your related files.
You might set up a document library for all your monthly sales files.
Here I have a document library called Sales and in a folder called 2018Q1 in which I have 3 Excel workbooks.
Each file has sales data by day for the particular month.
Export a Folder to Excel
If you click on the Export to Excel button found in the SharePoint folder this will download a query.iqy file.
When you open this file it launches Excel and creates a read-only connection to the list of files in the folder. You can refresh this just like when exporting a SharePoint List to an Excel Table.
This table only contains the names of files and not the actual contents of the files. There is a handy clickable hyperlink for each of the file or folder names. This will open up the SharePoint file or folder.
Create a From SharePoint Folder Query
You’ll need power query if you want to import and combine the data inside all the files.
To create a SharePoint Folder query go to the Data tab ➜ select Get Data ➜ choose From File ➜ choose From SharePoint Folder.
Now you’ll need to input the site URL (not the folder URL).
The Navigation preview will show a list of all files in the site and you’ll need to use power query to filter down to the files you want. Press the Transform Data button.
Filter on the Folder Path column to the desired folder. Then further filter on any file Name or Extension to get exactly the files you want.
When only the files you want to import and combine are left, click on the Combine Files toggle in the Content column heading.
Power query will import and combine the files based on a sample file. You can then select which sheets to import and view a preview of the data on the right side. Press the OK button to combine the files.
You can then Close & Load the query to import all the data. Now if you add a new monthly sales files to the folder and refresh the query, the new file’s data will be included in the query’s output.
Conclusions
SharePoint is a great place for storing files for collaboration and data that’s shared throughout the company.
But it might not be the best place for further using or analyzing the files or data.
That’s ok though, SharePoint and Excel are very well integrated. It’s easy to push and pull data from SharePoint to Excel.
You can quickly get data using the export options in either Excel or SharePoint. If you’re comfortable with power query, you can even use that.
About the Author
John is a Microsoft MVP and qualified actuary with over 15 years of experience. He has worked in a variety of industries, including insurance, ad tech, and most recently Power Platform consulting. He is a keen problem solver and has a passion for using technology to make businesses more efficient.

If you’re the author of Microsoft Excel data that others in your organization need to view and perhaps even update, you have many options, such as sharing an Excel file or creating a list using Microsoft Lists or Microsoft SharePoint.
If all you’re after is a small part of the Excel file, sharing the entire workbook is overkill and potentially dangerous. Microsoft Lists and SharePoint are similar, but Microsoft Lists is a good choice when interacting with the list via Teams.
SharePoint lists are also a solid choice and a bit easier to implement than Microsoft Lists. Once the data is available as a SharePoint list, you can decide who can access and update the list. The only requirement is that you format the data as an Excel table.
SEE: Get the most out of Excel with these 13 courses (TechRepublic Academy)
In this tutorial, I’ll show you how to export an Excel table to a SharePoint list. I’ll also share a lot of basic information about SharePoint lists along the way.
I’m using Microsoft 365 Business Premium, which includes OneDrive for Business and SharePoint. You must have Microsoft 365 Business Premium, Standard or Basic. However, you can export from Excel to SharePoint in earlier versions through Excel 2007.
You can follow along using this Microsoft Excel demonstration file.
What lists are in SharePoint
If you’re familiar with Microsoft Lists, you’ll find that SharePoint lists are similar. They’re an easy way to share data with others in your organization when they need to track the same data.
Technically, a SharePoint list is a collection of related data in table format, similar to Microsoft Excel. From one perspective, lists are a way to share data on a SharePoint site. You can also add attachments, such as documents and images. But, lists aren’t a simple list of data. Lists can also take the form of calendars, contacts, announcements, links, surveys and more. You can even integrate lists with Microsoft Flow, Microsoft Power Apps and Power Automate.
If the data is already in Excel, you might be wondering why you might use a SharePoint list instead of sharing the Excel workbook. It’s a valid question, and here are a few things to consider when choosing between the two:
- A SharePoint list can act as a main list with the most up-to-date data. Even though you can share an Excel file, users may save it locally and reference it instead of the online version. Who’s keeping up with the different versions? That’s not a problem if everyone’s interacting with a SharePoint list instead.
- Even though you can protect parts of an Excel file, it’s still too easy for someone to get off track and change or even delete important data. In contrast, a SharePoint list contains only the relevant data, so there’s no confusion.
- You can set permissions and implement data validation to protect the data in SharePoint, which ensures the integrity of your data. These options are available in Excel, but they’ll be in addition to the workbook’s purpose. With a SharePoint list, the list is its own purpose. There’s nothing else to distract you. In addition, SharePoint lists support version history. This may or may not be enabled locally for your Excel file.
- SharePoint lists support multiple view types for the data, which you can’t easily duplicate in an Excel file.
A SharePoint list is a great way to manage data when lots of people view and edit that data regularly. Now, let’s create a SharePoint list using Excel data.
How to create a SharePoint list using Excel
Once you’ve made the decision to share Excel data as a SharePoint list, you must format the data as an Excel Table. To format the data as a table, click anywhere inside the dataset and press Ctrl + T, or choose Table from the Tables group on the Insert tab. When Excel prompts you to confirm the conversion, note the header question, and then, click OK.
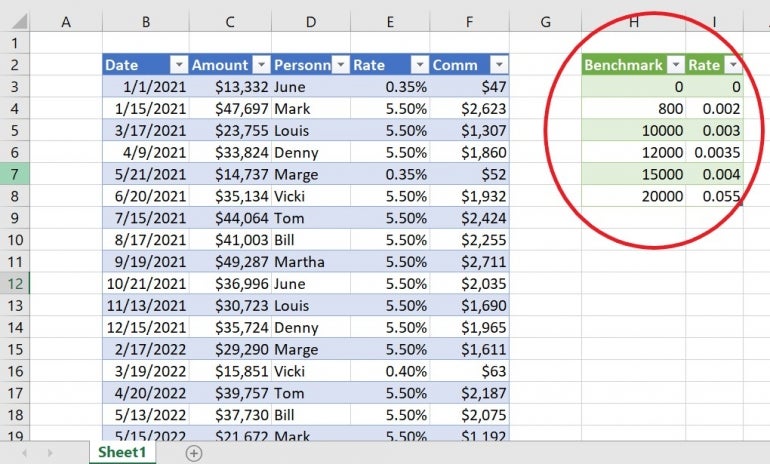
Figure A shows two table objects in the same Excel sheet. We want to create a SharePoint list of the rate table in H2:I8 because a couple of managers refer to these rates regularly. They also have permission to change them, but they all need the most up-to-date rates. This is a good example for using a SharePoint list. It’s okay for managers and even employees to see the rate table. It’s altogether another thing for those same people to see the actual sales and commission values for everyone in the organization.
Figure A
Now you’re ready to start the export:
Click inside the rate table, and in the contextual Table Design tab, click Export in the External Data Table group.
Choose Export Table To SharePoint list from the dropdown. If you’re not currently signed into your Microsoft account, the wizard will prompt you to do so at some point.
In the resulting dialog, enter the SharePoint site address. Enter the entire link, even if it’s enormously long. To find the URL, sign into your Microsoft account, and choose SharePoint from the list of apps. Then, choose the site where you plan to create the list, and copy the URL from the browser to the dialog.
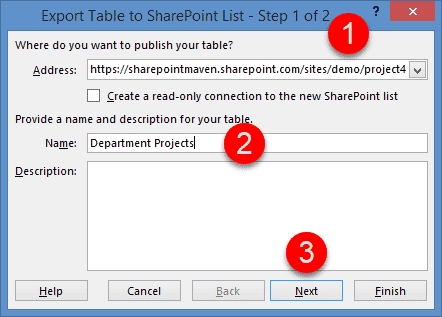
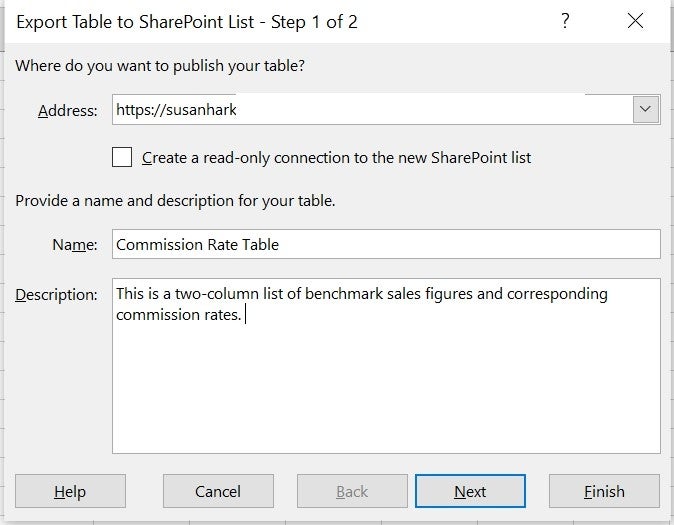
Name the list and add a meaningful description (Figure B). Then, click Next.
Figure B
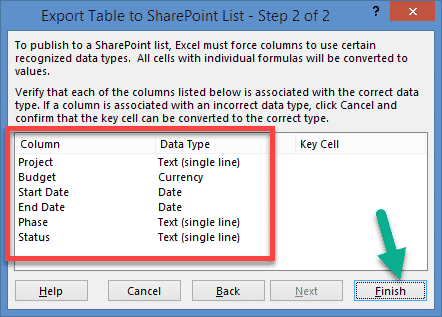
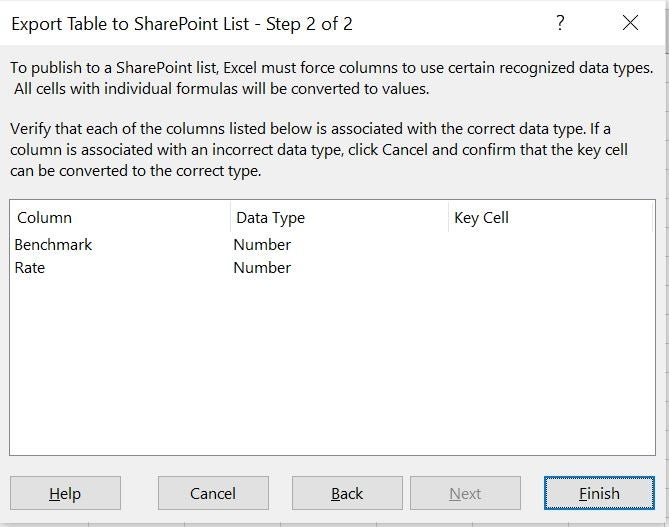
Confirm that the wizard correctly assigns the right data type to each column (Figure C), and click Finish.
Figure C
Click the link in the confirmation message shown in Figure D to access the new list. It’s a good idea to bookmark this page.
Figure D

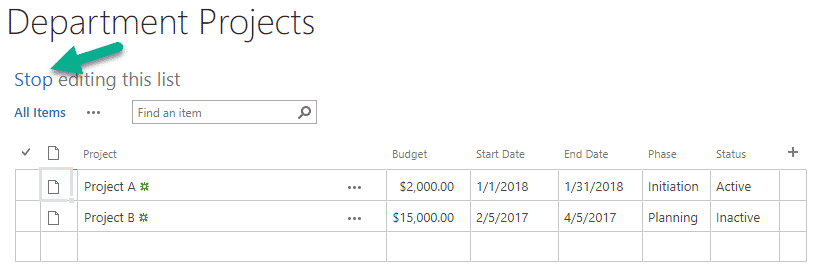
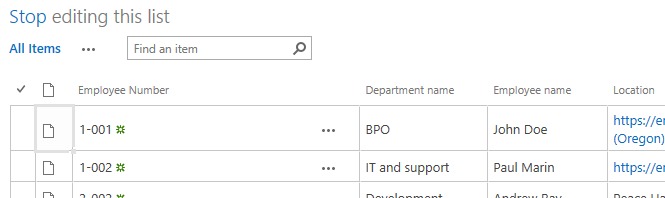
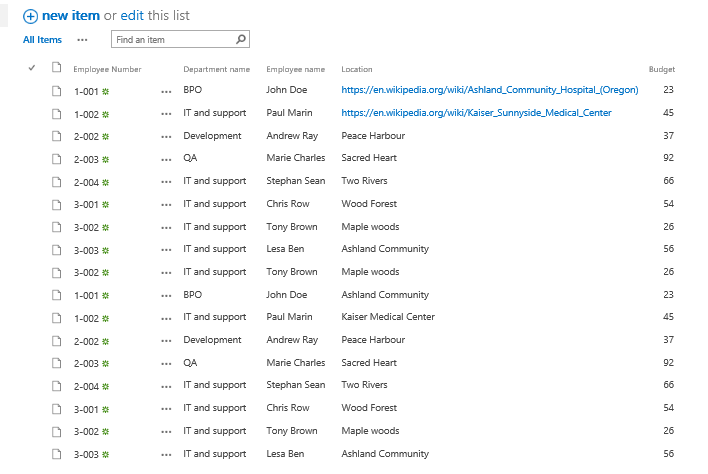
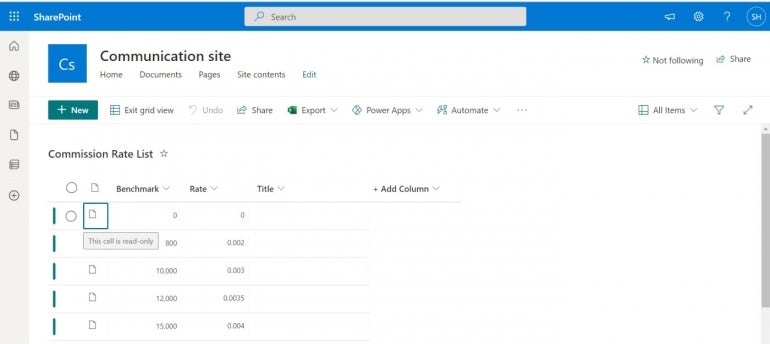
As you can see in Figure E, the SharePoint list contains the same rate records as the Excel workbook. At this point, you can edit the new list if necessary. To share it, click the Share link in the top-right corner. You can enter individuals or groups.
Figure E
You will have full access to the data and the structure. Those you share the list with can view and edit the data. But, they can’t edit permissions or list structure.
If you’ve used Microsoft Lists, you can see how much easier the SharePoint list is to create. The wizard does everything whereas Microsoft Lists, because of the increased social interaction functionality, requires more work on your part.
Be prepared to be hooked on SharePoint lists. They’re easy to implement and provide a great deal of useful flexibility to others in your organization.
Stay tuned
The one thing missing in this scenario is a live link between the SharePoint list and the original Excel workbook. As is, someone can change the list, and that change will not update the original data. In a future article, I’ll show you how to update the original data.