
Microsoft Excel is a spreadsheet program included in the Microsoft Office Suite. It’s compatible with Windows, Mac OS X, Android, and iOS. It simplifies the creation of text and numeric grids, formulas calculations, graphing tools, pivot tables, and the VBA Macro programming language (Visual Basic for Applications). Simple and advanced arithmetic operations and functions can be used to numerically manipulate grids of numbers organized in rows and columns.
PostgreSQL, sometimes known as Postgres, is a free and open-source Relational Database Management System (RDBMS) that emphasizes extensibility and SQL conformance. Structured objects are used instead of documents to store data in PostgreSQL. It employs conventional SQL syntax and formatting.
There are a variety of methods for importing Excel data into a PostgreSQL database; some are simple, while others are more complicated, depending on the sort of data you receive and the format it is in. In this article, you will learn everything about Excel to PostgreSQL along with the process which you might want to carry out while using it to make the process run smoothly.
What is PostgreSQL?

PostgreSQL, or Postgres, is a free, open-source Relational Database Management System (RDBMS) that focuses on extensibility and SQL compliance. It was first released on July 8, 1996, and was developed at the University of California, Berkeley. It was the Ignes database’s successor. Instead of storing data in the form of documents, PostgreSQL uses Structured objects. It uses the standard SQL syntax and style.
It’s written in C and has a monolithic architecture, which means all of the parts are connected and work in a logical order. It provides community assistance and further assistance to some of its paid customers. Because of its novel backup systems, it is frequently employed in the Healthcare, Finance, and Industrial industries.
Key Features of PostgreSQL
PostgreSQL has some distinguishing characteristics that make it a viable alternative to other standard RDBMSs. The following are some of these characteristics:
- PostgreSQL can handle a wide range of data, documents, and customization kinds.
- It features a Monolithic Architecture, which means that all of the components function together automatically.
- It’s perfect for transactional workflows like those found in bank systems, risk assessments, BI (Business Intelligence), and powering a variety of business applications.
- Storage is reliable because of various fail-safes and redundancy.
- Since it is open-source, anyone can utilize all of its features for free.
- Since its processing capacity depends on the system it runs on, it has limited scalability.
- It has a strong Access Control System with features such as row and column level security and multi-factor authentication with certificates.
- It is ACID (Atomicity, Consistency, Isolation, and Durability) compliant and runs on major operating systems.
To learn more about PostgreSQL, you can check the official website here.
What is Microsoft Excel?

Microsoft Excel is a Spreadsheet Application that is part of the Microsoft Office Suite. It runs on Windows, Mac OS X, Android, and iOS devices. It makes text and numeric grids, calculation of formulas, graphing tools, pivot tables, and the VBA Macro programming language easier to create (Visual Basic for Applications). To numerically manipulate grids of numbers organized in rows and columns, simple and sophisticated arithmetic operations and functions can be utilized.
Microsoft Excel is a spreadsheet program that may be used to create tables and record data. The information can range from a daily planner to financial information about a company. It also facilitates data analysis and the production of visualizations based on spreadsheet data.
Key Features of Microsoft Excel
- Paste Special: When copying data from one cell to another, the user can also copy formatting, value, formula, comments, and other items, as well as their combinations, depending on the user’s needs.
- Conditional Formatting: This feature draws attention to trends in your data as they appear in your spreadsheet.
- Excel Pivot Tables: These can be used to sort, count, total, or average data from a single large spreadsheet and display it in whatever way the user chooses in a new table.
- Add Multiple Rows: Users can add multiple rows and columns to their spreadsheets at any moment in Microsoft Excel.
- Print Optimisation: Print Preview, Fit to One Page, Altering Margins, Print Selection, Printing Headers, Portrait vs. Landscape, and Spreadsheet Design are all options for printing Excel sheets to your satisfaction.
- Vertical/Horizontal Formula Extention: Excel’s biggest feature is its ability to scale vertically and horizontally. Excel will conduct the necessary calculations any number of times once the formula is correct.
- Index-Match: One of the most powerful Excel function combinations is Index-Match. It can be used to look up a value in a large Data Table and return its equivalent in the table.
- Filters: Microsoft Excel provides capabilities that let you analyze data based on your own requirements. Filters are the terms for these functionalities.
- Flash Fill: While copying data, Excel offers suggestions for making specific changes. Consider the following scenario: you have two columns of names and you need to produce email addresses for each of them. While you’re selecting an email address for one row, Excel will propose email addresses for all of the other rows based on their names.
For further information on Microsoft Excel, check the official website here.
Hevo Data, a No-code Data Pipeline helps to load data from any data source such as Google Sheets, FTP, Google Search Console, SaaS applications, Cloud Storage, SDKs, and Streaming Services to a destination of your choice like PostgreSQL and simplifies the ETL process like Excel to PostgreSQL. It supports 100+ data sources (including 40+ free data sources) and is a 3-step process by just selecting the data source, providing valid credentials, and choosing the destination. Hevo not only loads the data onto the desired Data Warehouse/destination but also enriches the data and transforms it into an analysis-ready form without having to write a single line of code.
Get started with hevo for free
Its completely automated pipeline offers data to be delivered in real-time without any loss from source to destination. Its fault-tolerant and scalable architecture ensure that the data is handled in a secure, consistent manner with zero data loss and supports different forms of data. The solutions provided are consistent and work with different BI tools as well.
Check out why Hevo is the Best:
- Secure: Hevo has a fault-tolerant architecture that ensures that the data is handled in a secure, consistent manner with zero data loss.
- Schema Management: Hevo takes away the tedious task of schema management & automatically detects the schema of incoming data and maps it to the destination schema.
- Minimal Learning: Hevo, with its simple and interactive UI, is extremely simple for new customers to work on and perform operations.
- Hevo Is Built To Scale: As the number of sources and the volume of your data grows, Hevo scales horizontally, handling millions of records per minute with very little latency.
- Incremental Data Load: Hevo allows the transfer of data that has been modified in real-time. This ensures efficient utilization of bandwidth on both ends.
- Live Support: The Hevo team is available round the clock to extend exceptional support to its customers through chat, email, and support calls.
- Live Monitoring: Hevo allows you to monitor the data flow and check where your data is at a particular point in time.
Sign up here for a 14-day free trial!
There are many methods to transfer data from Excel to PostgreSQL. You will gain an understanding of two of them.
Method 1: Integrating Excel to PostgreSQL using ODBC Drivers
- Step 1: Install ODBC Drivers for PostgreSQL
- Step 2: Configure Postgres ODBC Driver in Excel
- Step 3: Authorise Connection with PostgreSQL
- Step 4: Load Data in Microsoft Excel
Get & Transform (Power Query) can be used to connect to PostgreSQL from Excel using ODBC. This approach presupposes you’ve installed a PostgreSQL ODBC Driver.
Step 1: Install ODBC Drivers for PostgreSQL
The first step in Excel to PostgreSQL data transfer is to install ODBC Driver. The PostgreSQL ODBC 64-bit driver is available for download. On the machine where the Secure Agent is installed, install the PostgreSQL ODBC driver.
Step 2: Configure Postgres ODBC Driver in Excel
Expand the Get Data drop-down box after clicking Data in Excel. Select From Other Sources > From ODBC from the drop-down menu.

Step 3: Authorise Connection with PostgreSQL
Choose your data source name in the From ODBC dialogue (DSN). You can expand the Advanced Options dialogue box and input the connection string for your Data Source if you haven’t yet established your ODBC Driver (without credentials, which are defined in the credentials dialogue box in the next step). You can also enter a SQL query that will be performed immediately after connecting to the data source. Click the OK button.

Select Database and input your credentials in the dialog box, then click Connect if you’re using a database Username or Password. Select Default or Custom and press Connect if your database is not password-protected or if you’ve previously entered your credentials in the ODBC Data Source settings.

Step 4: Load Data in Microsoft Excel
Select the table from which you wish to retrieve data in the pop-up box and click on Load.

The table’s data will be displayed in an Excel spreadsheet, where you can interact with it further.

You have successfully completed Excel to PostgreSQL data transfer via ODBC Driver.
Method 2: Integrating Excel to PostgreSQL via CSV Files
- Step 1: Excel File Conversion
- Step 2: CSV File Connection
- Step 3: Data Import
Step 1: Excel File Conversion
The first step in the CSV method in Excel to PostgreSQL data transfer is to Excel FIle Conversion. Open your file in Microsoft Excel if the file extension is xls or xlsx. This will need to be converted to a CSV file, which is a simple process. Simply Save As and modify the “Save as type:” to “CSV (*.csv)” before clicking Save. There is no need to change the file name to .csv because it will change automatically.
![]()
Step 2: CSV File Connection
Click Create and then Connection after right-clicking your Database Connection (or anyplace if your connections are empty). On the left, make sure the All tab is chosen, then scroll down to CSV. Now click Next.

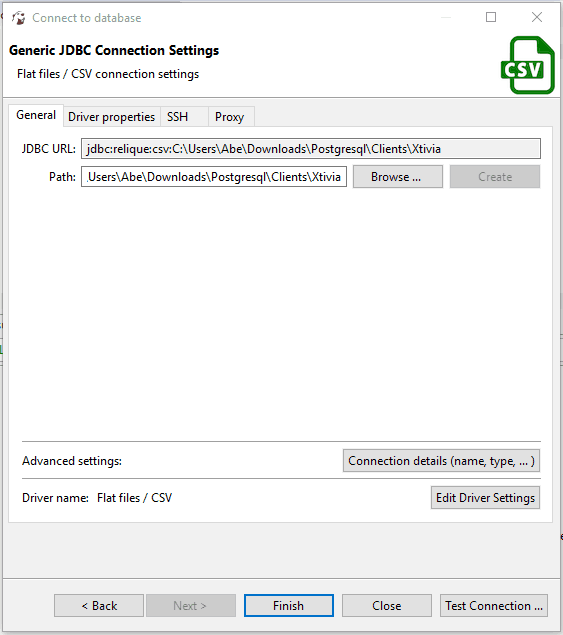
Select the folder where you saved your CSV file from Microsoft Excel by clicking Browse. You’re choosing a folder rather than a file. All CSV files in that folder will be loaded by the connection. Finish by clicking the Finish button.

You should now notice a new connection, which is configured similarly to a standard connection. Each of the CSV files in your folder will be organized into a table with columns.

Step 3: Data Import
Data Import is the last step in the process of Excel to PostgreSQL data transfer. After you’ve established the connection, you may query the data using SQL syntax, just like any other table. This data can now be imported into your PostgreSQL Table. Select Export Data from the context menu of the table you want to import into PostgreSQL.

Click Next after selecting Database. Change the target container to the schema in PostgreSQL where your table resides. Click on the OK button.

Choose the target (table) for the data to be imported. Set the target column for each data column by clicking Columns. This will map automatically if you have headers in your data that match the table columns. Click the OK button. Now, Next should be selected.

Set the connection and Data Load options. Remove the option for truncating the target table if you only want to add data to the table rather than rewriting it. Now, Next should be selected.

After you’ve double-checked that the source and target are correct, click Start to begin the import.
The data from your PostgreSQL table is now available for selection.

You have successfully completed Excel to PostgreSQL data transfer via CSV files.
Conclusion
This article teaches you about Excel to PostgreSQL. It provides in-depth knowledge about the concepts behind every step to help you understand and implement them efficiently. If you want to transfer data into your desired Database/destination, then Hevo Data is the right choice!
Visit our Website to Explore Hevo
Hevo Data provides users with a simpler platform for integrating data from 150+ sources such as Google Sheets, FTP, etc. for Analysis. It is a No-code Data Pipeline that can help you combine data from multiple sources. You can use it to transfer data from multiple data sources into your Data Warehouses, Databases such as PostgreSQL, or a destination of your choice. It helps you carry out ETL processes like Excel to PostgreSQL. It provides you with a consistent and reliable solution to managing data in real-time, ensuring that you always have Analysis-ready data in your desired destination.
Want to take Hevo for a spin? Sign Up for a 14-day free trial and experience the feature-rich Hevo suite firsthand. You can also have a look at our unbeatable pricing that will help you choose the right plan for your business needs!
Share your experience of learning about Excel to PostgreSQL! Let us know in the comments section below!
На чтение 6 мин Просмотров 10к. Обновлено 15.09.2021
Все мы знаем (особенно если мы частые или постоянные пользователи СУБД PostgreSQL), что СУБД PostgreSQL имеет дело с данными из различных форматов. Однако есть еще некоторые форматы, совместимость которых с СУБД PostgreSQL вызывает сомнения. Одним из таких форматов файлов является формат Excel, то есть xls или xlsx. Многие люди задаются вопросом, можем ли мы напрямую импортировать данные из таблицы Excel в таблицу PostgreSQL в Windows 10 или нет. Что ж, чтобы изучить ответ на этот вопрос, вам нужно будет прочитать эту статью. Кроме того, в этой статье мы также поделились методом, который позволит вам использовать данные таблицы Excel в таблице PostgreSQL в Windows 10.
Содержание
- Как импортировать данные Excel в PostgreSQL в Windows 10?
- Тогда что мне делать, если у меня есть большой лист Excel, данные которого мне нужны в таблице PostgreSQL?
- Шаг 1: преобразование листа Excel в файл CSV в Windows 10
- Шаг 2: Создание соответствующей таблицы в PostgreSQL в Windows 10
- Шаг 3: Импорт данных файла CSV в таблицу PostgreSQL в Windows 10
- Шаг 4: Отображение содержимого таблицы PostgreSQL в Windows 10
- Заключение
Как импортировать данные Excel в PostgreSQL в Windows 10?
Если мы конкретно поговорим об этом вопросе, «могу ли я загрузить Excel в PostgreSQL в Windows 10?» то ответ на этот вопрос — «Нет». Мы не можем напрямую импортировать данные из таблицы Excel в таблицу PostgreSQL в Windows 10. Однако есть другие обходные пути, с помощью которых мы можем легко импортировать данные файла Excel в таблицу PostgreSQL в Windows 10. Мы будем поговорим об одном таком обходном пути в следующих разделах этой статьи.
Тогда что мне делать, если у меня есть большой лист Excel, данные которого мне нужны в таблице PostgreSQL?
Теперь вы можете задаться вопросом, что вы можете сделать с таблицей Excel, которая у вас есть и содержит большое количество полезных данных. Будут ли эти данные потрачены впустую, поскольку вы не сможете напрямую импортировать их в таблицу PostgreSQL в Windows 10? К счастью, нет. Вы по-прежнему можете использовать эти данные, преобразовав их в один из таких форматов, поддерживаемых PostgreSQL в Windows 10. После преобразования ваших данных в соответствующий формат процесс импорта становится очень простым, и вы сможете увидеть его, выполнив следующие шаги:
Шаг 1: преобразование листа Excel в файл CSV в Windows 10
Поскольку наиболее часто используемый формат файла при работе с базами данных — это CSV, поэтому мы сначала преобразуем целевой лист Excel в файл CSV. Существуют и другие форматы, поддерживаемые PostgreSQL; однако здесь мы выбрали наиболее часто используемый, а также наиболее удобный, то есть CSV. Чтобы преобразовать лист Excel в файл CSV в Windows 10, вам сначала нужно найти этот файл, перейдя в целевой каталог, как показано на изображении ниже, а затем открыть этот лист Excel с помощью программы MS Excel.

В нашем целевом листе Excel у нас были некоторые образцы данных, показанные на следующем изображении. Таблица Excel состоит из трех разных столбцов, а именно StudentName, StudentAge и StudentGender. Этот лист Excel содержит в общей сложности пять различных записей или записей. Открыв целевой лист Excel, мы нажмем на меню «Файл» в строке меню, как вы можете видеть на изображении, показанном ниже:

В меню «Файл» мы найдем и щелкнем по опции «Сохранить как», как показано на добавленном изображении:

В диалоговом окне «Сохранить как» мы развернем раскрывающийся список «Тип файла» и выберем формат «CSV (с разделителями-запятыми)», как показано на изображении ниже:

После этого мы выберем место для сохранения нашего CSV-файла и нажмем кнопку «Сохранить».

После преобразования листа Excel в файл CSV процесс его загрузки в таблицу PostgreSQL будет точно таким же, как и у обычного файла CSV, и вы поймете это, выполнив следующие шаги.
Шаг 2: Создание соответствующей таблицы в PostgreSQL в Windows 10
Теперь, когда у нас есть файл CSV, содержащий нужные данные для импорта, мы создадим таблицу PostgreSQL для хранения этих данных с помощью следующего запроса:
# CREATE TABLE student_Data (StudentName VARCHAR (255) NOT NULL, StudentAge INT NOT NULL, StudentGrade VARCHAR (255) NOT NULL);
Этот запрос создаст таблицу с именем student_Data с тремя разными столбцами, то есть StudentName, StudentAge и StudentGrade соответственно. Эти три столбца будут содержать все данные, которые будут импортированы из файла CSV.
![]()
После успешного создания таблицы PostgreSQL на консоли появится ответ «СОЗДАТЬ ТАБЛИЦУ».

Шаг 3: Импорт данных файла CSV в таблицу PostgreSQL в Windows 10
После создания таблицы в PostgreSQL в Windows 10 мы выполним процесс импорта данных файла CSV в эту таблицу PostgreSQL, выполнив запрос, показанный ниже:
# COPY student_Data FROM ‘C:Excel.csv’ DELIMITER ‘,’ CSV HEADER;
Ключевое слово «COPY» в этом запросе импортирует данные из файла CSV в таблицу PostgreSQL. «Student_Data» — это имя таблицы PostgreSQL, в которую будут импортированы данные файла CSV. Затем за ключевым словом «FROM» следует путь, по которому мы будем читать файл CSV. Наше имя файла CSV было «Excel.csv». Ключевое слово «DELIMITER» следует за разделителем, используемым в файле CSV, который представлял собой запятую. Ключевое слово «CSV» представляет формат файла, который будет читать этот запрос. Наконец, ключевое слово «HEADER» указывает, что в файле CSV есть заголовок, который будет читать этот запрос. Эта строка заголовка будет пропущена после импорта данных в таблицу PostgreSQL, и вместо нее будет использоваться заголовок таблицы, то есть имена столбцов таблицы.

При успешном выполнении этого запроса на консоли отобразится сообщение «КОПИЯ 5», поскольку в Windows 10 из файла CSV в таблицу PostgreSQL нужно было импортировать пять различных записей.

Шаг 4: Отображение содержимого таблицы PostgreSQL в Windows 10
Наконец, чтобы убедиться, что данные нашей таблицы Excel (которые затем стали данными файла CSV) были успешно загружены в таблицу PostgreSQL, мы просмотрим содержимое таблицы PostgreSQL с помощью следующего запроса:
# SELECT * FROM student_Data;
На изображении ниже вы можете видеть, что все записи в таблице student_Data точно такие же, как и в записях нашего файла Excel.csv. Это означает, что загрузка листа Excel (который был преобразован в файл CSV) в таблицу PostgreSQL в Windows 10 прошла успешно.

Заключение
В этой статье был рассмотрен очень важный вопрос, касающийся СУБД PostgreSQL, а именно: можем ли мы загружать Excel в PostgreSQL или нет. Эта статья удовлетворительно ответила на этот очень распространенный вопрос. Более того, он также обеспечивает очень безопасный метод фактического использования данных таблицы Excel в таблице PostgreSQL в Windows 10. После использования этого метода данные таблицы Excel никогда не будут потрачены впустую; скорее, вы сможете эффективно использовать его в любой из ваших таблиц PostgreSQL в Windows 10.
The ESF Database Migration Toolkit is a robust and efficient solution for migrating data between various database formats, including MS Excel and PostgreSQL.
This guide will show you how to easily migrate data from MS Excel to PostgreSQL through a few simple steps of a wizard, streamlining complex migration processes and saving you valuable time.
Software Required:
| DMToolkit_x64.zip (60.9 MiB) |
64-bit Windows application for ESF Database Migration Toolkit 11.1.23 (2023-04-07). (md5: ba7fbaa2a70183bfab1276b3790b51c8) |
| DMToolkit_win32.zip (57.4 MiB) |
32-bit Windows application for ESF Database Migration Toolkit 11.1.23 (2023-04-07). (md5: 50677956511509d1e6bd99f3eb215fb1) |
System Supported:
- Windows 7 or higher.
- MS Excel 97 or higher.
- PostgreSQL 7.x or higher.
Introduction:
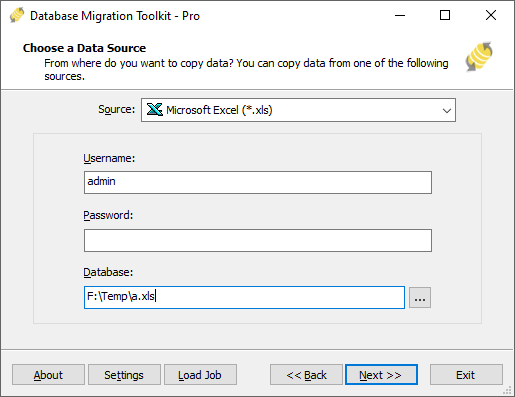
1. In «Choose a Data Source» dialog, Choose «Microsoft Excel(*.xls;*.xlsx)»;
- Click on the «…» button.
- Choose the Microsoft Excel (.xls or .xlsx) file that you want to use as the destination for the migrated data.

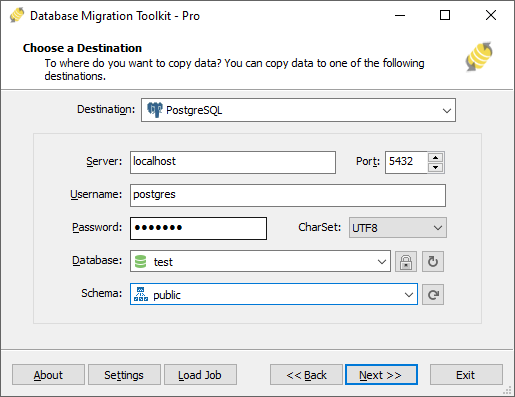
2. In «Choose a Destination» dialog, choose «PostgreSQL»;
- Input the server name (default: localhost) and port (default: 5432).
- Input the username (default is «postgres») and its password.
- Select the target database character set (default is «UTF8»), it’s important if the data contains non-ASCII characters e.g. German, French, Japanese.
- Press «Refresh Database» button to list all databases, you can choose an existing database or enter a new database name, the toolkit will automatically create the new database during the migration process.
- Input/select the target PostgreSQL schema name (default is «public»), or press «Refresh Schema» button to list all schemas.
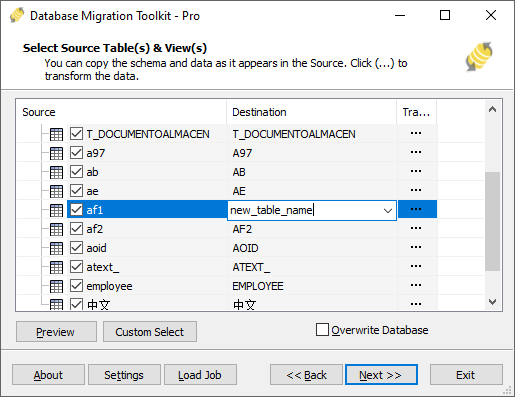
3.In «Select source Tables(s) & View(s)» dialog;
- Select the tables or views you want to migrate.
- You can access the table options or adjust the table structure by clicking the «…» button.

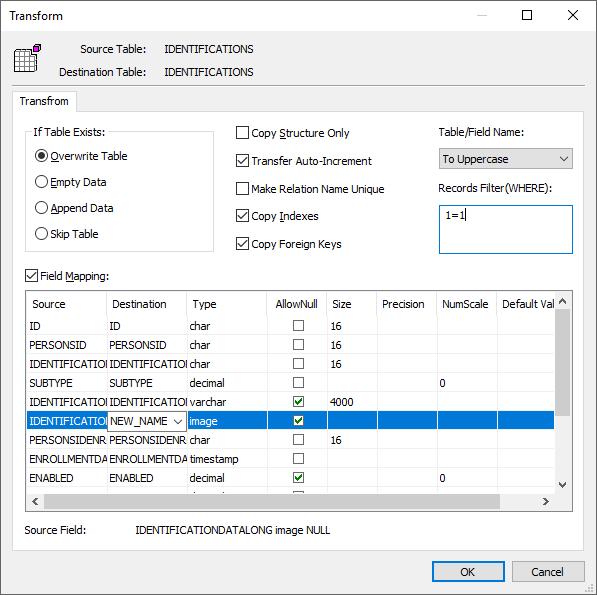
- In the «Field Mapping» option, you can customize the destination table’s fields, such as field name, data type, default value, comment, and more. You also have the option to choose the data transfer method, including Overwrite Table, Empty Data, Append Data, or Skip Table, or even filter the data before transferring it.
4. In «Execution» Dialog;
- You can start the migration process by clicking «Submit». The toolkit will efficiently and seamlessly migrate your data from MS Excel to PostgreSQL without the need for manual intervention.
- To keep track of the migration process, you can access the full migration log by clicking «Browse Log». This will provide you with a comprehensive view of the entire migration, including any potential issues and their resolutions.
- To save time in the future, you can save the migration settings as a job file by clicking «Save as job». This allows you to quickly reload the migration job at a later time or run the migration job using the command-prompt by typing «dmtc.exe —help». The command-prompt provides you with a full list of parameters to customize the migration process to your specific needs.
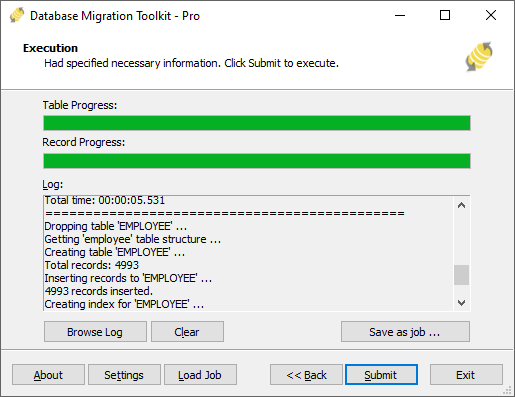
5.Finished!
Upon completion, the toolkit will generate a comprehensive migration report, providing you with all the information you need to verify the accuracy and completeness of the migration process. So, you can sit back and relax while the program carries out the task efficiently. Should you have any inquiries or recommendations, don’t hesitate to reach out to us. We’re always happy to help.
Download Now »
Related Links:
As explained here http://www.postgresonline.com/journal/categories/journal/archives/339-OGR-foreign-data-wrapper-on-Windows-first-taste.html
With ogr_fdw module, its possible to open the excel sheet as foreign table in pgsql and query it directly like any other regular tables in pgsql.
This is useful for reading data from the same regularly updated table
To do this, the table header in your spreadsheet must be clean, the current ogr_fdw driver can’t deal with wide-width character or new lines etc. with these characters, you will probably not be able to reference the column in pgsql due to encoding issue. (Major reason I can’t use this wonderful extension.)
The ogr_fdw pre-build binaries for windows are located here http://winnie.postgis.net/download/windows/pg96/buildbot/extras/
change the version number in link to download corresponding builds.
extract the file to pgsql folder to overwrite the same name sub-folders.
restart pgsql. Before the test drive, the module needs to be installed by executing:
CREATE EXTENSION ogr_fdw;
Usage in brief:
-
use ogr_fdw_info.exe to prob the excel file for sheet name list
ogr_fdw_info -s "C:/excel.xlsx" -
use «ogr_fdw_info.exe -l» to prob a individual sheet and generate a table definition code.
ogr_fdw_info -s "C:/excel.xlsx" -l "sheetname"
Execute the generated definition code in pgsql, a foreign table is created and mapped to your excel file. it can be queried like regular tables.
This is especially useful, if you have many small files with the same table structure. Just change the path and name in definition, and update the definition will be enough.
This plugin supports both XLSX and XLS file.
According to the document it also possible to write data back into the spreadsheet file, but all the fancy formatting in your excel will be lost, the file is recreated on write.
If the excel file is huge. This will not work. which is another reason I didn’t use this extension. It load data in one time.
But this extension also support ODBC interface, it should be possible to use windows’ ODBC excel file driver to create a ODBC source for the excel file and use ogr_fdw or any other pgsql’s ODBC foreign data wrapper to query this intermediate ODBC source. This should be fairly stable.
The downside is that you can’t change file location or name easily within pgsql like in the previous approach.
A friendly reminder. The permission issue applies to this fdw extensions. since its loaded into pgsql service. pgsql must have access privileged to the excel files.
We pride ourselves in building software that’s easy to use, but security is also our top priority.
We understand that some data uploaded might be sensitive, so we ensure that your data is only kept when needed.
We follow widely accepted industry standard practices when it comes to security:
- HTTPS is enforced for all communications with our server
-
We enforce a strict access policy and employees or external collaborators
never have access
to user data - All data is always encrypted at rest
-
All data is automatically deleted forever
24 hours after being uploaded.
We allow time before deleting files just in case you’re not done with the data, if you’re done with viewing or converting a file and want to delete it right away, you can do it yourself through the API.
Note that all files files uploaded without an account are acessible by a unique URL that is hidden but accesible by anyone, so we recommend you to sign up with an account if you want your files to be private, only your account will be able to access your files.
There are many ways to import data into a database, some are pretty straightforward, and others are more complex depending on the type of data you receive and which format it is in. I will show you how to import data from an excel file using the DBA tool DBeaver.
File Conversion
When you receive a file in Excel format, you must convert this data into a readable format. This format is usually .csv (Comma Delimited) but can often be in a format that has a delimiter that isn’t so common.
Excel file Conversion
Excel file extensions are usually xls or xlsx, open your file in Excel. You’ll need to convert this into a CSV file, which is extremely easy. All you need to do is Save As and change the “Save as type:” to “CSV (Comma delimited) (*.csv)” and click Save. The file name will change automatically, no need to change it to .csv.
![]()
Create csv Connection
Right-click your database connection (or anywhere if your connections are empty), click Create and then click Connection.
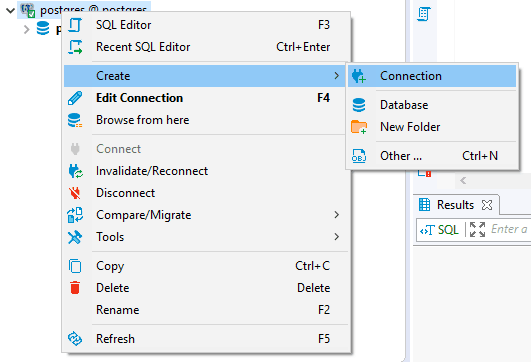
Make sure the All tab is selected on the left and scroll down to CSV. Click Next.
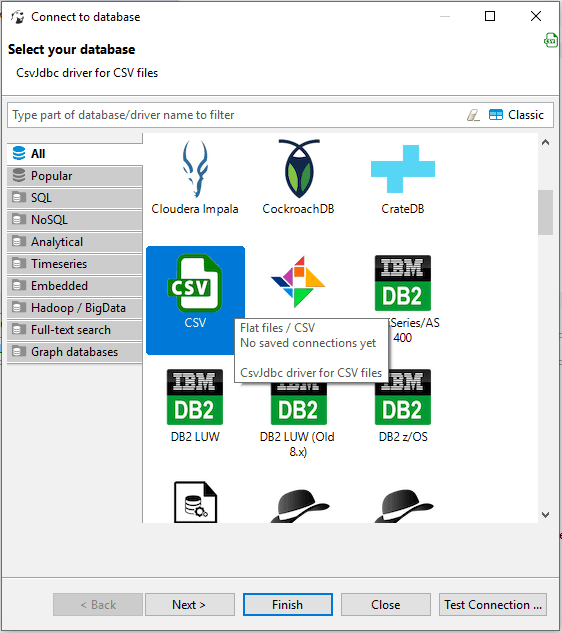
Click Browse… and select the folder where your csv file is that you saved from Excel. You’re selecting a folder here, not a file. The connection will load ALL csv files in that folder. Click Finish.
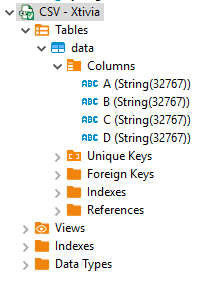
You will now see a new connection; this connection is set up exactly like a regular connection. Each csv file in your folder will be set up as a table with columns.
Data Import
Once the connection is made, you’re able to query the data just like you would any other table with sql syntax.

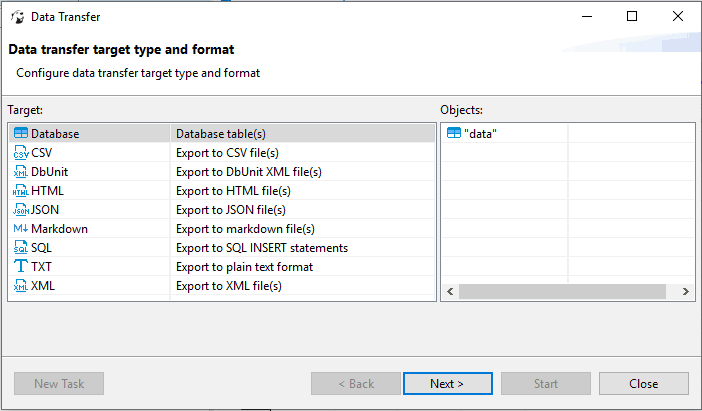
You can now import this data into your PostgreSQL table. Right-click the table you want to import into PostgreSQL and click Export Data.

Select Database and click Next.
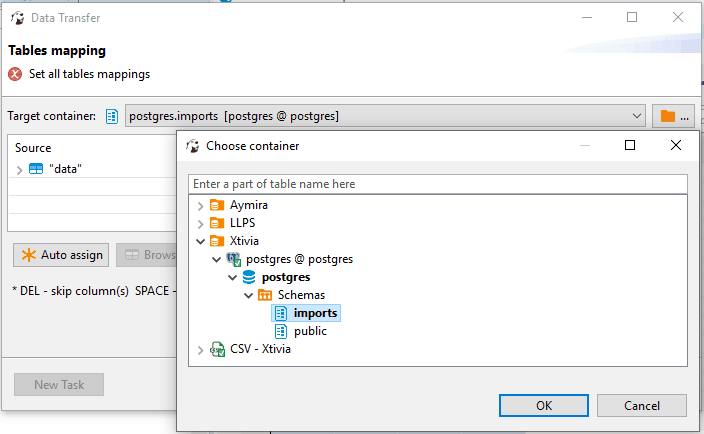
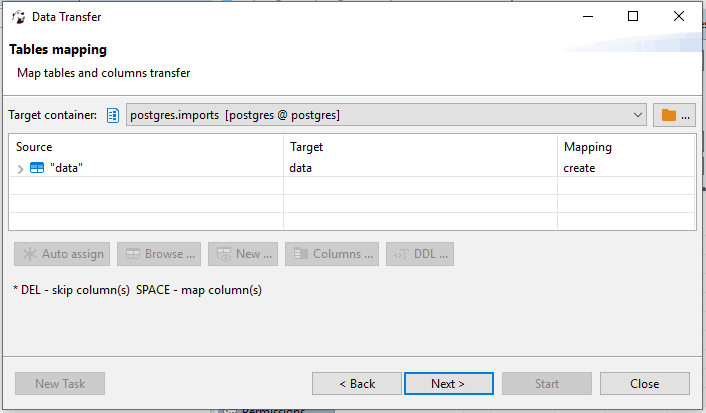
Change the target container to the schema where your table is in PostgreSQL. Click Ok.
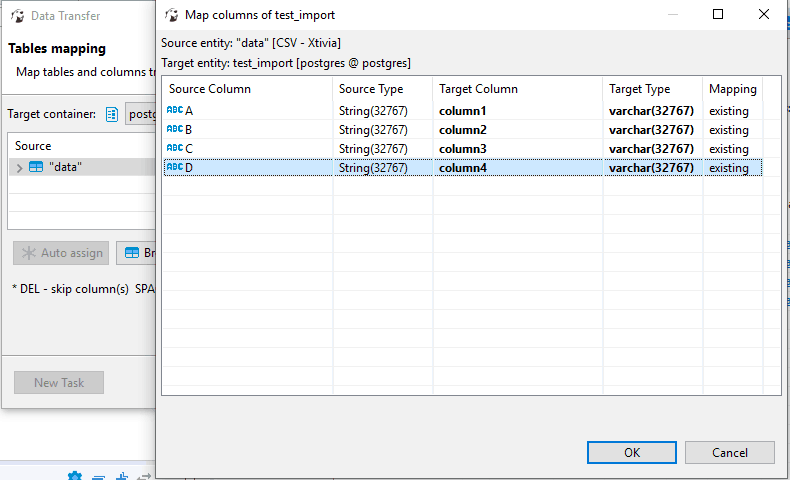
Select the target (table) where you want to import the data.
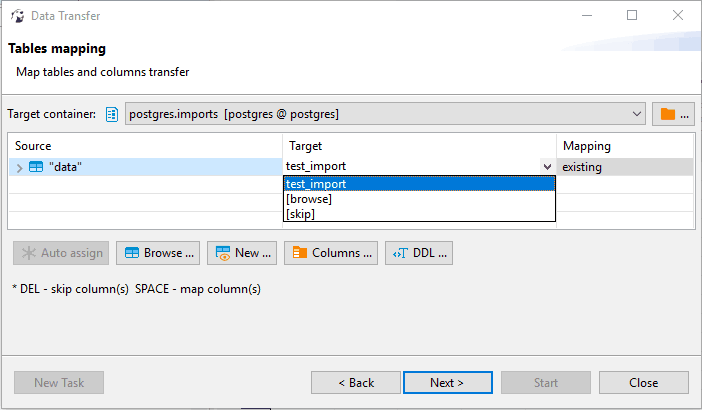
Click Columns and set the target column for each column of data. If you have headers already in your data that match the table columns, then this will automatically map. Click Ok. Click Next.
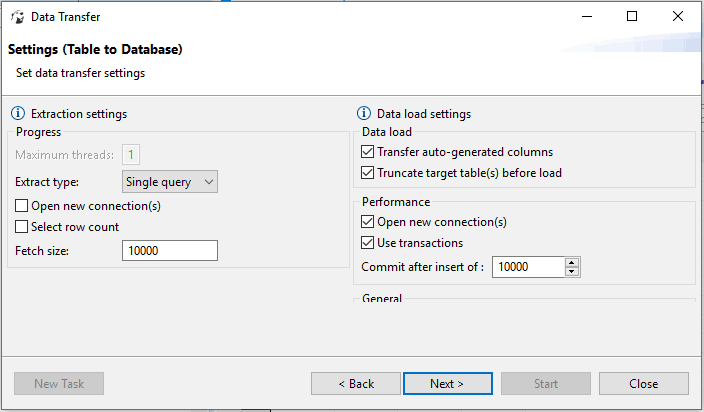
Set the options for connections and data load. If you only want to add data to the table and not overwrite the data, you will want to remove the option for truncating target table. Click Next.
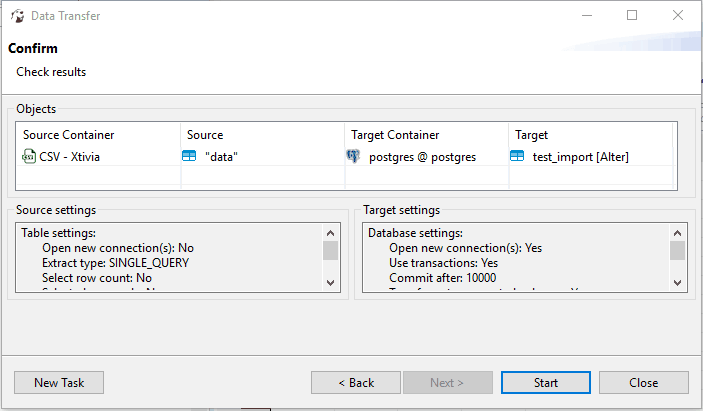
Check to make sure the source and target are correct and then click Start to begin the import.
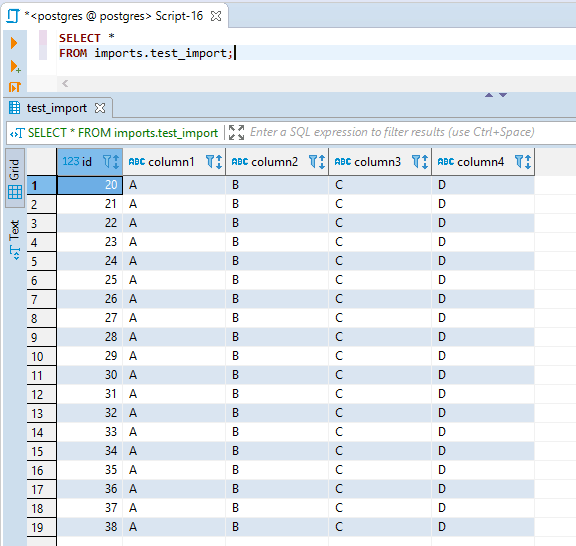
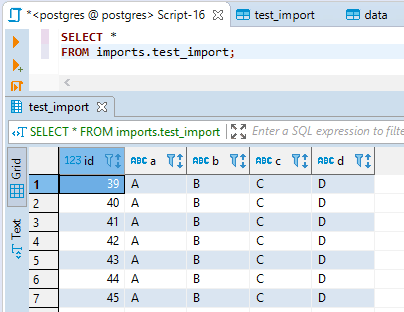
You can now select the data from your PostgreSQL table.
You can also create an empty table structure and select create under mapping in the Tables Mapping window, and it will create the columns for you. This is best used when you have headers.
When you select data from the table after the import, the first row in the import data will be what the columns are named.
*NOTE*
When you import data and have headers in your data, it will be used as the first row if you already have a table structure in place. This could cause your import to fail, or it could cause your data to be inconsistent with your column data.
PostgreSQL Updating Data Using CSV File with DBeaver
PostgreSQL Custom Delimited Imports with DBeaver