
Note: Microsoft Access doesn’t support importing Excel data with an applied sensitivity label. As a workaround, you can remove the label before importing and then re-apply the label after importing. For more information, see Apply sensitivity labels to your files and email in Office.
This article shows you how to move your data from Excel to Access and convert your data to relational tables so that you can use Microsoft Excel and Access together. To summarize, Access is best for capturing, storing, querying, and sharing data, and Excel is best for calculating, analyzing, and visualizing data.
Two articles, Using Access or Excel to manage your data and Top 10 reasons to use Access with Excel, discuss which program is best suited for a particular task and how to use Excel and Access together to create a practical solution.
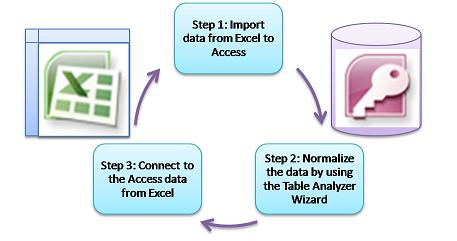
When you move data from Excel to Access, there are three basic steps to the process.
Note: For information on data modeling and relationships in Access, see Database design basics.
Step 1: Import data from Excel to Access
Importing data is an operation that can go a lot more smoothly if you take some time to prepare and clean your data. Importing data is like moving to a new home. If you clean out and organize your possessions before you move, settling into your new home is much easier.
Clean your data before you import
Before you import data into Access, in Excel it’s a good idea to:
-
Convert cells that contain non-atomic data (that is, multiple values in one cell) to multiple columns. For example, a cell in a «Skills» column that contains multiple skill values, such as «C# programming,» «VBA programming,» and «Web design» should be broken out to separate columns that each contain only one skill value.
-
Use the TRIM command to remove leading, trailing, and multiple embedded spaces.
-
Remove non-printing characters.
-
Find and fix spelling and punctuation errors.
-
Remove duplicate rows or duplicate fields.
-
Ensure that columns of data do not contain mixed formats, especially numbers formatted as text or dates formatted as numbers.
For more information, see the following Excel help topics:
-
Top ten ways to clean your data
-
Filter for unique values or remove duplicate values
-
Convert numbers stored as text to numbers
-
Convert dates stored as text to dates
Note: If your data cleaning needs are complex, or you don’t have the time or resources to automate the process on your own, you might consider using a third-party vendor. For more information, search for «data cleansing software» or «data quality» by your favorite search engine in your Web browser.
Choose the best data type when you import
During the import operation in Access, you want to make good choices so that you receive few (if any) conversion errors that will require manual intervention. The following table summarizes how Excel number formats and Access data types are converted when you import data from Excel to Access, and offers some tips on the best data types to choose in the Import Spreadsheet Wizard.
|
Excel number format |
Access data type |
Comments |
Best practice |
|---|---|---|---|
|
Text |
Text, Memo |
The Access Text data type stores alphanumeric data up to 255 characters. The Access Memo data type stores alphanumeric data up to 65,535 characters. |
Choose Memo to avoid truncating any data. |
|
Number, Percentage, Fraction, Scientific |
Number |
Access has one Number data type that varies based on a Field Size property (Byte, Integer, Long Integer, Single, Double, Decimal). |
Choose Double to avoid any data conversion errors. |
|
Date |
Date |
Access and Excel both use the same serial date number to store dates. In Access, the date range is larger: from -657,434 (January 1, 100 A.D.) to 2,958,465 (December 31, 9999 A.D.). Because Access does not recognize the 1904 date system (used in Excel for the Macintosh), you need to convert the dates either in Excel or Access to avoid confusion. For more information, see Change the date system, format, or two-digit year interpretation and Import or link to data in an Excel workbook. |
Choose Date. |
|
Time |
Time |
Access and Excel both store time values by using the same data type. |
Choose Time, which is usually the default. |
|
Currency, Accounting |
Currency |
In Access, the Currency data type stores data as 8-byte numbers with precision to four decimal places, and is used to store financial data and prevent rounding of values. |
Choose Currency, which is usually the default. |
|
Boolean |
Yes/No |
Access uses -1 for all Yes values and 0 for all No values, whereas Excel uses 1 for all TRUE values and 0 for all FALSE values. |
Choose Yes/No, which automatically converts underlying values. |
|
Hyperlink |
Hyperlink |
A hyperlink in Excel and Access contains a URL or Web address that you can click and follow. |
Choose Hyperlink, otherwise Access may use the Text data type by default. |
Once the data is in Access, you can delete the Excel data. Don’t forget to backup the original Excel workbook first before deleting it.
For more information, see the Access help topic Import or link to data in an Excel workbook.
Automatically append data the easy way
A common problem Excel users have is appending data with the same columns into one large worksheet. For example, you may have an asset tracking solution that started out in Excel but now has grown to include files from many workgroups and departments. This data may be in different worksheets and workbooks, or in text files that are data feeds from other systems. There is no user interface command or easy way to append similar data in Excel.
The best solution is to use Access, where you can easily import and append data into one table by using the Import Spreadsheet Wizard. Furthermore, you can append a lot of data into one table. You can save the import operations, add them as scheduled Microsoft Outlook tasks, and even use macros to automate the process.
Step 2: Normalize data by using the Table Analyzer Wizard
At first glance, stepping through the process of normalizing your data may seem a daunting task. Fortunately, normalizing tables in Access is a process that is much easier, thanks to the Table Analyzer Wizard.
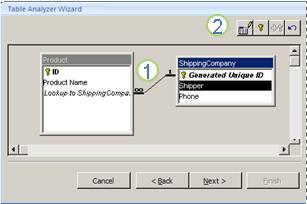
1. Drag selected columns to a new table and automatically create relationships
2. Use button commands to rename a table, add a primary key, make an existing column a primary key, and undo the last action
You can use this wizard to do the following:
-
Convert a table into a set of smaller tables and automatically create a primary and foreign key relationship between the tables.
-
Add a primary key to an existing field that contains unique values, or create a new ID field that uses the AutoNumber data type.
-
Automatically create relationships to enforce referential integrity with cascading updates. Cascading deletes are not automatically added to prevent accidentally deleting data, but you can easily add cascading deletes later.
-
Search new tables for redundant or duplicate data (such as the same customer with two different phone numbers) and update this as desired.
-
Back up the original table and rename it by appending «_OLD» to its name. Then, you create a query that reconstructs the original table, with the original table name so that any existing forms or reports based on the original table will work with the new table structure.
For more information, see Normalize your data using the Table Analyzer.
Step 3: Connect to Access data from Excel
After the data has been normalized in Access and a query or table has been created that reconstructs the original data, it’s a simple matter of connecting to the Access data from Excel. Your data is now in Access as an external data source, and so can be connected to the workbook through a data connection, which is a container of information that is used to locate, log on to, and access the external data source. Connection information is stored in the workbook and can also be stored in a connection file, such as an Office Data Connection (ODC) file (.odc file name extension) or a Data Source Name file (.dsn extension). After you connect to external data, you can also automatically refresh (or update) your Excel workbook from Access whenever the data is updated in Access.
For more information, see Import data from external data sources (Power Query).
Get your data into Access
This section walks you through the following phases of normalizing your data: Breaking values in the Salesperson and Address columns into their most atomic pieces, separating related subjects into their own tables, copying and pasting those tables from Excel into Access, creating key relationships between the newly created Access tables, and creating and running a simple query in Access to return information.
Example data in non-normalized form
The following worksheet contains non-atomic values in the Salesperson column and the Address column. Both columns should be split into two or more separate columns. This worksheet also contains information about salespersons, products, customers, and orders. This information should also be split further, by subject, into separate tables.
|
Salesperson |
Order ID |
Order Date |
Product ID |
Qty |
Price |
Customer Name |
Address |
Phone |
|---|---|---|---|---|---|---|---|---|
|
Li, Yale |
2349 |
3/4/09 |
C-789 |
3 |
$7.00 |
Fourth Coffee |
7007 Cornell St Redmond, WA 98199 |
425-555-0201 |
|
Li, Yale |
2349 |
3/4/09 |
C-795 |
6 |
$9.75 |
Fourth Coffee |
7007 Cornell St Redmond, WA 98199 |
425-555-0201 |
|
Adams, Ellen |
2350 |
3/4/09 |
A-2275 |
2 |
$16.75 |
Adventure Works |
1025 Columbia Circle Kirkland, WA 98234 |
425-555-0185 |
|
Adams, Ellen |
2350 |
3/4/09 |
F-198 |
6 |
$5.25 |
Adventure Works |
1025 Columbia Circle Kirkland, WA 98234 |
425-555-0185 |
|
Adams, Ellen |
2350 |
3/4/09 |
B-205 |
1 |
$4.50 |
Adventure Works |
1025 Columbia Circle Kirkland, WA 98234 |
425-555-0185 |
|
Hance, Jim |
2351 |
3/4/09 |
C-795 |
6 |
$9.75 |
Contoso, Ltd. |
2302 Harvard Ave Bellevue, WA 98227 |
425-555-0222 |
|
Hance, Jim |
2352 |
3/5/09 |
A-2275 |
2 |
$16.75 |
Adventure Works |
1025 Columbia Circle Kirkland, WA 98234 |
425-555-0185 |
|
Hance, Jim |
2352 |
3/5/09 |
D-4420 |
3 |
$7.25 |
Adventure Works |
1025 Columbia Circle Kirkland, WA 98234 |
425-555-0185 |
|
Koch, Reed |
2353 |
3/7/09 |
A-2275 |
6 |
$16.75 |
Fourth Coffee |
7007 Cornell St Redmond, WA 98199 |
425-555-0201 |
|
Koch, Reed |
2353 |
3/7/09 |
C-789 |
5 |
$7.00 |
Fourth Coffee |
7007 Cornell St Redmond, WA 98199 |
425-555-0201 |
Information in its smallest parts: atomic data
Working with the data in this example, you can use the Text to Column command in Excel to separate the «atomic» parts of a cell (such as street address, city, state, and postal code) into discrete columns.
The following table shows the new columns in the same worksheet after they have been split to make all values atomic. Note that the information in the Salesperson column has been split into Last Name and the First Name columns and that the information in the Address column has been split into Street Address, City, State, and ZIP Code columns. This data is in «first normal form.»
|
Last Name |
First Name |
Street Address |
City |
State |
ZIP Code |
|
|---|---|---|---|---|---|---|
|
Li |
Yale |
2302 Harvard Ave |
Bellevue |
WA |
98227 |
|
|
Adams |
Ellen |
1025 Columbia Circle |
Kirkland |
WA |
98234 |
|
|
Hance |
Jim |
2302 Harvard Ave |
Bellevue |
WA |
98227 |
|
|
Koch |
Reed |
7007 Cornell St Redmond |
Redmond |
WA |
98199 |
Breaking data out into organized subjects in Excel
The several tables of example data that follow show the same information from the Excel worksheet after it has been split into tables for salespersons, products, customers, and orders. The table design isn’t final, but it’s on the right track.
The Salespersons table contains only information about sales personnel. Note that each record has a unique ID (SalesPerson ID). The SalesPerson ID value will be used in the Orders table to connect orders to salespeople.
|
Salespersons |
||
|---|---|---|
|
Salesperson ID |
Last Name |
First Name |
|
101 |
Li |
Yale |
|
103 |
Adams |
Ellen |
|
105 |
Hance |
Jim |
|
107 |
Koch |
Reed |
The Products table contains only information about products. Note that each record has a unique ID (Product ID). The Product ID value will be used to connect product information to the Order Details table.
|
Products |
|
|---|---|
|
Product ID |
Price |
|
A-2275 |
16.75 |
|
B-205 |
4.50 |
|
C-789 |
7.00 |
|
C-795 |
9.75 |
|
D-4420 |
7.25 |
|
F-198 |
5.25 |
The Customers table contains only information about customers. Note that each record has a unique ID (Customer ID). The Customer ID value will be used to connect customer information to the Orders table.
|
Customers |
||||||
|---|---|---|---|---|---|---|
|
Customer ID |
Name |
Street Address |
City |
State |
ZIP Code |
Phone |
|
1001 |
Contoso, Ltd. |
2302 Harvard Ave |
Bellevue |
WA |
98227 |
425-555-0222 |
|
1003 |
Adventure Works |
1025 Columbia Circle |
Kirkland |
WA |
98234 |
425-555-0185 |
|
1005 |
Fourth Coffee |
7007 Cornell St |
Redmond |
WA |
98199 |
425-555-0201 |
The Orders table contains information about orders, salespersons, customers, and products. Note that each record has a unique ID (Order ID). Some of the information in this table needs to be split into an additional table that contains order details so that the Orders table contains only four columns — the unique order ID, the order date, the salesperson ID, and the customer ID. The table shown here has not yet been split into the Order Details table.
|
Orders |
|||||
|---|---|---|---|---|---|
|
Order ID |
Order Date |
SalesPerson ID |
Customer ID |
Product ID |
Qty |
|
2349 |
3/4/09 |
101 |
1005 |
C-789 |
3 |
|
2349 |
3/4/09 |
101 |
1005 |
C-795 |
6 |
|
2350 |
3/4/09 |
103 |
1003 |
A-2275 |
2 |
|
2350 |
3/4/09 |
103 |
1003 |
F-198 |
6 |
|
2350 |
3/4/09 |
103 |
1003 |
B-205 |
1 |
|
2351 |
3/4/09 |
105 |
1001 |
C-795 |
6 |
|
2352 |
3/5/09 |
105 |
1003 |
A-2275 |
2 |
|
2352 |
3/5/09 |
105 |
1003 |
D-4420 |
3 |
|
2353 |
3/7/09 |
107 |
1005 |
A-2275 |
6 |
|
2353 |
3/7/09 |
107 |
1005 |
C-789 |
5 |
Order details, such as the product ID and quantity are moved out of the Orders table and stored in a table named Order Details. Keep in mind that there are 9 orders, so it makes sense that there are 9 records in this table. Note that the Orders table has a unique ID (Order ID), which will referred to from the Order Details table.
The final design of the Orders table should look like the following:
|
Orders |
|||
|---|---|---|---|
|
Order ID |
Order Date |
SalesPerson ID |
Customer ID |
|
2349 |
3/4/09 |
101 |
1005 |
|
2350 |
3/4/09 |
103 |
1003 |
|
2351 |
3/4/09 |
105 |
1001 |
|
2352 |
3/5/09 |
105 |
1003 |
|
2353 |
3/7/09 |
107 |
1005 |
The Order Details table contains no columns that require unique values (that is, there is no primary key), so it is okay for any or all columns to contain «redundant» data. However, no two records in this table should be completely identical (this rule applies to any table in a database). In this table, there should be 17 records — each corresponding to a product in an individual order. For example, in order 2349, three C-789 products comprise one of the two parts of the entire order.
The Order Details table should, therefore, look like the following:
|
Order Details |
||
|---|---|---|
|
Order ID |
Product ID |
Qty |
|
2349 |
C-789 |
3 |
|
2349 |
C-795 |
6 |
|
2350 |
A-2275 |
2 |
|
2350 |
F-198 |
6 |
|
2350 |
B-205 |
1 |
|
2351 |
C-795 |
6 |
|
2352 |
A-2275 |
2 |
|
2352 |
D-4420 |
3 |
|
2353 |
A-2275 |
6 |
|
2353 |
C-789 |
5 |
Copying and pasting data from Excel into Access
Now that the information about salespersons, customers, products, orders, and order details has been broken out into separate subjects in Excel, you can copy that data directly into Access, where it will become tables.
Creating relationships between the Access tables and running a query
After you have moved your data to Access, you can create relationships between tables and then create queries to return information about various subjects. For example, you can create a query that returns the Order ID and the names of the salespersons for orders entered between 3/05/09 and 3/08/09.
In addition, you can create forms and reports to make data entry and sales analysis easier.
Need more help?
You can always ask an expert in the Excel Tech Community or get support in the Answers community.
Примечание: Microsoft Access не поддерживает импорт Excel данных с примененной меткой конфиденциальности. В качестве обходного решения можно удалить метку перед импортом, а затем повторно применить метку после импорта. Дополнительные сведения см. в статье «Применение меток конфиденциальности к файлам и электронной почте в Office».
В этой статье показано, как переместить данные Excel access и преобразовать данные в реляционные таблицы, чтобы можно было использовать Microsoft Excel и Access вместе. Подводя итоги, Access лучше всего подходит для записи, хранения, запроса и совместного использования данных, а Excel лучше всего подходит для вычисления, анализа и визуализации данных.
В двух статьях, в которых описывается использование Access или Excel для управления данными, а также 10 основных причин использования Access с Excel, рассматривается, какая программа лучше всего подходит для конкретной задачи и как использовать Excel и Access вместе для создания практического решения.
При перемещении данных Excel в Access необходимо выполнить три основных шага.
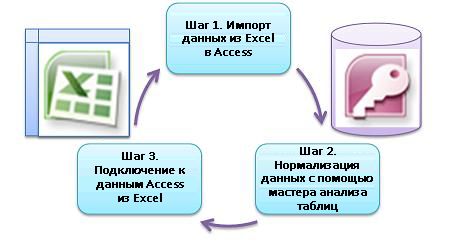
Шаг 1. Импорт данных из Excel в Access
Импорт данных — это операция, которая может выполняться гораздо более плавно, если требуется некоторое время для подготовки и очистки данных. Импорт данных аналогично перемещению на новый домашний сайт. Если вы очистите и упорядотите владение перед перемещением, переходить в новый дом гораздо проще.
Очистка данных перед импортом
Прежде чем импортировать данные в Access, Excel рекомендуется:
-
Преобразуйте ячейки, содержащие не атомарные данные (то есть несколько значений в одной ячейке), в несколько столбцов. Например, ячейку в столбце Skills, содержащую несколько значений навыка, таких как «программирование C#», «Программирование VBA» и «Веб-дизайн», следует разделить на отдельные столбцы, каждый из которых содержит только одно значение навыка.
-
Используйте команду TRIM, чтобы удалить начальные, конечные и несколько внедренных пробелов.
-
Удаление непечатаемых символов.
-
Поиск и исправление ошибок орфографии и пунктуации.
-
Удалите повторяющиеся строки или повторяющиеся поля.
-
Убедитесь, что столбцы данных не содержат смешанные форматы, особенно числа, отформатированные как текст или даты, отформатированные как числа.
Дополнительные сведения см. в следующих разделах Excel справки:
-
Первые 10 способов очистки данных
-
Фильтр уникальных значений или удаление повторяющихся значений
-
Преобразование чисел из текстового формата в числовой
-
Преобразование дат из текстового формата в формат даты
Примечание: Если ваши потребности в очистке данных сложны или у вас нет времени или ресурсов для автоматизации процесса самостоятельно, вы можете использовать стороннего поставщика. Для получения дополнительных сведений найдите «программное обеспечение очистки данных» или «качество данных» в предпочитаемой поисковой системы в веб-браузере.
Выбор оптимального типа данных при импорте
Во время операции импорта в Access необходимо сделать хороший выбор, чтобы получить несколько ошибок преобразования (если таковые имеются), которые требуют вмешательства вручную. В следующей таблице перечислены Excel форматы чи Excel и типы данных Access при импорте данных из Excel в Access, а также приведены некоторые советы по лучшим типам данных, которые можно выбрать в мастере импорта электронных таблиц.
|
Excel числовом формате |
Тип данных Access |
Комментарии |
Рекомендации |
|---|---|---|---|
|
Текст |
Text, Memo |
Тип данных Access Text хранит буквенно-цифровые данные до 255 символов. Тип данных Access Memo хранит буквенно-цифровые данные до 65 535 символов. |
Выберите memo , чтобы избежать усечения данных. |
|
Number, Percentage, Fraction, Scientific |
Числовой |
Access имеет один тип данных Number, который зависит от свойства Размера поля (byte, Integer, Long Integer, Single, Double, Decimal). |
Чтобы избежать ошибок преобразования данных, выберите значение Double. |
|
Дата |
Дата |
Access и Excel используют один и тот же серийный номер даты для хранения дат. В Access диапазон дат больше: от -657 434 (1 января 100 г. до 2958 465 (31 декабря 9999 г.). Так как Access не распознает систему дат 1904 (используется в Excel для Macintosh), необходимо преобразовать даты в Excel access, чтобы избежать путаницы. Дополнительные сведения см. в статье «Изменение системы даты, формата или двузначной интерпретации года» и «Импорт или ссылка на данные в Excel книге». |
Выберите дату. |
|
Время |
Системное время |
Доступ и Excel хранения значений времени с использованием одного типа данных. |
Выберите время, которое обычно используется по умолчанию. |
|
Валюта, бухгалтерия |
Денежный |
В Access тип данных «Валюта» хранит данные в виде 8-байтовых чисел с точностью до четырех десятичных знаков и используется для хранения финансовых данных и предотвращения округления значений. |
Выберите валюту, которая обычно используется по умолчанию. |
|
логический |
Логический |
Access использует -1 для всех значений «Да» и 0 для всех значений «Нет», тогда как Excel использует 1 для всех значений TRUE и 0 для всех значений FALSE. |
Нажмите кнопку «Да/Нет«, которая автоматически преобразует базовые значения. |
|
Гиперссылка |
Гиперссылка |
Гиперссылка в Excel Access содержит URL-адрес или веб-адрес, на который можно щелкнуть и следовать. |
Выберите гиперссылку. В противном случае Access может использовать текстовый тип данных по умолчанию. |
После получения данных в Access можно удалить Excel данных. Не забудьте создать резервную копию исходной Excel, прежде чем удалять ее.
Дополнительные сведения см. в разделе справки Access по импорту или ссылке на данные в Excel книге.
Автоматическое добавление данных простым способом
Распространенной проблемой Excel пользователей является добавление данных с одинаковыми столбцами на один большой лист. Например, у вас может быть решение для отслеживания ресурсов, которое было запущено в Excel но теперь теперь включает файлы из многих рабочих групп и отделов. Эти данные могут быть в разных листах и книгах или в текстовых файлах, которые являются веб-каналами данных из других систем. Нет команды пользовательского интерфейса или простого способа добавления аналогичных данных в Excel.
Лучшим решением является использование Access, где можно легко импортировать и добавлять данные в одну таблицу с помощью мастера импорта электронных таблиц. Кроме того, можно добавить большой объем данных в одну таблицу. Вы можете сохранить операции импорта, добавить их как запланированные задачи Microsoft Outlook и даже использовать макросы для автоматизации процесса.
Шаг 2. Нормализация данных с помощью мастера анализатора таблиц
На первый взгляд пошаговое выполнение процесса нормализации данных может показаться сложной задачей. К счастью, нормализация таблиц в Access — это гораздо более простой процесс благодаря мастеру анализатора таблиц.
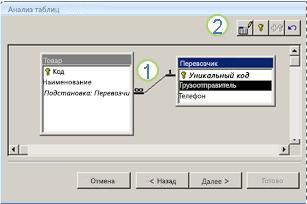
1. Перетащите выбранные столбцы в новую таблицу и автоматически создайте связи
2. Используйте команды кнопок, чтобы переименовать таблицу, добавить первичный ключ, сделать существующий столбец первичным ключом и отменить последнее действие.
Этот мастер можно использовать для выполнения следующих действий:
-
Преобразуйте таблицу в набор небольших таблиц и автоматически создайте связь первичного и внешнего ключей между таблицами.
-
Добавьте первичный ключ в существующее поле, содержащее уникальные значения, или создайте новое поле идентификатора, использующее тип данных «Счетчик».
-
Автоматическое создание связей для обеспечения целостности данных с помощью каскадных обновлений. Каскадные удаления не добавляются автоматически для предотвращения случайного удаления данных, но вы можете легко добавить каскадные удаления позже.
-
Найдите в новых таблицах избыточные или дублирующиеся данные (например, один и тот же клиент с двумя разными номерами телефонов) и обновите их по своему усмотрению.
-
Создайте резервную копию исходной таблицы и переименуйте ее, _OLD к ее имени. Затем создается запрос, который воссоздает исходную таблицу с исходным именем таблицы, чтобы все существующие формы или отчеты, основанные на исходной таблице, могли работать с новой структурой таблицы.
Дополнительные сведения см. в статье «Нормализация данных с помощью анализатора таблиц».
Шаг 3. Подключение доступ к данным из Excel
После нормализации данных в Access и создания запроса или таблицы, которые восстанавливают исходные данные, достаточно просто подключиться к данным Access из Excel. Теперь ваши данные доступны в Access как внешний источник данных, поэтому их можно подключить к книге через подключение к данным, которое представляет собой контейнер сведений, используемый для поиска, входа во внешний источник данных и доступа к нему. Сведения о подключении хранятся в книге и также могут храниться в файле подключения, например в ODC-файле Office (расширение ODC-имени файла) или файле имени источника данных (расширение DSN). После подключения к внешним данным вы также можете автоматически обновлять (или обновлять) свою Excel из Access при каждом обновлении данных в Access.
Дополнительные сведения см. в статье «Импорт данных из внешних источников данных (Power Query)».
Получение данных в Access
В этом разделе рассматриваются следующие этапы нормализации данных: размыкание значений в столбцах Salesperson и Address на наиболее атомарные части, разделение связанных субъектов на собственные таблицы, копирование и вставка этих таблиц из Excel в Access, создание ключевых связей между вновь созданными таблицами Access, создание и выполнение простого запроса в Access для возврата информации.
Примеры данных в не нормализованной форме
На следующем листе содержатся неавтеризованные значения в столбцах Salesperson и Address. Оба столбца должны быть разделены на два или более отдельных столбцов. Этот лист также содержит сведения о продавцах, продуктах, клиентах и заказах. Эти сведения также следует разделить по темам на отдельные таблицы.
|
Продавец |
Идентификатор заказа |
Дата заказа |
Код товара |
Количество |
продажи |
Имя клиента |
Адрес |
Телефон |
|---|---|---|---|---|---|---|---|---|
|
Li, Yale |
2349 |
3/4/09 |
C-789 |
3 |
7,00 долл. США |
Кофейная фабрика |
7007 Корнель-Редмонд, WA 98199 |
425-555-0201 |
|
Li, Yale |
2349 |
3/4/09 |
C-795 |
6 |
9,75 долл. США |
Кофейная фабрика |
7007 Корнель-Редмонд, WA 98199 |
425-555-0201 |
|
Адамс, Эллен |
2350 |
3/4/09 |
A-2275 |
2 |
16,75 долл. США |
Adventure Works |
1025 Circle Circle, WA 98234 |
425-555-0185 |
|
Адамс, Эллен |
2350 |
3/4/09 |
F-198 |
6 |
5,25 долл. США |
Adventure Works |
1025 Circle Circle, WA 98234 |
425-555-0185 |
|
Адамс, Эллен |
2350 |
3/4/09 |
B-205 |
1 |
4,50 долл. США |
Adventure Works |
1025 Circle Circle, WA 98234 |
425-555-0185 |
|
Хэнс, Хим |
2351 |
3/4/09 |
C-795 |
6 |
9,75 долл. США |
Contoso, Ltd. |
2302 Суа Бельвью ,Wa 98227 |
425-555-0222 |
|
Хэнс, Хим |
2352 |
3/5/09 |
A-2275 |
2 |
16,75 долл. США |
Adventure Works |
1025 Circle Circle, WA 98234 |
425-555-0185 |
|
Хэнс, Хим |
2352 |
3/5/09 |
D-4420 |
3 |
7,25 долл. США |
Adventure Works |
1025 Circle Circle, WA 98234 |
425-555-0185 |
|
Koch, Reed |
2353 |
3/7/09 |
A-2275 |
6 |
16,75 долл. США |
Кофейная фабрика |
7007 Корнель-Редмонд, WA 98199 |
425-555-0201 |
|
Koch, Reed |
2353 |
3/7/09 |
C-789 |
5 |
7,00 долл. США |
Кофейная фабрика |
7007 Корнель-Редмонд, WA 98199 |
425-555-0201 |
Сведения в его наименьших частях: атомарные данные
Работая с данными в этом примере, можно использовать команду «Текст в столбец» в Excel, чтобы разделить «атомарные» части ячейки (например, адрес улицы, город, штат и почтовый индекс) на дискретные столбцы.
В следующей таблице показаны новые столбцы на том же листе после их разделения, чтобы сделать все значения атомарными. Обратите внимание, что данные в столбце Salesperson разделены на столбцы «Фамилия» и «Имя», а сведения в столбце «Адрес» разделены на столбцы «Адрес», «Город», «Штат» и «Почтовый индекс». Эти данные в первой обычной форме.
|
Фамилия |
Имя |
адрес; |
Город |
Субъект |
Почтовый индекс |
|
|---|---|---|---|---|---|---|
|
Литий |
Йель |
2302( 2302, 2302, 2302— 2 |
Омск |
Красноярский край |
98227 |
|
|
Адамс |
Эллен |
Круг 1025 |
Сочи |
Красноярский край |
98234 |
|
|
Hance |
Алексей |
2302( 2302, 2302, 2302— 2 |
Омск |
Красноярский край |
98227 |
|
|
Кох |
Рид |
7007 Корнель-Редмонд |
Редмонд |
Красноярский край |
98199 |
Разделение данных на упорядоченные субъекты в Excel
В нескольких таблицах с примерами данных, приведенных ниже, отображаются одинаковые сведения из Excel после того, как он был разделен на таблицы для продавцов, продуктов, клиентов и заказов. Макет таблицы не является окончательным, но он на правильном пути.
Таблица Salespersons содержит только сведения о персонале отдела продаж. Обратите внимание, что каждая запись имеет уникальный идентификатор (идентификатор SalesPerson). Значение идентификатора SalesPerson будет использоваться в таблице Orders для подключения заказов к продавцам.
|
Продавцов |
||
|---|---|---|
|
Идентификатор продавца |
Фамилия |
Имя |
|
101 |
Литий |
Йель |
|
103 |
Адамс |
Эллен |
|
105 |
Hance |
Алексей |
|
107 |
Кох |
Рид |
Таблица Products содержит только сведения о продуктах. Обратите внимание, что каждая запись имеет уникальный идентификатор (идентификатор продукта). Значение идентификатора продукта будет использоваться для подключения сведений о продукте к таблице «Сведения о заказе».
|
Продукты |
|
|---|---|
|
Код товара |
продажи |
|
A-2275 |
16.75 |
|
B-205 |
4.50 |
|
C-789 |
7.00 |
|
C-795 |
9.75 |
|
D-4420 |
7.25 |
|
F-198 |
5,25 |
Таблица Customers содержит только сведения о клиентах. Обратите внимание, что каждая запись имеет уникальный идентификатор (идентификатор клиента). Значение идентификатора клиента будет использоваться для подключения сведений о клиентах к таблице «Заказы».
|
Customers |
||||||
|---|---|---|---|---|---|---|
|
Код клиента |
Имя |
адрес; |
Город |
Субъект |
Почтовый индекс |
Телефон |
|
1001 |
Contoso, Ltd. |
2302( 2302, 2302, 2302— 2 |
Омск |
Красноярский край |
98227 |
425-555-0222 |
|
1003 |
Adventure Works |
Круг 1025 |
Сочи |
Красноярский край |
98234 |
425-555-0185 |
|
1005 |
Кофейная фабрика |
7007 Корелл-ст |
Редмонд |
Красноярский край |
98199 |
425-555-0201 |
Таблица «Заказы» содержит сведения о заказах, продавцах, клиентах и продуктах. Обратите внимание, что каждая запись имеет уникальный идентификатор (идентификатор заказа). Некоторые сведения в этой таблице необходимо разделить на дополнительную таблицу, содержащую сведения о заказе, чтобы таблица «Заказы» содержала только четыре столбца: уникальный идентификатор заказа, дата заказа, идентификатор продавца и идентификатор клиента. Показанная здесь таблица еще не разделена на таблицу «Сведения о заказе».
|
Заказы |
|||||
|---|---|---|---|---|---|
|
Идентификатор заказа |
Дата заказа |
Идентификатор SalesPerson |
Код клиента |
Код товара |
Количество |
|
2349 |
3/4/09 |
101 |
1005 |
C-789 |
3 |
|
2349 |
3/4/09 |
101 |
1005 |
C-795 |
6 |
|
2350 |
3/4/09 |
103 |
1003 |
A-2275 |
2 |
|
2350 |
3/4/09 |
103 |
1003 |
F-198 |
6 |
|
2350 |
3/4/09 |
103 |
1003 |
B-205 |
1 |
|
2351 |
3/4/09 |
105 |
1001 |
C-795 |
6 |
|
2352 |
3/5/09 |
105 |
1003 |
A-2275 |
2 |
|
2352 |
3/5/09 |
105 |
1003 |
D-4420 |
3 |
|
2353 |
3/7/09 |
107 |
1005 |
A-2275 |
6 |
|
2353 |
3/7/09 |
107 |
1005 |
C-789 |
5 |
Сведения о заказе, такие как идентификатор продукта и количество, перемещаются из таблицы «Заказы» и сохраняются в таблице с именем «Сведения о заказе». Имейте в виду, что существует 9 заказов, поэтому имеет смысл, что в этой таблице 9 записей. Обратите внимание, что таблица «Заказы» имеет уникальный идентификатор (идентификатор заказа), на который будет ссылаться таблица «Сведения о заказе».
Окончательная структура таблицы «Заказы» должна выглядеть следующим образом:
|
Заказы |
|||
|---|---|---|---|
|
Идентификатор заказа |
Дата заказа |
Идентификатор SalesPerson |
Код клиента |
|
2349 |
3/4/09 |
101 |
1005 |
|
2350 |
3/4/09 |
103 |
1003 |
|
2351 |
3/4/09 |
105 |
1001 |
|
2352 |
3/5/09 |
105 |
1003 |
|
2353 |
3/7/09 |
107 |
1005 |
Таблица «Сведения о заказе» не содержит столбцов, которые требуют уникальных значений (т. е. нет первичного ключа), поэтому все столбцы могут содержать «избыточные» данные. Однако две записи в этой таблице не должны быть полностью идентичными (это правило применяется к любой таблице в базе данных). В этой таблице должно быть 17 записей, каждая из которых соответствует продукту в отдельном порядке. Например, в заказе 2349 три продукта C-789 составляют одну из двух частей всего заказа.
Поэтому таблица «Сведения о заказе» должна выглядеть следующим образом:
|
Сведения о заказе |
||
|---|---|---|
|
Номер заказа |
Код продукта |
Количество |
|
2349 |
C-789 |
3 |
|
2349 |
C-795 |
6 |
|
2350 |
A-2275 |
2 |
|
2350 |
F-198 |
6 |
|
2350 |
B-205 |
1 |
|
2351 |
C-795 |
6 |
|
2352 |
A-2275 |
2 |
|
2352 |
D-4420 |
3 |
|
2353 |
A-2275 |
6 |
|
2353 |
C-789 |
5 |
Копирование и вставка данных из Excel в Access
Теперь, когда сведения о продавцах, клиентах, продуктах, заказах и заказах разделены на отдельные субъекты в Excel, эти данные можно скопировать непосредственно в Access, где они станут таблицами.
Создание связей между таблицами Access и выполнение запроса
После перемещения данных в Access можно создать связи между таблицами, а затем создать запросы для возврата сведений о различных темах. Например, можно создать запрос, который возвращает идентификатор заказа и имена продавцов для заказов, введенных в период с 09.03.09 по 08.09.
Кроме того, можно создавать формы и отчеты, чтобы упростить ввод данных и анализ продаж.
Дополнительные сведения
Вы всегда можете задать вопрос специалисту Excel Tech Community или попросить помощи в сообществе Answers community.
There are many ways to do this. Let’s look at a couple of case studies.
Export data from Excel to Access (ADO)
If you want to export data to an Access table from an Excel worksheet, the macro example below shows how this can be done.
Sub ADOFromExcelToAccess()
' exports data from the active worksheet to a table in an Access database
' this procedure must be edited before use
Dim cn As ADODB.Connection, rs As ADODB.Recordset, r As Long
    ' connect to the Access database
    Set cn = New ADODB.Connection
    cn.Open "Provider=Microsoft.Jet.OLEDB.4.0; " & _
        "Data Source=C:FolderNameDataBaseName.mdb;"
    ' open a recordset
    Set rs = New ADODB.Recordset
    rs.Open "TableName", cn, adOpenKeyset, adLockOptimistic, adCmdTable
    ' all records in a table
    r = 3 ' the start row in the worksheet
    Do While Len(Range("A" & r).Formula) > 0
    ' repeat until first empty cell in column A
        With rs
            .AddNew ' create a new record
            ' add values to each field in the record
            .Fields("FieldName1") = Range("A" & r).Value
            .Fields("FieldName2") = Range("B" & r).Value
            .Fields("FieldNameN") = Range("C" & r).Value
            ' add more fields if necessary...
            .Update ' stores the new record
        End With
        r = r + 1 ' next row
    Loop
    rs.Close
    Set rs = Nothing
    cn.Close
    Set cn = Nothing
End Sub
Also . . .
Export data from Excel to Access (DAO)
If you want to export data to an Access table from an Excel worksheet, the macro example below illustrates another way to do this.
Sub DAOFromExcelToAccess()
' exports data from the active worksheet to a table in an Access database
' this procedure must be edited before use
Dim db As Database, rs As Recordset, r As Long
    Set db = OpenDatabase("C:FolderNameDataBaseName.mdb")
    ' open the database
    Set rs = db.OpenRecordset("TableName", dbOpenTable)
    ' get all records in a table
    r = 3 ' the start row in the worksheet
    Do While Len(Range("A" & r).Formula) > 0
    ' repeat until first empty cell in column A
        With rs
            .AddNew ' create a new record
            ' add values to each field in the record
            .Fields("FieldName1") = Range("A" & r).Value
            .Fields("FieldName2") = Range("B" & r).Value
            .Fields("FieldNameN") = Range("C" & r).Value
            ' add more fields if necessary...
            .Update ' stores the new record
        End With
        r = r + 1 ' next row
    Loop
    rs.Close
    Set rs = Nothing
    db.Close
    Set db = Nothing
End Sub
Also . . .
Browse to a single EXCEL File and Import Data from that EXCEL File via TransferSpreadsheet (VBA)
Here’s yet another way . . .
Sub TryThis()
        Dim strPathFile As String
        Dim strTable As String, strBrowseMsg As String
        Dim strFilter As String, strInitialDirectory As String
        Dim blnHasFieldNames As Boolean

        ' Change this next line to True if the first row in EXCEL worksheet
        ' has field names
        blnHasFieldNames = False

        strBrowseMsg = "Select the EXCEL file:"

        ' Change C:MyFolder to the path for the folder where the Browse
        ' window is to start (the initial directory). If you want to start in
        ' ACCESS' default folder, delete C:MyFolder from the code line,
        ' leaving an empty string as the value being set as the initial
        ' directory
        strInitialDirectory = "C:MyFolder"

        strFilter = ahtAddFilterItem(strFilter, "Excel Files (*.xls)", "*.xls")

        strPathFile = ahtCommonFileOpenSave(InitialDir:=strInitialDirectory, _
              Filter:=strFilter, OpenFile:=False, _
              DialogTitle:=strBrowseMsg, _
              Flags:=ahtOFN_HIDEREADONLY)

        If strPathFile = "" Then
              MsgBox "No file was selected.", vbOK, "No Selection"
              Exit Sub
        End If

        ' Replace tablename with the real name of the table into which
        ' the data are to be imported
        strTable = "tablename"

        DoCmd.TransferSpreadsheet acImport, acSpreadsheetTypeExcel9, _
              strTable, strPathFile, blnHasFieldNames

        ' Uncomment out the next code step if you want to delete the
        ' EXCEL file after it's been imported
        ' Kill strPathFile

End Sub
Convert Excel to Access Database
Use this simple method to learn how to create Access database from Excel spreadsheet.
Programmers convert Excel to Access database for easy maintenance, minimize the load or as a database backup. This article is going to explain how to import Excel into Access without using any ADODB or connection string. This method is going to very simple.
Instead of creating a connection string and mapping to it in SQL query every time, we are going to just do an Export in single step by using the Microsoft Access Object Library. The process explained in this article will work better in Office 2007 and above.
How to Import Excel into Access Database?
Before using the Macro code, let’s see how import Excel into Access is done manually. We need a source file (Excel) and a target destination file (MDB). Assume there is a table as in below format in an Excel sheet. To convert this Excel to Access database, create a new MDB file.
- Open the MDB file & Choose “External Data” from Menu.
- Choose “Excel” from the list of sources (Access, Excel, Text, XML etc) Import Tab.
- Enter Excel file path in ‘File Name’ field in the Pop up window.
- Choose ‘Import to new Table’ or ‘Append’ or ‘Link’ as per your requirement.
- Click next, proceed with few more windows to choose the Sheet or view that has data.
- click Finish to complete importing Excel data to Access.
Now, the data from Excel will be imported to the current mdb database. Access will also ask confirmation whether you want to store the import steps, so that it will be easy to repeat the same steps in just one click.
Also Read: Different methods to Read Data from external Excel Workbook.
VBA to Export Excel to Access Database
To create Access database from Excel spreadsheet, Press Alt + F11 to view the VB Editor in Excel. Copy paste the below code, change the MDB File path and Table name as per your need.
- Include “Microsoft Access Object Library” from Tools -> References.
- Press F5 to execute this code and export data.
Option Explicit
'This Code is downloaded from Officetricks.com
Public Sub Export_Excel_To_Access_MDB()
    Dim oDB As New Access.Application

    'Create Object to Link to the Access Databse
    oDB.OpenCurrentDatabase "C:OfficeTricksExcel_To_Access.accdb", False

    'Import data from Excel Spreadsheet to Access Database
    oDB.DoCmd.TransferSpreadsheet acImport, acSpreadsheetTypeExcel12, "ExcelToAccess", ThisWorkbook.FullName, True

    'Import only specific data range from Excel to Access
    oDB.DoCmd.TransferSpreadsheet acImport, acSpreadsheetTypeExcel12, "ExcelToAccess", ThisWorkbook.FullName, True, "Sheet1$A1:E3"

    'Export Data from Access to a Text File
    oDB.DoCmd.TransferText acExportDelim, TableName:="ExcelToAccess", Filename:=ThisWorkbook.Path & "ExportText.txt"

    'Close Access Application and quit
    oDB.CloseCurrentDatabase
    oDB.Quit
    Set oDB = Nothing

    'Process Completed
    MsgBox "Data Exported to Access DB"
End Sub
The above code also explains how to (1) Export particular range from Excel to Access and (2) Export data from Access database to a Text file.
This page only explains about how to do a plain data transfer (i.,e directly convert Excel to Access). It does not include the explanations about how to build a SWL query, to insert, alter, and inquire data from Access. To do those processes, we have to make use of other options present in DoCmd collection of Access Application Object.
We can export the data from Microsoft Excel to Microsoft Access by using VBA. Below is the VBA code and process which you need to paste in the code module of the file.
1. Open Excel
2. Press ALT + F11
3. VBA Editor will OPEN
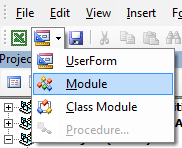
4. Click anywhere in the Project Window
5. Click on Insert
6. Click on Module

7. In the Code Window, Copy and Paste the below mentioned Code
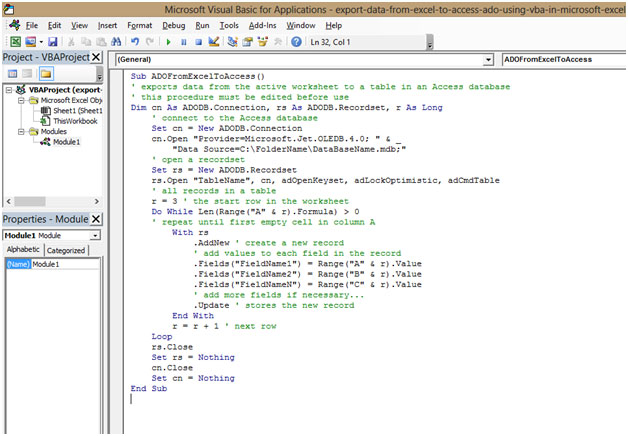
Sub ADOFromExcelToAccess()
‘ exports data from the active worksheet to a table in an Access database
‘ this procedure must be edited before use
Dim cn As ADODB.Connection, rs As ADODB.Recordset, r As Long
‘ connect to the Access database
Set cn = New ADODB.Connection
cn.Open «Provider=Microsoft.Jet.OLEDB.4.0; » & _
«Data Source=C:FolderNameDataBaseName.mdb;»
‘ open a recordset
Set rs = New ADODB.Recordset
rs.Open «TableName», cn, adOpenKeyset, adLockOptimistic, adCmdTable
‘ all records in a table
r = 3 ‘ the start row in the worksheet
Do While Len(Range(«A» & r).Formula) > 0
‘ repeat until first empty cell in column A
With rs
.AddNew ‘ create a new record
‘ add values to each field in the record
.Fields(«FieldName1») = Range(«A» & r).Value
.Fields(«FieldName2») = Range(«B» & r).Value
.Fields(«FieldNameN») = Range(«C» & r).Value
‘ add more fields if necessary…
.Update ‘ stores the new record
End With
r = r + 1 ‘ next row
Loop
rs.Close
Set rs = Nothing
cn.Close
Set cn = Nothing
End Sub
8. Once this is pasted, go to the Excel file
9. Click on the VIEW Tab on the ribbon
10. Click on Macros
11. Click on View Macros
12. The Shortcut Key to View Macros is ALT + F8
13. A Window will popup
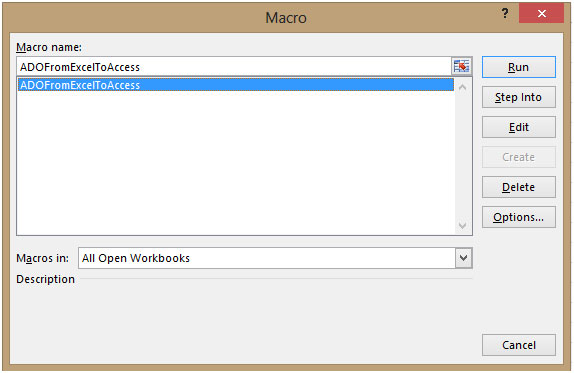
14. Select the Macro
15. Here the Macro is named as “ADOFromExcelToAccess”
16. Select the Macro “ADOFromExcelToAccess”
17. Click on Run
18. Click OK to close the Box
This is how we can Export data from Excel to Access by using VBA in Microsoft Excel.
![]()
Download Article
![]()
Download Article
This wikiHow teaches you how to create a database using data from a Microsoft Excel spreadsheet by importing the data directly into Access, which is Microsoft’s database management software, or by exporting the Excel data into a format that works with most database software. Microsoft Access is a part of the Microsoft Office software bundle and is only available for Windows.
-

1
Open Microsoft Access. It’s the red app with an A. Doing so opens the Access template page.
- Access is designed for use with Excel and comes bundled with Excel in Microsoft Office Professional and is only available for Windows.
-
2
Click Blank database. This option is in the upper-left side of the window.
- If you want to use a different template for your Access database, select the template that you want instead.
Advertisement
-
3
Click Create when prompted. This option is in the bottom-right corner of the pop-up window. Your Access database will open.
-
4
Click the External Data tab. It’s in the menu bar at the top of the Access window.
-
5
Click Saved Imports. You’ll find this in the far-left side of the External Data toolbar. A drop-down menu will appear.
-
6
Select File. It’s in the drop-down menu. Selecting this option prompts a pop-out menu.
-
7
Click Excel. This option is in the pop-out menu. Clicking it prompts the import window to open.
-
8
Click Browse. It’s in the upper-right part of the window.
-
9
Select an Excel spreadsheet. Go to the folder in which your Excel spreadsheet is located, then click the Excel spreadsheet which you want to open.
-
10
Click Open. It’s in the bottom-right corner of the window.
-
11
Specify how to transfer to the data. Click the radio button to the left of one of the following:
- Import the source data into a new table in the current database — Choose this option if you created a new database with no tables or if you want to add a new table to an existing database. By creating a new table you can edit the information in Access.
- Append a copy of the records to the table — Choose this option if you are using an existing database and want to add the data to one of the tables in the database. By appending an existing table, you can edit the information in Access.
- Link to the data source by creating a linked table — Choose this option to create a hyperlink in the database, which will open the Excel database in Excel. With this method, you cannot edit the information in Access.
-
12
Click OK. You’ll find this at the bottom of the window.
-
13
Select a sheet. At the top of the window, click the name of the sheet that you want to import from your selected Excel document.
- By default, Excel creates workbooks with three spreadsheets labeled «Sheet 1,» «Sheet 2,» and «Sheet 3.» You can only transfer one sheet at a time; if you have information on all three sheets, you must complete the transfer with one sheet and then go back to the «External Data» tab and repeat all the steps for each remaining sheet.
- You can delete, add, and edit the names of these sheets in Excel, and whatever changes you make will appear in the Access database.
-
14
Click Next. It’s in the bottom-right corner of the window.
-
15
Enable column headings. Check the «First Row Contains Column Headings» box if your Excel sheet has its own column headings in the top row (e.g., the A row).
- Uncheck the box if you want Access to create the column headings.
-
16
Click Next.
-
17
Edit your spreadsheet’s columns and fields if needed. If you want to import all the fields from the spreadsheet without change, skip this step:
- To edit a field, click the column header you want to change, then edit the name of the field, the data type, and/or whether or not it is indexed.
- If you don’t want to import a field, check the «Do Not Import Field (Skip)» box.
-
18
Click Next.
-
19
Set the primary key for the database. For best results, leave the default setting here as-is to let Access set the key.
- You can also set your own key by checking «Choose my own primary key» and entering it in the field next to that option, or you can select «No primary key» (not recommended).
-
20
Click Next.
-
21
Add a name. Type a name for the sheet into the «Import to Table» field.
- Skip this step to leave the database set to its default name.
-
22
Click Finish. This option is in the lower-right side of the window.
-
23
Click Close. It’s in the bottom-right corner of the window. This will close the import window and create your database.
- You can first check the «Save import steps» box if you want to ensure that Access will remember your settings for this database.


Advertisement
-
1
Open your Excel document. Double-click the Excel document which you want to convert into a database.
- If you haven’t yet created your document, open Excel, click Blank workbook, and create your document before proceeding.
-
2
Click File. It’s in the menu bar that’s either at the top of the Excel window (Windows) or at the top of the screen (Mac).
-
3
Click Save As. You’ll find this option in the File menu.
-
4
Double-click This PC. It’s in the middle of the page.
- Skip this step on a Mac.
-
5
Select a file format. Click the «Save as type» (Windows) or «File Format» (Mac) drop-down box, then select one of the following:
- If you’re using a computer-based database application, click a .CSV (comma separated values) format.
- If you’re using a Web-based database application, click an .XML format.
- If your Excel document doesn’t have any XML data in it, you won’t be able to choose XML.
-
6
Click Save. It’s at the bottom of the window. This will save your document using your selected preferences.
-
7
Create a new database in your database application. This process will vary depending on the application that you’re using, but you’ll usually open the application, click New (or File > New), and follow any on-screen instructions.
-
8
Locate the Import… button. It’s often found by clicking the File option, but your database application may vary.
-
9
Select your Excel file. Locate and double-click the file you exported from Excel.
-
10
Follow the database app’s prompts to import the data.
-
11
Save the database. You can usually open the «Save» menu by pressing Ctrl+S (Windows) or ⌘ Command+S (Mac).


Advertisement
Add New Question
-
Question
What is the difference between a database and a spreadsheet?

This answer was written by one of our trained team of researchers who validated it for accuracy and comprehensiveness.
wikiHow Staff Editor
Staff Answer
A spreadsheet stores information organized into rows and columns and is usually best used by one person at a time. A database might also have information organized into rows and columns, but it isn’t limited to just that and can store information according to a variety of different methodologies. Databases are typically made with multiple simultaneous users in mind and security features. Databases also allow for more complex and time consuming searches or operations and can eliminate some of the redundancy that becomes necessary when using spreadsheets extensively.
-
Question
How do I view this page in French?
Copy and paste onto Google Translate; when you copy the translated words onto Excel, it will automatically format it to its original form.
-
Question
I’ve imported data from Excel, but where does it go, and how do I access the information to populate my database?
You can go to «Insert > Pivot Table» and select «Use external connection» and pick the connection you’ve established. This will allow you to create a pivot table based on that external Access database.

Ask a Question
200 characters left
Include your email address to get a message when this question is answered.
Submit
Advertisement
-
There are several free online database websites that you can use to create a database, though you’ll have to sign up for an account with most of these services.
-
If you don’t have fully functional database software, you may also need a separate program to open database files on PC or Mac.
Thanks for submitting a tip for review!
Advertisement
-
Excel data doesn’t always transfer over to a database as neatly as you might hope for.
Advertisement
About This Article
Article SummaryX
To create a database from an Excel spreadsheet, you can use Microsoft Access, which is Microsoft’s database management software. When you have Microsoft Access, open the program and click “Blank database.” After creating your blank database, click the “External Data” tab at the top and then “New Data Source.” Then, select “File” from the drop-down menu and click “Excel.” Use the “Browse” button to locate your Excel spreadsheet. Once you’ve selected the spreadsheet, click “Open” and choose how you want to transfer the data. Select a sheet and enable column headings. To complete your database, set the primary key and click “Finish.” For best results, you can leave the default primary key setting as is. For more information, including how to use a third-party software to create a database from an Excel spreadsheet, read on!
Did this summary help you?
Thanks to all authors for creating a page that has been read 1,118,801 times.
Reader Success Stories
-

«Step-by-step help with pictures made this task easy for me. I’d still be attempting to achieve this task, but this…» more
Is this article up to date?
This tutorial will cover the ways to import data from Excel into an Access Table and ways to export Access objects (Queries, Reports, Tables, or Forms) to Excel.
Import Excel File Into Access
To import an Excel file to Access, use the acImport option of DoCmd.TransferSpreadsheet :
DoCmd.TransferSpreadsheet acImport, acSpreadsheetTypeExcel12, "Table1", "C:TempBook1.xlsx", TrueOr you can use DoCmd.TransferText to import a CSV file:
DoCmd.TransferText acLinkDelim, , "Table1", "C:TempBook1.xlsx", TrueImport Excel to Access Function
This function can be used to import an Excel file or CSV file into an Access Table:
Public Function ImportFile(Filename As String, HasFieldNames As Boolean, TableName As String) As Boolean
' Example usage: call ImportFile ("Select an Excel File",  "Excel Files", "*.xlsx",  "C:" , True,True, "ExcelImportTest", True, True,false,True)

    On Error GoTo err_handler

    If (Right(Filename, 3) = "xls") Or ((Right(Filename, 4) = "xlsx")) Then
                DoCmd.TransferSpreadsheet acImport, acSpreadsheetTypeExcel12, TableName, Filename, blnHasFieldNames
            End If
    If (Right(Filename, 3) = "csv") Then
                DoCmd.TransferText acLinkDelim, , TableName, Filename, True
    End If

Exit_Thing:

    'Clean up
    'Check if our linked in Excel table already exists... and delete it if so
    If ObjectExists("Table", TableName) = True Then DropTable (TableName)
    Set colWorksheets = Nothing

    Exit Function

err_handler:
    If (Err.Number = 3086 Or Err.Number = 3274 Or Err.Number = 3073) And errCount < 3 Then
        errCount = errCount + 1

    ElseIf Err.Number = 3127 Then
        MsgBox "The fields in all the tabs are the same. Please make sure that each sheet has the exact column names if you wish to import mulitple", vbCritical, "MultiSheets not identical"
        ImportFile = False
        GoTo Exit_Thing
    Else
        MsgBox Err.Number & " - " & Err.Description
        ImportFile = False
        GoTo Exit_Thing
        Resume
    End If
End Function
You can call the function like this:
Private Sub ImportFile_Example()
 Call VBA_Access_ImportExport.ImportFile("C:TempBook1.xlsx", True, "Imported_Table_1")
End Sub
Access VBA Export to New Excel File
To export an Access object to a new Excel file, use the DoCmd.OutputTo method or the DoCmd.TransferSpreadsheet method:
Export Query to Excel
This line of VBA code will export a Query to Excel using DoCmd.OutputTo:
DoCmd.OutputTo acOutputQuery, "Query1", acFormatXLSX, "c:tempExportedQuery.xls"Or you can use the DoCmd.TransferSpreadsheet method instead:
DoCmd.TransferSpreadsheet acExport, acSpreadsheetTypeExcel8, "Query1", "c:tempExportedQuery.xls", TrueNote: This code exports to XLSX format. Instead you can update the arguments to export to a CSV or XLS file format instead (ex. acFormatXLSX to acFormatXLS).
Export Report to Excel
This line of code will export a Report to Excel using DoCmd.OutputTo:
DoCmd.OutputTo acOutputReport, "Report1", acFormatXLSX, "c:tempExportedReport.xls"Or you can use the DoCmd.TransferSpreadsheet method instead:
DoCmd.TransferSpreadsheet acExport, acSpreadsheetTypeExcel8, "Report1", "c:tempExportedReport.xls", TrueExport Table to Excel
This line of code will export a Table to Excel using DoCmd.OutputTo:
DoCmd.OutputTo acOutputTable, "Table1", acFormatXLSX, "c:tempExportedTable.xls"Or you can use the DoCmd.TransferSpreadsheet method instead:
DoCmd.TransferSpreadsheet acExport, acSpreadsheetTypeExcel8, "Table1", "c:tempExportedTable.xls", TrueVBA Coding Made Easy
Stop searching for VBA code online. Learn more about AutoMacro — A VBA Code Builder that allows beginners to code procedures from scratch with minimal coding knowledge and with many time-saving features for all users!

Learn More
Export Form to Excel
This line of code will export a Form to Excel using DoCmd.OutputTo:
DoCmd.OutputTo acOutputForm, "Form1", acFormatXLSX, "c:tempExportedForm.xls"Or you can use the DoCmd.TransferSpreadsheet method instead:
DoCmd.TransferSpreadsheet acExport, acSpreadsheetTypeExcel8, "Form1", "c:tempExportedForm.xls", TrueExport to Excel Functions
These one line commands work great to export to a new Excel file. However, they will not be able to export into an existing workbook. In the section below we introduce functions that allow you to append your export to an existing Excel file.
Below that, we’ve included some additional functions to export to new Excel files, including error handling and more.
Export to Existing Excel File
The above code examples work great to export Access objects to a new Excel file. However, they will not be able to export into an existing workbook.
To export Access objects to an existing Excel workbook we’ve created the following function:
Public Function AppendToExcel(strObjectType As String, strObjectName As String, strSheetName As String, strFileName As String)

    Dim rst As DAO.Recordset
    Dim ApXL As Excel.Application
    Dim xlWBk As Excel.Workbook
    Dim xlWSh As Excel.Worksheet
    Dim intCount As Integer
    Const xlToRight As Long = -4161
    Const xlCenter As Long = -4108
    Const xlBottom As Long = -4107
    Const xlContinuous As Long = 1

    Select Case strObjectType

    Case "Table", "Query"
        Set rst = CurrentDb.OpenRecordset(strObjectName, dbOpenDynaset, dbSeeChanges)
    Case "Form"
        Set rst = Forms(strObjectName).RecordsetClone
    Case "Report"
        Set rst = CurrentDb.OpenRecordset(Reports(strObjectName).RecordSource, dbOpenDynaset, dbSeeChanges)
    End Select

    If rst.RecordCount = 0 Then
        MsgBox "No records to be exported.", vbInformation, GetDBTitle
    Else
        On Error Resume Next
        Set ApXL = GetObject(, "Excel.Application")
        If Err.Number <> 0 Then
            Set ApXL = CreateObject("Excel.Application")
        End If
        Err.Clear

        ApXL.Visible = False

        Set xlWBk = ApXL.Workbooks.Open(strFileName)
        Set xlWSh = xlWBk.Sheets.Add
        xlWSh.Name = Left(strSheetName, 31)


        xlWSh.Range("A1").Select
        Do Until intCount = rst.fields.Count
            ApXL.ActiveCell = rst.fields(intCount).Name
            ApXL.ActiveCell.Offset(0, 1).Select
            intCount = intCount + 1
        Loop

        rst.MoveFirst

        xlWSh.Range("A2").CopyFromRecordset rst

        With ApXL
            .Range("A1").Select
            .Range(.Selection, .Selection.End(xlToRight)).Select
            .Selection.Interior.Pattern = xlSolid
            .Selection.Interior.PatternColorIndex = xlAutomatic
            .Selection.Interior.TintAndShade = -0.25
            .Selection.Interior.PatternTintAndShade = 0
            .Selection.Borders.LineStyle = xlNone
            .Selection.AutoFilter
            .Cells.EntireColumn.AutoFit
            .Cells.EntireRow.AutoFit
            .Range("B2").Select
            .ActiveWindow.FreezePanes = True
            .ActiveSheet.Cells.Select
            .ActiveSheet.Cells.WrapText = False
            .ActiveSheet.Cells.EntireColumn.AutoFit
            xlWSh.Range("A1").Select
            .Visible = True
        End With

        'xlWB.Close True
        'Set xlWB = Nothing
        'ApXL.Quit
        'Set ApXL = Nothing
    End If
End Function
You can use the function like this:
Private Sub AppendToExcel_Example()
    Call VBA_Access_ImportExport.ExportToExcel("Table", "Table1", "VBASheet", "C:TempTest.xlsx")
End Sub
Notice you are asked to define:
- What to Output? Table, Report, Query, or Form
- Object Name
- Output Sheet Name
- Output File Path and Name.
VBA Programming | Code Generator does work for you!
Export SQL Query to Excel
Instead you can export an SQL query to Excel using a similar function:
Public Function AppendToExcelSQLStatemet(strsql As String, strSheetName As String, strFileName As String)
    Dim strQueryName As String
    Dim ApXL As Excel.Application
    Dim xlWBk As Excel.Workbook
    Dim xlWSh As Excel.Worksheet
    Dim intCount As Integer
    Const xlCenter As Long = -4108
    Const xlBottom As Long = -4107
    Const xlVAlignCenter = -4108
    Const xlContinuous As Long = 1
    Dim qdf As DAO.QueryDef
    Dim rst As DAO.Recordset

    strQueryName = "tmpQueryToExportToExcel"

    If ObjectExists("Query", strQueryName) Then
        CurrentDb.QueryDefs.Delete strQueryName
    End If
    Set qdf = CurrentDb.CreateQueryDef(strQueryName, strsql)
    Set rst = CurrentDb.OpenRecordset(strQueryName, dbOpenDynaset)

    If rst.RecordCount = 0 Then
        MsgBox "No records to be exported.", vbInformation, GetDBTitle
    Else
        On Error Resume Next
        Set ApXL = GetObject(, "Excel.Application")
        If Err.Number <> 0 Then
            Set ApXL = CreateObject("Excel.Application")
        End If
        Err.Clear

        ApXL.Visible = False

        Set xlWBk = ApXL.Workbooks.Open(strFileName)
        Set xlWSh = xlWBk.Sheets.Add
        xlWSh.Name = Left(strSheetName, 31)


        xlWSh.Range("A1").Select
        Do Until intCount = rst.fields.Count
            ApXL.ActiveCell = rst.fields(intCount).Name
            ApXL.ActiveCell.Offset(0, 1).Select
            intCount = intCount + 1
        Loop

        rst.MoveFirst

        xlWSh.Range("A2").CopyFromRecordset rst

        With ApXL
            .Range("A1").Select
            .Range(.Selection, .Selection.End(xlToRight)).Select
            .Selection.Interior.Pattern = xlSolid
            .Selection.Interior.PatternColorIndex = xlAutomatic
            .Selection.Interior.TintAndShade = -0.25
            .Selection.Interior.PatternTintAndShade = 0
            .Selection.Borders.LineStyle = xlNone
            .Selection.AutoFilter
            .Cells.EntireColumn.AutoFit
            .Cells.EntireRow.AutoFit
            .Range("B2").Select
            .ActiveWindow.FreezePanes = True
            .ActiveSheet.Cells.Select
            .ActiveSheet.Cells.WrapText = False
            .ActiveSheet.Cells.EntireColumn.AutoFit
            xlWSh.Range("A1").Select
            .Visible = True
        End With


        'xlWB.Close True
        'Set xlWB = Nothing
        'ApXL.Quit
        'Set ApXL = Nothing
    End If
End Function
Called like this:
Private Sub AppendToExcelSQLStatemet_Example()
    Call VBA_Access_ImportExport.ExportToExcel("SELECT * FROM Table1", "VBASheet", "C:TempTest.xlsx")
End Sub
Where you are asked to input:
- SQL Query
- Output Sheet Name
- Output File Path and Name.
Function to Export to New Excel File
These functions allow you to export Access objects to a new Excel workbook. You might find them more useful than the simple single lines at the top of the document.
Public Function ExportToExcel(strObjectType As String, strObjectName As String, Optional strSheetName As String, Optional strFileName As String)

    Dim rst As DAO.Recordset
    Dim ApXL As Object
    Dim xlWBk As Object
    Dim xlWSh As Object
    Dim intCount As Integer
    Const xlToRight As Long = -4161
    Const xlCenter As Long = -4108
    Const xlBottom As Long = -4107
    Const xlContinuous As Long = 1

    On Error GoTo ExportToExcel_Err
    DoCmd.Hourglass True

    Select Case strObjectType

    Case "Table", "Query"
        Set rst = CurrentDb.OpenRecordset(strObjectName, dbOpenDynaset, dbSeeChanges)
    Case "Form"
        Set rst = Forms(strObjectName).RecordsetClone
    Case "Report"
        Set rst = CurrentDb.OpenRecordset(Reports(strObjectName).RecordSource, dbOpenDynaset, dbSeeChanges)
    End Select

    If rst.RecordCount = 0 Then
        MsgBox "No records to be exported.", vbInformation, GetDBTitle
        DoCmd.Hourglass False
    Else
        On Error Resume Next
        Set ApXL = GetObject(, "Excel.Application")
        If Err.Number <> 0 Then
            Set ApXL = CreateObject("Excel.Application")
        End If
        Err.Clear
        On Error GoTo ExportToExcel_Err

        Set xlWBk = ApXL.Workbooks.Add
        ApXL.Visible = False

        Set xlWSh = xlWBk.Worksheets("Sheet1")
        If Len(strSheetName) > 0 Then
            xlWSh.Name = Left(strSheetName, 31)
        End If

        xlWSh.Range("A1").Select
        Do Until intCount = rst.fields.Count
            ApXL.ActiveCell = rst.fields(intCount).Name
            ApXL.ActiveCell.Offset(0, 1).Select
            intCount = intCount + 1
        Loop

        rst.MoveFirst

        xlWSh.Range("A2").CopyFromRecordset rst

        With ApXL
            .Range("A1").Select
            .Range(.Selection, .Selection.End(xlToRight)).Select
            .Selection.Interior.Pattern = xlSolid
            .Selection.Interior.PatternColorIndex = xlAutomatic
            .Selection.Interior.TintAndShade = -0.25
            .Selection.Interior.PatternTintAndShade = 0
            .Selection.Borders.LineStyle = xlNone
            .Selection.AutoFilter
            .Cells.EntireColumn.AutoFit
            .Cells.EntireRow.AutoFit
            .Range("B2").Select
            .ActiveWindow.FreezePanes = True
            .ActiveSheet.Cells.Select
            .ActiveSheet.Cells.WrapText = False
            .ActiveSheet.Cells.EntireColumn.AutoFit
            xlWSh.Range("A1").Select
            .Visible = True
        End With

retry:
        If FileExists(strFileName) Then
            Kill strFileName
        End If
        If strFileName <> "" Then
            xlWBk.SaveAs strFileName, FileFormat:=56
        End If

        rst.Close
        Set rst = Nothing
        DoCmd.Hourglass False
    End If

ExportToExcel_Exit:
    DoCmd.Hourglass False
    Exit Function

ExportToExcel_Err:
    DoCmd.SetWarnings True
    MsgBox Err.Description, vbExclamation, Err.Number
    DoCmd.Hourglass False
    Resume ExportToExcel_Exit

End Function
The function can be called like this:
Private Sub ExportToExcel_Example()
 Call VBA_Access_ImportExport.ExportToExcel("Table", "Table1", "VBASheet")
End SubExport Excel data to Access with VBA (Images and Code)
What is it?
This VBA code helps you to upload or export Excel data to Access in one click.
Why is it?
You can export Excel data to Access without even opening the Access DB.
How to Export Excel data to Access
Step 1: Open the Excel sheet and got to VBA code builder (Alt + F11) and Open a New Module
.
Step 2: Copy and Paste the below code in it.
Const TARGET_DB = “myDB.accdb” ‘Replace the ‘myDB.accdb’ with your db name, make sure both Excel and Access DB are at the same path.
Sub PushTableToAccess()
Dim cnn As ADODB.Connection
Dim MyConn
Dim rst As ADODB.Recordset
Dim i As Long, j As Long
Dim Rw As Long
Sheets(“Sheet Name”).Activate ‘Replace the ‘Sheet Name’ with your Excel Sheet name
Rw = Range(“A65536”).End(xlUp).Row
‘Give your Excel Sheet data Range
Set cnn = New ADODB.Connection
MyConn = ThisWorkbook.Path & Application.PathSeparator & TARGET_DB
With cnn
.Provider = “Microsoft.ACE.OLEDB.12.0”
.Open MyConn
End With
‘Replace the ‘tblMyExcelUpload’ with your table name in Access
Set rst = New ADODB.Recordset
rst.CursorLocation = adUseServer
rst.Open Source:=”tblMyExcelUpload”, ActiveConnection:=cnn, _
CursorType:=adOpenDynamic, LockType:=adLockOptimistic, _
Options:=adCmdTable
‘Load all records from Excel to Access.
For i = 2 To Rw
rst.AddNew
For j = 1 To 7
rst(Cells(1, j).Value) = Cells(i, j).Value
Next j
rst.Update
Next i
‘ Close the connection
rst.Close
cnn.Close
Set rst = Nothing
Set cnn = Nothing
End Sub
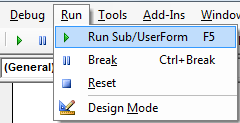
Step 3:Click the Run button or F5.(Also you can insert a button/shape in excel sheet then right click and assign this macro to run everytime.) You are done with uploading!! Excel records have been successfully uploaded to Access, Open your Access DB Table and check the data.
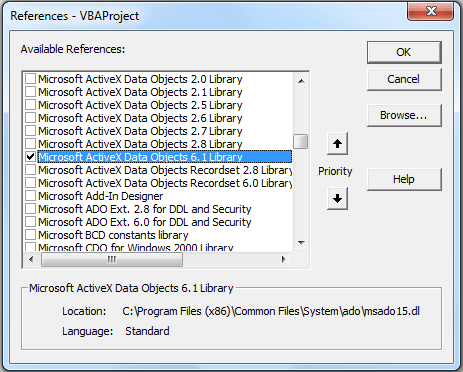
Note: Make sure ‘Microsoft ActiveX Data Objects Library’ is enabled from the Tools – References (number use latest version [6.1 as of this post]).
 Pin
Pin
8 Responses
-
Hello All;
Must the these two path locations be the same for this ADODBConnection to work? That is the ThisWorkbook.Path and Target_DB.
Command from above:
ThisWorkbook.Path & Application.PathSeparator & TARGET_DBOr, can the Workbook.Path be say
“C:MyExcelFilesMyWorkbook.xlsx” & the Access data base TARGET_DB be in
“C:MyDataBasesMyAccessDB.accdb”?My code works when both the Excel WorkBook and Access DB reside in the same folder, but when they are in different folder (properly organized library structure, the code fails at the .Open MyConn point.
Thanks All,
Mario, -
Hi
How I set password for it?
Tanks -
rst(Cells(1, j).Value) = Cells(i, j).Value
code breaks here
———-
Error 3265
Item cannot be found in the collection corresponding to the requested name or ordinal
———- -
How would the code look like if i have the spreadsheet and the db on different locations i.e paths?
-
Hello,
my code runs until
Sheets(“Sheet Name”).Activate
I have got the sheet selected but nothing further happens.
Could you advise?
Thank you
-
Is there any single command to uploaded the data like (Range.CopyFromRecordset) ?
-
Hi Krishnan, not sure, let me explore and will update you.
-
Leave a Reply
Applicable to: Office 2019/2016/365
Here’s a question from Mike:
“I know how to create Access forms and capture user input into a database table, but as i have already gathered there a way to automatically import data from an Excel workbook into an Access database table instead”?
Good question, Thanks. Yes, you can automatically import data from an Excel worksheet into new and existing Access tables so that later you can run queries and data analyses against that data set. Read on for the step by step data acquisition instructions from Excel.
Create Access table from Excel
Important Note: Before attempting to import the Excel file content ensure that the file you are about to import contains data in tabular form with proper and descriptive headings. Also, might be a good idea to ensure that your spreadsheet doesn’t contain any duplicated rows.
- Open Microsoft Access.
- When prompted, either select an existing database or create a blank database.
- In Access 2016, go ahead and hit the External Data tab in the ribbon.
- Next, from the import & link Group, hit the Excel button.
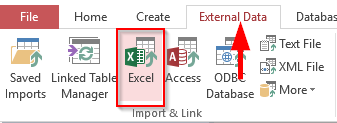
- Alternatively, if you are using Access 2019, hit New Data Source>>From File and select Excel
- Next, go ahead and hit Browse to select the Excel file that will be imported into the table.

- Browse to your computer or shared location to find your Excel spreadsheet.
- Once done, hit Open.
- Next, you should specify how you would like to store the Excel data in your Access database.
- In this case, we want to go ahead and create a table and then insert the imported Excel data into it. Therefore, we’ll select import the source data into a new table in the current database and click OK.
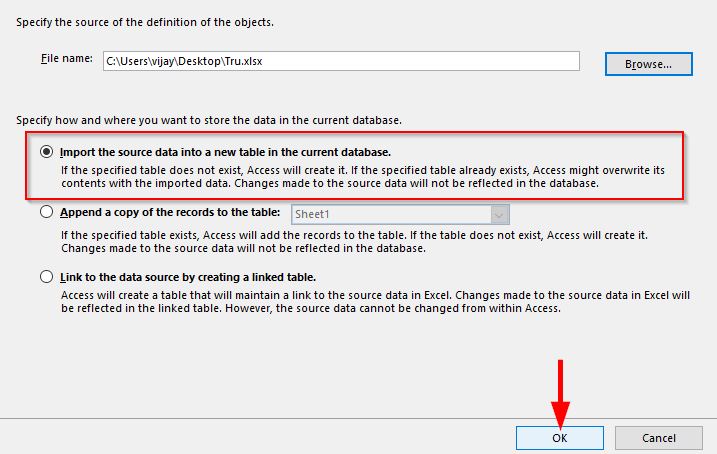
- If your Excel spreadsheet has column headings, make sure to mark the First Row Contains.. check box; then hit Next.

- Then select each column to modify the field name and data type if needed.
- Hit Next.

- Now select if we need primary key option in your table.
- Check on Let Access add primary key to make access to add a column, use it as primary key or select choose my own primary key and add the primary key column.
- If we do not need primary key, check on No primary key.

- Your last step will be to define a meaningful name for the newly created table,.
- As an optional step, you might want to run a quick analysis to optimize your table. The analysis tool allows you to identify duplicates, compact the table for better performance etc’. If so, then go ahead and check I would like to analyze my table after importing the data and click Finish.
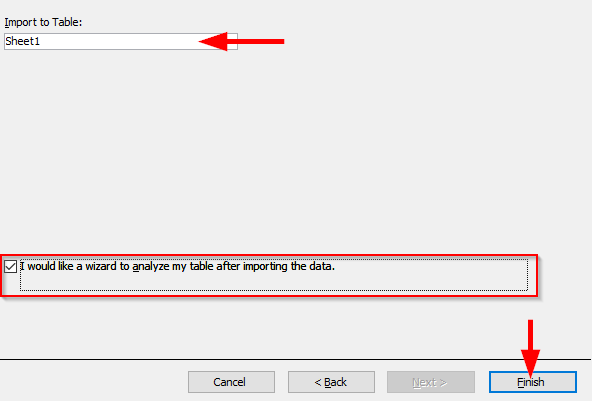
Note: So far, we learnt how to bring on data from Excel to Access. You might be as well interested in exporting your data from Access to Excel.
Import Excel to Access existing tables
Sometime your might need to append data that is stored in an Excel (either as a XLS or CSV file format) into an existing Access database table.
- If we need to insert the Excel spreadsheet data into the database which was created by us before, check on Append a copy of the records into the table.
- Hit Next.

- Remember, the column names of the table has to be same as the column names in the Excel sheet that is going to be imported.
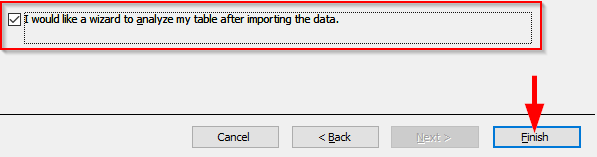
- Hit Finish.
Hope it helps. This was just a simple data import tutorial for beginners. Readers looking at specific questions or solutions are advised to inquiry via the contact page.
- Remove From My Forums
-
Question
-
Dear Developing Team
I have a database of data that I need to dump into a excel file (that is easy) using VB.NET. The hard part is to then (after the file is modified), upload the changes from the excel file into the access table. This includes to update all the rows that are
changed and add all the rows that are new.I thought of importing the data from excel into a record set and the table from access into a record set.. Then compare both and add the differences to access… but I need help here to make it happen either way….
Thanks a lot
Answers
-
If this is about MS Excel to MS Office Access, then I follow in this always Paul Clement.
Use the tools given for that in Access, that gives better results then using your own way with datasets or recordsets in VB for .Net.
The best thing to do if you want to do it programmatically is asking this in the VBA forum.
http://social.msdn.microsoft.com/Forums/en-US/home?forum=isvvb
Success
Cor-
Marked as answer by
Friday, May 30, 2014 9:14 AM
-
Marked as answer by
-
No magic bullet for this operation. You will have to read the data (OleDbDataReader would be preferable) row by row from the Excel Worksheet and then perform a lookup (SQL SELECT statement) by the each row’s primary key on the Access table. If the
row is not found in the Access table then execute an INSERT statement (OleDbCommand.ExecuteNonQuery should be fine) using the data from the Excel row. If a row is found, that matches the primary key, then execute an UPDATE statement using the data from the
Excel row.
Paul ~~~~ Microsoft MVP (Visual Basic)
-
Marked as answer by
Carl Cai
Friday, May 30, 2014 9:14 AM
-
Marked as answer by
-
well, I dont feel that bad then…. it just seems that everyone make it look super easy and I am here fighting my way through it..haha..
I am kinda new on databases so, is harder for me I guess.
Thanks
Hi,
As Cor suggested, that is a better way to interop with excel, and you could also start it with the following tip.
To generate the dataset from excel, we could use this way.
   Using ExcelConn As New System.Data.OleDb.OleDbConnection("Provider=Microsoft.ACE.OLEDB.12.0;Data Source=D:SQLExcelTest.xlsx;Extended Properties=Excel 12.0")
                    Try
                        ExcelConn.Open()
                        'New sheet in Workbook
                        Dim ExcelCommand As New System.Data.OleDb.OleDbCommand("SELECT * from [agency_reg$] ", ExcelConn)
                        Dim exAdp As OleDb.OleDbDataAdapter = New OleDb.OleDbDataAdapter(ExcelCommand)
                        exAdp.Fill(exdst, "table1")
                    Catch ex As Exception
                        MsgBox(ex.ToString())
                        Return
                    Finally
                        ExcelConn.Close()
                    End Try
                End Using
But that will got the DataType issue,i.e, the ID column which should be integer when generate them to excel and get that data with the way above, it turns out its datatype is double, so if you want to set its default DataType, then you could code with this
way.Using ExcelConn As New System.Data.OleDb.OleDbConnection("Provider=Microsoft.ACE.OLEDB.12.0;Data Source=D:SQLExcelTest.xlsx;Extended Properties=Excel 12.0") Try ExcelConn.Open() 'New sheet in Workbook Dim ExcelCommand As New System.Data.OleDb.OleDbCommand("SELECT * from [agency_reg$] ", ExcelConn) Dim exAdp As OleDb.OleDbDataAdapter = New OleDb.OleDbDataAdapter(ExcelCommand) exdst.Tables.Add("table1") With exdst.Tables(0) With .Columns .Add(New DataColumn With {.DataType = GetType(Int32), .ColumnName = "agentID"}) End With End With exAdp.Fill(exdst, "table1") Catch ex As Exception MsgBox(ex.ToString()) Return Finally ExcelConn.Close() End Try End UsingThen you could follow Paul’s suggestion to get your task done.
In addition, I would suggest you just have a try since whoever coding with vb.net was new to vb.net at first, what could get your task or work done is yourself.
So, just share your current code and the error message if you got with us. Telling us you are new on databases isn’t helpful to solve this issue.
Regards.
Regards.
We are trying to better understand customer views on social support experience, so your participation in this interview project would be greatly appreciated if you have time. Thanks for helping make community forums a great place.
Click
HERE to participate the survey.-
Marked as answer by
Carl Cai
Friday, May 30, 2014 9:14 AM
-
Marked as answer by
-
Here is an example that has everything but the Update query code. Sheet3 in the Excel Workbook contains the updated data and is exported to the Customers table.
        Dim ConnectionString As String = "Provider=Microsoft.ACE.OLEDB.12.0;" & _
                            "Data Source=C:Users...DocumentsMy DatabaseExcelBook2007.xlsx;" & _
                            "Extended Properties=""Excel 12.0;HDR=YES"""

        Dim AccessConnectionString As String = "Provider=Microsoft.ACE.OLEDB.12.0;" & _
                            "Data Source=C:Users...DocumentsMy DatabaseAccessdb1 XP.accdb;"

        Dim ExcelConnection As New System.Data.OleDb.OleDbConnection(ConnectionString)
        ExcelConnection.Open()

        Dim ExcelCommand As New System.Data.OleDb.OleDbCommand
        ExcelCommand.Connection = ExcelConnection
        ExcelCommand.CommandText = "Select * from [Sheet3$]"
        ExcelCommand.CommandType = CommandType.Text

        Dim ExcelDataReader As System.Data.OleDb.OleDbDataReader
        ExcelDataReader = ExcelCommand.ExecuteReader()

        While (ExcelDataReader.Read())
            Dim AccessConnection As New System.Data.OleDb.OleDbConnection(AccessConnectionString)
            AccessConnection.Open()
            Dim AccessCommand As New System.Data.OleDb.OleDbCommand
            AccessCommand.Connection = AccessConnection
            AccessCommand.CommandText = "SELECT Count(CustomerID) As CustIDCount FROM Customers WHERE CustomerID = @CustomerID"
            AccessCommand.Parameters.AddWithValue("@CustomerID", ExcelDataReader.Item("CustomerID").ToString)
            Dim RowCount As Int32
            RowCount = DirectCast(AccessCommand.ExecuteScalar, Int32)
            If RowCount > 0 Then
                'Row found perform update
            Else
                'Row not found perform insert
                Dim AccessCommandInsert As New System.Data.OleDb.OleDbCommand
                AccessCommandInsert.Connection = AccessConnection
                AccessCommandInsert.CommandText = "INSERT INTO Customers (CustomerID, CompanyName, ContactName, ContactTitle, Address, City, Region, PostalCode, Country, Phone, Fax) " & _
                                                  "VALUES(@CustID, @CompanyName, @ContactName, @ContactTitle, @Address, @City, @Region, @PostalCode, @Country, @Phone, @Fax)"
                AccessCommandInsert.Parameters.AddWithValue("@CustID", ExcelDataReader.Item("CustomerID").ToString)
                AccessCommandInsert.Parameters.AddWithValue("@CompanyName", ExcelDataReader.Item("CompanyName").ToString)
                AccessCommandInsert.Parameters.AddWithValue("@ContactName", ExcelDataReader.Item("ContactName").ToString)
                AccessCommandInsert.Parameters.AddWithValue("@ContactTitle", ExcelDataReader.Item("ContactTitle").ToString)
                AccessCommandInsert.Parameters.AddWithValue("@Address", ExcelDataReader.Item("Address").ToString)
                AccessCommandInsert.Parameters.AddWithValue("@City", ExcelDataReader.Item("City").ToString)
                AccessCommandInsert.Parameters.AddWithValue("@Region", ExcelDataReader.Item("Region").ToString)
                AccessCommandInsert.Parameters.AddWithValue("@PostalCode", ExcelDataReader.Item("PostalCode").ToString)
                AccessCommandInsert.Parameters.AddWithValue("@Country", ExcelDataReader.Item("Country").ToString)
                AccessCommandInsert.Parameters.AddWithValue("@Phone", ExcelDataReader.Item("Phone").ToString)
                AccessCommandInsert.Parameters.AddWithValue("@Fax", ExcelDataReader.Item("Fax").ToString)
                AccessCommandInsert.ExecuteNonQuery()
             End If
            AccessConnection.Close()
        End While

        ExcelDataReader.Close()
        ExcelConnection.Close()
Paul ~~~~ Microsoft MVP (Visual Basic)
-
Marked as answer by
Carl Cai
Friday, May 30, 2014 9:15 AM
-
Marked as answer by
-
Does the Worksheet only contain updated and new rows? If so, then there is no reason to compare against the current data. If the Worksheet contains all data then it would be simpler just to delete the existing data from the Access table and then export
all the rows from Excel.
Paul ~~~~ Microsoft MVP (Visual Basic)
-
Marked as answer by
Carl Cai
Friday, May 30, 2014 9:19 AM
-
Marked as answer by
-
Why are you using VB.NET for this? I can understand using it to interact with either Access of Excel, but not BOTH. Although I’m certain that it can be done, I’m not sure it’s a good project for you right now, as it seems like you need to get
this done soon.Maybe you should dump your data from Access into Excel. Then, make the changes in Excel, and push the data back to Access. See this link for some ideas.
http://www.accessmvp.com/KDSnell/EXCEL_Import.htm
Exporting from Excel to Access.
http://www.erlandsendata.no/english/index.php?d=envbadacexportado
http://www.erlandsendata.no/english/index.php?d=envbadacexportdao
This is a great resource too.
http://www.datawright.com.au/excel_resources/excel_access_and_ado.htm
All those resources basically do bulk loads, so for a true UPDATE task, Take a look at this as well.
http://www.mrexcel.com/forum/microsoft-access/545350-updating-access-table-excel.html
Of course, you can do other things, like bulk load from Excel to a staging table in Access, and then move the new and changed records from the staging table into your production table. In Access try Create > Query Wizard > Find Unmatched Query
Wizard . . . walk through the steps.You can use VBA to automate all the steps of what you want to do, and that will be a lot easier, for now, then trying to do it with VB.NET.
Knowledge is the only thing that I can give you, and still retain, and we are both better off for it.
-
Marked as answer by
Carl Cai
Friday, May 30, 2014 9:15 AM
-
Marked as answer by