
This is a great question and I was surprised at how difficult it was to find a clear and complete answer, most of the answers I found were either sudo-code or not 100% complete.
I was able to create a complete solution to copy and save the data from my DataGridView to an excel file based on Jake’s answer so I’m posting my complete solution in the hopes that it can help other new comers to c# like myself 
First off, you will need the Microsoft.Office.Interop.Excel reference in your project. See MSDN on how to add it.
My Code:
using Excel = Microsoft.Office.Interop.Excel;

private void btnExportToExcel_Click(object sender, EventArgs e)
{
    SaveFileDialog sfd = new SaveFileDialog();
    sfd.Filter = "Excel Documents (*.xls)|*.xls";
    sfd.FileName = "Inventory_Adjustment_Export.xls";
    if (sfd.ShowDialog() == DialogResult.OK)
    {
        // Copy DataGridView results to clipboard
        copyAlltoClipboard();

        object misValue = System.Reflection.Missing.Value;
        Excel.Application xlexcel = new Excel.Application();

        xlexcel.DisplayAlerts = false; // Without this you will get two confirm overwrite prompts
        Excel.Workbook xlWorkBook = xlexcel.Workbooks.Add(misValue);
        Excel.Worksheet xlWorkSheet = (Excel.Worksheet)xlWorkBook.Worksheets.get_Item(1);

        // Format column D as text before pasting results, this was required for my data
        Excel.Range rng = xlWorkSheet.get_Range("D:D").Cells;
        rng.NumberFormat = "@";

        // Paste clipboard results to worksheet range
        Excel.Range CR = (Excel.Range)xlWorkSheet.Cells[1, 1];
        CR.Select();
        xlWorkSheet.PasteSpecial(CR, Type.Missing, Type.Missing, Type.Missing, Type.Missing, Type.Missing, true);

        // For some reason column A is always blank in the worksheet. ¯_(ツ)_/¯
        // Delete blank column A and select cell A1
        Excel.Range delRng = xlWorkSheet.get_Range("A:A").Cells;
        delRng.Delete(Type.Missing);
        xlWorkSheet.get_Range("A1").Select();

        // Save the excel file under the captured location from the SaveFileDialog
        xlWorkBook.SaveAs(sfd.FileName, Excel.XlFileFormat.xlWorkbookNormal, misValue, misValue, misValue, misValue, Excel.XlSaveAsAccessMode.xlExclusive, misValue, misValue, misValue, misValue, misValue);
        xlexcel.DisplayAlerts = true;
        xlWorkBook.Close(true, misValue, misValue);
        xlexcel.Quit();

        releaseObject(xlWorkSheet);
        releaseObject(xlWorkBook);
        releaseObject(xlexcel);

        // Clear Clipboard and DataGridView selection
        Clipboard.Clear();
        dgvItems.ClearSelection();

        // Open the newly saved excel file
        if (File.Exists(sfd.FileName))
            System.Diagnostics.Process.Start(sfd.FileName);
    }
}

private void copyAlltoClipboard()
{
    dgvItems.SelectAll();
    DataObject dataObj = dgvItems.GetClipboardContent();
    if (dataObj != null)
        Clipboard.SetDataObject(dataObj);
}

private void releaseObject(object obj)
{
    try
    {
        System.Runtime.InteropServices.Marshal.ReleaseComObject(obj);
        obj = null;
    }
    catch (Exception ex)
    {
        obj = null;
        MessageBox.Show("Exception Occurred while releasing object " + ex.ToString());
    }
    finally
    {
        GC.Collect();
    }
}
Всем доброго времени суток!
Хотел бы поделиться своим практическим примером экспортирования данных из таблицы DataGridView в Microsoft Excel.
Потратив около пары часов на поиск нормального примера, такового не обнаружил… Немного поэкспериментировав с имеющимся кодом, получил нужный результат!
Итак, для использования Excel приложения необходимо подключить соответствующие references, а именно:
- «Microsoft Office 11.0 Object Library» расположенного во вкладке COM компонентов
- «Microsoft.Office.Interop.Excel» расположенного во вкладке .Net компонентов
Далее прописываем
using Microsoft.Office.Interop.Excel;
Теперь нам доступен класс для запуска Excel из нашей программы. Создадим объект класса:
Microsoft.Office.Interop.Excel.Application ExcelApp = new Microsoft.Office.Interop.Excel.Application();
Создаем рабочую книгу:
ExcelApp.Application.Workbooks.Add(Type.Missing);
Нам доступно редактирование некоторых параметров, в качестве примера изменим ширину столбцов:
ExcelApp.Columns.ColumnWidth = 15;
Задать значение ячейки можно так:
ExcelApp.Cells[1, 1 ]= "№п/п";
Для переноса данных применил такой цикл (dgvHadTovar — это имя моего компонента DataGridView):
for (int i = 0; i < dgvHadTovar.ColumnCount; i++)

 {

 for (int j = 0; j < dgvHadTovar.RowCount; j++)

 {

 ExcelApp.Cells[j + 2, i + 1 ] = (dgvHadTovar[i,j].Value).ToString();

 }

 }
j + 2, потому что первая строка отведена для подписей столбцов!
И для отображения полученного результата, необходимо показать документ:
ExcelApp.Visible = true;
В итоге получилась такая функция:
private void button1_Click(object sender, EventArgs e)

 {

 Microsoft.Office.Interop.Excel.Application ExcelApp = new Microsoft.Office.Interop.Excel.Application();

 ExcelApp.Application.Workbooks.Add(Type.Missing);

 ExcelApp.Columns.ColumnWidth = 15;
ExcelApp.Cells[1, 1 ]= "№п/п";
ExcelApp.Cells[1, 2 ]= "Число";
ExcelApp.Cells[1, 3 ]= "Название";
ExcelApp.Cells[1, 4 ]= "Количество";
ExcelApp.Cells[1, 5 ]= "Цена ОПТ";
ExcelApp.Cells[1, 6 ]= "Цена Розница";
ExcelApp.Cells[1, 7] = "Сумма";
for (int i = 0; i < dgvHadTovar.ColumnCount; i++)
{
for (int j = 0; j < dgvHadTovar.RowCount; j++)
{
ExcelApp.Cells[j + 2, i + 1 ] = (dgvHadTovar[i,j].Value).ToString();
}
}
ExcelApp.Visible = true;
}
There are lots of ways to do this, but most ways, if your wanting to rely on automation, will require the use of the Interop.
Adding a COM reference to your project is good start, depending on which version of Office you have installed, you will need to add the Microsoft Excel x.x Library, this in turn will add the ncessary references to your project.
I use Office 2007, which will show as the Microsoft.Excel 12.0 Library, once selected the following references appear.
Microsoft.Office.Core
Microsoft.Office.Interop.Excel
Once you have that set up, the next stage is to decide how you want to integrate with the Excel application, by this I mean, do you want the application’s UI to appear, or to just use it in the background in order to create a worksheet and save it.
When you figure out how your interoperation is to occur, then the next step is to plan your data insertion.
For example, if your using a DataSet, there are many options available, alternatively you can simply work through the rows of your DataGridView and populate cells as you need them.
Happy to provide more info on request.
what is DataGridView?
The control provides a powerful and flexible way to display data in a tabular format. You can use the DataGridView control to show read-only views of a small amount of data, or you can scale it to show editable views of very large sets of data. You can extend the DataGridView control in a number of ways to build custom behaviors into your applications.
For example, you can programmatically specify your own sorting algorithms, and you can create your own types of cells. You can easily customize the appearance of the DataGridView control by choosing among several properties. Many types of data stores can be used as a data source, or the DataGridView control can operate with no data source bound to it.
what is Excel?
Excel is a spreadsheet program from Microsoft and a component of its Office product group for business applications. Microsoft Excel enables users to format, organize and calculate data in a spreadsheet by organizing data using software like Excel, data analysts and other users can make information easier to view as data is added or changed.
Excel contains a large number of boxes called cells that are ordered in rows and columns. Data is placed in these cells. Excel is a part of the Microsoft Office and Office 365 suites and is compatible with other applications in the Office suite. The spreadsheet software is available for Windows, macOS, Android, and iOS platforms.
DataGridView to excel c#
in this article, I will explain with an example, how to export DataGridView data to an Excel file using C#.DataGridView cannot be exported directly to an Excel file and hence need to generate a DataTable dt and export the DataTable to an Excel file. The DataTable will be exported to a formatted Excel file using the ClosedXml library which is a wrapper of OpenXml.for this tutorial, I have already created the database and all the data is in datagridview.
Step # 1: Create Visual Studio Project:
Open Visual Studio. I am using Visual Studio 2019.

Click on Create New Project.
Now, Select Windows Form App from Template, and Press Next, Following Window will appear. Write Project Name. I have written exporting datagridview to excel.
Now, Click Next, Following WIndow will appear.
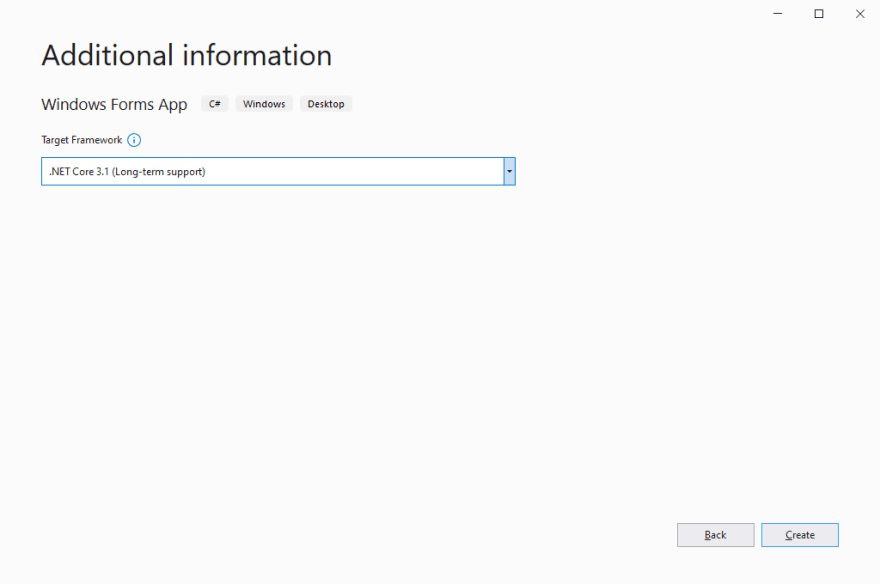
Select .Net Core 3.1 from Dropdown Menu. Click on the «Create» Button, Project will be created.
Step # 2: Install Nuget Package DocumentFormat.OpenXml and ClosedXml Libraries
for this, we need a document open XML sdk and closedXMl library. You can download the libraries using the following download locations.https://github.com/ClosedXML/ClosedXML
Step # 3: Design Window Forms and writes code

The design form will look like this I have created a windows form and connected that form with the database and all the data is loaded into the windows forms application.
Importing data to datagridview.
You will need to import the following namespaces before starting the code.

DataGridView
Inside the Form Load event, the DataGridView is populated with records from the table.

Export DataGridView to Excel
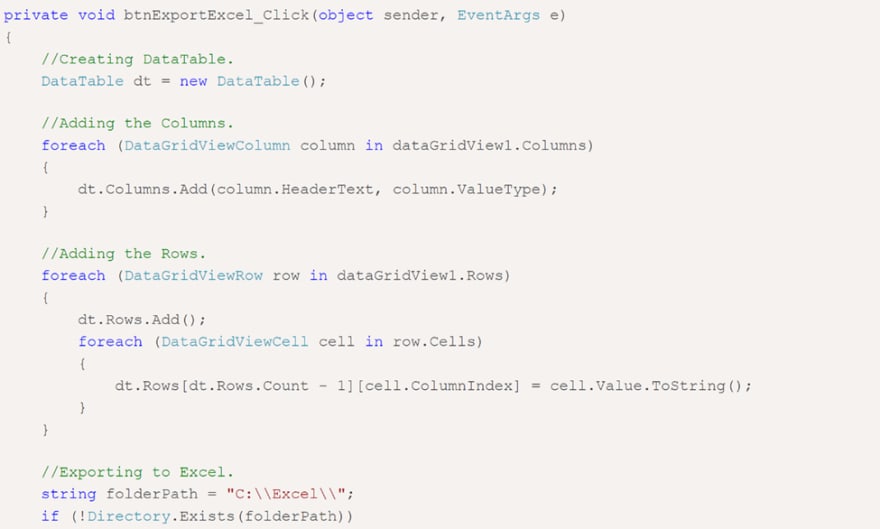
Inside the Button Click event handler, first, a DataTable is created with columns same as that of the DataGridView, and a loop is executed over the DataGridView rows and all the data is added to the DataTable.Then a Workbook object is created to which the DataTable is added as Worksheet using the Add method which accepts DataTable and the name of the Sheet as parameters.
Once the DataTable is added as a Worksheet to the Workbook, the formatting is done by first setting the Header row background color and then applying background colors to the rows and the alternating rows of the Excel file.
Finally, the export data to and export data WorkBook is saved to the specified location on the disk. we can use that workbook as a normal excel documents or workbook. we can also create or fill and export large excel files and normal excel sheets and we can set the filename as well to set the name we have to set the name of the project and then save the name of the file as a string.
Before you write source code, you must add a reference to the Microsoft Excel object library. Right-click on your project and select Add Reference menu. After that go to the COM tab and select and add Microsoft Excel 12.0 object library. Now here is my Button click event handler where I create Excel object sender or object obj and documents, get data from DataGridView, and add rows and columns to the document.
Export data source code sample
Excel files
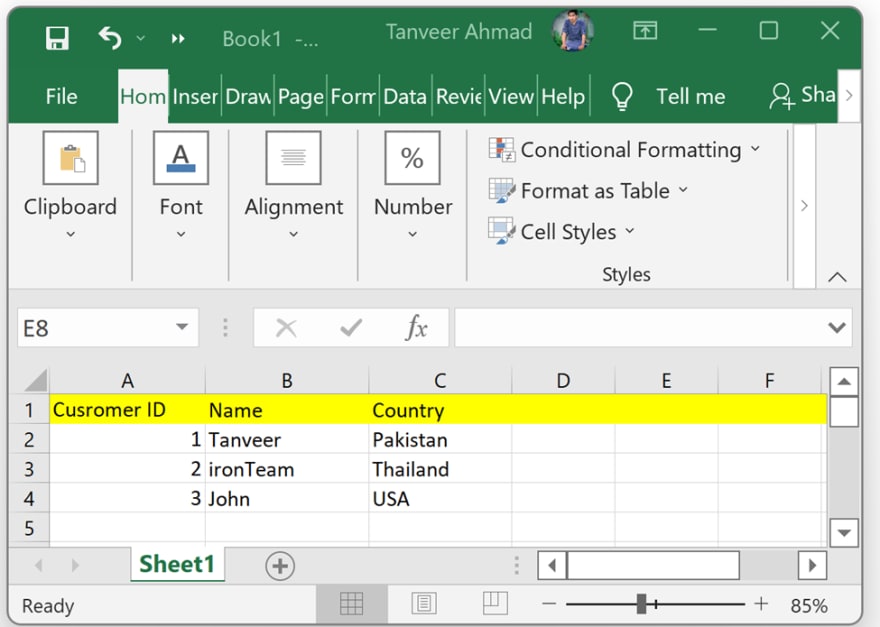
after writing the complete source code when we press the export data button the excel file will be generate and when we open the excel file we will get a look like this. all the data of database will be in excel file
This is the completion of the guide. I hope it was easy for you to follow and understand. So, what are you waiting for? 30 Days Free Trial You can obtain the License here and begin straightaway. If you are not yet an IronPDF customer, you can try 30-day free trial to check out their available features. If you buy the complete Iron Suite, you will get all 5 Products for the Price of 2. For further details about the licensing, please follow this link to Purchase the complete Package.
You can download the software product from this link.
In this article I will explain with an example, how to export DataGridView data to Excel file with formatting i.e. Colors and Styles in Windows Forms (WinForms) Applications using C# and VB.Net.
DataGridView cannot be exported directly to Excel file and hence need to generate a DataTable and export the DataTable to Excel file.
The DataTable will be exported to a formatted Excel file using ClosedXml library which is a wrapper of OpenXml.
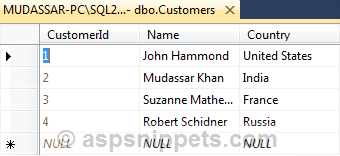
Database
I have made use of the following table Customers with the schema as follows.
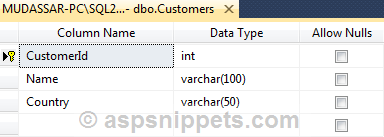
I have already inserted few records in the table.
Note: You can download the database table SQL by clicking the download link below.
Download DocumentFormat.OpenXml and ClosedXml Libraries
You can download the libraries using the following download locations.
Note: The DLL files of both OpenXml and ClosedXml are present in the attached sample.
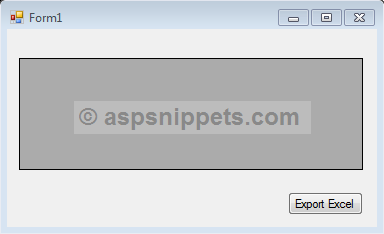
Form Controls
I have added a DataGridView and a Button to the Windows Form.
Namespaces
You will need to import the following namespaces.
C#
using System.IO;
using System.Data;
using ClosedXML.Excel;
using System.Data.SqlClient;
VB.Net
Imports System.IO
Imports System.Data
Imports ClosedXML.Excel
Imports System.Data.SqlClient
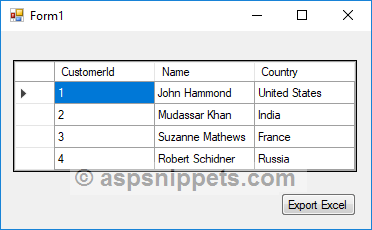
Populating DataGridView
Inside the Form Load event, the DataGridView is populated with records from Customers table.
C#
private void Form1_Load(object sender, EventArgs e)
{
this.BindDataGridView();
}
private void BindDataGridView()
{
string constring = @»Data Source=.SQL2014;Initial Catalog=AjaxSamples;Integrated Security=true»;
using (SqlConnection con = new SqlConnection(constring))
{
using (SqlCommand cmd = new SqlCommand(«SELECT * FROM Customers», con))
{
cmd.CommandType = CommandType.Text;
using (SqlDataAdapter sda = new SqlDataAdapter(cmd))
{
using (DataTable dt = new DataTable())
{
sda.Fill(dt);
dataGridView1.DataSource = dt;
}
}
}
}
}
VB.Net
Private Sub Form1_Load(sender As System.Object, e As System.EventArgs) Handles MyBase.Load
Me.BindDataGridView()
End Sub
Private Sub BindDataGridView()
Dim constring As String = «Data Source=.SQL2014;Initial Catalog=AjaxSamples;Integrated Security=true»
Using con As New SqlConnection(constring)
Using cmd As New SqlCommand(«SELECT * FROM Customers», con)
cmd.CommandType = CommandType.Text
Using sda As New SqlDataAdapter(cmd)
Using dt As New DataTable()
sda.Fill(dt)
dataGridView1.DataSource = dt
End Using
End Using
End Using
End Using
End Sub
Exporting DataGridView data to Excel with formatting
Inside the Button Click event handler, first a DataTable is created with columns same as that of the DataGridView and a loop is executed over the DataGridView rows and all the data is added to the DataTable.
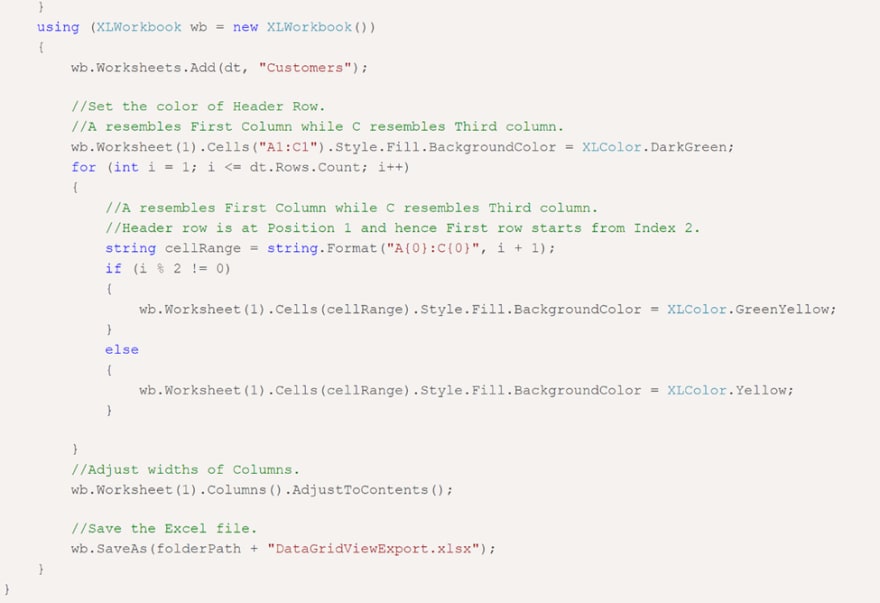
Then a Workbook object is created to which the DataTable is added as Worksheet using the Add method which accepts DataTable and the name of the Sheet as parameters.
Once the DataTable is added as a Worksheet to the Workbook, the formatting is done by first setting the Header row background color and then applying background colors to the rows and the alternating rows of the Excel file.
Finally the WorkBook is saved to the specified location on the disk.
C#
private void btnExportExcel_Click(object sender, EventArgs e)
{
//Creating DataTable.
DataTable dt = new DataTable();
//Adding the Columns.
foreach (DataGridViewColumn column in dataGridView1.Columns)
{
dt.Columns.Add(column.HeaderText, column.ValueType);
}
//Adding the Rows.
foreach (DataGridViewRow row in dataGridView1.Rows)
{
dt.Rows.Add();
foreach (DataGridViewCell cell in row.Cells)
{
dt.Rows[dt.Rows.Count — 1][cell.ColumnIndex] = cell.Value.ToString();
}
}
//Exporting to Excel.
string folderPath = «C:\Excel\»;
if (!Directory.Exists(folderPath))
{
Directory.CreateDirectory(folderPath);
}
using (XLWorkbook wb = new XLWorkbook())
{
wb.Worksheets.Add(dt, «Customers»);
//Set the color of Header Row.
//A resembles First Column while C resembles Third column.
wb.Worksheet(1).Cells(«A1:C1»).Style.Fill.BackgroundColor = XLColor.DarkGreen;
for (int i = 1; i <= dt.Rows.Count; i++)
{
//A resembles First Column while C resembles Third column.
//Header row is at Position 1 and hence First row starts from Index 2.
string cellRange = string.Format(«A{0}:C{0}», i + 1);
if (i % 2 != 0)
{
wb.Worksheet(1).Cells(cellRange).Style.Fill.BackgroundColor = XLColor.GreenYellow;
}
else
{
wb.Worksheet(1).Cells(cellRange).Style.Fill.BackgroundColor = XLColor.Yellow;
}
}
//Adjust widths of Columns.
wb.Worksheet(1).Columns().AdjustToContents();
//Save the Excel file.
wb.SaveAs(folderPath + «DataGridViewExport.xlsx»);
}
}
VB.Net
Private Sub btnExportExcel_Click(sender As Object, e As EventArgs) Handles btnExportExcel.Click
‘Creating DataTable.
Dim dt As New DataTable()
‘Adding the Columns.
For Each column As DataGridViewColumn In dataGridView1.Columns
dt.Columns.Add(column.HeaderText, column.ValueType)
Next
‘Adding the Rows.
For Each row As DataGridViewRow In dataGridView1.Rows
dt.Rows.Add()
For Each cell As DataGridViewCell In row.Cells
dt.Rows(dt.Rows.Count — 1)(cell.ColumnIndex) = cell.Value.ToString()
Next
Next
‘Exporting to Excel.
Dim folderPath As String = «C:Excel»
If Not Directory.Exists(folderPath) Then
Directory.CreateDirectory(folderPath)
End If
Using wb As New XLWorkbook()
wb.Worksheets.Add(dt, «Customers»)
‘Set the color of Header Row.
‘A resembles First Column while C resembles Third column.
wb.Worksheet(1).Cells(«A1:C1»).Style.Fill.BackgroundColor = XLColor.DarkGreen
For i As Integer = 1 To dt.Rows.Count
‘A resembles First Column while C resembles Third column.
‘Header row is at Position 1 and hence First row starts from Index 2.
Dim cellRange As String = String.Format(«A{0}:C{0}», i + 1)
If i Mod 2 <> 0 Then
wb.Worksheet(1).Cells(cellRange).Style.Fill.BackgroundColor = XLColor.GreenYellow
Else
wb.Worksheet(1).Cells(cellRange).Style.Fill.BackgroundColor = XLColor.Yellow
End If
Next
‘Adjust widths of Columns.
wb.Worksheet(1).Columns().AdjustToContents()
‘Save the Excel file.
wb.SaveAs(folderPath & «DataGridViewExport.xlsx»)
End Using
End Sub
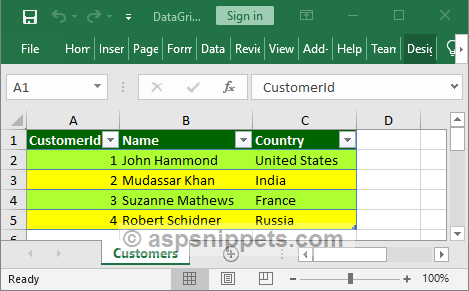
Screenshot
Downloads
- Download ExportToExcel — 1 MB
Introduction
A very common problem in winform applications occurs when data should be exported from DatagridView to Excel, there’s some commercial workarounds to solve this problem. This article describe a simple versatile and free way to do.
Background
The work to exporting to Excel is made by «Office XP Primary Interop Assemblies (PIAs)»
Initially, the data is obtained from datagridview’s datasource, formated and then exported to a excel file throw Excel COM Interiop.
The Datagridview datasource could be :
- ArrayList of Entities
- Dataset with at least 1 datatable
- Datatable
Data should be stored in a DataTable before beign exported to excel, if DataGridView’s DataSource is an ArrayList, then the ArrayList is converted to a DataTable using the method ArrayListToDataTable
ArrayList arr = (ArrayList)dataGridView.DataSource;
       dt = ArrayListToDataTable(arr);
Once the data is stored in the datatable is exported to excel using the method dataTable2Excel
dataTable2Excel(dt, dataGridView, pFullPath_toExport, nameSheet);
Using the code
You should only copy the following 2 files to your project
- ExportToExcel.cs
- UC_DataGridView.cs
- UC_DataGridView.Designer.cs
Use the DataGridView in you project and export to excel using the next code
Tools.ExportToExcel.ExportToExcel exp = new Tools.ExportToExcel.ExportToExcel();
exp.dataGridView2Excel(this.dgvDataToExport, path, "NameSheet");
Points of Interest
Please note that the titles in excel file was obtained from DataGridView headers, not from DataTable name columns.
There’s a bug, titles of columns are not exported correct, i am working on it.
History
15/10/2008 First Release