
Export SQL Data to Excel from Microsoft SQL Server
Let’s go over three ways to export an SQL Query to an Excel File Using MSSQL
Despite the pushback from Database aficionados, sometimes it makes sense to export data from SQL to an Excel file. It really depends on who is the audience of the information. Not everyone is great with SQL Analysis. Few people require access to the database.
And lots of times the boss just needs to see the information in Excel.
So, if Excel is the Output required this article is here to help you Export SQL Queries to Excel.
Here are three ways to Export a SQL query to Excel format. The last one can be kind of tricky. I’ll provide a condensed version followed by a detailed version with screenshots.
Three quick ways to Export SQL Data to Excel:
Choose the Summarized Version and then scroll to further down to use the SQL Export Version to Excel that works best for you.
Method Number 1 – Copy Grid results and Paste into Excel
Under Query, Make sure results to Grid are selected.
After Running your query, right-click the top right corner of the grid.
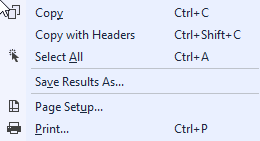
Copy With Headers.
Paste into an Excel File
Possible Issues:
I’ve seen formatting issues with this strategy. For Example, there are situations where the spreadsheet drops preceding zeroes after the copy-paste.
I’ve also noticed lengthy fields, (think of a really long free text field) end up running into the next line.
For the reasons above, I prefer this next method for a clean Excel file.
Method Number 2: Export the Query Results as a Task
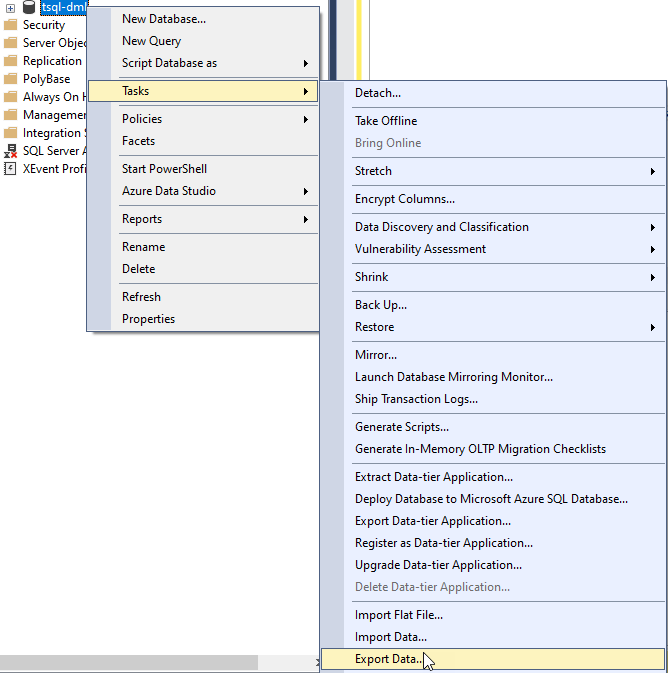
In the object explorer window, find the database you want to export from.
Right Click the Database, Click Tasks, and Export Data
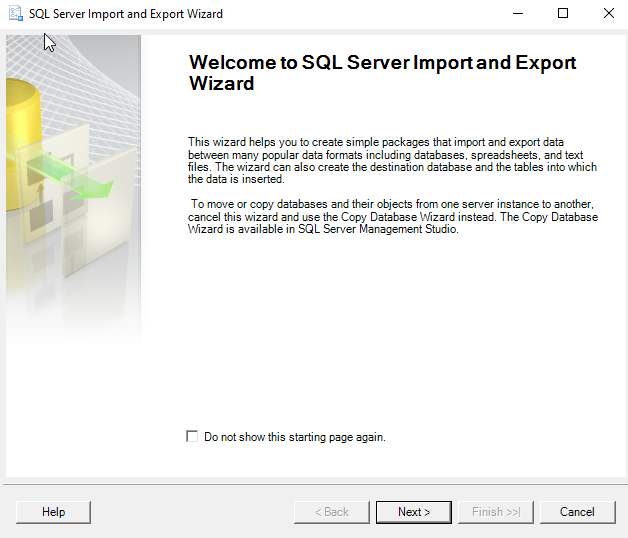
The Wizard walks you through the rest of the steps but I have included screenshots below.
Method Number 3 – Use Good Old fashioned TSQL to send the data to an excel file
For those who value speed above all use the following script format.
INSERT INTO OPENROWSET(‘Microsoft.ACE.OLEDB.12.0′,’Excel 12.0; Database=C:SQL2019ReportsUsernames.xlsx;’,’SELECT * FROM [Sheet1$]’) SELECT DisplayName FROM dbo.Users Where Reputation > 2000
Possible Issues – Configuring this might not be your type of fun and getting this straight deserves its own article.
Step by Step instructions with screenshots
Method Number 1 – Copy Grid results and paste into Excel
After ensuring results to grid turned on, Execute your query, right-click the top left-hand corner of the results grid.
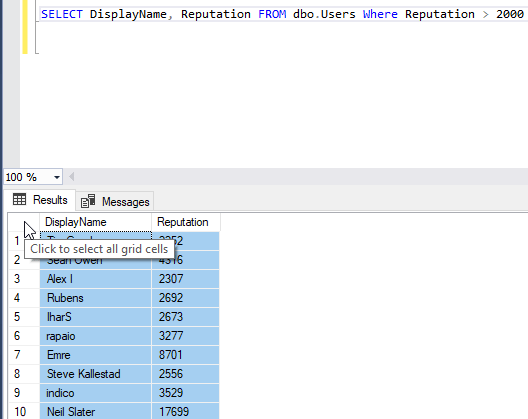
Choose Copy with Headers and then you are ready to paste in Excel with Ctrl + C
Method 2 – Export Via the Export Wizard
Right-click on the database you want to export from. Then Select tasks and “Export Data”.
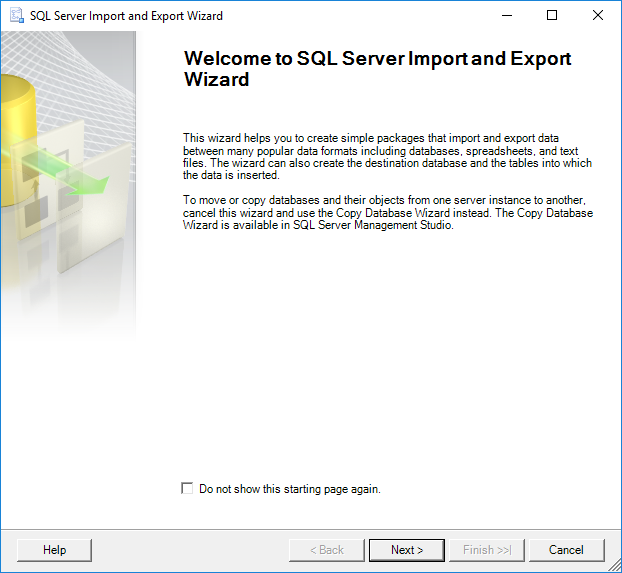
The SQL Server Wizard will startup. Click Next through the prompts.
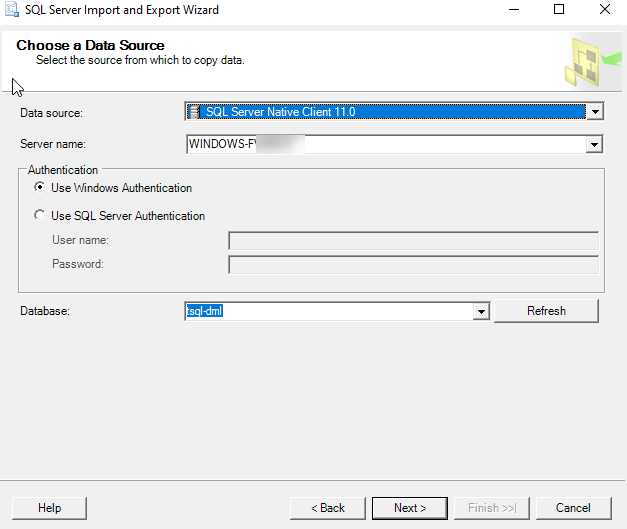
Select the appropriate Native client, your server name, and database and choose “Next”.
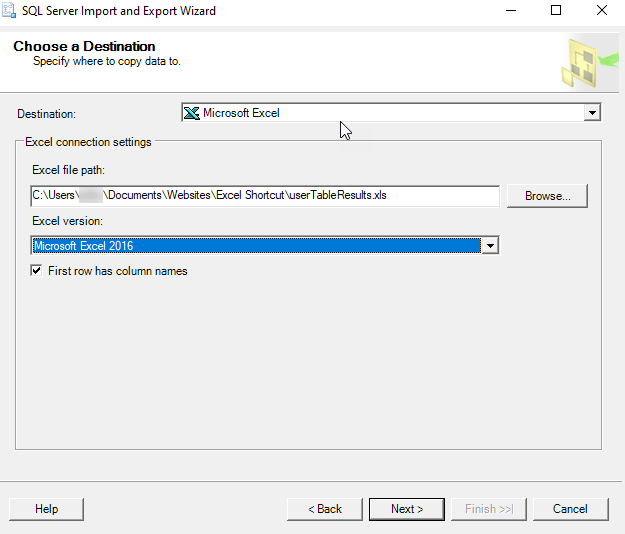
Next, Select Microsoft Excel and the file path where you want to import the data. The .xls file that you name will be created by this process.
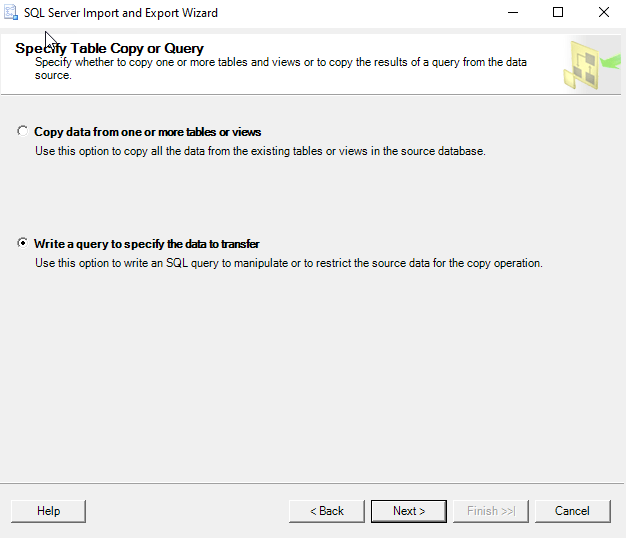
Now you can choose to export a whole table or a query. For the purpose of this exercise, we are creating a query.
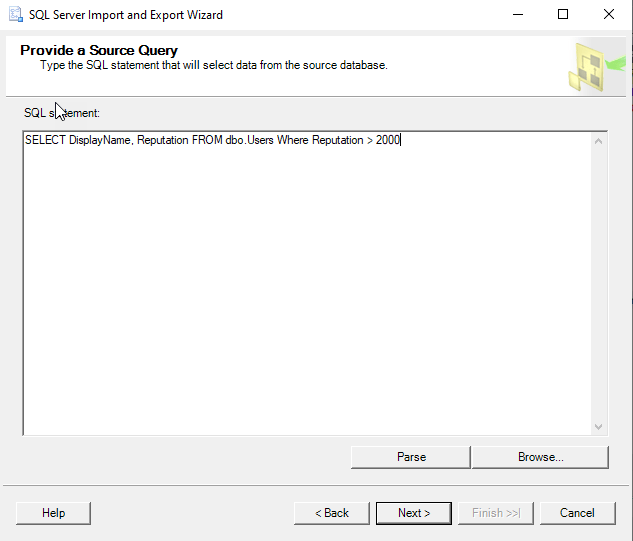
Paste the query into the SQL Statement field. Make sure every output field has a unique name.
Click Next on the “Select Source Tables and Views” screen.

I use the default settings on the “conversion issues and data type mapping screen”
Now you can choose to Run immediately or Save an SSIS Package for later reuse.
Double Check your settings and click finish.
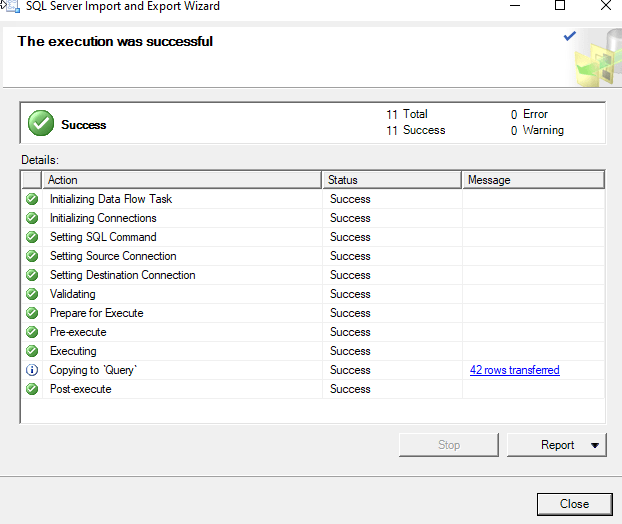
Make sure there were no errors in the Export.
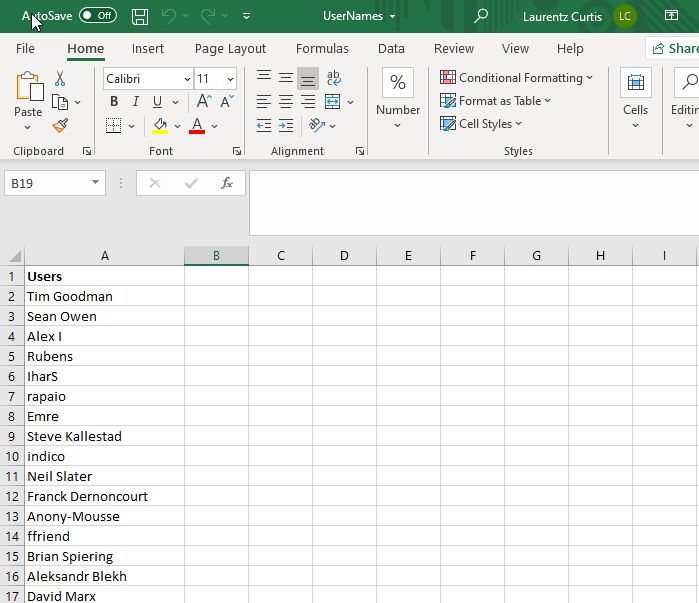
Now Go to the directory you choose earlier and make sure you have a sweet-looking Excel File at that location!
Method Number 3 – Use TSQL to send the data to an excel file
This method is the quickest once you get it set up but the configuration is the tricky part. Permissions can be a limiting factor.
Also with the script below, you have to make sure the file exists before you run the query for it to import properly.
First, create a blank excel file at the directory of your choosing.
C:SQL2019ReportsUsernames.xlsx
Then run this script below.
INSERT INTO OPENROWSET(‘Microsoft.ACE.OLEDB.12.0’,’Excel 12.0;
Database=C:SQL2019ReportsUsernames.xlsx;’,’SELECT * FROM [Sheet1$]’)
SELECT DisplayName FROM dbo.Users Where Reputation > 2000

Configuring this can be tricky and dependent on your level of permissions. Make sure you have the correct Linked Server/Provider installed (‘Microsoft.ACE.OLEDB.12.0’) And check your Database user settings to this server .

There are several ways to Export/Import SQL Server data to an Excel file. In this article, a couple of ways to import and export SQL Server data to an Excel file will be explained:
- Export SQL Server data to an Excel file using
- the SQL Server Import and Export Wizard
- T-SQL code
- Export to Excel from ApexSQL Complete
- Import SQL Server data into Excel using the Data Connection Wizard
In SQL Server Management Studio (SSMS), there is a feature that provides for exporting data from one data source to another data source; in this case, data from SQL Server will be copied to an Excel file trough Export Wizard.
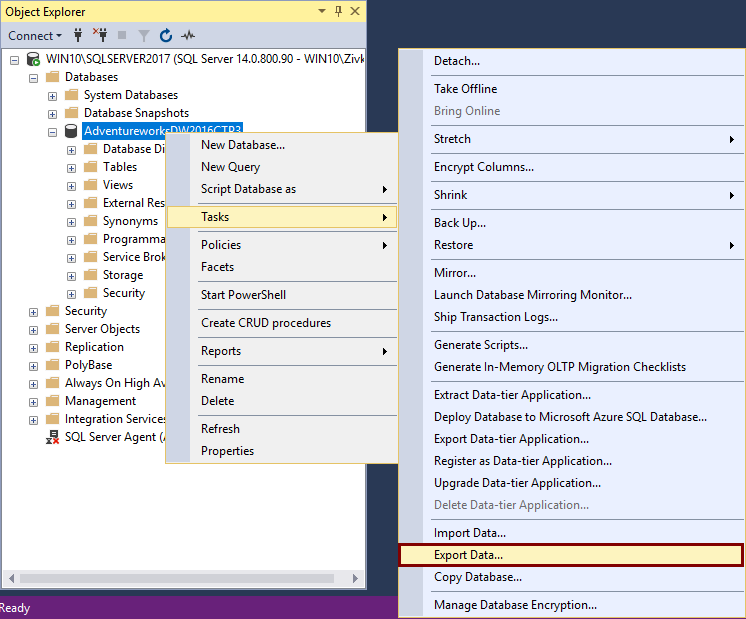
To start to use this feature, go to Object Explorer, right click on any database (e.g. AdventureworksDW2016CTP3), under the Tasks, choose Export Data command:
This will open the SQL Server Import and Export Wizard window:
To proceed with exporting SQL Server data to an Excel file, click the Next button. This will open the Choose a Data Source window. On this window, a source from which you want to copy data can be chosen:
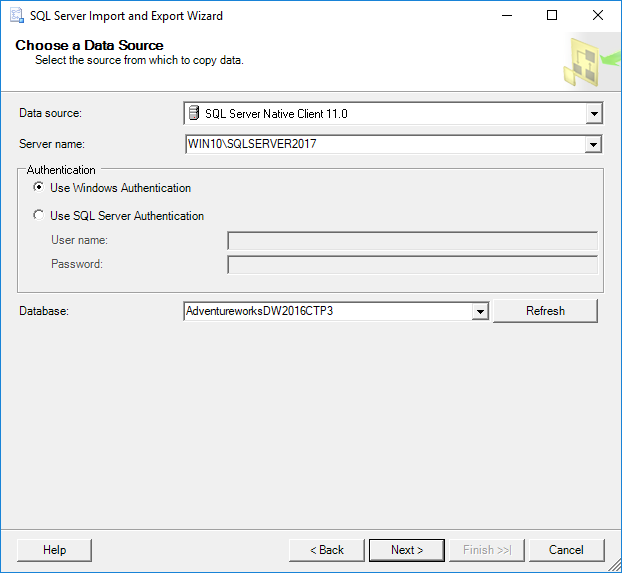
From the Data source drop down box, choose the SQL Server Native Client 11.0 item. Under the Server name drop down box, choose the SQL Server instance from which data need to be copied. In the Authentication section, choose the authentication mode for the data source connection and under the Database drop down box, choose the database from which the data will be copied. After all these options are set, click the Next button to proceed.
This will open the Choose a Destination window in which can be specified where to copy data from the data source:

In the Destination drop down box, choose the Microsoft Excel item. Under the Excel file path, choose the destination for copied data from SQL Server data source (SQL Data.xlsx). In the Excel version drop down box, choose the version of the Microsoft Excel worksheet. After these are all set, press the Next button to continue. But after pressing the Next button, the following warning message may appear:
The operation could not be completed.
ADDITIONAL INFORMATION:
The ‘Microsoft.ACE.OLEDB.12.0’ provider is not registered on the local machine. (System.Data)
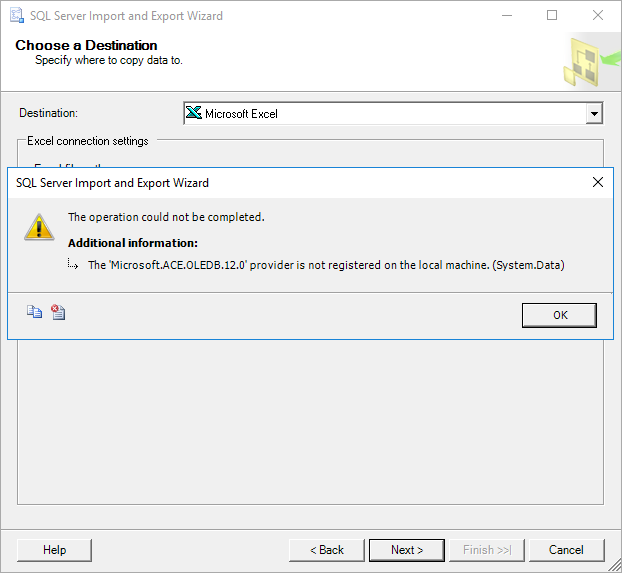
This happens because SSMS is a 32-bit application and when you launch the Export Wizard via SSMS, it launches a 32-bit version of Export Wizard. On the other hand, the machine (Operating system) on which SSMS is installed is a 64-bit version and the installed SQL Server is a 64-bit version.
To solve this problem, close SSMS, go to the Start menu and find the 64-bit version of SQL Server Import and Export Data:
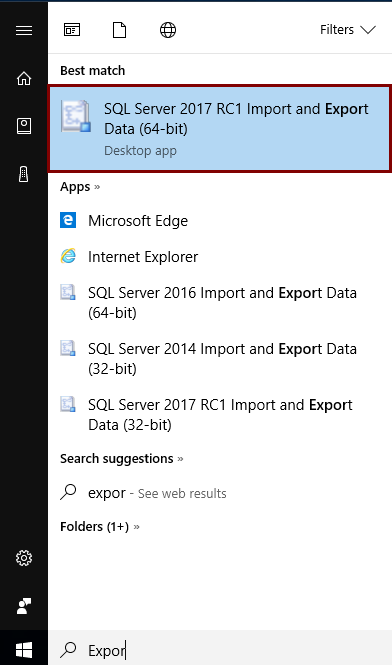
After launching this SQL Server Import and Export Wizard, it will be prompted with the same window that is used via SSMS. After setting all previous options, click the Next button. The Specify Table Copy or Query window will appear:
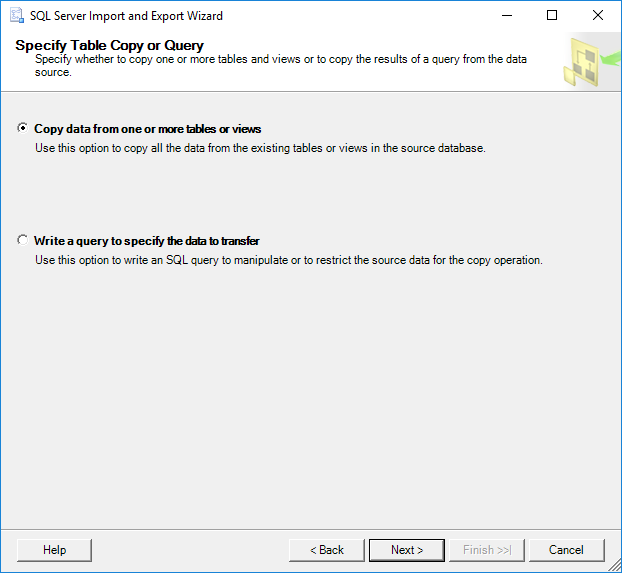
On this window, whether to copy data from one or more tables and views or to copy the results of a query can be specified.
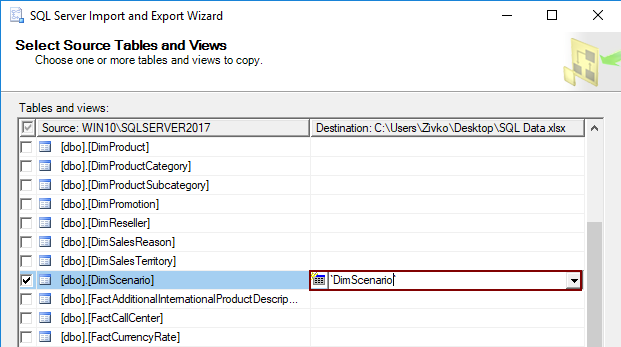
Select the Copy data from one or more tables or views radio button and click the Next button. The Select Source Table and Views window allows choosing one or more tables and views from which you want to export SQL Server data to an Excel file by clicking the check box next to the name of the table/view:
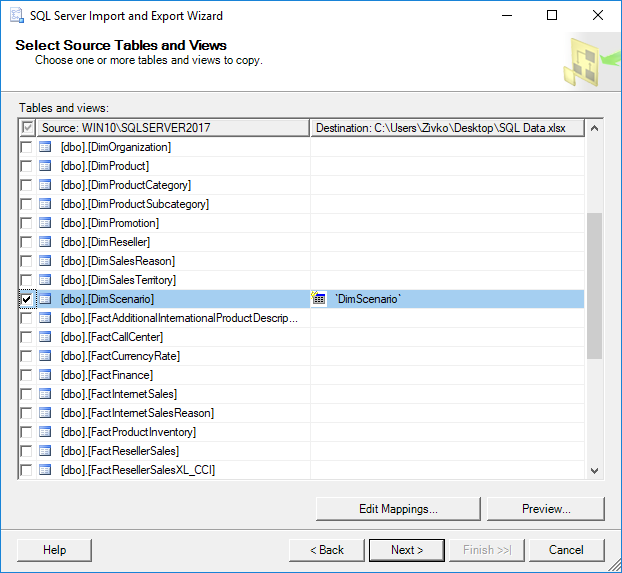
As it may be noticed, as soon as the check box next to a table/view is checked, the name of the table/view will be copied under the Destination column. This name represents the name of the sheet where the data from the table will be put, this name can be changed to whatever you like, but for now, it will be left as it is:
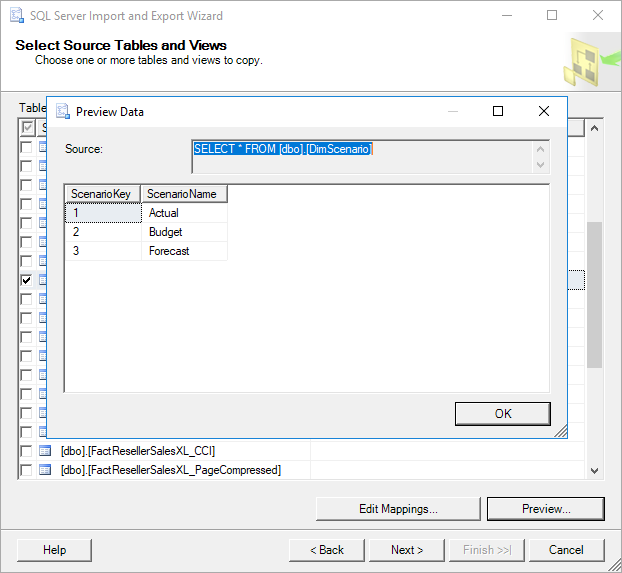
To preview which data will be generated to an Excel file, click the Preview button:
After choosing which tables/views data will be copied to an Excel file, click the Next button:
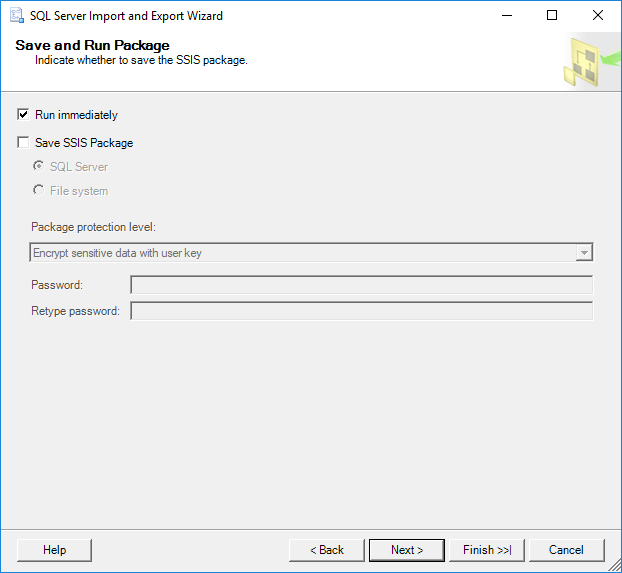
On the Save as Run Package window, check the Run immediately check box and click the Next button:
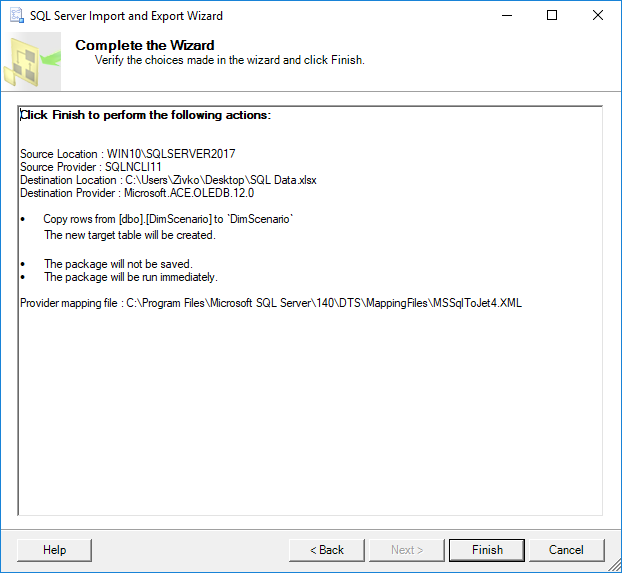
The Complete the Wizard window shows all options that are chosen for exporting operations. To finalize the process of export SQL Server data to an Excel file, click the Finish button. The last SQL Server Import and Export Wizard window shows the state of the data have been successfully exported or some errors occurred during exporting data:
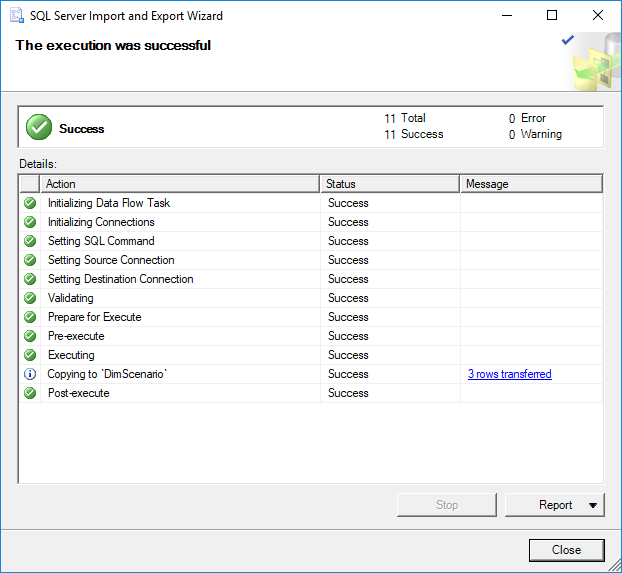
In our case, the data were successfully generated into the SQL Data.xlsx file in the DimScenario sheet:
Export SQL Server data to an Excel file using T-SQL code
The Transact-SQL OPENROWSET can be used to export SQL Server data to an Excel file via SSMS. In a query editor type and execute the following code:
INSERT INTO OPENROWSET('Microsoft.ACE.OLEDB.12.0','Excel 12.0;
Database=C:UsersZivkoDesktopSQL Data.xlsx;','SELECT * FROM [Sheet1$]')
SELECT * FROM dbo.DimScenario
But, when executing the above code, the following error may occur:
Msg 15281, Level 16, State 1, Line 1
SQL Server blocked access to STATEMENT ‘OpenRowset/OpenDatasource’ of component ‘Ad Hoc Distributed Queries’ because this component is turned off as part of the security configuration for this server. A system administrator can enable the use of ‘Ad Hoc Distributed Queries’ by using sp_configure. For more information about enabling ‘Ad Hoc Distributed Queries’, search for ‘Ad Hoc Distributed Queries’ in SQL Server Books Online.
To resolve this error the Ad Hoc Distributed Queries option should be enabled This can be done by using the sp_configure procedure and executing the following SQL code in a query editor:
EXEC sp_configure 'show advanced options', 1
RECONFIGURE
EXEC sp_configure 'Ad Hoc Distributed Queries', 1
RECONFIGURE
After executing the above code, the following message will appear that indicate that the show advanced options and Ad Hoc Distributed Queries options are enabled:
Configuration option ‘show advanced options’ changed from 0 to 1. Run the RECONFIGURE statement to install.
Configuration option ‘Ad Hoc Distributed Queries’ changed from 0 to 1. Run the RECONFIGURE statement to install.
Now, when again the code is executed:
INSERT INTO OPENROWSET('Microsoft.ACE.OLEDB.12.0','Excel 12.0;
Database=C:UsersZivkoDesktopSQL Data.xlsx;','SELECT * FROM [Sheet1$]')
SELECT * FROM dbo.DimScenario
The following error may appear:
OLE DB provider “Microsoft.ACE.OLEDB.12.0” for linked server “(null)” returned message “The Microsoft Access database engine cannot open or write to the file ”. It is already opened exclusively by another user, or you need permission to view and write its data.”.
Msg 7303, Level 16, State 1, Line 1
Cannot initialize the data source object of OLE DB provider “Microsoft.ACE.OLEDB.12.0” for linked server “(null)
This usually happens because of inadequate permissions.
More about how to resolving these issues can be found in the How to query Excel data using SQL Server linked servers page.
One way for resolving this issue is to open SSMS as an administrator and execute the code again. But this time, another error may appear:
Msg 213, Level 16, State 1, Line 1
Column name or number of supplied values does not match table definition.
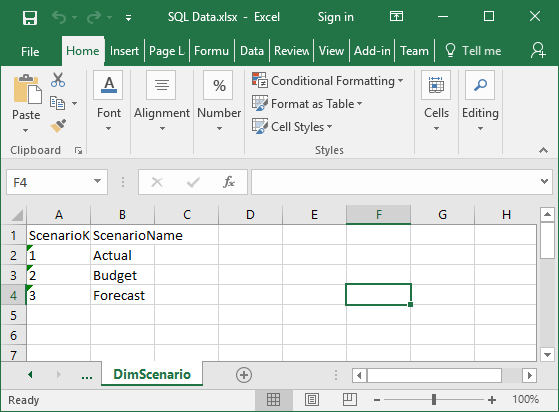
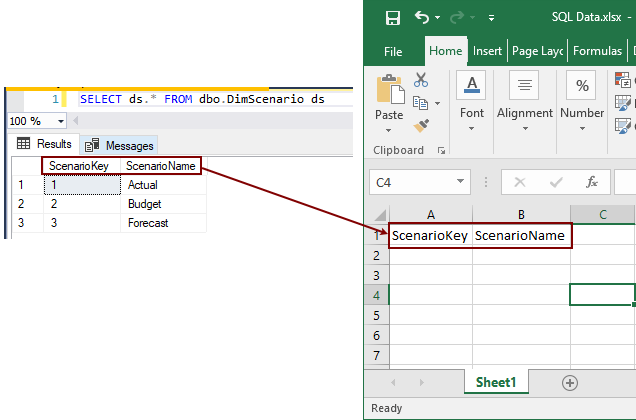
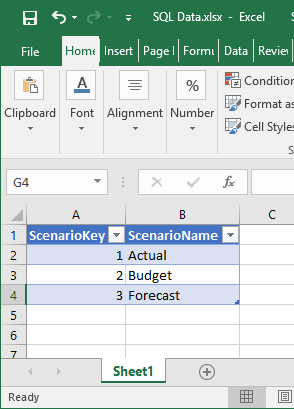
To resolved this, open excel file (e.g. SQL Data.xlsx) for which is planned to store the data from SQL Server table (e.g. dbo.DimScenario) and enter the column names which will represent the column names from the DimScenario table:
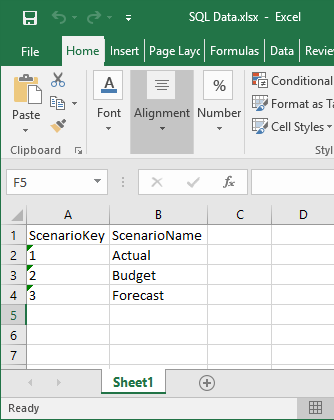
Close the SQL Data.xlsx file and once again execute the code:
Now, the following message will appear:
(3 rows affected)
Finally, the data from the SQL Server table are copied into the Excel file:
Import SQL Server data into Excel using the Data Connection Wizard dialog
Another way to copy data from SQL Server table to an Excel file is to use the Data Connection Wizard dialog from Excel.
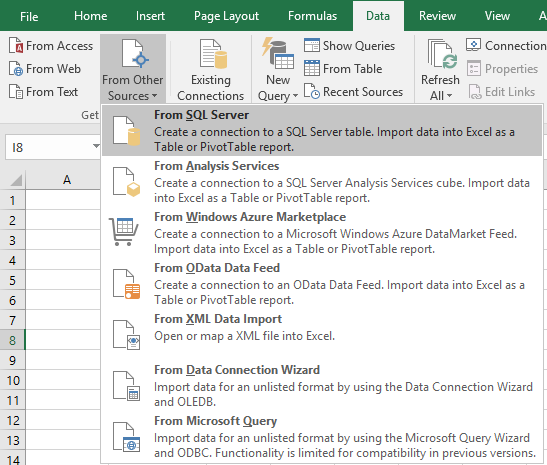
In order to achieve that, open an Excel file (e.g. SQL Data.xlsx) in which you want to import data. In the Data tab, under the From Other Source sub-menu, choose the From SQL Server command:
This will open the Data Connection Wizard dialog. In the Server name, enter a name of the SQL Server instance from which data need to be copied. In the Log on credentials section, choose the authentication mode for the data source connection and click the Next button:

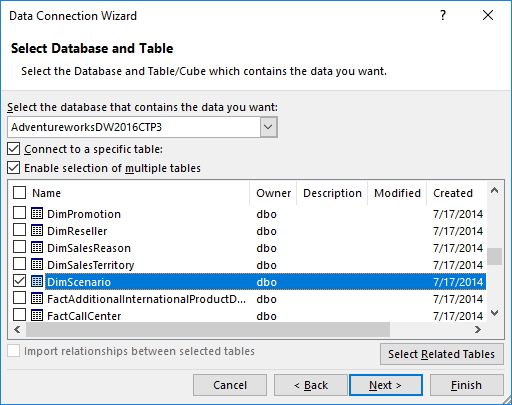
From the Select the database that contains the data you want drop down box, choose the database from which the data will be copied. In the grid, all available tables and views will be listed. Choose a desired table / view (e.g. DimScenario) and click the Next button to proceed.
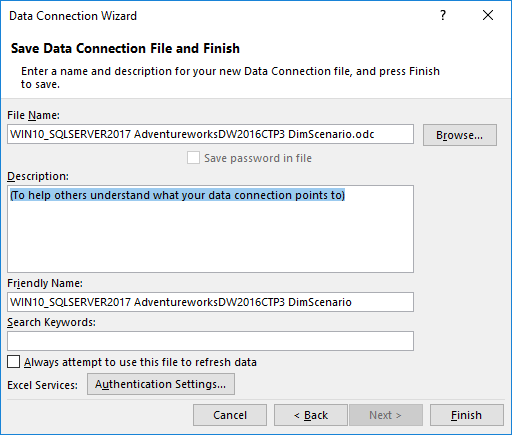
On this window, leave everything as it is and press the Finish button:
In the Import Data dialog, choose the Table radio button, under the Where do you want to put the data? section, choose the Existing worksheet radio button and press the OK button:
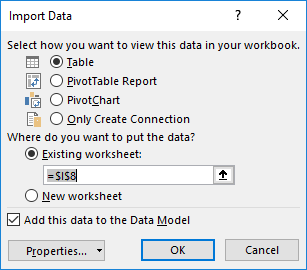
After pressing the OK button, the data from the DimScenario table will be copied to the SQL Data.xslx file:
Export SQL Server data to an Excel file using Export to Excel from ApexSQL Complete
Using the Export to Excel feature from ApexSQL Complete, add-in for SSMS and Visual Studio, exporting data from the SQL Server table to an Excel file can be done by one click.
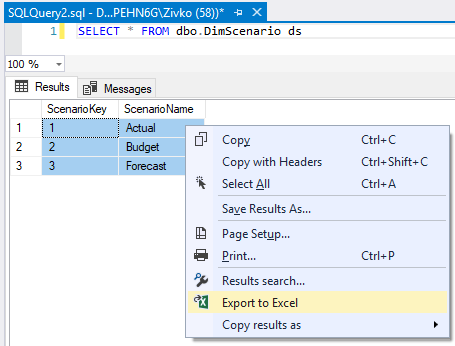
In a query editor, type and execute the following code:
SELECT * FROM dbo.DimScenario ds
From the Results grid, select data that you want to export to an Excel file, right click in the Result grid and, from the context menu, choose the Export to Excel option:
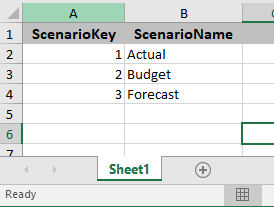
This will open a new Excel workbook and the selected data from the Results grid will be copied in the first worksheet:
More about exporting to Excel via ApexSQL Complete can be found on the Export to Excel page.
See also:
- Tutorial: Import Data into Excel, and Create a Data Model
- Get started with this simple example of the Import and Export Wizard
- How to query Excel data using SQL Server linked servers
- Export to Excel
September 11, 2017
| title | description | author | ms.author | ms.date | ms.service | ms.subservice | ms.topic | monikerRange |
|---|---|---|---|---|---|---|---|---|
|
Import data from Excel to SQL Server or Azure SQL Database |
This article describes methods to import data from Excel to SQL Server or Azure SQL Database. Some use a single step, others require an intermediate text file. |
rwestMSFT |
randolphwest |
03/30/2023 |
sql |
data-movement |
conceptual |
=azuresqldb-current||>=sql-server-2016||>=sql-server-linux-2017||=azuresqldb-mi-current |
Import data from Excel to SQL Server or Azure SQL Database
[!INCLUDE SQL Server Azure SQL Database]
There are several ways to import data from Excel files to [!INCLUDE ssnoversion-md] or to Azure SQL Database. Some methods let you import data in a single step directly from Excel files; other methods require you to export your Excel data as text (CSV file) before you can import it.
This article summarizes the frequently used methods and provides links for more detailed information. A complete description of complex tools and services like SSIS or Azure Data Factory is beyond the scope of this article. To learn more about the solution that interests you, follow the provided links.
List of methods
There are several ways to import data from Excel. You may need to install SQL Server Management Studio (SSMS) to use some of these tools.
You can use the following tools to import data from Excel:
| Export to text first ([!INCLUDE ssnoversion-md] and SQL Database) | Directly from Excel ([!INCLUDE ssnoversion-md] on-premises only) |
|---|---|
| Import Flat File Wizard | SQL Server Import and Export Wizard |
| BULK INSERT statement | SQL Server Integration Services (SSIS) |
| BCP | OPENROWSET function |
| Copy Wizard (Azure Data Factory) | |
| Azure Data Factory |
If you want to import multiple worksheets from an Excel workbook, you typically have to run any of these tools once for each sheet.
[!IMPORTANT]
To learn more, see limitations and known issues for loading data to or from Excel files.
Import and Export Wizard
Import data directly from Excel files by using the [!INCLUDE ssnoversion-md] Import and Export Wizard. You also can save the settings as a SQL Server Integration Services (SSIS) package that you can customize and reuse later.
-
In [!INCLUDEssManStudioFull], connect to an instance of the [!INCLUDEssNoVersion] [!INCLUDEssDE].
-
Expand Databases.
-
Right-click a database.
-
Select Tasks.
-
Choose to Import Data or Export Data:
:::image type=»content» source=»../../integration-services/import-export-data/media/start-wizard-ssms.jpg» alt-text=»Start wizard SSMS»:::
This launches the wizard:
:::image type=»content» source=»media/excel-connection.png» alt-text=»Connect to an Excel data source»:::
To learn more, review:
- Start the SQL Server Import and Export Wizard
- Get started with this simple example of the Import and Export Wizard
Integration Services (SSIS)
If you’re familiar with SQL Server Integration Services (SSIS) and don’t want to run the [!INCLUDE ssnoversion-md] Import and Export Wizard, create an SSIS package that uses the Excel Source and the [!INCLUDE ssnoversion-md] Destination in the data flow.
To learn more, review:
- Excel Source
- SQL Server Destination
To start learning how to build SSIS packages, see the tutorial How to Create an ETL Package.
:::image type=»content» source=»media/excel-to-sql-data-flow.png» alt-text=»Components in the data flow»:::
OPENROWSET and linked servers
[!IMPORTANT]
In Azure SQL Database, you cannot import directly from Excel. You must first export the data to a text (CSV) file.
[!NOTE]
The ACE provider (formerly the Jet provider) that connects to Excel data sources is intended for interactive client-side use. If you use the ACE provider on [!INCLUDE ssnoversion-md], especially in automated processes or processes running in parallel, you may see unexpected results.
Distributed queries
Import data directly into [!INCLUDE ssnoversion-md] from Excel files by using the Transact-SQL OPENROWSET or OPENDATASOURCE function. This usage is called a distributed query.
[!IMPORTANT]
In Azure SQL Database, you cannot import directly from Excel. You must first export the data to a text (CSV) file.
Before you can run a distributed query, you have to enable the ad hoc distributed queries server configuration option, as shown in the following example. For more info, see ad hoc distributed queries Server Configuration Option.
sp_configure 'show advanced options', 1;
RECONFIGURE;
GO
sp_configure 'ad hoc distributed queries', 1;
RECONFIGURE;
GO
The following code sample uses OPENROWSET to import the data from the Excel Sheet1 worksheet into a new database table.
USE ImportFromExcel;
GO
SELECT * INTO Data_dq
FROM OPENROWSET('Microsoft.ACE.OLEDB.12.0',
    'Excel 12.0; Database=C:TempData.xlsx', [Sheet1$]);
GO
Here’s the same example with OPENDATASOURCE.
USE ImportFromExcel;
GO
SELECT * INTO Data_dq
FROM OPENDATASOURCE('Microsoft.ACE.OLEDB.12.0',
    'Data Source=C:TempData.xlsx;Extended Properties=Excel 12.0')...[Sheet1$];
GO
To append the imported data to an existing table instead of creating a new table, use the INSERT INTO ... SELECT ... FROM ... syntax instead of the SELECT ... INTO ... FROM ... syntax used in the preceding examples.
To query the Excel data without importing it, just use the standard SELECT ... FROM ... syntax.
For more info about distributed queries, see the following articles:
- Distributed Queries (Distributed queries are still supported in [!INCLUDE sssql19-md], but the documentation for this feature hasn’t been updated.)
- OPENROWSET
- OPENDATASOURCE
Linked servers
You can also configure a persistent connection from [!INCLUDE ssnoversion-md] to the Excel file as a linked server. The following example imports the data from the Data worksheet on the existing Excel linked server EXCELLINK into a new [!INCLUDE ssnoversion-md] database table named Data_ls.
USE ImportFromExcel;
GO
SELECT * INTO Data_ls FROM EXCELLINK...[Data$];
GO
You can create a linked server from SQL Server Management Studio (SSMS), or by running the system stored procedure sp_addlinkedserver, as shown in the following example.
DECLARE @RC INT;
DECLARE @server NVARCHAR(128);
DECLARE @srvproduct NVARCHAR(128);
DECLARE @provider NVARCHAR(128);
DECLARE @datasrc NVARCHAR(4000);
DECLARE @location NVARCHAR(4000);
DECLARE @provstr NVARCHAR(4000);
DECLARE @catalog NVARCHAR(128);

-- Set parameter values
SET @server = 'EXCELLINK';
SET @srvproduct = 'Excel';
SET @provider = 'Microsoft.ACE.OLEDB.12.0';
SET @datasrc = 'C:TempData.xlsx';
SET @provstr = 'Excel 12.0';

EXEC @RC = [master].[dbo].[sp_addlinkedserver] @server,
    @srvproduct,
    @provider,
    @datasrc,
    @location,
    @provstr,
    @catalog;
For more info about linked servers, see the following articles:
- Create Linked Servers
- OPENQUERY
For more examples and info about both linked servers and distributed queries, see the following article:
- How to use Excel with SQL Server linked servers and distributed queries
Prerequisite — Save Excel data as text
To use the rest of the methods described on this page — the BULK INSERT statement, the BCP tool, or Azure Data Factory — first you have to export your Excel data to a text file.
In Excel, select File | Save As and then select Text (Tab-delimited) (*.txt) or CSV (Comma-delimited) (*.csv) as the destination file type.
If you want to export multiple worksheets from the workbook, select each sheet, and then repeat this procedure. The Save as command exports only the active sheet.
[!TIP]
For best results with data importing tools, save sheets that contain only the column headers and the rows of data. If the saved data contains page titles, blank lines, notes, and so forth, you may see unexpected results later when you import the data.
The Import Flat File Wizard
Import data saved as text files by stepping through the pages of the Import Flat File Wizard.
As described previously in the Prerequisite section, you have to export your Excel data as text before you can use the Import Flat File Wizard to import it.
For more info about the Import Flat File Wizard, see Import Flat File to SQL Wizard.
BULK INSERT command
BULK INSERT is a Transact-SQL command that you can run from SQL Server Management Studio. The following example loads the data from the Data.csv comma-delimited file into an existing database table.
As described previously in the Prerequisite section, you have to export your Excel data as text before you can use BULK INSERT to import it. BULK INSERT can’t read Excel files directly. With the BULK INSERT command, you can import a CSV file that is stored locally or in Azure Blob storage.
USE ImportFromExcel;
GO
BULK INSERT Data_bi FROM 'C:Tempdata.csv'
   WITH (
      FIELDTERMINATOR = ',',
      ROWTERMINATOR = 'n'
);
GO
For more info and examples for [!INCLUDE ssnoversion-md] and SQL Database, see the following articles:
- Import Bulk Data by Using BULK INSERT or OPENROWSET(BULK…)
- BULK INSERT
BCP tool
BCP is a program that you run from the command prompt. The following example loads the data from the Data.csv comma-delimited file into the existing Data_bcp database table.
As described previously in the Prerequisite section, you have to export your Excel data as text before you can use BCP to import it. BCP can’t read Excel files directly. Use to import into [!INCLUDE ssnoversion-md] or SQL Database from a test (CSV) file saved to local storage.
[!IMPORTANT]
For a text (CSV) file stored in Azure Blob storage, use BULK INSERT or OPENROWSET. For an examples, see Example.
bcp.exe ImportFromExcel..Data_bcp in "C:Tempdata.csv" -T -c -t ,
For more info about BCP, see the following articles:
- Import and Export Bulk Data by Using the bcp Utility
- bcp Utility
- Prepare Data for Bulk Export or Import
Copy Wizard (ADF)
Import data saved as text files by stepping through the pages of the Azure Data Factory (ADF) Copy Wizard.
As described previously in the Prerequisite section, you have to export your Excel data as text before you can use Azure Data Factory to import it. Data Factory can’t read Excel files directly.
For more info about the Copy Wizard, see the following articles:
- Data Factory Copy Wizard
- Tutorial: Create a pipeline with Copy Activity using Data Factory Copy Wizard.
Azure Data Factory
If you’re familiar with Azure Data Factory and don’t want to run the Copy Wizard, create a pipeline with a Copy activity that copies from the text file to [!INCLUDE ssnoversion-md] or to Azure SQL Database.
As described previously in the Prerequisite section, you have to export your Excel data as text before you can use Azure Data Factory to import it. Data Factory can’t read Excel files directly.
For more info about using these Data Factory sources and sinks, see the following articles:
- File system
- SQL Server
- Azure SQL Database
To start learning how to copy data with Azure data factory, see the following articles:
- Move data by using Copy Activity
- Tutorial: Create a pipeline with Copy Activity using Azure portal
Common errors
Microsoft.ACE.OLEDB.12.0″ hasn’t been registered
This error occurs because the OLEDB provider isn’t installed. Install it from Microsoft Access Database Engine 2010 Redistributable. Be sure to install the 64-bit version if Windows and [!INCLUDE ssnoversion-md] are both 64-bit.
The full error is:
Msg 7403, Level 16, State 1, Line 3
The OLE DB provider "Microsoft.ACE.OLEDB.12.0" has not been registered.
Cannot create an instance of OLE DB provider «Microsoft.ACE.OLEDB.12.0» for linked server «(null)»
This indicates that the Microsoft OLEDB hasn’t been configured properly. Run the following Transact-SQL code to resolve this:
EXEC sp_MSset_oledb_prop N'Microsoft.ACE.OLEDB.12.0', N'AllowInProcess', 1;
EXEC sp_MSset_oledb_prop N'Microsoft.ACE.OLEDB.12.0', N'DynamicParameters', 1;
The full error is:
Msg 7302, Level 16, State 1, Line 3
Cannot create an instance of OLE DB provider "Microsoft.ACE.OLEDB.12.0" for linked server "(null)".
The 32-bit OLE DB provider «Microsoft.ACE.OLEDB.12.0» cannot be loaded in-process on a 64-bit SQL Server
This occurs when a 32-bit version of the OLD DB provider is installed with a 64-bit [!INCLUDE ssnoversion-md]. To resolve this issue, uninstall the 32-bit version and install the 64-bit version of the OLE DB provider instead.
The full error is:
Msg 7438, Level 16, State 1, Line 3
The 32-bit OLE DB provider "Microsoft.ACE.OLEDB.12.0" cannot be loaded in-process on a 64-bit SQL Server.
The OLE DB provider «Microsoft.ACE.OLEDB.12.0» for linked server «(null)» reported an error.
Cannot initialize the data source object of OLE DB provider «Microsoft.ACE.OLEDB.12.0» for linked server «(null)»
Both of these errors typically indicate a permissions issue between the [!INCLUDE ssnoversion-md] process and the file. Ensure that the account that is running the [!INCLUDE ssnoversion-md] service has full access permission to the file. We recommend against trying to import files from the desktop.
The full errors are:
Msg 7399, Level 16, State 1, Line 3
The OLE DB provider "Microsoft.ACE.OLEDB.12.0" for linked server "(null)" reported an error. The provider did not give any information about the error.
Msg 7303, Level 16, State 1, Line 3
Cannot initialize the data source object of OLE DB provider "Microsoft.ACE.OLEDB.12.0" for linked server "(null)".
Next steps
- Get started with this simple example of the Import and Export Wizard
- Import data from Excel or export data to Excel with SQL Server Integration Services (SSIS)
- bcp Utility
- Move data by using Copy Activity
SQL Server Export to Excel using SQL Server Integration Services
Introduction
This article contains a complete example of SQL Server data export to Microsoft Excel and CSV files using SQL Server Integration Services.
You will find useful tips to get around difficulties and save your time.
You will find a useful configurable command file to run export packages.
You can download example files also.
Bonus
You can develop amazing Microsoft Excel applications for working with Microsoft SQL Server using database development skills only!
Visit www.savetodb.com, download and install SaveToDB Add-In for Microsoft Excel.
That’s all!
Connect to tables, views, and stored procedures, edit the data and save it back to a database.
Add features to your Microsoft Excel applications step by step configuring apps via SQL.
Table of Contents
- Introduction
- The Basics of SQL Server Integration Services
- Excel 2003-2016 and CSV Providers
- SQL Server Export to Excel 2003-2016
- SQL Server Export to CSV
- SSIS Packages Run using Command Line
- Conclusion
- See Also
The Basics of SQL Server Integration Services
SQL Server Integration Services (SSIS) are powerful tools to import-export data between SQL Server/SQL Azure and other data sources including Microsoft Excel 2003-2016 and CSV files.
You can create SSIS packages using two tools:
- SQL Server Business Intelligence Development Studio (BIDS)
- SQL Server Import-Export Wizard.
You can run SSIS packages using the following tools:
- SQL Server Import-Export Wizard when you create packages.
- The dtexec command line utility.
- The dtexecui interactive utility.
- SQL Agent.
BIDS and SQL Agent are not avaiable in SQL Server Express Edition.
Also, in Express Edition, you cannot save a designed package from the Import-Export Wizard,
See a good video how to design an SSIS package using BIDS:
Creating a Basic Package (SQL Server Video)
We will talk about package design using SQL Server Import-Export Wizard.
This feature covers import-export task with Microsoft Excel and CSV files.
Excel 2003-2016 and CSV Providers
Jet OLE DB Provider for Microsoft Excel 2003
The Microsoft.Jet.OLEDB.4.0 Provider is used to import-export data with Microsoft Excel 97-2003 workbooks.
It is named «Microsoft Excel» in the Import-Export Wizard.
This provider is available by default on all Windows platform but has only the 32-bit version.
So, use the 32-bit version of dtexec utility and specify Run64BitRuntime=False in the Debug Options of SQL Server Business Intelligence Development Studio project properties.
ACE OLE DB Provider for Microsoft Excel 2007-2016
Microsoft Office 12.0 Access Database Engine OLE DB Provider is used to import-export data with Microsoft Excel 2007-2016 workbooks like *.xlsx, *.xlsm, *.xlb.
You can download and install this provider using the following link:
Microsoft Access Database Engine 2010 Redistributable
Note that the platform of the provider should be the same as installed Microsoft Office platform.
Also, you should use the appropriate platform versions of dtexec and the Import-Export Wizard.
So, if you have Microsoft Office x64 installed, you should install the 64-bit provider and use the 64-bit Import-Export Wizard.
Note that SQL Server Management Studio and SQL Server Business Intelligence Development Studio run only the 32-bit Import-Export Wizard from a shell. So, use the «Import and Export Data (64-bit)» link from the SQL Server Start Menu group to run the wizard.
To configure the provider, fill in the Data Source value with an Excel workbook path and Extended Properties with the «Excel 12.0;HDR=YES» value for import to SQL Server from Excel, and the «Excel 12.0» value for export from SQL Server to Excel.
In the 32-bit Import-Export Wizard, you can use the «Microsoft Excel» data source with the «Microsoft Excel 2007» version to configure the ACE OLE DB Provider the same way as for Excel 2003 data source.
Flat File Source Provider
The Flat File Source Provider is available by default and has 32-bit and 64-bit versions.
SQL Server Export to Excel 2003-2016
How to Run Import-Export Wizard
You can use three basic ways to run Import-Export Wizard:
- Run from SQL Server group in the Start Menu.
- Run from SQL Server Management Studio (Object Explorer, Database, Tasks, Export Data…).
- Run from SQL Server Business Intelligence Development Studio (Solution Explorer, SSIS Packages, SSIS Import and Export Wizard…).
Only the first way allows running the 64-bit version of the Wizard that is required for the 64-bit ACE OLE DB Provider.
Choose a Data Source
At this step we can choose the following providers:
- SQL Server Native Client.
- Microsoft OLE DB Provider for SQL Server.
- .NET Framework Data Provider for SqlServer.
The only .NET Framework Data Provider for SqlServer allows connecting to SQL Azure at design time.
However, I have an error during the package run using dtexec utility:
Code: 0xC0047062
Description: Microsoft.SqlServer.Dts.Runtime.DtsCouldNotCreateManagedConnectionException: Could not create a managed connection manager.
Moreover, I cannot find a solution.
So, SQL Server Native Client is the best choice.
For SQL Azure, we can make a design time connection to local SQL Server and then define a real connection string at runtime.

Choose a Destination
You can choose the Microsoft Excel provider and select Excel 2003 or Excel 2007-2016 version only if you run the 32-bit version of the Import-Export wizard.


You should run the 64-bit version of the Import-Export Wizard to export to Excel 2007-2016 if you have the 64-bit Microsoft Office installed. In the 64-bit version of the wizard only manual configuration of the ACE OLE DB provider available.
Fill-in Data Source and Extended Properties fields as shown below.


Pay attention that the «Excel 12.0» string is used but not «Excel 12.0;HDR=YES«.
It is a good idea to test connection.
Specify Table Copy or Query
Select the first option to export data from a table or view.
Select the second option to export data from a query or stored procedure.

Select Source Tables and Views
If a destination file still not exists, you can choose a new table as a destination.
In the Columns Mappings dialog box, you can see the Create destination table option.
The Drop and re-create destination table option does not work with Excel files.


The Create destination table mode works only with Excel 2003 and does not work with Excel 2007-2016.
Also, you should delete the existing destination file before the package run.
For Excel 2007-2016, you should use an existing workbook as a destination file. For Excel 2003 you can.
Also, you should create column names on the destination worksheet and fill in one row of test data at least.
If the destination worksheet does not contain test data, you get all types as VarChar.


This method works, but you get text data in all columns:

To avoid this issue provide test data before the Import-Export Wizard run.

The Wizard defines the right types when the table contains the test data:

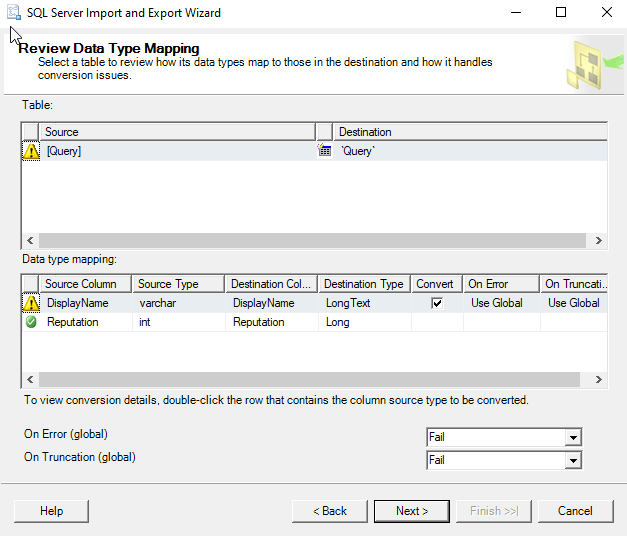
Review Data Type Mapping
The types are quite different for non-existing and existing files, but the both work fine.


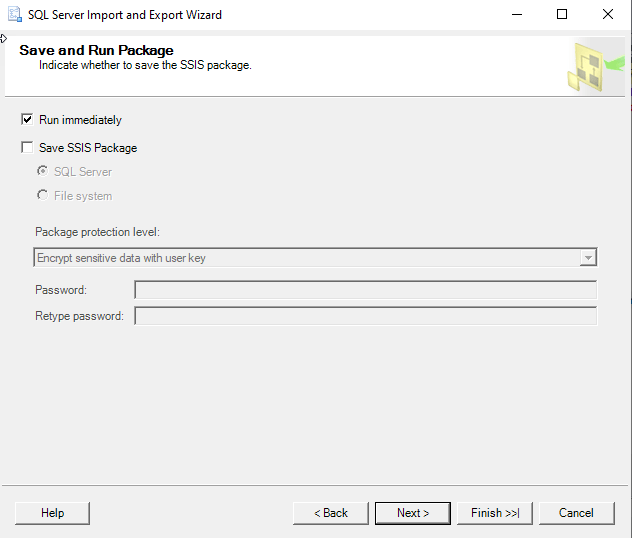
Save and Run Package
The SQL Server Express Import-Export Wizard does not allow saving packages.
There are two options for storing SSIS packages:
- SQL Server
- File system
Advantages of the storing to a file system are that you can edit SSIS packages using a text editor and distribute packages easily.
There are some options of the Package protection level:
- Do not save sensitive data.
- Encrypt sensitive data with the user key.
- Encrypt sensitive data with a password.
- Encrypt all data with the user key.
- Encrypt all data with a password.
User key options restrict SSIS package run on other machines. Thus, you cannot distribute it easily.
Encrypt all data options restricts access to an SSIS package text. Thus, you cannot edit it using a text editor.
If an SSIS package does not contain sensitive data, you cannot run and debug a package using SQL Server Business Intelligence Development Studio.
So, the best way for most cases is «Encrypt sensitive data with password«.
Password «123» is used in the example.


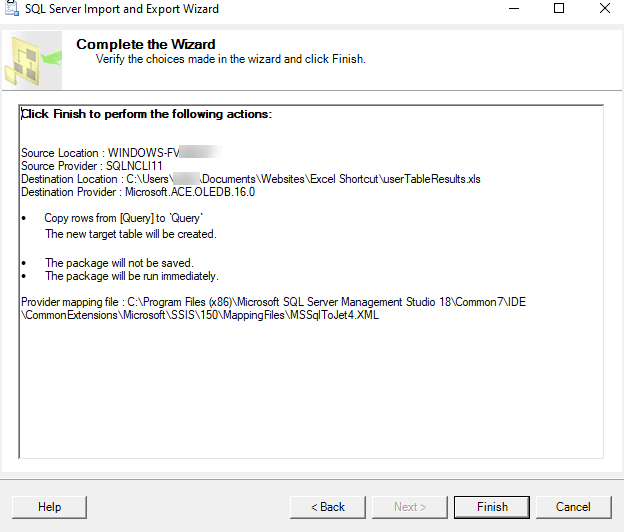
Complete the Wizard
Verify the choices and click «Finish» button.


SQL Server Export to SCV can be used as an alternative of exporting to Excel files.
The Wizard steps are quite similar to steps discussed above.
On the Choose a destination step you should select the Flat File provider.


Pay attention to Text qualifier field.
Without quote qualifier a result can be wrong. For example:
ID,Float,Datetime,Nvarchar
1,123.4567,2011-06-17 01:00:00,Hello, SQL Server!!!
2,,2011-06-17 01:00:00,Hello, Excel!
With quote qualifier the result is:
"ID","Float","Datetime","Nvarchar"
"1","123.4567","2011-06-17 01:00:00","Hello, SQL Server!!!"
"2","","2011-06-17 01:00:00","Hello, Excel!"
This result is not good too.
To fix this issue the export package using text editor and change the string
<DTS:Property DTS:Name=»TextQualified»>-1</DTS:Property>
to
<DTS:Property DTS:Name=»TextQualified»>0</DTS:Property>
for desired columns.
The desired result:
ID,Float,Datetime,"Nvarchar"
1,123.4567,2011-06-17 01:00:00,"Hello, SQL Server!"
2,,,"Hello, Excel!"
SSIS Packages Run using Command Line
SSIS Packages Runtime Configuration
The basic command for SSIS package run is
dtexec /file <package> /decrypt <package password>
where the package password is from the «SaveandRunPackage» step of the Import-Export Wizard.
On 64-bit computers, the 64-bit version of dtexec is used by default.
The paths for dtexec executables:
C:Program FilesMicrosoft SQL Server100DTSBinnDTExec.exe

C:Program Files (x86)Microsoft SQL Server100DTSBinnDTExec.exe
Also, we can modify SSIS package paramaters using /set PropertyPath;Value option.
The SQL Server/SQL Azure source connection string example:
/set Package.Connections[SourceConnectionOLEDB].Properties[ConnectionString];""Data Source=%server%;User ID=%username%;Password=%password%;Initial Catalog=%database%;Provider=SQLNCLI10;Auto Translate=false;""
The Excel 2003 destination connection string example:
/set Package.Connections[DestinationConnectionExcel].Properties[ConnectionString];""Provider=Microsoft.Jet.OLEDB.4.0;Data Source=%file%;Extended Properties="Excel 8.0;HDR=YES";""
The Excel 2007-2016 destination connection string example:
/set Package.Connections[DestinationConnectionOLEDB].Properties[ConnectionString];""Provider=Microsoft.ACE.OLEDB.12.0;Data Source=%file%;Extended Properties="Excel 12.0"""
Pay attention that «Excel=12.0» is used as Extended Properties. Otherwise, you will get en error.
The CSV destination connection string example:
/set Package.Connections[DestinationConnectionFlatFile].Properties[ConnectionString];%file%
SSIS Packages Run Automation
The right technology to run SSIS packages is SQL Agent.
However, we can use a simple and configurable batch file to run SSIS packages.
Let’s create export-config.txt for source SQL Server/SQL Azure connection string configuration:
source=Package.Connections[SourceConnectionOLEDB].Properties[ConnectionString];""Data Source=ko7h266q17.database.windows.net;User ID=excel_user@ko7h266q17;Password=ExSQL_#02;Initial Catalog=AzureDemo50;Provider=SQLNCLI10;Auto Translate=false;""
Let’s create export-task.txt for SSIS packages configuration:
# Specify x64 platform for ExportExcel2007add.dtsx if Microsoft Office x64 installed

# Destination   SSIS_Package            Password Type Platform   Workbook_Template
ExcelTest.csv   ExportCSV.dtsx          123      csv  x86        no
ExcelTest1.xls  ExportExcel2003.dtsx    123      jet  x86        delete
ExcelTest2.xls  ExportExcel2003add.dtsx 123      jet  x86        Test_Template.xls
ExcelTest.xlsx  ExportExcel2007add.dtsx 123      ace  x86        Test_Template.xlsx
If Workbook_Template is specified the command file copies the template to a destination file before the package run.
If the Workbook_Template column contains the delete value, the command file deletes the destination file before the package run.
Here the code of the export-ssis.cmd command file:
@echo off

rem Check and change the paths to dtexec.exe if needed
set dtexec_x64="C:Program FilesMicrosoft SQL Server100DTSBinnDTExec.exe"
set dtexec_x86="C:Program Files (x86)Microsoft SQL Server100DTSBinnDTExec.exe"
if not exist %dtexec_x86% set dtexec_x86=%dtexec_x64%

rem Reads %source% variable from config.txt
for /F "eol=# tokens=1* delims==" %%i in (export-config.txt) do set %%i=%%j

rem Reads and parses lines of task.txt
for /F "eol=# tokens=1* delims==" %%i in (export-task.txt) do call :RUN_ONE %%i %%j %%k %%l %%m %%n %%o %%p %%q

goto END

:RUN_ONE
set name=%1
set file=%~f1
set package=%2
set password=%3
set type=%4
set platform=%5
set template=%6

rem The connection string for the destination file
set destination=

if .%type%.==.csv. set destination=Package.Connections[DestinationConnectionFlatFile].Properties[ConnectionString];%file%

if .%type%.==.jet. set destination=Package.Connections[DestinationConnectionExcel].Properties[ConnectionString];""Provider=Microsoft.Jet.OLEDB.4.0;Data Source=%file%;Extended Properties="Excel 8.0;HDR=YES";""

if .%type%.==.ace. set destination=Package.Connections[DestinationConnectionOLEDB].Properties[ConnectionString];""Provider=Microsoft.ACE.OLEDB.12.0;Data Source=%file%;Extended Properties="Excel 12.0"""

if .destination.==.. goto END

rem The dtexec for required platform
set dtexec=
if .%platform%.==.x86. set dtexec=%dtexec_x86%
if .%platform%.==.x64. set dtexec=%dtexec_x64%
if .dtexec.==.. goto END

rem Delete an old workbook if specified
if .%template%.==.delete. if exist %file% del %file% > nul

rem Makes a new workbook using a template
if exist %template% copy %template% %file% > nul

echo.
echo %package% to %name%
echo.
%dtexec% /file %package% /decrypt %password% /set %source% /set %destination% /reporting E > %package%.log
type %package%.log

:END
The download package includes all these batch and example files.
Conclusion
If you have SQL Server Standard or higher, you can use SQL Server Integration Services to export SQL Server data to Microsoft Excel 2003-2016 or CSV files.
Hope that the article tips help you to save your time.
export-sql-server-to-excel-using-ssis.zip
See Also
- References
- SQL Server Integration Services (SSIS)
- SSIS Package Configurations
- dtexec Utility (SSIS Tool)
- SQL Server Agent
- How-To
- How to: Run the SQL Server Import and Export Wizard
- Creating a Basic Package (SQL Server Video)
- SQL Server Integration Services SSIS Package Configuration
- Downloads
- Microsoft Access Database Engine 2010 Redistributable
- Microsoft Access Database Engine 2016 Redistributable

Table of Contents
- Introduction
- Description
- Base Excel export
- Base Access export
- Base XML export
- Summary
- See also
- Source code
Introduction

This article will demonstrate how to export a table within
SQL-Server database to Microsoft Excel, Microsoft Access or a standard XML file utilizing
Transact-SQL
OPENROWSET. Using this method means no dealing with reading table data from a database into a client container such as a DataTable as an intermediate step to saving the table data to Microsoft Excel, Microsoft Access or an XML file where the intermediate
step can be simple or complex dependent on the chosen logic which could be using Open XML, Excel automation, a third party library or using a
StreamWriter. What follows are static code samples and dynamic code samples to build upon for your solution.
All base code resides in a class project while execution is performed in a windows form project. This by no means that this code is solely for windows form projects as the code to export data can run in any C# project type be it WPF, web solution etc.
Description
↑Back to top
Before writing code there is configuration to be performed, otherwise the following error will be raised when executing the code presented:
The requested operation could not be performed because OLE DB provider «Microsoft.ACE.OLEDB.12.0» for linked server «(null)» does not support the required transaction interface.
The configuration can be done in SQL-Server Management Studio (SSMS)
as demonstrated here, or SQL Operations Studio (SOS) for example.
Open SSMS, open Object Explorer, open to the following tree node.

Right click on the node above and select properties.

Select and check the following properties.

Select the Database node, right-click, select Refresh for validation. This concludes setting up SQL-Server for exporting data from tables in databases.
Setting up to run the code samples, unzip the attached Visual Studio solution, find CreateDatabase.sql, run this script in SSMS following by running the script SQL_Scripts.sql to create and populating a table. Both scripts are located in the root folder of
the attached solution.
All code samples are executed from a Windows form project as presented below:

Before getting into the code for exporting there are several classes that need to be discussed. In the main class for performing export operations, there is a base class, BaseSqlServerConnections which is responsible for centralizing properties for connecting
to the intended database. There are two properties, IsKarenMachine and IsKarensDatabaseServer. Both properties are only needed for these code samples. They are responsible for determining if you the reader have changed the server and catalog from the defaults
if they are not changed your connection will fail.
BaseSqlServerConnection inherits
BaseExceptionsHandler which provides properties which are used in each method of the main data class
SqlServerOperations to assist dealing with runtime exceptions.
On each build of the main project several commands run which are setup under project properties, Build Events in Pre-Build which will delete any Excel, Access or XML file. Each code sample copies a fresh Excel or Access file from a folder one level below the
application folder to use for the current code sample.
Pre-build command

Base Excel export
↑Back to top
The following utilizes a SqlClient connection and command to export, in this case the SQL-Server Customers table in the catalog ExcelExporting on the server KARENS-PC (remember to change this to your server name or to .SQLEXPRESS or localdb).
Inspecting the CommandText for the command object note the only variable is the Database set to the file name passed in. The actual table name and fields are static.
public
bool
ExportAllCustomersToExcel(string
pFileName, ref
int
pRowsExported)
{
using
(SqlConnection cn = new
SqlConnection { ConnectionString = ConnectionString })
{
using
(SqlCommand cmd = new
SqlCommand { Connection = cn })
{
cmd.CommandText =
$"INSERT INTO OPENROWSET('Microsoft.ACE.OLEDB.12.0', 'Excel 12.0;Database={pFileName}',"
+
"'SELECT * from [Customers$]') "
+
"SELECT CustomerIdentifier,CompanyName,ContactName,ContactTitle,"
+
"[Address],City,Region,PostalCode,Country,Phone "
+
"FROM Customers";
cn.Open();
try
{
pRowsExported = cmd.ExecuteNonQuery();
return
pRowsExported > 0;
}
catch
(Exception e)
{
mHasException =
true;
mLastException = e;
}
}
}
return
IsSuccessFul;
}
The data provider in the above example is exactly the same as for the code sample for exporting to Microsoft Access as shown in the partial code sample.
cmd.CommandText = $"INSERT INTO OPENROWSET('Microsoft.ACE.OLEDB.12.0','{pFileName}';'Admin';'',"
+
For the base SQL INSERT INTO, this is a standard SQL command up to OPENROWSET. OPENROWSET is the critical aspect of the entire command in combination with the initial setup at the start of this document.
Within OPENROWSET the provided is indicated along with extended properties for Excel which is not required for working with Microsoft Access.
In the second SELECT statement list field names, this could also be SELECT * too which is fine if all fields are to be exported yet it’s better to list each field and consider wrapping each field with brackets e.g. CustomerName bracketed would be [CustomerName].
This is to safeguard against fields with spaces in their name such as Customer Name which would cause an exception when executing the intended statement so wrapping all fields in brackets is a safety net.
The line, pRowsExported = cmd.ExecuteNonQuery executes the command to export and on success returns how many rows were exported.
Base Access export
↑Back to top
In this case, the code below is almost the same as the Excel export.
For the first two arguments to OPENROWSET the provider is exactly the same as the Excel OPENROWSET but with Microsoft Access the extended property is not required. Database is missing, instead, the file name is next followed by specifying ‘Admin’ which indicates
this is an admin. This could be an issue with a customer running this operation where their machine may be locked down by company security policies.
Fields are dynamic rather than hardcoded as with the Excel code sample. Excel can also have dynamic field names.
The WHERE condition is similar to another Excel method included in the attached solution which permits some or all records to be exported.
public
bool
ExportAllCustomersToAccess(string
pFileName, string
pCountry, ref
int
pRowsExported)
{
string
fields = "CompanyName,ContactName,ContactTitle,Phone";
using
(SqlConnection cn = new
SqlConnection { ConnectionString = ConnectionString })
{
using
(SqlCommand cmd = new
SqlCommand { Connection = cn })
{
/*
* If using .mdb use Microsoft.Jet.OLEDB.4.0 rather than Microsoft.ACE.OLEDB.12.0 as the provider name
*/
cmd.CommandText = $"INSERT INTO OPENROWSET('Microsoft.ACE.OLEDB.12.0','{pFileName}';'Admin';'',"
+
$"'SELECT {fields} FROM Customers') "
+
$" SELECT {fields} "
+
" FROM Customers";
if
(pCountry != "*")
{
cmd.CommandText = cmd.CommandText +
" WHERE Country = @Country";
cmd.Parameters.AddWithValue("@Country", pCountry);
}
try
{
cn.Open();
pRowsExported = cmd.ExecuteNonQuery();
return
pRowsExported > 0;
}
catch
(Exception e)
{
mHasException =
true;
mLastException = e;
}
}
}
return
IsSuccessFul;
}
Base XML export
↑Back to top
The main focus on exporting to XML is working with
FOR XML clause in a SELECT statement. If there is a large data set to export the common method of reading data into a DataSet then writing to XML may truncate the data which does not happen when using XmlReader in tanget with an instance of XmlDocument
as shown below.
public
bool
WriteCustomerTableToXmlFile(string
pFileName)
{
// Using SQL here or in a stored procedure write data to xml
// table is stored in this variable TempTable
using
(SqlConnection cn = new
SqlConnection() { ConnectionString = ConnectionString })
{
using
(SqlCommand cmd = new
SqlCommand() { Connection = cn })
{
// replace sql to match the temp table structure
string
selectStatement = @"
SELECT ( SELECT Cust.CustomerIdentifier ,
Cust.CompanyName ,
Cust.ContactName ,
Cust.ContactTitle
FROM dbo.Customers AS Cust
FOR
XML PATH('Customer') ,
TYPE
)
FOR XML PATH('') ,
ROOT('Customers');";
cmd.CommandText = selectStatement;
try
{
cn.Open();
XmlReader reader = cmd.ExecuteXmlReader();
var doc =
new
XmlDocument();
doc.Load(reader);
doc.Save(pFileName);
}
catch
(Exception e)
{
mHasException =
true;
mLastException = e;
}
}
}
return
IsSuccessFul;
}
Summary
↑Back to top
In this article you have learned the basics for exporting SQL-Server table data to Microsoft Excel, Microsoft Access and XML along with using base classes to handle data connections and a base class for handling runtime exceptions.
From here consider using stored procedures for exporting data to Microsoft Excel, Microsoft Access and XML if dealing with large datasets.
See also
Import and Export Excel Files into Varbinary (Max) in SQL Server
Source code
The full source code is provided in the following Github repository.