
Задача. У вас есть файл Excel – и вы хотите, чтобы эти данные были помещены в таблицу. Я покажу вам, как это делается, и мы задокументируем каждый шаг с большим количеством иллюстраций.
Прочитав этот пост, вы будете готовы с уверенностью импортировать данные в существующую таблицу из Excel. Хотите создать новую таблицу из Excel? Мы тоже можем это сделать.
В нашем примере я буду использовать таблицу HR.EMPLOYEES для создания XLS-файла для нашего импорта. Мы будем использовать этот файл Excel для заполнения пустой копии таблицы EMPLOYEES в другой схеме.
Шаг 0: Пустая таблица Oracle и ваш файл Excel
У вас есть таблица Oracle и один или несколько файлов Excel.
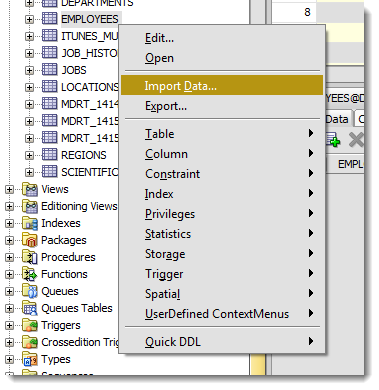
Шаг 1: Выбираем «Импорт данных» по правому щелчку мыши
Шаг 2: Выберите свой входной файл (XLSX) и проверьте данные

Когда вы выберете файл, мы захватим первые 100 строк для просмотра ниже. Этот «Предел строк предварительного просмотра» определяет, сколько строк вы можете использовать для проверки ИМПОРТА по мере прохождения мастера. Вы можете увеличить его, но это потребует больше ресурсов, так что не сходите с ума.
Кроме того, есть ли в вашем файле Excel заголовки столбцов? Хотим ли мы рассматривать их как строку к таблице? Скорее всего, нет. Если вы снимите флажок «Заголовок», имена столбцов станут новой строкой в вашей таблице – и, вероятно, не будут вставлены.
Иногда ваш файл Excel имеет несколько заголовков, или вам может потребоваться импортировать только определенное подмножество электронной таблицы. Используйте опцию «Пропустить строки», чтобы получить правильные данные.
Шаг 3: Создайте сценарий или импортируйте автоматически

alt+tab туда и обратно от Excel до SQL Developer.
Для этого упражнения будет использоваться метод «Вставки» (Insert). Каждая строка, обработанная в файле Excel, приведет к выполнению инструкции INSERT в таблице, в которую мы импортируем.
Если вы выберете «Вставить скрипт», мастер завершит работу скриптом ВСТАВКИ на вашем листе SQL. Это хорошая альтернатива, если вы хотите настроить SQL, или если вам нужно отладить/посмотреть, почему метод «Insert» не работает.
Шаг 4: Выберите столбцы Excel для импорта

У вас может быть файл Excel со 100 столбцами, но ваша таблица имеет только 30. Здесь вы даете команду SQL Developer, какие столбцы должны использоваться для импорта. Вы также можете изменить порядок столбцов, что может сделать следующий шаг немного проще.
Шаг 5: Сопоставьте столбцы Excel со столбцами таблицы

Если вы не обращаете внимания и просто позволяете Мастеру импорта делать всё по умолчанию, то сейчас самое время проснуться. Есть большая вероятность, что порядок столбцов файла Excel не будет соответствовать определению вашей таблицы. На этом шаге вы указываете SQL Developer-у, какие столбцы в электронной таблице совпадают с какими столбцами в таблице Oracle.
А помните, как мы установили это окно предварительного просмотра на 100 строк? Мы внимательно изучаем данные, ищем проблемы, пытаясь вписать их в столбец вашей таблицы. Если мы обнаружим проблему, мы пометим столбцы этими «предупреждающими» символами.
Я загрязнил свой файл Excel некоторыми намеренно ошибочными значениями, которые, как я знаю, не будут «подходить». Когда эти строки будут обнаружены в мастере, база данных их отклонит, но остальные строки будут введены.
Давайте на секунду поговорим о форматах даты и времени.
О TIMESTAMP тоже. В файле Excel у вас, вероятно, будут некоторые поля даты и времени, которые вы хотите переместить в столбцы формата DATE или TIMESTAMP. SQL Developer обрабатывает эти значения как строки – и ВАМ нужно сообщить SQL Developer формат DATE или TIMESTAMP, чтобы иметь возможность их преобразовать.
Давайте посмотрим на HIREDATE.
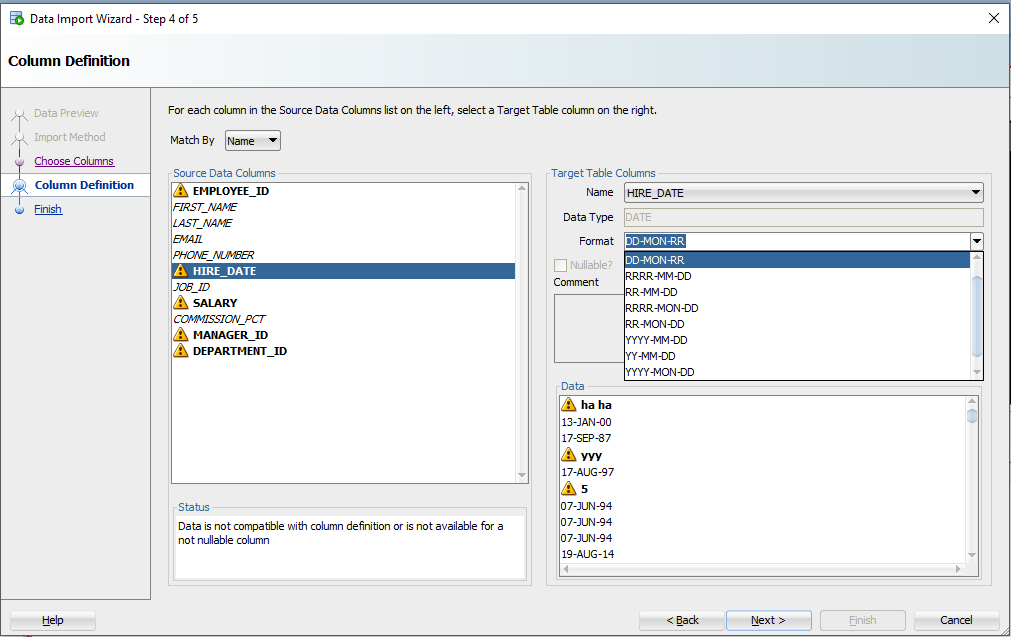
HIRE_DATE – если только вы не храните ДАТЫ в VARCHAR2, — и если вы делаете это, то делаете это НЕПРАВИЛЬНО. Всегда храните ДАТЫ в формате DATE!
Видите выпадающий селектор «Формат» (Format)? SQL Developer по умолчанию установил строку формата ДАТЫ в ‘DD-MON-RR’ – мы пытаемся угадать это на основе строк, которые мы рассматриваем в этом окне предварительного просмотра 100.
Если мы ошиблись в догадках или не смогли разобраться, вам нужно будет ввести это самостоятельно. Документы Oracle могут помочь вам определить правильную модель формата ДАТЫ. Если вы видите небольшое предупреждающее изображение рядом со значениями даты на панели данных, возможно, у вас неправильный формат.
Шаг 6: Проверьте свои настройки и ВПЕРЕД!
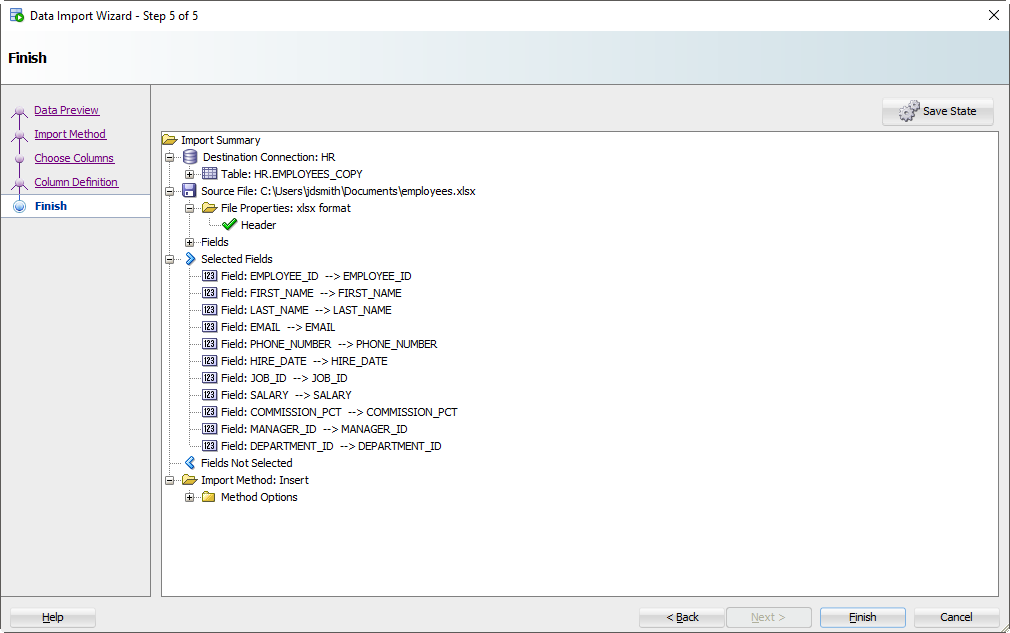
Нажмите на кнопку «Готово» (Finish).
Если Мастер столкнется с какими-либо проблемами при выполнении вставок, вы увидите следующее:

Я собираюсь сказать «Да», чтобы игнорировать все ошибки. Но если вам нужна КАЖДАЯ отдельная строка – вам нужно сказать «Отмена», чтобы начать все сначала. Затем вы можете либо исправить свои данные в файле Excel, либо внести изменения в свою таблицу, чтобы данные соответствовали/работали.
Нажав ‘Да», мы доберемся до конца нашей истории и наших данных!
Шаг 7: Посмотрите, Что сработало, а Что нет
Во-первых, есть ли плохие новости?
Если были строки, отклоненные базой данных, мы увидим их сейчас.
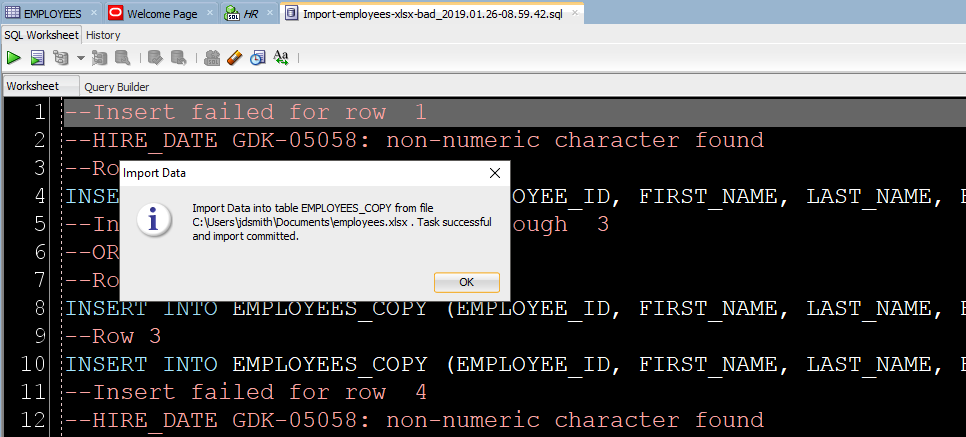
INSERT, которые мы пытались запустить, но не сработали. Вы можете изменить их вручную, чтобы исправить несколько записей. Но если у вас тысячи забракованных строк – лучше разобраться в файле (в источнике импорта).
Теперь давайте посмотрим на наши новые табличные данные!

Обратите внимание на панель «Журнал» (Log). Там можно увиеть файл, с которым мы работали, и сколько времени потребовалось для загрузки данных.
Всё! Можно выдохнуть свободно. Импорт из файла Excel в таблицу базы данных Oracle завершен. В шапке статьи вы можете посмотреть видео инструкцию — копию этого мануала на английском языке.
Вас заинтересует / Intresting for you:
There are many different methods, depending
upon the amount of data, the repetitiveness
of the process, and the amount of programming
I am willing to invest.

First, create the Oracle table, using the
SQL CREATE TABLE statement to define the table's
column lengths and types. Here's an example of a
sqlplus 'CREATE TABLE' statement:

CREATE TABLE SPECIES_RATINGS
(SPECIES VARCHAR2(10),
COUNT NUMBER,
RATING VARCHARC2(1));

Then load the data using any of the following
methods or an entirely new method you invent:

--------------------------------------------

First load method:

I use the SQL*Loader method.
You will need to save a copy of your spreadsheet
in a text format like CSV or PRN.

SQL*Loader Control file for CSV file:

load data
 infile 'c:datamydata.csv'
 into table emp
 fields terminated by "," optionally enclosed by '"'
 ( empno, empname, sal, deptno )

There are some GUIs that have wizards to walk you through the
process (Enterprise Manager -> Maintenance -> Data Movement ->
Move Row Data -> Load Data from User Files) for the
ad-hoc imports. Toad for Oracle has a SQL*Loader Wizard as
well. (DBA -> Data Import/Export -> SQL*Loader Wizard)

You can save your Excel data in PRN format if you are
planning to use positional data (fixed length) in your
control file.

SQL*Loader Control file for PRN file:

load data
 infile 'c:datamydata.prn'
 replace
 into table departments
 (  dept     position (02:05) char(4),
    deptname position (08:27) char(20)  )

Position(02:05) will give the 2nd to the 5th character

Once I've gone through the EM or Toad wizard, I save
the control file, tweak it as needed in a text editor,
and reuse it in SQL*Plus scripts.

SQL*Loader is handy also since it allows you to
skip certain data and call filter functions (i.e.
native functions as in DECODE() or TO_DATE() or
user defined functions) in your control .ctl file.

You can load from multiple input files provided
they use the same record format by repeating the
INFILE clause. Here is an example:

LOAD DATA
  INFILE file1.prn
  INFILE file2.prn
  INFILE file3.prn
  APPEND
  INTO TABLE emp
  ( empno  POSITION(1:4)   INTEGER EXTERNAL,
    ename  POSITION(6:15)  CHAR,
    deptno POSITION(17:18) CHAR,
    mgr    POSITION(20:23) INTEGER EXTERNAL
  )

You can also specify multiple "INTO TABLE" clauses
in the SQL*Loader control file to load into multiple
tables.

LOAD DATA
 INFILE 'mydata.dat'
 REPLACE
 INTO TABLE emp
      WHEN empno != ' '
 ( empno  POSITION(1:4)   INTEGER EXTERNAL,
   ename  POSITION(6:15)  CHAR,
   deptno POSITION(17:18) CHAR,
   mgr    POSITION(20:23) INTEGER EXTERNAL
 )
 INTO TABLE proj
      WHEN projno != ' '
 (  projno POSITION(25:27) INTEGER EXTERNAL,
    empno  POSITION(1:4)   INTEGER EXTERNAL
 )

With SQL*Loader, you can selectively load only
the records you need (see WHEN clause), skip
certain columns while loading data (see FILLER
columns) and load multi-line records (see
CONCATENATE and CONTINUEIF)

Once you've created the control file, you need
to start sql loader from the command line like this:
sqlldr username/password@connect_string control=ctl_file.ctl log=log.log

You can create a batch file to call sqlldr.

For more examples, see
http://examples.oreilly.com/orsqlloader/

That's it for the versatile SQL*Loader.

--------------------------------------------

Second load method:

In this scenario, I have full control of the
spreadsheet, but less control of the data because
users send me the spreadsheets back with data.

I create another worksheet within the same Excel
file, which has locked down INSERT statements
referring back to the sheet with the data. When
I receive the spreadsheet, I copy and paste the
INSERT statements directly into SQL*Plus, or
indirectly staging them in a SQL script.

Excel is a great tool for composing dynamic
SQL statements dynamically. (see Excel functions)

--------------------------------------------

Third load method:

If you need a utility to load Excel data into
Oracle, download quickload from sourceforge at
http://sourceforge.net/projects/quickload

--------------------------------------------

Fourth load method:

In theory, this should work.

Configure Generic Database connectivity (Heterogeneous Database HS)
Connect to the Excel spreadsheet from Oracle through ODBC.
Describe it (see DESC command) or
CREATE TABLE AS SELECT col1, col2 FROM ExcelTable
to make a copy and see what data types Oracle assigns
the columns by default.

http://www.e-ammar.com/Oracle_TIPS/HS/configuring_generic_database_con.htm

--------------------------------------------

References:

http://209.85.173.132/search?q=cache:GJN388WiXTwJ:www.orafaq.com/wiki/SQL*Loader_FAQ+Oracle+control+file+columns&cd=3&hl=en&ct=clnk&gl=us

http://forums.oracle.com/forums/thread.jspa?threadID=305918&tstart=0

http://techrepublic.com.com/5208-6230-0.html?forumID=101&threadID=223797&messageID=2245485

http://examples.oreilly.com/orsqlloader/
TL;DR – Skip to the video!
Hate GUIs, want to do this via the command-line?
THIS is your number one question – and it has been here on my blog since the day I posted it.
You have an Excel file – and you want that data put into a table. I’ll show you how, and we’ll document each step of the way with plenty of pictures.
You will be prepared to import data to an existing table from Excel with confidence after reading this post. Want to build a new table from Excel? We can do that, too.
Warning: This post has a LOT of pictures.
For our example I’ll be using the HR.EMPLOYEES table to create the XLS file for our import. We’ll use that Excel file to populate an empty copy of the EMPLOYEES table in another schema.
Step 0: The Empty Oracle Table and your Excel File
You have an Oracle table and you have one or more Excel files.

You do know how to view multiple objects at once in SQL Developer, right?
Step 1: Mouse-right click – Import Data

Step 2: Select your input (XLSX) file and verify the data

As you select the file, we’ll grab the first 100 rows for you to browse below. This ‘Preview Row Limit’ defines how many rows you can use to verify the IMPORT as we step through the wizard. You can increase it, but that will take more resources, so don’t go crazy.
Also, does your Excel file have column headers? Do we want to treat those as a row to the table? Probably not. If you uncheck the ‘Header’ flag, the column names will become a new row in your table – and probably fail to be inserted.
Sometimes your Excel file has multiple headers, or you may need to only import a certain subset of the spreadsheet. Use the ‘Skip Rows’ option to get the right data.
Step 3: Create a script or import automatically
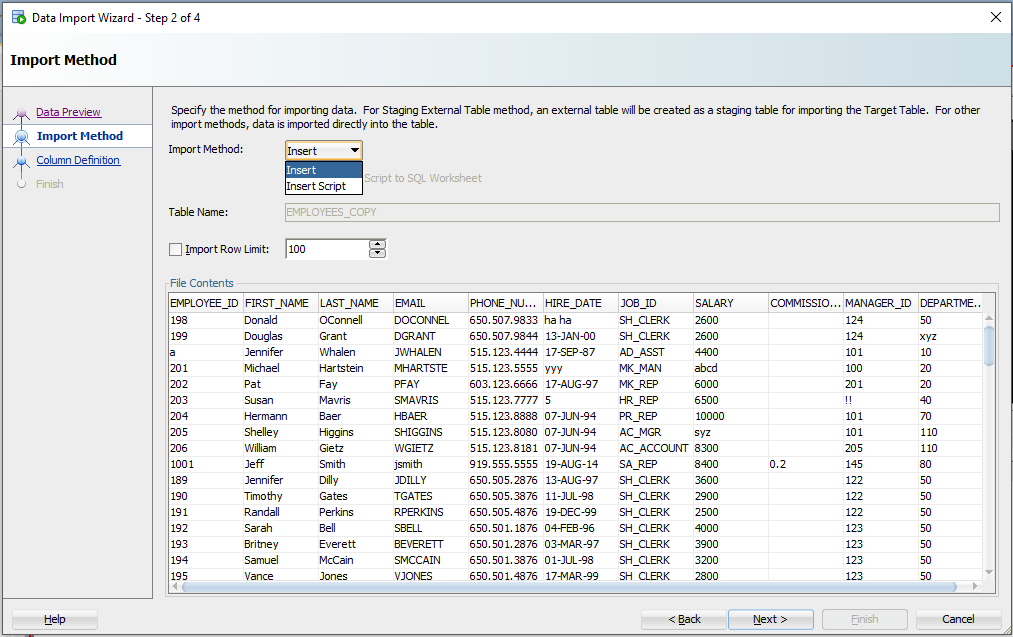
For this exercise the ‘Insert’ method will be used. Each row processed in the Excel file will result in an INSERT statement executed on the table we’re importing to.
If you choose ‘Insert Script’, the wizard will end with an INSERT Script in your SQL Worksheet. This is a nice alternative if you want to customize the SQL, or if you need to debug/see why the ‘Insert’ method isn’t working.
Working with CSV? You’ll get even more methods – great for VERY LARGE data sets.
Step 4: Select the Excel Columns to be Imported
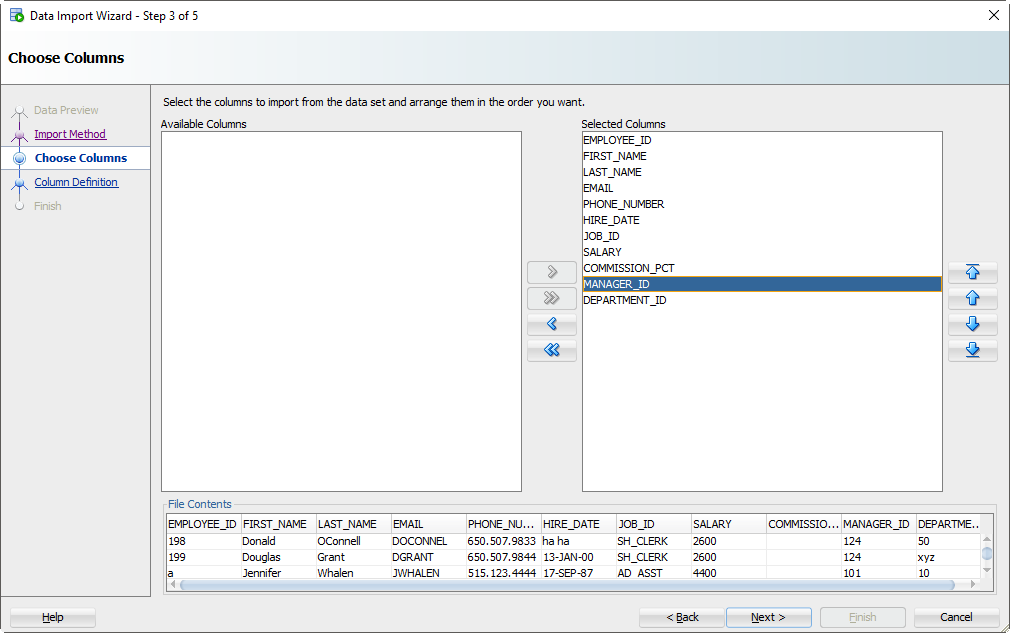
You may have an Excel file with 100 columns but your table only has 30. This is where you tell SQL Developer what columns are to be used for the import. You can also modify the column order, which may make the next step a bit easier.
Step 5: Map the Excel Columns to the Table Columns
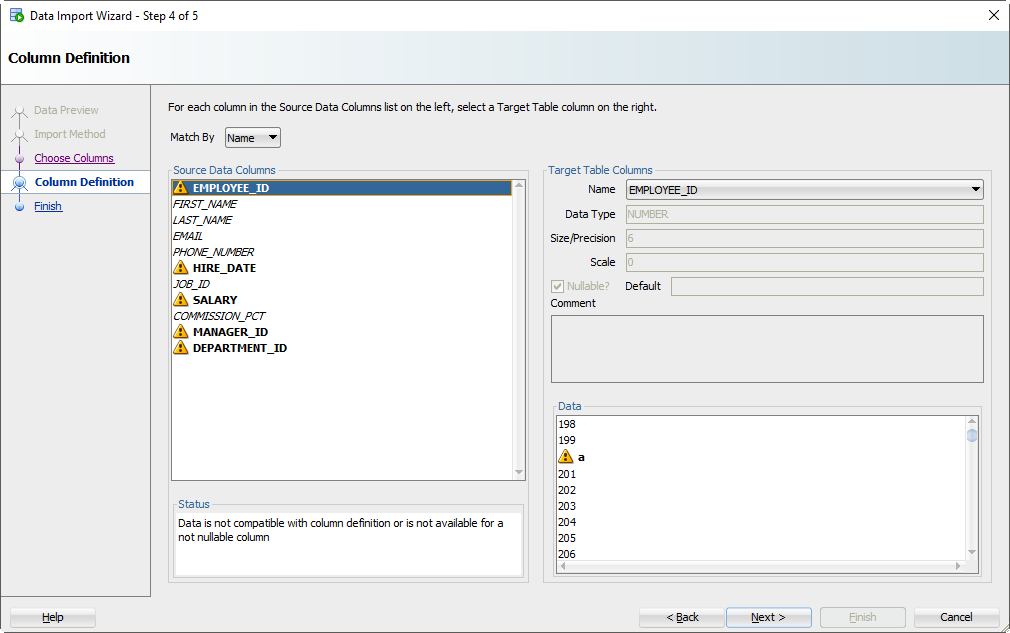
If you’re not paying attention and just letting the wizard guide you home, then now is the time to wake up. There’s a good chance the column order of the Excel file won’t match the definition of your table. This is where you will tell SQL Developer what columns in the spreadsheet match up to what columns in the Oracle table.
And remember how we set that preview window to 100 rows? We’re peaking at the data, looking for problems as we try to fit it into your table column. If we find a problem, we’ll mark the columns with those ‘warning’ symbols.
I’ve polluted my Excel file with some values that I know won’t ‘fit.’ When these rows are encountered in the wizard, they’ll be rejected by the database – but the other rows will come in.
Let’s talk about DATES for a second.
And TIMESTAMPS too. In the excel file, you’re probably going to have some date/time fields you want to move into DATE or TIMESTAMP columns. SQL Developer is treating those value as strings – and YOU need to tell SQL Developer the DATE or TIMESTAMP format to use to be able to convert them.
Let’s look at HIREDATE.

See the ‘Format’ drop down selector? SQL Developer has defaulted the DATE format string to ‘DD-MON-RR’ – we try to guess based on the rows we’re looking at in that 100 preview window.
If we have guessed wrong, or were unable to figure it out, you’ll need to input this yourself. The Oracle Docs can help you define the correct DATE Format Model. If you see the little warning graphics next to your Date values in the Data panel, you might have the wrong format.
Step 6: Verify your settings and GO!

Click on the ‘Finish’ button.
If the Wizard runs into any problems doing the INSERTs, you’ll see this:
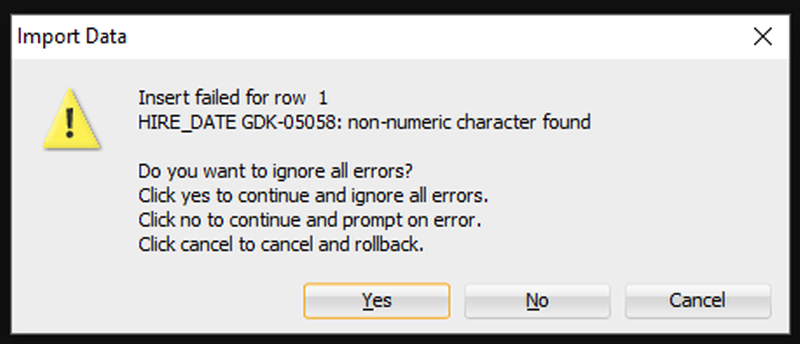
I’m going to say ‘Yes’ to ignore all the errors. But, if you need EVERY single row – you need to say ‘Cancel’ to start over. Then you can either fix your data in the Excel file, or make changes to your table so the data will fit/work.
After clicking ‘Yes’, we’ll get to the end of our story, and our data!
Step 7: See What Worked and What Didn’t
First, any bad news?
If there were rows rejected by the database, we’ll see those now.

Now let’s go look at our new table data!
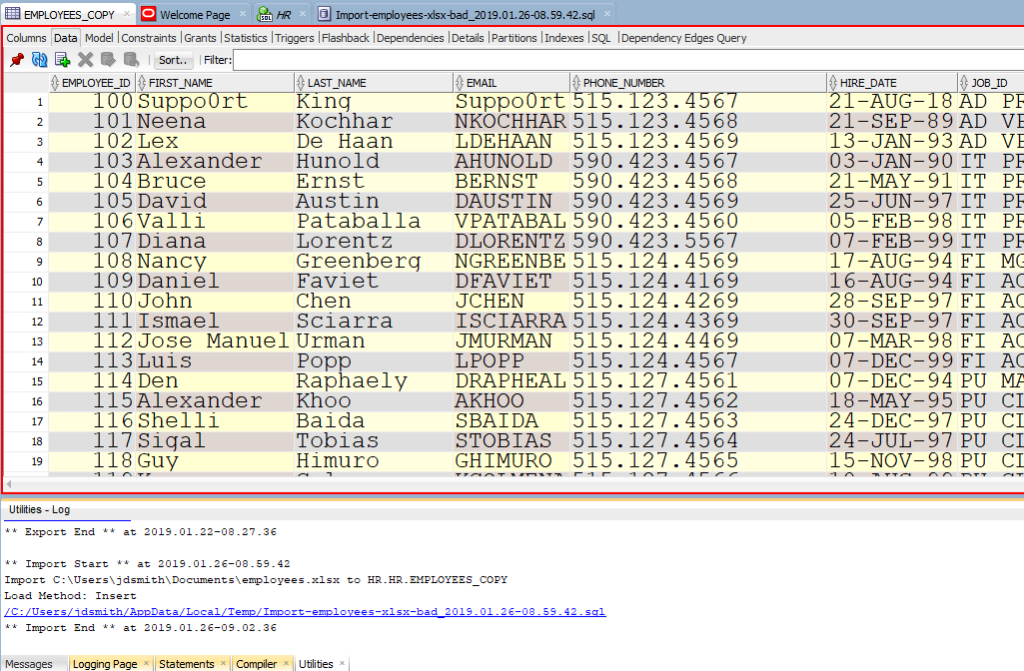
Note the ‘Log’ panel. We’ll show you the file we worked with, and how much time it took to load the data.
Just a few more pointers when it comes to Excel
- Storing data in Excel can be…dangerous
- If you have a lot of data or if this will be a repeating process, consider External Tables or SQL*Loader instead
- If you like to put data in Oracle because you understand SQL better than Excel macros, then welcome to the club 😉
- Here’s 11 more tips on Importing Excel/CSV into your database
The Movie
Are you trying to figure out how to load data from Excel into your database?
The problem: load data to Oracle
Many business analysts rely heavily upon Microsoft Excel as one of their primary sources for important business data. At some point they will need to load data into an Oracle database, and thus you will often hear them make requests such as the following:
- Copying Excel data to Oracle
- Importing Excel data to Oracle
- Loading Excel data to Oracle
- Transferring Excel data to Oracle
They key point is that regardless of how the business users ask, the request is essentially the same. Some very common ways they obtain such loading of the database data include:
Business user sending a formal data load request to their information systems people to perform and deliver the loaded Oracle table. However, this process can take time – sometimes more than the business user can wait.
Business user truly self-servicing by loading the database data themselves using a powerful tool like Quest®Toad® for Oracle, and then working with that data in Toad or some other database tool. This approach is quick and easy, plus Toad for Oracle integrates easily into the business analyst’s workflow.
In my recent blog titled “Copying database data to Microsoft Excel via Toad for Oracle” I showed how easily Toad for Oracle can export data into Excel — a favorite tool of many business analysts.
Toad for Oracle makes short work of this use case as well — how to load data from Excel into Oracle. For my example, I chose to use the Internet Movie Database (IMDB) and thus downloaded the movies title basic data. I then unzipped the file to obtain the 606 megabyte tab delimited text file named data.tsv. I then renamed that data file to movies.tsv so as not to forget what the file contains.

The solution to load data into Oracle
Many business analysts strongly favor the second choice of using Toad for Oracle to self-service and load data. In this blog I’ll review some common scenarios that facilitate easily copying Excel data to Oracle using Toad. The techniques that I’ll be showing work essentially the same in both of Toad’s primary interfaces for this task: the Schema Browser and Main-Menu—> Database —> Create —> Table. I’ll demonstrate using the Schema Browser, which is often the most common choice for this task.

Figure 1: Create a new table to load data
Now in Figure 2 below I’m inside the create table screen. First I chose to check the box for display advanced features, otherwise I would not see displayed the options which will be required. Second, I chose to open a file to read for the table’s column names. It uses the first row of data for that. Third, I chose my tab delimited text file. Finally, I pressed OK. Since my file was over 600 megabytes, it took a few seconds to process.

Figure 2: Method to populate the table columns to load data.
In Figure 3 below I now have all the columns for my table. Note that Toad has set the default datatype to VARCHAR2 for all columns. Moreover Toad also has set each column to be optional. You may need to modify these default choices as you know your data far better than Toad. Then press the OK button to create the table and load data.

Figure 3: Resulting population of table columns.
In Figure 4 below I have now created the table required to hold all the data for the IMDB movies data file. Remember, the file is over 600 megabytes in size, so the data load will likely take a few moments. But we’re more than half-way home at this point. Now I just need to import the data into my newly created table.

Figure 4: Resulting table creation.
In Figure 5 below I have now invoked Toad for Oracle’s Data Import wizard by opening the Right Hand Mouse (RHM) menu and select Import —> Data, or Main Menu —> Database—>Import—>Import Table Data. As you can now see, I am setup to initiate loading of the MOVIES table. However this is a multi-step wizard where we’ll need to specify additional information before the table can be loaded.

Figure 5: Page 1 of the data import wizard.
In Figure 6 below I am now on the second page of the data import wizard where I identify the file type and name. If you look back at Figure 2, you will see that we’ve answered two of the three key parameters. Note that we’ve yet to say that it’s a tab delimited file. Remember too that the first line in the file has the column names, so we’ll need to be able to tell Toad to skip over those.

Figure 6: Page 2 of the data import wizard.
In Figure 7 below I am now on the third page of the data import wizard where I identify the file as tab delimited text.

Figure 7: Page 3 of the data import wizard.
In Figure 8 below I am now on the fourth page of the data import wizard where I identify that Toad should start reading the table data at line 2 because the first row contains the column names. You should take your time on this page of the wizard to make sure you review the dates, times, and numbers settings based upon how your data is formatted in the text file.

Figure 8: Page 4 of the data import wizard.
In Figure 9 below I am now on the fifth page of the data import wizard where Toad has read a sample of the data rows and displays them for you to verify. Moreover, Toad displays a pop-up to see how you want to map the columns of data to the table columns. In this case it really does not matter. But had I created the columns in the table in a different order or reordered them, then the choice would have to be by matching the names.

Figure 9: Page 5 of the data import wizard.
In Figure 10 below I am now on the sixth page of the data import wizard where Toad displays the results of your selection from the prior page’s pop up where you specified the data file field to table column mapping. Again if I had reordered the columns in the table, I would have had to make changes on this page to properly align the fields to columns.

Figure 10: Page 6 of the data import wizard.
In Figure 11 below I am now on the seventh page of the data import wizard where Toad displays the field to column matching results performed upon the sample data with the column header row removed. Note that the columns displayed here are sized based upon the column name size. I’ll need to press the size cols to data button if I wish to be able to see the column values displayed in their entirety.

Figure 11: Page 7 of the data import wizard.
In Figure 12 below I am now on the eighth page of the data import wizard where Toad allows one to specify a host of parameters or options that control the actual database transaction processing. As you can see, I have said to perform batch array inserts of 500 rows, to truncate the table before loading, and to commit after every 500 rows. These choices will affect how long the actual data load takes. Remember that my data file is over 600 megabytes, so setting these parameters is critical. Now when I press the execute button, the data import process will begin.

Figure 12: Page 8 of the data import wizard.
In Figure 13 below I am now executing the data import process. The first time I ran this I got errors because the default column data types and size were VARCHAR(32) and the movies titles are much longer than that. I just chose to abort, increased the column lengths, and restarted the wizard. It then ran to completion without error. Did you note that even on my small VM running on a desktop PC that I’m getting loads of over 66,000 records per second!

Figure 13: Page 9 of the data import wizard.
Conclusion
If you are a business user who wants to copy from Excel to Oracle, use Toad. You can easily do automatic table creation and data loading as shown above. Thus you can self-service without requesting help from your information systems people. No other database tool makes copying data from Excel to Oracle quicker and easier than Toad. Plus no matter whether you’re using Toad freeware or the commercial version of Toad, the process is essentially the same.
Need help managing data? Try Toad for free!
Quest Software® is here to help you simplify complexity, reduce cost and risk, and drive performance. Maybe that’s why we’re consistently voted #1 by DBTA readers and have 95%+ customer satisfaction rate.

Toad® database management tools are cross-platform solutions from Quest® that can help new and veteran DBAs, and even “accidental” DBAs manage data in Oracle, SQL Server, DB2, SAP, MySQL, and Postgres environments.
Related Toad World posts
Blog: Copying database data to Microsoft Excel via Toad for Oracle
Useful resources
Toad for Oracle general information
Technical brief: Top Five Reasons to Choose Toad Over SQL Developer
Case study: Opening doors and creating opportunities with data insights
Have questions, comments?
Head over to the Toad for Oracle forum on Toad World®! Chat with Toad developers, and lots of experienced users.
Help your colleagues
If you think your colleagues would benefit from this blog, share it now on social media with the buttons located at the top of this blog post. Thanks!
Tags:
Toad for Oracle

Written by Bert Scalzo
Bert Scalzo is a guest-blogger for Quest and a renowned database expert, Oracle® ACE, author, database technology consultant, and formerly a member of Dell Software’s TOAD dev team. With three decades of Oracle® database experience to draw on, Bert’s webcasts garner high attendance and participation rates. His work history includes time at both Oracle Education and Oracle Consulting. Bert holds several Oracle Masters certifications and has an extensive academic background that includes a BS, MS and Ph.D. in computer science, as well as an MBA, and insurance industry designations.
Bert is a highly sought-after speaker who has presented at numerous Oracle conferences and user groups, including OOW, ODTUG, IOUG, OAUG, RMOUG and many others. Bert enjoys sharing his vast knowledge on data modeling, database benchmarking, database tuning and optimization, «star schema» data warehouses, Linux® and VMware®.
As a prolific writer, Bert has produced educational articles, papers and blogs for such well-respected publications as the Oracle Technology Network (OTN), Oracle Magazine, Oracle Informant, PC Week (eWeek), Dell Power Solutions Magazine, The LINUX Journal, LINUX.com, Oracle FAQ, Ask Toad and Toad World.
This popular author is known throughout the industry for his instructive books, which include:
• Oracle DBA Guide to Data Warehousing and Star Schemas
• TOAD Handbook (1st Edition)
• TOAD Handbook (2nd Edition)
• TOAD Pocket Reference (2nd Edition)
• Database Benchmarking: Practical Methods for Oracle & SQL Server
• Advanced Oracle Utilities: The Definitive Reference
• Oracle on VMware: Expert Tips for Database Virtualization
• Introduction to Oracle: Basic Skills for Any Oracle User
• Introduction to SQL Server: Basic Skills for Any SQL Server User
• Toad Unleashed
• Leveraging Oracle Database 12cR2 Testing Tools
• Database Benchmarking and Stress Testing
Drop Bert an email at bertscalzo2@gmail.com and he’ll write you back, and maybe send you an autographed book!
Содержание
- Let’s Develop in Oracle
- SQL*Loader — Load Excel/CSV file into Oracle Database Table
- Русские Блоги
- Excel импортирует данные в оракулы (SQL Loader)
- 10 Exporting and Importing Metadata and Data
- Using SQL Developer for Exporting and Importing
- Example: Exporting Metadata and Data for a Table
- Example: Importing Metadata and Data Using a Script File
- Example: Exporting Data to a Microsoft Excel File
- Example: Importing Data from a Microsoft Excel File
- Using Other Tools for Exporting and Importing Data
- Choosing the Right Export/Import Utility
- Loading Data with SQL*Loader
- Methods SQL*Loader Uses to Load Data
- SQL*Loader Features
- Example: Using SQL*Loader
- Exporting and Importing Data
- Exporting and Importing with Data Pump Export and Data Pump Import
- Exportin g and Importing Data with the Export and Import Utilities
Let’s Develop in Oracle
SQL*Loader — Load Excel/CSV file into Oracle Database Table
In the age of various GUI tool available to load an Excel file into Oracle Database, it is always fun to use SQL*Loader command line tool. With this blog I am trying to show how I loaded an Excel file into Oracle Database.
My Current Working Directory is «C:UsersngargDesktopload», all files are located in «C:UsersngargDesktopload» and also all commands will be executed from «C:UsersngargDesktopload».
I had a file AUG.xlsx, which had 14816 rows + 1 header row as following Image —
STEP1: I saved this file as CSV using Excel — Save As — «CSV UTF-8 (Comma Delimited)(*.csv)»
STEP2: Created a new table in my database
STEP3: Created following control file with name «load.ctl»
STEP4: Load started with SQL*Loader
It is as simple as this, we are done 🙂
As we can see here all the 14816 Rows successfully loaded into the table. We can validate it as
Here is the explanation of keywords used in Control file of SQL*Loader
1. SKIP=1 — Skip the first line of CSV, as it contains header
2. PARALLEL=true — specifies that loads can operate in multiple parallel to load data
3. DIRECT=true — specifies the load with use data path. A direct path load uses multiblock asynchronous I/O to writing the data blocks directly to the database files, and can usually load data at near disk speed.
4. DATE «mm/dd/YYYY HH24:MI» — need to provide format of dates of the date column of CSV.
SQL*Loader has also created a file «Results.log» in «C:UsersngargDesktopload» directory during execution.
In case of failure at some records, it might create another file with «.bad» extension, listing out the records which got failed.
Источник
Русские Блоги
Excel импортирует данные в оракулы (SQL Loader)
С помощью расширенного прикладного инструмента SQL * Loader системы базы данных ORACLE данные, сохраненные в исходном Excel, могут быть непосредственно загружены в таблицу базы данных ORACLE.
Сначала, после завершения ввода данных формы в Microsoft-Excel, выберите команду «Сохранить файл» и выберите «форматированный текстовый файл (разделенный пробелами)» в поле «Тип файла» диалогового окна. для формирования стандартного форматированного текстового файла (* .PRN) или выберите «CSV (через запятую)» , чтобы сформировать файл с разделителями-запятыми (* .CSV). Разница между ними заключается в том, что каждая запись в текстовом файле стандартного формата имеет одинаковую длину, данные располагаются компактно в соответствии с длиной поля исходного файла библиотеки, данные поля символов выровнены по левому краю, а тип данных Данные поля выровнены по правому краю, а недостающие части заполнены пробелами. Файл с разделителями-запятыми характеризуется тем, что записи могут быть разной длины. Поля расположены в том порядке, в котором они определены. Поля разделены запятыми. Левые и правые пробелы символьных полей и полей данных исключаются.
В следующем примере «CSV (с разделителями-запятыми)» используется в качестве примера для иллюстрации процесса импорта данных.
1. Предположим, что есть таблица Excel следующим образом (с именем input.xls):
| 1 | a | name1 | age1 |
| 2 | b | name2 | age2 |
| 3 | c | name3 | age3 |
| 4 | d | name4 | age4 |
| 5 | e | name5 | age5 |
| 6 | f | name6 | age6 |
| 7 | g | name7 | age7 |
| 8 | h | name8 | age8 |
| 9 | i | name9 | age9 |
| 10 | j | name10 | age10 |
| 11 | k | name11 | age11 |
| 12 | l | name12 | age12 |
| 13 | m | name13 | age13 |
| 14 | n | name14 | age14 |
2. Сохраните таблицу Excel как: CSV (через запятую) (* .csv). Именуется input.csv, файл сохраняется в корневом каталоге диска C.
3. Создайте новый файл с именем input.ctl. Откройте его как текстовый файл и введите следующий код:
Примечание. Если вышеуказанный файл CTL не прост в использовании, вы можете попытаться удалить файл внимания, потому что я не пытался обратить внимание, поэтому я не знаю, можно ли комментировать файл CTL следующим образом, да, да.
4. Создайте новую таблицу с именем person_zz в базе данных oracle, которая содержит четыре поля, а именно xh, wh, name и age. Обратите внимание, что при создании базы данных вы должны убедиться, что длина поля достаточно велика.
5. В случае обеспечения правильной установки Oracle, в командной строке (после Ctrl + R введите cmd и нажмите Enter).
Введите следующие команды и параметры:
C:Documents and Settingsuser>sqlldr userid=jwzh/[email protected]_170 control=c:/input.ctl
userid = имя пользователя / пароль @ строка подключения.
control = расположение файла управления форматом преобразования.
После успешного выполнения отображается следующее сообщение.
Источник
This chapter describes how to export (unload) from and import (load) into Oracle Database XE. You can export and import metadata (database object definitions), data, or both metadata and data. It contains the following topics:
Data can be exported for later importing (loading) into another Oracle database or into a non-Oracle database. Data that has been unloaded from a non-Oracle database can be loaded into an Oracle database, if the data is in a suitable format for loading.
This chapter includes the following topics:
For convenience and the range of features available, you may want to use SQL Developer for export and import operations unless you need to use another tool (command-line utility).
Using SQL Developer for Exporting and Importing
SQL Developer provides convenient wizards for exporting and importing metadata and data:
To export metadata or data, or both, use the Export Wizard: click Tools , then Database Export .
To import metadata or data, or both, use an appropriate method depending on how the material to be imported was created, or the format of the data to be imported. This method might be running a script file, or using the Data Import Wizard to import from a data file (such as a .csv file or a Microsoft Excel .xls file).
See the following examples of using SQL Developer for performing export and import operations:
Example: Exporting Metadata and Data for a Table
Assume that you want to export the REGIONS table, which is part of the HR sample schema, so that it can be created, along with its data, in another schema (either in the same Oracle database or another Oracle database).
To unload the REGIONS table:
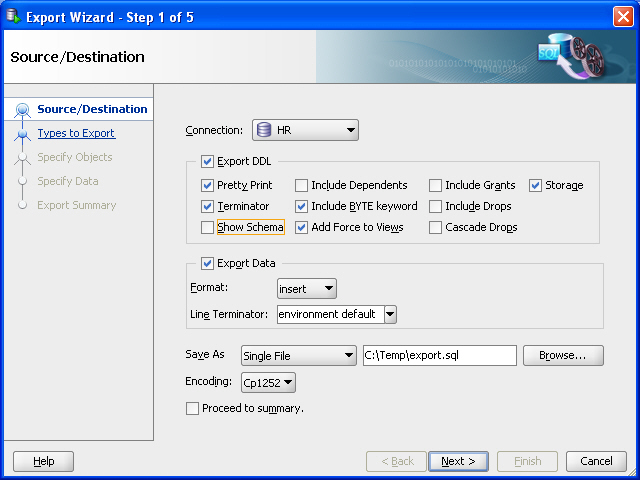
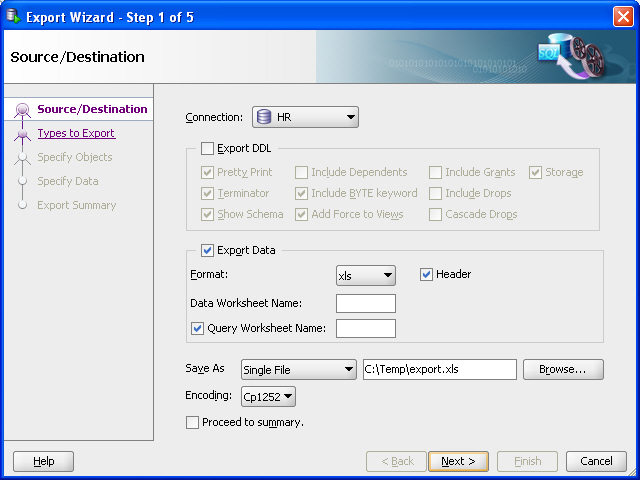
In SQL Developer, click Tools, then Database Export. Figure 10-1 shows the first page of the Export Wizard, but with entries reflecting selections that you will make.
Figure 10-1 Export Wizard: Source/Destination
Description of «Figure 10-1 Export Wizard: Source/Destination»
Accept the default values for the Source/Destination page options, except as follows:
Connection : Select HR .
Show Schema : Deselect (uncheck) this option, so that the HR schema name is not included in CREATE and INSERT statements in the .sql script file that will be created. (This enables you to re-create the table in a schema with any name, such as one not named HR.)
Save As location: Enter or browse to a desired folder on your local hard drive, and specify the file name for the script file. (In the figure, this file is C:tempexport.sql .) The script file containing CREATE and INSERT statements will be created in this location.
For explanations of the options on this or any other wizard page, click the Help button.
For example, Format has other possible values besides the default insert , which causes SQL INSERT statements to be included to insert the data. Other values include loader to cause SQL*Loader files to be created, and xls to cause a Microsoft Excel .xls file to be created.
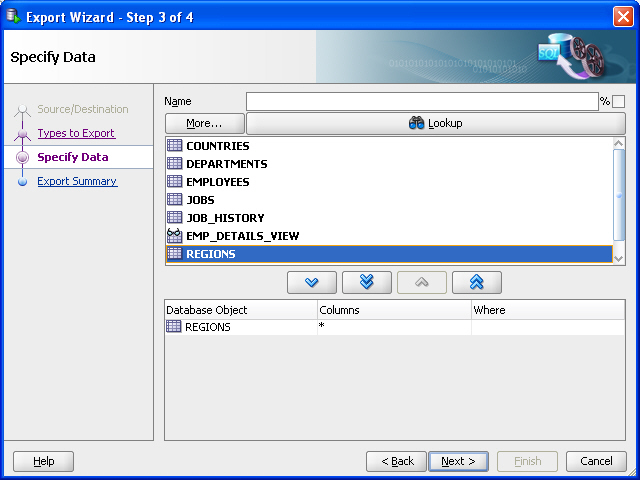
On the Types to Export page, deselect Toggle All, then select only Tables (because you only want to export a table).
On the Specify Objects page, click Lookup, then double-click the REGIONS table on the left to move it to the right-hand column. Figure 10-2 shows the result of these actions.
Figure 10-2 Export Wizard: Specify Objects
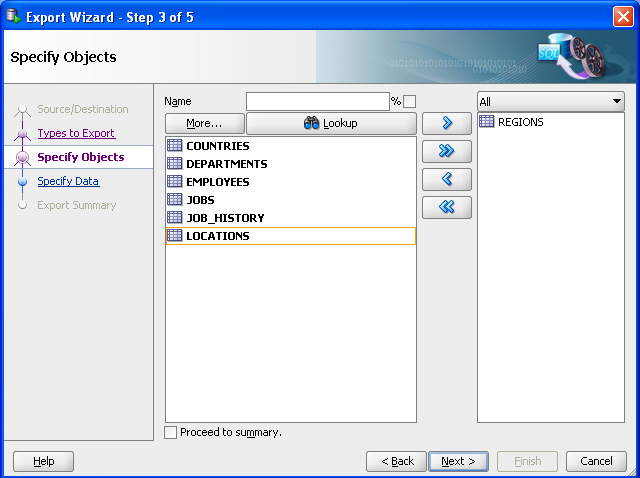
Description of «Figure 10-2 Export Wizard: Specify Objects»
On the Specify Data page, accept the defaults and click Next .
By default, all data from the specified table or tables is exported; however, if you want to limit the data to be exported, you can specify one or more » WHERE clauses» in the bottom part of this page.
On the Summary page, review the information; and if it is what you want, click Finish . (Given what you specified, this causes the export script to be created as C:tempexport.sql .)
If you need to make any changes, go back to the appropriate page or pages and make them, and then move forward to the Summary page again.
Example: Importing Metadata and Data Using a Script File
Assume that you wanted to re-create the REGIONS table that you exported in «Example: Exporting Metadata and Data for a Table», but in a different schema. This other schema can be an existing one or one that you create.
For example, assume that you created a user named NICK following the instructions in «Example: Creating a User». To re-create the REGIONS table in the schema of user NICK by invoking the script in C:tempexport.sql follow these steps using SQL Developer:
If you have not already created a database connection for NICK , create the connection.
Open the NICK connection.
In the SQL Worksheet for the NICK connection, type the following:
Click the Run Script icon.
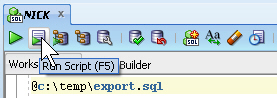
The Script Output pane shows that the REGIONS table has been created and four rows have been inserted.
In the Connections navigator, expand the Tables node under the NICK connection. You now see the REGIONS table.
Optionally, click the REGIONS table in the Connections navigator, and examine the information under the Columns and Data tabs in the main display area.
Example: Exporting Data to a Microsoft Excel File
Assume that you want to export only the data from the REGIONS table, which is part of the HR sample schema, so that the data can be imported into a table with the same column definitions. This might be a REGIONS table in another schema (either in the same Oracle database or another Oracle database).
You use the same Database Export wizard, but export only the data, and not the DDL (Data Definition Language statements for creating database objects).
To export the data the REGIONS table:
In SQL Developer, click Tools, then Database Export. Figure 10-3 shows the first page of the Export Wizard, but with entries reflecting selections that you will make.
Figure 10-3 Export Wizard: Source/Destination Specifying Data Export Only
Description of «Figure 10-3 Export Wizard: Source/Destination Specifying Data Export Only»
Accept the default values for the Source/Destination page options, except as follows:
Connection : Select HR .
Export DDL: Deselect (uncheck) this option. If a .sql script file is generated (which will not happen in this example), it will not contain any CREATE statements, but only INSERT statements.
Format : Select xls to have the data saved to a Microsoft Excel .xls file.
Save As location: Enter or browse to a desired folder on your local hard drive, and specify the file name for the .xls file. (In the figure, this file is C:tempexport.xls .)
On the Types to Export page, deselect Toggle All, then select only Tables (because you only want to export data for a table).
On the Specify Objects page, click Lookup , then double-click the REGIONS table on the left to have it appear in a row in the bottom part of the page. Figure 10-2 shows the result of these actions.
Figure 10-4 Export Wizard: Specify Objects for Exporting Data
Description of «Figure 10-4 Export Wizard: Specify Objects for Exporting Data»
By default, all data from the specified table or tables is exported; however, if you want to limit the data to be exported, you can specify one or more » WHERE clauses» in the bottom part of this page.
On the Summary page, review the information; and if it is what you want, click Finish . (Given what you specified, this causes the data in the REGIONS table to be exported to the file C:tempexport.xls .)
If you need to make any changes, go back to the appropriate page or pages and make them, and then move forward to the Summary page again.
Example: Importing Data from a Microsoft Excel File
Assume that you wanted to import the data that was exported in «Example: Exporting Data to a Microsoft Excel File», into a new table that has the same column definitions as the original ( REGIONS ) table.
For example, assume that you created a user named NICK following the instructions in «Example: Creating a User». This user wants to take the exported data, add one row in the Excel file, and import it into a new table that has the same column definitions as the REGIONS table. (This example is trivial, and adding a row to the Excel file may not be typical, but it is presented merely to illustrate some capabilities.)
To accomplish these goals, follow these steps:
In SQL Developer, if you have not already created a database connection for NICK , create the connection.
Open the NICK connection.
In the SQL Worksheet for the NICK connection, type the following:
Click the Run Script icon.
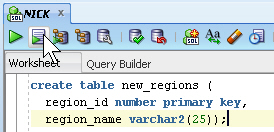
The Script Output pane shows that the NEW_REGIONS table has been created.
In the Connections navigator, expand the Tables node under the NICK connection. You now see the NEW_REGIONS table.
If you do not see the NEW_REGIONS table, disconnect from NICK (right-click NICK in the Connections navigator and select Disconnect) and connect again, and expand the Tables node.
Using Microsoft Excel, open the file containing the exported data (for example, c:tempexport.xls), and optionally add one or more rows.
Figure 10-5 shows the original file with one row added for the Antarctica region.
Figure 10-5 Microsoft Excel File with Exported Data (Modified)
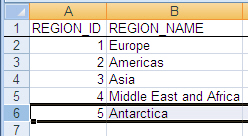
Description of «Figure 10-5 Microsoft Excel File with Exported Data (Modified)»
Save and close the Microsoft Excel .xls file.
In SQL Developer, in the Connections navigator display for NICK , right-lick the NEW_REGIONS table and select Import Data .
In the dialog box that is displayed, navigate to the c:temp folder, select export.xls , and click Open .
In the Data Import Wizard, accept all the defaults; click Next on each page until Summary, and click Finish there. (For information about the options on any wizard page, click the Help button.)
The data from the .xls file is loaded into the NEW_REGIONS table and is committed.
If the SQL Developer export and import wizards are not satisfactory for your needs, you can use one of the command-line utilities available with Oracle Database XE. These other tools are described in the following sections:
Choosing the Right Export/Import Utility
Oracle Database XE provides a number of powerful utilities for exporting and importing data. Table 10-1 provides a summary of these options.
Table 10-1 Summary of Other Export/Import Data Options
Command-line interface, invoked with sqlldr command
Bulk-loads data into the database from external files
Supports numerous input formats, including delimited, fixed record, variable record, and stream
Loads multiple tables simultaneously
Powerful data filtering capabilities
Data Pump Export and Data Pump Import utilities
Command-line interface, invoked with expdp and impdp commands
Exports and imports from one Oracle database to another (proprietary binary format)
Imports/exports all schema object types
Imports/exports entire database, entire schema, multiple schemas, multiple tablespaces, or multiple tables
Powerful data filtering capabilities
Does not support XMLType data
Export and Import utilities
Command-line interface, invoked with exp and imp commands
Exports and imports from one Oracle database to another (proprietary binary format)
Supports XMLType data
Does not support the FLOAT and DOUBLE data types
Capabilities similar to Data Pump; Data Pump is preferred unless you must import or export XMLType data
Table 10-2 provides a number of load/unload/import/export scenarios and suggests the appropriate option to use for each.
Table 10-2 Import/Export Scenarios and Recommended Options
| Feature or Utility | Description |
|---|---|
You have to load data that is not delimited. The records are fixed length, and field definitions depend on column positions.
You have tab-delimited text data to load, and there are more than 10 tables.
You have text data to load, and you want to load only records that meet certain selection criteria (for example, only records for employees in department number 3001).
You want to import or export an entire schema from or to another Oracle database. There is no XMLType data in any of the data.
Data Pump Export and Data Pump Import
You want to import or export data from or to another Oracle database. The data contains XMLType data and contains no FLOAT or DOUBLE data types.
Import ( imp ) and Export ( exp )
Oracle Database Utilities for more information on Data Pump, the Import and Export utilities, and SQL*Loader
Loading Data with SQL*Loader
SQL*Loader loads data from external datafiles into tables of an Oracle database. A particular datafile can be in fixed record format, variable record format, or stream record format (the default).
The input for a typical SQL*Loader session is a contr ol file, which controls the behavior of SQL*Loader, and some data, located either at the end of the control file itself, or in a separate datafile.
The output of a SQL*Loader session is an Oracle database (where the data is loaded), a log file, a «bad» file, and potentially, a discard file. The log file contains a detailed summary of the load, including a description of any errors that occurred during the load. The bad file contains records that were rejected, either by SQL*Loader or by the Oracle database. The discard file contains records that were filtered out of the load because they did not match any reco rd-selection criteria specified in the control file.
Methods SQL*Loader Uses to Load Data
SQL*Loader uses three different methods to load data, depending on the situation: conventional path, direct path, and external tables.
A conventional path load is the default loading method. It executes SQL INSERT statements to populate tables in an Oracle database. This method can sometimes be slower than other methods because extra overhead is added as SQL statements are generated, passed to Oracle, and executed. It can also be slower because when SQL*Loader performs a conventional path load, it competes equally with all other processes for buffer resources.
A direct path load does not compete with other users for database resources. It eliminates much of the Oracle database overhead by formatting Oracle data blocks and writing them directly to the database files, bypassing much of the data processing that normally takes place. Therefore, a direct path load can usually load data faster than conventional path. However, there are several restrictions on direct path loads that may require you to use a conventional path load. For example, direct path load cannot be used on clustered tables or on tables for which there are transactions pending.
See Oracle Database Utilities for a complete discussion of situations in which direct path load should and should not be used.
An external table load creates an external table for data that is contained in a datafile. The load executes INSERT statements to insert the data from the datafile into the target table. An external table load allows modification of the data being loaded by using SQL functions and PL/SQL functions as part of the INSERT statement that is used to create the external table.
See Oracle Database Administrator’s Guide for more information on external tables.
SQL*Loader Features
You can use SQL*Loader to do the following:
Load data across a network. This means that you can run the SQL*Loader client on a different system from the one that is running the SQL*Loader server.
Load data from multiple data files during the same load session.
Load data into multiple tables during the same load session.
Specify the character set of the data.
Selectively load data (you can load records based on the records’ values).
Manipulate the data before loading it, using SQL functions.
Generate unique sequential key values in specified columns.
Use the operating system’s file system to access the datafiles.
Load data from disk, tape, or named pipe.
Generate sophisticated error reports, which greatly aid troubleshooting.
Load arbitrarily complex object-relational data.
Use secondary datafiles for loading LOBs and collections.
Example: Using SQL*Loader
In the following example, a new table named dependents will be created in the HR sample schema. It will contain information about dependents of employees listed in the employees table of the HR schema. After the table is created, SQL*Loader will be used to load data about the dependents from a flat data file into the dependents table.
This example requires a data file and a SQL*Loader control file, which you will create in the first two steps.
Create the data file, dependents.dat , in your current working directory. You can create this file using a variety of methods, such as a spreadsheet application or by simply typing it into a text editor. It should have the following content:
This file is a CSV (comma-separated values) file in which the commas act as delimiters between the fields. The field containing the first name is enclosed in double quotation marks in cases where a variant of the official name is also provided—that is, where the first name field contains a comma.
Create the SQL*Loader control file, dependents.ctl , in your current working directory. You can create this file with any text editor. It should have the following content:
Do one of the following:
On Linux: Start a terminal session and log in to the Oracle Database XE host computer with the oracle user account.
On Windows: Log in to the Oracle Database XE host computer as the user who installed Oracle Database XE, and then open a command window.
On Linux, ensure that environment variables are set according to the instructions in «Setting Environment Variables on the Linux Platform».
Start the SQL Command Line (SQL*Plus) and connect as user hr by entering the following at the command prompt:
At the SQL prompt, create the dependents table, as follows:
The constraint on the last_name column indicates that a value must be provided. The constraint on the relative_id column indicates that it must match a value in the employee_id column of the employees table. The benefits column has a datatype of CLOB so that it can hold large blocks of character data. (In this example, there is not yet any benefits information available so the column is shown as NULL in the data file, dependents.dat .)
After you receive the Table created message, enter exit to exit the SQL Command Line.
From within your current working directory (where you created the control and data files), issue the following SQL*Loader command at the system prompt:
The data in the dependents.dat file is loaded into the dependents table and the following message is displayed:
Information about the load is written to the log file, dependents.log . The content of the log file looks similar to the following:
You can now work with the dependents table, as you would any other table.
Exporting and Importing Data
Oracle Database XE provides the following command-line utilities for exporting and importing data:
Data Pump Export and Data Pump Import
Export and Import
The following sections provide an overview of each utility. For a summary of when you might want to use each utility, see Table 10-2.
Oracle Database Utilities for detailed information on these utilities, including command line parameter descriptions and additional examples.
Exporting and Importing with Data Pump Export and Data Pump Import
The Data Pump Export utility exports data and metadata into a set of operating system files called a dump file set . The Data Pump Import utility imports an export dump file set into a target Oracle database.
A dump file set is made up of one or more disk files that contain table data, database object metadata, and control information. The files are written in a proprietary, binary format, which means that the dump file set can be imported only by the Data Pump Import utility. The dump file set can be imported to the same database or it can be moved to another system and loaded into the Oracle database there.
Because the dump files are written by the database, rather than by the Data Pump client application, you must create directory objects for the directories to which files will be written. A directory object is a da tabase object that is an alias for a directory in the host operating system’s file system.
Data Pump Export and Import enable you to move a subset of the data and metadata. This is done by using Data Pump parameters to specify export and import modes, as well as various filtering criteria.
You can also perform exports and imports over a network. In a network export, the data from the source database instance is written to a dump file set on the connected database instance. In a network import, a target database is loaded directly from a source database with no intervening dump files. This allows export and import operations to run concurrently, minimizing total elapsed time.
Data Pump Export and Import also provide a set of interactive commands so that you can monitor and modify ongoing export and import jobs.
Data Pump Export and Data Pump Import do not support XMLType data. If you need to export and import XMLType data, use the Export and Import options described in «Exporting and Importing Data with the Export and Import Utilities».
Example: Using Data Pump Export and Data Pump Import
In this example, suppose that you want to make some changes to the HR sample schema and then test those changes without affecting the current HR schema. You could export the HR schema and then import it into a new HRDEV schema, where you could perform development work and conduct testing. To do this, take the following steps:
Do one of the following:
On Windows: Log in to the Oracle Database XE host computer as the user who installed Oracle Database XE, and then open a command window.
On Linux: Start a terminal session and log in to the Oracle Database XE host computer with the oracle user account.
On Linux, ensure that environment variables are set according to the instructions in «Setting Environment Variables on the Linux Platform».
At the command prompt, issue the command appropriate to your operating system, to create the directory where the exported files will be placed:
Start the SQL Command Line (SQL*Plus) and connect as user SYSTEM by entering the following at the command prompt:
where password is the password that you specified for the SYS and SYSTEM user accounts upon installation (Windows) or configuration (Linux) of Oracle Database XE.
At the SQL prompt, enter the following commands to create a directory object named dmpdir for the tmp directory that you just created, and to grant read and write access to it for user HR .
Export the HR schema to a dump file named schema.dmp by issuing the following command at the system command prompt:
where password is the password for the SYSTEM user.
As the export operation takes place, messages similar to the following are displayed:
The schema.dmp file and the expschema.log file are written to the dmpdir directory.
Import the dump file, schema.dmp , into another schema, in this case, HRDEV . You use the REMAP_SCHEMA command parameter to indicate that objects are to be imported into a schema other than their original schema. Because the HRDEV user account does not already exist, the import process automatically creates it. In this example, you will import everything except constraints, ref_constraints, and indexes. If a table already exists, it is replaced with the table in the export file.
At the operating system command prompt, issue the following command:
where password is the password for the SYSTEM user.
As the import operation takes place, messages similar to the following are displayed (this output is also written to the impschema.log file in the dmpdir directory):
The HRDEV schema is now populated with data from the HR schema.
Assign a password to the newly created HRDEV user account. To do so, start the SQL Command Line and connect as user SYSTEM (as you did in step 4), and then at the SQL prompt, enter the following ALTER USER statement:
This statement assigns the password hrdev .
You can now work in the HRDEV schema without affecting your production data in the HR schema.
Exportin g and Importing Data with the Export and Import Utilities
The Export and Import utilities provide a simple way for you to transfer data objects between Oracle databases. They are invoked with the exp and imp commands, respectively. These utilities provide support for XMLType data, whereas the Data Pump Export and Import utilities do not.
The Export and Import utilities do not support the FLOAT and DOUBLE data types. If your data contains these types and does not contain XMLType data, you must use Data Pump Export and Import, described in «Exporting and Importing with Data Pump Export and Data Pump Import».
When you run the Export utility against an Oracle database, objects (such as tables) are extracted, followed by their related objects (such as indexes, comments, and grants), if any. The extracted data is written to an export dump file. The dump file is an Oracle binary-format dump file that can be read only by the Import utility. The version of the Import utility cannot be earlier than the version of the Export utility used to create the dump file.
Dump files generated by the Export ( exp ) utility can only be imported by the Import ( imp ) utility; they cannot be imported with the Data Pump Import ( impdp ) utility.
Like Data Pump Import and Export, data exported with the Export utility can be imported with the Import utility into the same or a different Oracle database.
See Oracle Database Utilities for further information about the Export and Import utilities and for examples of how to use them.
Источник
Adblock
detector
| Import/Export Scenario | Recommended Option |
|---|---|