

В React есть два способа реализации функции экспорта: с помощью любой сторонней библиотеки или с помощью создания компонента. Рассмотрим оба способа ниже.

Пример проекта
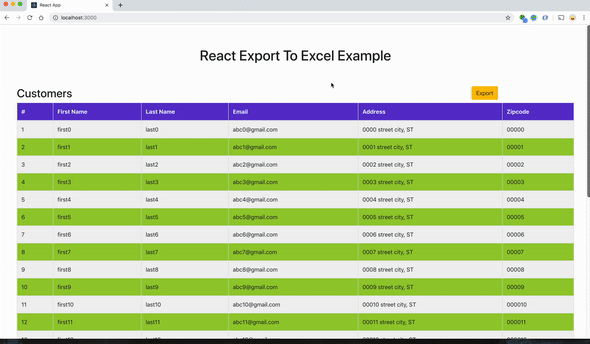
Возьмем простое приложение с данными в таблице и кнопкой экспорта в правом верхнем углу. При нажатии на кнопку данные из таблицы загружаются в таблицу Excel.
Проект можно импортировать отсюда и запустить напрямую.
// clone the project
git clone https://github.com/bbachi/react-exportexcel-example.git

// install and start the project
npm install
npm start
Предварительная подготовка
Создайте проект React с помощью create-react-app и установите пакеты npm xslx, bootstrap и file-saver.
// generate react project
create-react-app react-exportexcel-example

// install bootstrap
npm install react-bootstrap bootstrap --save

// install xsls and file-saver
npm install xlsx file-saver --save
Добавьте таблицы стилей из библиотеки React Bootstrap в index.html.
<!DOCTYPE html>
<html lang="en">
  <head>
    <meta charset="utf-8" />
    <link rel="shortcut icon" href="%PUBLIC_URL%/favicon.ico" />
    <!-- Bootstrap stylesheet link -->
    <link
      rel="stylesheet"
      href="https://maxcdn.bootstrapcdn.com/bootstrap/4.3.1/css/bootstrap.min.css"
      integrity="sha384-ggOyR0iXCbMQv3Xipma34MD+dH/1fQ784/j6cY/iJTQUOhcWr7x9JvoRxT2MZw1T"
      crossorigin="anonymous"
    />
    <meta name="viewport" content="width=device-width, initial-scale=1" />
    <meta name="theme-color" content="#000000" />

    <title>React App</title>
  </head>
  <body>
    <noscript>You need to enable JavaScript to run this app.</noscript>
    <div id="root"></div>
  </body>
</html>
Создание заголовка
Создаем заголовок для приложения. Это не обязательный шаг для реализации функции экспорта, однако с ним приложение выглядит лучше.
import React from 'react'

export const Header = () => {
    return (
        <div className="header">
            <h1>React Export To Excel Example</h1>
        </div>
    )
}
Создание таблицы Customers
Создаем компонент таблицы Customer. Это презентационный компонент, который принимает массив customers в качестве props и отображает в виде таблицы.
import React from 'react'
import Table from 'react-bootstrap/Table';

export const Customers = ({customers}) => {

    const CustomerRow = (customer,index) => {

        return(
              <tr key = {index} className='even'>
                  <td> {index + 1} </td>
                  <td>{customer.firstName}</td>
                  <td>{customer.lastName}</td>
                  <td>{customer.email}</td>
                  <td>{customer.address}</td>
                  <td>{customer.zipcode}</td>
              </tr>
          )
      }

      const CustomerTable = customers.map((cust,index) => CustomerRow(cust,index))

      const tableHeader = <thead className='bgvi'>
                            <tr>
                                <th>#</th>
                                <th>First Name</th>
                                <th>Last Name</th>
                                <th>Email</th>
                                <th>Address</th>
                                <th>Zipcode</th>
                            </tr>
                        </thead>

    return (
        <Table striped bordered hover>
            {tableHeader}
            <tbody>
                {CustomerTable}
            </tbody>
        </Table>
    )
}
Передача данных из компонента App
Нам нужно передать данные, отображаемые в таблице, из компонента app, а также импортировать компоненты Customers и Header для использования в функции render.
import React from 'react';
import './App.css';
import { Customers } from './Customers'
import { Header } from './Header'

class App extends React.Component {

  customers = () => {
    let custs = []
    for (let i = 0; i <= 25; i++) {
      custs.push({firstName: `first${i}`, lastName: `last${i}`,
      email: `abc${i}@gmail.com`, address: `000${i} street city, ST`, zipcode: `0000${i}`});
    }
    return custs;
  }

  render() {

    return (
      <div className="App">
        <Header />
        <Customers customers={this.customers()}/>
      </div>
    );
  }
}

export default App;
Приложение должно выглядеть следующим образом:

Реализация функции экспорта
Создаем компонент ExportCSV, принимающий данные в качестве props и осуществляющий функцию экспорта. В данном примере содержится компонент с методом exportToCSV, который обрабатывает все функции загрузки excel с помощью xlxs и file-saver.
import React from 'react'
import Button from 'react-bootstrap/Button';
import * as FileSaver from 'file-saver';
import * as XLSX from 'xlsx';

export const ExportCSV = ({csvData, fileName}) => {

    const fileType = 'application/vnd.openxmlformats-officedocument.spreadsheetml.sheet;charset=UTF-8';
    const fileExtension = '.xlsx';

    const exportToCSV = (csvData, fileName) => {
        const ws = XLSX.utils.json_to_sheet(csvData);
        const wb = { Sheets: { 'data': ws }, SheetNames: ['data'] };
        const excelBuffer = XLSX.write(wb, { bookType: 'xlsx', type: 'array' });
        const data = new Blob([excelBuffer], {type: fileType});
        FileSaver.saveAs(data, fileName + fileExtension);
    }

    return (
        <Button variant="warning" onClick={(e) => exportToCSV(csvData,fileName)}>Export</Button>
    )
}
Это презентационный компонент, который принимает данные для загрузки и название файла в качестве props. Метод exportToCSV вызывается при нажатии кнопки экспорта.
Теперь нужно импортировать этот компонент в компонент App.
// removed for brevity
render() {
return (
<div className="App">
<Header />
<div className="row">
<div className="col-md-8">
<h2>Customers</h2>
</div>
<div className="col-md-4 center">
<ExportCSV csvData={this.state.customers} fileName={this.state.fileName} />
</div>
</div>
<Customers customers={this.customers()}/>
</div>
);
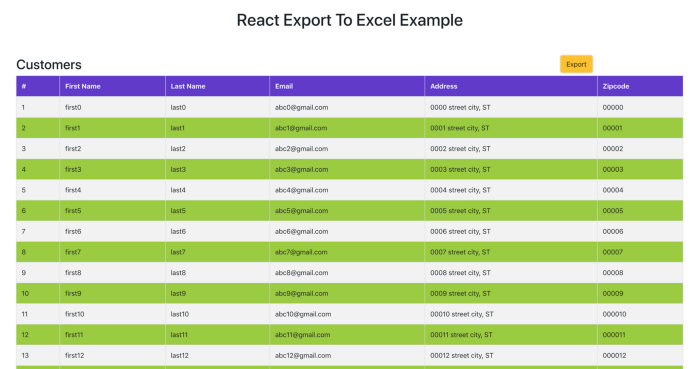
}Ниже представлен финальный скриншот со всеми функциями!
Функция экспорта с ThirdParty или NPM lib
react-csv — это сторонняя библиотека, которую можно использовать прямо из коробки. Нужно только передать данные и fileName, а обо всем остальном библиотека позаботится сама.
Сначала установите react-csv, а затем импортируйте его в компонент ExportCSV.
npm install react-csv --save
Импортируйте CSVLink из react-csv и передайте необходимые данные и fileName ссылке, указанной ниже.
import React from 'react'
import { CSVLink } from 'react-csv'
import Button from 'react-bootstrap/Button';

export const ExportReactCSV = ({csvData, fileName}) => {
    return (
        <Button variant="warning">
            <CSVLink data={csvData} filename={fileName}>Export</CSVLink>
        </Button>
    )
}
В компоненте App импортируйте ExportReactCSV вместо ExportCSV.
import { ExportReactCSV } from './ExportReactCSV'

    // removed code for the brevity

    <div className="col-md-4 center">
        <ExportReactCSV csvData={this.state.customers} fileName={this.state.fileName} />
    </div>

  }
}

export default App;
Вывод:
- Для реализации функции экспорта в React нужны библиотеки
xslsиfile-saver. - Есть несколько способов реализовать логику экспорта в React: использование собственной логики или использование любой сторонней библиотеки.
- Реализуйте логику экспорта с отдельным компонентом для повторного использования.
Читайте также:
- React Native vs Flutter
- Реализация жизненных циклов React с помощью Reason React Hooks
- Как развернуть React-приложение в Netlify
Перевод статьи Bhargav Bachina: Exporting Data to Excel with React
React-Export-Excel

A export to excel library built with and for React.
Installation
With yarn:
yarn add react-export-excel
With npm:
npm install react-export-excel --save
Code Examples
- Simple Excel Export
- Excel Export with Dataset
- Excel Export with Custom Download Button
- Excel Export with custom cells style
Excel Props
| Prop | Type | Default | Required | Description |
|---|---|---|---|---|
| hideElement | bool |
false | false |
To hide the button & directly download excel file |
| filename | string |
Download | false |
Excel file name to be downloaded |
| fileExtension | string |
xlsx | false |
Download file extension [xlsx] |
| element | HTMLElement |
<button> |
false |
Element to download excel file |
| children | Array<ExcelSheet> |
null |
true |
ExcelSheet Represents data |
ExcelSheet Props
| Prop | Type | Default | Required | Description |
|---|---|---|---|---|
| name | string |
"" |
true |
Sheet name in file |
| data | array<object> |
null |
false |
Excel Sheet data |
| dataSet | array<ExcelSheetData> |
null |
false |
Excel Sheet data |
| children | ExcelColumn |
null |
false |
ExcelColumns |
Note: In ExcelSheet props dataSet has precedence over data and children props.
For further types and definitions Read More
Cell Style
Cell styles are specified by a style object that roughly parallels the OpenXML structure. The style object has five
top-level attributes: fill, font, numFmt, alignment, and border.
| Style Attribute | Sub Attributes | Values |
|---|---|---|
| fill | patternType | "solid" or "none" |
| fgColor | COLOR_SPEC |
|
| bgColor | COLOR_SPEC |
|
| font | name | "Calibri" // default |
| sz | "11" // font size in points |
|
| color | COLOR_SPEC |
|
| bold | true or false |
|
| underline | true or false |
|
| italic | true or false |
|
| strike | true or false |
|
| outline | true or false |
|
| shadow | true or false |
|
| vertAlign | true or false |
|
| numFmt | "0" // integer index to built in formats, see StyleBuilder.SSF property |
|
"0.00%" // string matching a built-in format, see StyleBuilder.SSF |
||
"0.0%" // string specifying a custom format |
||
"0.00%;\(0.00%\);\-;@" // string specifying a custom format, escaping special characters |
||
"m/dd/yy" // string a date format using Excel’s format notation |
||
| alignment | vertical | "bottom" or "center" or "top" |
| horizontal | "bottom" or "center" or "top" |
|
| wrapText | true or false |
|
| readingOrder | 2 // for right-to-left |
|
| textRotation | Number from 0 to 180 or 255 (default is 0) |
|
90 is rotated up 90 degrees |
||
45 is rotated up 45 degrees |
||
135 is rotated down 45 degrees |
||
180 is rotated down 180 degrees |
||
255 is special, aligned vertically |
||
| border | top | { style: BORDER_STYLE, color: COLOR_SPEC } |
| bottom | { style: BORDER_STYLE, color: COLOR_SPEC } |
|
| left | { style: BORDER_STYLE, color: COLOR_SPEC } |
|
| right | { style: BORDER_STYLE, color: COLOR_SPEC } |
|
| diagonal | { style: BORDER_STYLE, color: COLOR_SPEC } |
|
| diagonalUp | true or false |
|
| diagonalDown | true or false |
COLOR_SPEC: Colors for fill, font, and border are specified as objects, either:
{ auto: 1}specifying automatic values{ rgb: "FFFFAA00" }specifying a hex ARGB value{ theme: "1", tint: "-0.25"}specifying an integer index to a theme color and a tint value (default 0){ indexed: 64}default value forfill.bgColor
BORDER_STYLE: Border style is a string value which may take on one of the following values:
thinmediumthickdottedhairdashedmediumDasheddashDotmediumDashDotdashDotDotmediumDashDotDotslantDashDot
Borders for merged areas are specified for each cell within the merged area. So to apply a box border to a merged area of 3×3 cells, border styles would need to be specified for eight different cells:
- left borders for the three cells on the left,
- right borders for the cells on the right
- top borders for the cells on the top
- bottom borders for the cells on the left
Dependencies
This library uses file-saver and xlsx and using json-loader will do the magic for you.
///webpack.config.js
vendor: [
        .....
        'xlsx',
        'file-saver'
],
.....
node: {fs: 'empty'},
externals: [
    {'./cptable': 'var cptable'},
    {'./jszip': 'jszip'}
 ]

UPDATED version of this tutorial available here
CREATE AND INSTALL
Create new react project
npx create-react-app react-data-to-excel
Enter fullscreen mode
Exit fullscreen mode
Now start project
npm start
Enter fullscreen mode
Exit fullscreen mode

Project successfully created.
Lets dive into installing neccassry libraries for our project. Install these three libraries.
npm install xlsx file-saver axios --save-dev
Enter fullscreen mode
Exit fullscreen mode
👉xlsx — library for parsing and writing various spreadsheet formats
👉file-saver — library for saving files on the client-side
👉axios — promise based HTTP client for the browser and node.js. We will use it for fetching data from server
UI AND LOGIC
Create a component namely ExportToExcel.js
import React from 'react'
import * as FileSaver from "file-saver";
import * as XLSX from "xlsx";

export const ExportToExcel = ({ apiData, fileName }) => {
  const fileType =
    "application/vnd.openxmlformats-officedocument.spreadsheetml.sheet;charset=UTF-8";
  const fileExtension = ".xlsx";

  const exportToCSV = (apiData, fileName) => {
    const ws = XLSX.utils.json_to_sheet(apiData);
    const wb = { Sheets: { data: ws }, SheetNames: ["data"] };
    const excelBuffer = XLSX.write(wb, { bookType: "xlsx", type: "array" });
    const data = new Blob([excelBuffer], { type: fileType });
    FileSaver.saveAs(data, fileName + fileExtension);
  };

  return (
    <button onClick={(e) => exportToCSV(apiData, fileName)}>Export</button>
  );
};
Enter fullscreen mode
Exit fullscreen mode
Sample data we will get from https://jsonplaceholder.typicode.com/posts
App.js
import React from 'react'
import axios from 'axios'
import './App.css';

import {ExportToExcel} from './ExportToExcel'

function App() {
  const [data, setData] = React.useState([])
  const fileName = "myfile"; // here enter filename for your excel file

  React.useEffect(() => {
    const fetchData = () =>{
     axios.get('https://jsonplaceholder.typicode.com/posts').then(r => setData(r.data) )
    }
    fetchData()
  }, [])

  return (
    <div className="App">
      <ExportToExcel apiData={data} fileName={fileName} />
    </div>
  );
}

export default App;
Enter fullscreen mode
Exit fullscreen mode
Start project
npm start
Enter fullscreen mode
Exit fullscreen mode
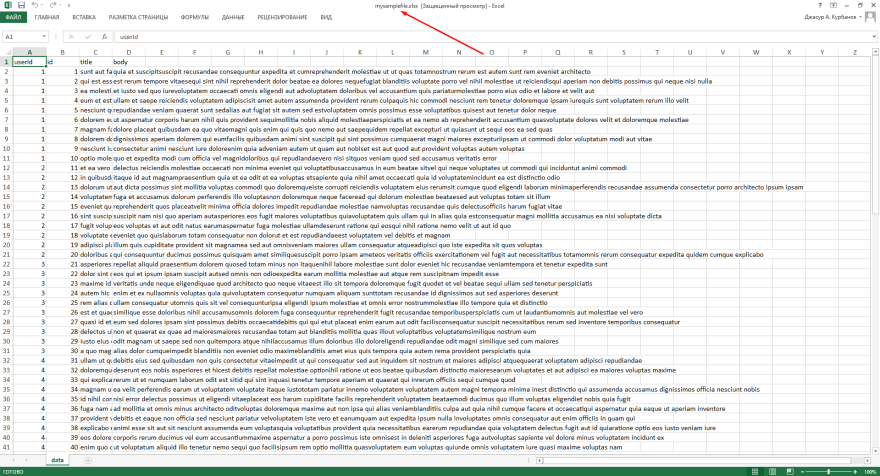
Once it successfully started. You can see one button. By pressing this button you download excel file with data filled from https://jsonplaceholder.typicode.com/posts
Output

Excel File
Github repo for this project link
I can propose the following two modules since I have already used them successfully in production (with custom columns also):
- react-data-export
- react-csv
And a third one, after a quick search, which looks promising (I haven’t used it though)
- react-export-excel —> It does not support TypeScript
The library that you are currently using does not support the removal of columns in the excel file according to this issue, which also proposes a fourth option:
- react-csv-creator
EDIT: Ok, I have created two examples.
The first can be found here and uses my 2nd proposal, react-csv
The second is the following, which uses my 3rd proposal, react-export-excel
2nd EDIT: I have updated both examples, the columns now are defined from your object’s structure, and two ways of removing the unwanted column are proposed (by key-value firstname or by index — the 1st one).
Please take into account that the above methods will work successfully if the objects’ structure is consistent in your data (each entry should have the same columns).
The camelCase method that I have used in both examples was taken from here.
import React from "react";
import ReactDOM from "react-dom";
import "./styles.css";
import ReactExport from "react-export-excel";
const ExcelFile = ReactExport.ExcelFile;
const ExcelSheet = ReactExport.ExcelFile.ExcelSheet;
const ExcelColumn = ReactExport.ExcelFile.ExcelColumn;

function App () {

    const data = [
        { firstname: "jill", lastname: "smith", age: 22 },
        { firstname: "david", lastname: "warner", age: 23 },
        { firstname: "nick", lastname: "james", age: 26 }
    ];

    const camelCase = (str) =>  {
        return str.substring(0, 1).toUpperCase() + str.substring(1);
    };

    const filterColumns = (data) => {
        // Get column names
        const columns = Object.keys(data[0]);

        // Remove by key (firstname)
        const filterColsByKey = columns.filter(c => c !== 'firstname');

        // OR use the below line instead of the above if you want to filter by index
        // columns.shift()

        return filterColsByKey // OR return columns
    };

    return (
        <div className="App">
            <ExcelFile filename="test">
                <ExcelSheet data={data} name="Test">
                    {
                        filterColumns(data).map((col)=> {
                            return <ExcelColumn label={camelCase(col)} value={col}/>
                        })
                    }
                </ExcelSheet>
            </ExcelFile>
            <table id="table-to-xls">
                <thead>
                <tr>
                    <th>Firstname</th>
                    <th>Lastname</th>
                    <th>Age</th>
                </tr>
                </thead>
                <tbody>
                {data.map(item => {
                    return (
                        <tr>
                            <td>{item.firstname}</td>
                            <td>{item.lastname}</td>
                            <td>{item.age}</td>
                        </tr>
                    );
                })}
                </tbody>
            </table>
        </div>
    );
}

const rootElement = document.getElementById("root");
ReactDOM.render(<App />, rootElement);
- Export React Data to Excel
- Example of a Component that Exports React Data to Excel
- Export Data from React to Excel — Simple Example
- Export Data from React to Excel — Advanced Example

React makes it very easy to receive and work with data from an API. Sometimes web applications can even collect user inputs and store them in the state.
Later you can display state values in your application, use them for dynamic features, or conditionally render (or skip rendering) certain elements. The point is that there are many use cases for state data in React.
One possible practical use case is to export state data to an Excel file.
Export React Data to Excel
The react-csv library provides the functionality to easily capture JavaScript data and export it as an Excel file. Data can be either from the state object or a normal array of objects.
To export data successfully, you must ensure that data follows a consistent format. Every object in the list (array) must have the same properties, or it will cause errors in the execution.
Structure of the Array
Within JavaScript, we format data as an array of arrays. The first array within the array will be used to generate column labels.
Arrays coming after that will be used to generate rows in the Excel file.
All arrays within the array must have the same number of values. As we already said, the first array will be used to generate columns.
The following arrays must have corresponding values at each position. Let’s look at this example.
[
    ["Full Name", "Age", "Occupation"],
    ["Irakli Tchigladze", 32, "writer"],
    ["George Abuladze", 33, "politician"],
    ["Nick Tsereteli", 19, "public worker"]
  ]
As you can see, the Full Name column comes first, Age second, and Occupation third. Values in the following arrays must have the same order.
That’s how the react-csv library assigns values to each column.
Example of a Component that Exports React Data to Excel
To better understand how the react-csv library works, let’s look at this web application that consists of a single component.
import "./styles.css";
import React from "react";
import { useState } from "react";
import { CSVLink } from "react-csv";

export default function App() {
  const [fullName, setFullName] = useState("");
  const [age, setAge] = useState(0);
  const [occupation, setOccupation] = useState("");
  const [data, setData] = useState([
    ["Full Name", "Age", "Occupation"],
    ["Irakli Tchigladze", 32, "writer"],
    ["George Abuladze", 33, "politician"],
    ["Nick Tsereteli", 19, "public worker"]
  ]);
  const handleSubmit = (e) => {
    setData([...data, [fullName, age, occupation]]);
    setFullName("");
    setAge(0);
    setOccupation("");
  };
  console.log(data);
  return (
    <div className="App">
      <CSVLink data={data}>Download Excel File</CSVLink>
      <form
        onSubmit={(e) => {
          e.preventDefault();
          handleSubmit();
        }}
      >
        <p>Full Name</p>
        <input
          type="text"
          value={fullName}
          onChange={(e) => setFullName(e.target.value)}
        />
        <p>Age</p>
        <input
          value={age}
          type="number"
          onChange={(e) => setAge(e.target.value)}
        />
        <p>Occupation</p>
        <input
          type="text"
          value={occupation}
          onChange={(e) => setOccupation(e.target.value)}
        />
        <p></p>
        <button type="submit">Submit data</button>
      </form>
    </div>
  );
}
We start by importing the useState hook, which we will use to generate state variables and update them. We also import the CSVLink custom component from the react-csv library.
Export Data from React to Excel — Simple Example
We use the useState() hook to initiate two state variables: data and setData. The latter is used to update the variable.
The argument to the useState() hook will be used as the default value for the data variable.
In JSX, we create a custom <CSVLink> component and set its data attribute equal to the state variable data. The web page will display a clickable text, Download Excel File.
Clicking this link will start a download in the browser. You’ll see data from the state variable if you open the file.
Go to this live CodeSandbox demo to try it yourself.
Export Data from React to Excel — Advanced Example
Web application on CodeSandbox does much more than allow you to download data in the state as an Excel file. It also allows you to update the state variable, which will be converted to Excel format.
On the live demo, you can enter values into the Full Name, Age, and Occupation fields, and click the Submit data button.
This will execute the handleSubmit() function, which will look at the current values of all three fields, create a new array, and add it to the existing state variable.
If you try downloading the file again, you will see that the values you entered into the fields will be the latest row in the Excel table.
The event handler also resets values you entered into fields.