
The best way of exporting array to excel is here.
    $data = array(
         '0' => array('Name'=> 'Parvez', 'Status' =>'complete', 'Priority'=>'Low', 'Salary'=>'001'),
         '1' => array('Name'=> 'Alam', 'Status' =>'inprogress', 'Priority'=>'Low', 'Salary'=>'111'),
         '2' => array('Name'=> 'Sunnay', 'Status' =>'hold', 'Priority'=>'Low', 'Salary'=>'333'),
         '3' => array('Name'=> 'Amir', 'Status' =>'pending', 'Priority'=>'Low', 'Salary'=>'444'),
         '4' => array('Name'=> 'Amir1', 'Status' =>'pending', 'Priority'=>'Low', 'Salary'=>'777'),
         '5' => array('Name'=> 'Amir2', 'Status' =>'pending', 'Priority'=>'Low', 'Salary'=>'777')
        );
        $filename =  time().".xls";
        header("Content-Type: application/vnd.ms-excel");
        header("Content-Disposition: attachment; filename="$filename"");

        ExportFile($data);
        function ExportFile($records) {
            $heading = false;
                if(!empty($records))
                  foreach($records as $row) {
                    if(!$heading) {
                      // display field/column names as a first row
                      echo implode("t", array_keys($row)) . "n";
                      $heading = true;
                    }
                    echo implode("t", array_values($row)) . "n";
                }
            exit;
        }
Not so long ago, I was tasked with adding an export-array-to-excel button to some pages of a React application. The criteria given for this button was:
- It had to be reusable, so it can be imported into any page and used as needed
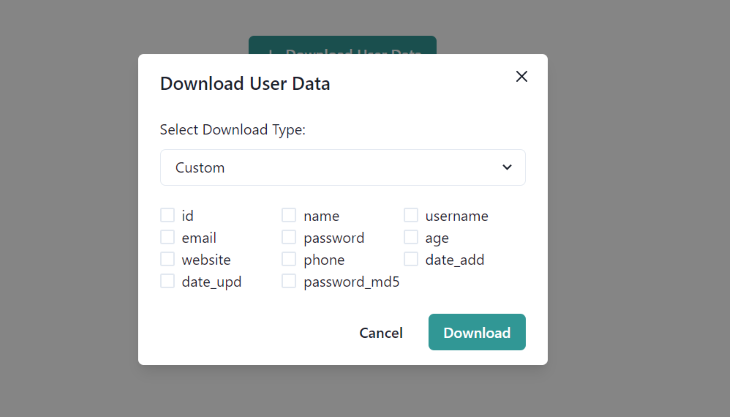
- When clicked, it should open up a modal that lets users choose between downloading all columns (all properties from each individual object of the array) or selected columns (only selected properties from individual objects of the array)
- The modal should contain a download button that will download a JSON API response array directly into a spreadsheet file based on the columns selected
I found out that this is a common feature request (maybe with a little variation) given to developers, especially those who work on admin dashboard-like projects, and that is why I’m writing this article.
This article assumes that you have a fair knowledge of JavaScript and React. In this article, I will first show you the fundamental concepts involved in exporting an array of objects into an Excel sheet. Then, based on that, create the reusable export-array-to-excel component shown above, using Chakra UI as the component library of choice.
The first thing that needs to be figured out is how to prompt a download on the browser.
In plain HTML, creating a button to prompt a download in the browser is pretty straightforward using an anchor tag and its download attribute. Simply pass the URL or file path of the file to be downloaded to the href attribute:
<a href="/files/excel-sheet-to-download.xls" download=”customer-list”>
       <button> Download to excel </button>
</a>
The download attribute is part of the HTML5 spec, and it specifies that the target should be downloaded when the link is clicked. The value passed to the download attribute specifies the filename for the downloaded file.
Unfortunately, the solution above won’t exactly work for our use case because there isn’t a pre-existing Excel file to link to.
We’ll have to perform four tasks spontaneously when the download button is clicked:
- Get the API response array and convert it to a table
- Embed the table into a spreadsheet XML template
- Programmatically create a file URL for the spreadsheet template using the
BlobandURL.createObjectURL()methods - Finally, assign the created URL to the
hrefof an anchor tag with a download attribute, then programmatically click the anchor tag to prompt a download
Let’s go over each step and write the necessary code for it. But first, we need to set up a React app and Chakra UI.
Setting up a React application
To set up a demo React app, use Create React App. Make sure you have Node >= 8.10 and npm >= 5.6 installed:
npx create-react-app export-array-demo
cd export-array-demo
npm start
Next, install Chakra UI:
npm i @chakra-ui/react @emotion/react @emotion/styled framer-motion
npm i @chakra-ui/icons
Chakra UI is an open-source component library for React that provides a set of simple, modular, and accessible components that make it easier to build the UI of applications. It will be used to quickly assemble UI elements that will be needed.
For Chakra UI to work correctly, you need to set up the ChakraProvider (which is the library’s context provider using the React Context API) in index.js:
import React from 'react';
…………
import {ChakraProvider} from "@chakra-ui/react"

ReactDOM.render(
  <React.StrictMode>
    <ChakraProvider>
      <App />
    </ChakraProvider>
  </React.StrictMode>,
  document.getElementById('root')
);
That’s all the initial setup needed. Next up, is to write functions to take care of the array to Excel export.
Write ArrayToExcel
To keep the core array-to-excel logic separated, create a Components/ArrayToExcel folder in src. Inside this folder, create two files ArrayToExcel.js which will contain the function that’ll take care of the conversion and download, and ArrayToExcelButton.js, which will house the button, modal, and other necessary UI elements.
In ArrayToExcel.js, copy the code here, which I’ll now go over in bits:
export const arrayToExcel = (function () {
....
})();
First, all functions are wrapped in an IIFE to make sure that variables scoping will always be protected.
Then there is the convertArrayToTable method returned from the arrayToExcel function:
convertArrayToTable : async (apiArray, fileName) => {
   //use keys from the first array object to form table column headers
   const tableHeaders = `<tr>${Object.keys(apiArray[0]).map(key =>   `<td>${key}</td>`).join('')}</tr>`;
   //now loop through all array objects to form table rows
   const tableRows = apiArray.map(obj =>
      [`<tr>
         ${Object.keys(obj).map(key => `<td>${obj[key] === null ||    obj[key] === '' ? '' : obj[key]}</td>`).join('')}
      <tr/>`]).join('');
   const table = `<table>${tableHeaders}${tableRows}</table>`.trim();


   const xmlTable = createXMLTable(table, fileName);
   const downloadURL = createFileUrl(xmlTable);
   downloadFile(downloadURL, fileName);
}
The convertArrayToTable function receives a JSON API response array (which is an array of objects) as a parameter and loops through the keys of the first object to form the first row, which will represent the table headers or columns. It also loops through each object and uses its values to create rows. Every map function returns an array, which then join method that converts into a string. Then using template literals, concatenate tableHeader and tableRows to form a complete table and pass it into createXMLTable:
const createXMLTable = (table, fileName) => {
  const xmlTable = `
        <html xmlns:o="urn:schemas-microsoft-com:office:office xmlns:x="urn:schemas-microsoft-com:office:excel"
       xmlns="http://www.w3.org/TR/REC-html40"
        >
           <meta http-equiv="content-type" content="application/vnd.ms-excel; charset=UTF-8"/>
           <head>
              <xml>
                <x:ExcelWorkbook>
                    <x:ExcelWorksheets>
                        <x:ExcelWorksheet>
                            <x:Name>${fileName}</x:Name>
                            <x:WorksheetOptions><x:DisplayGridlines/></x:WorksheetOptions>
                        </x:ExcelWorksheet>
                    </x:ExcelWorksheets>
                </x:ExcelWorkbook>
              </xml>
           </head>
           <body>
             ${table}
           </body>
        </html> `
        return xmlTable;
    }
The createXMLTable function uses the SpreadsheetDataXML specification by Microsoft to describe how a spreadsheet file should be structured. In the XML template, you’re instructing that the file should be a workbook with worksheets and that the particular worksheet which displays the table should have a title of whatever the fileName parameter is, and should display grid lines.
XML is a markup language mainly used to transfer data between different programs. In our case, between the web and a .xls (file extension for spreadsheet files) file.
You can write inline CSS here to style how the exported spreadsheet table should look.
Next is the createXMLTable function which returns an Excel file template that is passed to createFileUrl:
const createFileUrl = (xmlTable) => {
        const tableBlob = new Blob([xmlTable], {type: 'application/vnd.ms-excel;base64,' });
        const downloadURL = URL.createObjectURL(tableBlob);
        return downloadURL;
    }
To programmatically create a file URL for the Excel template, you’ll need to convert it into a file or a file-like object using the blob method. The blob method takes in an array and a MIME type as arguments. The blob method returns a blob object, which is passed into the createObjectURL method to create a unique file URL which can then be passed to an a tag.
The downloadFile function takes in the resulting URL from createFileUrl, and finally starts the download:
const downloadFile = (downloadURL, fileName) => {
        const downloadLink = document.createElement('a');
        document.body.appendChild(downloadLink);
        downloadLink.download = fileName;
        downloadLink.href = downloadURL;
        downloadLink.click();
    }
The downloadFile function passes the file URL to the href of the anchor tag which is created programmatically, and then invokes the click method on the link to trigger the download process. The fileName parameter assigned to the download will be the name of the file.
And that’s all you need to do, to take care of downloading an array of objects into an Excel file.
Next, let’s set up our array-to-excel component with UI elements from Chakra UI and also import arrayToExcel.
Assembling UI elements with Chakra UI
To build out the export-array-to-excel component as shown in the beginning, you’ll need a button, modal, select input, and checkbox UI elements.
In ArrayToExcelButton.js import these elements from Chakra UI:
import React, { useState } from "react";
import {
    Button,
    Modal,
    ModalOverlay,
    ModalContent,
    ModalHeader,
    ModalFooter,
    ModalBody,
    ModalCloseButton,
    Select,
    Checkbox,
} from "@chakra-ui/react"
import { DownloadIcon } from '@chakra-ui/icons'
Chakra exports those seven modal-based components to help you create any type of modal dialog.
Remember, from the workflow stated in the beginning, when the main button is clicked, it should open up a modal that lets users choose between downloading all columns or some selected columns (i.e. select properties from each object of the array):
const ArrayToExcelButton = ({ apiArray, fileName, buttonTitle }) => {

    const [showDownloadModal, setShowDownloadModal] = useState(false);
    const [columnsType, setColumnsType] = useState("1");
    const [selectedColumns, setSelectedColumns] = useState([]);

    return (
        <>
            <Button leftIcon={<DownloadIcon />} colorScheme="teal" onClick={() => setShowDownloadModal(true)}>
                {buttonTitle}
            </Button>
            {showDownloadModal &&
                <Modal isOpen={showDownloadModal} onClose={() =>    setShowDownloadModal(false)}>
                    <ModalOverlay />
                    <ModalContent>
                        <ModalHeader>{buttonTitle}</ModalHeader>
                        <ModalCloseButton />
                        <ModalBody>
                            <p style={{marginBottom:"10px" }}>
                              Select Download Type:
                            </p>
                            <Select onChange={(e) => setColumnsType(e.target.value)}>
                                <option value="1">All Columns</option>
                                <option value="2">Custom</option>
                            </Select>
                            {columnsType === "1" &&
                                <p style={{marginTop:"20px" }}>
                                    {Object.keys(apiArray[0]).map((key, index) => {
                                        return (
                                            <span key={index}>{(key)}, </span>
                                        )
                                    })}
                                </p>
                            }
                            {columnsType === "2" &&
                                <div style={{ display: "flex", flexWrap: "wrap", width: "100%", marginTop:"20px" }}>
                                    {Object.keys(apiArray[0]).map((key, index) => {
                                        return (
                                            <div key={index} style={{ display: "flex", alignItems: "center", width:"33.3%"}}>
                                                <Checkbox
                                                    id={key}
                                                    onChange={(e) =>       updateSelectedColumns(e, key)}
                                                >
                                                   {key}
                                                </Checkbox>

                                            </div>
                                        )
                                    })}
                                </div>
                            }

                        </ModalBody>

                        <ModalFooter>
                            <Button variant="ghost" mr={3} onClick={() => setShowDownloadModal(false)}>
                                Cancel
                            </Button>
                            <Button colorScheme="teal" onClick={() => apiArrayToExcel()}>
                                Download
                            </Button>
                        </ModalFooter>
                    </ModalContent>
                </Modal>
            }
        </>
    )
}

export default ArrayToExcelButton;
The main button which receives a buttonTitle prop, toggles opening, and closing of the download modal using the showDownloadModal state.
Inside ModalBody, there is a Select element that toggles the type of download to perform, “All Columns” or “Custom” using setColumnsType. If “All Column” is selected, loop through the first object of apiArray and list out all object properties in a paragraph. If “Columns” is selected, also loop through the first object of apiArray and list out each object properties alongside a checkbox.
To keep track of checked checkboxes we’ll use the updateSelectedColumns function:
const ArrayToExcelButton = ({ apiArray, fileName, buttonTitle }) => {

   ...

    const updateSelectedColumns = (e, column) => {
        if (e.target.checked) {
            setSelectedColumns([...selectedColumns, column]);
        } else {
            setSelectedColumns(selectedColumns.filter(value => value !== column));
        }
    }

   ...
When a checkbox is clicked, updateSelectedColumns either adds or removes the target object property from the selectedColumns state array.
Lastly, clicking on the modal’s download button triggers the array-to-excel download with the apiArrayToExcel function:
import React, { useState } from "react";
...
import {arrayToExcel} from "./ArrayToExcel";
import cloneDeep from "lodash.clonedeep";

const ArrayToExcelButton = ({ apiArray, fileName, buttonTitle }) => {

   ....
    const apiArrayToExcel = () => {
        if (columnsType === "1") {
           arrayToExcel.convertArrayToTable(apiArray, fileName)
        } else {
            const customArray = cloneDeep(apiArray);
            customArray.map(obj => Object.keys(obj).forEach((key) => {
                if (!selectedColumns.includes(key)) {
                    delete obj[key];
                }
            }))
            arrayToExcel.convertArrayToTable(customArray, fileName)
            setSelectedColumns([]);
        }
    }

....
If the value of the download type selected is “All Columns”, the apiArrayToExcel function simply calls the convertArrayToTable method from arrayToExcel passing in apiArray and fileName props as arguments. Else, if the value is Custom, it duplicates the apiArray array using cloneDeep from lodash, and loops through individual objects in customArray deleting object keys (alongside their corresponding values) that are not present in the selectedColumns array.
More great articles from LogRocket:
- Don’t miss a moment with The Replay, a curated newsletter from LogRocket
- Learn how LogRocket’s Galileo cuts through the noise to proactively resolve issues in your app
- Use React’s useEffect to optimize your application’s performance
- Switch between multiple versions of Node
- Discover how to animate your React app with AnimXYZ
- Explore Tauri, a new framework for building binaries
- Compare NestJS vs. Express.js
Because JavaScript arrays are reference types, simply assigning apiArray to a new variable will only create a shallow copy and any changes made to customArray will affect apiArray. To avoid that, deep clone the array using cloneDeep. The lodash cloneDeep method creates a deep clone of an array:
npm i --save lodash.clonedeep
With that, the export-array-to-excel component is ready!
Note, I added some inline styling to keep things simple and together. Ideally, you should keep styles separate.
To test our array-to-excel component, let’s make a mock API fetch call in App.js:
import React, { useState, useEffect } from "react";
import ArrayToExcelButton from "./Components/ArrayToExcel/ArrayToExcelButton"

const App =()=> {

  const [userData, setUserData] = useState([]);
  const [loading, setLoading] = useState(true);

  const fetchJsonArray = async () => {
    try {
      const response = await fetch('https://jsonfy.com/users');
      let jsonArray = await response.json();
      setUserData(jsonArray);
      setLoading(false);
    } catch (error) {
      console.log(error.message);
      setLoading(false);
    }
  }

  useEffect(() => {
    fetchJsonArray();
  }, [])

  return (
    <div className="App">
      {loading ?
        <p>Loading</p> :
        <ArrayToExcelButton apiArray={userData} fileName={"UserData.xls"} buttonTitle={"Download User Data"} />
      }
    </div>
  );
}

export default App;
Import ArrayToExcelButton and pass userData into it as props. Start up the application with npm run start and check that the button works fine.
The full code for this demo project can be found on my GitHub.
Conclusion
Congratulations! You’ve just learned how to export an array of objects to an Excel file using a reusable React component. As I mentioned before, this is a feature request you’re likely to encounter occasionally as a developer especially if you’re working on admin dashboard projects. Now, go on and build something great 🙂
LogRocket: Full visibility into your production React apps
Debugging React applications can be difficult, especially when users experience issues that are hard to reproduce. If you’re interested in monitoring and tracking Redux state, automatically surfacing JavaScript errors, and tracking slow network requests and component load time,
try LogRocket.


LogRocket
combines session replay, product analytics, and error tracking – empowering software teams to create the ideal web and mobile product experience. What does that mean for you?
Instead of guessing why errors happen, or asking users for screenshots and log dumps, LogRocket lets you replay problems as if they happened in your own browser to quickly understand what went wrong.
No more noisy alerting. Smart error tracking lets you triage and categorize issues, then learns from this. Get notified of impactful user issues, not false positives. Less alerts, way more useful signal.
The LogRocket Redux middleware package adds an extra layer of visibility into your user sessions. LogRocket logs all actions and state from your Redux stores.
Modernize how you debug your React apps —
start monitoring for free.
xlsexport is a JavaScript library for exporting arrays of objects to Excel XLS and CSV. xlsexport.js is a small, dependency-free library that allows exporting a JavaScript array (containing any number of objects) to Excel files.
export javascript array to xlsx, how to export javascript array info to excelon, export json array to excel in javascript, export datatable to excel using javascript, export array to csv javascript
Techniques:
- exportToXLS (String fileName): Convert data and force download an Excel XLS file.
- exportToCSV (String fileName): Convert data separated by semicolons and force download of a CSV file.
The filename parameter is optional, if not defined, the file will be named “export.xls”.
How to make use of it:
Installation:
# NPM
$ npm install xlsexport --save
Include the following “xls-export.js” from JavaScript in your HTML page.
<script src="xls-export.js"></script>
Initialize xlsexport and pass the following parameters to the “xlsExport” object.
const xls = new xlsExport(data, title);
Export JS object arrays to XLS.
xls.exportToXLS('export.xls')
Export JS object arrays to CSV.
xls.exportToCSV()
Activate RTL mode.
xls.exportToXLS('export.xls', true)
Export JavaScript Array To XLS And CSV, xlsexport Plugin/Github, javascript export to excel, javascript save csv file locally
See Demo And Download
Official Website(deblanco): Click Here
This superior jQuery/javascript plugin is developed by deblanco. For extra advanced usage, please go to the official website.
Recently popular package Laravel-Excel released a new version 3.0, which was a pretty radical change from previous versions. I needed to do a simple Excel export and noticed that their documentation covers only export from Laravel Collections but not from some custom structure. So I will show you a «workaround».
First, this is how documentation describes the basic workflow:
namespace AppExports;

use MaatwebsiteExcelConcernsFromCollection;

class InvoicesExport implements FromCollection
{
    public function collection()
    {
        return Invoice::all();
    }
}
You need to create a separate class for export (similar how Laravel Notifications work) and you can define a collection to export.
There are also other ways to export the data:
From Eloquent query:
class InvoicesExport implements FromQuery
{
    use Exportable;

    public function query()
    {
        return Invoice::query();
    }
}
Or, from View HTML table:
class InvoicesExport implements FromView
{
    public function view(): View
    {
        return view('exports.invoices', [
            'invoices' => Invoice::all()
        ]);
    }
}
But still, the problem is that all examples are based on Eloquent. What if I need Excel from some custom structure like array?
Imagine that I have this array:
[
  [
    'name' => 'Povilas',
    'surname' => 'Korop',
    'email' => 'povilas@laraveldaily.com',
    'twitter' => '@povilaskorop'
  ],
  [
    'name' => 'Taylor',
    'surname' => 'Otwell',
    'email' => 'taylor@laravel.com',
    'twitter' => '@taylorotwell'
  ]
]
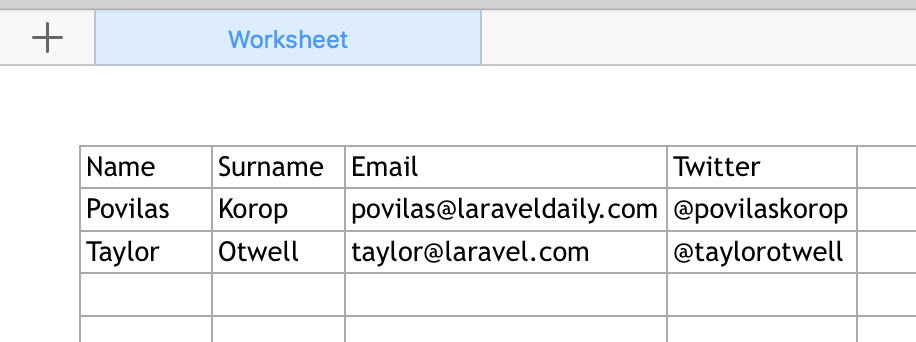
How do I export that into Excel, so that keys would be columns, and values would be rows?
There are two ways.
Option 1. Turn your Array into a Collection and add Headings
This is how the Export class would look:
namespace AppExports;

use MaatwebsiteExcelConcernsFromCollection;
use MaatwebsiteExcelConcernsExportable;
use MaatwebsiteExcelConcernsWithHeadings;

class CollectionExport implements FromCollection, WithHeadings
{
    use Exportable;

    public function collection()
    {
        return collect([
            [
                'name' => 'Povilas',
                'surname' => 'Korop',
                'email' => 'povilas@laraveldaily.com',
                'twitter' => '@povilaskorop'
            ],
            [
                'name' => 'Taylor',
                'surname' => 'Otwell',
                'email' => 'taylor@laravel.com',
                'twitter' => '@taylorotwell'
            ]
        ]);
    }

    public function headings(): array
    {
        return [
            'Name',
            'Surname',
            'Email',
            'Twitter',
        ];
    }

}
You need to implement collection() method by using Laravel’s collect() method and passing array to it. Also, you need to implement headings() to add a header row.
Finally, in Controller you will have this row at the end of the method:
return Excel::download(new CollectionExport(), 'export.xlsx');
Then you would have this as downloaded result:
Option 2. Pass Array into View
Alternatively, you can build this resources/views/exports/xml.blade.php:
<table>
    <thead>
    <tr>
        @foreach($data[0] as $key => $value)
        <th>{{ ucfirst($key) }}</th>
        @endforeach
        </tr>
    </thead>
    <tbody>
    @foreach($data as $row)
        <tr>
        @foreach ($row as $value)
            <td>{{ $value }}</td>
        @endforeach
    </tr>
    @endforeach
    </tbody>
</table>
And then have this in your Export class:
namespace AppExports;

use IlluminateContractsViewView;
use MaatwebsiteExcelConcernsFromView;

class BladeExport implements FromView
{

    public function view(): View
    {
        return view('exports.xml', [
            'data' => [
              [
                'name' => 'Povilas',
                'surname' => 'Korop',
                'email' => 'povilas@laraveldaily.com',
                'twitter' => '@povilaskorop'
              ],
              [
                'name' => 'Taylor',
                'surname' => 'Otwell',
                'email' => 'taylor@laravel.com',
                'twitter' => '@taylorotwell'
              ]
            ]
        ]);
    }
}
Controller stays the same, just different class name:
return Excel::download(new BladeExport(), 'export.xlsx');
Wait, but how to pass data into Export class?
Both of our examples have one flaw — the data is formed in the class itself. Actually, it shouldn’t even know about the data, it should accept it as a parameter. But how do we do that, if view() or collection() methods have no parameters?
We will pass it through __construct() method into a private variable. You could call it a dependency injection, although there are much better examples of dependency injection, look it up on Google.
class BladeExport implements FromView
{

    private $data;

    public function __construct($data)
    {
        $this->data = $data;
    }

    public function view(): View
    {
        return view('exports.xml', [
            'data' => $this->data
        ]);
    }
}
So we’re accepting $data as a parameter now. Then, in our Controller we can have this:
$data = [
    [
        'name' => 'Povilas',
        'surname' => 'Korop',
        'email' => 'povilas@laraveldaily.com',
        'twitter' => '@povilaskorop'
    ],
    [
        'name' => 'Taylor',
        'surname' => 'Otwell',
        'email' => 'taylor@laravel.com',
        'twitter' => '@taylorotwell'
    ]
];

return Excel::download(new BladeExport($data), 'export.xlsx');
I hope that’s helpful. Check out other examples in official documentation of the package.