Excel для Microsoft 365 Excel для Microsoft 365 для Mac Excel для Интернета Еще…Меньше
Windows: 2208 (сборка 15601)
Mac: 16.65 (сборка 220911)
Веб: представлено 15 сентября 2022
г.
iOS: 2.65 (сборка 220905)
Android: 16.0.15629
Расширяет или заполняет массив до указанных размеров строк и столбцов.
Синтаксис
=РАЗВЕРНУТЬ(массив; строки; [столбцы], [заполняющее_значение])
Синтаксис функции EXPAND поддерживает следующие аргументы.
-
массив. Массив, который нужно расширить.
-
строки. Количество строк в расширенном массиве. Если аргумент отсутствует, строки не расширяются.
-
столбцы. Количество столбцов в расширенном массиве. Если аргумент отсутствует, столбцы не расширяются.
-
заполняющее_значение Значение, используемое для заполнения. Значение по умолчанию — #Н/Д.
Заметки
-
Если строки не предоставлены или пусты, значением по умолчанию является количество строк в аргументе массива.
-
Если столбцы не предоставлены или пусты, значением по умолчанию является количество столбцов в аргументе массива.
Ошибки
-
Excel возвращает ошибку #ЗНАЧ, если аргумент строк или столбцов меньше количества строк или столбцов в аргументе массива.
-
Excel возвращает ошибку #Н/Д в заполненных ячейках, если pad_with не указан.
-
Excel возвращает ошибку #ЧИСЛО, если массив слишком велик.
Примеры
Скопируйте образец данных из следующей таблицы и вставьте его в ячейку A1 нового листа Excel. При необходимости можно отрегулировать ширину столбцов, чтобы видеть все данные.
Измените размер массива 2X2 на массив 3X3 и заполните пустые элементы значением #N/A.
|
Данные |
|
|---|---|
|
1 |
2 |
|
3 |
4 |
|
Формулы |
|
|
=EXPAND(A2:B3;3;3) |
Измените размер массива 1X1 на массив 3X3 и заполните пустые элементы с помощью «-«.
|
Данные |
|
|---|---|
|
1 |
2 |
|
3 |
4 |
|
Формулы |
|
|
=EXPAND(A2;3;3; «-«) |
См. также
Функция TOCOL
Функция ВСТРОКУ
Функция TAKE
Функция DROP
Нужна дополнительная помощь?
Purpose
Expand array by adding rows or columns
Usage notes
The EXPAND function expands an array by adding rows and columns, which are supplied as separate arguments. The values given for rows and columns represent the dimensions of the final array, not the number of rows or columns to add.
The EXPAND function takes four arguments: array, rows, columns, and pad_with. Array is required, along with at least one value for rows or columns. Array can be a range or an array from another formula. Rows and columns must be positive numbers that are at least the same size as the given array. If not provided, both rows and columns will default to the dimensions of array.
Basic usage
To expand an array to be 5 rows by 4 columns, you can use EXPAND like this:
=EXPAND(array,5,4) // expand to 5 x 4
By default, any new cells created will be filled with #N/A errors. To expand an array to be 10 rows by 3 columns, and fill new cells with «x»:
=EXPAND(array,10,3,"x") // expand to 10 x 3, fill with "x"
Note that the numbers given for rows and columns represent final dimensions, not new rows and columns.
Default and custom padding
In the example below, we are adding 2 rows to an existing array with 5 rows. The result is an array with 7 rows. The formula in F3 is:
=EXPAND(B3:D7,7) // default padding
Notice that by default, EXPAND fills the new empty cells with the #N/A error. In the screen, the formula in F3 has been modified to provide zero (0) for the pad_with argument:
=EXPAND(B3:D7,7,,0) // pad with 0
Notice the new cells now contain zero. Also notice that because we are not providing a value for columns, we need to add another comma after rows, in order to place the zero in the right location as the pad_with argument.
Notes
- If rows is less than the row count in array, EXPAND will return a #VALUE! error.
- If columns is less than the column count in array, EXPAND will return a #VALUE! error.
The EXPAND function expands an array to the specified row and column dimensions in Excel 365. The array can also be an expression.
For example, let’s use the MAKEARRAY function to return a calculated array of specified dimensions. Then insert a blank column in between each column using EXPAND. All in one go!
This post describes how to use the EXPAND function in Excel 365 in a tricky way. Also, the real-life use of it.
As the saying goes, “There is a downhill for every uphill.” Regarding EXPAND, it’s the DROP function.
Syntax and Arguments
EXPAND Syntax (Excel 365):
=Expand(array, rows, [columns], [pad_with])Function Arguments:
array: The range to expand.
rows: The number of rows we want in the expanded array.
It must be greater than or equal to the total number of rows in the array.
columns: An optional argument for expanding the array by columns.
It’s an optional argument in the EXPAND Excel 365 function. If we omit it, the formula won’t expand any column.
pad_with: The value with which to pad. The EXPAND function in Excel 365 returns #N/A in the cells in the expanded rows or columns. The pad_with helps us to replace that with any other character.
We will start with basic formula examples for the EXPAND function in Excel 365.
1. Basic Formula
I have got the following sample data in the A1:C8 range where A2:A8 contains the names of 7 employees, and B2:C8 their present or absent data during Monday and Tuesday.
The data for Wednesday, Thursday, and Friday is yet to come. There are three more employees to add in the next three days.
In other words, it’s incomplete data. So to make the format perfect in case we want to go for a printout, we can use the EXPAND function in Excel 365 as follows.
=EXPAND(A2:C8,10,6,"-")The formula adds three rows and three columns additionally.
The number of rows present in the source is 7. So, I’ve used 10 to get three more rows.
The number of columns present is 3. So I’ve used 6 to get three additional columns.
The new cells are filled with “-” because it’s the pad_with with value.
2. EXPAND Function and Virtual Array
Does this Microsoft Excel 365 function require a physical array?
Nope! We can expand the output of SEQUENCE, MAKEARRAY, etc., with the help of the EXPAND function in Excel 365.
Let’s fill a heart symbol in a 5×5 array with the help of the following EXPAND-based formula.
=CHOOSECOLS(EXPAND(SEQUENCE(5),5,6,"💖"),SEQUENCE(1,5,2))Let’s peel it to learn, and that should start from the middle of the formula.
The SEQUENCE(5) returns the numbers 1 to 5 in a column which is the array to use for expansion within the EXPAND.
The EXPAND function expands this into a 5×6 array and pads with the heart character (symbol).
The outer CHOOSECOLS returns columns 2 to 6 (omitting the sequence number, which is the first column).
Note:- Please don’t forget to change the font color of the heart to red to get the look and feel of the image above.
3. Inserting Columns Using the EXPAND Function in Excel 365
Let’s consider the sample data, which we used under “Basic Example” above.
What about inserting blank or padded columns instead of adding them at the end of the array?
You will learn that in the real-life example below.
E2 Formula:
=CHOOSECOLS(EXPAND(A2:C8,7,6,""),TOCOL(HSTACK(SEQUENCE(3),SEQUENCE(3,1,4))))Here is the explanation of this formula.
The array has three columns. So we require to insert a total of three columns.
Using the EXPAND function, we add three blank columns at the end of the array.
=EXPAND(A2:C8,7,6,"")Now we should cut each column from the expanded part and place it after columns 1, 2, and 3.
How to make it dynamically?
What we should do is generate two sequences: One with the numbers 1, 2, and 3, which represent the first three columns, and 4, 5, and 6, which represent the last three columns.
Then stack them horizontally (HSTACK) and apply TOCOL to get the numbers 1, 4, 2, 5, 3, 6.
The following three formulas do that.
- Sequence 1, 2, and 3:
SEQUENCE(3) - Sequence 4, 5, and 6:
SEQUENCE(3,1,4) - Get the numbers 1, 4, 2, 5, 3, 6:
TOCOL(HSTACK(SEQUENCE(3),SEQUENCE(3,1,4)))
Used CHOOSECOLS to select these columns from the expanded array.
The EXPAND function increases a cell range or array by a specified number of columns and rows.
Dynamic array formula in cell B6:
=EXPAND(B2:C3, 3, 3, «-«)
The EXPAND function is available to Excel 365 users and is in the «Array manipulation» category.
Table of Contents
- EXPAND Function Syntax
- EXPAND Function Arguments
- EXPAND Function example
- EXPAND Function example — how to extend an array up and left
- EXPAND Function example — extend array dynamically
- EXPAND Function example — errors
- EXPAND Function — values in random order
1. EXPAND Function Syntax
EXPAND(array, rows, [columns], [pad_with])
Back to top
2. EXPAND Function Arguments
| array | Required. The source cell range or array. |
| rows | Required. The new number of rows. |
| [columns] | Optional. The new number of columns. |
| [pad_with] | Optional. A string to pad new array values with. Default is #N/A meaning not available. |
Back to top
3. EXPAND Function example
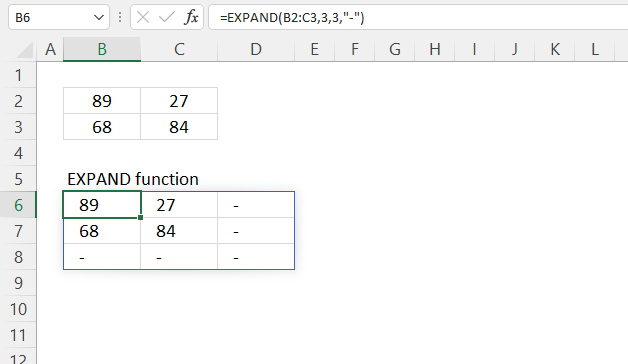
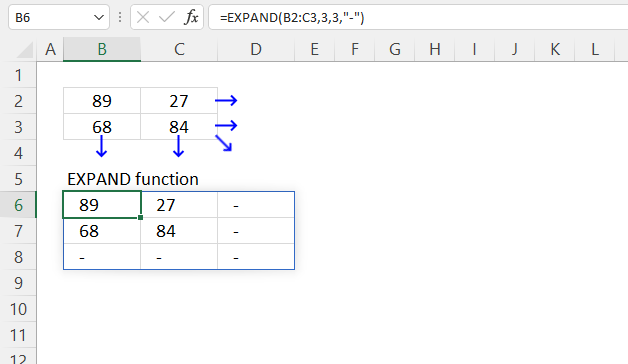
The picture above shows how the EXPAND function increases the original array from two columns and two rows to three columns and three rows.
The number of cells increases to 9 from 4 cells, 3 rows * 3 columns equals 9 cells. The new cells are padded with a minus sign.
Dynamic array formula in cell B6:
=EXPAND(B2:C3, 3, 3, «-«)
Note! If any of the values in the source range change, the values in the EXPAND function output change as well.
3.1 Explaining formula
Step 1 — EXPAND function
EXPAND(array, rows, [columns], [pad_with])
Step 2 — Populate arguments
array — B2:C3
rows — 3
[columns] — 3
[pad_with] — «-«. The double quotes are needed if a non-numeric value is used.
Step 3 — Evaluate function
EXPAND(B2:C3, 3, 3, «-«)
becomes
EXPAND({89, 27;
68, 84}, 3, 3, «-«)
and returns
{89, 27, «-«;
68, 84, «-«;
«-«, «-«, «-«}
Back to top
4. EXPAND Function example — how to extend an array up and left
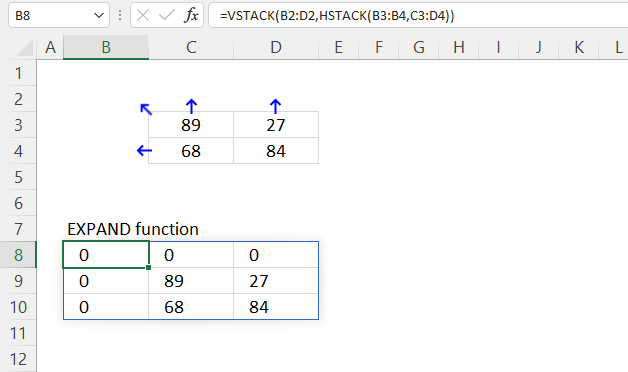
The EXPAND function lets you add more rows and columns to an array, they are, however, added to the right and below of the source array.
Use the following formula to add array containers above and to the left of the original array.
Dynamic array formula in cell B8:
=VSTACK(B2:D2, HSTACK(B3:B4, C3:D4))
Explaining formula
Step 1 — Add arrays horizontally
The HSTACK function lets you combine cell ranges or arrays, it joins data to the first blank cell to the right of a cell range or array (horizontal stacking)
HSTACK(array1, [array2],…)
HSTACK(B3:B4, C3:D4)
becomes
HSTACK({0; 0}, {89, 27; 68, 84})
and returns
{0, 89, 27; 0, 68, 84}.
Step 2 — Add arrays vertically
The VSTACK function lets you combine cell ranges or arrays, it joins data to the first blank cell at the bottom of a cell range or array (vertical stacking).
VSTACK(array1, [array2],…)
VSTACK(B2:D2, HSTACK(B3:B4, C3:D4))
becomes
VSTACK({0, 0, 0}, {0, 89, 27; 0, 68, 84})
and returns
{0, 0, 0;
0, 89, 27;
0, 68, 84}.
Back to top
5. EXPAND Function example — extend array dynamically
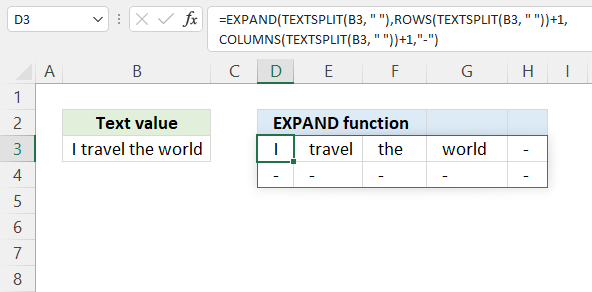
The section shows how to return dynamically resize an array meaning the array is always one row and one column larger than the source array.
Try changing the text value in cell B3 and the dynamic array formula in cell D3 adjusts accordingly.
Dynamic array formula in cell B9:
=LET(x, TEXTSPLIT(B3, » «), EXPAND(x, ROWS(x)+1, COLUMNS(x)+1, «-«))
Explaining formula
EXPAND(TEXTSPLIT(B3, » «), ROWS(TEXTSPLIT(B3, » «))+1, COLUMNS(TEXTSPLIT(B3, » «))+1, «-«)
Step 1 — Split text
The TEXTSPLIT function lets you split a string into an array across columns and rows based on delimiting characters.
TEXTSPLIT(Input_Text, col_delimiter, [row_delimiter], [Ignore_Empty])
TEXTSPLIT(B3, » «)
Step 2 — Calculate rows in array and add 1
The ROWS function calculates the number of rows in a given cell range or array.
ROWS(array)
ROWS(TEXTSPLIT(B3, » «))+1
Step 3 — Calculate columns in array and add 1
The COLUMNS function calculates the number of columns in a given cell range or array.
COLUMNS(array)
COLUMNS(TEXTSPLIT(B3, » «))+1
Step 4 — Expand array one row and one column
EXPAND(TEXTSPLIT(B3, » «), ROWS(TEXTSPLIT(B3, » «))+1, COLUMNS(TEXTSPLIT(B3, » «))+1, «-«)
becomes
EXPAND({«I», «travel», «the», «world»}, 1+1, 4+1, «-«)
and returns
{«I», «travel», «the», «world», «-«;
«-«, «-«, «-«, «-«, «-«}
Step 5 — Shorten the formula
The LET function lets you name intermediate calculation results which can shorten formulas considerably and improve performance.
LET(name1, name_value1, calculation_or_name2, [name_value2, calculation_or_name3…])
TEXTSPLIT(B3, » «) is repeated three times.
EXPAND(TEXTSPLIT(B3, » «), ROWS(TEXTSPLIT(B3, » «))+1, COLUMNS(TEXTSPLIT(B3, » «))+1, «-«)
becomes
LET(x, TEXTSPLIT(B3, » «),EXPAND(x,ROWS(x)+1,COLUMNS(x)+1,»-«))
Back to top
6. EXPAND function error
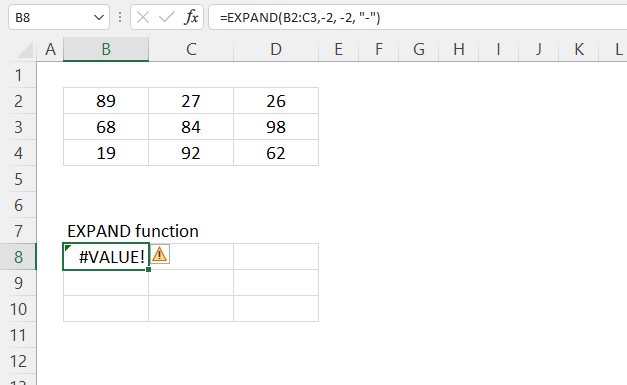
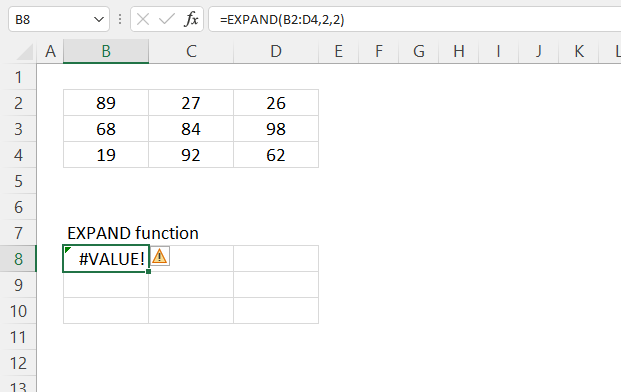
The EXPAND function returns a #VALUE! error if a negative number is used in the second or third argument.
Numbers smaller than the actual array size also return a #VALUE! error. Cell range B2:D4 has three rows and three columns.
Back to top
7. EXPAND function — values in random order
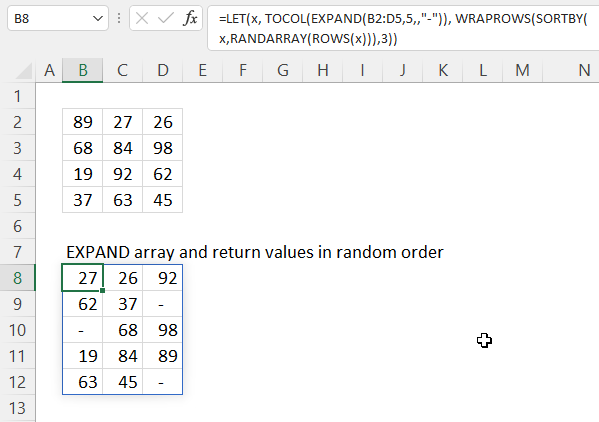
The image above demonstrates a formula that adds an additional row to cell range B2:D5 and the returns values in random order.
Dynamic array formula in cell B8:
=LET(x, TOCOL(EXPAND(B2:D5, 5, , «-«)), WRAPROWS(SORTBY(x, RANDARRAY(ROWS(x))), 3))
8.1 Explaining formula in cell B8
WRAPROWS(SORTBY(TOCOL(EXPAND(B2:D5,5,,»-«)),RANDARRAY(ROWS(TOCOL(EXPAND(B2:D5,5,,»-«))))),3)
Step 1 — Expand array with an extra row
EXPAND(B2:D5,5,,»-«)
becomes
EXPAND({89, 27, 26;68, 84, 98;19, 92, 62;37, 63, 45}, 5, , «-«)
and returns
{89, 27, 26;
68, 84, 98;
19, 92, 62;
37, 63, 45;
«-«, «-«, «-«}
Step 2 — Rearrange values into a single column
The TOCOL function rearranges values from a 2D cell range or array to a single column.
TOCOL(array, [ignore], [scan_by_col])
TOCOL(EXPAND(B2:D5,5,,»-«))
becomes
TOCOL({89, 27, 26;
68, 84, 98;
19, 92, 62;
37, 63, 45;
«-«, «-«, «-«})
and returns
{89; 27; 26; 68; 84; 98; 19; 92; 62; 37; 63; 45; «-«; «-«; «-«}
The semicolon is a row delimiting character, your computer may use an other row delimiting character.
Step 3 — Count cells
The ROWS function returns the number of columns in a given cell range or array.
ROWS(array)
ROWS(TOCOL(EXPAND(B2:D5,5,,»-«)))
becomes
ROWS({89; 27; 26; 68; 84; 98; 19; 92; 62; 37; 63; 45; «-«; «-«; «-«})
and returns 15.
Step 4 — Create random cells
The RANDARRAY function returns a table of random numbers across rows and columns.
RANDARRAY([rows], [columns], [min], [max], [whole_number])
RANDARRAY(ROWS(TOCOL(EXPAND(B2:D5, 5, , «-«)))))
becomes
RANDARRAY(15)
and returns
{0.215398134613085, 0.390607168196479, … ,0.83231474462401}.
Step 6 — Rearrange values in random order
The SORTBY function allows you to sort values from a cell range or array based on a corresponding cell range or array.
SORTBY(array, by_array1, [sort_order1], [by_array2, sort_order2],…)
SORTBY(TOCOL(EXPAND(B2:D5, 5, , «-«)), RANDARRAY(ROWS(TOCOL(EXPAND(B2:D5, 5, , «-«)))))
becomes
SORTBY({89; 27; 26; 68; 84; 98; 19; 92; 62; 37; 63; 45; «-«; «-«; «-«}, {0.215398134613085, 0.390607168196479, … ,0.83231474462401})
and returns
{«-«; «-«; 84; 62; 89; 92; 98; 37; 63; «-«; 26; 27; 45; 68; 19}.
Step 7 — Rearrange values to the original array size
The WRAPROWS function rearranges values from a single row to a 2D cell range based on a given number of values per row.
WRAPROWS(vector, wrap_count, [pad_with])
WRAPROWS(SORTBY(TOCOL(EXPAND(B2:D5,5,,»-«)),RANDARRAY(ROWS(TOCOL(EXPAND(B2:D5,5,,»-«))))),3)
becomes
WRAPROWS({«-«; «-«; 84; 62; 89; 92; 98; 37; 63; «-«; 26; 27; 45; 68; 19},3)
and returns
{84,92,»-«;
«-«,68,63;
27,37,19;
45,62,»-«;
98,89,26}
Step 8 — Shorten formula
The LET function lets you name intermediate calculation results which can shorten formulas considerably and improve performance.
LET(name1, name_value1, calculation_or_name2, [name_value2, calculation_or_name3…])
WRAPROWS(SORTBY(TOCOL(EXPAND(B2:D5,5,,»-«)),RANDARRAY(ROWS(TOCOL(EXPAND(B2:D5,5,,»-«))))),3)
becomes
LET(x, TOCOL(EXPAND(B2:D5, 5, , «-«)), WRAPROWS(SORTBY(x, RANDARRAY(ROWS(x))), 3))
Back to top
The following article has a formula that contains the EXPAND function.
The EXPAND function function is one of many functions in the ‘Array manipulation’ category.
Описание
Excel EXPAND Функция расширяет или дополняет массив до заданного количества измерений строк и столбцов на основе заданных аргументов строк и столбцов.
Синтаксис формулы
РАСШИРЯТЬ(массив,строки,[столбцы],[pad_with])
аргументы
- array: требуется, массив или диапазон, который вы хотите расширить.
- rows: требуется, но может быть пустым, целое число, количество строк, которые необходимо расширить массиву. Если отсутствует, массив возвращает количество своих строк.
- columns: необязательный, целое число, количество столбцов, которые необходимо расширить массиву. Если отсутствует, массив возвращает количество своих столбцов.
- pad_with: необязательный, значение для заполнения. По умолчанию #Н/Д.
Условия возврата товара
Функция EXPAND возвращает расширенный массив.
ошибки
- Если количество строк или столбцов аргумента меньше, чем количество строк или столбцов массива, функция РАСШИРИТЬ возвращает #ЗНАЧ! значение ошибки.
- Если массив слишком велик, функция РАСШИРИТЬ возвращает #ЧИСЛО! значение ошибки.
Замечания
- Если аргумент rows не указан или пуст, значением по умолчанию является количество строк массива.
- Если аргумент столбцов не указан или пуст, значением по умолчанию является количество столбцов массива.
- Если значение pad_with является текстом, вам нужно использовать в формуле текст, округленный двойными кавычками, например «текст», если значение pad_with является числовым значением, используйте его напрямую.
Версии
Функция EXPAND доступна только в Windows: 2203 (сборка 15104) и Mac: 16.60 (220304).
Использование и примеры
Чтобы расширить массив в диапазоне A1:C5 до 5 строк и 4 столбцов, выберите ячейку и используйте следующую формулу:/p>
=EXPAND(A1:C5,5,4)
Нажмите Enter .
Если вы хотите расширить массив и дополнить его указанным текстом, например «пустым», используйте следующую формулу:
=EXPAND(A1:C5,5,4,»blank»)
Другие функции:
-
Excel CHOOSECOLS Функция
Функция Excel CHOOSECOLS возвращает указанные столбцы в массиве или диапазоне.
-
Excel CHOOSEROWS/span> Function
Функция COLUMN возвращает номер столбца, в котором появляется формула, или возвращает номер столбца данной ссылки.
-
Excel DROP Функция
Функция Excel DROP возвращает определенные строки или столбцы из массива на основе заданного числа, которое обычно используется для получения содержимого таблицы, за исключением верхнего и нижнего колонтитула.
-
Excel LOOKUP Функция
Функция ПРОСМОТР находит определенное значение в диапазоне одного столбца или одной строки и возвращает соответствующее значение из другого диапазона (одной строки или одного столбца).
Лучшие инструменты для работы в офисе
Kutools for Excel — Помогает вам выделиться из толпы
Хотите быстро и качественно выполнять свою повседневную работу? Kutools for Excel предлагает 300 мощных расширенных функций (объединение книг, суммирование по цвету, разделение содержимого ячеек, преобразование даты и т. д.) и экономит для вас 80 % времени.
- Разработан для 1500 рабочих сценариев, помогает решить 80% проблем с Excel.
- Уменьшите количество нажатий на клавиатуру и мышь каждый день, избавьтесь от усталости глаз и рук.
- Станьте экспертом по Excel за 3 минуты. Больше не нужно запоминать какие-либо болезненные формулы и коды VBA.
- 30-дневная неограниченная бесплатная пробная версия. 60-дневная гарантия возврата денег. Бесплатное обновление и поддержка 2 года.
Вкладка Office — включение чтения и редактирования с вкладками в Microsoft Office (включая Excel)
- Одна секунда для переключения между десятками открытых документов!
- Уменьшите количество щелчков мышью на сотни каждый день, попрощайтесь с рукой мыши.
- Повышает вашу продуктивность на 50% при просмотре и редактировании нескольких документов.
- Добавляет эффективные вкладки в Office (включая Excel), точно так же, как Chrome, Firefox и новый Internet Explorer.
Комментарии (0)
Оценок пока нет. Оцените первым!


