Excel for Microsoft 365 Excel 2021 Excel 2019 Excel 2016 Excel 2013 Excel 2010 Excel 2007 More…Less
Functions are predefined formulas that perform calculations by using specific values, called arguments, in a particular order, or structure. Functions can be used to perform simple or complex calculations. You can find all of Excel’s functions on the Formulas tab on the Ribbon:
-
Excel function syntax
The following example of the ROUND function rounding off a number in cell A10 illustrates a function’s syntax.
1. Structure. The structure of a function begins with an equal sign (=), followed by the function name, an opening parenthesis, the arguments for the function separated by commas, and a closing parenthesis.
2. Function name. For a list of available functions, click a cell and press SHIFT+F3, which will launch the Insert Function dialog.
3. Arguments. Arguments can be numbers, text, logical values such as TRUE or FALSE, arrays, error values such as #N/A, or cell references. The argument you designate must produce a valid value for that argument. Arguments can also be constants, formulas, or other functions.
4. Argument tooltip. A tooltip with the syntax and arguments appears as you type the function. For example, type =ROUND( and the tooltip appears. Tooltips appear only for built-in functions.
Note: You don’t need to type functions in all caps, like =ROUND, as Excel will automatically capitalize the function name for you once you press enter. If you misspell a function name, like =SUME(A1:A10) instead of =SUM(A1:A10), then Excel will return a #NAME? error.
-
Entering Excel functions
When you create a formula that contains a function, you can use the Insert Function dialog box to help you enter worksheet functions. Once you select a function from the Insert Function dialog Excel will launch a function wizard, which displays the name of the function, each of its arguments, a description of the function and each argument, the current result of the function, and the current result of the entire formula.
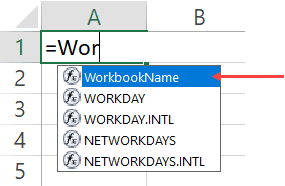
To make it easier to create and edit formulas and minimize typing and syntax errors, use Formula AutoComplete. After you type an = (equal sign) and beginning letters of a function, Excel displays a dynamic drop-down list of valid functions, arguments, and names that match those letters. You can then select one from the drop-down list and Excel will enter it for you.
-
Nesting Excel functions
In certain cases, you may need to use a function as one of the arguments of another function. For example, the following formula uses a nested AVERAGE function and compares the result with the value 50.
1. The AVERAGE and SUM functions are nested within the IF function.
Valid returns When a nested function is used as an argument, the nested function must return the same type of value that the argument uses. For example, if the argument returns a TRUE or FALSE value, the nested function must return a TRUE or FALSE value. If the function doesn’t, Excel displays a #VALUE! error value.
Nesting level limits A formula can contain up to seven levels of nested functions. When one function (we’ll call this Function B) is used as an argument in another function (we’ll call this Function A), Function B acts as a second-level function. For example, the AVERAGE function and the SUM function are both second-level functions if they are used as arguments of the IF function. A function nested within the nested AVERAGE function is then a third-level function, and so on.
Need more help?

This is hardly surprising. After all, Excel has hundreds of built-in functions.
The variety, in terms of uses and complexity, is quite remarkable. Excel seems to have a function for everything.
But…
Is this really the case?
And…
Even assuming that there is a function for everything, is relying solely on Excel’s built-in functions the most productive way to work?
If these type of questions have ever crossed your mind, and you’ve ever wondered how you can create new functions in Excel, I’m sure you’ll find this tutorial interesting.
On the other hand, you may think that with all the functions that are available in Excel, there is absolutely no need to create new functions. If that is the case, I’m confident that you’ll still find useful information in this blog post. Additionally, I believe that the information within it may just change your opinion.
The reason why I believe that, regardless of your opinion about the need to create new functions in Excel, you’ll find this Excel tutorial interesting is that, indeed, it explains how to you can create your own custom functions (technically called VBA Function procedures). And, just in case you believe this is unnecessary, this guide also provides strong reasons why you should consider creating and using these custom VBA functions.
The main purpose of this tutorial is to introduce to you Excel VBA Function procedures, also known as custom functions, User-Defined Functions or UDFs. More precisely, after reading this Excel tutorial on Excel VBA Function procedures, you’ll know the most relevant aspects regarding the following topics:
Where relevant, every concept and explanation is illustrated with the help of a basic example.
This Excel VBA Function Procedures Tutorial is accompanied by an Excel workbook containing these examples. You can get immediate free access to this example workbook by subscribing to the Power Spreadsheets Newsletter.
Let’s start by understanding, more precisely…
What Is A Procedure: Excel VBA Function Procedures Vs. VBA Sub Procedures
In general terms, a procedure is the part of a computer program that performs a particular task or action. If you’re working with Excel’s Visual Basic Editor, a procedure is the block of statements enclosed by a declaration statement and an End declaration.
When working with Visual Basic for Applications, you’ll constantly encounter 2 types of procedures:
- Sub procedures, which carry out one or more actions in Excel.
- Sub procedures don’t require arguments and don’t return data. You’ll see below that Function procedures do both of these.
- Function procedures, which carry out a calculation and return a value (can be a number or a string) or array.
- Function procedures are passive: they generally don’t carry out any actions. There is, however, at least one exception to this rule: It is possible to change the text in a cell comment using Function procedures.
- There are other methods that, when used in a VBA function, can also make changes to a workbook. Additionally, Function procedures that aren’t used in worksheet formulas can do pretty much the same as a regular Sub procedure.
In practice, you’re likely to (mostly) work with Sub procedures. In other words: Most of the procedures you’ll create will (likely) be Sub procedures.
The reason for this is that most macros are small/brief automations. As a consequence, most macros are self-contained Sub procedures.
The fact that most macros are self-contained Sub procedures used to carry out relatively simple jobs shouldn’t stop you from creating more complex and sophisticated macros when required.
As you’ll see in this Excel tutorial, VBA Function procedures can play a key role when creating complex and sophisticated macros. Therefore, let’s take a closer look at…
What Is An Excel VBA Function Procedure
Even if you’re not very familiar with Excel, you’re probably familiar with the concept of functions.
The reason for this is that, even if you’ve never used Visual Basic for Applications, you’ve probably worked quite a bit with worksheet functions. These are the functions that you use every time you create a formula in an Excel worksheet and, as a side-note, you can also use them in VBA.
Some examples of worksheet functions are SUM, IF, IFERROR and VLOOKUP function.
Worksheet functions work very similarly to Excel VBA Function procedures. Worksheet functions (generally) proceed as follows:
- Step #1: They generally take one or more arguments. There are some exceptions to this rule, as some functions such as TRUE and FALSE take no arguments.
- Step #2: The functions carry out a particular calculation.
- Step #3: Finally, a value is returned.
Excel VBA Function procedures do exactly the same thing. In other words, VBA functions take arguments and return values.
VBA Function procedures are very versatile. You can use them both when working with Visual Basic for Applications or directly in an Excel worksheet formula. I explain both ways of executing a VBA Function procedure below.
If Excel VBA Function procedures function similarly to regular worksheet functions, you may wonder…
Why Create And Use Excel VBA Function Procedures?
Excel has hundreds of functions. These functions carry out a huge range of calculations, some more useful than others.
Considering the huge amount of available worksheet functions, you may wonder whether you should take the time to learn how to create additional functions using Visual Basic for Applications.
I hope that, after reading this Excel tutorial and getting an idea about what Excel VBA Function procedures can do for you, you’ll agree with me that it makes sense to learn about this tool and use it when appropriate. The reason is that VBA Function procedures allow you to simplify your work. More precisely: User-Defined Functions (Function procedures) are useful when working with both:
- Worksheet formulas; and
- VBA procedures.
The following are some of the advantages of using Excel VBA Function procedures:
- VBA Function procedures can help you shorten your formulas. Shorter formulas are easier to read and understand. More generally, they are easier to work with.
- When creating applications, custom functions may help you reduce duplicated code. Among other advantages, this helps you minimize errors.
- When using VBA functions, you can write functions that perform operations that would (otherwise) be impossible.
The simplicity of of Excel VBA Function procedures (once they’re created) is illustrated by the fact that, once the User-Defined Function (Function procedure) has been created, a regular user (only) needs to know the function’s:
- Name; and
- Arguments.
VBA Function procedures can be extremely helpful when creating large and complex VBA projects. The reason for this is that, when working in large projects, you’ll usually create a structure involving multiple procedures (both Sub and Function procedures).
Since VBA Functions take incoming data (arguments) and return other data (values that result from calculations), they’re very useful for purposes of helping different procedures communicate between themselves. In other words, one of the strongest reasons why you should create and use VBA Function procedures is for purposes of improving your VBA coding skills in general. Appropriately working with Function procedures and Sub procedures becomes increasingly important as the size and complexity of your VBA Applications increases.
More precisely, when creating large and complex projects, you can take advantage of the ability of VBA functions to return a value. You can (usually) do this by assigning the name of the Excel VBA Function procedure to a variable in the section of the procedure where you call the function.
I explain how to call VBA Function procedures from other procedures further below.
Basic Syntax Of An Excel VBA Function Procedure
When working with VBA Sub procedures you can, up to a certain extent, rely on Excel’s macro recorder. This allows you to create basic macros by simply carrying out and recording the actions you want the macro to record and store.
When working with Excel VBA Function procedures, you can’t use the macro recorder. In other words, you must always enter the relevant VBA code.
The macro recorder may, however, be a helpful tool for purposes of finding properties (which I explain this blog post) and methods (which I cover here) that you may want to use in the Function procedure you’re creating.
The basic elements of an Excel VBA Function procedure are the following:
- It always begins with the Function keyword.
- It always ends with the End Function statement.
- Between the declaration and End statements, it contains the relevant block of statements with instructions.
As an example, let’s take the following very simple Excel VBA Function procedure (called Squared), which simply squares a certain number which is given to it as an argument.
In practice, you’ll be working with much more complex VBA Function procedures. However, this basic function is enough for the purposes of this Excel tutorial and allows us to focus in understanding the concepts that will later allow you to build much more complicated Function procedures.
Let’s take a closer look at the first element of the sample Excel VBA Function above:
Declaration Statement Of An Excel VBA Function Procedure
As you can see in the example above, the first statement is composed of 3 items:
- The Function keyword, which declares the beginning of the VBA Function procedure.
- The name of the VBA Function procedure which, in this example, is “Squared”.
- The arguments taken by the VBA function, enclosed by parentheses. In the example above, the Squared function takes only 1 argument: number.
- If the VBA Function procedure that you’re creating takes several arguments, use a comma (,) to separate them.
- If you’re creating a function that takes no arguments, leave the parentheses empty. Note that you must always have the parentheses, even if they are empty.
- I explain the concept of arguments, in the context of Excel VBA Function procedures, in more detail below.
How To Name Excel VBA Function Procedures
The name of the VBA Function procedure appears in the declaration statement itself, as shown above.
As a general rule, Function procedure names must follow the sale rules as variable names. These rules are substantially the same as those that apply to naming naming VBA Sub procedures and, more generally, to most items or elements within the Visual Basic for Applications environment.
The following are the main rules when naming variables:
- Names must start with letters.
- As long as the name complies with the above, they can also include numbers and certain (not all) punctuation characters. For example, underscore (_) is commonly used.
- The maximum number of characters a name can have is 255.
- Names can’t be the same as any of Excel’s key words, such as “Sheet”.
- No spaces are allowed. In other words, names must be a “continuous string of characters only”.
The following are common additional suggestions for naming your VBA Function procedures:
- Don’t use function names that match a cell reference or a named range, such as A1.
- If you do this, you can’t use that particular VBA function in a worksheet formula. If you try to do it, Excel displays the #REF! error.
- Don’t use VBA Function procedure names that are the same as that of a built-in function, such as SUM.
- This causes a name conflict between functions. In such cases, Excel uses the built-in function instead of the VBA function.
You may have noticed that the names of Excel’s built-in functions are always in uppercase, such as SUM, IFERROR or AND. Some VBA users like to use uppercase names, so that they match Excel’s style. This is (however) not mandatory.
For example, I have not applied this same formatting rule in the examples that appear in this Excel tutorial, where the sample VBA functions are called “Squared”, “Squared_Sign”, “Squared_Sign_2” and “Squared_Sign”.
How To Tell An Excel VBA Function Procedure Which Value To Return
The sample Excel VBA Function above only contains one statement between the declaration statement and the End declaration statement: “Squared = number ^ 2”.
This statement simply takes a number, squares it (elevates it to the power of 2), and assigns the resulting value to the variable Squared. You’ll notice that “Squared” is also the name of this Excel VBA Function procedure.
The reason for the name of the variable matching the name of the function is that this is how you tell an Excel VBA Function procedure which value to return. You specify the value to return by assigning that value to the function’s (Function procedure’s) name.
In other words, in these cases, the name of the function also acts as a variable. Therefore, when working with Function procedures, you’ll constantly encounter the name of the function being used as the name of a variable within the Function procedure itself. You must (as a general rule) assign a value to the Function procedure’s name one time (as a minimum).
You may see this clearer when dividing the process followed by a VBA function in the following 3 steps:
- Step #1: The function carries out the relevant calculations.
- Step #2: The VBA function assigns the obtained results to its own name.
- Step #3: Once the function ends, it returns the results.
Therefore, when creating Excel VBA Function procedures, you want to ensure that the condition above is complied with. In other words, make sure that, somewhere in the main body of the VBA code, the correct value is assigned to the variable that corresponds to the function name. In the example above, the only statement of the function assigns a value to the Squared variable.
Once an Excel VBA Function procedure has carried out any intermediate calculations, it returns the final value of the variable whose name is the same as the function’s name.
In the example above, the name of the function and returned variable is “Squared”. Therefore, once the VBA Function procedure carries out the required calculations, it returns the final value of the variable Squared.
Arguments Within Excel VBA Function Procedures
Arguments are the information or data that a function uses as input to carry out calculations.
When working with Excel VBA Function procedures you’ll usually encounter arguments in the following 2 situations:
- Situation #1: When declaring an Excel VBA Function procedure, you always include a set of parentheses. This is where you include the arguments taken by the function. If the function takes no arguments at all, you leave the parentheses empty.
- The Squared VBA Function used as an example above takes only 1 argument: number.
- The Squared VBA Function used as an example above takes only 1 argument: number.
- Situation #2: When executing the VBA Function procedure, you’ll usually (although not always) enter the arguments that the function must use to carry out its calculations.
- You can see how to execute an Excel VBA Function procedure, and enter the relevant arguments, below.
The following is a list of important points to bear in mind when working with both regular worksheet functions and VBA Function procedures.
- There are several ways in which a function can receive arguments. You can use any of the following as formula arguments:
- #1: Cell references.
- #2: Variables, including arrays.
- #3: Constants.
- #4: Literal values.
- #5: Expressions.
- The number of arguments vary from function to function.
- There are functions that have absolutely no arguments, such as TRUE and FALSE.
- On the other hand, there are functions that can take a very large number of arguments. For example, functions such as AND or OR can take up to 255 arguments. This leads me to the last point…
- Arguments can be either required or optional. The number of required or optional arguments varies between functions.
- Some functions have only a fixed number of required arguments. For example, the IF function has 3 required arguments.
- Other functions combine required and optional arguments. Examples of such functions are LEFT and RIGHT, which you can use to find what the first (LEFT) or last (RIGHT) characters in a text string are.
After seeing this last point, you may now be wondering…
How To Create Excel VBA Function Procedures With Optional Arguments
You already know how to declare the arguments of an Excel VBA Function procedure by listing them within parentheses when you declare the function.
Arguments are mandatory by default. If, when calling a VBA function, you forget to input them, the function won’t be executed.
In the case of the Excel VBA Function procedure Squared, which I’ve used as an example above, the argument number is required.
In order to make an argument optional, you need to list it differently. More precisely, optional arguments are:
- Preceded by the Optional keyword. This allows Excel to understand that the particular argument is optional.
- Ideally, although not required, followed by an equal sign and the default value for the optional argument. This determines the value that the Excel VBA Function procedure uses if the optional argument is not passed on to the function.
- The default value can be a string, a constant or a constant expression.
- Always last in the list of arguments within the parentheses. Once you use the Optional keyword, all the arguments that follow it must also be optional.
Let’s take a look at an example:
When squaring a number (even if the number is negative), the result is a non-negative number. For example, you can square both –10 or 10 and, in both cases, the result is 100.
Let’s assume that, in some situations, you need a negative number. In other words, you’d like to have the ability to ask Excel to return a non-positive number, such as –100 instead of 100 (when squaring –10 or 10).
For these purposes, you can use an Excel VBA Function procedure such as the following, called “Squared_Sign”:
The VBA code of Squared_Sign shares many items that are also in code for the simpler Squared VBA Function procedure.
In fact, all of the items that appear in the VBA code of Squared also appear in the code of Squared_Sign. Take a look at the following image, which underlines them:
You already know what each of these items does. When put together, the sections that are underlined above simply take the argument (number) and square it.
There are only 2 new elements that have been added to the Squared_Sign function, as compared to the original Squared VBA Function procedure. These are the ones that give users the option to ask Excel to return a non-positive number by using an optional argument. Let’s take a closer look at them:
An alternative, although slightly more advanced, approach to the above situation involves using the IsMissing function.
The IsMissing function is particularly helpful for purposes of testing whether an optional argument has been given. In other words, IsMissing returns a logical value that indicates whether a particular Variant argument has been passed to the relevant procedure. More precisely:
- If no value is passed to IsMissing, it returns True.
- Otherwise, IsMissing returns False.
The VBA Function procedure (called Squared_Sign_2) that appears in the image below uses the IsMissing function to proceed as follows:
- Step #1: If the second argument (called negative) is False or missing, IsMissing sets the value of “negative” to its default value of False.
- If negative is False, the function returns a positive number. This is the same result obtained with the Squared VBA function.
- Step #2: If the argument called negative is True, the Squared_Sign_2 VBA function returns a negative number.
How To Create Excel VBA Function Procedures With An Indefinite Number Of Arguments
There are some built-in functions that can take an “indefinite” number of arguments.
By “indefinite”, I mean up to 255.
One example of a built-in function that accepts an indefinite number of arguments in Excel is SUM. Take a look at the following screenshot of how this looks like in the Function Arguments dialog:
You can also create VBA Function procedures that take an unlimited number (meaning up to 255) arguments. You do this as follows:
- Use an array as the last or only argument in the list of arguments that you include in the declaration statement of the VBA function.
- Use the ParamArray keyword prior to that final (or only) array argument.
When used in the context of a VBA Function procedure, ParamArray indicates that the final argument of that function is an “optional array of Variant elements”.
You can’t use ParamArray alongside other optional keywords in the argument list of a VBA Function, such as Optional, ByVal or ByRef. Therefore, you can’t use both Optional and ParamArray in the same function.
Let’s see how ParamArray works in practice by creating a function that proceeds as follows:
- Step #1: Squares (elevates to the power of 2) a particular number. This is what the (less complex) Squared VBA Function achieves.
- Step #2: Sums the squared numbers.
The following VBA Function procedure (called “Squared_Sum”) is a relatively simple way of achieving this. Notice how the arguments are declared as an optional array of elements of the Variant data type.
This Excel VBA Function procedure isn’t particularly flexible. For example, it fails if you use a range of cells as argument and 1 of the cells contains a string (instead of a number).
However, for our purposes, Squared_Sum gets the job done. It particularly illustrates how you can use the ParamArray keyword to create VBA functions with an unlimited number of arguments.
In order to test that the Squared_Sum function works as planned, I have created an array listing the integers from 1 to 100 and applied Squared_Sum to it.
In order to confirm that the result returned by Squared_Sum is correct, I manually (i) squared each of the numbers in the array and (ii) added those squared values. Check out the 2 screenshots below showing how I set up this control:
As shown in the image below, the results returned by both methods are exactly the same.
The Squared_Sum VBA function is, however, easier and faster to implement than carrying out the calculations manually or creating long and complicated nested formulas.
This Excel VBA Function Procedures Tutorial is accompanied by an Excel workbook containing the data and procedures I use in the examples above. You can get immediate free access to this example workbook by subscribing to the Power Spreadsheets Newsletter.
Other Optional Items For An Excel VBA Function Procedure
The syntax described in the sections above outlines and illustrates the basic items you should include in the VBA code of a Function procedure.
Below is a much more comprehensive syntax for declaring functions, by including all its optional elements. Let’s take a look at it:
[Public | Private] [Static] Function name ([arglist]) [As type]
    [instructions]
    [name = expression]
    [Exit function]
    [instructions]
    [name = expression]
End Function
Notice that this structure shares many elements in common with that of a Sub procedure.
Let’s take a look at the optional elements (within brackets [ ]) that appear in the structure above.
Element #1: [Public | Private]
Private and Public are access modifiers and determine the scope of the VBA Function procedure. This means that the access modifiers are used to determine if there are any access restrictions in place.
In more practical terms, this is important because the scope of a function is what determines whether that particular VBA function can be called by VBA procedures that are stored in other modules or worksheets.
More precisely:
- Public Function procedures have no access restrictions. As a consequence, they can generally be accessed by all other VBA procedures in any module within any active Excel VBA project.
- Public is the default scope of VBA functions.
- Despite the above, Excel VBA Function procedures within a module that uses the Option Private statement, are not accessible from outside the relevant project.
- Private Function procedures are restricted. Therefore, only other VBA procedures within the same module can access them.
- Additionally, Private functions are not listed in Excel’s Insert Function dialog, which is one of the ways of calling an Excel VBA Function procedure. Knowing this is useful if you’re creating VBA functions that are designed to be called only by a Sub procedure. In that case, you can declare the relevant function as Private to reduce the probability of a user using such a function in a worksheet formula.
- Declaring an Excel VBA Function procedure as Private doesn’t fully prevent that function from being used in a worksheet formula. It simply prevents the display of the relevant function in the Insert Function dialog. I explain how you can call a VBA function using a worksheet formula below.
Element #2: [Static]
If you use the Static statement, any variables declared within the VBA Function procedure retain their values “as long as the code is running”. In other words, the values of any variables declared within the function are preserved between calls of the function.
Element #3: [arglist]
I explain the concept of arguments above.
Even though arguments are optional, meaning that you can have an Excel VBA Function procedure that takes no arguments, the set of parentheses after the Function name isn’t optional. You must always have the set of parentheses.
Element #4: [As type]
The As keyword, when combined with the Type statement, is used to determine which data type the VBA Function procedure returns.
Even though this item is optional, it’s (also) commonly recommended.
Element #5: [instructions]
Instructions are the VBA instructions that determine the calculations to be carried out by the Excel VBA Function procedure.
I mention these above as, generally, most Excel VBA Functions include some instructions.
Element #6: [name = expression]
This element makes reference to the fact that a correct value must be assigned to the variable that corresponds to the function name at least 1 time. This happens, generally, when execution of the instructions is completed.
An easy way to ensure that you’re meeting this condition is to follow the syntax “name = expression”, where:
- “name” is the name of the Excel VBA Function procedure.
- The name is followed by an equal (=) sign.
- “expression” is the value that the function should return.
Despite the above, this item is technically optional.
This topic is further explained above, where I explain how the value that a VBA function returns is determined.
Element #7: [Exit Function]
The Exit Function statement immediately exits the Function procedure.
Where To Store Excel VBA Function Procedures
There are 2 separate points that you may want to consider when storing an Excel VBA Function procedure. Let’s take a look at them:
Point #1: Always Store Excel VBA Function Procedures In Standard Modules
VBA code is generally stored in a module.
There are, however, a few different types of modules. If you put your VBA code in the wrong module, Excel isn’t able to find it or execute it.
Excel VBA Function procedures should always be stored in a standard module.
Make sure that you don’t store your Function procedures in other type of modules. If you fail to store your functions in a standard module, those formulas return the #NAME? error when executed.
The reason for this is that, when you enter a VBA Function procedure in another module, Excel doesn’t recognize that you’re creating a new VBA function.
You can refer to The Beginners Guide to Excel’s Visual Basic Editor, to see how you can insert and remove VBA modules.
As long as you meet the requirement of storing your VBA functions in standard modules, you can store several VBA Function procedures in a single module.
Point #2: Suggestions To Determine Where To Store Excel VBA Function Procedures
Consider the following guidelines to decide where to store VBA Function procedures:
- If the particular VBA function is only for your use, and won’t be used in another computer, store it in your personal macro workbook: Personal.xlsb.
- The personal macro workbook is a special type of workbook where you can store macros that are generally available when you use Excel in the same computer. This is the case, even if you’re not working on the same workbook in which you created the macro.
- If you need to distribute an Excel workbook that contains a VBA function to several people, store the function in that workbook.
- If you need to create several workbooks that use the same VBA Function procedure, and you’ll be distributing the workbooks to many people, store the function in a template.
- If you’ll be sharing a workbook with a VBA function among a determined group of people, use an add-in.
- You may also want to consider using an add-in for storing functions that you use constantly. The following are the 2 (main) advantages of using add-ins for these purposes:
- Advantage #1: Once the add-in is installed, you can use the functions in any Excel workbook.
- Advantage #2: You can, slightly, simplify your formulas whenever you’re using VBA functions that aren’t stored in the same Excel workbook you’re working in. The reason for this is that you avoid the need of having to tell Excel where is the VBA function by providing a filename qualifier. I explain the topic of such references in detail below.
- Using a add-ins, however, also carry some disadvantages. The more important disadvantage is that your Excel workbooks become dependent on the add-in file. Therefore, whenever you share a workbook that uses a VBA function stored in an add-in, you also need to share the relevant add-in.
- You may also want to consider using an add-in for storing functions that you use constantly. The following are the 2 (main) advantages of using add-ins for these purposes:
VBA Data Types And Excel VBA Function Procedures
I explain why learning and understanding the different VBA data types is important here.
At the most basic level, data types determine the way in which data is stored in the memory of a computer.
An inadequate choice or use of VBA data types usually results in an inefficient use of the memory. This inefficient use may have different effects in practice, with the most common being a slower execution of the VBA applications where data types are chosen or used incorrectly.
In the context of Excel VBA Function procedures, VBA data types are important in 2 scenarios:
- Scenario #1: An Excel VBA Function procedure can return different types of data types. You can choose which particular VBA data type is returned by a Function procedure.
- You can find an explanation of how to use the As keyword and Type statement for purposes of setting the appropriate data type above.
- You should generally make use of this option and explicitly determine the data type returned by any function.
- Scenario #2: When declaring arguments for an Excel VBA Function, you can also use the As keyword and Type statement for purposes of determining its data type.
- Some advanced VBA user argue that specifying the data type is always a good idea because it helps you conserve memory and, mainly, helps you avoid errors caused by other procedures passing the incorrect type of information to a function.
- It goes without saying that you should ensure that the data type of the argument matches the data type expected by the relevant procedure.
How To Execute An Excel VBA Function Procedure
I explain 9 ways in which you can execute a VBA Sub procedure here. The options to execute, run or call an Excel VBA Function procedure are much more restricted. In particular, you can’t execute an Excel VBA Function procedure directly by using the same methods you can use to execute a VBA Sub procedure, such as using the Macro dialog, a keyboard shortcut, or a button or other object.
You can generally only execute a Function procedure in the following 3 (broad) ways:
- Option #1: By calling it from another procedure. The calling procedure can be either a VBA Sub procedure or a VBA Function procedure.
- Option #2: By calling it from the Immediate Window of the Visual Basic Editor.
- Option #3: By using it in a formula, such as a worksheet formula or a formula used to specify conditional formatting.
Let’s take a look at how you can implement each of these options:
Option #1: How To Call An Excel VBA Function Procedure From Another Procedure
Let’s take a look again at the sample Excel VBA Function procedure called Squared:
The easiest method to call an Excel VBA Function Procedure is to simply use the function’s name. When using this particular method, you simply need to enter 2 things in the VBA code of the calling procedure:
- The name of the Excel VBA Function procedure being called.
- The argument(s) of the procedure being called.
As an example, let’s create a very simple VBA Sub procedure (named Squared_Caller) whose only purpose is to call the Squared VBA Function procedure to square the number 15 and display the result in a message box.
If you execute the above macro, Excel displays the following message box:
Let’s take a look at the process followed by the Squared_Caller Sub procedure step-by-step.
- Step #1: The Squared_Called Sub procedure is called using any of the methods that can be used to execute an Excel VBA Sub procedure.
- Step #2: The Squared_Called Sub procedure calls the Squared function procedure and passes to it the argument of 15.
- Step #3: The Squared function receives the argument of 15.
- Step #4: The Squared function performs the relevant calculation (squaring) using the value it has received as an argument. The resulting value when squaring 15 is 225.
- Step #5: The Squared function assigns the result of its calculations (225) to the variable Squared.
- Step #6: The Squared function ends and control returns to the Squared_Called Sub procedure.
- Step #7: The MsgBox function displays the value of the Squared variable which, as explained above, is 225.
Alternatively, you can use the Application.Run method. In this case, the equivalent of the Squared_Caller VBA Sub procedure that appears above, is as the following Sub procedure (called Squared_Caller_Run):
The first argument of the Application.Run method is the macro to run (Squared in the case above). The subsequent parameters (there is only 1 in the example above) are the arguments to be passed to the function being called.
The following can be arguments when using the Application.Run method:
- Strings.
- Numbers (as above).
- Expressions.
- Variables.
Option #2: How To Call An Excel VBA Function Procedure From The Immediate Window Of The Visual Basic Editor
The Immediate Window of the Visual Basic Editor is very useful for purposes of checking, testing and debugging VBA code.
The following image shows a possible way of calling the Squared VBA function from the Immediate Window:
The word Print that appears in the Immediate Window above allows you to evaluate an expression immediately. Alternatively, you can use a question mark (?), which acts as a shortcut for Print.
Option #3: How To Call An Excel VBA Function Procedure Using A Formula
You can’t execute VBA Sub procedures directly by using a worksheet formula. This is because a Sub procedure doesn’t return a value.
Executing an Excel VBA Function procedure using a worksheet formula is relatively simple, as long as you have some basic familiarity with regular worksheet functions.
In fact, working with an Excel VBA Function procedure in this way is substantially the same as working with the regular worksheet functions such as SUM, IF, IFERROR and VLOOKUP.
The main difference between built-in worksheet formulas and VBA Function procedures is that, when using VBA functions, you must make sure that (when necessary) you tell Excel the location of the function. This is the case, usually, when you’re calling Excel VBA Function procedures that are stored in a different workbook from the one you’re working on. I explain how to do this further below.
In addition to using VBA Function procedures in worksheet formulas, you can use them in formulas that specify rules for conditional formatting. When creating conditional formatting formulas, the logic is similar to that explained below.
In order to understand this, let’s take a look at 2 of the most common methods for executing a worksheet function and see how they can be applied for purposes of executing a VBA Function procedure.
Method #1: How To Enter A Formula Using A VBA Function Procedure
If you’ve worked with formulas before, you’re probably aware that you can generally execute worksheet functions by entering a formula into a cell.
You can do exactly the same with VBA Function procedures. In other words, you can execute a Function procedure by simply typing a formula in a cell. This particular formula must contain the Function procedure you want to execute. For these purposes:
- The name of the function is exactly the same name you’ve assigned to the Excel VBA Function procedure.
- The arguments, if applicable, are entered within the parentheses that follow the name of the function (just as you’d do with any other function).
As an example, let’s assume that you want to execute the sample Squared VBA Function procedure to square the number 10. For these purposes, simply type the following formula in a cell:
As expected, the result that Excel returns is the value 100.
The syntax described above only works when you’re executing Excel VBA Function procedures from the same Excel workbook as that which contains the function you’re calling, or when the function is stored in an add-in. Functions stored in add-ins are available for use in any Excel workbook.
Let’s assume, however, that you’re actually working in a different Excel workbook from the one that contains the module with the Function procedure you want to call. In these cases, you must tell Excel where it can find the VBA function you want to work with.
In such a case, you can proceed in either of the 2 following ways. This assumes that the VBA Function procedure you want to refer to is Public, and not Private.
Option #1: Include File Reference Prior To Function Name.
In this case, you must modify the syntax slightly by adding the name of the relevant workbook before the function name. When doing this, make sure that:
- You separate the worksheet and function names using an exclamation mark (!).
- The Excel workbook that contains the relevant Function procedure is open.
For example, let’s assume that the Squared VBA Function procedure above is defined in the Excel workbook Book1.xlsm. You’re working in a different Excel workbook, and want to square the number 10 using Squared. In such case, the formula that you should type is as follows:
As expected, Excel returns the value 100.
Option #2: Set Up A Reference To Appropriate Excel Workbook.
You can set up a reference to the appropriate Excel workbook using the References command of the Visual Basic Editor. You can find this in the Tools menu of the VBE.
If you choose to set up a reference to the Excel workbook where the relevant VBA Function procedure is stored, you don’t need to modify the syntax to include the file reference prior to the Function name.
Let’s take a look now at the second way in which you can call an Excel VBA Function procedure using a formula:
Method #2: How To Execute A VBA Function Procedure Using The Insert Function Dialog
You can also (generally) execute VBA Function procedures by using the Insert Function dialog. The main exception to this rule are VBA functions that are defined as Private.
Using the Private keyword is useful when you create VBA Function procedures that aren’t designed to be used in formulas. These functions are, then, generally executed by calling them from another procedure.
Let’s see how to execute a VBA function using the Insert Function dialog in the following 4 easy steps.
Step #1: Display The Insert Function dialog.
To get Excel to display the Insert Function dialog, click on “Insert Function” in the Formulas tab of the Ribbon or use the keyboard shortcut “Shift + F3”.
Step #2: Ask Excel To Display User Defined Functions.
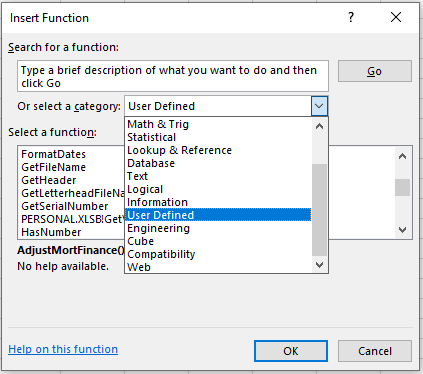
Once you’ve clicked on “Insert Function”, Excel displays the Insert Function dialog. Functions are organized in different categories, such as Financial, Text and Logical. You can see all the categories by clicking on the Or select a category drop-down menu.
For the moment, the category we’re interested in is User Defined functions. Therefore, click on “User Defined”.
Excel VBA Function procedures appear in the list of User Defined functions by default. You can, however, change the category in which such functions appear by following the procedure that I describe below.
You can’t use the search feature at the top of the Insert Function dialog for purposes of searching VBA functions.
The following screenshot shows what happens if I search for the Squared VBA Function procedure. Notice how none of the functions that appear in the Select a function list box is the one I’m actually looking for.
Step #3: Select The Excel VBA Function Procedure To Be Executed.
Once you’ve selected User Defined functions, Excel lists all the available VBA Function procedures in the Select a function list box.
Select the function that you want to execute and click on the OK button located on the lower right corner of the Insert Function dialog.
In the example image below, there’s only 1 VBA Function procedure: Squared. Therefore, in order to execute Squared, I select it and click on the OK button, as shown in the image below.
Step #4: Insert The Arguments For The Excel VBA Function Procedure.
Once you’ve selected the Excel VBA Function procedure to be executed, Excel displays the Function Arguments dialog.
Enter the relevant argument(s) that the function should work with (if any). Once you’ve entered these arguments, click the OK button on the lower right corner of the Function Arguments dialog to complete the process.
In the case of the sample Squared VBA Function procedure, the Function Arguments dialog looks as follows. Just as in the example above (entering a formula directly on the active cell), I enter the number 10 as argument.
As expected once again, the result returned by Excel is 100, which is correct.
Despite the fact that, operationally, executing an Excel VBA Function procedure is substantially the same as executing a regular worksheet function, you may have noticed 1 key difference:
Excel usually displays a description of worksheet functions. This happens regardless of which of the 2 methods described above you use. However, the same doesn’t happen (automatically) in the case of VBA Function procedures.
Let’s take a closer look at this difference, and see how we can get Excel to display the description of any VBA Function procedure:
How To Add A Description For An Excel VBA Function Procedure
First, let’s take a look at the way in which Excel displays the descriptions of regular worksheet functions, depending on which of the 2 methods of executing functions (described above) you’re using.
Method #1: Entering A Formula On An Active Cell
If you’re entering a function on an active cell, Excel displays a list of functions that can be used to complete the formula you’re writing. Additionally, Excel displays the description of the function that is currently selected in that list.
The following image shows how Excel automatically displays a list of options while I’m typing “=sum” to help me complete the formula. Note, in particular, how Excel describes the SUM function using tooltips.
Excel also includes VBA Function procedures in its list of suggestions to complete a formula. However, it doesn’t show a description of those functions.
For example, when I type “=squared”, Excel does suggest the Squared VBA Function procedure that I’ve created. However, it doesn’t display any description.
Method #2: Using The Insert Function Dialog
A similar thing happens if you’re using the Insert Function dialog for purposes of executing a function.
As a general rule, the Insert Function dialog displays the description of the function that is currently selected in Select a function list box. You see this on the lower section of the Insert Function dialog.
For example, in the case of the SUM function, the Insert Function dialog looks roughly as follows:
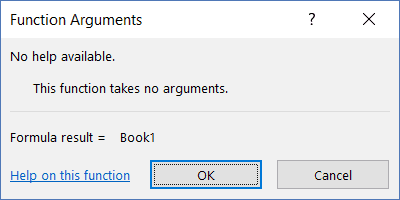
However, in the case of the Squared VBA Function procedure, things look different. As you’ll notice in the image below, the Insert Function dialog states that no help is available.
In this Excel Macro Tutorial for Beginners, I explain why you should get in the habit of describing your macros. Among other benefits, this allows you and other users to be aware (always) of what a particular macro does and what to expect when running it.
This suggestion also applies to Excel VBA Function procedures. Ideally, you should always add a description for any function you create.
Therefore, let’s take a look at how you can add a description for a VBA Function procedure in Excel:
How To Add A Description For An Excel VBA Function Procedure When Using The Insert Function Dialog
You can add a description for an Excel VBA Function procedure using either of the following 2 methods.
Any description of an Excel VBA Function procedure that you add using either of these 2 methods is only displayed when working with the Insert Function dialog. In other words, this method doesn’t add a tooltip that appears when entering a formula in an active cell.
Method #1: Using The Macro Dialog
You can add a VBA function description using the Macro dialog in the following 3 simple steps.
Step #1: Open The Macro Dialog.
To open the Macro dialog, click on “Macros” in the Developer tab of the Ribbon or use the keyboard shortcut “Alt + F8”.
Excel displays the Macro dialog. You’ll notice that this dialog lists only VBA Sub procedures. Excel VBA Function procedures don’t appear.
For example, in the following screenshot, the only macro that is listed is Squared_Caller. As I explain above, this is a VBA Sub procedure whose only purpose is to call the Squared Function procedure.
Take a look at the following step to see how to work with VBA Function procedures from the Macro dialog.
Step #2: Type The Name Of The VBA Function Procedure You Want To Describe And Click On The Options Button.
Despite the fact that the Macro dialog doesn’t display Excel VBA Function procedures, you can still work with them using the Macro dialog.
For these purposes, simply enter the name of the relevant function in the Macro name field. Once you’ve entered the appropriate name, click on the Options button located on the right side of the Macro dialog.
For example, when working with the VBA function called Squared, type “Squared” and click on “Options” as shown in the image below.
Step #3: Enter A Description Of The Excel VBA Function Procedure And Click The OK Button.
After you click “Options” in the Macro dialog, Excel displays the Macro Options dialog.
Type the description you want to assign to the VBA Function in the Description box and click on the OK button on the lower right corner of the Macro Options dialog.
The following image shows how this looks like in the case of the Squared VBA Function procedure.
Step #4: Click On The Cancel Button.
Once you’ve entered the description of the Excel VBA Function procedure and clicked the OK button, Excel returns to the Macro dialog.
To complete the process of assigning a description to a VBA Function, click on the Cancel button on the lower right corner of the Macro dialog.
Notice how the Macro dialog displays (on its lower part) the new description of the Excel VBA Function procedure.
Next time you execute the Excel VBA Function using the Insert Function dialog, Excel displays the relevant description that you’ve added. For example, the following image shows how the description of the Squared function appears in the Insert Function dialog.
As mentioned at the beginning of this section, this way of adding a description to an Excel VBA Function procedure doesn’t add a tooltip when entering a formula in an active cell. For example, when entering “=squared”, Excel continues to suggest the Squared VBA Function without showing its description.
As I explain below, this issue is more complicated to solve and exceeds the scope of this Excel VBA tutorial.
Method #2: Using The Application.MacroOptions Method
You can also add a description for an Excel VBA Function procedure using VBA code. For these purposes, you use the Application.MacroOptions method.
The main use of the Application.MacroOptions method is that it allows you to work with the Macro Options dialog. As shown below, you can also use this method for purposes of changing the category of an Excel VBA Function procedure.
The Application.MacroOptions method has several optional parameters. In this particular case, I only use 1 argument: Description. As you may expect, this argument determines the description of the VBA function.
The following macro (called Function_Description) is an example of how Application.MacroOptions can be applied for purposes of adding a description for the Squared_Sign VBA Function procedure:
You only need to execute this macro once. Once the Function_Description macro has run, and you’ve saved the Excel workbook, the description you’ve assigned to the VBA function is stored for the future.
The following image shows how this description looks like in the Insert Function dialog:
However, just as with the previous method, this way of adding a description isn’t able to make Excel show a tooltip when entering a formula with the Squared_Sign function in an active cell. Notice how, in the image below, Excel doesn’t display any description for this particular VBA function:
You may be wondering:
Is there a way to make Excel display a description of a VBA Function procedure when entering a formula in an active cell?
Let’s take a brief look at this topic:
The Issue Of Adding A Description For An Excel VBA Function Procedure When Entering A Formula
Let’s go back to the question above:
Is it possible to add a description for an Excel VBA Function procedure that will be displayed when entering a formula in an active cell?
The short answer is no. Currently you can’t add a tooltip for an Excel VBA Function procedure such as those that appear when working with the standard worksheet functions. This may change in the future.
The longer answer is more complicated. The topic of adding a description for an Excel VBA Function procedure when entering a formula has been the subject of several discussions.
The way I usually handle the lack of a function description when entering formulas with Excel VBA Function procedures is by using the keyboard shortcut “Shift + Ctrl + A” to get Excel to display all the arguments of the function.
You can implement this workaround in the following 2 easy steps.
Step #1: Type The Formula With The Name Of The Relevant Excel VBA Function Procedure
This is self-explanatory. Simply type a formula as you’d usually do.
For example, if working with the Squared VBA Function procedure, simply type “=squared”.
Step #2: Press The Keyboard Shortcut “Ctrl + Shift + A”
Once you’ve typed the name of the relevant Excel VBA Function, use the keyboard shortcut “Ctrl + Shift + A”.
Once you do this, Excel displays all the arguments of the Excel VBA Function procedure in order to help you complete the formula. For example, in the case of the Squared function, Excel displays the following:
Even though this isn’t exactly the same as having Excel display a description of the VBA Function procedure, getting all the arguments of the function may help you understand what the function does. This is particularly true if both the function and the arguments have descriptive and meaningful names.
For example, if Excel displays “=squared(number)” as in the screenshot above, you’ll probably be able to figure out that the purpose of that particular VBA Function procedure is to square the number that is given as an argument.
If you’re not able to figure out what the function does using this method, you can always go to the Insert Function dialog where the description of the Excel VBA Function you’ve added always appears.
Now that we’re talking about function arguments, did you know that you can also add argument descriptions for your Excel VBA Function procedures?
Let’s take a look at how you can do this:
How To Add Descriptions For The Arguments Of An Excel VBA Function Procedure
When you use the Insert Function and Function Arguments dialogs to enter a built-in function, Excel displays a description for each of the arguments. For example, in the case of the SUM function, this looks as follows:
However, Excel doesn’t show (by default) descriptions of the arguments for an Excel VBA Function procedure. For example, the description for the arguments of the Squared function within the Function Arguments dialog looks (by default) as follows:
This is very similar to what happens with the description of the function itself, as described in the section above. And just as you can add a description for the whole Excel VBA Function procedure, you can add a description for its arguments.
The possibility of adding argument descriptions for Excel VBA Function procedures was only added in Excel 2010. If you use an earlier version of Excel, argument descriptions are not displayed.
You add descriptions for the arguments of an Excel VBA Function procedure using the Application.MacroOptions method. This method allows you to work with the Macro Options dialog.
Let’s see how you can use the Application.MacroOptions method to add a description for the arguments of a VBA Function procedure. The following macro (Argument_Descriptions) adds a description to the only argument of the Squared VBA Function.
Once you’ve run this macro once and save the Excel workbook, the argument description is stored and associated with the relevant VBA Function procedure.
Let’s go once more to the Function Arguments dialog for the Squared VBA Function. The following screenshot shows how, now, the argument has a description (is the number to be squared).
You can use macros that are similar to the Argument_Descriptions macro that appears above for purposes of adding argument descriptions to any Excel VBA Function procedure you create. The macro has only one statement containing the following 3 items:
Item #1: Application.MacroOptions method.
This is simply the Application.MacroOptions method, which allows you to work on the Macro Options dialog box. In this particular case, the Application.MacroOptions method uses the 2 parameters that appear below (Macro and ArgumentDescriptions).
Item #2: Macro Parameter.
The Macro parameter of the Application.MacroOptions method is simply the name of the Excel VBA Function procedure you want to assign an argument description to.
In the example above, this is “Squared”.
Item #3: ArgumentDescriptions Parameter.
The ArgumentDescriptions parameter is an array where you include the descriptions of the arguments for the Excel VBA Function procedure that you’ve created. These are the descriptions that, once the macro has been executed, appear in the Function Arguments dialog.
You must always use the Array function when assigning argument descriptions. This applies even if, as in the case above, you’re assigning a description for a single argument.
In the case that appears above, there is only one argument description: “Number to be squared”. If you want or need to add more than one argument, use a comma to separate them.
How To Change The Category Of An Excel VBA Function Procedure
You’ve already seen that when you create an Excel VBA Function procedure, Excel lists it by default in the User Defined category. Check out, for example, the following screenshot of the Insert Function dialog. Notice how both the Squared and the Squared_Sign VBA Function procedures appear as User Defined functions.
You may, however, want to have your VBA functions listed in a different category. That may make more sense, depending on the function that you’ve created and how are you planning to use it.
After all, the Excel Function Library has several different categories other than User Defined.
In the case of the Squared VBA Function procedure that appears in the screenshot above, it makes sense to list it under the Math & Trig category. To do this, you just need to run the following macro (named Function_Category) one time:
Once you’ve executed this macro and saved the Excel workbook with the Squared VBA Function procedure, Squared is assigned permanently to the category 3, which is Math & Trig. You can see how this looks in the Insert Function dialog:
Additionally, you can also see the Squared VBA Function procedure in the Math & Trig category in the Formulas tab of the Ribbon:
You can apply similar macros for purposes of organizing any other Excel VBA Function procedures you may have created. You just need to adjust the VBA code that appears above accordingly. Let’s take a look at this code so you understand how it proceeds and how you should use it.
The Function_Category Sub procedure contains a single statement, with the following 3 main items:
Item #1: Application.MacroOptions Method
You can use the Application.MacroOptions method, among others, for purposes of determining in which category an Excel VBA Function procedure is displayed. In the case above, the Application.MacroOptions method has only 2 parameters (Macro and Category).
Item #2: Macro Parameter
You’ve already seen the Macro parameter being used in the Application.MacroOptions method when assigning a description to a VBA Function procedure or its arguments. This parameter is simply the name of the VBA Function you want to assign a category to.
In the case above, this is Squared.
Item #3: Category Parameter
The Category parameter of the Application.MacroOptions method is an integer that determines the relevant function category. In other words, this parameter determines in which category the Excel VBA Function procedure appears.
In the example above, this is 3. However, as of the time of writing, Excel has the following 18 built-in categories.
- Financial.
- Date & Time.
- Math & Trig.
- Statistical.
- Lookup & Reference.
- Database.
- Text.
- Logical.
- Information.
- Commands.
- Customizing.
- Macro Control.
- DDE/External.
- User Defined.
- Engineering.
- Cube.
- Compatibility (introduced in Excel 2010).
- Web (introduced in Excel 2013).
In addition to the built-in categories listed above, you can create custom categories. Let’s take a look at one of the ways in which you can assign an Excel VBA Function procedure to a new custom category…
How To Create New Categories For Excel VBA Function Procedures
There are several methods to create custom categories for Excel VBA Function procedures. I may cover them in a future tutorial. If you want to be informed whenever I publish new blog posts or Excel tutorials, please make sure to register below:
In this particular section, I explain a simple way of defining a new category using the same Application.MacroOptions method described above.
When using this method, you simply replace the category parameter of the Application.MacroOptions method (3 in the example above) with a string containing the name of the new category. Let’s see how this looks in practice:
In the section above, you’ve assigned the Squared VBA Function to the Math & Trig category. However, the Squared_Sign function continues to be listed in the User Defined category.
Let’s assume that you want to list this particular VBA Function procedure under a new category named “Useful Excel Functions”. The macro that appears below achieves this. Notice how the only things that change, when compared with the Function_Category macro used above, are the parameter values, namely the name of the macro and the function category.
Once you’ve executed this macro one time and saved the relevant Excel workbook, the Squared_Sign VBA Function is assigned permanently to the Useful Excel Functions list. The reason why this works is that, if you use a category name that has never been used, Excel simply defines a new category using that name.
The result of executing the macro above looks as follows in the Insert Function dialog:
You may be wondering:
What happens if, when using the Application.MacroOptions method, you include a category name that is exactly the same as that of a built-in category?
For example, let’s go back to the Function_Category Sub procedure used to assign the Squared VBA Function to the Math & Trig category. Let’s change the integer representing the Math & Trig category (3) by the string “Math & Trig”, as shown in the image below:
As shown in the screenshot below, Excel simply lists the relevant VBA Function in the Math & Trig built-in category. No new categories are defined.
In other words, both using (i) the integer 3 or (ii) the string “Math & Trig”, as category parameter when using the Applications.MacroOptions method yield the same result: the function is assigned to the Math & Trig list (category #3).
More generally, whenever you use a category name that matches a built-in category name (such as Financial, Logical, Text, or Date & Time), Excel simply lists the relevant VBA Function procedure in that built-in category.
Conclusion
By now, you probably have a very good grasp of Excel VBA Function procedures and are ready to start creating some custom functions. However, the knowledge you’ve gained from this Excel tutorial isn’t limited to this…
You’ve also seen how you can add descriptions and organize the VBA functions you create for purposes of making their use easier later, both for you and for the people you share your Excel workbooks with.
Finally, I hope that, if you’re not yet convinced of the usefulness of Excel VBA Function procedures, you’ve found the arguments in favor of using them compelling. Hopefully, you’ll give it a try soon.
Hello Excellers and welcome back to another blog post in this #macromonday series. Today lets look at executing a function procedure in Excel. But first, if you need a reminder of the difference between a VBA Sub procedure and a VBA Function procedure, let’s do a small recap.
When most people talk about Macros in Excel they are talking about Sub procedures. Most of the macros that we record or write in VBA are Sub procedures. Sub is basically a command. By executing a Sub procedure and what happens absolutely depends on the code that you write as part of that Sub procedure.
But, we also have a Function which is also a procedure, but quite different from its brother or sister the Sub. You are probably already aware of the concept of an Excel Function if you have used Excel in any shape or form for a while. For example a VLOOKUP, SUM, INDEX, MIN, MAX. These are all Functions that usually take at least one argument and do some calculations in the background to return a single value. That is a Function.
SUB v FUNCTIONS
⇒A Sub procedure is a group of VBA statements that will perform a single or group actions in Excel.
⇒A Function procedure is a group of VBA statements that perform a calculation and like the definition of an Excel Function will return a single value.
If you want to read all of the Macro Monday series of blog posts you can do so at the link below.
How To Excel At Excel – Macro Mondays Blog Posts.
This link is updated every week with new content so make sure to BOOKMARK it for ease so you can check back weekly.
Sub Procedures
In my Macro Mondays blog post series, I have been sharing mainly Sub Procedures. Usually, these macros take the repetition out of everyday Excel processes and procedures you carry out to help speed up your day and get your job done more efficiently.
Every Sub procedure starts with the word Sub and ends with the word End Sub statement. Logical isn’t it. Let’s remind ourselves of the process to distinguish it from the Function procedure. In this example, I will use a VBA Sub procedure to convert all of the user selected cells to Upper Case.
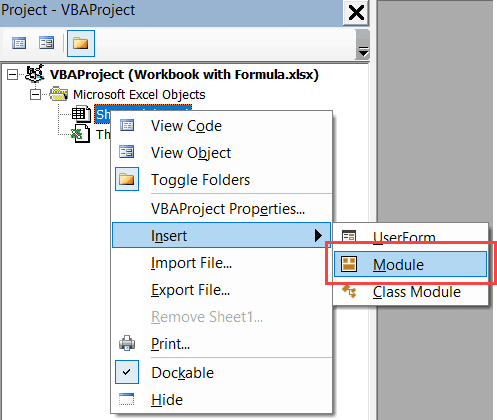
First, we need to create a new module to save this Macro into.
- Insert a module by opening Visual Basic by hitting ALT+F11, or select the Developer Tab and in the Code Group Select Visual Basic.
- You can now hit Insert Module.
I have chosen to store this in my Personal Macro Workbook so I can use with any workbook I want to.
Further Notes On Your Personal Macro Workbook
To read more about your Personal Macro Workbook you can read my corresponding blog posts below.
Macro Mondays -Creating and Updating Your Personal Macro Workbook
Macro Mondays – Create A Shortcut To Your Personal Excel Macro Workbook
Why Is My Personal Macro Workbook Not Loading Automatically?
As soon as you type the line of code Sub ConvertToUpper (which is the name I have selected for my macro) and hit return Excel automatically inserts the End Sub part of the code for you.
This macro will convert all of the cells that a user has selected and automatically converts the text to Upper Case. This is a Sub Procedure. Let’s move onto Function Procedures.
Function Procedures.
In the way that every Sub procedure begins with the words Sub, Functions always begin with…yes you guessed it the word Function and ends with the words End Function. Most calculations can be achieved with what is provided by default within Excel. After you have used the software for a time isn’t long before you find yourself wishing that there was a function that did a particular job, and you can’t find anything suitable on the list. You need a UDF. (User Defined Function). Now, these can be easy to the most complex, but the theory is the same, you want Excel to do a calculation to return a single value back. Let’s walk through a fairly simple one to get the idea going. We will calculate the area of a rectangle. This is simple.
The Area Of An Rectangle = LENGTH x WIDTH
First, we need to create a new module to save this Macro into. Insert a module by opening Visual Basic by hitting ALT+F11, or select the Developer Tab and in the Code Group Select Visual Basic. You can now hit Insert Module.
Into the empty module type
Function RecArea ()
Excel automatically again inserts for us the End Function code. Nice.
- Insert your cursor into the brackets. This is where we specify our arguments just as we do in most Excel Functions. An argument is some information that Excel requires to carry out the calculation
- We specify Length As Double and Width As Double. This declares the Excel the type of data to expect. This speeds up our code and helps avoid any errors. Double data type allows large numbers and also fractions.
- The next part of our Function procedure is the actual calculation.
The full code can be seen below. It is a simple example.
So, we now know the difference between a Procedure and a Function. How on earth do we call or use the Function we have created?. There are a number of ways to call the function which I will take you through one by one below.
1. Call The Function From A Sub Procedure
As you cannot call the Excel Function directly, you must, therefore, call it from another procedure. If we take our example of the RecArea function already used, we can create a procedure which is defined in the same module as the custom created RecArea function. There are two stages. First display an Input Box (well two of them, one after the other), to collect the two values of Length and Width. Secondly, we then use the MsgBox function to display to the user the result after it is processed by the RecArea Function. So, let’s get to writing some VBA Code.
Preparing To Write The Macro
Our VB editor should be already open, from writing the Function RecArea. If it does not then follow the steps above to create the function. We now need to write the sub Procedure in the same module as the Function. Type Sub then the name of your macro. In this example, I have called it simply Sub AreaCalc. Notice that Excel will automatically enter the end text End Sub to end the Sub Routine. We simply need to enter the rest of the code between these two lines.
[stextbox id=’info’]
Sub AreaCalc()
End Sub
[/stextbox]
Declaring Variables
The stage in to declare any variables. This ensures excel allocates memory to these values. In this macro, we need to declare 3 variables, Length, Width and RecArea values. I am declaring the value type as Double. This means it is one of the non-integral numeric data types. This means that, just as a decimal, it can be used to hold both integers and fractions.
[stextbox id=’info’]
Dim Length As Double, Width As Double
Dim RecArea As Double
[/stextbox]
Collecting The Width And Length Off The User
We now use the InputBox function to collect the variables of Width and Length to use in our function. Once you begin to type InputBox, Excel automatically will display the full list of available optional arguments to use. In this example, I have kept it straightforward and just used the first option of Prompt. This is the text surrounded by quotation marks and indicates to the user what value to enter into the box.
[stextbox id=’info’]
Width = InputBox(“Enter The Width”)
Length = InputBox(“Enter The Length”)
RecArea = Width * Length
[/stextbox]
Displaying The Result Of The Function
This next line of code is simple. We instruct Excel to display the result of the RecArea function in a message box.
[stextbox id=’info’]
MsgBox (RecArea)
[/stextbox]
Ending The Routine
The End Sub code ends the routine once the calculation has completed has been displayed in the message box.
[stextbox id=’info’]
End Sub
[/stextbox]
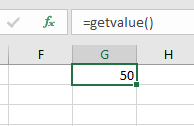
2. Call The Excel Function From A Worksheet Formula
We can also call the VBA Function procedure from a worksheet formula. Activate a worksheet in the same workbook that holds the RecArea function definition. Then enter the following formula in any cell
=RecArea(5,8)
You can see that once you begin typing the =Rec into any cell the Function syntax appears just like any other Excel Function.
Your answer to this example will be 40. You can use this function any number of times in the worksheet. Like Excel’s built-in functions, your custom functions appear in the Insert Function dialog box.
3. Call The Excel Function From The Visual Basic Immediate Window
The final way to call a Function procedure is to use the Immediate Window in the VB Editor. This is usually only used for testing. It pretty much works the same way as calling the Function from a worksheet formula. You will, of course, need the Immediate Window to be visible. If it is not then it can be activated by selecting the View Menu | Immediate Window
So how do you use the Immediate Window?. All you need to do is Type ? then the Function.
As can be seen in the screencast below where I can call the RecArea function.
So, there are a number of ways to call Excel Functions, either from a Sub Procedure, from the worksheet or by using the Immediate Window. Try all three methods to test your VBA code.
What Next? Want More Tips?
So, if you want more tips then sign up for my Monthly Newsletter where I share 3 Tips on the first Wednesday of the month and receive my free Ebook, 30 Excel Tips.
 If you want to see all of the blog posts in the Macro Monday series. Click on the link below
Macro Mondays Blog Posts.
Do You Need Help With An Excel Problem?.
Finally, I am pleased to announce I have teamed up with Excel Rescue, where you can get help FAST. All you need to do is choose the Excel task that most closely describes what you need to be done. Above all, there is a money back guarantee and similarly Security and Non-Disclosure Agreements. Try It!. Need Help With An Excel VBA Macro?. Of course, you don’t need to ask how to list all files in a directory as it is right here for free.
In Visual Basic, the functions and sub-procedures play similar roles but have different or unique characteristics. However, both perform a programmed task. They utilize a set or group of commands to deliver the required results. The key difference between the sub and the functions is that a sub-procedure generally does not return a result whereas functions tend to return a result. Hence if there is a need for having a value post execution of tasks, then place the VBA code under a function or otherwise place the code under a sub-procedure. In Excel, there is the availability of large numbers of VBA functions that could be utilized in the development of new VBA codes. Such functions are referred to as Built-in functions. With the increase in the size of a VBA program, both Functions and Sub-procedures play a crucial role in the management and performance of VBA code.
Functions in VBA
A function in VBA can be defined as a procedure that executes a piece of code or instructions and post-execution, it returns the value of the tasks performed. A function is hence invoked using a variable. Functions are directly called in the spreadsheets by using excel based formulas. An excel VBA function is not of executable nature. They help in performing a set of repetitive tasks. Following is the syntax for the VBA function: –
Function <Function name> (Parameters) as variable type
Piece of codes
End function.
Here is a small example of the VBA function:
Function CalcArea(a As Double, b As Double) As Double
CalcArea = a * b
End Function
In an excel spreadsheet, place the formula in range A1 as shown below:
The following would be the output in range A1 of the excel spreadsheet as shown below:
The above code is a very simple example of how to program or develop custom functions. A VBA programmer can develop as many custom functions’ basis the need of the program. He can insert a new module and start developing a new function just by naming it by a new unique function name.
Sub in VBA
A sub-procedure in VBA can be defined as a procedure that executes a piece of code or instructions, but post-execution does not return the value of the tasks performed. A sub-procedure, therefore, does not require a variable for getting invoked. An excel VBA sub-routine or a sub-procedure is of executable nature and can be assigned as a macro to any excel based object. Like functions, they help in performing a set of repetitive tasks. Following is the syntax for the VBA sub-procedure:
Sub <sub name> (Parameters)
Piece of codes
End sub
Here is a small example of a VBA sub-routine:
sub CalcArea()
Dim a As Double, b As Double
c = a * b
Sheet3.activate
Sheet3.range(“A1”).value=c
End sub
In an excel module, select run sub/user form present under the Run option:
The following would be the output in range A1 of the excel spread sheet as shown below:
The above code is like functions but the only difference is that in this program, the values are hard coded in the sub-procedure itself whereas, in functions, the values are to be passed by the end user. The following things should be followed when creating a sub-routine:
- It should not have any spaces.
- It should not begin with any number or special character. It can however begin with an underscore or a simple letter.
- The name of the sub-procedure should not be the same as that of the reserved keywords present in the excel VBA.
To Summarize, the following are the differences between a function and a sub in VBA:
|
Function In VBA |
Sub In VBA |
|---|---|
| Functions always return a value after it completes their required set of instructions. | Sub does not return a value after it completes its required set of instructions. |
| Functions do not have any alternate nomenclature in VBA | In VBA, Subs are referred to as subprocedures as well as subroutines |
| To Execute Function, it is to be passed on to the excel sheet beginning with equal to sign. In Short, they are invoked as excel based formulas. | To execute a sub in VBA, it can be run or could be executed through Project explorer or by assigning it as a macro on excel objects. |
With VBA, you can create a custom Function (also called a User Defined Function) that can be used in the worksheets just like regular functions.
These are helpful when the existing Excel functions are not enough. In such cases, you can create your own custom User Defined Function (UDF) to cater to your specific needs.
In this tutorial, I’ll cover everything about creating and using custom functions in VBA.
If you’re interested in learning VBA the easy way, check out my Online Excel VBA Training.
What is a Function Procedure in VBA?
A Function procedure is a VBA code that performs calculations and returns a value (or an array of values).
Using a Function procedure, you can create a function that you can use in the worksheet (just like any regular Excel function such as SUM or VLOOKUP).
When you have created a Function procedure using VBA, you can use it in three ways:
- As a formula in the worksheet, where it can take arguments as inputs and returns a value or an array of values.
- As a part of your VBA subroutine code or another Function code.
- In Conditional Formatting.
While there are already 450+ inbuilt Excel functions available in the worksheet, you may need a custom function if:
- The inbuilt functions can’t do what you want to get done. In this case, you can create a custom function based on your requirements.
- The inbuilt functions can get the work done but the formula is long and complicated. In this case, you can create a custom function that is easy to read and use.
Note that custom functions created using VBA can be significantly slower than the inbuilt functions. Hence, these are best suited for situations where you can’t get the result using the inbuilt functions.
Function Vs. Subroutine in VBA
A ‘Subroutine’ allows you to execute a set of code while a ‘Function’ returns a value (or an array of values).
To give you an example, if you have a list of numbers (both positive and negative), and you want to identify the negative numbers, here is what you can do with a function and a subroutine.
A subroutine can loop through each cell in the range and can highlight all the cells that have a negative value in it. In this case, the subroutine ends up changing the properties of the range object (by changing the color of the cells).
With a custom function, you can use it in a separate column and it can return a TRUE if the value in a cell is negative and FALSE if it’s positive. With a function, you can not change the object’s properties. This means that you can not change the color of the cell with a function itself (however, you can do it using conditional formatting with the custom function).
When you create a User Defined Function (UDF) using VBA, you can use that function in the worksheet just like any other function. I will cover more on this in the ‘Different Ways of Using a User Defined Function in Excel’ section.
Creating a Simple User Defined Function in VBA
Let me create a simple user-defined function in VBA and show you how it works.
The below code creates a function that will extract the numeric parts from an alphanumeric string.
Function GetNumeric(CellRef As String) as Long
Dim StringLength As Integer
StringLength = Len(CellRef)
For i = 1 To StringLength
If IsNumeric(Mid(CellRef, i, 1)) Then Result = Result & Mid(CellRef, i, 1)
Next i
GetNumeric = Result
End Function
When you have the above code in the module, you can use this function in the workbook.
Below is how this function – GetNumeric – can be used in Excel.
Now before I tell you how this function is created in VBA and how it works, there are a few things you should know:
- When you create a function in VBA, it becomes available in the entire workbook just like any other regular function.
- When you type the function name followed by the equal to sign, Excel will show you the name of the function in the list of matching functions. In the above example, when I entered =Get, Excel showed me a list that had my custom function.
I believe this is a good example when you can use VBA to create a simple-to-use function in Excel. You can do the same thing with a formula as well (as shown in this tutorial), but that becomes complicated and hard to understand. With this UDF, you only need to pass one argument and you get the result.
Anatomy of a User Defined Function in VBA
In the above section, I gave you the code and showed you how the UDF function works in a worksheet.
Now let’s deep dive and see how this function is created. You need to place the below code in a module in the VB Editor. I cover this topic in the section – ‘Where to put the VBA Code for a User-Defined Function’.
Function GetNumeric(CellRef As String) as Long
' This function extracts the numeric part from the string
Dim StringLength As Integer
StringLength = Len(CellRef)
For i = 1 To StringLength
If IsNumeric(Mid(CellRef, i, 1)) Then Result = Result & Mid(CellRef, i, 1)
Next i
GetNumeric = Result
End Function
The first line of the code starts with the word – Function.
This word tells VBA that our code is a function (and not a subroutine). The word Function is followed by the name of the function – GetNumeric. This is the name that we will be using in the worksheet to use this function.
- The name of the function cannot have spaces in it. Also, you can’t name a function if it clashes with the name of a cell reference. For example, you can not name the function ABC123 as it also refers to a cell in Excel worksheet.
- You shouldn’t give your function the same name as that of an existing function. If you do this, Excel would give preference to the in-built function.
- You can use an underscore if you want to separate words. For example, Get_Numeric is an acceptable name.
The function name is followed by some arguments in parenthesis. These are the arguments that our function would need from the user. These are just like the arguments that we need to supply to Excel’s inbuilt functions. For example in a COUNTIF function, there are two arguments (range and criteria)
Within the parenthesis, you need to specify the arguments.
In our example, there is only one argument – CellRef.
It’s also a good practice to specify what kind of argument the function expects. In this example, since we will be feeding the function a cell reference, we can specify the argument as a ‘Range’ type. If you don’t specify a data type, VBA would consider it to be a variant (which means you can use any data type).
If you have more than one arguments, you can specify those in the same parenthesis – separated by a comma. We will see later in this tutorial on how to use multiple arguments in a user-defined function.
Note that the function is specified as the ‘String’ data type. This would tell VBA that the result of the formula would be of the String data type.
While I can use a numeric data type here (such as Long or Double), doing that would limit the range of numbers it can return. If I have a 20 number long string that I need to extract from the overall string, declaring the function as a Long or Double would give an error (as the number would be out of its range). Hence I have kept the function output data type as String.
The second line of the code – the one in green that starts with an apostrophe – is a comment. When reading the code, VBA ignores this line. You can use this to add a description or a detail about the code.
The third line of the code declares a variable ‘StringLength’ as an Integer data type. This is the variable where we store the value of the length of the string that is being analyzed by the formula.
The fourth line declares the variable Result as a String data type. This is the variable where we will extract the numbers from the alphanumeric string.
The fifth line assigns the length of the string in the input argument to the ‘StringLength’ variable. Note that ‘CellRef’ refers to the argument that will be given by the user while using the formula in the worksheet (or using it in VBA – which we will see later in this tutorial).
Sixth, seventh, and eighth lines are the part of the For Next loop. The loop runs for as many times as many characters are there in the input argument. This number is given by the LEN function and is assigned to the ‘StringLength’ variable.
So the loop runs from ‘1 to Stringlength’.
Within the loop, the IF statement analyzes each character of the string and if it’s numeric, it adds that numeric character to the Result variable. It uses the MID function in VBA to do this.
The second last line of the code assigns the value of the result to the function. It’s this line of code that ensures that the function returns the ‘Result’ value back in the cell (from where it’s called).
The last line of the code is End Function. This is a mandatory line of code that tells VBA that the function code ends here.
The above code explains the different parts of a typical custom function created in VBA. In the following sections, we will deep dive into these elements and also see the different ways to execute the VBA function in Excel.
Arguments in a User Defined Function in VBA
In the above examples, where we created a user-defined function to get the numeric part from an alphanumeric string (GetNumeric), the function was designed to take one single argument.
In this section, I will cover how to create functions that take no argument to the ones that take multiple arguments (required as well as optional arguments).
Creating a Function in VBA without Any Arguments
In Excel worksheet, we have several functions that take no arguments (such as RAND, TODAY, NOW).
These functions are not dependent on any input arguments. For example, the TODAY function would return the current date and the RAND function would return a random number between 0 and 1.
You can create such similar function in VBA as well.
Below is the code that will give you the name of the file. It doesn’t take any arguments as the result it needs to return is not dependent on any argument.
Function WorkbookName() As String
WorkbookName = ThisWorkbook.Name
End Function
The above code specifies the function’s result as a String data type (as the result we want is the file name – which is a string).
This function assigns the value of ‘ThisWorkbook.Name’ to the function, which is returned when the function is used in the worksheet.
If the file has been saved, it returns the name with the file extension, else it simply gives the name.
The above has one issue though.
If the file name changes, it wouldn’t automatically update. Normally a function refreshes whenever there is a change in the input arguments. But since there are no arguments in this function, the function doesn’t recalculate (even if you change the name of the workbook, close it and then reopen again).
If you want, you can force a recalculation by using the keyboard shortcut – Control + Alt + F9.
To make the formula recalculate whenever there is a change in the worksheet, you need to a line of code to it.
The below code makes the function recalculate whenever there is a change in the worksheet (just like other similar worksheet functions such as TODAY or RAND function).
Function WorkbookName() As String
Application.Volatile True
WorkbookName = ThisWorkbook.Name
End Function
Now, if you change the workbook name, this function would update whenever there is any change in the worksheet or when you reopen this workbook.
Creating a Function in VBA with One Argument
In one of the sections above, we have already seen how to create a function that takes only one argument (the GetNumeric function covered above).
Let’s create another simple function that takes only one argument.
Function created with the below code would convert the referenced text into uppercase. Now we already have a function for it in Excel, and this function is just to show you how it works. If you have to do this, it’s better to use the inbuilt UPPER function.
Function ConvertToUpperCase(CellRef As Range)
ConvertToUpperCase = UCase(CellRef)
End Function
This function uses the UCase function in VBA to change the value of the CellRef variable. It then assigns the value to the function ConvertToUpperCase.
Since this function takes an argument, we don’t need to use the Application.Volatile part here. As soon as the argument changes, the function would automatically update.
Creating a Function in VBA with Multiple Arguments
Just like worksheet functions, you can create functions in VBA that takes multiple arguments.
The below code would create a function that will extract the text before the specified delimiter. It takes two arguments – the cell reference that has the text string, and the delimiter.
Function GetDataBeforeDelimiter(CellRef As Range, Delim As String) as String
Dim Result As String
Dim DelimPosition As Integer
DelimPosition = InStr(1, CellRef, Delim, vbBinaryCompare) - 1
Result = Left(CellRef, DelimPosition)
GetDataBeforeDelimiter = Result
End Function
When you need to use more than one argument in a user-defined function, you can have all the arguments in the parenthesis, separated by a comma.
Note that for each argument, you can specify a data type. In the above example, ‘CellRef’ has been declared as a range datatype and ‘Delim’ has been declared as a String data type. If you don’t specify any data type, VBA considers these are a variant data type.
When you use the above function in the worksheet, you need to give the cell reference that has the text as the first argument and the delimiter character(s) in double quotes as the second argument.
It then checks for the position of the delimiter using the INSTR function in VBA. This position is then used to extract all the characters before the delimiter (using the LEFT function).
Finally, it assigns the result to the function.
This formula is far from perfect. For example, if you enter a delimiter that is not found in the text, it would give an error. Now you can use the IFERROR function in the worksheet to get rid of the errors, or you can use the below code that returns the entire text when it can’t find the delimiter.
Function GetDataBeforeDelimiter(CellRef As Range, Delim As String) as String
Dim Result As String
Dim DelimPosition As Integer
DelimPosition = InStr(1, CellRef, Delim, vbBinaryCompare) - 1
If DelimPosition < 0 Then DelimPosition = Len(CellRef)
Result = Left(CellRef, DelimPosition)
GetDataBeforeDelimiter = Result
End Function
We can further optimize this function.
If you enter the text (from which you want to extract the part before the delimiter) directly in the function, it would give you an error. Go ahead.. try it!
This happens as we have specified the ‘CellRef’ as a range data type.
Or, if you want the delimiter to be in a cell and use the cell reference instead of hard coding it in the formula, you can’t do that with the above code. It’s because the Delim has been declared as a string datatype.
If you want the function to have the flexibility to accept direct text input or cell references from the user, you need to remove the data type declaration. This would end up making the argument as a variant data type, which can take any type of argument and process it.
The below code would do this:
Function GetDataBeforeDelimiter(CellRef, Delim) As String
Dim Result As String
Dim DelimPosition As Integer
DelimPosition = InStr(1, CellRef, Delim, vbBinaryCompare) - 1
If DelimPosition < 0 Then DelimPosition = Len(CellRef)
Result = Left(CellRef, DelimPosition)
GetDataBeforeDelimiter = Result
End Function
Creating a Function in VBA with Optional Arguments
There are many functions in Excel where some of the arguments are optional.
For example, the legendary VLOOKUP function has 3 mandatory arguments and one optional argument.
An optional argument, as the name suggests, is optional to specify. If you don’t specify one of the mandatory arguments, your function is going to give you an error, but if you don’t specify the optional argument, your function would work.
But optional arguments are not useless. They allow you to choose from a range of options.
For example, in the VLOOKUP function, if you don’t specify the fourth argument, VLOOKUP does an approximate lookup and if you specify the last argument as FALSE (or 0), then it does an exact match.
Remember that the optional arguments must always come after all the required arguments. You can’t have optional arguments at the beginning.
Now let’s see how to create a function in VBA with optional arguments.
Function with Only an Optional Argument
As far as I know, there is no inbuilt function that takes optional arguments only (I can be wrong here, but I can’t think of any such function).
But we can create one with VBA.
Below is the code of the function that will give you the current date in the dd-mm-yyyy format if you don’t enter any argument (i.e. leave it blank), and in “dd mmmm, yyyy” format if you enter anything as the argument (i.e., anything so that the argument is not blank).
Function CurrDate(Optional fmt As Variant)
Dim Result
If IsMissing(fmt) Then
CurrDate = Format(Date, "dd-mm-yyyy")
Else
CurrDate = Format(Date, "dd mmmm, yyyy")
End If
End Function
Note that the above function uses ‘IsMissing’ to check whether the argument is missing or not. To use the IsMissing function, your optional argument must be of the variant data type.
The above function works no matter what you enter as the argument. In the code, we only check if the optional argument is supplied or not.
You can make this more robust by taking only specific values as arguments and showing an error in rest of the cases (as shown in the below code).
Function CurrDate(Optional fmt As Variant)
Dim Result
If IsMissing(fmt) Then
CurrDate = Format(Date, "dd-mm-yyyy")
ElseIf fmt = 1 Then
CurrDate = Format(Date, "dd mmmm, yyyy")
Else
CurrDate = CVErr(xlErrValue)
End If
End Function
The above code creates a function that shows the date in the “dd-mm-yyyy” format if no argument is supplied, and in “dd mmmm,yyyy” format when the argument is 1. It gives an error in all other cases.
Function with Required as well as Optional Arguments
We have already seen a code that extracts the numeric part from a string.
Now let’s have a look at a similar example that takes both required as well as optional arguments.
The below code creates a function that extracts the text part from a string. If the optional argument is TRUE, it gives the result in uppercase, and if the optional argument is FALSE or is omitted, it gives the result as is.
Function GetText(CellRef As Range, Optional TextCase = False) As String
Dim StringLength As Integer
Dim Result As String
StringLength = Len(CellRef)
For i = 1 To StringLength
If Not (IsNumeric(Mid(CellRef, i, 1))) Then Result = Result & Mid(CellRef, i, 1)
Next i
If TextCase = True Then Result = UCase(Result)
GetText = Result
End Function
Note that in the above code, we have initialized the value of ‘TextCase’ as False (look within the parenthesis in the first line).
By doing this, we have ensured that the optional argument starts with the default value, which is FALSE. If the user specifies the value as TRUE, the function returns the text in upper case, and if the user specifies the optional argument as FALSE or omits it, then the text returned is as is.
Creating a Function in VBA with an Array as the Argument
So far we have seen examples of creating a function with Optional/Required arguments – where these arguments were a single value.
You can also create a function that can take an array as the argument. In Excel worksheet functions, there are many functions that take array arguments, such as SUM, VLOOKUP, SUMIF, COUNTIF, etc.
Below is the code that creates a function that gives the sum of all the even numbers in the specified range of the cells.
Function AddEven(CellRef as Range)
 Dim Cell As Range
 For Each Cell In CellRef
 If IsNumeric(Cell.Value) Then
 If Cell.Value Mod 2 = 0 Then
 Result = Result + Cell.Value
 End If
 End If
 Next Cell
 AddEven = Result
 End Function
You can use this function in the worksheet and provide the range of cells that have the numbers as the argument. The function would return a single value – the sum of all the even numbers (as shown below).
In the above function, instead of a single value, we have supplied an array (A1:A10). For this to work, you need to make sure your data type of the argument can accept an array.
In the code above, I specified the argument CellRef as Range (which can take an array as the input). You can also use the variant data type here.
In the code, there is a For Each loop that goes through each cell and checks if it’s a number of not. If it isn’t, nothing happens and it moves to the next cell. If it’s a number, it checks if it’s even or not (by using the MOD function).
In the end, all the even numbers are added and teh sum is assigned back to the function.
Creating a Function with Indefinite Number of Arguments
While creating some functions in VBA, you may not know the exact number of arguments that a user wants to supply. So the need is to create a function that can accept as many arguments are supplied and use these to return the result.
An example of such worksheet function is the SUM function. You can supply multiple arguments to it (such as this):
=SUM(A1,A2:A4,B1:B20)
The above function would add the values in all these arguments. Also, note that these can be a single cell or an array of cells.
You can create such a function in VBA by having the last argument (or it could be the only argument) as optional. Also, this optional argument should be preceded by the keyword ‘ParamArray’.
‘ParamArray’ is a modifier that allows you to accept as many arguments as you want. Note that using the word ParamArray before an argument makes the argument optional. However, you don’t need to use the word Optional here.
Now let’s create a function that can accept an arbitrary number of arguments and would add all the numbers in the specified arguments:
Function AddArguments(ParamArray arglist() As Variant)
For Each arg In arglist
AddArguments = AddArguments + arg
Next arg
End Function
The above function can take any number of arguments and add these arguments to give the result.
Note that you can only use a single value, a cell reference, a boolean, or an expression as the argument. You can not supply an array as the argument. For example, if one of your arguments is D8:D10, this formula would give you an error.
If you want to be able to use both multi-cell arguments you need to use the below code:
Function AddArguments(ParamArray arglist() As Variant)
For Each arg In arglist
For Each Cell In arg
AddArguments = AddArguments + Cell
Next Cell
Next arg
End Function
Note that this formula works with multiple cells and array references, however, it can not process hardcoded values or expressions. You can create a more robust function by checking and treating these conditions, but that’s not the intent here.
The intent here is to show you how ParamArray works so you can allow an indefinite number of arguments in the function. In case you want a better function than the one created by the above code, use the SUM function in the worksheet.
Creating a Function that Returns an Array
So far we have seen functions that return a single value.
With VBA, you can create a function that returns a variant that can contain an entire array of values.
Array formulas are also available as inbuilt functions in Excel worksheets. If you’re familiar with array formulas in Excel, you would know that these are entered using Control + Shift + Enter (instead of just the Enter). You can read more about array formulas here. If you don’t know about array formulas, don’t worry, keep reading.
Let’s create a formula that returns an array of three numbers (1,2,3).
The below code would do this.
Function ThreeNumbers() As Variant
Dim NumberValue(1 To 3)
NumberValue(1) = 1
NumberValue(2) = 2
NumberValue(3) = 3
ThreeNumbers = NumberValue
End Function
In the above code, we have specified the ‘ThreeNumbers’ function as a variant. This allows it to hold an array of values.
The variable ‘NumberValue’ is declared as an array with 3 elements. It holds the three values and assigns it to the ‘ThreeNumbers’ function.
You can use this function in the worksheet by entering the function and hitting the Control + Shift + Enter key (hold the Control and the Shift keys and then press Enter).
When you do this, it will return 1 in the cell, but in reality, it holds all the three values. To check this, use the below formula:
=MAX(ThreeNumbers())
Use the above function with Control + Shift + Enter. You will notice that the result is now 3, as it is the largest values in the array returned by the Max function, which gets the three numbers as the result of our user-defined function – ThreeNumbers.
You can use the same technique to create a function that returns an array of Month Names as shown by the below code:
Function Months() As Variant
Dim MonthName(1 To 12)
MonthName(1) = "January"
MonthName(2) = "February"
MonthName(3) = "March"
MonthName(4) = "April"
MonthName(5) = "May"
MonthName(6) = "June"
MonthName(7) = "July"
MonthName(8) = "August"
MonthName(9) = "September"
MonthName(10) = "October"
MonthName(11) = "November"
MonthName(12) = "December"
Months = MonthName
End Function
Now when you enter the function =Months() in Excel worksheet and use Control + Shift + Enter, it will return the entire array of month names. Note that you see only January in the cell as that is the first value in the array. This does not mean that the array is only returning one value.
To show you the fact that it is returning all the values, do this – select the cell with the formula, go to the formula bar, select the entire formula and press F9. This will show you all the values that the function returns.
You can use this by using the below INDEX formula to get a list of all the month names in one go.
=INDEX(Months(),ROW())
Now if you have a lot of values, it’s not a good practice to assign these values one by one (as we have done above). Instead, you can use the Array function in VBA.
So the same code where we create the ‘Months’ function would become shorter as shown below:
Function Months() As Variant
Months = Array("January", "February", "March", "April", "May", "June", _
"July", "August", "September", "October", "November", "December")
End Function
The above function uses the Array function to assign the values directly to the function.
Note that all the functions created above return a horizontal array of values. This means that if you select 12 horizontal cells (let’s say A1:L1), and enter the =Months() formula in cell A1, it will give you all the month names.
But what if you want these values in a vertical range of cells.
You can do this by using the TRANSPOSE formula in the worksheet.
Simply select 12 vertical cells (contiguous), and enter the below formula.
Understanding the Scope of a User Defined Function in Excel
A function can have two scopes – Public or Private.
- A Public scope means that the function is available for all the sheets in the workbook as well as all the procedures (Sub and Function) across all modules in the workbook. This is useful when you want to call a function from a subroutine (we will see how this is done in the next section).
- A Private scope means that the function is available only in the module in which it exists. You can’t use it in other modules. You also won’t see it in the list of functions in the worksheet. For example, if your Function name is ‘Months()’, and you type function in Excel (after the = sign), it will not show you the function name. You can, however, still, use it if you enter the formula name.
If you don’t specify anything, the function is a Public function by default.
Below is a function that is a Private function:
Private Function WorkbookName() As String
WorkbookName = ThisWorkbook.Name
End Function
You can use this function in the subroutines and the procedures in the same modules, but can’t use it in other modules. This function would also not show up in the worksheet.
The below code would make this function Public. It will also show up in the worksheet.
Function WorkbookName() As String
WorkbookName = ThisWorkbook.Name
End Function
Different Ways of Using a User Defined Function in Excel
Once you have created a user-defined function in VBA, you can use it in many different ways.
Let’s first cover how to use the functions in the worksheet.
Using UDFs in Worksheets
We have already seen examples of using a function created in VBA in the worksheet.
All you need to do is enter the functions name, and it shows up in the intellisense.
Note that for the function to show up in the worksheet, it must be a Public function (as explained in the section above).
You can also use the Insert Function dialog box to insert the user defined function (using the steps below). This would work only for functions that are Public.
The above steps would insert the function in the worksheet. It also displays a Function Arguments dialog box that will give you details on the arguments and the result.
You can use a user defined function just like any other function in Excel. This also means that you can use it with other inbuilt Excel functions. For example. the below formula would give the name of the workbook in upper case:
=UPPER(WorkbookName())
Using User Defined Functions in VBA Procedures and Functions
When you have created a function, you can use it in other sub-procedures as well.
If the function is Public, it can be used in any procedure in the same or different module. If it’s Private, it can only be used in the same module.
Below is a function that returns the name of the workbook.
Function WorkbookName() As String
WorkbookName = ThisWorkbook.Name
End Function
The below procedure call the function and then display the name in a message box.
Sub ShowWorkbookName()
MsgBox WorkbookName
End Sub
You can also call a function from another function.
In the below codes, the first code returns the name of the workbook, and the second one returns the name in uppercase by calling the first function.
Function WorkbookName() As String
WorkbookName = ThisWorkbook.Name
End Function
Function WorkbookNameinUpper()
WorkbookNameinUpper = UCase(WorkbookName)
End Function
Calling a User Defined Function from Other Workbooks
If you have a function in a workbook, you can call this function in other workbooks as well.
There are multiple ways to do this:
- Creating an Add-in
- Saving function in the Personal Macro Workbook
- Referencing the function from another workbook.
Creating an Add-in
By creating and installing an add-in, you will have the custom function in it available in all the workbooks.
Suppose you have created a custom function – ‘GetNumeric’ and you want it in all the workbooks. To do this, create a new workbook and have the function code in a module in this new workbook.
Now follow the steps below to save it as an add-in and then install it in Excel.
Now the add-in has been activated.
Now you can use the custom function in all the workbooks.
Saving the Function in Personal Macro Workbook
A Personal Macro Workbook is a hidden workbook in your system that opens whenever you open the Excel application.
It’s a place where you can store macro codes and then access these macros from any workbook. It’s a great place to store those macros that you want to use often.
By default, there is no personal macro workbook in your Excel. You need to create it by recording a macro and saving it in the Personal macro workbook.
You can find the detailed steps on how to create and save macros in the personal macro workbook here.
Referencing the function from another workbook
While the first two methods (creating an add-in and using personal macro workbook) would work in all situations, if you want to reference the function from another workbook, that workbook needs to be open.
Suppose you have a workbook with the name ‘Workbook with Formula’, and it has the function with the name ‘GetNumeric’.
To use this function in another workbook (while the Workbook with Formula is open), you can use the below formula:
=’Workbook with Formula’!GetNumeric(A1)
The above formula will use the user defined function in the Workbook with Formula file and give you the result.
Note that since the workbook name has spaces, you need to enclose it in single quotes.
Using Exit Function Statement VBA
If you want to exit a function while the code is running, you can do that by using the ‘Exit Function’ statement.
The below code would extract the first three numeric characters from an alphanumeric text string. As soon as it gets the three characters, the function ends and returns the result.
Function GetNumericFirstThree(CellRef As Range) As Long
Dim StringLength As Integer
StringLength = Len(CellRef)
For i = 1 To StringLength
If J = 3 Then Exit Function
If IsNumeric(Mid(CellRef, i, 1)) Then
J = J + 1
Result = Result & Mid(CellRef, i, 1)
GetNumericFirstThree = Result
End If
Next i
End Function
The above function checks for the number of characters that are numeric, and when it gets 3 numeric characters, it Exits the function in the next loop.
Debugging a User Defined Function
There are a few techniques you can use while debugging a user-defined function in VBA:
Debugging a Custom Function by Using the Message Box
Use MsgBox function to show a message box with a specific value.
The value you display can be based on what you want to test. For example, if you want to check if the code is getting executed or not, any message would work, and if you want to check whether the loops are working or not, you can display a specific value or the loop counter.
Debugging a Custom Function by Setting the Breakpoint
Set a breakpoint to be able to go step through each line one at a time. To set a breakpoint, select the line where you want it and press F9, or click on the gray vertical area which is left to the code lines. Any of these methods would insert a breakpoint (you will see a red dot in the gray area).
Once you have set the breakpoint and you execute the function, it goes till the breakpoint line and then stops. Now you can step through the code using the F8 key. Pressing F8 once moves to the next line in the code.
Debugging a Custom Function by Using Debug.Print in the Code
You can use Debug.Print statement in your code to get the values of the specified variables/arguments in the immediate window.
For example, in the below code, I have used Debug.Print to get the value of two variables – ‘j’ and ‘Result’
Function GetNumericFirstThree(CellRef As Range) As Long
Dim StringLength As Integer
StringLength = Len(CellRef)
For i = 1 To StringLength
If J = 3 Then Exit Function
If IsNumeric(Mid(CellRef, i, 1)) Then
 J = J + 1
 Result = Result & Mid(CellRef, i, 1)
 Debug.Print J, Result
 GetNumericFirstThree = Result
End If
Next i
End Function
When this code is executed, it shows the following in the immediate window.
Excel Inbuilt Functions Vs. VBA User Defined Function
There are few strong benefits of using Excel in-built functions over custom functions created in VBA.
- Inbuilt functions are a lot faster than the VBA functions.
- When you create a report/dashboard using VBA functions, and you send it to a client/colleague, they wouldn’t have to worry about whether the macros are enabled or not. In some cases, clients/customers get scared by seeing a warning in the yellow bar (which simply asks them to enable macros).
- With inbuilt Excel functions, you don’t need to worry about file extensions. If you have macros or user-defined functions in the workbook, you need to save it in .xlsm.
While there are many strong reasons to use Excel in-built functions, in a few cases, you’re better off using a user-defined function.
- It’s better to use a user-defined function if your inbuilt formula is huge and complicated. This becomes even more relevant when you need someone else to update the formulas. For example, if you have a huge formula made up of many different functions, even changing a reference to a cell can be tedious and error-prone. Instead, you can create a custom function that only takes one or two arguments and does all the heavy lifting the backend.
- When you have to get something done that can not be done by Excel inbuilt functions. An example of this can be when you want to extract all the numeric characters from a string. In such cases, the benefit of using a user-defined function gar outweighs its negatives.
Where to put the VBA Code for a User-Defined Function
When creating a custom function, you need to put the code in the code window for the workbook in which you want the function.
Below are the steps to put the code for the ‘GetNumeric’ function in the workbook.
- Go to the Developer tab.
- Click on the Visual Basic option. This will open the VB editor in the backend.
- In the Project Explorer pane in the VB Editor, right-click on any object for the workbook in which you want to insert the code. If you don’t see the Project Explorer go to the View tab and click on Project Explorer.
- Go to Insert and click on Module. This will insert a module object for your workbook.
- Copy and paste the code in the module window.
You May Also Like the Following Excel VBA Tutorials:
- Working with Cells and Ranges in Excel VBA.
- Working with Worksheets in Excel VBA.
- Working with Workbooks using VBA.
- How to use Loops in Excel VBA.
- Excel VBA Events – An Easy (and Complete) Guide
- Using IF Then Else Statements in VBA.
- How to Record a Macro in Excel.
- How to Run a Macro in Excel.
- How to Sort Data in Excel using VBA (A Step-by-Step Guide).
- Excel VBA InStr Function – Explained with Examples.
Home / What is a Function in Excel
Home / What is a Function in Excel
What is a Function in Excel
In Excel, a function is a predefined formula that performs a specific calculation by using values a user input as arguments. Every Excel function has a specific purpose, in simple words, it calculates a specific value. Each function has its arguments (the value one needs to input) to get the result value in the cell.
Components
Each function has two major components. In short, each function (except a few) is made up of two following things:
- Function Name
- Arguments
Let me show you an example. Let’s take a look at the below function which we have inserted in the cell A1.
Now if you look at the formula bar you can understand the structure of the function by splitting it into two parts i.e. name and arguments.
Function Arguments
As I have already mentioned that in a function you need to specify input values to get the desired result. An argument is that value which you need to specify. If you look at the syntax of a function you can see there in each function there is set arguments to specify.
Below are the types of arguments:
- Required: A required argument is compulsory for a user to specify and without which a function can’t calculate its result.
- Optional: If you skip specifying these arguments it will not stop a function to calculate its result value.
- No Arguments: There are few functions (like NOW) where you don’t need to specify any argument.
How to INSERT a Function in Excel
The easiest way to insert a function in a cell in Excel is to type the name of the function you want to insert starting with equals to sign.
Let’s say you want to insert the SUM function:
- First of all, you need to type = and the then type SUM.
- After that, enter the opening parentheses.
- Specify the arguments (refer to a cell or you can directly enter values into the function).
- In the end, type closing parentheses and hit enter.
Major Types
Below are the major types:
- Text Functions: If you deal with data where you have text, then below are some of the functions which you need to learn to work efficiently.
- Date Functions: Dates are one of the major ingredients of data that you use every day, and helps you to analyze your data in a better way.
- Time Functions: Just like dates, time is could also be there in data and you can use time functions to deal with data where you have time values.
- Logical Functions: Logical functions can help you create some of the most helpful formula in your spreadsheet.
- Maths Functions: Excel is all about calculations and analysis, and mathematical functions and you can use these functions to get better in calculations and analysis.
- Statistical Functions: One of the best things about Excel is there are a bunch of statistical functions there that you can use to analyze data easily.
- Lookup Functions: In Excel, there some specific functions which can help you to look up a value or specific information about a cell or a range of cells.
- Information Function: These some specific functions which you can use to get information about the values you supplied.
- Financial Functions: These functions can help you calculate some of the common but important financial calculations in an easy way.
About the Author
Puneet is using Excel since his college days. He helped thousands of people to understand the power of the spreadsheets and learn Microsoft Excel. You can find him online, tweeting about Excel, on a running track, or sometimes hiking up a mountain.
In this Article
- Creating a Function without Arguments
- Calling a Function from a Sub Procedure
- Creating Functions
- Single Argument
- Multiple Arguments
- Optional Arguments
- Default Argument Value
- ByVal and ByRef
- Exit Function
- Using a Function from within an Excel Sheet
This tutorial will teach you to create and use functions with and without parameters in VBA
VBA contains a large amount of built-in functions for you to use, but you are also able to write your own. When you write code in VBA, you can write it in a Sub Procedure, or a Function Procedure. A Function Procedure is able to return a value to your code. This is extremely useful if you want VBA to perform a task to return a result. VBA functions can also be called from inside Excel, just like Excel’s built-in Excel functions.
Creating a Function without Arguments
To create a function you need to define the function by giving the function a name. The function can then be defined as a data type indicating the type of data you want the function to return.
You may want to create a function that returns a static value each time it is called – a bit like a constant.
Function GetValue() As Integer
   GetValue = 50
End Function
If you were to run the function, the function would always return the value of 50.
You can also create functions that refer to objects in VBA but you need to use the Set Keyword to return the value from the function.
Function GetRange() as Range
  Set GetRange = Range("A1:G4")
End Function
If you were to use the above function in your VBA code, the function would always return the range of cells A1 to G4 in whichever sheet you are working in.
Calling a Function from a Sub Procedure
Once you create a function, you can call it from anywhere else in your code by using a Sub Procedure to call the function.
The value of 50 would always be returned.
You can also call the GetRange function from a Sub Procedure.
In the above example, the GetRange Function is called by the Sub Procedure to bold the cells in the range object.
Creating Functions
Single Argument
You can also assign a parameter or parameters to your function. These parameters can be referred to as Arguments.
Function ConvertKilosToPounds (dblKilo as Double) as Double
   ConvertKiloToPounds = dblKilo*2.2
End Function
We can then call the above function from a Sub Procedure in order to work out how many pounds a specific amount of kilos are.
A function can be a called from multiple procedures within your VBA code if required. This is very useful in that it stops you from having to write the same code over and over again. It also enables you to divide long procedures into small manageable functions.
In the above example, we have 2 procedures – each of them are using the Function to calculate the pound value of the kilos passed to them in the dblKilo Argument of the function.
Multiple Arguments
You can create a Function with multiple arguments and pass the values to the Function by way of a Sub Procedure.
Function CalculateDayDiff(Date1 as Date, Date2 as Date) as Double
   CalculateDayDiff = Date2-Date1
End Function
We can then call the function to calculate the amount of days between 2 dates.
Optional Arguments
You can also pass Optional arguments to a Function. In other words, sometimes you may need the argument, and sometimes you may not – depending on what code you are using the Function with .
Function CalculateDayDiff(Date1 as Date, Optional Date2 as Date) as Double
'check for second date and if not there, make Date2 equal to today's date.
   If Date2=0 then Date2 = Date
'calculate difference
   CalculateDayDiff = Date2-Date1
End Function
VBA Coding Made Easy
Stop searching for VBA code online. Learn more about AutoMacro — A VBA Code Builder that allows beginners to code procedures from scratch with minimal coding knowledge and with many time-saving features for all users!
Learn More
Default Argument Value
You can also set the default value of the Optional arguments when you are creating the function so that if the user omits the argument, the value that you have put as default will be used instead.
Function CalculateDayDiff(Date1 as Date, Optional Date2 as Date="06/02/2020") as Double
'calculate difference
   CalculateDayDiff = Date2-Date1
End Function
ByVal and ByRef
When you pass values to a function, you can use the ByVal or ByRef keywords. If you omit either of these, the ByRef is used as the default.
ByVal means that you are passing a copy of the variable to the function, whereas ByRef means you are referring to the original value of the variable. When you pass a copy of the variable (ByVal), the original value of the variable is NOT changed, but when you reference the variable, the original value of the variable is changed by the function.
Function GetValue(ByRef intA As Integer) As Integer
   intA = intA * 4
   GetValue = intA
End Function
In the function above, the ByRef could be omitted and the function would work the same way.
Function GetValue(intA As Integer) As Integer
   intA = intA * 4
   GetValue = intA
End Function
To call this function, we can run a sub-procedure.
Sub TestValues()
   Dim intVal As Integer
'populate the variable with the value 10
   intVal = 10
'run the GetValue function, and show the value in the immediate window
   Debug.Print GetValue(intVal)
'show the value of the intVal variable in the immediate window
   Debug.Print  intVal
End Sub
Note that the debug windows show the value 40 both times. When you pass the variable IntVal to the function – the value of 10 is passed to the function, and multiplied by 4. Using the ByRef keyword (or omitting it altogether), will AMEND the value of the IntVal variable. This is shown when you show first the result of the function in the immediate window (40), and then the value of the IntVal variable in the debug window (also 40).
If we do NOT want to change the value of the original variable, we have to use ByVal in the function.
Function GetValue(ByVal intA As Integer) As Integer
intA = intA * 4
GetValue = intA
End Function
Now if we call the function from a sub-procedure, the value of the variable IntVal will remain at 10.
Exit Function
If you create a function that tests for a certain condition, and once the condition is found to be true, you want return the value from the function, you may need to add an Exit Function statement in your Function in order to exit the function before you have run through all the code in that function.
Function FindNumber(strSearch As String) As Integer
   Dim i As Integer
'loop through each letter in the string
   For i = 1 To Len(strSearch)
   'if the letter is numeric, return the value to the function
      If IsNumeric(Mid(strSearch, i, 1)) Then
         FindNumber= Mid(strSearch, i, 1)
   'then exit the function
         Exit Function
      End If
   Next
   FindNumber= 0
End Function
The function above will loop through the string that is provided until it finds a number, and then return that number from the string. It will only find the first number in the string as it will then Exit the function.
The function above can be called by a Sub routine such as the one below.
Sub CheckForNumber()
   Dim NumIs as Integer
'pass a text string to the find number function
   NumIs = FindNumber("Upper Floor, 8 Oak Lane, Texas")
'show the result in the immediate window
   Debug.Print NumIs
End Sub
VBA Programming | Code Generator does work for you!
Using a Function from within an Excel Sheet
In addition to calling a function from your VBA code using a sub procedure, you can also call the function from within your Excel sheet. The functions that you have created should by default appear in your function list in the User Defined section of the function list.
Click on the fx to show the Insert Function dialog box.
Select User Defined from the Category List
Select the function you require from the available User Defined Functions (UDF’s).
Alternatively, when you start writing your function in Excel, the function should appear in the drop down list of functions.
If you do not want the function to be available inside an Excel sheet, you need to put the Private word in front of the word Function when you create the function in your VBA code.
Private Function CalculateDayDiff(Date1 as Date, Date2 as Date) as Double
   CalculateDayDiff = Date2-Date1
End Function
It will now not appear in the drop down list showing the Excel functions available.
Interestingly enough, however, you can still use the function – it just will not appear in the list when looking for it!
If you have declared the second argument as Optional, you can omit it within the Excel sheet as well as within the VBA code.
You can also use the a function that you have created without arguments in your Excel sheet.
VBA code to call a function
The below example will help you to know how to call a function in Excel VBA Macros (it can be Excel VBA function, or user defined function). We generally create lot of function and we use the functions whenever and any time we want. The below example will help you to understand calling a simple function with and without parameters.
Calling a function Excel VBA
Here is the simple example to call the Now function to display the time. We use the Now function to get the System Current Time and Date.
'vba code to call a function
Sub vba_code_to_call_a_function()
    MsgBox Now()
End Sub
Calling a function Excel VBA: Function with Parameters
Here is the another example to call the Left function to extract the left part of a string. We use the left function to extract the left part of any string.
'vba code to call a function
Sub vba_code_to_call_a_function_a()
    MsgBox Left("123", 2)
End Sub
Calling a user defined Function Excel VBA
It is same as above, but we have to make sure that the functions is written before calling the function. Other wise it will though the run time error.
'User Defined Function
Function mySum(ByVal A As Integer, ByVal B As Integer)
    mySum = A + B
End Function

'vba code to call a the user defined function
Sub vba_code_to_call_a_function_b()
    'Calling udf
    MsgBox mySum(1, 5)
End Sub
VBA code to Convert and Save the Excel to CSV – Instructions
Please follow the below step by step instructions to test this Example VBA Macro codes:
- Step 1: Open a New Excel workbook
- Step 2: Press Alt+F11 – This will open the VBA Editor (alternatively, you can open it from Developer Tab in Excel Ribbon)
- Step 3: Insert a code module from then insert menu of the VBE
- Step 4: Copy the above code and paste in the code module which have inserted in the above step
- Step 5: Now press F8 to debug the Macro to check how the VBA is calling the function while execution
A Powerful & Multi-purpose Templates for project management. Now seamlessly manage your projects, tasks, meetings, presentations, teams, customers, stakeholders and time. This page describes all the amazing new features and options that come with our premium templates.
Save Up to 85% LIMITED TIME OFFER

All-in-One Pack
120+ Project Management Templates
Essential Pack
50+ Project Management Templates
Excel Pack
50+ Excel PM Templates
PowerPoint Pack
50+ Excel PM Templates
MS Word Pack
25+ Word PM Templates
Ultimate Project Management Template
Ultimate Resource Management Template
Project Portfolio Management Templates
Related Posts
- Calling a function Excel VBA
- Calling a function Excel VBA: Function with Parameters
- Calling a user defined Function Excel VBA
- VBA code to Convert and Save the Excel to CSV – Instructions
VBA Reference
Effortlessly
Manage Your Projects
120+ Project Management Templates
Seamlessly manage your projects with our powerful & multi-purpose templates for project management.
120+ PM Templates Includes:
One Comment
-
Rajadurai16
March 16, 2017 at 4:18 PM — ReplyTimer vba codes
Dim binNew As Boolean
Dim TRows, THows, i As LongPrivate Sub UserForm_Click()
End Sub
Private Sub CmdClose_Click()
If CmdClose.Caption = “Close” Then
Unload Me
Else
CmdClose.Caption = “Close”
CmdNew.Enabled = True
CmdDelete.Enabled = True
End If
End SubPrivate Sub CmdNew_Click()
binNew = True
txtEmpNo.Text = ”
txtEmpName.Text = ”
txtAddr1.Text = ”
txtAddr2.Text = ”
txtAddr3.Text = ”CmdClose.Caption = “Cancel”
CmdNew.Enabled = False
CmdSave.Enabled = True
CmdDelete.Enabled = False
End SubPrivate Sub cmdSave_Click()
If Trim(txtEmpNo.Text) = ” Then
MsgBox “Enter Emp. No. “, vbCritical, “Save”
Exit Sub
End If
Call prSave
End SubPrivate Sub prSave()
If binNew = True Then
THows = Worksheets(“Data”).Range(“A1”).CurrentRegion.Rows.Count
With Worksheets(“Data”).Range(“A1″)
.Offset(THows, 0).Value = txtEmpNo.Text
.Offset(THows, 1).Value = txtEmpName.Text
.Offset(THows, 2).Value = txtAddr1.Text
.Offset(THows, 3).Value = txtAddr2.Text
.Offset(THows, 4).Value = txtAddr3.TextEnd With
txtEmpNo.Text = ”
txtEmpName.Text = ”
txtAddr1.Text = ”
txtAddr2.Text = ”
txtAddr3.Text = ”Call PrComboBoxFill
Else
For i = 2 To TRows
If Trim(Worksheets(“Data”).Cells(i, 1).Value) = Trim(ComboBox1.Text) Then
Worksheets(“Data”).Cells(i, 1).Value = txtEmpNo.Text
Worksheets(“Data”).Cells(i, 2).Value = txtEmpName.Text
Worksheets(“Data”).Cells(i, 3).Value = txtAddr1.Text
Worksheets(“Data”).Cells(i, 4).Value = txtAddr2.Text
Worksheets(“Data”).Cells(i, 5).Value = txtAddr3.TexttxtEmpNo.Text = ”
txtEmpName.Text = ”
txtAddr1.Text = ”
txtAddr2.Text = ”
txtAddr3.Text = ”Exit For
End If
Next i
End If
binNew = FalseEnd Sub
————————————-
Private Sub cmdDelete_Click()
TRows = Worksheets(“Data”).Range(“A1”).CurrentRegion.Rows.Count
Dim strDel
strDel = MagBox(“Delete ?”, vbYesNo, “Delete”)
If strDel = vbYes Then
For i = 2 To TRows
If Trims(Worksheets(“Data”).Cells(i, 1).Value) = Trim(ComboBox1.Text) Then‘ sheet1.range(i & “:” & i).Delete
Worksheets(“Data”).Range(i & “:” & i).DeleteTxtEmpNo.Text = ”
txtEmpName.Text = ”
TxtempAddr1.Text = ”
TxtempAddr2.Text = ”
TxtempAddr3.Text = ”
TxtempAddr4.Text = ”
Call prCoboBoxFill
Exit For
End If
Next i
If Trim(ComboBox1.Text) = ” Then
cmdSave.Enabled = False
cmdDelete.Enabled = False
Else
cmdSave.Enabled = True
cmdDelete.Enabled = True
End If
End If
End Sub
——————————–
Private Sub CmdClose_Click()
If CmdClose.Caption = “Close” Then
Unload Me
Else
CmdClose.Caption = “Close”
CmdNew.Enabled = True
CmdDelete.Enabled = True
End If
End Sub
————————————-Private Sub PrComboBoxFill()
TRows = Worksheets(“Data”).Range(“A1”).CurrentRegion.Rows.Count
ComboBox1.Clear
For i = 2 To TRows
ComboBox1.AddItem Worksheets(“Data”).Cells(i, 1).ValueNext i
End Sub
—————————————————–
Private Sub Userform_Initialize()
Call PrComboBoxFillCmdSave.Enabled = False
CmdDelete.Enabled = FalseEnd Sub
—————————————————–
Private Sub cmdsearch_Click()
binNew = False
txtEmpNo.Text = ”
txtEmpName.Text = ”
txtAddr1.Text = ”
txtAddr2.Text = ”
txtAddr3.Text = ”TRows = Worksheets(“Data”).Range(“A1”).CurrentRegion.Rows.Count
For i = 2 To TRows
If Val(Trim(Worksheets(“Data”).Cells(i, 1).Value)) = Val(Trim(ComboBox1.Text)) ThentxtEmpNo.Text = Worksheets(“Data”).Cells(i, 1).Value
txtEmpName.Text = Worksheets(“Data”).Cells(i, 2).Value
txtAddr1.Text = Worksheets(“Data”).Cells(i, 3).Value
txtAddr2.Text = Worksheets(“Data”).Cells(i, 4).Value
txtAddr3.Text = Worksheets(“Data”).Cells(i, 5).ValueExit For
End If
Next i
If txtEmpNo.Text = ” Then
Else
CmdSave.Enabled = True
CmdDelete.Enabled = True
End If
End Sub
Effectively Manage Your
Projects and Resources
ANALYSISTABS.COM provides free and premium project management tools, templates and dashboards for effectively managing the projects and analyzing the data.
We’re a crew of professionals expertise in Excel VBA, Business Analysis, Project Management. We’re Sharing our map to Project success with innovative tools, templates, tutorials and tips.
Project Management
Excel VBA
Download Free Excel 2007, 2010, 2013 Add-in for Creating Innovative Dashboards, Tools for Data Mining, Analysis, Visualization. Learn VBA for MS Excel, Word, PowerPoint, Access, Outlook to develop applications for retail, insurance, banking, finance, telecom, healthcare domains.
Page load link
Go to Top


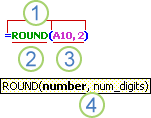

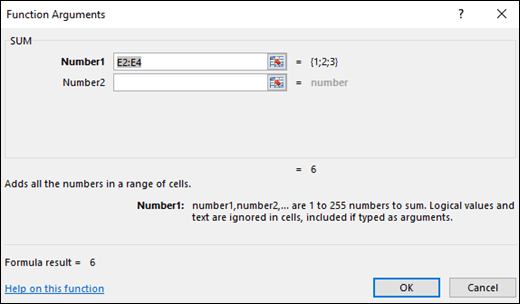
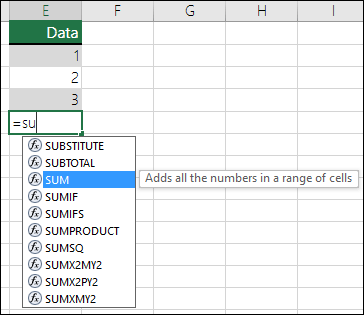


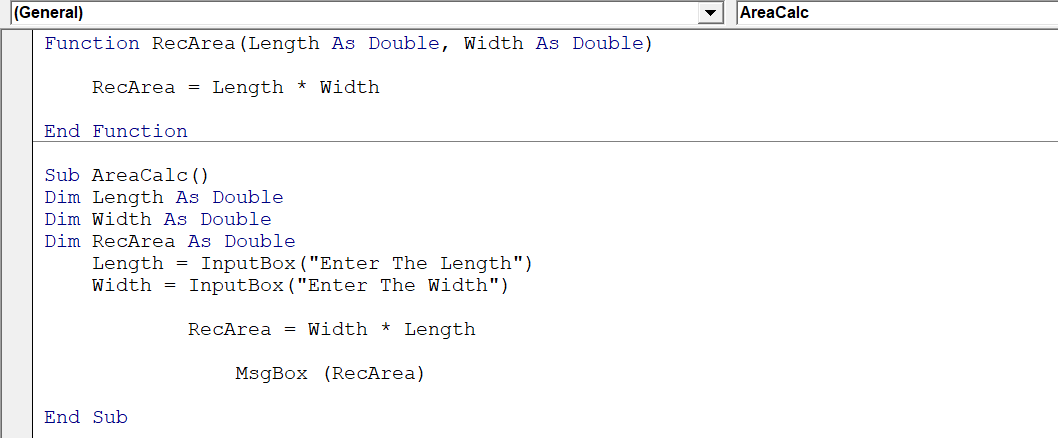
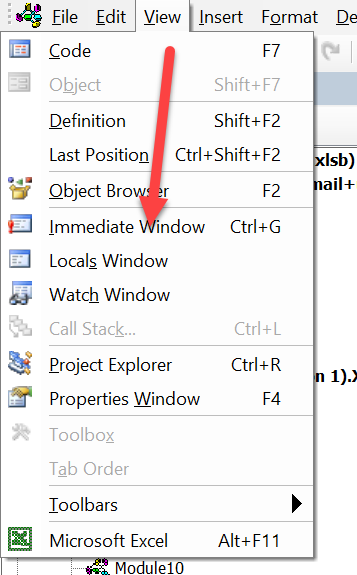
 If you want to see all of the blog posts in the Macro Monday series. Click on the link below


