
|
jfd Пользователь Сообщений: 302 |
#1 29.01.2013 18:10:48 Здравствуйте!
Прикрепленные файлы
Изменено: jfd — 29.01.2013 18:11:55 |
||
|
Sergei_A Пользователь Сообщений: 443 |
#2 29.01.2013 19:06:29 Не хватило самой малости
|
||
|
jfd Пользователь Сообщений: 302 |
Спасибо, все заработало как надо. |
|
The_Prist  Пользователь Сообщений: 14181 Профессиональная разработка приложений для MS Office |
Потому что свойство PrintArea принимает в качестве аргумента текст(т.е. адрес диапазона), а не сам диапазон как объект. Даже самый простой вопрос можно превратить в огромную проблему. Достаточно не уметь формулировать вопросы… |
|
Добрый всем вечер. |
|
|
Sergei_A Пользователь Сообщений: 443 |
#6 12.03.2013 20:19:57
8 — это номер столбца H |
||
|
Выдает ошибку — переменная не определена( |
|
|
Kuzmich Пользователь Сообщений: 7998 |
|
|
Sergei_A Пользователь Сообщений: 443 |
#9 12.03.2013 21:20:49 SerjVorotilov, сорри, к Option Explicit я себя пока не приучил
|
||
|
Большое спасибо Вам, Sergei_A и Kuzmich |
|
|
Что-то не могу понять — область печати в обоих случаях — диапазон А1:Н1, несморя на наличие данных в ячейках, расположенных ниже (но в диапазоне А:Н) Прикрепленные файлы
|
|
|
Sergei_A Пользователь Сообщений: 443 |
#12 13.03.2013 00:06:23 Не думал, что у Вас первый столбец пустой, по-этому всегда лучше сразу кидать пример
|
||
|
Спасибо, Сергей, то что нужно. |
|
|
jfd Пользователь Сообщений: 302 |
#14 13.03.2013 00:16:13 Кажется самый простой вариант
|
||
|
SerjVorotilov Пользователь Сообщений: 231 |
#15 13.03.2013 00:30:10 Сделал через Worksheet_SelectionChange:
Еще раз огромное спасибо Вам, Сергей. |
||
|
SerjVorotilov Пользователь Сообщений: 231 |
#16 13.03.2013 00:33:51 Сделал через Worksheet_SelectionChange:
Еще раз огромное спасибо Вам, Сергей. Блин, только при использовании Worksheet_SelectionChange макрос начинает реагировать на ввод данных в столбцы, выходящие за определенный мной диапазон А:Н, что не есть гуд. |
||
|
Sergei_A Пользователь Сообщений: 443 |
#17 13.03.2013 00:42:26 Воспользуйтесь событием Workbook_BeforePrint
Изменено: Sergei_A — 13.03.2013 00:44:00 |
||
|
marchela  Пользователь Сообщений: 8 |
Здравствуйте! |
|
Sanja Пользователь Сообщений: 14838 |
Согласие есть продукт при полном непротивлении сторон. |
|
marchela Пользователь Сообщений: 8 |
#20 18.01.2019 12:13:25 Доброго дня! Почему не в тему? У меня похожая задача. Смотрите вложение Сделал через Worksheet_SelectionChange:
у меня работает, но только нужно реализовать выделение области БЕЗ учета форматов и формул — только по отображаемому значению в ячейке. КАК ОПРЕДЕЛИТЬ ПОСЛЕДНЮЮ ЯЧЕЙКУ НА ЛИСТЕ ЧЕРЕЗ VBA? СПОСОБ 4 Да видел я этот пример — с реализацией туго , помогите, пожалуйста, соединить этот код с кодом из способа 4 Прикрепленные файлы
Изменено: marchela — 18.01.2019 12:20:36 |
||
|
Юрий М  Модератор Сообщений: 60570 Контакты см. в профиле |
marchela, код следует оформлять соответствующим тегом: ищите такую кнопку (см. скрин) и исправьте своё сообщение. |
|
Юрий М Модератор Сообщений: 60570 Контакты см. в профиле |
#22 18.01.2019 12:24:26 И ещё:
Т.е. Ваш вопрос лишь косвенно связан с этой темой — задание области печати. |
||
|
Antag  Пользователь Сообщений: 52 |
Получится задать разные области печати на нескольких листах книги, чтобы область печати менялась в зависимости от значения одной ячейки в другом листе? Если Главный!R6=»a» → область печати одна, |
|
MikeVol  Пользователь Сообщений: 229 Ученик |
#24 24.01.2023 09:17:05 Antag Доброго времени суток. Возможно я не понял вас правильно. Как понял. Вариант:
Изменено: MikeVol — 24.01.2023 09:23:29 |
||
|
Antag Пользователь Сообщений: 52 |
#25 24.01.2023 16:05:48
Если Главный!R6=»a» → область печати на других (но не на всех) листах A1:G256, Изменено: Antag — 24.01.2023 16:06:08 |
||
|
MikeVol Пользователь Сообщений: 229 Ученик |
#26 24.01.2023 18:15:11 Antag,
вы этого не указали в своём стартовом посте #23 Думаю что при таких раскладах вам не составит большого труда подстроить под ваши нужды выше мной выложеный код. Необходимо изначально чётко ставить задачи, тут экстрасенсорными способностями никто не обладает. Удачи вам. Изменено: MikeVol — 24.01.2023 18:16:32 |
||
|
_Boroda_  Пользователь Сообщений: 1496 Контакты см. в профиле |
#27 25.01.2023 09:26:46 Для листов 1 и 3. Без макросов. См. Диспетчер имен Прикрепленные файлы
Скажи мне, кудесник, любимец ба’гов… |
Параметры печатной страницы в VBA Excel. Свойство PageSetup объекта Worksheet. Объект PageSetup и описание некоторых его свойств с примерами.
PageSetup — это объект, который содержит все атрибуты параметров страницы в виде свойств (диапазон печати, размеры полей, ориентация страницы и т.д.).
Объект PageSetup возвращается свойством PageSetup объекта Worksheet:
где Expression — это выражение (переменная), возвращающее объект Worksheet.
Свойства объекта PageSetup
Диапазон печати
Установить диапазон для печати из кода VBA Excel можно с помощью свойства PageSetup.PrintArea:
|
Worksheets(«Лист1»).PageSetup.PrintArea = «D7:L30» Лист1.PageSetup.PrintArea = Selection.Address |
Размеры полей
Свойства, отвечающие за размер полей печатной страницы:
| Свойство | Описание |
|---|---|
| LeftMargin | Возвращает или задает размер левого поля |
| TopMargin | Возвращает или задает размер верхнего поля |
| RightMargin | Возвращает или задает размер правого поля |
| BottomMargin | Возвращает или задает размер нижнего поля |
Свойства, отвечающие за размер полей, предназначены для чтения и записи, выражаются в точках (1 точка равна 1/72 дюйма или ≈1/28 см). Тип данных — Double.
Для того, чтобы вручную не высчитывать количество точек в дюймах или сантиметрах, существуют методы Application.InchesToPoints и Application.CentimetersToPoints, которые автоматически переводят дюймы и сантиметры в точки.
Пример задания размеров полей для печатной страницы:
|
Sub Primer1() With Лист4.PageSetup .LeftMargin = 72 ‘1 дюйм (2,54 см) .TopMargin = Application.CentimetersToPoints(2) ‘2 см .RightMargin = 28 ‘приблизительно 1 см .BottomMargin = Application.InchesToPoints(0.5) ‘0,5 дюйма (1,27 см) End With End Sub |
Пример чтения размеров заданных полей для печатной страницы и запись их в ячейки диапазона [A1:A4] активного листа:
|
Sub Primer2() With Лист4.PageSetup [A1] = .LeftMargin [A2] = .TopMargin [A3] = .RightMargin [A4] = .BottomMargin End With End Sub |
Масштаб
Масштабирование рабочего листа для печати осуществляется в VBA Excel с помощью свойства PageSetup.Zoom:
|
Лист4.PageSetup.Zoom = 200 ‘Увеличение масштаба до 200% (от 100%) Worksheets(«Лист4»).PageSetup.Zoom = 80 ‘Уменьшение масштаба до 80% (от 100%) |
Свойство PageSetup.Zoom может задавать или возвращать значение от 10 до 400 процентов.
Ориентация страницы
За ориентацию печатной страницы отвечает свойство PageSetup.Orientation, которое возвращает или задает значение константы из коллекции XlPageOrientation.
Константы коллекции XlPageOrientation:
| Константа | Значение | Описание |
|---|---|---|
| xlPortrait | 1 | Портретный режим (вертикальная ориентация) |
| xlLandscape | 2 | Ландшафтный режим (горизонтальная ориентация) |
Примеры установки ориентации печатной страницы из кода VBA Excel:
|
Worksheets(«Лист4»).PageSetup.Orientation = xlPortrait ActiveSheet.PageSetup.Orientation = xlLandscape |
Содержание
- Русские Блоги
- [Excel VBA] Параметры печати объекта PageSetup
- 1. Свойства, соответствующие вкладке «Страница»
- 2. Свойства, соответствующие вкладке «Поля».
- 3. Свойства, соответствующие вкладке «Верхний / нижний колонтитул».
- 4. Свойства, соответствующие вкладке «Рабочий лист»
- 5. Атрибуты, не соответствующие вкладкам
- Range.PrintOut метод
- VBA Excel. Объект PageSetup (параметры страницы)
- Описание объекта PageSetup
- Свойства объекта PageSetup
- Диапазон печати
- Размеры полей
Русские Блоги
[Excel VBA] Параметры печати объекта PageSetup
Мы часто печатаем вещи в своей работе и вручную устанавливаем некоторые параметры, например, горизонтальную или вертикальную печать. Разберитесь в свойствах PageSetup, задайте параметры печати с помощью нескольких коротких строк кода, затем вы можете установить их один раз, использовать постоянно, удобно и эффективно.
Объект PageSetup представляет инструкции по настройке страницы. Содержит все свойства настроек страницы (левое поле, нижнее поле, размер бумаги и т. Д.).
В следующем примере устанавливается альбомная ориентация печати, а затем выполняется печать рабочего листа.
1. Свойства, соответствующие вкладке «Страница»

| Атрибуты | Описание |
|---|---|
| FirstPageNumber | Вернуть или установить номер первой страницы при печати указанного рабочего листа. Если установлено значение xlAutomatic, Microsoft Excel использует номер первой страницы. Значение по умолчанию — xlAutomatic. Длинный шрифт, читаемый и записываемый. |
| FitToPagesTall | Верните или установите высоту страницы, используемую для масштабирования листа при его печати. Применяется только к рабочим листам. Тип варианта, читаемый и записываемый. |
| FitToPagesWide | Верните или установите ширину страницы, используемую для масштабирования рабочего листа при его печати. Применяется только к рабочим листам. Тип варианта, читаемый и записываемый. |
| Orientation | Возвращает или задает значение XlPageOrientation, которое представляет портретный или альбомный режим печати. |
| Pages | Возвращает или задает количество страниц в коллекции Pages. |
| PaperSize | Верните или установите размер бумаги. Может читать и писать XlPaperSize. |
| PrintQuality | Вернуть или установить качество печати. Тип варианта, читаемый и записываемый. |
| Zoom | Возвращает или задает значение Variant, которое представляет собой процентное значение от 10% до 400%. Этот процент представляет собой коэффициент масштабирования, когда Microsoft Excel печатает рабочий лист. Это свойство применяется только к листам. Если для этого атрибута установлено значениеFalse, ЗатемFitToPagesWide с участием FitToPagesTallАтрибуты определяют способ масштабирования листа. При любом увеличении сохраняется соотношение сторон исходного документа. |
В этом примере Sheet1 настраивается для печати в альбомной ориентации.
2. Свойства, соответствующие вкладке «Поля».

Установление и возврат маржи в пунктах. быть полезнымInchesToPoints Метод преобразования дюймов в фунты, вы также можете использоватьCentimetersToPoints Метод перевода сантиметров в точки.
Точка: относится к единице измерения высоты печатаемых символов. Фунт равен 1/72 дюйма или примерно равен 1/28 сантиметра. )
| Атрибуты | Описание |
|---|---|
| BottomMargin | Возвращает или задает размер нижнего поля в пунктах. Двойной тип, читаемый и записываемый. |
| CenterHorizontally | Если указанный рабочий лист напечатан в центре страницы по горизонтали, значение атрибута равно True. Логический тип, доступный для чтения и записи. |
| CenterVertically | Если указанный рабочий лист напечатан в центре страницы по вертикали, значение атрибута равно True. Логический тип, доступный для чтения и записи. |
| FooterMargin | Вернуть или установить расстояние от нижнего колонтитула до низа страницы в пунктах. Двойной тип, читаемый и записываемый. |
| HeaderMargin | Вернуть или установить расстояние от верха страницы до верхнего колонтитула в пунктах. Двойной тип, читаемый и записываемый. |
| LeftMargin | Возвращает или задает размер левого поля в пунктах. Двойной тип, читаемый и записываемый. |
| RightMargin | Возвращает или задает размер правого поля в пунктах. Двойной тип, читаемый и записываемый. |
| TopMargin | Возвращает или задает размер верхнего поля в пунктах. Двойной тип, читаемый и записываемый. |
В следующем примере устанавливаются все поля первого листа.
Эти два свойства аналогичны настройке содержимого ячейки по центру по горизонтали и вертикали.
3. Свойства, соответствующие вкладке «Верхний / нижний колонтитул».

| Атрибуты | Описание |
|---|---|
| AlignMarginsHeaderFooter | Если Excel выравнивает верхний и нижний колонтитулы с полями, заданными в параметрах настройки страницы, он возвращает True. Чтение / запись логического типа. |
| CenterFooter | Отцентрируйте информацию нижнего колонтитула в объекте PageSetup. Чтение / запись типа String. |
| CenterFooterPicture | Возвращает графический объект, который представляет изображение в средней части нижнего колонтитула. Используется для установки атрибутов, связанных с изображением. |
| CenterHeader | Выровняйте информацию заголовка по центру объекта PageSetup. Чтение / запись типа String. |
| CenterHeaderPicture | Возвращает графический объект, который представляет изображение в средней части заголовка. Используется для установки атрибутов, связанных с изображением. |
| DifferentFirstPageHeaderFooter | Истинно, если на первой странице используется другой верхний или нижний колонтитул. Чтение / запись логического типа. |
| LeftFooter | Возвращает или задает выравнивание текста в левом нижнем колонтитуле книги или раздела. |
| LeftFooterPicture | Возвращает графический объект, который представляет изображение в левой части нижнего колонтитула. Используется для установки атрибутов, связанных с изображением. |
| LeftHeader | Возвращает или задает выравнивание текста в левом заголовке книги или раздела. |
| LeftHeaderPicture | Возвращает графический объект, который представляет изображение в левой части заголовка. Используется для установки атрибутов, связанных с изображением. |
| OddAndEvenPagesHeaderFooter | Если нечетные и четные страницы указанного объекта PageSetup имеют разные верхние и нижние колонтитулы, значение этого атрибута равно True. Логический тип, доступный для чтения и записи. |
| RightFooter | Возвращает или задает расстояние (в пунктах) между правым краем страницы и правым краем нижнего колонтитула. Чтение / запись типа String. |
| RightFooterPicture | Возвращает графический объект, который представляет изображение в правой части нижнего колонтитула. Используется для установки атрибутов изображения. |
| RightHeader | Вернуть или установить правую часть заголовка. Чтение / запись типа String. |
| RightHeaderPicture | Укажите графическое изображение, которое должно отображаться в правом заголовке. Только чтение. |
| ScaleWithDocHeaderFooter | Возвращает или задает, будут ли масштабироваться верхний и нижний колонтитулы вместе с документом при изменении размера документа. Чтение / запись логического типа. |
4. Свойства, соответствующие вкладке «Рабочий лист»

| Атрибуты | Описание |
|---|---|
| BlackAndWhite | Если элементы в указанном документе напечатаны черно-белыми, значение атрибута равно True. Логический тип, доступный для чтения и записи. |
| Draft | Если графика на листе не печатается при печати, значение атрибута равно True. Логический тип, доступный для чтения и записи. |
| Order | Возвращает или задает значение XlOrder, которое представляет порядок, который Microsoft Excel использует для нумерации страниц при печати большого рабочего листа. |
| PrintArea | Верните или установите область для печати в виде строки, которая использует ссылку стиля A1 макроязыка. Тип строки, доступный для чтения и записи. |
| PrintComments | Вернуть или установить способ печати комментариев на листе. Тип XlPrintLocation, доступный для чтения и записи. Вы можете распечатать комментарии в виде текстовых полей или концевых сносок. |
| PrintErrors | Устанавливает или возвращает константу XlPrintErrors, которая указывает тип отображаемой ошибки печати. Эта функция позволяет пользователям отменять отображение ошибок при печати рабочего листа. Могу читать и писать. |
| PrintGridlines | Если линии сетки ячеек напечатаны на странице, значение равно True. Применяется только к рабочим листам. Логический тип, доступный для чтения и записи. |
| PrintHeadings | Если заголовки строк и столбцов печатаются одновременно при печати этой страницы, значение равно True. Применяется только к рабочим листам. Логический тип, доступный для чтения и записи. |
| PrintNotes | Если при печати рабочего листа комментарии к ячейкам печатаются вместе как концевые сноски, значение равно True. Применяется только к рабочим листам. Логический тип, доступный для чтения и записи. |
| PrintTitleColumns | Возвращает или задает столбец, содержащий ячейки, которые повторно появляются в левой части каждой страницы, выраженные строкой на языке макросов в стиле A1. Тип строки, доступный для чтения и записи. Установите для этого атрибута значениеFalseИли пустая строка («»), строка заголовка будет закрыта. |
| PrintTitleRows | Возвращает или задает те строки, которые содержат ячейки, которые многократно появляются в верхней части каждой страницы, выраженные в нотации стиля A1 с помощью строк макроязыка. Тип строки, доступный для чтения и записи. |

Комментарий будет напечатан на новой странице.

5. Атрибуты, не соответствующие вкладкам
| Атрибуты | Описание |
|---|---|
| Application | Если идентификатор объекта не используется, это свойство возвращает объект Application, представляющий приложение Microsoft Excel. Если используется идентификатор объекта, это свойство возвращает объект Application, представляющий создателя указанного объекта (вы можете использовать это свойство в объекте автоматизации OLE, чтобы вернуть приложение объекта). Только чтение. |
| Creator | Возвращает 32-битное целое число, указывающее приложение, создавшее объект. Только чтение Длинный тип. |
| EvenPage | Возвращает или задает выравнивание текста на четных страницах книги или раздела. |
| FirstPage | Возвращает или задает выравнивание текста на первой странице книги или раздела. |
| Parent | Возвращает родительский объект указанного объекта. Только чтение. |
Range.PrintOut метод
Этот метод эквивалентен нажатию кнопки печати в Excel для выполнения операции печати. Этот метод позволяет указать принтер для печати.
Выражение выглядит следующим образом.
.PrintOut(From, To, Copies, Preview, ActivePrinter, PrintToFile, Collate, PrToFileName)
| название | Описание |
|---|---|
| From | Номер начальной страницы для печати. Если этот параметр не указан, печать начнется с начальной позиции. |
| To | Номер конечной страницы печати. Если этот параметр не указан, печать будет до последней страницы. |
| Copies | Количество копий для печати. Если этот параметр не указан, будет напечатана только одна копия. |
| Preview | Если этоTrue, Microsoft Excel вызовет предварительный просмотр перед печатью объекта. Если этоFalse(Или опустите этот параметр), объект будет немедленно напечатан. |
| ActivePrinter | Задайте имя активного принтера. |
| PrintToFile | Если этоTrue, Затем распечатайте в файл. Если не указаноPrToFileName, Microsoft Excel предложит пользователю ввести имя файла вывода, который будет использоваться. |
| Collate | Если этоTrue, Печать нескольких копий с подборкой. |
| PrToFileName | в случае PrintToFileУстановить какTrue, Параметр указывает имя файла для печати. |
Заметка:From с участием ToОписанная «страница» относится к странице, которая будет напечатана, а не ко всем страницам в указанном листе или книге.
Публичный аккаунт WeChat: VBA168
Обратите внимание на общедоступную учетную запись WeChat и каждый день получайте объяснения классических примеров Excel VBA.
Магазины Taobao предоставляют услуги настройки Excel.
Источник
VBA Excel. Объект PageSetup (параметры страницы)
Параметры печатной страницы в VBA Excel. Свойство PageSetup объекта Worksheet. Объект PageSetup и описание некоторых его свойств с примерами.
Описание объекта PageSetup
Объект PageSetup возвращается свойством PageSetup объекта Worksheet:
где Expression — это выражение (переменная), возвращающее объект Worksheet.
Свойства объекта PageSetup
Диапазон печати
Установить диапазон для печати из кода VBA Excel можно с помощью свойства PageSetup.PrintArea:
Размеры полей
Свойства, отвечающие за размер полей печатной страницы:
| Свойство | Описание |
|---|---|
| LeftMargin | Возвращает или задает размер левого поля |
| TopMargin | Возвращает или задает размер верхнего поля |
| RightMargin | Возвращает или задает размер правого поля |
| BottomMargin | Возвращает или задает размер нижнего поля |
Свойства, отвечающие за размер полей, предназначены для чтения и записи, выражаются в точках (1 точка равна 1/72 дюйма или ≈1/28 см). Тип данных — Double.
Для того, чтобы вручную не высчитывать количество точек в дюймах или сантиметрах, существуют методы Application.InchesToPoints и Application.CentimetersToPoints, которые автоматически переводят дюймы и сантиметры в точки.
Пример задания размеров полей для печатной страницы:
Источник
This Excel VBA tutorial explains how to set print area, page width, Print Title, Orientation in Excel VBA.
To set Print Area in Excel spreadsheet, first select (highlight) Cells that we want to set as Print Area, and then navigate to ribbon Page Layout > Print Area > Set Print Area
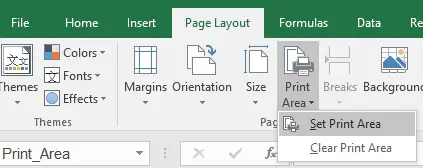
To set Print Area in Excel VBA, we have to use PageSetup.PrintArea Property.
For example, in order to set Print Area A1:N21, we can write
Public Sub printArea()
    ActiveSheet.PageSetup.printArea = "$A$1:$N$21"
End Sub
Excel VBA set page width and height
After we have defined the Print Area, the next step is to set the page width and height.
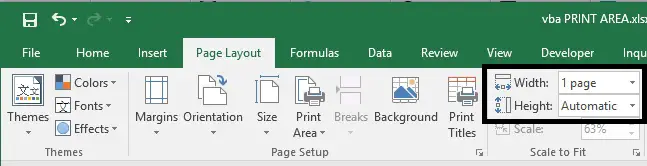
For most of the time, we want the page Width to be 1 page, while the height is Automatic, meaning we let Excel decide how many pages to print depending on how many rows are in the data, we just need to ensure all the field headers are displayed in one page.
Public Sub printArea()
    With ActiveSheet.PageSetup
        .printArea = "$A$1:$N$21"
        .FitToPagesWide = 1
        .FitToPagesTall = False
    End With
End Sub
While the above code would work perfectly, in fact, it is more correct to set the FitToPagesTall = 0 to make it Automatic, but this command would generate an error
Run-time error ‘1004’: Unable to set the FitToPagesTall property of the PageSetup class
The error is generated when we have not turned on the communication to the printer. To avoid this error, we can temporarily turn off the communication using Application.PrintCommunication Property.
Public Sub printArea()
    Application.PrintCommunication = False
    With ActiveSheet.PageSetup
        .printArea = "$A$1:$N$21"
        .FitToPagesWide = 1
        .FitToPagesTall = 0
    End With
    Application.PrintCommunication = True
End Sub
Excel VBA set Print Title
In case the number of records (rows) is so large that it takes more than 1 page to print all the data, we need to ensure all pages contain the field headers on top of each page. In Excel spreadsheet, we set it under Page Layout > Print Titles > Rows to repeat at top
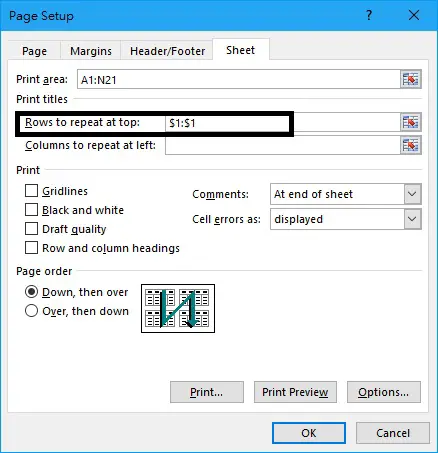
In VBA, we set this using PrintTitleRows Property.
Public Sub printArea()
    With ActiveSheet.PageSetup
        .printArea = "$A$1:$N$21"
        .FitToPagesWide = 1
        .FitToPagesTall = False
        .PrintTitleRows = "$1:$1"
    End With
End Sub
Excel VBA set Orientation
Sometimes we want to rotate the paper by 90 degree to Landscape when there are too many fields to display in Portrait layout.
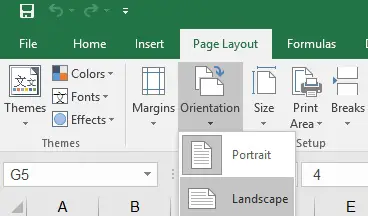
In VBA, we can either set Orientation = xlPortrait or Orientation = xlLandscape
Public Sub printArea()
    With ActiveSheet.PageSetup
        .printArea = "$A$1:$N$21"
        .FitToPagesWide = 1
        .FitToPagesTall = False
        .PrintTitleRows = "$1:$1"
        .Orientation = xlLandscape
    End With
End Sub
Other Properties
I have introduced the most commonly used properties in this article, in fact, there are more than 50 properties for PageSetup Object. If you want to learn other properties, click here.
 If you’re anything like me, you probably spend a substantial amount of time working in Excel. The results of your efforts are probably beautiful and useful Excel worksheets.
From time-to-time, you probably share the results of your work in Excel with others. 2 of the most common ways of achieving this are:
- Printing your worksheets.
- Saving your files as PDF.
Printing an Excel file may be the last step you take prior to distributing your work. Knowing how to appropriately set up and print your files is, therefore, very important. You probably don’t want to cause a bad impression simply because your file doesn’t print properly.
Correctly setting up and printing your Excel files takes some time. The good news is that you can easily automate most of these activities using VBA. And if that’s your purpose, then this VBA Tutorial is likely to be of help.
My purpose with this blog post is to provide you with the most relevant information you need to appropriately set up your Excel files for printing and, as required, print or display a print preview.
- The first section of this Tutorial introduces and explains several VBA constructs that are commonly used when printing Excel files.
- In the second section, I go through 2 detailed VBA code examples that you can easily adjust and start using today.
This Excel VBA Print Tutorial is accompanied by an example workbook. This workbook contains the example VBA Sub procedures I explain below. It also has the data and worksheets that appear in the screenshots throughout this post. You can get immediate free access to this example workbook by clicking the button below.

The following Table of Contents lists the main topics I cover in this blog post:
Let’s start by taking a very basic look at the process your VBA code usually follows when printing from Excel or displaying a print preview:
How To Print Or Display Print Preview In Excel With VBA
Generally, you can print or display a print preview with VBA in the following 2 easy steps:
- Specify the page and print setup.
- Print or display the print preview.
This VBA Tutorial covers these 2 steps in detail. Let’s start by looking at the VBA construct you use to print Excel worksheets, the…
PrintOut Method
The PrintOut method allows you to print the referenced object. However, you can’t generally print hidden sheets.

You can work with the PrintOut method at several different levels. In other words, you can refer to different objects. The object you refer to determines what Excel prints.
Because of the above, the Microsoft Dev Center lists different versions of the PrintOut method. The following are the most relevant:
- Workbook.PrintOut.
- Window.PrintOut.
- Sheets.PrintOut.
- Worksheets.PrintOut.
- Worksheet.PrintOut.
- Range.PrintOut.
- Charts.PrintOut.
- Chart.PrintOut.
Generally, the syntax and parameters are always the same. That is regardless of the object you’re printing.
The basic syntax of the PrintOut method is as follows:
expression.PrintOut(From, To, Copies, Preview, ActivePrinter, PrintToFile, Collate, PrToFileName, IgnorePrintAreas)
“expression” is the object you want to print.
As shown above, PrintOut has the following 9 parameters. These arguments are optional.
- From.
- To.
- Copies.
- Preview.
- ActivePrinter.
- PrintToFile.
- Collate.
- PrToFileName.
- IgnorePrintAreas.
In some cases, the IgnorePrintAreas parameter isn’t applicable. This is the case when you apply the PrintOut method to the Window (Window.PrintOut), Range (Range.PrintOut) and Chart (Chart.PrintOut) objects. In such cases, the basic syntax looks roughly as follows:
expression.PrintOut(From, To, Copies, Preview, ActivePrinter, PrintToFile, Collate, PrToFileName)
Let’s take a closer look at the 9 parameters I list above:
Parameters #1 And #2: From And To
You can use the From and To parameters to specify the pages that Excel prints. More precisely, you can specify the following:
- From:
- The page at which Excel starts printing.
- If you omit the From parameter, Excel starts printing at the beginning.
- To:
- The last page Excel prints.
- If you don’t specify the To argument, Excel prints stops printing after the last page.

Parameter #3: Copies
The Copies parameter allows you to specify how many copies Excel prints. The default, which Excel uses if you fail to specify Copies, is printing 1 copy.

Parameter #4: Preview
Generally, when you print with VBA, Excel doesn’t display the print preview prior to printing. This means that Visual Basic for Applications generally prints the relevant object immediately.
In other words, Preview is set to False by default.
If you want to invoke the print preview prior to Excel printing, set Preview to True.

Parameter #5: ActivePrinter
You use the ActivePrinter parameter to set the name of the active printer.

Parameters #6 And #8: PrintToFile And PrToFileName
By default, Excel doesn’t print to a file. In other words, PrintToFile is set to False.
If you want to print to a file, you must set the PrintToFile parameter to True.

The PrToFileName is relevant if you set PrintToFile to True. In such a case:
- You can use PrToFileName to specify the name of the output file.
- If you don’t specify a filename with the PrToFileName parameter, Excel prompts the user to enter the name of the file it should print to.
Parameter #7: Collate
Collating is useful if you’re printing multiple copies. If you use Excel’s collation feature, Excel automatically organizes the printed sheets into logically organized sets. Since the sets of printouts are logically organized, you generally don’t have to rearrange or reorganize them into separate packages.

Let’s assume that you’re printing 3 copies of a worksheet that has 3 pages. Excel organizes the printed sheets differently depending on whether you choose to collate or not. More specifically:
The Collate argument allows you to control this setting, as follows:
- True: Collate.
- False: Don’t collate.
Parameter #9: IgnorePrintAreas
By default, Excel considers any print areas set for the relevant object.
When applicable, you can use the IgnorePrintAreas parameter to determine whether Excel ignores (or not) these print areas. The values that IgnorePrintAreas can take are as follows:
- True: Ignore print areas.
- False: Don’t ignore print areas.

PrintPreview Method
Parameter #4 of the PrintOut method I explain in the previous section allows you to display the print preview prior to printing.
You can, however, get Excel to display the print preview without having to invoke the PrintOut method. The following methods show a preview of the applicable object printout:
- Workbook.PrintPreview.
- Window.PrintPreview.
- Sheets.PrintPreview.
- Worksheets.PrintPreview.
- Worksheet.PrintPreview.
- Range.PrintPreview.
- Charts.PrintPreview.
- Chart.PrintPreview.
The basic syntax of the PrintPreview method is as follows:
expression.PrintPreview(EnableChanges)
The following definitions apply:
- expression: Object whose printout you want to preview.
- EnableChanges: Optional parameter. allows you to specify whether the user can change page setup options that are available within the print preview screen. You specify this setting as one of the Boolean values True or False. This looks roughly as follows:
expression.PrintPreview EnableChanges:=True
expression.PrintPreview EnableChanges:=False
PageSetup Object
The PageSetup object holds the description of the page setup.

You generally access the PageSetup object through the PageSetup property. Choose 1 of the following 2 properties depending on which object (worksheet vs. chart) you’re working with:
- Worksheet.PageSetup property.
- Chart.PageSetup property.
Therefore, you generally access most page setup attributes through the properties of PageSetup. The PageSetup object has the following 48 properties:
- AlignMarginsHeaderFooter.
- Application.
- BlackAndWhite.
- BottomMargin.
- CenterFooter.
- CenterFooterPicture.
- CenterHeader.
- CenterHeaderPicture.
- CenterHorizontally.
- CenterVertically.
- Creator.
- DifferentFirstPageHeaderFooter.
- Draft.
- EvenPage.
- FirstPage.
- FirstPageNumber.
- FitToPagesTall.
- FitToPagesWide.
- FooterMargin.
- HeaderMargin.
- LeftFooter.
- LeftFooterPicture.
- LeftHeader.
- LeftHeaderPicture.
- LeftMargin.
- OddAndEvenPagesHeaderFooter.
- Order.
- Orientation.
- Pages.
- PaperSize.
- Parent.
- PrintArea.
- PrintComments.
- PrintErrors.
- PrintGridlines.
- PrintHeadings.
- PrintNotes.
- PrintQuality.
- PrintTitleColumns.
- PrintTitleRows.
- RightFooter.
- RightFooterPicture.
- RightHeader.
- RightHeaderPicture.
- RightMargin.
- ScaleWithDocHeaderFooter.
- TopMargin.
- Zoom.
Let’s take a closer look at some (most) of the 48 properties I list above.
The explanations below don’t follow the alphabetical order above. Rather, I categorize the properties per my criteria. Certain properties may, strictly speaking, fall in more than 1 category.
PageSetup Properties Dealing With Print Area, Paper Size, Orientation And Scaling
The following 5 properties allow you to specify paper size, orientation and scaling:
- #17: PageSetup.FitToPagesTall.
- #18: PageSetup.FitToPagesWide.
- #28: PageSetup.Orientation.
- #30: PageSetup.PaperSize.
- #32: PageSetup.PrintArea.
- #48: PageSetup.Zoom.
Let’s take a closer look at each of these properties:
Property #32: PageSetup.PrintArea
Use the PrintArea property to specify the range you want to print. This property is only applicable to worksheets.

The basic syntax you can use to specify the print area is as follows:
PageSetup.PrintArea = rangeA1String
The following definitions apply:
- PageSetup: PageSetup object.
- rangeA1String: Range you want to set as print area. You express the print area as a string using A1-style in the language of the macro.
You can set the print area to the entire worksheet by setting the PrintArea property to False or an empty string. In this case, the basic statement structure you use looks roughly as follows:
PageSetup.PrintArea = False
PageSetup.PrintArea = ""
Property #30: PageSetup.PaperSize
The PaperSize property allows you to determine the size of the paper.

You do this by setting this property to one of the following 42 XlPaperSize constants.
| Name | Value | Description |
| xlPaperLetter | 1 | Letter (8-1/2 in. x 11 in.) |
| xlPaperLetterSmall | 2 | Letter Small (8-1/2 in. x 11 in.) |
| xlPaperTabloid | 3 | Tabloid (11 in. x 17 in.) |
| xlPaperLedger | 4 | Ledger (17 in. x 11 in.) |
| xlPaperLegal | 5 | Legal (8-1/2 in. x 14 in.) |
| xlPaperStatement | 6 | Statement (5-1/2 in. x 8-1/2 in.) |
| xlPaperExecutive | 7 | Executive (7-1/2 in. x 10-1/2 in.) |
| xlPaperA3 | 8 | A3 (297 mm x 420 mm) |
| xlPaperA4 | 9 | A4 (210 mm x 297 mm) |
| xlPaperA4Small | 10 | A4 Small (210 mm x 297 mm) |
| xlPaperA5 | 11 | A5 (148 mm x 210 mm) |
| xlPaperB4 | 12 | B4 (250 mm x 354 mm) |
| xlPaperB5 | 13 | A5 (148 mm x 210 mm) |
| xlPaperFolio | 14 | Folio (8-1/2 in. x 13 in.) |
| xlPaperQuarto | 15 | Quarto (215 mm x 275 mm) |
| xlPaper10x14 | 16 | 10 in. x 14 in. |
| xlPaper11x17 | 17 | 11 in. x 17 in. |
| xlPaperNote | 18 | Note (8-1/2 in. x 11 in.) |
| xlPaperEnvelope9 | 19 | Envelope #9 (3-7/8 in. x 8-7/8 in.) |
| xlPaperEnvelope10 | 20 | Envelope #10 (4-1/8 in. x 9-1/2 in.) |
| xlPaperEnvelope11 | 21 | Envelope #11 (4-1/2 in. x 10-3/8 in.) |
| xlPaperEnvelope12 | 22 | Envelope #12 (4-1/2 in. x 11 in.) |
| xlPaperEnvelope14 | 23 | Envelope #14 (5 in. x 11-1/2 in.) |
| xlPaperCsheet | 24 | C size sheet |
| xlPaperDsheet | 25 | D size sheet |
| xlPaperEsheet | 26 | E size sheet |
| xlPaperEnvelopeDL | 27 | Envelope DL (110 mm x 220 mm) |
| xlPaperEnvelopeC5 | 28 | Envelope C5 (162 mm x 229 mm) |
| xlPaperEnvelopeC3 | 29 | Envelope C3 (324 mm x 458 mm) |
| xlPaperEnvelopeC4 | 30 | Envelope C4 (229 mm x 324 mm) |
| xlPaperEnvelopeC6 | 31 | Envelope C6 (114 mm x 162 mm) |
| xlPaperEnvelopeC65 | 32 | Envelope C65 (114 mm x 229 mm) |
| xlPaperEnvelopeB4 | 33 | Envelope B4 (250 mm x 353 mm) |
| xlPaperEnvelopeB5 | 34 | Envelope B5 (176 mm x 250 mm) |
| xlPaperEnvelopeB6 | 35 | Envelope B6 (176 mm x 125 mm) |
| xlPaperEnvelopeItaly | 36 | Envelope (110 mm x 230 mm) |
| xlPaperEnvelopeMonarch | 37 | Envelope Monarch (3-7/8 in. x 7-1/2 in.) |
| xlPaperEnvelopePersonal | 38 | Envelope (3-5/8 in. x 6-1/2 in.) |
| xlPaperFanfoldUS | 39 | U.S. Standard Fanfold (14-7/8 in. x 11 in.) |
| xlPaperFanfoldStdGerman | 40 | German Legal Fanfold (8-1/2 in. x 13 in.) |
| xlPaperFanfoldLegalGerman | 41 | German Legal Fanfold (8-1/2 in. x 13 in.) |
| xlPaperUser | 256 | User-defined |
When setting the PaperSize property, make sure to confirm that the relevant printers support the paper size you want to specify.
The basic syntax of the PaperSize property looks as follows:
PageSetup.PaperSize = xlPaperSizeConstant
The following definitions are applicable:
- PageSetup: PageSetup object.
- xlPaperSizeConstant: One of the XlPaperSize constants in the table above.
Property #28: PageSetup.Orientation
You can use the Orientation property to determine the page orientation. PageSetup.Orientation can take either of the following XlPageOrientation constants:
- xlPortrait (1): Portrait mode.
- xlLandscape (2): Landscape mode.

The statement structure you can use to set the page orientation to portrait or landscape mode are roughly as follows:
PageSetup.Orientation = xlPortrait
PageSetup.Orientation = xlLandscape
“PageSetup” is a PageSetup object.
Property #48: PageSetup.Zoom
The Zoom property allows you to specify the value by which Excel scales a worksheet for printing. When scaling, Excel retains the aspect ratio of the worksheet.

You can only apply this property to worksheets. To scale a worksheet with the Zoom property, use the following statement structure:
PageSetup.Zoom = zoom%
The following definitions apply:
- PageSetup: PageSetup object.
- zoom%: Percentage by which you want to scale the worksheet. It generally must be between 10% and 400%.
As an alternative to the Zoom property, you can scale a worksheet by using the FitToPagesTall and FitToPagesWide properties I explain below. However, any scaling settings you specify with Zoom prevail over those 2 properties.
Therefore, if you want to scale a worksheet with the FitToPagesTall or FitToPagesWide properties, set Zoom to False with the following statement:
PageSetup.Zoom = False
Properties #17 And #18: PageSetup.FitToPagesTall And PageSetup.FitToPagesWide
Use the FitToPagesTall and FitToPagesWide properties to specify the number of pages tall or wide the worksheet is scaled to.

The following 2 restrictions apply to the FitToPagesTall and FitToPagesWide properties:
- You can generally only apply them to worksheets.
- If you assign a value to the PageSetup.Zoom property (other than False), they’re ignored. In other words, Zoom prevails over FitToPagesTall and FitToPagesWide.
The basic syntax you can use to work with these properties is as follows:
PageSetup.FitToPagesTall = pages#
PageSetup.FitToPagesWide = pages#
The following definitions are applicable:
- PageSetup: PageSetup object.
- pages#: Number of pages you want the worksheet scaled to.
You can generally set values for both the FitToPagesTall and FitToPagesWide properties. You can, however, allow the scaling to be determined by a single of these properties. To do this, set the other property (representing the scaling you don’t want) to False. This looks as follows:
- Determine the scaling per the FitToPagesWide property only:
PageSetup.FitToPagesTall = False
PageSetup.FitToPagesWide = pages#
- Determine the scaling per the FitToPagesTall property only:
PageSetup.FitToPagesTall = pages#
PageSetup.FitToPagesWide = False
PageSetup Properties Dealing With Printing Order And Basic Page Numbering
In this section, I introduce the following 2 properties:
- #16: PageSetup.FirstPageNumber.
- #27: PageSetup.Order.
Let’s look at each of them:
Property #27: PageSetup.Order
The Order property allows you to specify the order in which Excel organizes the pages of a large worksheet. You have 2 ordering options, represented by the following XlOrder constants:
- xlDownThenOver: First, go down the rows of the worksheet. Then, move over to the right.
- xlOverThenDown: First, go across the columns. Then, move down the rows.

The following is the basic statement structure you can use to specify either of the values above:
PageSetup.Order = xlDownThenOver
PageSetup.Order = xlOverThenDown
“PageSetup” is a PageSetup object.
Property #16: PageSetup.FirstPageNumber
Use the FirstPageNumber to set the first page number that Excel uses when printing.

The following is the basic syntax you can use to work with FirstPageNumber:
PageSetup.FirstPageNumber = number#
The following definitions apply:
- PageSetup: PageSetup object.
- number#: Number you want to assign. The default value of the FirstPageNumber property is xlAutomatic. You can also set FirstPageNumber to this default value, roughly as follows:
PageSetup.FirstPageNumber = xlAutomatic
PageSetup Properties Dealing With The Printing Of Certain Items
When printing, you can specify the way in which certain items are printed, and if they’re printed at all. The following are the main PageSetup properties you can use for these purposes:
- #33: PageSetup.PrintComments.
- #34: PageSetup.PrintErrors.
- #35: PageSetup.PrintGridlines.
- #36: PageSetup.PrintHeadings.
- #37: PageSetup.PrintNotes.
- #39: PageSetup.PrintTitleColumns.
- #40: PageSetup.PrintTitleRows.
Let’s take a closer look at each of them:
Properties #33 And #37: PageSetup.PrintComments And PageSetup.PrintNotes
Use the PrintComments property to determine if, and how, comments are printed. You can set PrintComments to any of the following xlPrintLocation constants:
- xlPrintNoComments (-4142): Don’t print comments.
- xlPrintSheetEnd (1): Print comments at the end of the sheet.
- xlPrintInPlace (16): Print comments as displayed on the sheet.

The basic statement structure you can use to specify how comments are printed is as follows:
PageSetup.PrintComments = xlPrintLocationConstant
The following definitions apply:
- PageSetup: PageSetup object.
- xlPrintLocationConstant: 1 of the 3 xlPrintLocation constants above.
An alternative, although more restricted, way of handling the printing of comments is by using the PrintNotes property. PrintNotes accepts either of the Boolean Values True and False, as follows:
- True: Print comments at the end of the sheet.
- False: Don’t print comments.
The basic statement structure you can use when working with the PrintNotes property is as follows:
PageSetup.PrintNotes = True
PageSetup.PrintNotes = False
“PageSetup” represents a PageSetup object.
Property #34: PageSetup.PrintErrors
The PrintErrors property allows you determine the way in which error values are displayed when printing. You determine how print errors are displayed by setting PrintErrors to any of the following xlPrintErrors constants:
- xlPrintErrorsDisplayed (0): Display print errors.
- xlPrintErrorsBlank (1): Display blanks instead of print errors.
- xlPrintErrorsDash (2): Display print errors as dashes (–).
- xlPrintErrorsNA (3): Display print errors as not available (#N/A).

Use the following statement structure to assign a value to PageSetup.PrintErrors:
PageSetup.PrintErrors = xlPrintErrorsConstant
The following definitions are applicable:
- PageSetup: PageSetup object.
- xlPrintErrorsConstant: Any of the xlPrintErrors constants above.
Property #35: PageSetup.PrintGridlines
You can use the PrintGridlines property to specify whether gridlines are printed. You do this by setting PrintGridlines to one of the Boolean values True or False, as follows:
- True: Print gridlines.
- False: Don’t print gridlines.

The PrintGridlines property is only applicable to worksheets.
You can use the following rough statement structure for purposes of setting PrintGridlines:
PageSetup.PrintGridlines = True
PageSetup.PrintGridlines = False
“PageSetup” represents a PageSetup object.
Property #36: PageSetup.PrintHeadings
The PrintHeadings property allows you to specify whether row and column headings are printed. To specify the setting you want, set the PrintHeadings to one of the Boolean values True or False, as follows:
- True: Print headings.
- False: Don’t print headings.

Considering the above, you can use the following basic statement structure to specify whether headings are printed or not:
PageSetup.PrintHeadings = True
PageSetup.PrintHeadings = False
“PageSetup” is a PageSetup object.
Properties #39 And #40: PageSetup.PrintTitleColumns And PageSetup.PrintTitleRows
The PrintTitleColumns and PrintTitleRows properties allow you to repeat certain rows or columns on each page of a worksheet. More precisely, you can specify the following:
- PrintTitleColumns: Certain columns appear on the left side of each page.
- PrintTitleRows: Certain rows appear at the top of each page.

You can only apply these 2 properties to worksheets.
You can use the following basic syntax as guidance when working with the PrintTitleColumns or PrintTitleRows properties:
PageSetup.PrintTitleColumns = columnsA1String
PageSetup.PrintTitleRows = rowsA1String
The following definitions apply:
- PageSetup: PageSetup object.
- columnsA1String and rowsA1String: Columns or rows you want to specify as title columns or rows. Express the title rows or columns as a string in A1-style notation in the language of the macro.
Generally, you should specify full rows or columns as title rows or columns. If you specify incomplete rows or columns, Excel automatically expands the range to cover the full row or column.
You can also “turn off” either of these 2 properties by setting them to False or an empty string. This looks roughly as follows:
PageSetup.PrintTitleColumns = False
PageSetup.PrintTitleColumns = ""
PageSetup.PrintTitleRows = False
PageSetup.PrintTitleRows = ""
PageSetup Properties Dealing With Print Quality
The following 3 properties of the PageSetup object deal with print quality matters:
- #3: PageSetup.BlackAndWhite.
- #13: PageSetup.Draft.
- #38: PageSetup.PrintQuality.
These PageSetup settings (usually) differ among printers. As I explain below (for PageSetup.PrintQuality), the macro recorder may help you find what is the appropriate syntax for a certain printer.
Executing the same macro on a different computer/printer may (still) result in an error. In some cases, you may want to consider working with error handler constructs (for ex., wrap the statements with the On Error Resume Next statement) to handle the potential errors caused by these printer setting differences.
When working with PageSetup, the macro recorder usually generates several unnecessary statements that you can delete. You can use the information within this Tutorial to decide which statements are useful to achieve your purposes.
Let’s take a closer look at them:
Property #38: PageSetup.PrintQuality
Use the PrintQuality property to determine the print quality.

The PrintQuality property has a single optional parameter: Index. You use index to specify to which of the following you’re referring to:
- 1: Horizontal print quality.
- 2: Vertical print quality.
If you don’t use the Index argument, you can set the property to an array with 2 elements. The first element contains the horizontal print quality. The second element contains the vertical print quality.
The basic statement structure you can use to specify the PrintQuality property looks roughly as follows:
PageSetup.PrintQuality(Index) = quality#
The following definitions apply:
- PageSetup: PageSetup object.
- quality#: Print quality you want to specify.
In practice, working with the PageSetup.PrintQuality property is trickier than it may seem at first glance. The main reason for this is that the precise specification depends on the printer driver.
In other words, the precise VBA statement you should use usually varies from case to case. You can usually get a good idea of the exact syntax you work with by using the macro recorder.
Property #13: PageSetup.Draft
The Draft property allows you to print as draft. The main consequence of printing as draft is that Excel doesn’t print graphics. This makes the printing process faster and usually requires less ink.
The Draft property takes one of the Boolean values True or False, as follows:
- True: Print as draft.
- False: Don’t print as draft.

The following statements show the basic structure you can generally use to work with the Draft property:
PageSetup.Draft = True
PageSetup.Draft = False
“PageSetup” represents a PageSetup object.
Property #38: PageSetup.BlackAndWhite
You can use the BlackAndWhite property to print in black and white. This property, however, only applies to worksheets.
BlackAndWhite takes either of the Boolean values, as follows:
- True: Print in black and white.
- False: Don’t print in black and white.

The following statements display the basic structure you can usually work with:
PageSetup.BlackAndWhite = True
PageSetup.BlackAndWhite = False
“PageSetup” is a PageSetup object.
PageSetup Properties Dealing With Margins
The following 7 properties of the PageSetup object refer to margins:
- #1: PageSetup.AlignMarginsHeaderFooter.
- #4: PageSetup.BottomMargin.
- #19: PageSetup.FooterMargin.
- #20: PageSetup.HeaderMargin.
- #25: PageSetup.LeftMargin.
- #45: PageSetup.RightMargin.
- #47: PageSetup.TopMargin.
I cover each of them in the following sections.
Properties #19 And #20: PageSetup.FooterMargin And PageSetup.HeaderMargin
The PageSetup.HeaderMargin and PageSetup.FooterMargin properties allow you to specify the margin or the header or footer (as appropriate).
You express margins as points measuring the following distances:
- HeaderMargin: Distance between the top of the page and the header.
- FooterMargin: Distance between the bottom of the page and footer.

The syntax of the HeaderMargin and FooterMargin properties is substantially the same. To specify these margins, use the following statement structure:
PageSetup.HeaderMargin = margin#
PageSetup.FooterMargin = margin#
The following definitions apply:
- PageSetup: PageSetup object.
- margin#:
- Margin, expressed in points.
- You can use the Application.InchesToPoints or Application.CentimetersToPoints methods to convert a measurement from (i) inches or centimeters, to (ii) points. I explain both methods below.
Property #1: PageSetup.AlignMarginsHeaderFooter
When working with headers and footers, you generally don’t set left and right margins.
However, you can choose whether Excel aligns the header and the footer with the general right and left page margins by using the PageSetup.AlignMarginsHeaderFooter property. AlignMarginsHeaderFooter can take either of the following values:
- True: Header and footer are aligned with margins.
- False: Excel doesn’t align the header and footer with the margins.

Because of the above, you can use the following statements to determine whether Excel carries out the header and footer alignment:
PageSetup.AlignMarginsHeaderFooter = True
PageSetup.AlignMarginsHeaderFooter = False
“PageSetup” is a PageSetup object.
The setting you choose for this property influences all headers and footers: left, right and center. The following comparison shows how Excel aligns headers and footers when they’re aligned with page margins vs. when they’re not:
| AlignMarginsHeaderFooter | True | False |
| Left | Aligned with left margin. | On left side of page, regardless of left margin. |
| Center | Centered between left and right margin. | Centered in page, regardless of the margins. |
| Right | Aligned with right margin. | On right side of page, regardless of left margin. |
Properties #4, #25, #45 And #47: PageSetup.BottomMargin, PageSetup.LeftMargin, PageSetup.RightMargin And PageSetup.TopMargin
The TopMargin, RightMargin, BottomMargin and LeftMargin properties allow you to set margins.

The syntax of these properties is substantially the same. In other words, to set a margin, use the following basic statement structure:
PageSetup.TopMargin = margin#
PageSetup.RightMargin = margin#
PageSetup.BottomMargin = margin#
PageSetup.LeftMargin = margin#
The following definitions apply:
- PageSetup: PageSetup object.
- margin#:
- Margin you’re specifying. When working with these properties, you must express margins in points.
- If you want to express margins in inches or centimeters, use the Application.InchesToPoints or Application.CentimetersToPoints methods. I cover both methods in their own section below.
PageSetup Properties That Center The Sheet On The Page
Most of the settings within the Margins tab of Excel’s Page Setup dialog box deal directly with margins. I explain the most relevant margin-related VBA properties above.
At the bottom of the Margins tab, there are 2 settings that allow you to specify whether Excel centers the sheet horizontally or vertically when printing.

The 2 properties that allow you to specify these settings are as follows:
- PageSetup.CenterHorizontally.
- PageSetup.CenterVertically.
Let’s look at each of them:
Property #9: PageSetup.CenterHorizontally
The CenterHorizontally property allows you to determine whether Excel centers the content horizontally on the printed page. You specify this by setting the property to one of the Boolean values True or False, as follows:
- True: Center.
- False: Don’t center.
The basic structure of the statements that allow you to do this is as follows:
PageSetup.CenterHorizontally = True
PageSetup.CenterHorizontally = False
“PageSetup” is a PageSetup object.
Property #10: PageSetup.CenterVertically
The CenterVertically property is like the CenterHorizontally property above. By using CenterVertically, you can specify whether the content is centered vertically on the printed page.
CenterVertically takes the Boolean values True and False, as follows:
- True: Center.
- False: Don’t center.
The syntax you use to specify your vertical-centering setting is roughly as follows:
PageSetup.CenterVertically = True
PageSetup.CenterVertically = False
“PageSetup” represents a PageSetup object.
PageSetup Properties Dealing With Headers Or Footers
The following 18 properties of the PageSetup object are related to headers or footers:
- #1: PageSetup.AlignMarginsHeaderFooter.
- #5: PageSetup.CenterFooter.
- #6: PageSetup.CenterFooterPicture.
- #7: PageSetup.CenterHeader.
- #8: PageSetup.CenterHeaderPicture.
- #12: PageSetup.DifferentFirstPageHeaderFooter.
- #19: PageSetup.FooterMargin.
- #20: PageSetup.HeaderMargin.
- #21: PageSetup.LeftFooter.
- #22: PageSetup.LeftFooterPicture.
- #23: PageSetup.LeftHeader.
- #24: PageSetup.LeftHeaderPicture.
- #26: PageSetup.OddAndEvenPagesHeaderFooter.
- #41: PageSetup.RightFooter.
- #42: PageSetup.RightFooterPicture.
- #43: PageSetup.RightHeader.
- #44: PageSetup.RightHeaderPicture.
- #46: PageSetup.ScaleWithDocHeaderFooter.
I explain properties #1 (PageSetup.AlignMarginsHeaderFooter), #19 (PageSetup.FooterMargin) and #20 (PageSetup.HeaderMargin) above. Please refer to the appropriate section for their explanation.
In addition to a description of all these properties, I include a list of the VBA codes you can use to format headers and footers, or add certain items to them.
In the following sections, I look at the other 15 properties I list above:
Properties #5, #7, #21, #23, #41 And #43: PageSetup.CenterFooter, PageSetup.CenterHeader, PageSetup.LeftFooter, PageSetup.LeftHeader, PageSetup.RightFooter And PageSetup.RightHeader
If you want to set a header or footer, use the following properties of the PageSetup object:
- PageSetup.LeftHeader: Left header.
- PageSetup.CenterHeader: Center header.
- PageSetup.RightHeader: Right header.
- PageSetup.RightFooter: Right footer.
- PageSetup.CenterFooter: Center footer.
- PageSetup.LeftFooter: Left footer.

If you want to work with any of these properties, use the following syntax:
PageSetup.LeftHeader = string
PageSetup.CenterHeader = string
PageSetup.RightHeader = string
PageSetup.RightFooter = string
PageSetup.CenterFooter = string
PageSetup.LeftFooter = string
The following definitions apply:
- PageSetup: PageSetup object.
- string: Header or footer you specify. You normally specify this as a string.

Properties #6, #8, #22, #24, #42 And #44: PageSetup.CenterFooterPicture, PageSetup.CenterHeaderPicture, PageSetup.LeftFooterPicture, PageSetup.LeftHeaderPicture, PageSetup.RightFooterPicture And PageSetup.RightHeaderPicture
In the previous section, I introduce the properties that allow you to specify a header or footer. Those properties deal with strings.
The properties I cover in this section also allow you to specify headers or footers. However, in this case, the properties deal with graphic images.
In other words, you work with the following properties to specify a header or footer picture:
- LeftHeaderPicture: Left header.
- CenterHeaderPicture: Center header.
- RightHeaderPicture: Right header.
- RightFooterPicture: Right footer.
- CenterFooterPicture: Center footer.
- LeftFooterPicture: Left footer.

The syntax you use to work with these properties is more complex than the one you use to set a string header/footer. The reason for this is that the properties I cover in this section return a Graphic object. The Graphic object holds the properties of the header and footer pictures.
In other words, you set a header or footer picture in the following 3 steps:
- Set the equivalent non-picture footer or header property to be equal to the string “&G”. &G is one of the special VBA codes you can use when working with headers and footers (I cover this topic in its own section below). &G initializes the picture and shows it in the location of the relevant footer or header.
The statements, depending on which of the properties above you use, are as follows. In all cases, “PageSetup” represents a PageSetup object.
- LeftHeaderPicture:
PageSetup.LeftHeader = "&G"
- CenterHeaderPicture:
PageSetup.CenterHeader = "&G"
- RightHeaderPicture:
PageSetup.RightHeader = "&G"
- RightFooterPicture:
PageSetup.RightFooter = "&G"
- CenterFooterPicture:
PageSetup.CenterFooter = "&G"
- LeftFooterPicture:
PageSetup.LeftFooter = "&G"
- LeftHeaderPicture:
- Refer to the appropriate Graphic object using the properties I list above.
- Work with the properties of the Graphic object to specify the characteristics of the header or footer picture.


The Graphic object has the following 14 properties:
- Graphic.Application.
- Graphic.Brightness.
- Graphic.ColorType.
- Graphic.Contrast.
- Graphic.Creator.
- Graphic.CropBottom.
- Graphic.CropLeft.
- Graphic.CropRight.
- Graphic.CropTop.
- Graphic.Filename.
- Graphic.Height.
- Graphic.LockAspectRatio.
- Graphic.Parent.
- Graphic.Width.
In the following sections, I provide more details about the most relevant of these properties. Property #10 (Graphic.Filename) is particularly important.
Property #2: Graphic.Brightness
Use the Graphic.Brightness property to specify the brightness of a footer or header picture.

The following lines show the basic statement structure you can use for these purposes:
PageSetup.LeftHeaderPicture.Brightness = brightness#
PageSetup.CenterHeaderPicture.Brightness = brightness#
PageSetup.RightHeaderPicture.Brigthness = brightness#
PageSetup.RightFooterPicture.Brightness = brightness#
PageSetup.CenterFooterPicture.Brightness = brightness#
PageSetup.LeftFooterPicture.Brightness = brightness#
The following definitions apply:
- PageSetup: PageSetup object reference.
- brightness#: is the property value you specify. This value can range between 0.0 (dimmest) and 1.0 (brightest).
Property #3: Graphic.ColorType
You can use the Graphic.ColorType property to apply certain color transformations to a header or footer picture. You specify the appropriate transformation by using one of the following MsoPictureColorType constants:
- msoPictureMixed (-2): Mixed.
- msoPictureAutomatic (1): Default.
- msoPictureGrayscale (2): Grayscale.
- msoPictureBlackAndWhite (3): Black and white.
- msoPictureWatermark (4): Watermark.

The syntax of this property looks as follows:
PageSetup.LeftHeaderPicture.ColorType = msoPictureColorTypeConstant
PageSetup.CenterHeaderPicture.ColorType = msoPictureColorTypeConstant
PageSetup.RightHeaderPicture.ColorType = msoPictureColorTypeConstant
PageSetup.RightFooterPicture.ColorType = msoPictureColorTypeConstant
PageSetup.CenterFooterPicture.ColorType = msoPictureColorTypeConstant
PageSetup.LeftFooterPicture.ColorType = msoPictureColorTypeConstant
The following definitions are applicable:
- PageSetup: PageSetup object reference.
- msoPictureColorTypeConstant: MsoPictureColorType constant. I list these constants above.
Property #4: Graphic.Contrast
The Graphic.Contrast property allows you to specify the contrast of a header or footer picture.

The basic syntax for specifying the picture contrast is as follows:
PageSetup.LeftHeaderPicture.Contrast = contrast#
PageSetup.CenterHeaderPicture.Contrast = contrast#
PageSetup.RightHeaderPicture.Contrast = contrast#
PageSetup.RightFooterPicture.Contrast = contrast#
PageSetup.CenterFooterPicture.Contrast = contrast#
PageSetup.LeftFooterPicture.Contrast = contrast#
The following definitions are applicable:
- PageSetup: PageSetup object reference.
- contrast#: Value you set for the Contrast property. This value must be between 0.0 (least contrast) and 1.0 (greatest contrast).
Properties #6, #7, #8 And #9: Graphic.CropBottom, Graphic.CropLeft, Graphic.CropRight And Graphic.CropTop
You can use the following properties to crop a header or footer picture:
- Graphic.CropTop: Crop off the top.
- Graphic.CropRight: Crop off the right side.
- Graphic.CropBottom: Crop off the bottom.
- Graphic.CropLeft: Crop off the left side.

The following list shows the basic syntax you use to work with the properties above:
- Graphic.CropTop:
PageSetup.LeftHeaderPicture.CropTop = cropPoints#
PageSetup.CenterHeaderPicture.CropTop = cropPoints#
PageSetup.RightHeaderPicture.CropTop = cropPoints#
PageSetup.RightFooterPicture.CropTop = cropPoints#
PageSetup.CenterFooterPicture.CropTop = cropPoints#
PageSetup.LeftFooterPicture.CropTop = cropPoints#
- Graphic.CropRight:
PageSetup.LeftHeaderPicture.CropRight = cropPoints#
PageSetup.CenterHeaderPicture.CropRight = cropPoints#
PageSetup.RightHeaderPicture.CropRight = cropPoints#
PageSetup.RightFooterPicture.CropRight = cropPoints#
PageSetup.CenterFooterPicture.CropRight = cropPoints#
PageSetup.LeftFooterPicture.CropRight = cropPoints#
- Graphic.CropBottom:
PageSetup.LeftHeaderPicture.CropBottom = cropPoints#
PageSetup.CenterHeaderPicture.CropBottom = cropPoints#
PageSetup.RightHeaderPicture.CropBottom = cropPoints#
PageSetup.RightFooterPicture.CropBottom = cropPoints#
PageSetup.CenterFooterPicture.CropBottom = cropPoints#
PageSetup.LeftFooterPicture.CropBottom = cropPoints#
- Graphic.CropLeft:
PageSetup.LeftHeaderPicture.CropLeft = cropPoints#
PageSetup.CenterHeaderPicture.CropLeft = cropPoints#
PageSetup.RightHeaderPicture.CropLeft = cropPoints#
PageSetup.RightFooterPicture.CropLeft = cropPoints#
PageSetup.CenterFooterPicture.CropLeft = cropPoints#
PageSetup.LeftFooterPicture.CropLeft = cropPoints#
The following definitions apply:
- PageSetup: PageSetup object reference.
- cropPoints#: Number of points you want to crop off the picture. Generally, Excel calculates the size of the cropped section with respect to the original size of the header or footer picture.
Property #10: Graphic.Filename
If you’re specifying a header or footer image, you’ll need to deal with this property. Graphic.Filename allows you to specify the location of the file you use as header or footer picture.

You can generally specify any of the following locations:
- An URL.
- A file path, including both local and network paths.
The statement structure you use to specify Filename is as follows:
PageSetup.LeftHeaderPicture.Filename = locationString
PageSetup.CenterHeaderPicture.Filename = locationString
PageSetup.RightHeaderPicture.Filename = locationString
PageSetup.RightFooterPicture.Filename = locationString
PageSetup.CenterFooterPicture.Filename = locationString
PageSetup.LeftFooterPicture.Filename = locationString
The following are the applicable definitions:
- PageSetup: PageSetup object reference.
- locationString: Location of your header or footer image. You generally specify Filename as a string.
Properties #11, #13 And #14: Graphic.Height, Graphic.LockAspectRatio And Graphic.Width
The 3 properties I cover in this section (Height, LockAspectRatio and Width) allow you to specify the size of a header or footer image.

You can set the height and width of the header or footer picture with the Height and Width properties (respectively). The statements you can use for these purposes look as follows:
- Height:
PageSetup.LeftHeaderPicture.Height = height#
PageSetup.CenterHeaderPicture.Height = height#
PageSetup.RightHeaderPicture.Height = height#
PageSetup.RightFooterPicture.Height = height#
PageSetup.CenterFooterPicture.Height = height#
PageSetup.LeftFooterPicture.Height = height#
- Width:
PageSetup.LeftHeaderPicture.Width = width#
PageSetup.CenterHeaderPicture.Width = width#
PageSetup.RightHeaderPicture.Width = width#
PageSetup.RightFooterPicture.Width = width#
PageSetup.CenterFooterPicture.Width = width#
PageSetup.LeftFooterPicture.Width = width#
The following definitions apply:
- PageSetup: PageSetup object reference.
- height# and width#:
- Height and width of the header or footer picture. You specify both Height and Width in points.
- If you want to work with inches or centimeters, you can use the Application.InchesToPoints or Application.CentimetersToPoints methods I describe further below.
The LockAspectRatio property allows you to choose which of the following ways Excel behaves when you resize a picture:
- The original proportions of the picture are maintained. In other words, height and width maintain a dependency relation.
- The original proportions of the picture aren’t necessarily maintained. You can change the width or height of the picture independently.
To specify an option, use the following MsoTriState constants:
- msoTrue (-1): Retain original proportions of picture.
- msoFalse (0): Modify width or height of picture independently.

The statement structure you can use to set the value of the LockAspectRatio property is as follows:
PageSetup.LeftHeaderPicture.LockAspectRatio = msoTriStateConstant
PageSetup.CenterHeaderPicture.LockAspectRatio = msoTriStateConstant
PageSetup.RightHeaderPicture.LockAspectRatio = msoTriStateConstant
PageSetup.RightFooterPicture.LockAspectRatio = msoTriStateConstant
PageSetup.CenterFooterPicture.LockAspectRatio = msoTriStateConstant
PageSetup.LeftFooterPicture.LockAspectRatio = msoTriStateConstant
The following definitions apply:
- PageSetup: PageSetup object reference.
- msoTriStateConstant: msoTrue or msoFalse, as I explain above.
Properties #12 And #26: PageSetup.DifferentFirstPageHeaderFooter And PageSetup.OddAndEvenPagesHeaderFooter
The DifferentFirstPageHeaderFooter and OddAndEvenPagesHeaderFooter allow you to specify whether headers and footers are:
- Different in the first page, in the case of DifferentFirstPageHeaderFooter.
- Different for odd and even numbers, in the case of the OddAndEvenPagesHeaderFooter.

You specify whether any of the differences above applies by setting the relevant property to True. The following basic statements do this:
PageSetup.DifferentFirstPageHeaderFooter = True
PageSetup.OddAndEvenPagesHeaderFooter = True
“PageSetup” is a reference to a PageSetup object.
The DifferentFirstPageHeaderFooter and OddAndEvenPagesHeaderFooter properties only specify whether there are different headers/footers for certain pages. These properties don’t specify the characteristics or content of the headers/footers of those pages. You specify those characteristics/content by accessing the appropriate HeaderFooter object. I explain how you do this in the sections covering the PageSetup.FirstPage and PageSetup.EvenPage properties below.
Property #46: PageSetup.ScaleWithDocHeaderFooter
Use the ScaleWithDocHeaderFooter property to determine whether Excel scales the header and footer (with the rest of the document) when you change the size of the document.
The ScaleWithDocHeaderFooter property can take the Boolean values True and False, as follows:
- True: Scale header and footer.
- False: Don’t scale.

The corresponding statement structure you can use is as follows:
PageSetup.ScaleWithDocHeaderFooter = True
PageSetup.ScaleWithDocHeaderFooter = False
“PageSetup” is a PageSetup object.
VBA Codes For Formatting Or Adding Items To Headers And Footers
The table below displays the special codes you can use as part of header or footer properties. These codes allow you to do the following:
- Format the header/footer.
- Insert certain items/information in the header/footer.
Some of these codes can be very useful. You can check out an example of what you can do with them in macro example #2 below. In that case, I use codes to:
- Insert a picture header.
- Insert the number of each page expresses as “Page # of #”.
| Code | Description |
| &L | Align characters that follow to the left. |
| &C | Center the characters that follow. |
| &R | Align characters that follow to the right. |
| &E | Toggle double-underline printing on/off. |
| &X | Toggle superscript printing on/off. |
| &Y | Toggle subscript printing on/off. |
| &B | Toggle bold printing on/off. |
| &I | Toggle italic printing on/off. |
| &U | Toggle underline printing on/off. |
| &S | Toggle strikethrough printing on/off. |
| &”fontFaceName” |
Print characters that follow in specified font (fontFaceName). Include double quotations (“”). |
| &fontSize# |
Print characters that follow in specified font size (fontSize#). Express fontSize# in points and as a 2-digit number. |
| &colorHex |
Print characters that follow in specified color (colorHex). Express colorHex as a hexadecimal color value. |
| &”+” |
Print characters that follow in Heading font of current theme. Include double quotations (“”). |
| &”-“ |
Print characters that follow in Body font of current theme. Include double quotations (“”). |
| &Kxx.Syyy |
Print characters that follow in specified color from current theme. The following definitions apply:
If the values you specify aren’t within applicable limits, Excel uses nearest valid value. |
| &D |
Print current date. |
| &T |
Print current time. |
| &F |
Print filename. |
| &A |
Print tab name. |
| &P |
Print page number. |
| &P+# |
Print page number plus specified number (#). |
| &P-# |
Print page number minus specified number (#). |
| && |
Print an ampersand (&). |
| &N |
Print total number of pages. |
| &Z |
Print file path. |
| &G |
Insert picture. |
If you’re dealing with codes where you must include numbers at the end (for example, fontSize#), be careful with how you structure the string you assign to the header or footer property. In these cases, you generally want to avoid structuring your string in such a way that you have numbers in the following places:
- At the end of your special code; and
- At the beginning of the actual string you want Excel to display as header/footer.
Such a structure may result in Excel interpreting the whole digit combination (both #1 and #2 above) as a single number. This generally results in inappropriate formatting (for example, a very large fontSize#) and incomplete header/footer text (without the number you intended to include at the beginning).
A possible solution to this issue is including a space after the special code. For example, if you want to specify a center header that states “200 Customers” and whose font size is 15 points:
- Instead of using a statement with the following structure:
PageSetup.CenterHeader = "15200 Customers"
- Try the statement below:
PageSetup.CenterHeader = "15 200 Customers"
PageSetup Properties Dealing With Differences Between Pages
As I explain in the section about the DifferentFirstPageHeaderFooter and OddAndEvenPagesHeaderFooter properties above, you can specify that certain pages have different headers or footers. You do this by setting the applicable property to True.
Those 2 properties of the PageSetup object don’t specify the actual characteristics of the differing headers/footers. I explain how you can specify such characteristics in this section.
You can specify different headers/footers for (i) the first page vs. the other pages, or (ii) even vs. odd pages in the following 4 easy steps:
- Set the DifferentFirstPageHeaderFooter or OddAndEvenPagesHeaderFooter property (as applicable) to True.
- Use the PageSetup.FirstPage or PageSetup.EvenPage property (as applicable) to access the appropriate Page object.
- Use the properties of the Page object to access the HeaderFooter object representing the applicable header/footer.
- Work with the properties of the HeaderFooter object to specify the characteristics of the relevant header/footer.
I explain step #1, and provide the basic statement syntax you use, above. In this section, we take a closer look at the constructs involved in steps #2 to #4. This includes the following PageSetup properties:
- #14: PageSetup.FirstPage.
- #15: PageSetup.EvenPage.
Properties #14 And #15: PageSetup.EvenPage And PageSetup.FirstPage
Both PageSetup.FirstPage and PageSetup.EvenPage return a Page object. The Page object represents a page.
The Page object has the following 6 properties:
- Page.CenterFooter.
- Page.CenterHeader.
- Page.LeftFooter.
- Page.LeftHeader.
- Page.RightFooter.
- Page.RightHeader.
These properties return a HeaderFooter object. Let’s look at the…
HeaderFooter Object
The HeaderFooter object represents a header or footer.
In other words, HeaderFooter is the object you work with for purposes of specifying the headers and footers of either of the following:
- First page, if the DifferentFirstPageHeaderFooter property is set to True.
- Even pages, if the OddAndEvenPagesHeaderFooter property is True.
HeaderFooter has the following 2 properties:
- HeaderFooter.Text.
- HeaderFooter.Picture.
HeaderFooter.Text Property
The HeaderFooter.Text property allows you to specify the text that appears within a header or footer.

The basic syntax you use to specify the text of a header or footer is as follows:
expression.LeftHeader.Text = string
expression.CenterHeader.Text = string
expression.RightHeader.Text = string
expression.RightFooter.Text = string
expression.CenterFooter.Text = string
expression.LeftFooter.Text = string
The following definitions apply:
- PageSetup: PageSetup object.
- string: Header or footer you want to set. You generally set these properties to a string.
HeaderFooter.Picture Property
The HeaderFooter.Picture property returns a Graphic object. This Graphic object represents the header or footer picture you use.
I cover the Graphic object in detail when introducing the CenterFooterPicture, CenterHeaderPicture, LeftFooterPicture, LeftHeaderPicture, RightFooterPicture and RightHeaderPicture properties. Those properties return a Graphic object representing a header or footer picture. Just as the HeaderFooter.Picture property we’re looking at in this section.
Therefore, you can use the HeaderFooter.Picture property for purposes of setting a header or footer picture. You specify the characteristics of the picture through the properties of the Graphic object.
I explain the most important properties of the Graphic object above. The comments there are roughly applicable to the object returned by the Picture property here.
There are, however, some differences in the constructs you use in the 3-step process you use to set the header or footer picture. When working with the HeaderFooter.Picture property, you set a header or footer picture in the following 3 simple steps:
- Set the equivalent non-picture footer or header property to be equal “&G”.
Normally, you do this by working with the LeftHeader, CenterHeader, RightHeader, RightFooter, CenterFooter or LeftFooter properties of the PageSetup object. This isn’t the case when dealing with a HeaderFooter object.
When working with a HeaderFooter object, as we’re doing now, the property you set to equal “&G” is HeaderFooter.Text. In other words, the statements you use look roughly as follows:
expression.LeftHeader.Text = "&G"
expression.CenterHeader.Text = "&G"
expression.RightHeader.Text = "&G"
expression.RightFooter.Text = "&G"
expression.CenterFooter.Text = "&G"
expression.LeftFooter.Text = "&G"
“expression” represents a Page object. In this context, you generally use the PageSetup.FirstPage or PageSetup.EvenPage properties to refer to that object.
- Refer to the appropriate Graphic object using the HeaderFooter.Picture property.
- Use the properties of the Graphic object to specify the characteristics of the relevant header or footer picture.
Please refer to the appropriate section above for a more detailed explanation of steps #2 and #3.
As a relatively simply example, the basic statement structure you can use to specify the location of the file you use as header or footer picture (Filename property) is as follows:
expression.LeftHeader.Picture.Filename = locationString
expression.CenterHeader.Picture.Filename = locationString
expression.RightHeader.Picture.Filename = locationString
expression.RightFooter.Picture.Filename = locationString
expression.CenterFooter.Picture.Filename = locationString
expression.LeftFooter.Picture.Filename = locationString
The following definitions apply:
- expression: Page object.
- locationString: String specifying location of your header or footer image.
HPageBreak And VPageBreak Objects
The HPageBreak and VPageBreak objects represent individual page breaks. The corresponding collections of all page breaks within the print area are HPageBreaks and VPageBreaks.
HPageBreak and HPageBreaks refer to horizontal page breaks. VPageBreak and VPageBreaks refer to vertical page breaks.
You can generally access the HPageBreak of VPageBreak objects through the following properties:
- Sheets.HPageBreaks or Sheets.VPageBreaks.
- Worksheets.HPageBreaks or Worksheets.VPageBreaks.
- Worksheet.HPageBreaks or Worksheet.VPageBreaks.
- Charts.HPageBreaks or Charts.VPageBreaks.
Generally, the properties above return one of the following:
- A HPageBreaks collection representing all the horizontal page breaks within the applicable object.
- A VPageBreaks collection that represents all the vertical page breaks within the object.
In the following sections, I introduce some of the most important VBA constructs you can use to work with page breaks:
HPageBreak.Delete And VPageBreak.Delete Methods
Use the HPageBreak.Delete or the VPageBreak.Delete methods to delete a page break.

The basic structure of the statements you use to work with these methods is as follows:
HPageBreak.Delete
VPageBreak.Delete
The following definitions apply:
- HPageBreak: HPageBreak object.
- VPageBreak: VPageBreak object.
HPageBreak.DragOff And VPageBreak.DragOff Methods
Generally, the easiest way to eliminate a page break is to work with the Delete method I describe in the previous section.
However, if you’re working with the macro recorder, you may encounter the DragOff method. The HPageBreak.DragOff and VPageBreak.DragOff methods drag a page break outside of the print area.
The basic syntax of the DragOff method looks roughly as follows:
HPageBreak.DragOff(Direction, RegionIndex)
VPageBreak.DragOff(Direction, RegionIndex)
The following definitions apply:
- HPageBreak: HPageBreak object.
- VPageBreak: VPageBreak object.
- Direction: The direction in which the drag off occurs. Direction is expressed as one of the following XlDirection constants:
- xlUp (-4162): Up.
- xlToRight (-4161): Right.
- xlToLeft (-4159): Left.
- xlDown (-4121): Down.
- RegionIndex: The index of the print area region where the page break is located. If you have a single contiguous print area, there’s only 1 print area region and RegionIndex is 1. If you have non-contiguous printing areas, you’re dealing with more than 1 print area region.
HPageBreak.Location And VPageBreak.Location Properties
The Location property allows you to set the location of a page break.
The basic statement structure you use for these purposes is as follows:
HPageBreak.Location = locationRange
VPageBreak.Location = locationRange
The following definitions are applicable:
- HPageBreak: HPageBreak object.
- VPageBreak: VPageBreak object.
- locationRange: is the Range object (usually a cell) that defines the location of the page break. The following rules apply:
- HPageBreak.Location: A horizontal page break is set at the top edge of the range you specify as location.
- VPageBreak.Location: A vertical page break is on the left edge of the range you set as location.
HPageBreaks.Add And VPageBreaks.Add Methods
Use the Add method to add a page break.

The basic syntax of the Add method is as follows:
HPageBreaks.Add(locationRange)
VPageBreaks.Add(locationRange)
The following definitions are applicable:
- HPageBreak: HPageBreak object.
- VPageBreak: VPageBreak object.
- locationRange: Range object you use to specify the location of the new page break. In this sense, the Add method works in a very similar way to the HPageBreak.Location and VPageBreak.Location properties I describe above.
When specifying the location of the added page break, consider the following rules:
- HPageBreaks.Add: A horizontal page break is added above the range you specify as location.
- VPageBreaks.Add: Vertical page breaks are added to the left of the range you define as location.
Worksheet.ResetAllPageBreaks Method
In the previous section, I introduce the HPageBreak and VPageBreak objects. These are the objects you generally work with when dealing with page breaks.
The Worksheet.ResetAllPageBreaks method also deals with page breaks. It resets all page breaks within a worksheet.

The basic statement structure you use to reset page breaks with ResetAllPageBreaks is as follows:
Worksheet.ResetAllPageBreaks
“Worksheet” is a worksheet object.
Application.InchesToPoints And Application.CentimetersToPoints Methods
In previous sections, I introduce certain VBA constructs that measure distances in points. This is the case, for example, of the properties that deal with margins and image cropping.
In such cases, you may prefer to express those distances in inches or centimeters. The following 2 methods allow you to that:
- Application.InchesToPoints.
- Application.CentimetersToPoints.
Both methods take a measurement (in inches or centimeters) and convert it to points. The basic statement syntax you can use for these purposes is as follows:
Application.InchesToPoints(Inches)
Application.CentimetersToPoints(Centimeters)
“Inches” and “Centimeters” are the values you want to convert to points.
Macro Code Examples To Print With Excel
In the following sections, I provide 2 step-by-step examples of VBA code that you can easily adjust to easily manipulate the constructs I introduce in the previous sections.
For these examples, I created a sample workbook. This sample workbook contains a table with 200 entries of random customer data (Name, Address and Email). The emails are all made-up outlook.com addresses.
You can get immediate free access to this example workbook by clicking the button below.
The following screenshot shows how the sample data looks like:

Macro Example #1: Quick Print
The following sample macro (printInExcel) shows how you can quickly print an Excel worksheet with VBA. This Sub procedure prints 2 copies of the first 2 pages of “PrintOut Example”.

The macro has a single statement. I break this statement apart in several lines for legibility.
Let’s take a closer look at each of these lines of code:
Line #1: Worksheets(“PrintOut Example”).PrintOut
Uses the Worksheet.PrintOut method to print the worksheet named “PrintOut Example” (Worksheets(“PrintOut Example”)).
The following lines of code (#2 to #7) are parameters of this method.
Lines #2 And #3: From:=1 | To:=2
The From and To parameters specify the pages that Excel prints. In this case, the instruction is as follows:
- Start printing at page 1 (From:=1).
- Print until page 2 (To:=2).
Line #4: Copies:=2
The Copies argument specifies that 2 copies are printed.
Line #5: Preview:=False
The Preview parameter is set to its default (False). Because of this, Excel doesn’t display the print preview prior to printing.
Line #6: Collate:=True
The Collate parameter is set to True. This ensures that Excel organizes the printed sheets into separate sets.
In this example, Excel prints 2 copies. Each copy has 2 pages. Therefore, by collating, Excel proceeds as follows:
- Print the entire first copy.
- Print the entire second copy.
Line #7: IgnorePrintAreas:=True
The IgnorePrintAreas parameter is set to True. The consequence of this is that Excel ignores any print areas and prints the entire worksheet (PrintOut Example).
Macro Example #1 Results
The following images show the rough results I obtain when executing the sample macro above (printInExcel). I display screenshots of the print preview for clarity purposes. The printout looks materially the same.


As you can see above, the macro does its job but results aren’t necessarily the best.
The macro prints the 2 first pages of the sample worksheet. However, the page setup can be easily improved to, for example:
- Display all columns within the same sheet of paper. The printout resulting from the execution of the printInExcel macro example above leaves out the Email column.
- Repeat the header row (Customer Name | Address | Email) in all printed pages.
The following macro example #2 deals with these and several other common page setup settings. Let’s dive right into it:
Macro Example #2: Specify Page Setup And Display Print Preview
The following macro example (pageSetupPrintPreview) does the following:
- Specifies several page setup settings.
- Displays the print preview of the sample worksheet.

The code of this Sub procedure may look relatively complex at first glance. Don’t worry about that too much. This code simply implements several of the VBA constructs that I explain in the first part of this VBA Tutorial.
Some of the VBA constructs I include in the macro don’t have a material effect on the print preview that I display at the end. This is the case, for example, with the PageSetup.PrintQuality property I mention in step #7 below. I do this because my main purpose is to provide you examples that you can easily adjust and use.
Let’s dive into some more details of this sample macro. In this case, I take you through each of the main steps the VBA code goes through.
At the beginning of this VBA Tutorial, I mention that you can generally print or display the print preview of a page in 2 easy steps:
- Specify the page setup.
- Print or display the print preview.
I’m aware that the following explanation goes through (many) more steps. However, I organize it this way mostly for clarity purposes. At a basic level, I’m simply applying the 2 steps above.
Step #1: Variable Declaration And Assignment: Dim myWorksheet As Worksheet | Dim iCounter As Long | Dim myCmPointsBase As Single | Set myWorksheet = Worksheets(“PrintPreview Example”) | myCmPointsBase = Application.CentimetersToPoints(0.5)

The first 3 lines of code declare 3 variables, one of these (myWorksheet) an object variable. The fourth and fifth lines of code carry out assignments. This goes as follows:
- Dim myWorksheet As Worksheet: myWorksheet represents the worksheet your macro works with.
- Dim iCounter As Long: iCounter is the counter for a For… Next Loop I describe further below.
- Dim myCmPointsBase As Single: This macro sets several margins and (some) picture sizes. Those measurements must be expressed in points. myCmPointsBase holds a “base” or “lowest common denominator” that I use to calculate those margins/sizes.
- Set myWorksheet = Worksheets(“PrintPreview Example”): Assigns a worksheet (PrintPreview Example) to the myWorksheet object variable.
- myCmPointsBase = Application.CentimetersToPoints(0.5): The Application.CentimetersToPoints method converts 0.5 centimeters to points. This value becomes the base I use to calculate margins and sizes that must be expressed in points. You can see this at work in steps #8 through #11 below.
Step #2: Set Up With… End With Blocks

Notice that there are several With… End With blocks. The purpose of these With… End With blocks is to simplify the syntax. The series of statements within each block work with the object specified in the opening line of the block.
- With myWorksheet: Virtually all the statements within the sample macro are within this With… End With block. Generally, the statements within the block work with myWorksheet. myWorksheet is an object variable representing the worksheet you want to print.
- With .PageSetup: This block is nested within block #1 above. Therefore, it’s a simplification of “myWorksheet.PageSetup”. Generally, the statements within this block refer to the PageSetup object.
- With .CenterHeaderPicture: The block is nested within block #2 above. Therefore, it’s a simplification of “myWorksheet.PageSetup.CenterHeaderPicture”. The statements within the block deal with the Graphic object returned by the CenterHeaderPicture property.
- With . EvenPage: This block is also nested within block #2 above. The fully-qualified object reference is “myWorksheet.PageSetup.EvenPage”. The statements within the block work with the Page object that EvenPage returns.
- With .CenterHeader: This block is nested within block #4 above. Therefore, it’s a simplification of “myWorksheet.PageSetup.EvenPage.CenterHeader”. The statements within the block refer to the HeaderFooter object that it returns.
- With.Picture: The block is nested within block #5 above. This is a simplification of “myWorksheet.PageSetup.EvenPage.CenterHeader.Picture”. The block deals with the Graphic object returned by the HeaderFooter.Picture property. As I explain below, the internal structure of this block is substantially the same as that of block #3 above (With .CenterHeaderPicture).
Step #3: Specify Page Breaks: .ResetAllPageBreaks | For iCounter = 5 To 205 Step 41 | .HPageBreaks.Add .Cells(iCounter, 1) | Next iCounter

You can specify page breaks in the following 2 easy steps:
- Reset all page breaks.
- Add the new page breaks you want.
The lines of code we’re looking at are one of the ways in which you can achieve this.
The first of these statements is relatively straightforward:
- .ResetAllPageBreaks: resets all page breaks within myWorksheet.
The second step is slightly more involved. At its basic level, it adds a page break every 41 rows, starting on the first row with data in the sample worksheet (row 5).
To understand how this is achieve, let’s look at what’s going on:
- For iCounter = 5 To 205 Step 41 | Next iCounter: A For… Next loop. I explain loops (including For… Next loops) in the post that you can find within the Archives. For purposes of this VBA Tutorial, I only highlight the main aspects of this loop, as follows:
- For iCounter = 5 To 205:
- The loop counter starts at 5 (iCounter = 5) and ends at 205 (To 205). These numbers (5 and 205) correspond to the location of the first (5) and the last (205) rows with data in the sample worksheet the macro works with.
- In plain English, the loop starts on the first row with data and stops after the last row with data within the worksheet. As I explain below (when setting the PageSetup.PrintArea property), these rows (5 to 205) also correspond to the print area I specify in the macro.
- You can easily generalize this kind of loop by, for example, getting VBA to identify which is the last row of the worksheet you’re working with.
- Step 41:
- Every time the loop goes through a row, the counter changes by 41. Because of this, the loop doesn’t really go through every single row between rows 5 and 205. It starts on row 5, and then goes through every 41th row thereafter. This continues until the value of the counter exceeds 205.
- In other words, the loop goes through the following rows:
- Row 5 (see #1 above).
- Row 46 (5 + 41).
- Row 87 (46 + 41).
- Row 128 (87 + 41).
- Row 169 (128 + 41).
- For iCounter = 5 To 205:
- .HPageBreaks.Add .Cells(iCounter, 1):
- The HPageBreaks.Add method adds a new horizontal page break.
- Each page break is added above the range identified by “.Cells(iCounter, 1)”. The Worksheet.Cells property refers to the cell located at the intersection of row iCounter and column 1 (column A). iCounter follows the pattern I explain above (5, 46, 87, 128 and 169).
- Therefore, the construct I explain here adds a page break above each of the rows identified by iCounter. This results in a page break every 41 rows.
Step #4: Specify Print Area, Paper Size And Orientation: . PrintArea = “B5:D205” | .PaperSize = xlPaperA4 | .Orientation = xlPortrait

These 3 lines of code use the PageSetup.PrintArea, PageSetup.PaperSize and PageSetup.Orientation properties to specify the print area, paper size and orientation. This goes as follows:
- .PrintArea = “B5:D205”: Specifies the print area. The range to print is from cell B5 to cell D205 (“B5:D205”). This corresponds to the cells with data within the sample worksheet.
- .PaperSize = xlPaperA4: Sets the size of paper to xlPaperA4. The constant xlPaperA4 represents A4 (210 mm x 297 mm).
- .Orientation = xlPortrait: Determines that the page orientation is portrait (xlPortrait).
Step #5: Specify Worksheet Scaling For Printing: .Zoom = False | .FitToPagesTall = False | .FitToPagesWide = 1

One of the main issues with the results obtained when executing macro example #1 above (printInExcel) is that not all the columns appeared in the same piece of paper. The Email column didn’t fit.
The 3 lines of code we’re working with solve this problem. They make Excel scale the worksheet to 1 page wide. Let’s look at what each line of code does:
- .Zoom = False: Sets the Zoom property to False. This ensures that the worksheet is scaled in accordance with the FitToPagesTall and FitToPagesWide properties.
- .FitToPagesTall = False: Sets the FitToPagesTall property to False. Like #1 above, this allows the scaling to be determined by a single property: FitToPagesWide in this case.
- .FitToPagesWide = 1: Scales the worksheet to 1 page wide.
Step #6: Print Gridlines, Headings And Specify Title Rows: .PrintGridlines = True | .PrintHeadings = True | .PrintTitleRows = myWorksheet.Rows(5).Address

These 3 lines of code specify the rules for the printing of certain items, as follows:
- .PrintGridlines = True: Determines that gridlines are printed.
- .PrintHeadings = True: Specifies that row and columns headings are printed.
- .PrintTitleRows = myWorksheet.Rows(5).Address: Specifies that a row is repeated as header row at the top of each printed page. In this case, the row corresponds to row 5 of myWorksheet (myWorksheet.Rows(5)). The statement uses the Address property (.Address) to return a string representing row 5.
Step #7: Specify Print Quality: .PrintQuality = -3

This line of code specifies the Print quality.
As I mention in the section on the PageSetup.PrintQuality property, you can generally get a good idea of the syntax you should use by working with the macro recorder. This is what I did to determine that the appropriate value is -3. In the case of the computer/printer I’m working with, this value corresponds to Medium print quality.
The exact statement you use to specify print quality may be different in your situation. Within the context of this example, it doesn’t really make much difference because, at the end, we’re not going to print the worksheet. Just get a print preview.
Step #8: Specify Header And Footer Margins: .FooterMargin = myCmPointsBase * 3 | .HeaderMargin = myCmPointsBase * 3 | .AlignMarginsHeaderFooter = True

These 3 lines of code specify the margins and basic alignment of headers and footers. For purposes of these statements, remember that the variable myCmPointsBase holds the number of points equivalent to 0.5 centimeters.
The process is as follows:
- .FooterMargin = myCmPointsBase * 3: Sets the footer margin to 1.5 centimeters (myCmPointsBase * 3 = 0.5 * 3 = 1.5 centimeters converted to points).
- .HeaderMargin = myCmPointsBase * 3: Like #1 above. Specifies that the header margin is 1.5 centimeters.
- .AlignMarginsHeaderFooter = True: Aligns headers and footers with general right and left margins (specified in step #9 below).
Step #9: Specify Margins: .TopMargin = myCmPointsBase * 6 | .RightMargin = myCmPointsBase * 5 | .BottomMargin = myCmPointsBase * 6 | .LeftMargin = myCmPointsBase * 5

These 4 lines of code specify the general page margins. For these purposes, I rely on the myCmPointsBase variable. The value held by this variable is the number of points equivalent to 0.5 centimeters. The statements we’re looking at proceed as follows:
- .TopMargin = myCmPointsBase * 6 | .BottomMargin = myCmPointsBase * 6: Set the top and bottom margins to 3 centimeters (myCmPointsBase * 6 = 0.5 * 6 = 3 centimeters converted to points).
- .RightMargin = myCmPointsBase * 5 | .LeftMargin = myCmPointsBase * 5: Set the right and left margins to 2.5 centimeters (myCmPointsBase * 5 = 0.5 * 5 = 2.5 centimeters converted to points).
Step #10: Center Contents On Page: .CenterHorizontally = True | .CenterVertically = True

These 2 lines of code determine that the sheet is centered both horizontally and vertically when printing. Both statements have the same basic structure as follows:
- .CenterHorizontally = True: Centers the sheet horizontally.
- .CenterVertically = True: Centers the sheet vertically.
Step #11: Set Headers And Footers

Within this example, several statements deal with headers and footers. Let’s look at each of the different headers and footers that the macro sets:
Step #11.1: Set Center And Right Footer (Text): .CenterFooter = “&BCustomer List Example” | .RightFooter = “Page &P of &N”
These 2 lines of code set footers. However, the way they work differs, as follows:
- .CenterFooter = “&BCustomer List Example”: Sets the center footer to display “Customer List Example”. Uses the &B formatting code to toggle bold printing on/off.
- .RightFooter = “Page &P of &N”: Sets the right footer to display the page number out of the total number of pages. For these purposes, it uses the &P and &N codes. &P prints the page number. &N prints the total number of pages.
Step #11.2: Set Center Header (Allow For Picture): .CenterHeader = “&G”
This statement makes reference to the center header (.CenterHeader). By setting the PageSetup.CenterHeader property to the code “&G”, the picture (see next section) is initialized and displayed in the location of the center header.
Step #11.3: Set Picture Center Header: With .CenterHeaderPicture | .Filename = “https://powerspreadsheets.com/wp-content/uploads/Power-Spreadsheets-Website-Logo.jpg” | .ColorType = msoPictureAutomatic | .LockAspectRatio = msoTrue | .Height = myCmPointsBase * 2 | End With
This With… End With block specifies a center header picture and determines several of its most important characteristics.
The statements within the block work with the Graphic object that the PageSetup.CenterHeaderPicture property returns. Those statements determine the main attributes of the Graphic object, as follows:
- .Filename = “https://powerspreadsheets.com/wp-content/uploads/Power-Spreadsheets-Website-Logo.jpg”: Specifies the location of the file used as picture header. In this case, this corresponds to the URL where the Power Spreadsheets logo (which you find at the header of this website) is located. In other words, the following image is used:

- .ColorType = msoPictureAutomatic: Specifies that no color transformation is applied to the header image. The msoPictureAutomatic constant represents default color transformation.
- .LockAspectRatio = msoTrue: Specifies that the original proportional relationship of the picture (height vs. width) is maintained when the image is resized.
- .Height = myCmPointsBase * 2: Sets the height of the header image to 1 centimeter. myCmPointsBase is a variable representing the number of points equivalent to 0.5 centimeters.
Step #11.4: Specify That Headers And Footers Are Different For Odd And Even-Numbered Pages: .OddAndEvenPagesHeaderFooter = True
This statement uses the PageSetup.OddAndEvenPagesHeaderFooter to specify that header and footers differ between odd and even-numbered pages.
This leads us the next group of statements. Notice that they’re all within a With… End With block (With .EvenPage | End With). Therefore, the statements below refer to the Page object returned by the PageSetup.EvenPage property.
Step #11.5: Set Center And Right Footer (Text) For Even Pages: .CenterFooter.Text = “&BCustomer List Example” | .RightFooter.Text = “Page &P of &N”
These lines of code set the center and right footer for even pages.
The effect of these statements is virtually the same as that which sets the center and right footers in general, which I describe above. In other words:
- The center footer for even pages is also “Customer List Example”. The &B code turns bold printing on/off.
- The right footer for even pages also displays the current page number out of the total number of pages (Page # of #) by using the &P and &N codes.
The statement structure, however, differs depending on which footer you set. These differences are as follows:
- If you want to set the general center footer, you work with the PageSetup.CenterFooter property. If you’re setting the text of the center footer of even pages, you use the Page.CenterFooter and the HeaderFooter.Text properties.
- Like the above, you set the general right footer with the PageSetup.RightFooter property. In the case of even pages, you use the Page.RightFooter and HeaderFooter.Text properties.
Step #11.6: Set Picture Center Header For Even Pages: With .CenterHeader | .Text = “&G” | With .Picture | .Filename = “https://powerspreadsheets.com/wp-content/uploads/Power-Spreadsheets-Website-Logo.jpg” | .ColorType = msoPictureAutomatic | .LockAspectRatio = msoTrue | .Height = myCmPointsBase * 2 | End With | End With
This group of statements does the following to even pages:
- Initializes the header picture and allows it to be displayed in the place of the center header.
- Specifies the main attributes of the header picture.
Notice that, further above, I include lines of code that do the same to the general center headers. The statements we analyze in this section use a similar logic and structure to that which I explain then. Let’s take a closer look at this:
- The statements we’re looking at are wrapped within a With… End With block (With .CenterHeader | End With). Therefore, we’re working with the HeaderFooter object that the Page.CenterHeader property returns.
- The text of the center header is set to the code “&G” (.Text = “&G”). Doing this allows us to display the picture in the location of the center header.
- This construct differs from that I use for the general center header above (.CenterHeader = “&G”). In that case, the VBA construct I rely on is the PageSetup.CenterHeader property.
- A second With… End With block (With .Picture | End With) works with the Graphic object that the HeaderFooter.Picture property returns.
- This differs from the structure I use above to specify the general center header pictures (With .CenterHeaderPicture | End With). In that case, I access the relevant Graphic object through the PageSetup.CenterHeaderPicture property.
- Despite the differences in #3 above, notice that the statements within that With… End With block are the same regardless of the construct I use to access the Graphic object:
- .Filename = “https://powerspreadsheets.com/wp-content/uploads/Power-Spreadsheets-Website-Logo.jpg”: Specifies the location of the picture header file. For this example, is the header of the Power Spreadsheets website.
- .ColorType = msoPictureAutomatic: Applies the default color transformation to the picture header.
- .LockAspectRatio = msoTrue: Locks the proportional relationship between the height and the width of the picture, as it’s resized.
- .Height = myCmPointsBase * 2: Sets the height of the picture header to 1 centimeter.
Step #11.7: Set Right Header (Text) For Even Pages: .RightHeader.Text = “This is an even page”
The center footer and center header that I set for even pages is, in practice, the same as that which I specify in general.
However, prior to this line of code. I haven’t specified a right header.
The statement we’re looking at (.RightHeader.Text = “This is an even page”) sets the right header for even pages. The chosen string is “This is an even page”.
Because of the above, this statement generates a practical difference between even and odd pages:
- Odd pages, which follow the general rule, don’t have a right header.
- Even pages, which follow the rule we’re looking at, have a right header stating “This is an even page”.
Step #12: Display Print Preview: .PrintPreview

After all the page settings are defined by the previous statements, this line of code gets Excel to display the print preview.
If you want to print, this is usually the place where you’d work with the Print method. Macro example #1 above can give you a rough idea of the syntax you can use for these purposes.
Macro Example #2 Results
The images below show the print preview of the sample worksheet. This results in 5 pages.
Notice the following characteristics, caused by the sample macro (pageSetupPrintPreview). You can compare some of these with the results I obtain when executing macro example #1 above.
- The worksheet is scaled to 1 page wide. This a consequence of the specifications for worksheet scaling (step #5 above).
- The sheet is centered both horizontally and vertically. This setting is explained in step #10 above.
- Gridlines and headings are printed. This is a result of the requirements I explain in step #6 above.
- Row 5 of the sample worksheet appears at the top of the data in every page. This is also a consequence of step #6 above.
- Page breaks exist every 41 rows of the worksheet. This specification is set in step #3 above.
- The center header is Power Spreadsheets’ website header, as required by step #11 above.
- The center footer states “Customer List Example”. This is also set in step #11 above.
- The right footer provides the page number out of the total number of pages. Again, this is a consequence of step #11.
- The right header of even pages states “This is an even page”. Just as #5 and #6 above, this is established in step #11.


Conclusion
Knowing how to correctly setup and print Excel files is essential. When done appropriately, this helps you to easily share your work with others.
After reading this VBA Tutorial, you have the knowledge you require to begin automating most of your printing and page setup activities. You also have a good understanding of the main VBA constructs you can use. The following are some of these constructs we’ve reviewed in this post:
- The PrintOut method.
- The PrintPreview method.
- The PageSetup object.
- The HPageBreak and VPageBreak objects.
- The Worksheet.ResetAllPageBreaks method.
- The Application.InchesToPoints and Application.CentimetersToPoints methods.
You’ve also seen 2 practical and detailed examples of VBA code that you can adjust and start using immediately.
Remember that this Excel VBA Tutorial is accompanied by a sample workbook. This workbook contains the VBA code of the sample macros and the data I show in the screenshots above. You can get immediate free access to this example workbook by clicking the button below.