
На чтение 31 мин. Просмотров 19.3k.
Когда вы создаете или записываете макрос в Excel, вам нужно запустить макрос, чтобы выполнить шаги в коде.
Несколько способов запуска макроса включают использование диалогового окна макроса, назначение макроса кнопке, использование ярлыка и т.д.
Помимо этих запускаемых пользователем макросов, вы также можете использовать события VBA для запуска макроса.
Содержание
- События Excel VBA — Введение
- Различные типы событий Excel VBA
- Где поставить код, связанный с событием
- Понимание последовательности событий
- Понимание роли аргументов в событиях VBA
- События на уровне рабочей книги (поясняются примерами)
- События уровня рабочего листа (объясненные с примерами)
- Событие Excel VBA OnTime
- Событие Excel VBA OnKey
- Отключение событий в VBA
- Влияние событий Undo Stack
Позвольте мне сначала объяснить, что такое событие в VBA.
Событие — это действие, которое может инициировать выполнение указанного макроса.
Например, когда вы открываете новую книгу, это событие. Когда вы вставляете новый лист, это событие. Если дважды щелкнуть ячейку, это событие.
В VBA есть много таких событий, и вы можете создавать коды для этих событий. Это означает, что как только происходит событие, и если вы указали код для этого события, этот код будет немедленно выполнен.
Excel автоматически сделает это, как только заметит, что событие произошло. Таким образом, вам нужно только написать код и поместить его в правильную подпрограмму события (это будет описано далее в этой статье).
Например, если вы вставляете новый лист и хотите, чтобы он имел префикс года, вы можете написать для него код.
Теперь, когда кто-нибудь вставляет новый лист, этот код будет автоматически выполняться и добавлять префикс года к имени листа.
Другой пример: вы хотите изменить цвет ячейки, когда кто-то дважды щелкает по ней. Вы можете использовать событие двойного щелчка для этого.
Точно так же вы можете создавать коды VBA для многих таких событий (рассмотрим позже в этой статье).
Ниже приведена краткая картинка, показывающая событие двойного щелчка в действии. Как только я дважды щелкну по ячейке A1. Excel мгновенно открывает окно сообщения, в котором отображается адрес ячейки.
Двойной щелчок — это событие, а отображение окна сообщения — это то, что я указал в коде, когда происходит событие двойного щелчка.

Хотя приведенный выше пример является бесполезным событием, я надеюсь, что он поможет вам понять, как это происходит.
Различные типы событий Excel VBA
В Excel есть разные объекты — например, сам Excel (к которому мы часто обращаемся как приложение), рабочие книги, рабочие таблицы, диаграммы и т.д.
Каждый из этих объектов может иметь различные события, связанные с ним. Например:
- Если вы создаете новую книгу, это событие уровня приложения.
- Если вы добавляете новый лист, это событие уровня книги.
- Если вы измените значение в ячейке на листе, это событие уровня рабочего листа.
Ниже приведены различные типы событий, которые существуют в Excel:
- События уровня рабочего листа. Это типы событий, которые запускаются на основе действий, выполненных в рабочем листе. Примеры этих событий включают изменение ячейки на рабочем листе, изменение выделения, двойной щелчок по ячейке, щелчок правой кнопкой мыши по ячейке и т.д.
- События на уровне рабочей книги. Эти события будут инициироваться на основе действий на уровне рабочей книги. Примеры таких событий включают добавление новой рабочей таблицы, сохранение рабочей книги, открытие рабочей книги, печать части или всей рабочей книги и т.д.
- События уровня приложения: это события, которые происходят в приложении Excel. Примером этого может быть закрытие любой из открытых рабочих книг или открытие новой рабочей книги.
- События уровня пользовательской формы: эти события будут инициироваться на основе действий в пользовательской форме. Примеры этого включают инициализацию пользовательской формы или нажатие кнопки в пользовательской форме.
- События диаграммы: это события, относящиеся к листу диаграммы. Лист диаграммы отличается от рабочего листа. Примеры таких событий могут включать изменение серии диаграммы или изменение размера диаграммы.
- События OnTime и OnKey. Это два события, которые не соответствуют ни одной из перечисленных выше категорий. Поэтому я перечислил их отдельно. Событие «OnTime» позволяет вам выполнить код в определенное время или по истечении определенного времени. Событие «OnKey» позволяет выполнить код, когда используется определенное нажатие клавиши (или комбинация нажатий клавиш).
Где поставить код, связанный с событием
В приведенном выше разделе я рассмотрел различные типы событий.
В зависимости от типа события вам необходимо поместить код в соответствующий объект.
Например, если это событие, связанное с рабочим листом, оно должно идти в окне кода объекта рабочего листа. Если она связана с книгой, она должна идти в окне кода для объекта книги.
В VBA разные объекты — такие как Worksheets, Workbooks, Chart Sheets, UserForms и т.д. Имеют собственные окна кода. Вам необходимо поместить код события в окно кода соответствующего объекта. Например, если это событие уровня рабочей книги, вам нужно иметь код события в окне кода рабочей книги.
Следующие разделы охватывают места, где вы можете поместить код события:
В окне кода Worksheet
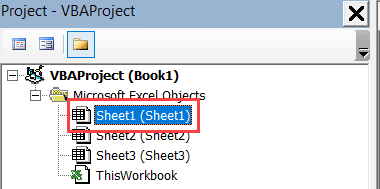
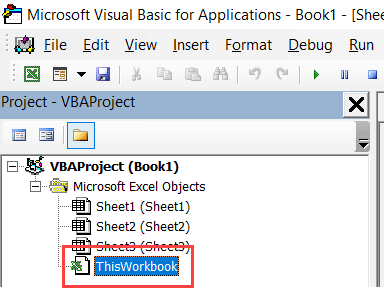
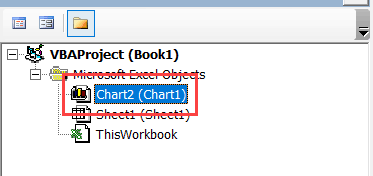
Когда вы откроете VB Editor (используя сочетание клавиш ALT + F11), вы заметите объект рабочих таблиц в Project Explorer. Для каждого листа в книге вы увидите один объект.

Если дважды щелкнуть объект листа, в который вы хотите поместить код, откроется окно кода для этого листа.
Хотя вы можете начать писать код с нуля, гораздо лучше выбрать событие из списка параметров и позволить VBA автоматически вставить соответствующий код для выбранного события.
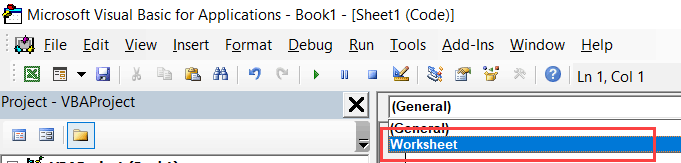
Для этого вам нужно сначала выбрать рабочий лист из выпадающего списка в левом верхнем углу окна кода.

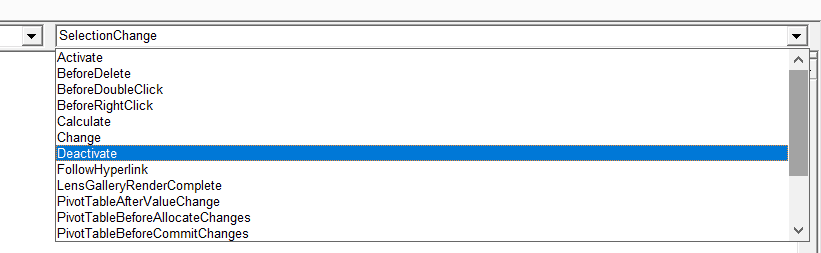
После выбора рабочего листа из выпадающего списка вы получите список всех событий, связанных с рабочим листом. Вы можете выбрать тот, который вы хотите использовать, из выпадающего списка в правом верхнем углу окна кода.

Как только вы выберете событие, оно автоматически введет первую и последнюю строку кода для выбранного события. Теперь вы можете добавить свой код между двумя строками.

Примечание. Как только вы выберете «Worksheet» в раскрывающемся списке, вы увидите две строки кода в окне кода. После того, как вы выбрали событие, для которого вы хотите код, вы можете удалить строки, которые появились по умолчанию.
Обратите внимание, что каждый лист имеет собственное окно кода. Когда вы вводите код для Лист1, он будет работать только в том случае, если событие происходит в Лист1.
В окне кода ThisWorkBook
Точно так же как рабочие листы, если у вас есть код события уровня книги, вы можете поместить его в окно кода ThisWorkbook.

Когда вы дважды щелкните на ThisWorkbook, он откроет окно кода для него.
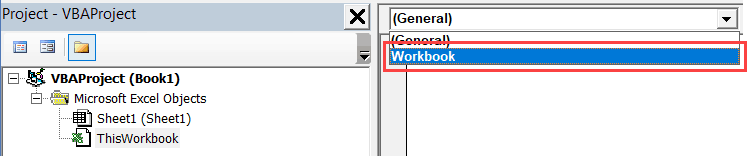
Вам нужно выбрать Workbook из выпадающего списка в верхнем левом углу окна кода.

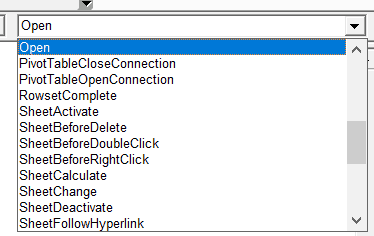
После выбора Workbook из выпадающего списка вы получите список всех событий, связанных с Workbook. Вы можете выбрать тот, который вы хотите использовать, из выпадающего списка в правом верхнем углу окна кода.

Как только вы выберете событие, оно автоматически введет первую и последнюю строку кода для выбранного события. Теперь вы можете добавить свой код между двумя строками.
Примечание. Как только вы выберете Workbook из выпадающего списка, вы увидите две строки кода в окне кода. После того, как вы выбрали событие, для которого вы хотите код, вы можете удалить строки, которые появились по умолчанию.
В окне кода Userform
Когда вы создаете пользовательские формы в Excel, вы также можете использовать события пользовательской формы для выполнения кодов на основе определенных действий. Например, вы можете указать код, который будет выполняться при нажатии кнопки.
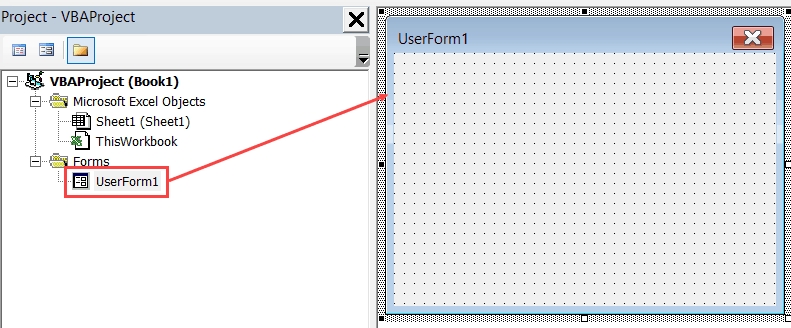
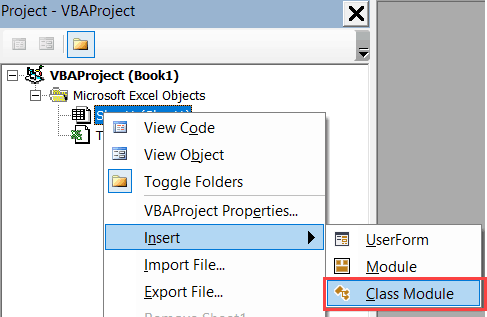
Хотя объекты Sheet и ThisWorkbook уже доступны при открытии редактора VB, пользовательская форма — это то, что вам нужно создать в первую очередь.
Чтобы создать пользовательскую форму, щелкните правой кнопкой мыши любой из объектов, перейдите на вкладку «Вставка» и выберите «UserForm».

Это вставит объект UserForm в книгу.

Если дважды щелкнуть пользовательскую форму (или любой объект, который вы добавляете в пользовательскую форму), откроется окно кода для пользовательской формы.
Теперь, так же как рабочие листы или ThisWorkbook, вы можете выбрать событие, и оно вставит первую и последнюю строку для этого события. И тогда вы можете добавить код в середине этого.
В окне кода Chart
В Excel вы также можете вставлять листы диаграмм (которые отличаются от листов). Лист диаграмм должен содержать только диаграммы.
Вставив лист диаграммы, вы сможете увидеть объект листа диаграммы в редакторе VB.
Вы можете добавить код события в окно кода листа диаграммы, как мы это делали на листе.
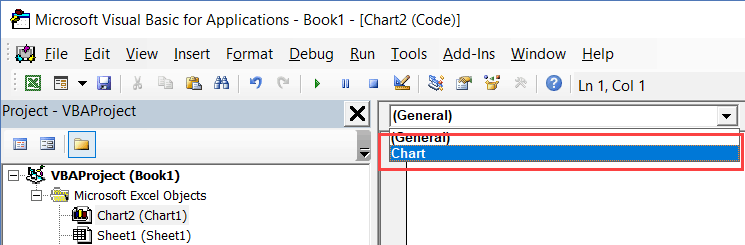
Дважды щелкните объект листа Chart в Project Explorer. Это откроет окно кода для листа диаграммы.

Теперь вам нужно выбрать Chart из выпадающего списка в верхнем левом углу окна кода.

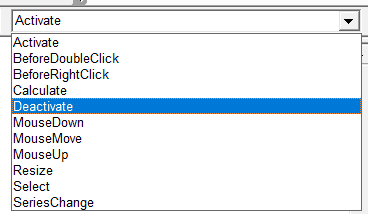
После выбора Chart из выпадающего списка вы получите список всех событий, связанных с листом Chart. Вы можете выбрать тот, который вы хотите использовать, из выпадающего списка в правом верхнем углу окна кода.

Примечание. Как только вы выберете Chart из выпадающего списка, вы заметите две строки кода в окне кода. После того, как вы выбрали событие, для которого вы хотите код, вы можете удалить строки, которые появились по умолчанию.
В Class Module
Class Module должны быть вставлены так же, как пользовательские формы.

Модуль класса может содержать код, связанный с приложением, которым может быть сам Excel и встроенные диаграммы.
Я расскажу о модуле класса в качестве отдельного учебного пособия в ближайшие недели.
Обратите внимание, что кроме событий OnTime и OnKey, ни одно из перечисленных выше событий не может быть сохранено в обычном модуле VBA.
Понимание последовательности событий
Когда вы запускаете событие, оно не происходит изолированно. Это также может привести к последовательности нескольких триггеров.
Например, когда вы вставляете новый лист, происходит следующее:
- Добавлен новый рабочий лист
- Предыдущая рабочая таблица деактивируется
- Новый лист активируется
Хотя в большинстве случаев вам не нужно беспокоиться о последовательности, если вы создаете сложные коды, основанные на событиях, лучше знать последовательность, чтобы избежать неожиданных результатов.
Понимание роли аргументов в событиях VBA
Прежде чем мы перейдем к примерам событий и удивительным вещам, которые вы можете с ним сделать, я должен рассмотреть одну важную концепцию.
В событиях VBA было бы два типа кодов:
- Без каких-либо аргументов
- С аргументами
И в этом разделе я хочу быстро осветить роль аргументов.
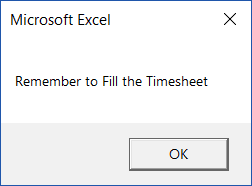
Ниже приведен код без аргументов (круглые скобки пусты):
Private Sub Workbook_Open()
MsgBox "Не забудьте заполнить расписание"
End Sub
С помощью приведенного выше кода, когда вы открываете рабочую книгу, она просто показывает окно сообщения с сообщением — «Не забудьте заполнить расписание».
Теперь давайте посмотрим на код, который имеет аргумент.
Private Sub Workbook_NewSheet(ByVal Sh As Object)
Sh.Range("A1") = Sh.Name
End Sub
Приведенный выше код использует аргумент Sh, который определен как тип объекта. Аргумент Sh может быть рабочим листом или листом диаграммы, так как указанное выше событие вызывается при добавлении нового листа.
Присвоив новый лист, который добавляется к книге, объектной переменной Sh, VBA позволил нам использовать его в коде. Поэтому, чтобы обратиться к новому названию листа, я могу использовать Sh.Name.
Концепция аргументов будет полезна при ознакомлении с примерами событий VBA в следующих разделах.
События на уровне рабочей книги (поясняются примерами)
Ниже приведены наиболее часто используемые события в книге.
| Событие | Что запускает событие |
| Activate | Когда книга активирована |
| AfterSave | Когда книга установлена как надстройка |
| BeforeSave | Когда рабочая книга сохранена |
| BeforeClose | Когда рабочая книга закрыта |
| BeforePrint | Когда печатается книга |
| Deactivate | Когда книга деактивирована |
| NewSheet | Когда добавляется новый лист |
| Open | Когда рабочая книга открыта |
| SheetActivate | Когда любой лист в книге активирован |
| SheetBeforeDelete | При удалении любого листа |
| SheetBeforeDoubleClick | При двойном щелчке по любому листу |
| SheetBeforeRightClick | При щелчке правой кнопкой мыши по любому листу |
| SheetCalculate | Когда любой лист рассчитывается или пересчитывается |
| SheetDeactivate | Когда рабочая книга деактивирован |
| SheetPivotTableUpdate | При обновлении книги |
| SheetSelectionChange | При изменении рабочей книги |
| WindowActivate | Когда книга активирована |
| WindowDeactivate | Когда книга деактивирована |
Обратите внимание, что это не полный список.
Помните, что код для события Workbook хранится в окне кода объектов ThisWorkbook.
Теперь давайте посмотрим на некоторые полезные события из рабочей книги и посмотрим, как они могут быть использованы в вашей повседневной работе.
Событие Workbook Open
Допустим, вы хотите показать пользователю дружеское напоминание, чтобы заполнять его расписания при каждом открытии определенной рабочей книги.
Вы можете использовать приведенный ниже код, чтобы сделать это:
Private Sub Workbook_Open()
MsgBox "Не забудьте заполнить расписание"
End Sub
Теперь, как только вы откроете рабочую книгу с этим кодом, она покажет вам окно сообщения с указанным сообщением.

При работе с этим кодом (или с кодами событий рабочей книги в целом) необходимо знать несколько вещей:
- Если в книге есть макрос, и вы хотите сохранить его, вам нужно сохранить его в формате .XLSM. В противном случае код макроса будет потерян.
- В приведенном выше примере код события будет выполняться только при включенных макросах. Может появиться желтая полоса, запрашивающая разрешение на включение макросов. Пока это не включено, код события не выполняется.
- Код события Workbook помещается в окно кода объекта ThisWorkbook.
Вы можете дополнительно уточнить этот код и показать сообщение только пятницы.
Код ниже сделает это:
Private Sub Workbook_Open()
wkday = Weekday(Date)
If wkday = 6 Then MsgBox "Не забудьте заполнить расписание"
End Sub
Обратите внимание, что в функции «Weekday» воскресенье присваивается значение 1, понедельник — 2 и т. Д.
Поэтому на пятницу я использовал 6.
Событие Open Workbook может быть полезно во многих ситуациях, таких как:
- Когда вы хотите показать приветственное сообщение человеку, когда книга открыта.
- Когда вы хотите отобразить напоминание, когда рабочая книга открыта.
- Если вы хотите всегда активировать один конкретный лист в книге, когда она открыта.
- Когда вы хотите открыть связанные файлы вместе с книгой.
- Если вы хотите фиксировать дату и время каждый раз, когда открывается рабочая книга.
Событие Workbook NewSheet
Событие NewSheet запускается при вставке нового листа в рабочую книгу.
Допустим, вы хотите ввести значение даты и времени в ячейку A1 вновь вставленного листа. Вы можете использовать приведенный ниже код, чтобы сделать это:
Private Sub Workbook_NewSheet(ByVal Sh As Object)
On Error Resume Next
Sh.Range("A1") = Format(Now, "dd-mmm-yyyy hh:mm:ss")
End Sub
Приведенный выше код использует «On Error Resume Next» для обработки случаев, когда кто-то вставляет лист диаграммы, а не лист. Поскольку на листе диаграммы нет ячейки A1, будет отображаться ошибка, если «On Error Resume Next» не используется.
Другой пример может быть, когда вы хотите применить некоторые базовые настройки или форматирование к новому листу, как только он будет добавлен. Например, если вы хотите добавить новый лист и хотите, чтобы он автоматически получал серийный номер (до 100), то вы можете использовать код ниже.
Private Sub Workbook_NewSheet(ByVal Sh As Object)
On Error Resume Next
With Sh.Range("A1")
.Value = "S. No."
.Interior.Color = vbBlue
.Font.Color = vbWhite
End With
For i = 1 To 100
Sh.Range("A1").Offset(i, 0).Value = i
Next i
Sh.Range("A1", Range("A1").End(xlDown)).Borders.LineStyle = xlContinuous
End Sub
Приведенный выше код также немного форматирует. Это дает ячейке заголовка синий цвет и делает шрифт белым. Это также применяет границу ко всем заполненным ячейкам.
Приведенный выше код является примером того, как короткий код VBA может помочь вам украсть несколько секунд каждый раз, когда вы вставляете новый лист (на случай, если вам придется каждый раз это делать).
Событие Workbook BeforeSave
Событие «BeforeSave» запускается при сохранении книги. Обратите внимание, что событие инициируется сначала, а затем рабочая книга сохраняется.
При сохранении книги Excel возможны два сценария:
- Вы сохраняете его в первый раз, и он покажет диалоговое окно Сохранить как.
- Вы уже сохранили его ранее, и он просто сохранит и перезапишет изменения в уже сохраненной версии.
Теперь давайте рассмотрим несколько примеров, где вы можете использовать событие BeforeSave.
Предположим, у вас есть новая книга, которую вы сохраняете впервые, и вы хотите напомнить пользователю о необходимости сохранить ее на диске K, затем вы можете использовать следующий код:
Private Sub Workbook_BeforeSave(ByVal SaveAsUI As Boolean, Cancel As Boolean)
If SaveAsUI Then MsgBox "Сохраните этот файл на диске K"
End Sub
В приведенном выше коде, если файл никогда не был сохранен, SaveAsUI имеет значение True и вызывает диалоговое окно Save As. Приведенный выше код будет отображать сообщение до появления диалогового окна «Save As».
Другим примером может быть обновление даты и времени, когда файл сохраняется в определенной ячейке.
Приведенный ниже код вставляет отметку даты и времени в ячейку A1 листа She1 при каждом сохранении файла.
Private Sub Workbook_BeforeSave(ByVal SaveAsUI As Boolean, Cancel As Boolean)
Worksheets("Лист1").Range("A1") = Format(Now, "dd-mmm-yyyy hh:mm:ss")
End Sub
Обратите внимание, что этот код выполняется, как только пользователь сохраняет рабочую книгу. Если книга сохраняется в первый раз, в ней отобразится диалоговое окно «Save As». Но код уже выполняется к тому времени, когда вы видите диалоговое окно Save As. На этом этапе, если вы решите отменить и не сохранить книгу, дата и время уже будут введены в ячейку.
Событие Workbook BeforeClose
Событие «BeforeClose» происходит непосредственно перед закрытием книги.
Приведенный ниже код защищает все рабочие листы до их закрытия.
Private Sub Workbook_BeforeClose(Cancel As Boolean)
Dim sh As Worksheet
For Each sh In ThisWorkbook.Worksheets
sh.Protect
Next sh
End Sub
Помните, что код события срабатывает, как только вы закрываете книгу.
Об этом событии важно знать, что не имеет значения, закрыта ли рабочая книга или нет.
В случае, если рабочая книга не была сохранена, и вы увидите приглашение с вопросом о том, сохранять рабочую книгу или нет, и вы нажмете Отмена, она не сохранит вашу рабочую книгу. Однако код события уже был бы выполнен к тому времени.
Событие Workbook BeforePrint
Когда вы даете команду печати (или команду предварительного просмотра), запускается событие «BeforePrint».
Приведенный ниже код будет пересчитывать все рабочие листы до их печати.
Private Sub Workbook_BeforePrint(Cancel As Boolean)
 For Each ws in Worksheets
 ws.Calculate
 Next ws
 End Sub
Когда пользователь печатает книгу, событие вызывается независимо от того, печатает ли он всю книгу или только ее часть.
Другой пример, приведенный ниже, — это код, который добавляет дату и время в нижний колонтитул при печати рабочей книги.
Private Sub Workbook_BeforePrint(Cancel As Boolean)
Dim ws As Worksheet
For Each ws In ThisWorkbook.Worksheets
ws.PageSetup.LeftFooter = "Напечатано - " & Format(Now, "dd-mmm-yyyy hh:mm")
Next ws
End Sub
События уровня рабочего листа (объясненные с примерами)
События рабочего листа происходят на основе триггеров в рабочем листе.
Ниже приведены наиболее часто используемые события на листе.
| Событие | Что запускает событие |
| Activate | Когда лист активирован |
| BeforeDelete | Перед удалением листа |
| BeforeDoubleClick | Перед двойным щелчком на листе |
| BeforeRightClick | Перед щелчком правой кнопкой мыши по рабочему листу |
| Calculate | До того, как рабочий лист будет рассчитан или пересчитан |
| Change | При изменении ячеек на листе |
| Deactivate | Когда лист деактивирован |
| PivotTableUpdate | При обновлении сводной таблицы на листе |
| SelectionChange | Когда выбор на рабочем листе изменяется |
Обратите внимание, что это не полный список. Вы можете найти полный список здесь.
Помните, что код события Worksheet хранится в окне кода объекта рабочего листа (в том, в котором вы хотите, чтобы событие было запущено). В одной книге может быть несколько рабочих листов, и ваш код будет запущен только тогда, когда событие происходит в рабочей таблице, в которой оно размещено.
Теперь давайте посмотрим на некоторые полезные события на листе и посмотрим, как их можно использовать в вашей повседневной работе.
Событие Worksheet Activate
Это событие вызывается при активации рабочего листа.
Приведенный ниже код снимает защиту листа, как только он активирован.
Private Sub Worksheet_Activate()
ActiveSheet.Unprotect
End Sub
Вы также можете использовать это событие, чтобы убедиться, что конкретная ячейка или диапазон ячеек (или именованный диапазон) выбран, как только вы активируете рабочую таблицу. Приведенный ниже код выберет ячейку D1, как только вы активируете лист.
Private Sub Worksheet_Activate()
ActiveSheet.Range("D1").Select
End Sub
Событие Worksheet Change
Событие изменения запускается всякий раз, когда вы вносите изменения в лист.
Ну .. не всегда.
Есть некоторые изменения, которые вызывают событие, а некоторые нет. Вот список некоторых изменений, которые не вызовут событие:
- При изменении форматирования ячейки (размер шрифта, цвет, рамка и т.д.).
- Когда вы объединяете клетки. Это удивительно, так как иногда объединение ячеек также удаляет содержимое из всех ячеек, кроме верхнего левого.
- Когда вы добавляете, удаляете или редактируете комментарий к ячейке.
- Когда вы сортируете диапазон ячеек.
- Когда вы используете поиск цели.
Следующие изменения могут вызвать событие (даже если вы думаете, что не должно):
- Копирование и вставка форматирования вызовут событие.
- Очистка форматирования вызовет событие.
- Запуск проверки орфографии вызовет событие.
Ниже код будет отображать окно сообщения с адресом ячейки, которая была изменена.
Private Sub Worksheet_Change(ByVal Target As Range)
MsgBox "Вы только что изменились " & Target.Address
End Sub
Хотя это бесполезный макрос, он показывает, как использовать аргумент Target, чтобы узнать, какие ячейки были изменены.
Теперь давайте посмотрим пару более полезных примеров.
Предположим, у вас есть диапазон ячеек (скажем, A1: D10), и вы хотите показать подсказку и спросить пользователя, действительно ли он хочет изменить ячейку в этом диапазоне, вы можете использовать приведенный ниже код.
Отображается подсказка с двумя кнопками — «Да» и «Нет». Если пользователь выбирает «Да», изменение выполняется, в противном случае оно отменяется.
Private Sub Worksheet_Change(ByVal Target As Range)
If Target.Row <= 10 And Target.Column <= 4 Then
Ans = MsgBox("Вы вносите изменения в ячейки в A1: D10. Вы уверены, что хотите это?", vbYesNo)
End If
If Ans = vbNo Then
Application.EnableEvents = False
Application.Undo
Application.EnableEvents = True
End If
End Sub
В приведенном выше коде мы проверяем, находится ли целевая ячейка в первых 4 столбцах и первых 10 строках. Если это так, появится окно сообщения. Кроме того, если пользователь выбрал «Нет» в окне сообщения, изменение отменяется (с помощью команды Application.Undo).
Обратите внимание, что я использовал Application.EnableEvents = False перед строкой Application.Undo. И затем я изменил его, используя Application.EnableEvent = True в следующей строке.
Это необходимо, поскольку, когда происходит отмена, это также вызывает событие изменения. Если я не установлю для параметра EnableEvent значение False, он продолжит вызывать событие изменения.
Вы также можете отслеживать изменения в именованном диапазоне, используя событие изменения. Например, если у вас есть именованный диапазон с именем «DataRange», и вы хотите показать подсказку на случай, если пользователь внесет изменение в этот именованный диапазон, вы можете использовать код ниже:
Private Sub Worksheet_Change(ByVal Target As Range)
Dim DRange As Range
Set DRange = Range("DataRange")
If Not Intersect(Target, DRange) Is Nothing Then
MsgBox "Вы только что внесли изменения в диапазон данных"
End If
End Sub
Приведенный выше код проверяет, имеет ли ячейка / диапазон, в котором вы внесли изменения, какие-либо ячейки, общие для диапазона данных. Если это так, он показывает окно сообщения.
Событие SelectionChange Workbook
Событие изменения выбора запускается всякий раз, когда в рабочем листе есть изменение выбора.
Приведенный ниже код будет пересчитывать лист, как только вы измените выбор.
Private Sub Worksheet_SelectionChange(ByVal Target As Range)
Application.Calculate
End Sub
Другой пример этого события — когда вы хотите выделить активную строку и столбец выбранной ячейки.
Что-то, как показано ниже:

Следующий код может сделать это:
Private Sub Worksheet_SelectionChange(ByVal Target As Range)
Cells.Interior.ColorIndex = xlNone
With ActiveCell
.EntireRow.Interior.Color = RGB(248, 203, 173)
.EntireColumn.Interior.Color = RGB(180, 198, 231)
End With
End Sub
Код сначала удаляет цвет фона из всех ячеек, а затем применяет цвет, упомянутый в коде, к активной строке и столбцу.
И это проблема с этим кодом. Что он удаляет цвет со всех клеток.
Если вы хотите выделить активную строку / столбец, не изменяя цвета в других ячейках, используйте технику, показанную в этом руководстве.
Событие Workbook DoubleClick
Это одно из моих любимых событий на листе, и вы увидите много учебных пособий, в которых я использовал это.
Это событие срабатывает при двойном щелчке по ячейке.
Позвольте мне показать вам, как это круто.
С помощью приведенного ниже кода вы можете дважды щелкнуть ячейку, и она применит цвет фона, изменит цвет шрифта и сделает текст в ячейке жирным;
Private Sub Worksheet_BeforeDoubleClick(ByVal Target As Range, Cancel As Boolean)
Cancel = True
With Target
.Interior.Color = vbBlue
.Font.Color = vbWhite
.Font.Bold = True
End With
End Sub
Это может быть полезно, когда вы просматриваете список ячеек и хотите выделить несколько выбранных. Хотя вы можете использовать клавишу F4, чтобы повторить последний шаг, он сможет применить только один вид форматирования. С этим событием двойного щелчка вы можете применить все три с помощью двойного щелчка.
Обратите внимание, что в приведенном выше коде я сделал значение Cancel = True.
Это сделано для того, чтобы действие двойного щелчка по умолчанию было отключено — то есть войти в режим редактирования. Если Cancel = True, Excel не переведет вас в режим редактирования, если дважды щелкнуть ячейку.
Вот еще один пример.
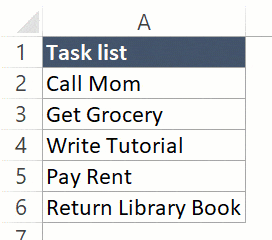
Если у вас есть список дел в Excel, вы можете использовать событие двойного щелчка, чтобы применить формат перечеркивания, чтобы пометить задачу как выполненную.
Как показано ниже:

Вот код, который сделает это:
Private Sub Worksheet_BeforeDoubleClick(ByVal Target As Range, Cancel As Boolean)
Cancel = True
CurrFormat = Target.Font.Strikethrough
If CurrFormat Then
Target.Font.Strikethrough = False
Else
Target.Font.Strikethrough = True
End If
End Sub
Обратите внимание, что в этом коде я сделал двойной щелчок в качестве события переключения. Если дважды щелкнуть ячейку, она проверяет, был ли уже применен формат зачеркивания. Если это так, двойной щелчок удаляет зачеркнутый формат, а если этого не было, то применяется зачеркнутый формат.
Событие Excel VBA OnTime
События, которые мы видели до сих пор в этой статье, были связаны с одним из объектов Excel, будь то рабочая книга, рабочий лист, лист диаграммы или пользовательские формы и т.д.
Событие OnTime отличается от других событий, поскольку оно может быть сохранено в обычном модуле VBA (тогда как другие должны были быть помещены в окно кода объектов, таких как ThisWorkbook или Worksheets или UserForms).
В обычном модуле VBA он используется как метод объекта приложения.
Причина, по которой это считается событием, заключается в том, что оно может быть запущено в зависимости от указанного вами времени. Например, если я хочу, чтобы лист пересчитывался каждые 5 минут, я могу использовать для него событие OnTime.
Или, если я хочу показать сообщение / напоминание в определенное время дня, я могу использовать событие OnTime.
Ниже приведен код, который будет показывать сообщение в 2 часа дня каждый день.
Sub MessageTime()
Application.OnTime TimeValue("14:00:00"), "ShowMessage"
End Sub

Sub ShowMessage()
MsgBox "Время обеда"
End Sub
Помните, что вам нужно поместить этот код в обычный модуль VBA,
Кроме того, хотя событие OnTime будет запускаться в указанное время, макрос необходимо запускать вручную в любое время. После запуска макроса он будет ждать до 14:00, а затем вызовет макрос «ShowMessage».
Макрос ShowMessage будет отображать сообщение.
Событие OnTime принимает четыре аргумента:
Application.OnTime (Самое раннее время, Процедура, Последнее время, Расписание)
- EarliestTime: время, когда вы хотите запустить процедуру.
- Procedure: имя процедуры, которая должна быть запущена.
- LatestTime (Необязательно): Если другой код выполняется и указанный код не может быть запущен в указанное время, вы можете указать LatestTime, которого он должен ждать. Например, это может быть EarliestTime + 45 (что означает, что он будет ждать 45 секунд, пока другая процедура завершится). Если даже через 45 секунд процедура не может быть запущена, она прекращается. Если вы не укажете это, Excel подождет, пока код может быть запущен, а затем запустит его.
- Schedule (необязательно): если установлено значение «ИСТИНА», оно планирует новую процедуру времени. Если ЛОЖЬ, то это отменяет ранее установленную процедуру. По умолчанию это ИСТИНА
В приведенном выше примере мы использовали только первые два аргумента.
Давайте посмотрим на другой пример.
Приведенный ниже код будет обновлять лист каждые 5 минут.
Dim NextRefresh as Date

Sub RefreshSheet()
ThisWorkbook.Worksheets("Лист1").Calculate
NextRefresh = Now + TimeValue("00:05:00")
Application.OnTime NextRefresh, "RefreshSheet"
End Sub

Sub StopRefresh()
On Error Resume Next
Application.OnTime NextRefresh, "RefreshSheet", , False
End Sub
Приведенный выше код обновляет лист каждые 5 минут.
Он использует функцию «Now», чтобы определить текущее время, а затем добавляет 5 минут к текущему времени.
Событие OnTime будет продолжаться до тех пор, пока вы его не остановите. Если вы закроете книгу, а приложение Excel все еще будет запущено (другие книги открыты), книга, в которой запущено событие OnTime, снова откроется.
Это лучше сделать, если специально остановить событие OnTime.
В приведенном выше коде у меня есть код StopRefresh, но вам нужно выполнить его, чтобы остановить событие OnTime. Вы можете сделать это вручную, назначить ее кнопке и сделать это, нажав кнопку или вызвав ее из события закрытия рабочей книги.
Private Sub Workbook_BeforeClose(Cancel As Boolean)
Call StopRefresh
End Sub
Вышеупомянутый код события «BeforeClose» находится в окне кода ThisWorkbook.
Событие Excel VBA OnKey
Когда вы работаете с Excel, он продолжает отслеживать нажатия клавиш, которые вы используете. Это позволяет нам использовать нажатия клавиш в качестве триггера для события.
С помощью события OnKey вы можете указать нажатие клавиши (или комбинацию нажатий клавиш) и код, который должен выполняться при использовании этого нажатия клавиши. При нажатии этих клавиш выполняется код для него.
Точно так же, как событие OnTime, у вас должен быть способ отменить событие OnKey. Кроме того, когда вы устанавливаете событие OnKey для определенного нажатия клавиши, оно становится доступным во всех открытых книгах.
Прежде чем я покажу вам пример использования события OnKey, позвольте мне сначала поделиться кодами клавиш, которые вам доступны в VBA.
| Ключ | Код |
| Backspace | {BACKSPACE} or {BS} |
| Break | {BREAK} |
| Caps Lock | {CAPSLOCK} |
| Delete | {DELETE} or {DEL} |
| Down Arrow | {DOWN} |
| End | {END} |
| Enter | ~ |
| Enter (on the nueric keypad) | {ENTER} |
| Escape | {ESCAPE} or {ESC} |
| Home | {HOME} |
| Ins | {INSERT} |
| Left Arrow | {LEFT} |
| NumLock | {NUMLOCK} |
| PageDown | {PGDN} |
| PageUp | {PGUP} |
| RightArrow | {RIGHT} |
| Scroll Lock | {SCROLLOCK} |
| Tab | {TAB} |
| Up Arrow | {UP} |
| F1 through F15 | {F1} through {F15} |
Когда вам нужно использовать любое событие onkey, вам нужно использовать код для него.
В приведенной выше таблице приведены коды для однократных нажатий.
Вы также можете комбинировать их со следующими кодами:
Shift: + (знак плюс)
Контроль: ^ (Карет)
Alt:% (в процентах)
Например, для Alt F4 вам нужно использовать код: «% {F4}» — где% для клавиши ALT, а {F4} для клавиши F4.
Теперь давайте посмотрим на примере (помните, код для событий OnKey находится в обычном модуле VBA).
Когда вы нажимаете клавишу PageUp или PageDown, она переходит на 29 строк выше / ниже активной ячейки (по крайней мере, это то, что она делает на моем ноутбуке).
Если вы хотите, чтобы он перескакивал только на 5 строк одновременно, вы можете использовать следующий код:
Sub PageUpDOwnKeys()
Application.OnKey "{PgUp}", "PageUpMod"
Application.OnKey "{PgDn}", "PageDownMod"
End Sub

Sub PageUpMod()
On Error Resume Next
ActiveCell.Offset(-5, 0).Activate
End Sub

Sub PageDownMod()
On Error Resume Next
ActiveCell.Offset(5, 0).Activate
End Sub
Когда вы запускаете первую часть кода, он запускает события OnKey. Как только это будет выполнено, использование PageUp и клавиши PageDown заставит курсор перескакивать только на 5 строк за раз.
Обратите внимание, что мы использовали «On Error Resume Next», чтобы убедиться, что ошибки игнорируются. Эти ошибки могут возникать, когда вы нажимаете клавишу PageUp, даже если вы находитесь в верхней части листа. Поскольку больше нет строк для перехода, код покажет ошибку. Но так как мы использовали «On Error Resume Next», он будет проигнорирован.
Чтобы убедиться, что эти события OnKey доступны, вам нужно запустить первую часть кода. Если вы хотите, чтобы это было доступно, как только вы откроете рабочую книгу, вы можете поместить ее в окно кода ThisWorkbook.
Private Sub Workbook_Open()
Application.OnKey "{PgUp}", "PageUpMod"
Application.OnKey "{PgDn}", "PageDownMod"
End Sub
Приведенный ниже код вернет ключи к их нормальной работе.
Sub Cancel_PageUpDownKeysMod()
Application.OnKey "{PgUp}"
Application.OnKey "{PgDn}"
End Sub
Если вы не укажете второй аргумент в методе OnKey, он вернет нажатие клавиши к своей обычной функциональности.
В случае, если вы хотите отменить функциональность нажатия клавиши, чтобы Excel ничего не делал при использовании этого нажатия клавиши, вам нужно использовать пустую строку в качестве второго аргумента.
В приведенном ниже коде Excel ничего не будет делать, когда мы используем ключи PageUp или PageDown.
Sub Ignore_PageUpDownKeys()
Application.OnKey "{PgUp}", ""
Application.OnKey "{PgDn}", ""
End Sub
Отключение событий в VBA
Иногда вам может потребоваться отключить события, чтобы ваш код работал правильно.
Например, предположим, что у меня есть диапазон (A1: D10), и я хочу показать сообщение всякий раз, когда ячейка изменяется в этом диапазоне. Поэтому я показываю окно сообщения и спрашиваю пользователя, уверены ли они, что хотят внести изменения. Если ответ «Да», изменение внесено, и если ответ «Нет», VBA отменит его.
Вы можете использовать следующий код:
Private Sub Worksheet_Change(ByVal Target As Range)
If Target.Row <= 10 And Target.Column <= 4 Then
Ans = MsgBox("Вы вносите изменения в ячейки в A1: D10. Вы уверены, что хотите это?", vbYesNo)
End If
If Ans = vbNo Then
Application.Undo
End If
End Sub
Проблема с этим кодом заключается в том, что когда пользователь выбирает «Нет» в окне сообщения, действие отменяется (как я использовал Application.Undo).
Когда происходит отмена, и значение возвращается к исходному, событие изменения VBA снова инициируется, и пользователю снова отображается то же самое окно сообщения.
Это означает, что вы можете продолжать нажимать НЕТ в окне сообщения, и оно будет отображаться. Это происходит, когда вы застряли в бесконечном цикле в этом случае.
Чтобы избежать таких случаев, вам нужно отключить события, чтобы событие изменения (или любое другое событие) не срабатывало.
Следующий код будет хорошо работать в этом случае:
Private Sub Worksheet_Change(ByVal Target As Range)
If Target.Row <= 10 And Target.Column <= 4 Then
Ans = MsgBox("Вы вносите изменения в ячейки в A1: D10. Вы уверены, что хотите это?", vbYesNo)
End If
If Ans = vbNo Then
Application.EnableEvents = False
Application.Undo
Application.EnableEvents = True
End If
End Sub
В приведенном выше коде, прямо над строкой Application.Undo, мы использовали — Application.EnableEvents = False.
Если для параметра EnableEvents установлено значение False, это не приведет к возникновению какого-либо события (в текущей или любой открытой рабочей книге).
После того, как мы завершили операцию отмены, мы можем переключить свойство EnableEvents на True.
Имейте в виду, что отключение событий влияет на все книги, которые в данный момент открыты (или открыты, когда для параметра EnableEvents установлено значение False). Например, как часть кода, если вы откроете новую книгу, событие Workbook Open не будет работать.
Влияние событий Undo Stack
Позвольте мне сначала рассказать вам, что такое Undo Stack.
Когда вы работаете в Excel, он продолжает следить за вашими действиями. Когда вы делаете ошибку, вы всегда можете использовать Control + Z, чтобы вернуться к предыдущему шагу (то есть отменить ваше текущее действие).
Если вы дважды нажмете Control + Z, это вернет вас назад на два шага. Эти шаги, которые вы выполнили, сохраняются как часть Undo Stack.
Любое событие, которое изменяет рабочий лист, уничтожает этот стек отмены. Это означает, что если я выполнил 5 действий до запуска события, я не смогу использовать Control + Z, чтобы вернуться к этим предыдущим шагам. Запуск события уничтожил этот стек для меня.
В приведенном ниже коде я использую VBA для ввода метки времени в ячейку A1 при каждом изменении в листе.
Private Sub Worksheet_Change(ByVal Target As Range)
Application.EnableEvents = False
Range("A1").Value = Format(Now, "dd-mmm-yyyy hh:mm:ss")
Application.EnableEvents = True
End Sub
Поскольку я делаю изменения в листе, это уничтожит Undo Stack.
Также обратите внимание, что это не ограничивается только событиями.
Если у вас есть код, который хранится в обычном модуле VBA, и вы вносите изменения в рабочую таблицу, это также уничтожит Undo Stack в Excel.
Например, приведенный ниже код просто вводит текст «Hello» в ячейку A1, но даже выполнение этого приведет к разрушению
Undo Stack.
Sub TypeHello()
Range("A1").Value = "Привет"
End Sub
Содержание
- Worksheet object (Excel)
- Remarks
- Example
- Events
- Methods
- Properties
- See also
- Support and feedback
- VBA-Урок 11.2. События рабочего листа (Worksheet Events)
- Worksheet_SelectionChange (Открытие книги)
- Worksheet_Activate (Событие активации листа)
- Worksheet_Deactivate (Событие деактивации листа)
- Worksheet_BeforeDoubleClick (Событие двойного щелчка по ячейке)
- Worksheet_BeforeRightClick (Событие перед правым кликом)
- Worksheet_Calculate (Событие перерасчета листа)
- Worksheet_Change (Событие изменения содержимого ячейки)
- Worksheet_FollowHyperlink (Событие нажатия на ссылку)
- Temporarily deactivate all events (Временное отключение всех событий)
- Использование событий с объектами Excel
- Пример
- См. также
- Поддержка и обратная связь
- Событие Worksheet.Change (Excel)
- Синтаксис
- Параметры
- Возвращаемое значение
- Замечания
- Пример
- Поддержка и обратная связь
- Excel VBA Events – An Easy (and Complete) Guide
- Excel VBA Events – Introduction
- Different Types of Excel VBA Events
- Where to Put the Event-Related Code
- In Worksheet Code Window
- In ThisWorkbook Code Window
- In Userform Code Window
- In Chart Code Window
- In Class Module
- Understanding the Event Sequence
- Understanding the Role of Arguments in VBA Events
- Workbook Level Events (Explained with Examples)
- Workbook Open Event
- Workbook NewSheet Event
- Workbook BeforeSave Event
- Workbook BeforeClose Event
- Workbook BeforePrint Event
- Worksheet Level Events (Explained with Examples)
- Worksheet Activate Event
- Worksheet Change Event
- Workbook SelectionChange Event
- Workbook DoubleClick Event
- Excel VBA OnTime Event
- Excel VBA OnKey Event
- Disabling Events in VBA
- Impact of Events Undo Stack
Worksheet object (Excel)
Represents a worksheet.
The Worksheet object is a member of the Worksheets collection. The Worksheets collection contains all the Worksheet objects in a workbook.
The Worksheet object is also a member of the Sheets collection. The Sheets collection contains all the sheets in the workbook (both chart sheets and worksheets).
Example
Use Worksheets (index), where index is the worksheet index number or name, to return a single Worksheet object. The following example hides worksheet one in the active workbook.
The worksheet index number denotes the position of the worksheet on the workbook’s tab bar. Worksheets(1) is the first (leftmost) worksheet in the workbook, and Worksheets(Worksheets.Count) is the last one. All worksheets are included in the index count, even if they are hidden.
The worksheet name is shown on the tab for the worksheet. Use the Name property to set or return the worksheet name. The following example protects the scenarios on Sheet1.
When a worksheet is the active sheet, you can use the ActiveSheet property to refer to it. The following example uses the Activate method to activate Sheet1, sets the page orientation to landscape mode, and then prints the worksheet.
This example uses the BeforeDoubleClick event to open a specified set of files in Notepad. To use this example, your worksheet must contain the following data:
- Cell A1 must contain the names of the files to open, each separated by a comma and a space.
- Cell D1 must contain the path to where the Notepad files are located.
- Cell D2 must contain the path to where the Notepad program is located.
- Cell D3 must contain the file extension, without the period, for the Notepad files (txt).
When you double-click cell A1, the files specified in cell A1 are opened in Notepad.
Events
Methods
Properties
See also
Support and feedback
Have questions or feedback about Office VBA or this documentation? Please see Office VBA support and feedback for guidance about the ways you can receive support and provide feedback.
Источник
VBA-Урок 11.2. События рабочего листа (Worksheet Events)
На предыдущем уроке мы рассматривали события, относящиеся к целой книги. Сейчас мы сфокусируемся на событиях связанных с отдельным листом.
Worksheet_SelectionChange (Открытие книги)
Чтобы выполнить инструкции, основанные на событиях для отдельного листа, выберите лист в редакторе, а затем Worksheet :
Событие SelectionChange будет добавлено по умолчанию. Это событие выполняется когда бы не изменялось содержание диапазона:
Например, следующий код добавляет цвета заливки одного или более выбранных ячеек и автоматически удаляет цвет заливки от предыдущего выбранного диапазона, когда данный диапазон меняется:
Worksheet_Activate (Событие активации листа)
Это событие возникает при активации рабочего листа
Worksheet_Deactivate (Событие деактивации листа)
Это событие возникает при активации другого рабочего листа
Worksheet_BeforeDoubleClick (Событие двойного щелчка по ячейке)
Это событие возникает при двойном щелчке на ячейке рабочего листа:
Worksheet_BeforeRightClick (Событие перед правым кликом)
Это событие возникает перед самым кликом правой кнопки мыши по рабочему листу
Worksheet_Calculate (Событие перерасчета листа)
Это событие возникает каждый раз, когда рассчитываются или пересчитываются данные на рабочем листе
Worksheet_Change (Событие изменения содержимого ячейки)
Это событие возникает каждый раз, когда изменяется содержимое ячеек на заданном листе:
Worksheet_FollowHyperlink (Событие нажатия на ссылку)
Это событие возникает при нажатии на ссылку (гипертекст)
Temporarily deactivate all events (Временное отключение всех событий)
Чтобы выполнять код без каких-либо событий, вставьте его между двумя строчками такого кода:
Источник
Использование событий с объектами Excel
Вы можете написать процедуры событий в Microsoft Excel на уровне листа, диаграммы, таблицы запросов, книги или приложения. Например, событие Activate происходит на уровне листа, а событие SheetActivate доступно как на уровне книги, так и на уровне приложения. Событие SheetActivate для книги возникает при активации любого листа в книге. На уровне приложения событие SheetActivate возникает при активации любого листа в любой открытой книге.
Процедуры листа, диаграммы и событий доступны для любого открытого листа или книги. Чтобы написать процедуры событий для внедренной диаграммы, объекта QueryTable или объекта Application , необходимо создать новый объект с помощью ключевого слова WithEvents в модуле класса.
Используйте свойство EnableEvents для включения или отключения событий. Например, использование метода Save для сохранения книги приводит к возникновению события BeforeSave. Это можно предотвратить, задав для свойства EnableEvents значение False перед вызовом метода Save .
Пример
См. также
Поддержка и обратная связь
Есть вопросы или отзывы, касающиеся Office VBA или этой статьи? Руководство по другим способам получения поддержки и отправки отзывов см. в статье Поддержка Office VBA и обратная связь.
Источник
Событие Worksheet.Change (Excel)
Происходит при изменении ячеек на листе пользователем или внешней ссылкой.
Синтаксис
expression. Изменение (целевой объект)
Выражение Переменная, представляющая объект Worksheet .
Параметры
| Имя | Обязательный или необязательный | Тип данных | Описание |
|---|---|---|---|
| Target (Целевое значение) | Обязательный | Диапазон | Измененный диапазон. Может быть несколько ячеек. |
Возвращаемое значение
Nothing
Замечания
Это событие не возникает при изменении ячеек во время пересчета. Используйте событие Calculate для перехвата пересчета листа.
Пример
В следующем примере кода цвет измененных ячеек изменяется на синий.
В следующем примере кода проверяется, что при изменении значения ячейки измененная ячейка находится в столбце A, а также если измененное значение ячейки больше 100. Если значение больше 100, смежная ячейка в столбце B изменяется на красный цвет.
В следующем примере кода значения в диапазоне A1:A10 задаются в верхнем регистре при вводе данных в ячейку.
Поддержка и обратная связь
Есть вопросы или отзывы, касающиеся Office VBA или этой статьи? Руководство по другим способам получения поддержки и отправки отзывов см. в статье Поддержка Office VBA и обратная связь.
Источник
Excel VBA Events – An Easy (and Complete) Guide
When you create or record a macro in Excel, you need to run the macro to execute the steps in the code.
A few ways of running a macro includes using the macro dialog box, assigning the macro to a button, using a shortcut, etc.
Apart from these user-initiated macro executions, you can also use VBA events to run the macro.
This Tutorial Covers:
Excel VBA Events – Introduction
Let me first explain what is an event in VBA.
An event is an action that can trigger the execution of the specified macro.
For example, when you open a new workbook, it’s an event. When you insert a new worksheet, it’s an event. When you double-click on a cell, it’s an event.
There are many such events in VBA, and you can create codes for these events. This means that as soon as an event occurs, and if you have specified a code for that event, that code would instantly be executed.
Excel automatically does this as soon as it notices that an event has taken place. So you only need to write the code and place it in the correct event subroutine (this is covered later in this article).
For example, if you insert a new worksheet and you want it to have a year prefix, you can write the code for it.
Now, whenever anyone inserts a new worksheet, this code would automatically be executed and add the year prefix to the worksheet’s name.
Another example could be that you want to change the color of the cell when someone double-clicks on it. You can use the double-click event for this.
Similarly, you can create VBA codes for many such events (as we will see later in this article).
Below is a short visual that shows the double-click event in action. As soon as I double click on cell A1. Excel instantly opens a message box that shows the address of the cell.
Double-click is an event, and showing the message box is what I have specified in the code whenever the double-click event takes place.
While the above example is a useless event, I hope it helps you understand what events really are.
Different Types of Excel VBA Events
There are different objects in Excel – such as Excel itself (to which we often refer to as the application), workbooks, worksheets, charts, etc.
Each of these objects can have various events associated with it. For example:
- If you create a new workbook, it’s an application level event.
- If you add a new worksheet, it’s a workbook level event.
- If you change the value in a cell in a sheet, it’s a worksheet level event.
Below are the different types of Events that exist in Excel:
- Worksheet Level Events: These are the types of events that would trigger based on the actions taken in the worksheet. Examples of these events include changing a cell in the worksheet, changing the selection, double-clicking on a cell, right-clicking on a cell, etc.
- Workbook Level Events: These events would be triggered based on the actions at the workbook level. Examples of these events include adding a new worksheet, saving the workbook, opening the workbook, printing a part or the entire workbook, etc.
- Application Level Events: These are the events that occur in the Excel application. Example of these would include closing any of the open workbooks or opening a new workbook.
- UserForm Level Events: These events would be triggered based on the actions in the ‘UserForm’. Examples of these include initializing a UserForm or clicking a button in the UserForm.
- Chart Events: These are events related to the chart sheet. A chart sheet is different than a worksheet (which is where most of us are used to work in Excel). A chart sheets purpose is to hold a chart. Examples of such events would include changing the series of the chart or resizing the chart.
- OnTime and OnKey Events: These are two events that don’t fit in any of the above categories. So I have listed these separately. ‘OnTime’ event allows you to execute a code at a specific time or after a specific time has elapsed. ‘OnKey’ event allows you to execute a code when a specific keystroke (or a combination of keystrokes) is used.
In the above section, I covered the different types of events.
Based on the type of event, you need to put the code in the relevant object.
For example, if it’s a worksheet related event, it should go in the code window of the worksheet object. If it’s workbook related, it should go in the code window for a workbook object.
The following sections cover the places where you can put the event code:
In Worksheet Code Window
When you open the VB Editor (using keyboard shortcut ALT + F11), you would notice the worksheets object in the Project Explorer. For each worksheet in the workbook, you will see one object.
When you double-click on the worksheet object in which you want to place the code, it would open the code window for that worksheet.
While you can start writing the code from scratch, it’s much better to select the event from a list of options and let VBA automatically insert the relevant code for the selected event.
To do this, you need to first select worksheet from the drop down at the top-left of the code window.
After selecting worksheet from the drop down, you get a list of all the events related to the worksheet. You can select the one you want to use from the drop-down at the top right of the code window.
As soon as you select the event, it would automatically enter the first and last line of the code for the selected event. Now you can add your code in between the two lines.

Note: As soon as you select Worksheet from the drop-down, you would notice two lines of code appear in the code window. Once you have selected the event for which you want the code, you can delete the lines that appeared by default.
Note that each worksheet has a code window of its own. When you put the code for Sheet1, it will only work if the event happens in Sheet1.
In ThisWorkbook Code Window
Just like worksheets, if you have a workbook level event code, you can place it in ThisWorkbook code window.
When you double-click on ThisWorkbook, it will open the code window for it.
You need to select Workbook from the drop-down at the top-left of the code window.
After selecting Workbook from the drop down, you get a list of all the events related to the Workbook. You can select the one you want to use from the drop-down at the top right of the code window.
As soon as you select the event, it would automatically enter the first and last line of the code for the selected event. Now you can add your code in between the two lines.
Note: As soon as you select Workbook from the drop-down, you would notice two lines of code appear in the code window. Once you have selected the event for which you want the code, you can delete the lines that appeared by default.
In Userform Code Window
When you’re creating UserForms in Excel, you can also use UserForm events to executes codes based on specific actions. For example, you can specify a code that is executed when the button is clicked.
While the Sheet objects and ThisWorkbook objects are already available when you open the VB Editor, UserForm is something you need to create first.
To create a UserForm, right-click on any of the objects, go to Insert and click on UserForm.

This would insert a UserForm object in the workbook.
When you double-click on the UserForm (or any of the object that you add to the UserForm), it would open the code window for the UserForm.
Now just like worksheets or ThisWorkbook, you can select the event and it will insert the first and the last line for that event. And then you can add the code in the middle of it.
In Chart Code Window
In Excel, you can also insert Chart sheets (which are different then worksheets). A chart sheet is meant to contain charts only.
When you have inserted a chart sheet, you will be able to see the Chart sheet object in the VB Editor.
You can add the event code to the chart sheet code window just like we did in the worksheet.
Double click on the Chart sheet object in the Project Explorer. This will open the code window for the chart sheet.
Now, you need to select Chart from the drop-down at the top-left of the code window.
After selecting Chart from the drop-down, you get a list of all the events related to the Chart sheet. You can select the one you want to use from the drop-down at the top right of the code window.
Note: As soon as you select Chart from the drop-down, you would notice two lines of code appear in the code window. Once you have selected the event for which you want the code, you can delete the lines that appeared by default.
In Class Module
Class Modules need to be inserted just like UserForms.
A class module can hold code related to the application – which would be Excel itself, and the embedded charts.
I will cover the class module as a separate tutorial in the coming weeks.
Understanding the Event Sequence
When you trigger an event, it doesn’t happen in isolation. It may also lead to a sequence of multiple triggers.
For example, when you insert a new worksheet, the following things happen:
- A new worksheet is added
- The previous worksheet gets deactivated
- The new worksheet gets activated
While in most cases, you may not need to worry about the sequence, if you’re creating complex codes that rely on events, it’s better to know the sequence to avoid unexpected results.
Understanding the Role of Arguments in VBA Events
Before we jump to Event examples and the awesome things you can do with it, there is one important concept I need to cover.
In VBA events, there would be two types of codes:
- Without any arguments
- With arguments
And in this section, I want to quickly cover the role of arguments.
Below is a code that has no argument in it (the parenthesis are empty):
With the above code, when you open a workbook, it simply shows a message box with the message – “Remember to fill the Timesheet”.
Now let’s have a look at a code that has an argument.
The above code uses the Sh argument which is defined as an object type. The Sh argument could be a worksheet or a chart sheet, as the above event is triggered when a new sheet is added.
By assigning the new sheet that is added to the workbook to the object variable Sh, VBA has enabled us to use it in the code. So to refer to the new sheet name, I can use Sh.Name.
The concept of arguments will be useful when you go through the VBA events examples in the next sections.
Workbook Level Events (Explained with Examples)
Following are the most commonly used events in a workbook.
| EVENT NAME | WHAT TRIGGERS THE EVENT |
| Activate | When a workbook is activated |
| AfterSave | When a workbook is installed as an add-in |
| BeforeSave | When a workbook is saved |
| BeforeClose | When a workbook is closed |
| BeforePrint | When a workbook is printed |
| Deactivate | When a workbook is deactivated |
| NewSheet | When a new sheet is added |
| Open | When a workbook is opened |
| SheetActivate | When any sheet in the workbook is activated |
| SheetBeforeDelete | When any sheet is deleted |
| SheetBeforeDoubleClick | When any sheet is double-clicked |
| SheetBeforeRightClick | When any sheet is right-clicked |
| SheetCalculate | When any sheet is calculated or recalculated |
| SheetDeactivate | When a workbook is deactivated |
| SheetPivotTableUpdate | When a workbook is updated |
| SheetSelectionChange | When a workbook is changed |
| WindowActivate | When a workbook is activated |
| WindowDeactivate | When a workbook is deactivated |
Note that this is not a complete list. You can find the complete list here.
Remember that the code for Workbook event is stored in the ThisWorkbook objects code window.
Now let’s have a look at some useful workbook events and see how these can be used in your day-to-day work.
Workbook Open Event
Let’s say that you want to show the user a friendly reminder to fill their timesheets whenever they open a specific workbook.
You can use the below code to do this:
Now as soon as you open the workbook that has this code, it will show you a message box with the specified message.
There are a few things to know when working with this code (or Workbook Event codes in general):
- If a workbook has a macro and you want to save it, you need to save it in the .XLSM format. Else the macro code would be lost.
- In the above example, the event code would be executed only when the macros are enabled. You may see a yellow bar asking for permission to enable macros. Until that is enabled, the event code is not executed.
- The Workbook event code is placed in the code window of ThisWorkbook object.
You can further refine this code and show the message only of Friday.
The below code would do this:
Note that in the Weekday function, Sunday is assigned the value 1, Monday is 2 and so on.
Hence for Friday, I have used 6.
Workbook Open event can be useful in many situations, such as:
- When you want to show a welcome message to the person when a workbook is opened.
- When you want to display a reminder when the workbook is opened.
- When you want to always activate one specific worksheet in the workbook when it’s opened.
- When you want to open related files along with the workbook.
- When you want to capture the date and time stamp every time the workbook is opened.
Workbook NewSheet Event
NewSheet event is triggered when you insert a new sheet in the workbook.
Let’s say that you want to enter the date and time value in cell A1 of the newly inserted sheet. You can use the below code to do this:
The above code uses ‘On Error Resume Next’ to handle cases where someone inserts a chart sheet and not a worksheet. Since chart sheet doesn’t have cell A1, it would show an error if ‘On Error Resume Next’ is not used.
Another example could be when you want to apply some basic setting or formatting to a new sheet as soon as it is added. For example, if you want to add a new sheet and want it to automatically get a serial number (up to 100), then you can use the code below.
The above code also does a bit of formatting. It gives the header cell a blue color and makes the font white. It also applies a border to all the filled cells.
The above code is an example of how a short VBA code can help you steal a few seconds every time you insert a new worksheet (in case this is something that you have to do every time).
Workbook BeforeSave Event
Before Save event is triggered when you save a workbook. Note that the event is triggered first and then the workbook is saved.
When saving an Excel workbook, there could be two possible scenarios:
- You’re saving it for the first time and it will show the Save As dialog box.
- You’ve already saved it earlier and it will simply save and overwrite the changes in the already saved version.
Now let’s have a look at a few examples where you can use the BeforeSave event.
Suppose you have a new workbook that you’re saving for the first time, and you want to remind the user to save it in the K drive, then you can use the below code:
In the above code, if the file has never been saved, SaveAsUI is True and brings up the Save As dialog box. The above code would display the message before the Save As dialog box appear.
Another example could be to update the date and time when the file is saved in a specific cell.
The below code would insert the date & time stamp in cell A1 of Sheet1 whenever the file is saved.
Note that this code is executed as soon as the user saves the workbook. If the workbook is being saved for the first time, it will show a Save As dialog box. But the code is already executed by the time you see the Save As dialog box. At this point, if you decide to cancel and not save the workbook, the date and time would already be entered in the cell.
Workbook BeforeClose Event
Before Close event happens right before the workbook is closed.
The below code protects all the worksheets before the workbook is closed.
Remember that the event code is triggered as soon as you close the workbook.
One important thing to know about this event is that it doesn’t care whether the workbook is actually closed or not.
In case the workbook has not been saved and you’re shown the prompt asking whether to save the workbook or not, and you click Cancel, it will not save your workbook. However, the event code would have already been executed by then.
Workbook BeforePrint Event
When you give the print command (or Print Preview command), the Before Print event is triggered.
The below code would recalculate all the worksheets before your workbook is printed.
When the user is printing the workbook, the event would be fired whether he/she is printing the entire workbook or only a part of it.
Another example below is of the code that would add the date and time to the footer when the workbook is printed.
Worksheet Level Events (Explained with Examples)
Worksheet events take place based on the triggers in the worksheet.
Following are the most commonly used events in a worksheet.
| Event Name | What triggers the event |
| Activate | When the worksheet is activated |
| BeforeDelete | Before the worksheet is deleted |
| BeforeDoubleClick | Before the worksheet is double-clicked |
| BeforeRightClick | Before the worksheet is right-clicked |
| Calculate | Before the worksheet is calculated or recalculated |
| Change | When the cells in the worksheet are changed |
| Deactivate | When the worksheet is deactivated |
| PivotTableUpdate | When the Pivot Table in the worksheet is updated |
| SelectionChange | When the selection on the worksheet is changed |
Note that this is not a complete list. You can find the complete list here.
Remember that the code for Worksheet event is stored in the worksheet object code window (in the one in which you want the event to be triggered). There can be multiple worksheets in a workbook, and your code would be fired only when the event takes place in the worksheet in which it is placed.
Now let’s have a look at some useful worksheet events and see how these can be used in your day-to-day work.
Worksheet Activate Event
This event is fired when you activate a worksheet.
The below code unprotects a sheet as soon as it is activated.
You can also use this event to make sure a specific cell or a range of cells (or a named range) is selected as soon as you activate the worksheet. The below code would select cell D1 as soon as you activate the sheet.
Worksheet Change Event
A change event is fired whenever you make a change in the worksheet.
Well.. not always.
There are some changes that trigger the event, and some that don’t. Here is a list of some changes that won’t trigger the event:
- When you change the formatting of the cell (font size, color, border, etc.).
- When you merge cells. This is surprising as sometimes, merging cells also removes content from all the cells except the top-left one.
- When you add, delete, or edit a cell comment.
- When you sort a range of cells.
- When you use Goal Seek.
The following changes would trigger the event (even though you may think it shouldn’t):
- Copy and pasting formatting would trigger the event.
- Clearing formatting would trigger the event.
- Running a spell check would trigger the event.
Below is a code would show a message box with the address of the cell that has been changed.
While this is a useless macro, it does show you how to use the Target argument to find out what cells have been changed.
Now let’s see a couple of more useful examples.
Suppose you have a range of cells (let’s say A1:D10) and you want to show a prompt and ask the user if they really wanted to change a cell in this range or not, you can use the below code.
It shows a prompt with two buttons – Yes and No. If the user selects ‘Yes’, the change is done, else it is reversed.
In the above code, we check whether the Target cell is in first 4 columns and the first 10 rows. If that’s the case, the message box is shown. Also, if the user selected No in the message box, the change is reversed (by the Application.Undo command).
Note that I have used Application.EnableEvents = False before the Application.Undo line. And then I reversed it by using Application.EnableEvent = True in the next line.
This is needed as when the undo happens, it also triggers the change event. If I don’t set the EnableEvent to False, it will keep on triggering the change event.
You can also monitor the changes to a named range using the change event. For example, if you have a named range called “DataRange” and you want to show a prompt in case user makes a change in this named range, you can use the code below:
The above code checks whether the cell/range where you have made the changes has any cells common to the Data Range. If it does, it shows the message box.
Workbook SelectionChange Event
The selection change event is triggered whenever there is a selection change in the worksheet.
The below code would recalculate the sheet as soon as you change the selection.
Another example of this event is when you want to highlight the active row and column of the selected cell.
Something as shown below:
The following code can do this:
The code first removes the background color from all the cells and then apply the one mentioned in the code to the active row and column.
And that’s the problem with this code. That it removes color from all cells.
If you want to highlight the active row/column while keeping the color in other cells intact, use the technique shown in this tutorial.
Workbook DoubleClick Event
This is one of my favorite worksheet events and you’ll see a lot of tutorials where I have used this (such as this one or this one).
This event is triggered when you double-click on a cell.
Let me show you how awesome this is.
With the below code, you can double-click on a cell and it will apply a background color, change the font color, and make the text in the cell bold;
This can be useful when you’re going through a list of cells and want to highlight a few selected ones. While you can use the F4 key to repeat the last step, it would only be able to apply one kind of formatting. With this double-click event, you can apply all three with just a double-click.
Note that in the above code, I have made the value of Cancel = True.
This is done so that the default action of double-click is disabled – which is to get into the edit mode. With Cancel = True, Excel would not get you into Edit mode when you double-click on the cell.
Here is another example.
If you have a to-do list in Excel, you can use double-click event to apply the strikethrough format to mark the task as completed.
Something as shown below:
Here is the code that will do this:
Note that in this code, I have made double-click as a toggle event. When you double-click on a cell, it checks if the strikethrough format has already been applied. If it has been, double-click removes the strikethrough format, and if it hasn’t been, then the strikethrough format is applied.
Excel VBA OnTime Event
The events that we have seen so far in this article were associated with one of the Excel objects, be it the workbook, worksheet, chart sheet, or UserForms, etc.
OnTime event is different than other events as it can be stored in the regular VBA module (while the others were to be placed in the code window of objects such as ThisWorkbook or Worksheets or UserForms).
Within the regular VBA module, it is used as a method of the application object.
The reason this is considered an event is that it can be triggered based on the time you specify. For example, if I want the sheet to recalculate every 5 minutes, I can use the OnTime event for it.
Or, if I want to show a message/reminder at a specific time of the day, I can use the OnTime event.
Below is a code that will show a message at 2 pm every day.
Remember you need to place this code in the regular VBA module,
Also, while the OnTime event would be triggered at the specified time, you need to run the macro manually at any time.
Once you run the macro, it will wait till it’s 2 PM and then call the ‘ShowMessage’ macro.
The ShowMessage macro would then display the message.
The OnTime event takes four arguments:
Application. OnTime (EarliestTime, Procedure, LatestTime, Schedule)
- EarliestTime: The time when you want to run the procedure.
- Procedure: The name of the procedure that should be run.
- LatestTime (Optional): In case another code is running and your specified code can’t be run at the specified time, you can specify the LatestTime for which it should wait. For example, it could be EarliestTime + 45 (which means it will wait for 45 seconds for the other procedure to get completed). If even after 45 seconds the procedure is not able to run, it gets abandoned. If you don’t specify this, Excel would wait until the code can be run, and then run it.
- Schedule (Optional): If set to True, it schedules new time procedure. If False, then it cancels the previously set procedure. By default, this is True.
In the above example, we only used the first two arguments.
Let’s look at another example.
The below code would refresh the worksheet every 5 min.
The above code would refresh the worksheet every 5 minutes.
It uses the Now function to determine the current time and then adds 5 minutes to the current time.
The OnTime event would continue to run until you stop it. If you close the workbook and Excel application is still running (other workbooks are open), the workbook that has the OnTime event running in it would reopen itself.
This is better handled by specifically stopping the OnTime event.
In the above code, I have the StopRefresh code, but you need to execute it to stop the OnTime event. You can do this manually, assign it to a button and do this by pressing the button or call it from the Workbook Close event.
The above ‘BeforeClose’ event code goes in ThisWorkbook code window.
Excel VBA OnKey Event
When you’re working with Excel, it keeps monitoring the keystrokes you use. This allows us to use keystrokes as the trigger for an event.
With OnKey event, you can specify a keystroke (or a combination of keystrokes) and the code that should be executed when that keystroke is used. When these keystrokes are pressed, it will execute the code for it.
Just like OnTime event, you need to have a way to cancel the OnKey event. Also, when you set the OnKey event for a specific keystroke, it becomes available in all the open workbooks.
Before I show you an example of using the OnKey event, let me first share the key codes that are available to you in VBA.
| KEY | CODE |
| Backspace | or |
| Break | |
| Caps Lock | |
| Delete | or |
| Down Arrow | |
| End | |
| Enter | |
| Enter (on the nueric keypad) | |
| Escape | or |
| Home | |
| Ins | |
| Left Arrow | |
| NumLock | |
| PageDown | |
| PageUp | |
| RightArrow | |
| Scroll Lock | |
| Tab | |
| Up Arrow | |
| F1 through F15 | through |
When you need to use any onkey event, you need to use the code for it.
The above table has the codes for single keystrokes.
You can also combine these with the following codes:
- Shift: + (Plus Sign)
- Control: ^ (Caret)
- Alt: % (Percentage)
For Example, for Alt F4, you need to use the code: “% ” – where % is for the ALT key and is for the F4 key.
Now let’s have a look at an example (remember the code for OnKey events are placed in the regular VBA module).
When you hit the PageUp or PageDown key, it jumps 29 rows above/below the active cell (at least that’s what it’s doing on my laptop).
If you want it to jump only 5 rows at a time, you can use the below code:
When you run the first part of the code, it will run the OnKey events. Once this is executed, using the PageUp and the PageDown key would only make the cursor jump 5 rows at a time.
Note that we have used ‘On Error Resume Next’ to make sure errors are ignored. These errors can occur when you press the PageUp key even when you’re at the top of the worksheet. Since there are no more rows to jump, the code would show an error. But since we have used ‘On Error Resume Next’, it will be ignored.
To make sure these OnKey events are available, you need to run the first part of the code. In case you want this to be available as soon as you open the workbook, you can place this in the ThisWorkbook code window.
The below code will return the keys to their normal functionality.
When you don’t specify the second argument in the OnKey method, it will return the keystroke to its regular functionality.
In case you want to cancel the functionality of a keystroke, so that Excel does nothing when that keystroke is used, you need to use a blank string as the second argument.
In the below code, Excel would do nothing when we use the PageUp or PageDown keys.
Disabling Events in VBA
Sometimes you may need to disable events to make your code work properly.
For example, suppose I have a range (A1:D10) and I want to show a message whenever a cell is changed in this range. So I show a message box and asks the user whether they are sure that they want to make the change. If the answer is Yes, the change is made, and if the answer is No, then VBA would undo it.
You can use the below code:
The problem with this code is that when the user selects No in the message box, the action is reversed (as I have used Application.Undo).
When the undo happens and the value is changed back to the original one, the VBA change event is again triggered, and the user is again shown the same message box.
This means that you can continue to click NO on the message box and it will keep showing up. This happens as you have got stuck in the infinite loop in this case.
To avoid such cases, you need to disable events so that the change event (or any other event) is not triggered.
The following code would work well in this case:
In the above code, right above the Application.Undo line, we have used – Application.EnableEvents = False.
Setting EnableEvents to False would not trigger any event (in the current or any open workbooks).
Once we have completed the undo operation, we can switch back the EnableEvents property to True.
Keep in mind that disabling events impacts all the workbooks that are currently opened (or opened while EnableEvents is set to False). For example, as a part of the code, if you open a new workbook, then the Workbook Open event would not work.
Impact of Events Undo Stack
Let me first tell you what an Undo Stack is.
When you work in Excel, it keeps monitoring your actions. When you make a mistake, you can always use Control + Z to go back to the previous step (i.e., undo your current action).
If you press Control + Z twice, it will take you back two steps. These steps that you have performed are stored as a part of the Undo stack.
Any event that changes the worksheet destroys this Undo stack. This means that if I have done 5 things before I trigger an event, I will not be able to use Control + Z to go back to those previous steps. Triggering the event has destroyed that stack for me.
In the below code, I use VBA to enter the timestamp in cell A1 whenever there is a change in the worksheet.
Since I am making a change in the worksheet, this will destroy the undo stack.
Also, note that this is not limited to events only.
If you have a code that is stored in regular VBA module, and you make a change in the worksheet, it would also destroy the undo stack in Excel.
For example, the below code simply enter the text “Hello” in cell A1, but even running this would destroy the undo stack.
You May Also Like the Following Excel VBA Tutorials:
Источник
When you create or record a macro in Excel, you need to run the macro to execute the steps in the code.
A few ways of running a macro includes using the macro dialog box, assigning the macro to a button, using a shortcut, etc.
Apart from these user-initiated macro executions, you can also use VBA events to run the macro.
Excel VBA Events – Introduction
Let me first explain what is an event in VBA.
An event is an action that can trigger the execution of the specified macro.
For example, when you open a new workbook, it’s an event. When you insert a new worksheet, it’s an event. When you double-click on a cell, it’s an event.
There are many such events in VBA, and you can create codes for these events. This means that as soon as an event occurs, and if you have specified a code for that event, that code would instantly be executed.
Excel automatically does this as soon as it notices that an event has taken place. So you only need to write the code and place it in the correct event subroutine (this is covered later in this article).
For example, if you insert a new worksheet and you want it to have a year prefix, you can write the code for it.
Now, whenever anyone inserts a new worksheet, this code would automatically be executed and add the year prefix to the worksheet’s name.
Another example could be that you want to change the color of the cell when someone double-clicks on it. You can use the double-click event for this.
Similarly, you can create VBA codes for many such events (as we will see later in this article).
Below is a short visual that shows the double-click event in action. As soon as I double click on cell A1. Excel instantly opens a message box that shows the address of the cell.
Double-click is an event, and showing the message box is what I have specified in the code whenever the double-click event takes place.
While the above example is a useless event, I hope it helps you understand what events really are.
Different Types of Excel VBA Events
There are different objects in Excel – such as Excel itself (to which we often refer to as the application), workbooks, worksheets, charts, etc.
Each of these objects can have various events associated with it. For example:
- If you create a new workbook, it’s an application level event.
- If you add a new worksheet, it’s a workbook level event.
- If you change the value in a cell in a sheet, it’s a worksheet level event.
Below are the different types of Events that exist in Excel:
- Worksheet Level Events: These are the types of events that would trigger based on the actions taken in the worksheet. Examples of these events include changing a cell in the worksheet, changing the selection, double-clicking on a cell, right-clicking on a cell, etc.
- Workbook Level Events: These events would be triggered based on the actions at the workbook level. Examples of these events include adding a new worksheet, saving the workbook, opening the workbook, printing a part or the entire workbook, etc.
- Application Level Events: These are the events that occur in the Excel application. Example of these would include closing any of the open workbooks or opening a new workbook.
- UserForm Level Events: These events would be triggered based on the actions in the ‘UserForm’. Examples of these include initializing a UserForm or clicking a button in the UserForm.
- Chart Events: These are events related to the chart sheet. A chart sheet is different than a worksheet (which is where most of us are used to work in Excel). A chart sheets purpose is to hold a chart. Examples of such events would include changing the series of the chart or resizing the chart.
- OnTime and OnKey Events: These are two events that don’t fit in any of the above categories. So I have listed these separately. ‘OnTime’ event allows you to execute a code at a specific time or after a specific time has elapsed. ‘OnKey’ event allows you to execute a code when a specific keystroke (or a combination of keystrokes) is used.
Where to Put the Event-Related Code
In the above section, I covered the different types of events.
Based on the type of event, you need to put the code in the relevant object.
For example, if it’s a worksheet related event, it should go in the code window of the worksheet object. If it’s workbook related, it should go in the code window for a workbook object.
In VBA, different objects – such as Worksheets, Workbooks, Chart Sheets, UserForms, etc., have their own code windows. You need to put the event code in the relevant object’s code window. For example – if it’s a workbook level event, then you need to have the event code in the Workbook code window.
The following sections cover the places where you can put the event code:
In Worksheet Code Window
When you open the VB Editor (using keyboard shortcut ALT + F11), you would notice the worksheets object in the Project Explorer. For each worksheet in the workbook, you will see one object.
When you double-click on the worksheet object in which you want to place the code, it would open the code window for that worksheet.
While you can start writing the code from scratch, it’s much better to select the event from a list of options and let VBA automatically insert the relevant code for the selected event.
To do this, you need to first select worksheet from the drop down at the top-left of the code window.
After selecting worksheet from the drop down, you get a list of all the events related to the worksheet. You can select the one you want to use from the drop-down at the top right of the code window.
As soon as you select the event, it would automatically enter the first and last line of the code for the selected event. Now you can add your code in between the two lines.
Note: As soon as you select Worksheet from the drop-down, you would notice two lines of code appear in the code window. Once you have selected the event for which you want the code, you can delete the lines that appeared by default.
Note that each worksheet has a code window of its own. When you put the code for Sheet1, it will only work if the event happens in Sheet1.
In ThisWorkbook Code Window
Just like worksheets, if you have a workbook level event code, you can place it in ThisWorkbook code window.
When you double-click on ThisWorkbook, it will open the code window for it.
You need to select Workbook from the drop-down at the top-left of the code window.
After selecting Workbook from the drop down, you get a list of all the events related to the Workbook. You can select the one you want to use from the drop-down at the top right of the code window.
As soon as you select the event, it would automatically enter the first and last line of the code for the selected event. Now you can add your code in between the two lines.
Note: As soon as you select Workbook from the drop-down, you would notice two lines of code appear in the code window. Once you have selected the event for which you want the code, you can delete the lines that appeared by default.
In Userform Code Window
When you’re creating UserForms in Excel, you can also use UserForm events to executes codes based on specific actions. For example, you can specify a code that is executed when the button is clicked.
While the Sheet objects and ThisWorkbook objects are already available when you open the VB Editor, UserForm is something you need to create first.
To create a UserForm, right-click on any of the objects, go to Insert and click on UserForm.
This would insert a UserForm object in the workbook.
When you double-click on the UserForm (or any of the object that you add to the UserForm), it would open the code window for the UserForm.
Now just like worksheets or ThisWorkbook, you can select the event and it will insert the first and the last line for that event. And then you can add the code in the middle of it.
In Chart Code Window
In Excel, you can also insert Chart sheets (which are different then worksheets). A chart sheet is meant to contain charts only.
When you have inserted a chart sheet, you will be able to see the Chart sheet object in the VB Editor.
You can add the event code to the chart sheet code window just like we did in the worksheet.
Double click on the Chart sheet object in the Project Explorer. This will open the code window for the chart sheet.
Now, you need to select Chart from the drop-down at the top-left of the code window.
After selecting Chart from the drop-down, you get a list of all the events related to the Chart sheet. You can select the one you want to use from the drop-down at the top right of the code window.
Note: As soon as you select Chart from the drop-down, you would notice two lines of code appear in the code window. Once you have selected the event for which you want the code, you can delete the lines that appeared by default.
In Class Module
Class Modules need to be inserted just like UserForms.
A class module can hold code related to the application – which would be Excel itself, and the embedded charts.
I will cover the class module as a separate tutorial in the coming weeks.
Note that apart from OnTime and OnKey events, none of the above events can be stored in the regular VBA module.
Understanding the Event Sequence
When you trigger an event, it doesn’t happen in isolation. It may also lead to a sequence of multiple triggers.
For example, when you insert a new worksheet, the following things happen:
- A new worksheet is added
- The previous worksheet gets deactivated
- The new worksheet gets activated
While in most cases, you may not need to worry about the sequence, if you’re creating complex codes that rely on events, it’s better to know the sequence to avoid unexpected results.
Understanding the Role of Arguments in VBA Events
Before we jump to Event examples and the awesome things you can do with it, there is one important concept I need to cover.
In VBA events, there would be two types of codes:
- Without any arguments
- With arguments
And in this section, I want to quickly cover the role of arguments.
Below is a code that has no argument in it (the parenthesis are empty):
Private Sub Workbook_Open()
MsgBox "Remember to Fill the Timesheet"
End Sub
With the above code, when you open a workbook, it simply shows a message box with the message – “Remember to fill the Timesheet”.
Now let’s have a look at a code that has an argument.
Private Sub Workbook_NewSheet(ByVal Sh As Object)
Sh.Range("A1") = Sh.Name
End Sub
The above code uses the Sh argument which is defined as an object type. The Sh argument could be a worksheet or a chart sheet, as the above event is triggered when a new sheet is added.
By assigning the new sheet that is added to the workbook to the object variable Sh, VBA has enabled us to use it in the code. So to refer to the new sheet name, I can use Sh.Name.
The concept of arguments will be useful when you go through the VBA events examples in the next sections.
Workbook Level Events (Explained with Examples)
Following are the most commonly used events in a workbook.
| EVENT NAME | WHAT TRIGGERS THE EVENT |
| Activate | When a workbook is activated |
| AfterSave | When a workbook is installed as an add-in |
| BeforeSave | When a workbook is saved |
| BeforeClose | When a workbook is closed |
| BeforePrint | When a workbook is printed |
| Deactivate | When a workbook is deactivated |
| NewSheet | When a new sheet is added |
| Open | When a workbook is opened |
| SheetActivate | When any sheet in the workbook is activated |
| SheetBeforeDelete | When any sheet is deleted |
| SheetBeforeDoubleClick | When any sheet is double-clicked |
| SheetBeforeRightClick | When any sheet is right-clicked |
| SheetCalculate | When any sheet is calculated or recalculated |
| SheetDeactivate | When a workbook is deactivated |
| SheetPivotTableUpdate | When a workbook is updated |
| SheetSelectionChange | When a workbook is changed |
| WindowActivate | When a workbook is activated |
| WindowDeactivate | When a workbook is deactivated |
Note that this is not a complete list. You can find the complete list here.
Remember that the code for Workbook event is stored in the ThisWorkbook objects code window.
Now let’s have a look at some useful workbook events and see how these can be used in your day-to-day work.
Workbook Open Event
Let’s say that you want to show the user a friendly reminder to fill their timesheets whenever they open a specific workbook.
You can use the below code to do this:
Private Sub Workbook_Open()
MsgBox "Remember to Fill the Timesheet"
End Sub
Now as soon as you open the workbook that has this code, it will show you a message box with the specified message.
There are a few things to know when working with this code (or Workbook Event codes in general):
- If a workbook has a macro and you want to save it, you need to save it in the .XLSM format. Else the macro code would be lost.
- In the above example, the event code would be executed only when the macros are enabled. You may see a yellow bar asking for permission to enable macros. Until that is enabled, the event code is not executed.
- The Workbook event code is placed in the code window of ThisWorkbook object.
You can further refine this code and show the message only of Friday.
The below code would do this:
Private Sub Workbook_Open()
wkday = Weekday(Date)
If wkday = 6 Then MsgBox "Remember to Fill the Timesheet"
End Sub
Note that in the Weekday function, Sunday is assigned the value 1, Monday is 2 and so on.
Hence for Friday, I have used 6.
Workbook Open event can be useful in many situations, such as:
- When you want to show a welcome message to the person when a workbook is opened.
- When you want to display a reminder when the workbook is opened.
- When you want to always activate one specific worksheet in the workbook when it’s opened.
- When you want to open related files along with the workbook.
- When you want to capture the date and time stamp every time the workbook is opened.
Workbook NewSheet Event
NewSheet event is triggered when you insert a new sheet in the workbook.
Let’s say that you want to enter the date and time value in cell A1 of the newly inserted sheet. You can use the below code to do this:
Private Sub Workbook_NewSheet(ByVal Sh As Object)
On Error Resume Next
Sh.Range("A1") = Format(Now, "dd-mmm-yyyy hh:mm:ss")
End Sub
The above code uses ‘On Error Resume Next’ to handle cases where someone inserts a chart sheet and not a worksheet. Since chart sheet doesn’t have cell A1, it would show an error if ‘On Error Resume Next’ is not used.
Another example could be when you want to apply some basic setting or formatting to a new sheet as soon as it is added. For example, if you want to add a new sheet and want it to automatically get a serial number (up to 100), then you can use the code below.
Private Sub Workbook_NewSheet(ByVal Sh As Object)
On Error Resume Next
With Sh.Range("A1")
.Value = "S. No."
.Interior.Color = vbBlue
.Font.Color = vbWhite
End With
For i = 1 To 100
Sh.Range("A1").Offset(i, 0).Value = i
Next i
Sh.Range("A1", Range("A1").End(xlDown)).Borders.LineStyle = xlContinuous
End Sub
The above code also does a bit of formatting. It gives the header cell a blue color and makes the font white. It also applies a border to all the filled cells.
The above code is an example of how a short VBA code can help you steal a few seconds every time you insert a new worksheet (in case this is something that you have to do every time).
Workbook BeforeSave Event
Before Save event is triggered when you save a workbook. Note that the event is triggered first and then the workbook is saved.
When saving an Excel workbook, there could be two possible scenarios:
- You’re saving it for the first time and it will show the Save As dialog box.
- You’ve already saved it earlier and it will simply save and overwrite the changes in the already saved version.
Now let’s have a look at a few examples where you can use the BeforeSave event.
Suppose you have a new workbook that you’re saving for the first time, and you want to remind the user to save it in the K drive, then you can use the below code:
Private Sub Workbook_BeforeSave(ByVal SaveAsUI As Boolean, Cancel As Boolean)
If SaveAsUI Then MsgBox "Save this File in the K Drive"
End Sub
In the above code, if the file has never been saved, SaveAsUI is True and brings up the Save As dialog box. The above code would display the message before the Save As dialog box appear.
Another example could be to update the date and time when the file is saved in a specific cell.
The below code would insert the date & time stamp in cell A1 of Sheet1 whenever the file is saved.
Private Sub Workbook_BeforeSave(ByVal SaveAsUI As Boolean, Cancel As Boolean)
Worksheets("Sheet1").Range("A1") = Format(Now, "dd-mmm-yyyy hh:mm:ss")
End Sub
Note that this code is executed as soon as the user saves the workbook. If the workbook is being saved for the first time, it will show a Save As dialog box. But the code is already executed by the time you see the Save As dialog box. At this point, if you decide to cancel and not save the workbook, the date and time would already be entered in the cell.
Workbook BeforeClose Event
Before Close event happens right before the workbook is closed.
The below code protects all the worksheets before the workbook is closed.
Private Sub Workbook_BeforeClose(Cancel As Boolean)
Dim sh As Worksheet
For Each sh In ThisWorkbook.Worksheets
sh.Protect
Next sh
End Sub
Remember that the event code is triggered as soon as you close the workbook.
One important thing to know about this event is that it doesn’t care whether the workbook is actually closed or not.
In case the workbook has not been saved and you’re shown the prompt asking whether to save the workbook or not, and you click Cancel, it will not save your workbook. However, the event code would have already been executed by then.
Workbook BeforePrint Event
When you give the print command (or Print Preview command), the Before Print event is triggered.
The below code would recalculate all the worksheets before your workbook is printed.
Private Sub Workbook_BeforePrint(Cancel As Boolean)
 For Each ws in Worksheets
 ws.Calculate
 Next ws
 End Sub
When the user is printing the workbook, the event would be fired whether he/she is printing the entire workbook or only a part of it.
Another example below is of the code that would add the date and time to the footer when the workbook is printed.
Private Sub Workbook_BeforePrint(Cancel As Boolean)
Dim ws As Worksheet
For Each ws In ThisWorkbook.Worksheets
ws.PageSetup.LeftFooter = "Printed On - " & Format(Now, "dd-mmm-yyyy hh:mm")
Next ws
End Sub
Worksheet Level Events (Explained with Examples)
Worksheet events take place based on the triggers in the worksheet.
Following are the most commonly used events in a worksheet.
| Event Name | What triggers the event |
| Activate | When the worksheet is activated |
| BeforeDelete | Before the worksheet is deleted |
| BeforeDoubleClick | Before the worksheet is double-clicked |
| BeforeRightClick | Before the worksheet is right-clicked |
| Calculate | Before the worksheet is calculated or recalculated |
| Change | When the cells in the worksheet are changed |
| Deactivate | When the worksheet is deactivated |
| PivotTableUpdate | When the Pivot Table in the worksheet is updated |
| SelectionChange | When the selection on the worksheet is changed |
Note that this is not a complete list. You can find the complete list here.
Remember that the code for Worksheet event is stored in the worksheet object code window (in the one in which you want the event to be triggered). There can be multiple worksheets in a workbook, and your code would be fired only when the event takes place in the worksheet in which it is placed.
Now let’s have a look at some useful worksheet events and see how these can be used in your day-to-day work.
Worksheet Activate Event
This event is fired when you activate a worksheet.
The below code unprotects a sheet as soon as it is activated.
Private Sub Worksheet_Activate()
ActiveSheet.Unprotect
End Sub
You can also use this event to make sure a specific cell or a range of cells (or a named range) is selected as soon as you activate the worksheet. The below code would select cell D1 as soon as you activate the sheet.
Private Sub Worksheet_Activate()
ActiveSheet.Range("D1").Select
End Sub
Worksheet Change Event
A change event is fired whenever you make a change in the worksheet.
Well.. not always.
There are some changes that trigger the event, and some that don’t. Here is a list of some changes that won’t trigger the event:
- When you change the formatting of the cell (font size, color, border, etc.).
- When you merge cells. This is surprising as sometimes, merging cells also removes content from all the cells except the top-left one.
- When you add, delete, or edit a cell comment.
- When you sort a range of cells.
- When you use Goal Seek.
The following changes would trigger the event (even though you may think it shouldn’t):
- Copy and pasting formatting would trigger the event.
- Clearing formatting would trigger the event.
- Running a spell check would trigger the event.
Below is a code would show a message box with the address of the cell that has been changed.
Private Sub Worksheet_Change(ByVal Target As Range)
MsgBox "You just changed " & Target.Address
End Sub
While this is a useless macro, it does show you how to use the Target argument to find out what cells have been changed.
Now let’s see a couple of more useful examples.
Suppose you have a range of cells (let’s say A1:D10) and you want to show a prompt and ask the user if they really wanted to change a cell in this range or not, you can use the below code.
It shows a prompt with two buttons – Yes and No. If the user selects ‘Yes’, the change is done, else it is reversed.
Private Sub Worksheet_Change(ByVal Target As Range)
If Target.Row <= 10 And Target.Column <= 4 Then
Ans = MsgBox("You are making a change in cells in A1:D10. Are you sure you want it?", vbYesNo)
End If
If Ans = vbNo Then
Application.EnableEvents = False
Application.Undo
Application.EnableEvents = True
End If
End Sub
In the above code, we check whether the Target cell is in first 4 columns and the first 10 rows. If that’s the case, the message box is shown. Also, if the user selected No in the message box, the change is reversed (by the Application.Undo command).
Note that I have used Application.EnableEvents = False before the Application.Undo line. And then I reversed it by using Application.EnableEvent = True in the next line.
This is needed as when the undo happens, it also triggers the change event. If I don’t set the EnableEvent to False, it will keep on triggering the change event.
You can also monitor the changes to a named range using the change event. For example, if you have a named range called “DataRange” and you want to show a prompt in case user makes a change in this named range, you can use the code below:
Private Sub Worksheet_Change(ByVal Target As Range)
Dim DRange As Range
Set DRange = Range("DataRange")
If Not Intersect(Target, DRange) Is Nothing Then
MsgBox "You just made a change to the Data Range"
End If
End Sub
The above code checks whether the cell/range where you have made the changes has any cells common to the Data Range. If it does, it shows the message box.
Workbook SelectionChange Event
The selection change event is triggered whenever there is a selection change in the worksheet.
The below code would recalculate the sheet as soon as you change the selection.
Private Sub Worksheet_SelectionChange(ByVal Target As Range)
Application.Calculate
End Sub
Another example of this event is when you want to highlight the active row and column of the selected cell.
Something as shown below:
The following code can do this:
Private Sub Worksheet_SelectionChange(ByVal Target As Range)
Cells.Interior.ColorIndex = xlNone
With ActiveCell
.EntireRow.Interior.Color = RGB(248, 203, 173)
.EntireColumn.Interior.Color = RGB(180, 198, 231)
End With
End Sub
The code first removes the background color from all the cells and then apply the one mentioned in the code to the active row and column.
And that’s the problem with this code. That it removes color from all cells.
If you want to highlight the active row/column while keeping the color in other cells intact, use the technique shown in this tutorial.
Workbook DoubleClick Event
This is one of my favorite worksheet events and you’ll see a lot of tutorials where I have used this (such as this one or this one).
This event is triggered when you double-click on a cell.
Let me show you how awesome this is.
With the below code, you can double-click on a cell and it will apply a background color, change the font color, and make the text in the cell bold;
Private Sub Worksheet_BeforeDoubleClick(ByVal Target As Range, Cancel As Boolean)
Cancel = True
With Target
.Interior.Color = vbBlue
.Font.Color = vbWhite
.Font.Bold = True
End With
End Sub
This can be useful when you’re going through a list of cells and want to highlight a few selected ones. While you can use the F4 key to repeat the last step, it would only be able to apply one kind of formatting. With this double-click event, you can apply all three with just a double-click.
Note that in the above code, I have made the value of Cancel = True.
This is done so that the default action of double-click is disabled – which is to get into the edit mode. With Cancel = True, Excel would not get you into Edit mode when you double-click on the cell.
Here is another example.
If you have a to-do list in Excel, you can use double-click event to apply the strikethrough format to mark the task as completed.
Something as shown below:
Here is the code that will do this:
Private Sub Worksheet_BeforeDoubleClick(ByVal Target As Range, Cancel As Boolean)
Cancel = True
CurrFormat = Target.Font.Strikethrough
If CurrFormat Then
Target.Font.Strikethrough = False
Else
Target.Font.Strikethrough = True
End If
End Sub
Note that in this code, I have made double-click as a toggle event. When you double-click on a cell, it checks if the strikethrough format has already been applied. If it has been, double-click removes the strikethrough format, and if it hasn’t been, then the strikethrough format is applied.
Excel VBA OnTime Event
The events that we have seen so far in this article were associated with one of the Excel objects, be it the workbook, worksheet, chart sheet, or UserForms, etc.
OnTime event is different than other events as it can be stored in the regular VBA module (while the others were to be placed in the code window of objects such as ThisWorkbook or Worksheets or UserForms).
Within the regular VBA module, it is used as a method of the application object.
The reason this is considered an event is that it can be triggered based on the time you specify. For example, if I want the sheet to recalculate every 5 minutes, I can use the OnTime event for it.
Or, if I want to show a message/reminder at a specific time of the day, I can use the OnTime event.
Below is a code that will show a message at 2 pm every day.
Sub MessageTime()
Application.OnTime TimeValue("14:00:00"), "ShowMessage"
End Sub

Sub ShowMessage()
MsgBox "It's Lunch Time"
End Sub
Remember you need to place this code in the regular VBA module,
Also, while the OnTime event would be triggered at the specified time, you need to run the macro manually at any time.
Once you run the macro, it will wait till it’s 2 PM and then call the ‘ShowMessage’ macro.
The ShowMessage macro would then display the message.
The OnTime event takes four arguments:
Application.OnTime(EarliestTime, Procedure, LatestTime, Schedule)
- EarliestTime: The time when you want to run the procedure.
- Procedure: The name of the procedure that should be run.
- LatestTime (Optional): In case another code is running and your specified code can’t be run at the specified time, you can specify the LatestTime for which it should wait. For example, it could be EarliestTime + 45 (which means it will wait for 45 seconds for the other procedure to get completed). If even after 45 seconds the procedure is not able to run, it gets abandoned. If you don’t specify this, Excel would wait until the code can be run, and then run it.
- Schedule (Optional): If set to True, it schedules new time procedure. If False, then it cancels the previously set procedure. By default, this is True.
In the above example, we only used the first two arguments.
Let’s look at another example.
The below code would refresh the worksheet every 5 min.
Dim NextRefresh as Date

Sub RefreshSheet()
ThisWorkbook.Worksheets("Sheet1").Calculate
NextRefresh = Now + TimeValue("00:05:00")
Application.OnTime NextRefresh, "RefreshSheet"
End Sub

Sub StopRefresh()
On Error Resume Next
Application.OnTime NextRefresh, "RefreshSheet", , False
End Sub
The above code would refresh the worksheet every 5 minutes.
It uses the Now function to determine the current time and then adds 5 minutes to the current time.
The OnTime event would continue to run until you stop it. If you close the workbook and Excel application is still running (other workbooks are open), the workbook that has the OnTime event running in it would reopen itself.
This is better handled by specifically stopping the OnTime event.
In the above code, I have the StopRefresh code, but you need to execute it to stop the OnTime event. You can do this manually, assign it to a button and do this by pressing the button or call it from the Workbook Close event.
Private Sub Workbook_BeforeClose(Cancel As Boolean)
Call StopRefresh
End Sub
The above ‘BeforeClose’ event code goes in ThisWorkbook code window.
Also read: Make VBA Code Pause or Delay
Excel VBA OnKey Event
When you’re working with Excel, it keeps monitoring the keystrokes you use. This allows us to use keystrokes as the trigger for an event.
With OnKey event, you can specify a keystroke (or a combination of keystrokes) and the code that should be executed when that keystroke is used. When these keystrokes are pressed, it will execute the code for it.
Just like OnTime event, you need to have a way to cancel the OnKey event. Also, when you set the OnKey event for a specific keystroke, it becomes available in all the open workbooks.
Before I show you an example of using the OnKey event, let me first share the key codes that are available to you in VBA.
| KEY | CODE |
| Backspace | {BACKSPACE} or {BS} |
| Break | {BREAK} |
| Caps Lock | {CAPSLOCK} |
| Delete | {DELETE} or {DEL} |
| Down Arrow | {DOWN} |
| End | {END} |
| Enter | ~ |
| Enter (on the nueric keypad) | {ENTER} |
| Escape | {ESCAPE} or {ESC} |
| Home | {HOME} |
| Ins | {INSERT} |
| Left Arrow | {LEFT} |
| NumLock | {NUMLOCK} |
| PageDown | {PGDN} |
| PageUp | {PGUP} |
| RightArrow | {RIGHT} |
| Scroll Lock | {SCROLLOCK} |
| Tab | {TAB} |
| Up Arrow | {UP} |
| F1 through F15 | {F1} through {F15} |
When you need to use any onkey event, you need to use the code for it.
The above table has the codes for single keystrokes.
You can also combine these with the following codes:
- Shift: + (Plus Sign)
- Control: ^ (Caret)
- Alt: % (Percentage)
For Example, for Alt F4, you need to use the code: “%{F4}” – where % is for the ALT key and {F4} is for the F4 key.
Now let’s have a look at an example (remember the code for OnKey events are placed in the regular VBA module).
When you hit the PageUp or PageDown key, it jumps 29 rows above/below the active cell (at least that’s what it’s doing on my laptop).
If you want it to jump only 5 rows at a time, you can use the below code:
Sub PageUpDOwnKeys()
Application.OnKey "{PgUp}", "PageUpMod"
Application.OnKey "{PgDn}", "PageDownMod"
End Sub

Sub PageUpMod()
On Error Resume Next
ActiveCell.Offset(-5, 0).Activate
End Sub

Sub PageDownMod()
On Error Resume Next
ActiveCell.Offset(5, 0).Activate
End Sub
When you run the first part of the code, it will run the OnKey events. Once this is executed, using the PageUp and the PageDown key would only make the cursor jump 5 rows at a time.
Note that we have used ‘On Error Resume Next’ to make sure errors are ignored. These errors can occur when you press the PageUp key even when you’re at the top of the worksheet. Since there are no more rows to jump, the code would show an error. But since we have used ‘On Error Resume Next’, it will be ignored.
To make sure these OnKey events are available, you need to run the first part of the code. In case you want this to be available as soon as you open the workbook, you can place this in the ThisWorkbook code window.
Private Sub Workbook_Open()
Application.OnKey "{PgUp}", "PageUpMod"
Application.OnKey "{PgDn}", "PageDownMod"
End Sub
The below code will return the keys to their normal functionality.
Sub Cancel_PageUpDownKeysMod()
Application.OnKey "{PgUp}"
Application.OnKey "{PgDn}"
End Sub
When you don’t specify the second argument in the OnKey method, it will return the keystroke to its regular functionality.
In case you want to cancel the functionality of a keystroke, so that Excel does nothing when that keystroke is used, you need to use a blank string as the second argument.
In the below code, Excel would do nothing when we use the PageUp or PageDown keys.
Sub Ignore_PageUpDownKeys()
Application.OnKey "{PgUp}", ""
Application.OnKey "{PgDn}", ""
End Sub
Disabling Events in VBA
Sometimes you may need to disable events to make your code work properly.
For example, suppose I have a range (A1:D10) and I want to show a message whenever a cell is changed in this range. So I show a message box and asks the user whether they are sure that they want to make the change. If the answer is Yes, the change is made, and if the answer is No, then VBA would undo it.
You can use the below code:
Private Sub Worksheet_Change(ByVal Target As Range)
If Target.Row <= 10 And Target.Column <= 4 Then
Ans = MsgBox("You are making a change in cells in A1:D10. Are you sure you want it?", vbYesNo)
End If
If Ans = vbNo Then
Application.Undo
End If
End Sub
The problem with this code is that when the user selects No in the message box, the action is reversed (as I have used Application.Undo).
When the undo happens and the value is changed back to the original one, the VBA change event is again triggered, and the user is again shown the same message box.
This means that you can continue to click NO on the message box and it will keep showing up. This happens as you have got stuck in the infinite loop in this case.
To avoid such cases, you need to disable events so that the change event (or any other event) is not triggered.
The following code would work well in this case:
Private Sub Worksheet_Change(ByVal Target As Range)
If Target.Row <= 10 And Target.Column <= 4 Then
Ans = MsgBox("You are making a change in cells in A1:D10. Are you sure you want it?", vbYesNo)
End If
If Ans = vbNo Then
Application.EnableEvents = False
Application.Undo
Application.EnableEvents = True
End If
End Sub
In the above code, right above the Application.Undo line, we have used – Application.EnableEvents = False.
Setting EnableEvents to False would not trigger any event (in the current or any open workbooks).
Once we have completed the undo operation, we can switch back the EnableEvents property to True.
Keep in mind that disabling events impacts all the workbooks that are currently opened (or opened while EnableEvents is set to False). For example, as a part of the code, if you open a new workbook, then the Workbook Open event would not work.
Impact of Events Undo Stack
Let me first tell you what an Undo Stack is.
When you work in Excel, it keeps monitoring your actions. When you make a mistake, you can always use Control + Z to go back to the previous step (i.e., undo your current action).
If you press Control + Z twice, it will take you back two steps. These steps that you have performed are stored as a part of the Undo stack.
Any event that changes the worksheet destroys this Undo stack. This means that if I have done 5 things before I trigger an event, I will not be able to use Control + Z to go back to those previous steps. Triggering the event has destroyed that stack for me.
In the below code, I use VBA to enter the timestamp in cell A1 whenever there is a change in the worksheet.
Private Sub Worksheet_Change(ByVal Target As Range)
Application.EnableEvents = False
Range("A1").Value = Format(Now, "dd-mmm-yyyy hh:mm:ss")
Application.EnableEvents = True
End Sub
Since I am making a change in the worksheet, this will destroy the undo stack.
Also, note that this is not limited to events only.
If you have a code that is stored in regular VBA module, and you make a change in the worksheet, it would also destroy the undo stack in Excel.
For example, the below code simply enter the text “Hello” in cell A1, but even running this would destroy the undo stack.
Sub TypeHello()
Range("A1").Value = "Hello"
End Sub
You May Also Like the Following Excel VBA Tutorials:
- Working with Cells and Ranges in Excel VBA.
- Working with Worksheets in Excel VBA.
- Working with Workbooks in Excel VBA.
- Excel VBA Loops – The Ultimate Guide.
- Using IF Then Else Statment in Excel VBA.
- For Next Loop in Excel.
- Creating User-Defined Functions in Excel VBA.
- How to Create and Use Add-ins in Excel.
- Create and Reuse Macros by saving in Personal Macro Workbook.
In this Article
- What are VBA events?
- Types of Events
- Dangers of Using Code in Events
- Disable Events
- Workbook Events Examples (not exhaustive)
- Workbook Open Event
- Workbook New Sheet Event
- Workbook Before Save Event
- Workbook Before Close Event
- Worksheet Event Examples (not exhaustive)
- Worksheet Change Event
- Worksheet Before Double Click Event
- Worksheet Activate Event
- Active X Control Events (not exhaustive)
- Command Button Click Event
- Drop Down (Combo Box) Change Event
- Tick Box (Check Box) Click Event
- UserForm Events (not exhaustive)
- UserForm Activate Event
- Change Event
- Click Event
- Chart Events
- Application Events
- Application.OnTime
- Application.OnKey
What are VBA events?
Events are happening all the time when a user opens an Excel workbook and starts doing various actions such as entering data into cells or moving between sheets
Within the Visual Basic Editor (ALT+F11), sub routines are already set up which can get fired off when the user does something e.g. entering data into a cell. The sub routine does not provide any action code, merely a ‘Sub’ statement and an ‘End Sub’ statement with no code between them. They are effectively dormant so nothing happens until you enter some code.
Here is an example based on the ‘Change’ event in a worksheet:

As a VBA programmer, you can add in code to make certain things happen when the user takes a specific action. This gives you the chance to control the user, and to prevent them taking actions that you do not want them to do and which might damage your workbook. For example, you may want them to save off their own individual copy of the workbook under another name, so that they do not affect the original, which may be being used by a number of users.
If they close the workbook, then they will automatically be prompted to save their changes. However, the workbook has a ‘BeforeClose’ event and you can enter code to prevent the workbook being closed and firing off a ‘Save’ event. You can then add a button to the worksheet itself and put your own ‘Save’ routine onto it. You can also disable the ‘Save’ routine using the ‘BeforeSave’ event
An understanding of how events work is absolutely essential to a VBA programmer.
Types of Events
Workbook Events – these events are fired off based on what the user does with the workbook itself. They include user actions such as opening the workbook, closing the workbook, saving the workbook, adding or deleting sheet
Worksheet Events – these events are fired off by a user taking actions on a specific worksheet. Every worksheet within the workbook has an individual code module, which contains various events specifically for that worksheet (not for all the worksheets). These include user actions such as changing the contents of a cell, double clicking on a cell, or right clicking on a cell.
Active X Control Events – Active X controls can be added to a worksheet using the ‘Insert’ icon on the ‘Developer’ tab in the Excel ribbon. These are often button controls to enable the user to take various actions under control of your code, but they can also be objects such as drop downs. Using Active X controls as opposed to Form controls on the worksheet gives a whole scope for programmability. Active X controls give you far more flexibility from a programming point of view over using form controls in a worksheet.
For example, you could have two drop down controls on your worksheet. You want the available list in the second drop down to be based on what the user chose in the first drop down. Using the ‘Change’ event on the first drop down, you can create code to read what the user has selected and then update the second drop down. You could also de-activate the second drop down until the user has made a selection in the first drop down
UserForm Events – You can insert and design a professional looking form to use as a pop-up. All the controls that you place on your form are Active X controls and they have the same events as the Active X controls that you might place on a worksheet
Chart Events – These events are only related to a chart sheet and not to a chart appearing as part of a worksheet. These events include resizing the chart or selecting the chart.
Application Events – These use the Application object in VBA. Examples would allow code to be fired off when a certain key is pressed or when a certain time is reached. You could program a situation where the workbook is left open 24/7 and it imports data from an external source overnight at a pre-determined time.
Dangers of Using Code in Events
When you write code to do something when the user takes a certain action, you need to bear in mind that your code could be triggering other events, which could put your code into a continuous loop.
For example, suppose that you use the ‘Change’ event on a worksheet so that when the user puts a value into a cell, a calculation based on that cell is placed into the cell immediately to the right of it.
The problem here is that the placing of the calculated value into the cell triggers another ‘Change’ event, which then in turn triggers yet another ‘Change’ event, and so on until your code has run out of columns to use, and throws up an error message.
You need to think carefully when writing the code for the event to ensure that other events will not be triggered inadvertently
Disable Events
You can use code to disable events to get around this problem. What you will need to do is to incorporate code to disable events whilst your event code is running and then re-enable events at the end of the code. Here is an example of how to do it:
Sub DisableEvents()
Application.EnableEvents = False
Application.EnableEvents = True
End Sub
Bear in mind that this disables all events right across the Excel application, so this would also affect other functions within Excel. If you use this for any reason, make sure that events are switched back on afterwards.
Importance of Parameters in Events
Events usually have parameters which you can use to find out more about what the user is doing and the cell location that they are in.
For example, the Worksheet Change event looks like this:
Private Sub Worksheet_Change(ByVal Target As Range)By using the range object, you can find out the cell row/column coordinates that the user is actually in.
Private Sub Worksheet_Change(ByVal Target As Range)
MsgBox Target.Column
MsgBox Target.Row
End Sub
If you only want your code to work on a certain column or row number, then you add a condition that exits the subroutine if the column is not the required one.
Private Sub Worksheet_Change(ByVal Target As Range)
If Target.Column <> 2 Then Exit Sub
End Sub
This gets around the problem of your code triggering multiple events, since it will only work if the user has changed a cell in column 2 (column B)
Workbook Events Examples (not exhaustive)
The workbook events are found under the ‘ThisWorkbook’ object in the VBE Project Explorer. You will need to select ‘Workbook’ on the first drop down on the code window and then the second drop down will show you all the events available

Workbook Open Event
This event is fired off whenever the workbook is opened by a user. You could use it to put a welcome message to a user by capturing their username
Private Sub Workbook_Open()
MsgBox "Welcome " & Application.UserName
End Sub
You could also check their username against a list held on a hidden sheet to see if they are authorised to access the workbook. If they are not an authorised user, then you can display a message and close the workbook so that they cannot use it.
Workbook New Sheet Event
This event is triggered when a user adds a new sheet to the workbook
You could use this code to only allow yourself to add a new sheet, rather than have different users all adding sheets and making a mess of the workbook
Private Sub Workbook_NewSheet(ByVal Sh As Object)
Application.DisplayAlerts = False
If Application.UserName <> "Richard" Then
        Sh.Delete
End If
Application.DisplayAlerts = True
End Sub
Note that you need to switch off the alerts as a user warning will appear when the sheet is deleted which allows the user to circumvent your code. Make sure that you turn the alerts back on afterwards!
VBA Coding Made Easy
Stop searching for VBA code online. Learn more about AutoMacro — A VBA Code Builder that allows beginners to code procedures from scratch with minimal coding knowledge and with many time-saving features for all users!

Learn More
Workbook Before Save Event
This event is triggered when the user clicks on the ‘Save’ icon, but before the ‘Save’ actually takes place
As described earlier, you may want to prevent users saving their changes to the original workbook, and force them to create a new version using a button on the worksheet. All that you need to do is to change the ‘Cancel’ parameter to True, and the workbook can never be saved by the conventional method.
Private Sub Workbook_BeforeSave(ByVal SaveAsUI As Boolean, Cancel As Boolean)
Cancel = True
End Sub
Workbook Before Close Event
You can use this event to prevent users closing down the workbook, and again force them to exit through a worksheet button. Again, you set the ‘Cancel’ parameter to ‘True’. The red X in the top right-hand corner of the Excel window no longer works any more.
Private Sub Workbook_BeforeClose(Cancel As Boolean)
Cancel = True
End Sub
Worksheet Event Examples (not exhaustive)
The worksheet events are found under the specific sheet name object in the VBE Project Explorer. You will need to select ‘Worksheet’ on the first drop down on the code window and then the second drop down will show you all the events available

VBA Programming | Code Generator does work for you!
Worksheet Change Event
This event is triggered when a user makes a change to a worksheet, such as entering a new value into a cell
You can use this event to put an additional value or comment in next to the changed cell, but as discussed earlier, you do not want to start setting off a loop of events.
Private Sub Worksheet_Change(ByVal Target As Range)
If Target.Column <> 2 Then Exit Sub
ActiveSheet.Cells(Target.Row, Target.Column + 1). Value = _
ActiveSheet.Cells(Target.Row, Target.Column). Value * 1.1
End Sub
In this example, the code will only work if the value is entered into Column B (column 2). If this is true then it will add 10% to the number and place it into the next available cell
Worksheet Before Double Click Event
This event will fire off code if a user double clicks on a cell. This can be extremely useful for financial reports such as a balance sheet or profit & loss account where numbers are likely to be challenged by managers, especially if the bottom line is negative!
You can use this to provide a drill-down facility, so that when the manager challenges a particular number, all they have to do is double click on the number, and the breakdown appears as part of the report.
This is very impressive from a user’s point of view, and saves them constantly asking ‘why is this number so high?’
You would need to write code to find out the heading / criteria for the number (using the Target object properties) and then filter the tabular data and then copy it into the report.
Worksheet Activate Event
This event occurs when the user moves from one sheet to another. It applies to the new sheet that the user is moving to.
It could be used to ensure that the new sheet is completely calculated before the user starts doing anything on it. It can also be used to only re-calculate that particular sheet without re-calculating the entire workbook. If the workbook is large and has complicated formula in it, then re-calculating one sheet saves a lot of time
Private Sub Worksheet_Activate()
ActiveSheet.Calculate
End Sub
Active X Control Events (not exhaustive)
As discussed earlier, you can add Active X controls directly onto a worksheet. These can be command buttons, drop downs, and list boxes
The Active X events are found under the specific sheet name object (where you added the control) in the VBE Project Explorer. You will need to select the name of the Active X control on the first drop down on the code window and then the second drop down will show you all the events available

Command Button Click Event
When you have put a command button onto a spreadsheet, you will want it to take some action. You do this by putting code on the Click event.
You can easily put an ‘Are you sure message?’ on this so that a check is made before your code runs
Private Sub CommandButton1_Click ()
Dim ButtonRet As Variant
ButtonRet = MsgBox("Are you sure that you want to do this?", vbQuestion Or vbYesNo)
If ButtonRet = vbNo Then Exit Sub
End Sub
AutoMacro | Ultimate VBA Add-in | Click for Free Trial!
Drop Down (Combo Box) Change Event
An Active X drop down has a change event, so that if a user selects a particular item from the drop-down list, you can capture their choice using this event and then write code to adapt other parts of the sheet or workbook accordingly.
Private Sub ComboBox1_Change ()
MsgBox "You selected " & ComboBox1.Text
End Sub
Tick Box (Check Box) Click Event
You can add a tick or check box to a worksheet so as to provide option choices for the user. You can use the click event on it to see if the user has changed anything on this. The values returned are True or False according to whether it has been ticked or not.
Private Sub CheckBox1_Click ()
MsgBox CheckBox1.Value
End Sub
UserForm Events (not exhaustive)
Excel provides the ability for you to design your own forms. These can be very useful to use as pop-ups to collect information or to provide multiple choices to the user. They use Active X controls as described previously and have exactly the same events, although the events depend very much on the type of control.
Here is an example of a simple form:
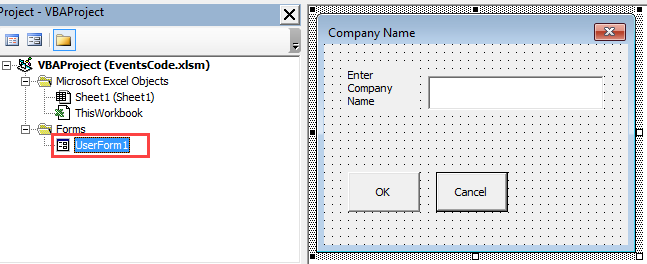
When it is displayed this is what it looks like on screen
You would use events on the form to do things like enter a default company name when the form is opened, to check the company name input agrees to one already in the spreadsheet and has not been mis-spelt, and to add code to the click events on the ‘OK’ and ‘Cancel’ buttons
The code and events behind the form can be viewed by double clicking anywhere on the form
The first drop down gives access to all the controls on the form. The second drop down will give access to the events

AutoMacro | Ultimate VBA Add-in | Click for Free Trial!
UserForm Activate Event
This event is triggered when the form is activated, normally when it is displayed. This event can be used to set up default values e.g. a default company name in the company name text box
Private Sub UserForm_Activate()
TextBox1.Text = "My Company Name"
End Sub
Change Event
Most of the controls on the form have a change event, but in this example, the company name text box can use the event to put a restriction on the length of the company name being entered
Private Sub TextBox1_Change ()
If Len (TextBox1.Text) > 20 Then
    MsgBox "The name is restricted to 20 characters", vbCritical
    TextBox1.Text = ""
 End If
End Sub
Click Event
You can use this event to take action from the user clicking on controls on the form, or even the form itself
On this form there is an ‘OK’ button, and having collected a company name, we would want to place it in a cell on the spreadsheet for future reference
Private Sub CommandButton1_Click ()
ActiveSheet.Range("A1"). Value = TextBox1.Text
Me.Hide
End Sub
This code acts when the user clicks the ‘OK’ button. It puts the value in the company name input box into cell A1 on the active sheet and then hides the form so that user control is returned back to the worksheet.
Chart Events
Chart events only work on charts that are on a separate chart sheet, and not on a chart that is incorporated into a standard worksheet
Chart events are somewhat limited and cannot be used on a worksheet where you might well have multiple charts. Also, users do not necessarily want to switch from a worksheet containing numbers to a chart sheet – there is no immediate visual impact here
The most useful event would be to find out the component of a chart that a user has clicked on e.g. a segment in a pie chart, or a bar in a bar chart, but this is not an event available on the standard range of events.
This problem can be solved by using a class module to add a ‘Mouse Down’ event which will return details of the chart component that the user has clicked on. This is used on a chart within a worksheet.
This involves some very complicated coding, but the results are spectacular. You can create drill downs e.g. the user clicks on a pie chart segment and instantly that chart is hidden and a second chart appears in its place showing a pie chart of detail for the original segment, or you could produce the tabular data supporting that segment of the pie chart.
AutoMacro | Ultimate VBA Add-in | Click for Free Trial!
Application Events
You can use the Application object in VBA to fire off code according to a particular event
Application.OnTime
This can enable you to fire off a piece of code at regular intervals for as long as the workbook is loaded into Excel. You may want to auto-save your workbook to a different folder every 10 minutes, or leave the worksheet running overnight so as to bring in the latest data from an external source.
In this example, a sub routine is entered into a module. It displays a message box to every 5 minutes, although this could easily be another coded procedure. At the same time, it resets the timer to the current time plus 5 more minutes.
Every time it runs, the timer resets to run the same sub routine in another 5 minutes time.
Sub TestOnTime()
MsgBox "Testing OnTime"
Application.OnTime (Now () + TimeValue("00:05:00")), "TestOnTime"
End Sub
Application.OnKey
This function enables you to design your own hot keys. You can make any key combination call a sub routine of your creation.
In this example the letter ‘a’ is redirected so that instead of placing an ‘a’ in a cell, it will display a message box. This code needs to be placed in an inserted module.
Sub TestKeyPress()
Application.OnKey "a", "TestKeyPress"
End Sub
Sub TestKeyPress()
MsgBox "You pressed 'a'"
End Sub
You run the sub routine ‘TestKeyPress’ first of all. You only need to run this once. It tells Excel that every time the letter ‘a’ is pressed it will call the sub routine ‘TestKeyPress’. The sub routine ‘TestKeyPress’ just displays a message box to tell you that you pressed key ‘a’. It could of course load a form or do all sorts of other things.
You can use any key combination that you can use with the ‘SendKeys’ function
To cancel this functionality, you run the ‘OnKey’ statement without the ‘Procedure’ parameter.
Sub CancelOnKey()
Application.OnKey "a"
End Sub
Everything is now back to normal.
 Once you’ve created a macro, you need a way to execute or call it. Otherwise, all of your work designing and coding the VBA application would’ve been in vain.
Within Excel, you have several different options for calling or running a VBA Sub procedure. In fact, in this Excel VBA tutorial alone, I explain 9 different ways in which you can execute a Sub procedure.
A very useful way of executing a macro is by telling Excel that a Sub procedure should be executed when a particular event occurs. As I explain below, knowing how to do this allows you to create VBA applications that are able to do things that would otherwise be impossible.
This blog post focuses on the topic of Excel VBA events. To be more precise:
In this tutorial, I provide all the information you need to understand what are Excel VBA events and how to start using them in your macros.
I also provide a complete list of Application events, workbook events, worksheet events, chart events, and non-object events. This Excel VBA Events Tutorial is accompanied by a Cheat Sheet with a shorter version of this list of VBA events. You can get immediate free access to this Cheat Sheet by subscribing to the Power Spreadsheets Newsletter.
The following table of contents lists the main topics I cover in this tutorial:
Let’s start by taking a look at…
What Are Excel VBA Events
In regular English, an event is something that happens.
You can, from a broad perspective, use the same definition for an event within Visual Basic for Applications. In other words, an Excel VBA event is something that happens while you’re working on Excel.
Events happen all the time while you’re working in Excel. As explained in both Excel Macros for Dummies and Excel 2016 Power Programming with VBA:
Everything that happens in Excel happens to an object through an event.
I provide a very detailed list of events below.
The concept of an Excel VBA event is relatively simple. Therefore, you might be wondering…
Why Are Excel VBA Events Useful
The main reason why you may find events useful is because you can create macros that are automatically executed when a certain event occurs. This allows you to, among other things:
- Add interactivity to your Excel workbooks.
- Improve user experience.
- Perform activities that would otherwise (without VBA events) be impossible.
The Sub procedures that are automatically executed when a particular event occurs are usually known as event-handler procedures. Note that event-handler procedures are always Sub procedures. You generally don’t handle events with Function procedures.
Now that you understand what is an Excel VBA event, and why it’s useful, let’s start to check out the…
Main Categories Of Excel VBA Events
Most Excel experts classify Excel VBA events on the basis of which is the object of the event. In other words, they take into consideration the VBA object where the event occurs.
On the basis of this criteria, you can classify events in the following categories:
- Application Events, which occur to the Excel Application itself.
- Workbook Events, which happen when something happens to a workbook.
- Worksheet Events, which are triggered whenever something happens to a worksheet.
- Chart Events, which occur when something happens to a chart.
- UserForm Events, which happen to a UserForm or an object within a UserForm.
This VBA tutorial doesn’t cover the topic of UserForms or UserForm events. I may write about this in the future. If you want to receive an email whenever I publish new tutorials in Power Spreadsheets, please make sure to register for our Newsletter by entering your email address below:
- Non-object Events, which aren’t associated with a particular object. These events work different from the previous categories. In fact, you access these events through VBA methods of the Application object.
Before we dig deeper into the events themselves, let’s see…
How To Create Event-Handler Procedures
In certain respects, the process of creating an event-handler procedure is the same that you would follow when crafting regular Sub procedures.
However, there are 2 characteristics that are particular to event-handler procedures and have a material effect on the way you should proceed:
- Characteristic #1: As a general rule, event-handler procedures must be stored in the module that corresponds to the relevant object where the event happens.
This is very important: Event-handler procedures generally don’t go in a standard module. As explained in Excel VBA Programming for Dummies, if you store an event-handler procedure in a standard module:
#1: The procedure won’t be executed when the event occurs.
#2: You won’t receive an error message.
The exceptions to this rule are: (i) non-object events which go in a standard module, and (ii) Application and embedded Chart events which go in a Class Module.
Even though you can only store event-handler procedures within certain modules, those event-handler procedures can still call other procedures that you store within other modules (including normal modules).
- Characteristic #2: The structure of the names of event-handler procedures are generally composed of 3 items:
Item #1: The relevant object.
Item #2: An underscore (_).
Item #3: The name of the event that triggers the Sub procedure.
Furthermore, several event-handler procedures have arguments passed to the procedure. The names of the arguments vary depending on the particular case. You can find several examples of event-handler procedures that use arguments below.
Fortunately, you can easily handle both of these characteristics by following the steps I describe below. In the words of Excel guru John Walkenbach (in Excel VBA Programming for Dummies):
Writing these event-handlers is relatively straightforward after you understand how the process works.
Let’s take a look at the basics of this process:
Step #1: Go To The Appropriate Module
As a general rule, event-handler procedures must be stored within a particular module. In the following sections, I explain:
- In which module should you store a particular event-handler procedure, depending on its characteristics.
- How can you get to (or create) that module.
The sections below aren’t applicable to the non-object events (OnTime and OnKey) which I explain below. In those cases, you can store the relevant procedures within a normal module.
In the case of Application, Workbook, Worksheet and Chart events (which are the bulk of what I cover in this blog post), the following are the 2 rules you must consider to determine where to store your VBA code:
- Rule #1: If you’re working with Workbook, Worksheet or Chart (for chart sheet) events, you use the code module of the corresponding object.
- Rule #2: If you want to work with Application or Chart (for embedded charts) events, you use a Class Module.
Let’s start by taking a look at rule #1. In other words, let’s see…
How To Go To An Object Code Module: Usual Process
In most cases, you can easily get to the Code module you want to go to in the following 2 simple steps:
Step #1: Go To The Visual Basic Editor.
First, you must go to the Visual Basic Editor. You can easily do this in either of the following ways:
- Select “Visual Basic” within the Developer Tab of the Ribbon.

- Use the keyboard shortcut “Alt + F11”.

Step #2: Display The Code Of The Appropriate Module
Once you’re within the environment of the Visual Basic Editor, go to the Project Window. This is window is usually located on the upper-left side of the screen.

Within the Project Window, each workbook or add-in that’s currently open appears as a separate project. In the screenshot above, there’s only 1 project (Book1.xlsx).

Each project may contain several nodes. Regardless of the number of nodes, focus on the Microsoft Excel Objects node.

The Microsoft Excel Objects node usually contains the following items:
- Each worksheet within the relevant workbook.
You should use the appropriate Sheet module for event-handler procedures that refer to a particular worksheet (worksheet events).

- Each chart sheet within the workbook.
Similar to worksheets, you use the relevant Chart module for event-handler procedures that refer to a certain chart sheet (chart events).

- The workbook itself.
You use the ThisWorkbook module for event-handler procedures that deal with the workbook (workbook events).


For these purposes, each separate worksheet and chart sheet is a separate object. In order to display the code of the specific module you want to work with, you can do either of the following:
- Double-click on the object module.
- Right-click on the object module and select “View Code”.
For example, the following image shows how it looks like when I ask the VBE to display the code within ThisWorkbook.

How To Go To A Worksheet Or Chart Sheet Code Module (Alternative)
In the case of sheets, you can also get to the relevant module in the following 2 easy steps:
- Step #1: Right-click on the relevant worksheet or chart sheet.

- Step #2: Select “View Code” within the context menu that Excel displays.


Now that you know how to get to the modules that correspond to workbooks, worksheets and chart sheets, let’s take a look at…
How To Create A Class Module For Dealing With Application Events
As I explain above, in order to work with Application and embedded Chart events, you must work with a Class Module. This section covers how to create a Class Module to work with Application events. The following section does the same thing for embedded Chart events.
In order to create a Class Module for purposes of dealing with Application events, you just need to follow these 7 easy steps:
- Step #1: Go to the Visual Basic Editor by following the explanation I provide above.
- Step #2: Insert a Class Module. You can do this by (i) right-clicking on the relevant VBA project within the Project Explorer window, (ii) selecting “Insert” and “Class Module”.

Alternatively, you can insert a Class Module by going to the Insert menu of the VBE and selecting “Class Module”. If you want to work with keyboard shortcuts, you can use “Alt, I, C”.

- Step #3: Assign a new name to the Class Module you just created. You can easily do this by typing the name you want in the (Name) field within the Properties Window of the VBE.

For this particular example, I name the module “applicationClassModule”.

- Step #4: Use the WithEvents keyword to declare a Public Application object. The basic form of this statement is as follows:
Public WithEvents applicationObjectName As Application
For these purposes, applicationObjectName is the name of the declared Application object. In the example below, I use the name “applicationObject”.

- Step #5: If you’ve not inserted a regular VBA module yet, do this. You can insert a module by (i) right-clicking on the appropriate VBA Project, and (ii) selecting to Insert a Module.

Alternatively, you can select “Module” from within the Insert menu or use the keyboard shortcut “Alt, I, M”.

- Step #6: Declare a module-level object variable within the appropriate module. The module in which you declare the variable must be the one in which you store the Sub procedure to which I make reference in step #7 below.
The purpose of this object variable is to refer to the Public Application object that you’ve declared in step #4 above. You can use a statement of the following form in order to do this declaration:
Dim objectVariableName As New classModuleName
For these purposes: (i) objectVariableName is the name you want to assign to the newly declared object variable, and (ii) classModuleName is the name of the Class Module you created in step #2 above. In the example below, classModuleName is “applicationClassModule” and objectVariableName “classApplication”. The variable is declared in a normal module.

- Step #7: Connect the object variable you declared in step #6 with the Application object you declared in step #4. You do this by executing a Sub procedure that uses the following Set statement to make the appropriate assignment:
Set objectVariableName.applicationObjectName = Application
For these purposes: (i) objectVariableName is the name you assigned to the object variable in step #6, (ii) applicationObjectName is the name you assigned to the Application object in step #4. In the following example, objectVariableName is “classApplication” and applicationObjectName is “applicationObject”.

If this statement isn’t executed, the Application-level event-handler procedures won’t work appropriately.
In the example above, I include the assignment statement within a macro stored in a regular VBA module. You can, however, include the Set statement is in the Workbook_Open Sub event-handler procedure. This procedure is triggered when the Workbook.Open event (the workbook is opened) occurs.

If you change the module in which you store the procedure that connects the object variable and Application object, remember to adjust the location of the object variable declaration made in step #6 above. In other words, make the object variable declaration in the same module.


If you want to create a Class Module for purposes of working with Chart events, the process is substantially similar to that above. However, since there are a couple of differences, let’s take a closer look at…
How To Create A Class Module For Dealing With (Embedded) Chart Events
The process of creating a Class Module for purposes of working with Chart events for embedded charts, is very similar to the one I describe above for Application events. In fact, as you’ll notice below, all of the steps are either identical or materially the same.
You can use a Class Module for purposes of working with both embedded charts and chart sheets.
The 5 easy steps you must follow to create such a Class Module are as follows.
- Step #1: Follow steps #1, through #3 of the process I describe above for purposes of creating a Class Module. In other words:
#1: Go to the Visual Basic Editor.
#2: Create a Class Module.
#3: Rename the Class Module.
In this example, I create a Class Module named “embeddedChartClassModule”.

- Step #2: Declare a Public Chart object within the newly created Class Module by using the WithEvents keyword. In this particular case, the basic structure of the statement is as follows:
Public WithEvents chartObjectName As Chart
chartObjectName is the name you want to assign to the newly declared Chart object. In the example below, chartObjectName is “embeddedChartObject”.

- Step #3: If necessary, insert a regular VBA module, as I explain in step #5 of the process to create a Class Module to deal with Application events.
- Step #4: Declare a module-level object variable within the module in which you’ll store the Sub procedure to which I refer to in step #5 below.
This object variable makes reference to the Public Chart object you declared in step #2 above. The basic form of the statement you can use for the declaration is pretty much the same as that in step #6 of the process to create a Class Module when working with Application events.
Dim objectVariableName As New classModuleName
objectVariableName is the name of the newly declared object variable. classModuleName is the name of the Class Module you created in step #1 above. In the following example, objectVariableName is “classEmbeddedChart”. classModuleName is “embeddedChartClassModule”, which is the name I assigned to the ClassModule in step #1.

In this particular case, I’m using the same regular module as I used when explaining how to create a Class Module to deal with Application events. This may help you notice the similarities between both statements.
- Step #5: Connect the object variable you declared in step #4 and the Chart object you declared in step #2. You do this by executing a Sub procedure that uses the following Set statement to make an assignment:
Set objectVariableName.chartObjectName = Chart
objectVariableName is the name you assigned to the object variable in step #4 (classEmbeddedChart in the example below). chartObjectName is the name you assigned to the Chart object in step #2 (embeddedChartObject in this example). Chart is the relevant embedded Chart object.
In the example below, Chart makes reference to Chart 1 (ChartObjects(“Chart 1”).Chart) within Sheet1 of the active workbook (Worksheets(“Sheet1”)). This statement uses the ChartObject.Chart property for purposes of returning the appropriate chart.

Just as is the case when working with Application events, the statement above must be executed in order for the embedded chart event-handler procedures to work appropriately. Therefore, you may want to include the statement within the Workbook_Open Sub procedure. In such case, my comments above (when discussing the same situation for Application events) are generally applicable.


As explained by Bill Jelen and Tracy Syrstad in Excel 2016 VBA and Macros, chart events are the same for both chart sheets and embedded charts. I include these events in the list that you can find below.
The main difference between an event-handler procedure that deals with chart sheets and an event-handler dealing with embedded charts is related to the Sub procedure name. More precisely:
- When you’re dealing with a chart sheet, the name of the Sub procedure is generally of the following form:
Chart_Event
The following image shows how this looks like when working with the Chart.Activate event. Activate is the default event of the Chart object.

- When you’re working with an embedded chart, the Sub procedure’s name usually uses the following structure:
chartObjectName_Event
chartObjectName is the name you assign to the Public Chart object you declared in the relevant Class Module (step #2 above). If we continue with the same example as above, the name of the Sub procedure corresponding to the Chart.Activate event (which I explain below) is as follows:


Step #2: Start Writing The Code For Your Event-Handler Procedure
Strictly speaking, once you’re within the appropriate Code module, you can simply start writing the VBA code for your event-handler procedure.
However, as I mention above, (i) the names of event-handler procedures must follow certain rules and (ii) sometimes you’ll have to deal with the appropriate arguments.
You may be able to memorize the appropriate declaration statement (including name and arguments) for certain events. However, learning all of these details for the large number of existing events isn’t efficient. In fact…
It isn’t really necessary.
As I show below, the Visual Basic Editor can help you create your event-handler procedures by entering the appropriate declaration statement. This guarantees that you’re always using the appropriate procedure name and arguments.
Getting this declaration statement right is very important. As explained by John Walkenbach in Excel VBA Programming for Dummies:
If you don’t get the name exactly right, the procedure won’t work.
Step #1: Select The Appropriate Object
At the top of the Code Window for a particular object there are 2 drop-downs. Their default labels are usually as follows:
- (General).
This is the Object drop-down list.
- (Declarations).
This is the Procedure drop-down list.
 and (Declarations) in VBE drop-downs")
Click on the Object drop-down menu and select the object you’re going to be working with. Within Object modules, there’s usually only 1 other option in addition to the default (General).
In other words:
- If you’re in a workbook module, select “Workbook”.

- If you’re in a worksheet module, select “Worksheet”,

- If you’re in a chart module, select “Chart”.


Within Class Modules, you’ll have 3 options: (i) (General), (ii) (Class), and (iii) the public Application or Chart object that you declared within the module. In this case, you should select the Application or Chart object. For example, in the screenshot below, I select applicationObject. applicationObject is the name I assigned to the public Application object in step #1 of the process to create a Class Module to deal with Application events above.

Once you’ve selected the appropriate object, the Visual Basic Editor includes the declaration and End statements for a particular Sub procedure. This Sub procedure is that corresponding to the default event of the applicable object. For example, in the screenshot below, my Visual Basic Editor has included the following statements:
- Private Sub Workbook_Open().
- End Sub

These statements make reference to an event-handler procedure that deals with the Workbook.Open event. I explain this particular event below. Open is the default event of the Workbook object.
If you want to work with the event to which the VBA code proposed by the VBE responds to (Workbook.Open in this example), you can start crafting your Sub procedure as usual. In other words, you can proceed to step #4 below.
However, the event to which the code suggested by the Visual Basic Editor makes reference to (Open in the example above) may not be the one you want to work with. In these cases, proceed to…
Step #2: Select The Appropriate Event
Click on the Procedure drop-down on the right side of the screen. The expanded drop-down list shows the events that apply to the object that you’ve selected in step #1 above.
For example, the following screenshot shows the drop-down list of events corresponding to the Workbook object:

You can scroll up or down as required. I provide a complete list of all the events that you can work with below.
From within this drop-down list, choose the event you want to work with. For example, in the case below, I select the Workbook.BeforeClose event.

Once you’ve selected the appropriate event, the Visual Basic Editor automatically enters new declaration and End statements for the Sub procedure that corresponds to the object and event you’ve selected in the previous step #1 and this step #2.
In the example above, these statements are the following:
- Private Sub Workbook_BeforeClose(Cancel As Boolean).
- End Sub

When entering the new declaration and End statements, the Visual Basic Editor doesn’t delete the previous suggestion.

Therefore, to maintain a clean module, you may want to proceed to…
Step #3: Delete The Code For The Sub Procedure You Aren’t Creating
If you won’t be working with the event to which the suggestion made by the VBE in step #1 above made reference to (the default event for the chosen object), you can delete it.
In the example we’re looking at, I delete the declaration and End statements for the Private Sub Workbook_Open.

Once you’ve completed the 3 steps above, you’re ready to move to…
Step #4: Code Your Sub Procedure
The statements of your VBA procedure go between the declaration and End statements that the Visual Basic Editor entered in the appropriate Object module or Class Module.
The following screenshot shows where this is for the Private Sub Workbook_BeforeClose.

Some event-handler procedures use arguments. For example, the Private Sub Workbook_BeforeClose procedure above uses one parameter called Cancel.

Your VBA code can work with these parameters. Usually, you can do either of the following within your event-handler procedure:
- Use the data that is passed.
- Change the value of the parameter.
In particular, the Cancel parameter (in the example above) is a common event argument (as you’ll see below). Its default value is False, which indicates that the relevant event (closing the workbook in the example above) occurs. However, if your VBA code sets Cancel to True, the event (closing the workbook) is cancelled.
In the following sections, I provide a comprehensive list of Excel VBA events that will help you create your event-handler procedures. However, before we dig into that topic, it’s important to understand how I’ve organized this list.
List Of Excel VBA Events: Organization And Levels At Which You Can Monitor Events
In the following sections, I provide a comprehensive list of Excel VBA events. This list of events includes the following:
- Application events.
- Workbook events.
- Worksheet events.
- Chart events.
By my count, I’ve listed 115 events.
Explaining each event individually would make this VBA tutorial even longer. Therefore, I’ve grouped certain events into groups. The basic criteria I’ve used to group the events are the following:
- Criterion #1: What triggers them.
Generally, if a few events are triggered by the same action, I group them together.
- Criterion #2: At what level (Application, workbook, worksheet or chart) can you monitor the occurrence of the event.
Most of the events that I group together are triggered by the same action, but you can monitor them at different levels.
This VBA tutorial doesn’t focus on the topic of event sequencing. However, as you go through this list, please be aware that, as explained by Excel authorities Mike Alexander and Dick Kusleika in Excel 2016 Power Programming with VBA:
Some actions trigger multiple events.
In such case, the events occur in a particular sequence. This order may be relevant for certain of your event-handler procedures.
If you’re interested in learning more about which events fire when you do something in Excel, you can find applications that track which events are fire and in which sequence.
I may write further about the topic of event sequencing in future VBA tutorials. If you want to receive an email whenever I publish new material within Power Spreadsheets, please make sure to register for our Newsletter by entering your email address below:
Furthermore, some events that are substantially the same are available at different levels. An example of such group of events is composed of Application.SheetActivate, Workbook.SheetActivate, Worksheet.Activate and Chart.Activate (which I explain here). All of these events are triggered by the activation of an object. This object can be a sheet (both worksheet or chart) and, in the case of Chart.Activate, an embedded chart.
However, the scope at which these events are monitored varies:
- The Application-level event (Application.SheetActivate) is triggered when any sheet in any workbook is activated. In other words, it monitors the event at the Excel Application level.
- The Workbook-level event (Workbook.SheetActivate) occurs when any sheet within the relevant workbook is activated. In this case, the monitoring occurs at the workbook level.
- The Worksheet and Chart-level events fire when the object itself (worksheet, chart sheet or embedded chart) is activated. Therefore, the monitoring happens at the worksheet or chart level.
I’ve organized this list in these groups for convenience purposes only. There are, certainly, other ways in which you could classify the events.
In fact, if you don’t agree with the way in which I’ve organized the list of VBA events, you can:
- Download the VBA Event Cheat Sheet by following the link above.
- Quickly convert the PDF file to Excel using one of the methods I explain here.
- Re-organize it to better suit your needs.
Now that this is clear, let’s start taking a look at the list of Excel VBA events:
Events Related To New Object Creation Or Deletion
Application.NewWorkbook
The Application.NewWorkbook event is triggered by the creation of a new workbook.
The event has a single parameter: Wb. Wb represents the newly created workbook.
Application.WorkbookNewSheet And Workbook.NewSheet
The NewSheet event is triggered whenever a new sheet (includes both worksheets and chart sheets) is created within a workbook.
NewSheet is available at the following levels:
- Application: With the Application.WorkbookNewSheet event.
- Workbook: With the Workbook.NewSheet event.
NewSheet has the following parameters:
- Wb: The workbook where the new sheet is created.
Wb is only relevant at the Application level (Application.WorkbookNewSheet).
- Sh: Sh represents the newly created sheet.
Application.WorkbookNewChart And Workbook.NewChart
From a broad perspective, the NewChart event fires when you create a new chart in a workbook.
The NewChart event is available at the following levels:
- Application: With the Application.WorkbookNewChart event.
- Workbook: With the Workbook.NewChart event.
As a general rule, NewChart occurs when you either (i) insert or (ii) paste a new chart within a sheet. This includes both worksheets and chart sheets. However, the NewChart event doesn’t happen in the following 6 situations:
- Case #1: When you move a chart (object or sheet) from one location to another.
There’s, however, an exception to this rule. If you move a chart from a chart object to a chart sheet, the event occurs. This is because, in such cases, Excel actually must “create” a new chart.
- Case #2: If you copy/paste a chart sheet.
- Case #3: Changing the chart type.
- Case #4: If you change the data source of a chart.
- Case #5: When you undo or redo a chart insertion or pasting.
- Case #6: Loading a workbook that contains charts.
If you insert or paste more than 1 new chart, the NewChart event occurs with respect to each of those charts. The order in which you insert the charts determines the order in which the NewChart event happens for each chart. In other words, in such cases, NewChart happens:
- First for the chart that you inserted first.
- Second for the chart that you inserted second.
- …
- Last for the chart you inserted last.
The NewChart event has the following arguments:
- Wb: The workbook where the new chart is created.
Wb is only applicable to the Application.WorkbookNewChart event. It isn’t relevant for the Workbook.NewChart event.
- Ch: Ch is of the data type Chart. It represents the newly inserted chart.
Application.SheetBeforeDelete, Workbook.SheetBeforeDelete And Worksheet.BeforeDelete
The BeforeDelete event is triggered when a sheet is deleted.
BeforeDelete has the following versions:
- Application Level: The Application.SheetBeforeDelete event.
- Workbook Level: The Workbook.SheetBeforeDelete event.
- Worksheet Level: The Worksheet.BeforeDelete event.
At the Application (Application.SheetBeforeDelete) and workbook levels (Workbook.SheetBeforeDelete), this event applies to any sheet. This includes both worksheets and chart sheets. In such cases, the only parameter is Sh. Sh is the deleted sheet.
Events Related To Opening, Closing, Printing And Saving
Application.WorkbookOpen And Workbook.Open
The Open event happens when a workbook is opened.
You can work with the following versions of the event:
- Application Level: With the Application.WorkbookOpen event.
- Workbook Level: Using the Workbook.Open event.
The Application.WorkbookOpen event has a single parameter: Wb. Wb is the opened workbook.
The Workbook.Open event has no arguments.
Application.WorkbookBeforeSave And Workbook.BeforeSave
The BeforeSave event is triggered before an open workbook is saved.
You can monitor the BeforeSave event at the following levels:
- Application: With the Application.WorkbookBeforeSave event.
- Workbook: Using the Workbook.BeforeSave event.
BeforeSave has the following parameters:
- Wb: The saved workbook.
Wb is only necessary for the Application.WorkbookBeforeSave event. It isn’t applicable to the Workbook.BeforeSave event.
- SaveAsUI: A Boolean. It’s True if Excel must display the Save As dialog box due to the existence of unsaved workbook changes.
- Cancel: A Boolean. By default, Cancel is False and the event occurs. You can set Cancel to True, in which case the workbook isn’t saved.
Application.WorkbookAfterSave And Workbook.AfterSave
The AfterSave event happens after a workbook is saved.
You can use the following versions of AfterSave:
- Application Level: The Application.WorkbookAfterSave event.
- Workbook Level: The Workbook.AfterSave event.
AfterSave has the following parameters:
- Wb: The saved workbook.
Wb is only relevant for the Application.WorkbookAfterSave event.
- Success: Success returns True is the saving operation is successful. If the saving operation is unsuccessful, Success returns False.
Application.WorkbookBeforeClose And Workbook.BeforeClose
The rules that determine when the BeforeClose event happens are the following:
- Rule #1: If you’ve made changes to the workbook since it was last saved, BeforeClose happens before you’re asked to save the changes.

Understanding this rule #1 is important. If you click the Cancel button in the dialog box above, Excel cancels the process of closing the workbook.

However, by that point, the BeforeClose event has already been executed. This means, in effect, that the BeforeClose event can occur even without the workbook being actually closed.
- Rule #2: Other than the above rule #1, the general rule is that BeforeClose occurs before the workbook closes.


You can monitor the BeforeClose event at the following levels:
- Application: With the Application.WorkbookBeforeClose event.
- Workbook: Using the Workbook.BeforeClose event.
The BeforeClose event has the following parameters
- Wb: The closed workbook.
This argument only applies to the Application-level event (Application.WorkbookBeforeClose).
- Cancel: A Boolean with the following possibilities:
False: This is the default value passed to the procedure. In such a case, the event occurs.
True: You can set Cancel to True within the procedure. In such case, (i) the operation of closing the workbook stops, and (ii) the workbook continues to be open.
Application.WorkbookBeforePrint And Workbook.BeforePrint
The BeforePrint event occurs before anything within the workbook (including the workbook as a whole) is printed. As explained in Excel 2016 Power Programming with VBA, the BeforePrint event also occurs if you preview the printing.
You can use the following versions of BeforePrint:
- Application Level: The Application.WorkbookBeforePrint event.
- Workbook Level: The Workbook.BeforePrint event.
The BeforePrint event has the following arguments:
- Wb: The printed workbook.
Wb applies only to the Application.WorkbookBeforePrint event.
- Cancel: The Cancel parameter of BeforePrint behaves in a very similar manner to the Cancel parameter of the BeforeClose event above. More precisely:
False: Is the value passed to the procedure. The event occurs.
True: If you sent Cancel to True within the procedure, there’s no printing operation.
Events Related To Object Activation, Selection, Resizing And Mouse Clicks
Application.WorkbookActivate And Workbook.Activate
The Activate event (for a workbook) is triggered when a workbook is activated.
You can monitor the Activate event at the following levels:
- Application: Application.WorkbookActivate.
- Workbook: Workbook.Activate event.
If you’re working at the Application level (with Application.WorkbookActivate), the event has a parameter: Wb. Wb is the activated workbook.
Application.SheetActivate, Workbook.SheetActivate, Worksheet.Activate And Chart.Activate
The Activate event (for a sheet or chart) is triggered whenever a sheet or chart is activated.
You can monitor this event at the following levels:
- Application Level: Using the Application.SheetActivate event.
- Workbook Level: Use the Workbook.SheetActivate event.
- Worksheet Level: With the Worksheet.Activate event.
- Chart Level: Using the Chart.Activate event.
The Application.SheetActivate and Workbook.SheetActivate events apply to any sheet and include both worksheets and chart sheets.
In addition to occurring when a chart sheet is activated, the Chart.Activate event also fires when an embedded chart is activated.
For the cases of Application.SheetActivate and Workbook.SheetActivate, the only parameter of the event is Sh. Sh represents the activated sheet.
Worksheet.Activate and Chart.Activate don’t have parameters.
Application.WorkbookDeactivate And Workbook.Deactivate
The Deactivate (for a workbook) event fires when the relevant workbook is deactivated.
You can use Deactivate at the following levels:
- Application: With the Application.WorkbookDeactivate event.
- Workbook: With the Workbook.Deactivate event.
Application.SheetDeactivate, Workbook.SheetDeactivate And Worksheet.Deactivate
The Deactivate (for a sheet or chart) event happens when a sheet or chart is deactivated.
The Deactivate event is available in the following versions:
- Application Level: The Application.SheetDeactivate event.
- Workbook Level: The Workbook.SheetDeactivate event.
- Worksheet Level: The Worksheet.Deactivate event.
- Chart Level: The Chart.Deactivate event.
Application.SheetDeactivate and Workbook.SheetDeactivate apply to both worksheets and chart sheets. Both of these events have a single parameter: Sh. Sh is the relevant sheet.
Application.WindowActivate, Workbook.WindowActivate, Application.WindowDeactivate And Workbook.WindowDeactivate
The WindowActivate event happens when the workbook window is activated.
The opposite of WindowActivate is WindowDeactivate. The WindowDeactivate event occurs when a workbook window is deactivated.
You can refer to both the WindowActivate and WindowActivate events at the following levels:
- Application: Where the relevant events are Application.WindowActivate and Application.WindowDeactivate.
- Workbook: In which case you work with the Workbook.WindowActivate and Workbook.WindowDeactivate events.
Both WindowActivate and WindowDeactivate have the following parameters:
- Wb: The workbook that is displayed in the window that is activated or deactivated.
The Wb parameter applies only to the Application-level events. That is, you only use Wb when working with Application.WindowActivate or Application.WindowDeactivate.
- Wn: The window that is activated or deactivated.
Application.SheetSelectionChange, Workbook.SheetSelectionChange And Worksheet.SelectionChange
The SelectionChange event occurs when the selection (cell or object) changes.
You can work with the following versions of this event:
- Application Level: The Application.SheetSelectionChange event.
- Workbook Level: The Workbook.SheetSelectionChange event.
- Worksheet Level: The Worksheet.SelectionChange event.
The Application.SheetSelectionChange and Workbook.SheetSelectionChange events don’t apply to selection changes in chart sheets.
SelectionChange has the following 1 or 2 parameters, depending on which version you’re using:
- Sh: The worksheet containing the new selection.
Sh is only relevant for the Application.SheetSelectionChange and Workbook.SheetSelectionChange event.
- Target: The newly selected range.
Application.SheetBeforeDoubleClick, Workbook.SheetBeforeDoubleClick And Worksheet.BeforeDoubleClick
The BeforeDoubleClick event happens when a worksheet is double-clicked. However, the event doesn’t fire when you double-click the border of a cell.
You can use the following versions of the BeforeDoubleClick event:
- Application: With the Application.SheetBeforeDoubleClick event.
- Workbook: Using the Workbook.SheetBeforeDoubleClick event.
- Worksheet: With the Worksheet.BeforeDoubleClick event.
The Application.SheetBeforeDoubleClick and Workbook.SheetBeforeDoubleClick events don’t apply to chart sheets.
The BeforeDoubleClick event occurs just before the action that’s usually triggered by the double-click. For example, when you double-click on a cell, you can edit directly in the cell. In such a situation, the sequence goes roughly as follows:
- #1: You double-click on the cell.
- #2: The BeforeDoubleClick event occurs.
- #3: You can edit directly in the cell.
The BeforeDoubleClick event has the following parameters:
- Sh: The relevant worksheet (a Worksheet object).
This parameter is only applicable for the Application.SheetBeforeDoubleClick and Workbook.SheetBeforeDoubleClick events. The Worksheet.BeforeDoubleClick event doesn’t have a Sh parameter.
- Target: A Range representing the “cell nearest to the mouse pointer” at the moment you double-click.
- Cancel: A Boolean which, by default, is False (the event occurs). You can set the Cancel argument to True, in which case Excel doesn’t carry out the default double-click action (editing directly in the cell in the example above).
Chart.BeforeDoubleClick
The Chart.BeforeDoubleClick event fires when a chart element is double-clicked.
Just as the SheetBeforeDoubleClick and Worksheet.BeforeDoubleClick events above, Chart.BeforeDoubleClick:
- Happens before the action that corresponds to the double-click by default.
- Isn’t triggered if you double-click the border of a cell.
The Chart.BeforeDoubleClick event has the following 4 parameters:
- Cancel: A Boolean whose default value is False (event occurs). If you set the Cancel argument to True, Excel doesn’t perform the default double-click action.
- Arg1: Additional event information, which depends on the value of ElementID. You can find the different ElementIDs and their meanings below.
- Arg2: Just as Arg1, Arg2 is additional event information that depends on ElementID’s value.
- ElementID: The object that you or the user actually double-click.
As I mention above, the value of ElementID is what “determines the expected values of Arg1 and Arg2”.
Let’s take a look at the different ElementIDs you’re likely to find, as well as the consequences of each of these ElementIDs for the values of the Arg1 and Arg2 parameters:
ElementID Group #1: xlAxis, xlAxisTitle, xlDisplayUnitLabel, xlMajorGridlines and xlMinorGridlines
This first group of ElementIDs is composed of the following IDs:
- xlAxis.
- xlAxisTitle.
- xlDisplayUnitLabel.
- xlMajorGridlines.
- xlMinorGridlines
In all of these cases, the meaning of Arg1 and Arg2 is as follows:
- Arg1: AxisIndex.
AxisIndex can take either of 2 xlAxisGroup constants:
xlPrimary (1), indicating that the axis is primary.
xlSecondary (2), which indicates that the axis is secondary.
- Arg2: AxisType.
AxisType takes one of the following xlAxisType constants:
xlCategory (1): Indicates that the axis displays categories.
xlValue (2): Specifies an axis that displays values.
xlSeriesAxis (3): Specifies that the axis displays data series.
ElementID Group #2: xlPivotChartDropZone
The meaning of Arg1 when the ElementID is xlPivotChartDropZone is DropZoneType. Arg2’s meaning is None.
DropZoneType specifies the drop zone type and can take the following values from the xlPivotFieldOrientation enumeration:
- xlRowField (1): Row.
Row specifies the Category field.
- xlColumnField (2): Column.
Column specifies the Series field.
- xlPageField (3): Page.
- xlDataField (4): Data.
ElementID Group #3: xlPivotChartFieldButton
When ElementID is xlPivotChartFieldButton, Arg1 and Arg2 have the following meanings:
- Arg1: DropZoneType.
I introduce DropZoneType in the previous section.
- Arg2: PivotFieldIndex.
PivotFieldIndex specifies the offset within the PivotFields collection for one of the following fields:
#1: A specific Column (Series).
#2: Specific Data.
#3: A specific Page.
#4: A specific Row (Category).
The PivotFields object is a collection of all PivotField objects within a PivotTable report. The PivotField object represents a particular field within the PivotTable report.
ElementID Group #4: xlDownBars, xlDropLines, xlHiLoLines, xlRadarAxisLabels, xlSeriesLines and xlUpBars
This section covers the following ElementIDs:
- xlDownBars.
- xlDropLines.
- xlHiLoLines.
- xlRadarAxisLabels.
- xlSeriesLines.
- xlUpBars.
In any of such cases, the meaning of Arg1 is GroupIndex. Arg2’s meaning is None.
GroupIndex specifies the offset within the ChartsGroup collection for a particular chart group. The ChartGroups collection represents the series that are plotted in a particular chart and share the same format.
ElementID Group #5: xlChartArea, xlChartTitle, xlCorners, xlDataTable, xlFloor, xlLegend, xlNothing, xlPlotArea and xlWalls
This ElementID group is composed of the following:
- xlChartArea.
- xlChartTitle.
- xlCorners.
- xlDataTable.
- xlFloor.
- xlLegend.
- xlNothing.
- xlPlotArea.
- xlWalls
In any of these cases, the meaning of both Arg1 and Arg2 is None.
ElementID Group #6: xlErrorBars, xlLegendEntry, xlLegendKey, xlXErrorBars and xlYErrorBars
ElementID Group #6 is composed of the following:
- xlErrorBars.
- xlLegendEntry.
- xlLegendKey.
- xlXErrorBars.
- xlYErrorBars.
For these ElementIDs, Arg1 means SeriesIndex. SeriesIndex specifies the offset within the Series collection for a particular series. The Series collection contains all the series within a chart or chart group.
Arg2’s meaning is None.
ElementID Group #7: xlDataLabel and xlSeries
This section covers 2 ElementIDs:
- xlDataLabel.
- xlSeries
In both cases:
- Arg1’s meaning is SeriesIndex.
I introduce SeriesIndex in the previous section.
- Arg2’s meaning is PointIndex.
PointIndex specifies the offset within the Points collection for a particular point within a series. The Points collection contains all of the points within a chart series.
ElementID Group #8: xlTrendline
If ElementID is xlTrendline:
- The meaning of Arg1 is SeriesIndex.
I provide an introduction to SeriesIndex in the section covering ElementID group #6 above.
- The meaning of Arg2 is TrendLineIndex.
TrendlineIndex specifies the offset within the Trendlines collection for a particular trendline within a series. The Trendlines collection contains all of the trendlines for a particular chart series.
ElementID Group #9: xlShape
If ElementID is xlShape:
- Arg1’s meaning is ShapeIndex.
ShapeIndex specifies the offset within the Shapes collection” for a particular shape. The Shapes collection contains all the shapes within a particular sheet.
- Arg2’s meaning is None.
Application.SheetBeforeRightClick, Workbook.SheetBeforeRightClick, Worksheet.BeforeRightClick And Chart.BeforeRightClick
The BeforeRightClick event is, to a certain extent, substantially similar to the previous BeforeDoubleClick event.
The main difference between BeforeRightClick and BeforeDoubleClick, as implied by their names, is on the way you click the mouse:
- BeforeDoubleClick occurs when a worksheet is double-clicked.
- BeforeRightClick happens (i) when a worksheet is right-clicked or (ii) in the case of the Chart.BeforeRightClick, when a chart element is right-clicked.
In other words, the BeforeRightClick event occurs (i) when a worksheet or chart element (for Chart.BeforeRightClick) is right-clicked, but (ii) before the default action that’s usually triggered by the right-click. For example, when you right-click on a cell, Excel generally displays a context menu.

Therefore, if you’re working with the BeforeRightClick event and right-click on a cell, the sequence occurs as follows:
- #1: You right-click.
- #2: The BeforeRightClick event fires.
- #3: Excel displays the contextual menu.
The RightClick event doesn’t fire if, when right-clicking, you place the mouse pointer on items such as a shape or command bar.
You can use the BeforeRightClick event at the following levels:
- Application: Use the Application.SheetBeforeRightClick event.
- Workbook: With the Workbook.SheetBeforeRightClick event.
- Worksheet: Using the Worksheet.BeforeRightClick event.
- Chart: Use the Chart.BeforeRightClick event.
Just as the SheetBeforeDoubleClick event above, Application.SheetBeforeRightClick and Workbook.SheetBeforeRightClick don’t apply to chart sheets.
BeforeRightClick has the same parameters as BeforeDoubleClick. More precisely:
- Sh: The Worksheet object that represents the worksheet.
Sh is an argument only when you’re working at the Application (Application.SheetBeforeRightClick) or workbook level (Workbook.SheetBeforeRightClick). The Worksheet.BeforeRightClick event doesn’t have a Sh parameter.
- Target: The cell that is nearest to the mouse pointer when you right-click.
- Cancel: A Boolean with a default value of False (event occurs). If you set Cancel to True, the default right-click action (displaying a context menu in the example above) doesn’t happen.
Chart.Select
The Chart.Select event occurs when an element of the chart is selected.
The Chart.Select event has the 3 following parameters:
- ElementID: The chart element that is selected.
- Arg1: Additional information that depends on the value of ElementID.
- Arg2: Just as Arg1, additional event information dependent on the value of ElementID.
I provide a thorough description of ElementID, Arg1 and Arg2, as well as their relationship, in this section above.
Chart.MouseDown, Chart.MouseMove And Chart.MouseUp
The MouseDown, MouseMove and MouseUp events are all related to mouse movements over a chart. More precisely, these events are triggered when the following actions happen over a chart:
- Chart.MouseDown: A mouse button is pressed.
- Chart.MouseMove: The position of the mouse pointer changes.
- Chart.MouseUp: The mouse button is released.
All of these events have the same 4 parameters:
- Button: Indicates the mouse button that is pressed or released. It also indicates if no mouse button is pressed or released.
The Button argument can be 1 of the 3 xlMouseButton constants:xlNoButton (0): No button.
xlPrimaryButton (1): The primary mouse button. This is usually the left mouse button.
xlSecondaryButton (2): The secondary mouse button. Usually, the right button is the secondary mouse button.
- Shift: Indicates the state of the Shift, Ctrl and Alt keys. Shift can be one of (or a sum of) values.
- x: The x coordinate of the mouse pointer. This is in chart object client coordinates.
- y: The y coordinate of the mouse pointer. This, just as x, is in chart object client coordinates.
Application.WindowResize And Workbook.WindowResize
The WindowResize event fires when the workbook window is resized.
You can monitor the WindowResize event at the following levels:
- Application: Application.WindowResize.
- Workbook: Workbook.WindowResize.
WindowResize has the following parameters:
- Wb: The workbook that is displayed within the resized window.
Wb only applies to the Application.WindowResize event.
- Wn: The resized window.
Chart.Resize
The Chart.Resize event is triggered when the relevant chart is resized.
In Excel 2016 VBA and Macros, authors Bill Jelen (Mr. Excel) and Tracy Syrstad explain that Chart.Resize doesn’t occur if the size is changed by using the controls within “the Chart Tools, Format tab or Format Chart area task pane”.
Events Related To Changes And Calculations
Application.AfterCalculate
The Application.AfterCalculate event fires once the following activities and conditions are met:
- Condition #1: All refresh activity is completed. This includes both synchronous and asynchronous refresh activity.
- Condition #2: All calculation activities are completed.
- Condition #3: There aren’t any outstanding queries.
As a general rule, this event is the last calculation-related event to occur. What I mean is that it happens after the following:
- Application.SheetCalculate, Workbook.SheetCalculate, Worksheet.Calculate and Chart.Calculate.
- Application.SheetChange, Workbook.SheetChange and Worksheet.Change.
- QueryTable.AfterRefresh.
- The Application.CalculationState property is set to xlDone (meaning calculations are complete).
As a consequence of the above, the AfterCalculate event is commonly used to determine the moment in which all the data in a workbook has been completely updated by any applicable queries or calculations.
You can use the Applicaton.AfterCalculate event even if there’s no sheet data in the workbook.
Application.SheetCalculate, Workbook.SheetCalculate, Worksheet.Calculate And Chart.Calculate
You can work with the Calculate event at the following levels:
- Application: With the Application.SheetCalculate event.
- Workbook: With the Workbook.SheetCalculate event.
- Worksheet: Using the Worksheet.Calculate event.
- Chart: With the Chart.Calculate event.
The rules for triggering the event differ depending on the level you’re working at.
The Application.SheetCalculate and the Workbook.SheetCalculate events occur in the following 2 cases:
- Case #1: Any worksheet is recalculated.
- Case #2: Any changed or updated data is plotted on a chart.
The Worksheet.SheetCalculate event is triggered when the worksheet itself is recalculated.
The Chart.Calculate event fires when the relevant chart plots data that’s new or has changed.
At the Application (Application.SheetCalculate) and workbook levels (Workbook.SheetCalculate), the Sh parameter is used. Sh is the relevant chart or worksheet.
Application.SheetChange, Workbook.SheetChange And Worksheet.Change
The Change event fires when 1 or more cells in a worksheet are changed by either of the following:
- The user.
- A VBA Procedure.
- An external link.
The Change event isn’t triggered by a recalculation. For those purposes, please refer to the Calculate event.
Further to the above, as explained in Excel 2016 Power Programming with VBA, the Change event may behave unexpectedly. More precisely:
Some actions that should trigger the event don’t, and other actions that shouldn’t trigger the event do!
For example:
- The following actions trigger the Change event: (i) copying and pasting, or clearing, the formatting, (ii) deleting the contents of an empty cell, (iii) using the spell checker, (iv) doing a Find and Replace operation, (v) using AutoSum, or (vi) adding the Total Row to a table.
- The following don’t trigger the Change event: (i) merging cells, (ii) adding, editing or deleting cell comments, (iii) sorting a range, or (iv) using Goal Seek.
You can monitor the Change event at the following levels:
- Application: Using the Application.SheetChange event.
- Workbook: With the Workbook.SheetChange event.
- Worksheet: Use the Worksheet.Change event.
Application.SheetChange and Workbook.SheetChange don’t apply to chart sheets.
The SheetChange event has the following parameters:
- Sh: The relevant worksheet.
This parameter applies only at the Application (Application.SheetChange) and workbook levels (Workbook.SheetChange).
- Target: The cell range that changes.
Events Related To Protected View Windows
Application.ProtectedViewWindowOpen
The Application.ProtectedViewWindowOpen event fires when an Excel workbook is opened within a Protected View window.
ProtectedViewWindowOpen has a single parameter: Pvw. Pvw represents the newly opened Protected View window.
Application.ProtectedViewWindowActivate And Application.ProtectedViewWindowDeactivate
The Application.ProtectedViewWindowActivate event fires when a Protected View window is activated.
The opposite event is Application.ProtectedViewWindowDeactivate. Application.ProtectedViewWindowDeactivate occurs when a Protected View window is deactivated.
The only parameter of both Application.ProtectedViewWindowActivate and Application.ProtectedViewWindowDeactivate is Pvw. Pvw is the activated or deactivated Protected View window.
Application.ProtectedViewWindowResize
The Application.ProtectedViewWindow event occurs when any Protected View window is resized.
The only argument of ProtectedViewWindowResize is Pvw. Pvw stands for the resized Protected View window.
Application.ProtectedViewWindowBeforeEdit
The Application.ProtectedViewWindowBeforeEdit event is triggered immediately before Excel enables editing on the workbook within a Protected View window.
ProtectedViewWindowBeforeEdit has the following 2 arguments:
- Pvw: The Protected View window holding the workbook with enabled editing.
- Cancel: A Boolean which is False by default (the event occurs).
You can set the Cancel parameter to True. In such case, editing isn’t enabled on the applicable workbook.
Application.ProtectedViewWindowBeforeClose
The Application.ProtectedViewWindowBeforeClose event occurs immediately prior to the closure of either of the following:
- A Protected View window.
- A workbook in a Protected View window.
The ProtectedViewWindowBeforeClose event has the following 3 parameters:
- Pvw: The relevant Protected View window.
- Reason: A constant from the XlProtectedViewCloseReason enumeration that specifies how (the reason) the Protected View window is closed.
Reason can take either of the following values:
xlProtectedViewCloseEdit (1), which indicates that the user clicked on the Enable Editing button.
xlProtectedViewCloseForced (2), indicating that Excel closed the Protected View window forcefully or stopped responding.
xlProtectedViewCloseNormal (0), corresponding to the Protected View window being closed normally.
- Cancel: A Boolean which is False by default. In such a case, the event occurs.
You can set Cancel to True within the procedure. In such case, Excel doesn’t close the Protected View window.
Events Related To PivotTables
Application.SheetPivotTableAfterValueChange, Workbook.SheetPivotTableAfterValueChange And Worksheet.PivotTableAfterValueChange
The PivotTableAfterValueChange happens after one or more cells within a PivotTable are either:
- Edited; or
- If the cell (or range of cells) contains formulas, recalculated.
The PivotTableAfterValueChange event only happens in these 2 cases. Therefore, the event isn’t triggered by (among others) any of the following operations:
- Operation #1: Refreshing the PivotTable.
- Operation #2: Sorting the PivotTable.
- Operation #3: Filtering the PivotTable.
- Operation #4: Drilling down on the PivotTable.
These 4 operations may result in changes in the PivotTable. Examples of this are the potential movement of cells or the retrieving of new values from the data source. Despite these potential effects in the PivotTable, the event we’re looking at isn’t triggered.
You can work with the following versions of PivotTableAfterValueChange:
- Application Level: Using the Application.SheetPivotTableAfterValueChange event.
- Workbook Level: With the Workbook.SheetPivotTableAfterValueChange event.
- Worksheet Level: Using the Worksheet.PivotTableAfterValueChange event.
PivotTableAfterValueChange has the following parameters:
- Sh: The worksheet containing the PivotTable.
The Sh parameter is only relevant if you’re working with Application.SheetPivotTableAfterValueChange or Workbook.SheetPivotTableAfterValueChange. It doesn’t apply to the Worksheet.PivotTableAfterValueChange event.
- TargetPivotTable: The PivotTable containing the cell(s) that change(s).
- TargetRange: The range within the PivotTable containing the edited/recalculated cells.
Workbook.SheetPivotTableChangeSync And Worksheet.PivotTableChangeSync
The PivotTableChangeSync event occurs after most changes to a PivotTable. Some of the changes that are covered by the SheetPivotTableChangeSync event are the following:
- Clearing.
- Grouping.
- Refreshing.
PivotTableChangeSync is available at the workbook and worksheet level:
- Workbook: With the Workbook.SheetPivotTableChangeSync event.
- Worksheet: Using the Worksheet.PivotTableChangeSync event.
The PivotTableChangeSync event has 1 or 2 parameters, depending on whether you’re working at the workbook or the worksheet level. The possible arguments are as follows:
- Sh: The worksheet containing the PivotTable.
This argument is only for the Workbook.SheetPivotTableChangeSync event. It’s not applicable for the Worksheet.PivotTableChangeSync event.
- Target: The PivotTable that changes.
Application.SheetPivotTableUpdate, Workbook.SheetPivotTableUpdate And Worksheet.PivotTableUpdate
The PivotTableUpdate event occurs after a PivotTable report is updated.
You can monitor the SheetPivotTableUpdate event at the Application, workbook and worksheet level:
- Application: Using the Application.SheetPivotTableUpdate event.
- Workbook: With the Workbook.SheetPivotTableUpdate event.
- Worksheet: Using the Worksheet.PivotTableUpdate event.
PivotTableUpdate has the 1 or 2 parameters depending on whether you’re working with the workbook or worksheet version. There arguments are virtually the same as those of PivotTableChangeSync above:
- Sh: The selected sheet.
This applies only to the Application.SheetPivotTableUpdate and Workbook.SheetPivotTableUpdate events.
- Target: The selected PivotTable.
Application.WorkbookPivotTableCloseConnection, Workbook.PivotTableCloseConnection, Application.WorkbookPivotTableOpenConnection And Workbook.PivotTableOpenConnection
Both of these events (PivotTableCloseConnection and PivotTableOpenConnection) are related to the status of the connection between a PivotTable report and its data source. More precisely:
- PivotTableCloseConnection happens after a PivotTable report closes that connection.
- PivotTableOpenConnection occurs after the PivotTable report opens the connection.
These events are available at the following levels:
- Application: With the Application.WorkbookPivotTableCloseConnection and Application.WorkbookPivotTableOpenConnection events.
- Workbook: Using the Workbook.PivotTableCloseConnection and the Workbook.PivotTableOpenConnection events.
PivotTableCloseConnection and PivotTableOpenConnection have the following parameters:
- Wb: Wb is the relevant workbook.
Wb is only applicable at the Application level. Therefore, it applies to the Application.WorkbookPivotTableCloseConnection and Application.WorkbookPivotTableOpenConnection events only.
- Target: The chosen PivotTable report.
PivotTableBeforeAllocateChanges, PivotTableBeforeCommitChanges And PivotTableBeforeDiscardChanges
All of the following events deal with changes to PivotTables and, therefore, the PivotTableChangeList collection. I explain each of these events individually in the following sections.
However, in order to understand how each of these events works, it may help if you have a basic idea about the following VBA constructs:
PivotTableChangeList Collection, ValueChange Object And ValueChange.Order Property
The PivotTableChangeList collection represents all of the changes you’ve made to the value cells within a PivotTable report that is based on an OLAP data source.
Each of the individual changes is represented by a ValueChange object.
ValueChange contains several properties that specify the details about the change(s) you’ve made. One of these properties is ValueChange.Order.
The Order property of ValueChange returns a value indicating the order in which a particular change (represented by a ValueChange object) is performed relative to the other changes held within the PivotTableChangeList collection. Excel assigns the value held by the ValueChange.Order property automatically. As a general rule, the value assigned corresponds to the order in which you’ve applied the changes to the PivotTable report. However, if a single operation results in multiple changes, the value assignment within that set of changes is made arbitrarily.
With these in mind, let’s start taking a look at the events covered in this section:
Application.SheetPivotTableBeforeAllocateChanges, Workbook.SheetPivotTableBeforeAllocateChanges And Worksheet.PivotTableBeforeAllocateChanges
PivotTableBeforeAllocateChanges happens before changes are applied to a PivotTable. More precisely, SheetPivotTableBeforeAllocateChanges occurs in the following sequence:
- #1: You (the user) chooses to apply changes to the PivotTable.
- #2: The SheetPivotTableBeforeAllocateChanges event happens.
- #3: Excel executes an UPDATE CUBE statement. This applies all the changes to the PivotTable.
The SheetPivotTableBeforeAllocateChanges event is available at the Application, workbook and worksheet levels:
- Application: Application.SheetPivotTableBeforeAllocateChanges.
- Workbook: Workbook.SheetPivotTableBeforeAllocateChanges.
- Worksheet: Worksheet.PivotTableBeforeAllocateChanges.
PivotTableBeforeAllocateChanges has the following 5 arguments:
- Sh: The worksheet with the PivotTable.
This parameter is only relevant if you’re working with the Application.SheetPivotTableBeforeAllocateChanges or Workbook.SheetPivotTableBeforeAllocateChanges events. It doesn’t apply to the Worksheet.PivotTableBeforeAllocateChanges event.
- TargetPivotTable: The PivotTable containing the changes that the UPDATE CUBE statement applies.
- ValueChangeStart: The index to the first change within the applicable PivotTableChangeList collection. The index to this first change is specified by the ValueChange.Order property which I explain above.
- ValueChangeEnd: The index to the last change within the relevant PivotTableChangeList collection. Just as with ValueChangeStart, the index is specified by the Order property of the ValueChange object within the collection.
- Cancel: A Boolean that, by default is False. In such case, the event occurs.
You can set Cancel to True within the relevant procedure. In such case: (i) changes aren’t applied, and (ii) edits are lost.
Application.SheetPivotTableBeforecommitChanges, Workbook.SheetPivotTableBeforeCommitChanges And Worksheet.PivotTableBeforeCommitChanges
The PivotTableBeforeCommitChanges occurs before changes are committed against the OLAP data source of a PivotTable. To be more precise, the relevant sequence is as follows:
- #1: You choose to save changes for the PivotTable.
- #2: The SheetPivotTableBeforeCommitChanges event occurs.
- #3: Excel executes a COMMIT TRANSACTION against the OLAP data source.
You can work with the following versions of this event:
- Application: The Application.SheetPivotTableBeforeCommitChanges event.
- Workbook: The Workbook.SheetPivotTableBeforeCommitChanges event.
- Worksheet: The Worksheet.PivotTableBeforeCommitChanges event.
The 5 parameters of PivotTableBeforeCommitChanges are virtually the same as those of PivotTableBeforeAllocateChanges above. Therefore, they’re as follows:
- Sh: The worksheet containing the relevant PivotTable.
Sh only applies when you’re working at the Application or workbook levels with Application.SheetPivotTableBeforeCommitChanges or Workbook.SheetPivotTableBeforeCommitChanges. It doesn’t apply to Worksheet.PivotTableBeforeCommitChanges.
- TargetPivotTable: The PivotTable with the changes to commit.
- ValueChangeStart: The index to the first change within the PivotTableChangeList collection. The index is specified by the Order property I introduce above.
- ValueChangeEnd: The index to the last change within the PivotTableChangeList collection. This is also specified by the ValueChange.Order property.
- Cancel: False by default (event occurs). If you set Cancel to True, the changes “aren’t committed against the OLAP data source”.
Application.SheetPivotTableBeforeDiscardChanges, Workbook.SheetPivotTableBeforeDiscardChanges And Worksheet.PivotTableBeforeDiscardChanges
The PivotTableBeforeDiscardChanges event is triggered before changes to a particular PivotTable are discarded. The sequence in which PivotTableBeforeDiscardChanges occurs is quite similar to that of the previous PivotTableBeforeAllocateChanges and PivotTableBeforeCommitChanges events. More precisely:
- #1: You choose to discard changes.
- #2: SheetPivotTableBeforeDiscardChanges occurs.
- #3: Excel “executes a ROLLBACK TRANSACTION statement against the OLAP data source” if there’s an active transaction and the changed values are discarded.
You can work with the following versions of the PivotTableBeforeDiscardChanges event:
- Application Lever: Using the Application.SheetPivotTableBeforeDiscardChanges event.
- Workbook Level: With the Workbook.SheetPivotTableBeforeDiscardChanges event.
- Worksheet Level: Using the Worksheet.PivotTableBeforeDiscardChanges event.
The PivotTableBeforeDiscard event has the following arguments. Notice that they’re substantially the similar to the equivalent parameters of the previously explained events:
- Sh: The worksheet that contains the PivotTable.
This parameter is only relevant for the Application.SheetPivotTableBeforediscardChanges and the Workbook.SheetPivotTableBeforeDiscardChanges events. It doesn’t apply to Worksheet.PivotTableBeforeDiscardChanges.
- TargetPivotTable: The PivotTable with the discarded changes.
- ValueChangeStart: The index to the first change within the PivotTableChangeList collection. This index is specified by the Order property, which I cover above.
- ValueChangeEnd: The index to the last change within the PivotTableChangeList collection. Just as in the case of ValueChangeStart, the index is specified by the ValueChange.Order property.
Application.WorkbookRowsetComplete And Workbook.RowsetComplete
The RowsetComplete event may help if you work with OLAP PivotTables. More precisely, RowsetComplete occurs when either of the following actions is completed in connection with an OLAP PivotTable:
- Action #1: Drill through a recordset.
- Action #2: Calls the rowset action.
You can monitor the RowsetComplete event at the following levels:
- Application: With the Application.WorkbookRowsetComplete event.
- Workbook: With the Workbook.RowsetComplete event.
RowsetComplete isn’t available at the worksheet level. The reason for this is that (generally) the recordset is created on a separate sheet. As a consequence of this, the event needs to be at the workbook or Application level.
RowsetComplete has the following parameters:
- Wb: The workbook for which the Application.WorkbookRowsetComplete event happens.
This argument isn’t applicable to the Workbook.RowsetComplete event.
- Description: A string that describes the event.
- Sheet: The worksheet in which the relevant recordset is created.
- Success: A Boolean indicating success or failure.
Events Related To Add-Ins: Application.WorkbookAddinInstall, Workbook.AddinInstall, Application.WorkbookAddinUninstall And Workbook.AddinUninstall
The AddinInstall event occurs when the relevant workbook is installed as an add-in.
The AddinUninstall event is the opposite. Therefore, it happens when the workbook is uninstalled as an add-in.
As explained by Bill Jelen (Mr. Excel) and Tracy Syrstad in Excel 2016 VBA and Macros:
- The events make reference to installation and uninstallation of an add-in. The events aren’t triggered by the mere opening or closing of a workbook.
- The AddinUninstall event doesn’t close the workbook automatically.
You can monitor both of these events at the following levels:
- Application Level: With the Application.WorkbookAddinInstall and Application.WorkbookAddinUninstall events.
- Workbook Level: With the Workbook.AddinInstall event and the Workbook.AddinUninstall event.
The Application-level events (Application.WorkbookAddinInstall and Application.WorkbookAddinUninstall) have a parameter: Wb. This argument represents the relevant (installed) workbook.
Events Related To The Excel Data Model
Application.WorkbookModelChange And Workbook.ModelChange
The ModelChange event is triggered after there’s a change to Excel’s data model.
You can use the following versions of the ModelChange event:
- Application Level: Application.WorkbookModelChange.
- Workbook Level: Workbook.ModelChange event.
The ModelChange event has the following arguments:
- Wb: The relevant workbook.
This argument is only relevant for the Application.WorkbookModelChange event.
- Changes: Changes is a ModelChanges object.
The ModelChanges object represents the changes made to the data model. In other words, ModelChanges has information about which are the changes (you can make several in a single operation) made to the data model when a model change (the ModelChange event) occurs.
Application.SheetTableUpdate, Workbook.SheetTableUpdate And Worksheet.TableUpdate
TableUpdate is triggered after a Query table that is connected to the data model is updated.
The TableUpdate event is available at the Application, workbook and worksheet levels:
- Application: Using the Application.SheetTableUpdate event.
- Workbook: With the Workbook.SheetTableUpdate event.
- Worksheet: Using the Worksheet.TableUpdate event.
The TableUpdate event has the following parameters:
- Sh: The relevant worksheet.
You only need to consider Sh when working with Application.SheetTableUpdate or Workbook.SheetTableUpdate. It’s not applicable to Worksheet.TableUpdate.
- Target: The relevant Query table with data from the data model.
Events Related To XML Data
Application.WorkbookAfterXmlExport, Workbook.AfterXmlExport, Application.WorkbookBeforeXmlExport And Workbook.BeforeXmlExport
The AfterXmlExport and BeforeXmlExport events are connected to either the (i) saving or (ii) exporting of XML data from the relevant workbook.
More precisely:
- AfterXmlExport occurs after Excel either (i) saves or (ii) exports XML data from the relevant workbook.
- BeforeXmlExport happens before Excel carries out either of these actions.
You can monitor these events at the following levels:
- Application: With the Application.WorkbookAfterXmlExport and Application.WorkbookBeforeXmlExport events.
- Workbook: With the Workbook.AfterXmlExport event and the Workbook.BeforeXmlExport event.
AfterXmlExport has the following parameters:
- Wb: The relevant target workbook.
Wb is only applicable to the Application.WorkbookAfterXmlExport event.
- Map: The XML schema map used for the saving or exporting of the data. Map is of the data type XmlMap.
- Url: The location of the exported XML file. You specify Url as a string.
- Result: The result of the saving or exporting operation. This can be one of the 2 xlXmlExportResult constants:
xlXmlExportSuccess (0): The operation was successful.
xlXmlExportValidationFailed (1): The contents of the XML file don’t match the schema map.
BeforeXmlExport has the following parameters. Only the fourth parameter (Cancel in BeforeXmlExport vs. Result in AfterXmlExport) differs materially from the arguments of AfterXmlExport above:
- Wb, which is only applicable for purposes of using the Application.WorkbookBeforeXmlExport event.
- Map.
- Url.
- Cancel: A Boolean. The default value is False. If you set Cancel to True, the save or export operation is cancelled.
The BeforeXmlExport doesn’t happen when you’re saving to the XML Spreadsheet file format.
Application.WorkbookAfterXmlImport, Workbook.AfterXmlImport, Application.WorkbookBeforeXmlImport And Workbook.BeforeXmlImport
The AfterXmlImport and BeforeXmlImport events are related to either the (i) refreshment of existing XML data connections, or (ii) import of new XML data into the workbook. AfterXmlImport occurs after either of these. BeforeXmlImport is triggered before them.
These events are available at the following levels:
- Application: With the Application.WorkbookAfterXmlImport event and the Application.WorkbookBeforeXmlImport event.
- Workbook: With the Workbook.AfterXmlImport event and the Workbook.BeforeXmlImport event.
Similar to what occurs with the previous events (AfterXmlExport and BeforeXmlExport), AfterXmlImport has the following parameters:
- Wb: The relevant workbook.
Wb is only applicable to the Application.WorkbookAfterXmlImport event. It’s not an argument of the Workbook.AfterXmlImport event.
- Map: The XML map used for the import of data. As I explain above, Map is of the data type XmlMap.
- IsRefresh: A Boolean making reference to the way in which the AfterXmlImport event is triggered. More precisely:
If the AfterXmlImport event is triggered because an existing connection to XML data is refreshed, IsRefresh is True.
If the event is triggered due to the data being imported from a different data source, IsRefresh is False.
- Result: Just as in the case of the AfterXmlExport event, Result indicates the result of the operation. However, in the case of AfterXmlImport, the relevant operation is a refresh or import. In this case, Result can be one of the 3 xlXmlImportResult constants:
#1: xlXmlImportSuccess (0): The XML data file import was successful.
#2: xlXmlImportElementsTruncated (1): The XML data file is too large for the relevant worksheet. Therefore, the contents of the XML data file are truncated.
#3: xlXmlImportValidationFailed (2): The contents of the XML data file don’t match the relevant schema map.
BeforeXmlImport, on the other hand, has the following arguments. 2 of those arguments (Map and Refresh) are substantially similar to those of the AfterXmlImport event. The other parameters (Wb, Url and Cancel) are quite similar to the relevant parameters of BeforeXmlExport above.
- Wb: The workbook. This argument is only relevant for the Application.WorkbookBeforeXmlImport event.
- Map.
- Url: The location of the exported XML file. Just as in the case of AfterXmlExport and BeforeXmlExport, you specify Url as a string.
- IsRefresh.
- Cancel: A Boolean which you can set to True in order to cancel the import/refresh operation.
Other Events
Application.SheetFollowHyperlink, Workbook.SheetFollowHyperlink And Worksheet.FollowHyperlink
The FollowHyperlink event is triggered whenever you click a hyperlink.
You have access to the FollowHyperlink event at the following levels:
- Application: Using the Application.SheetFollowHyperlink event.
- Workbook: With the Workbook.SheetFollowHyperlink event.
- Worksheet: Using the Worksheet.FollowHyperlink event.
FollowHyperlink has the following arguments:
- Sh: The Worksheet object where the hyperlink is.
Sh is only applicable to the Application.SheetFollowHyperlink and Workbook.SheetFollowHyperlink events. It doesn’t apply at the worksheet level with Worksheet.FollowHyperlink.
- Target: The relevant Hyperlink object.
Application.SheetLensGalleryRenderComplete, Workbook.SheetLensGalleryRenderComplete And Worksheet.LensGalleryRenderComplete
As explained in Excel 2016 VBA and Macros, the LensGalleryRenderComplete event fires when you select the Quick Analysis Tool.
You can use the following versions of LensGalleryRenderComplete:
- Application: The Application.SheetLensGalleryRenderComplete event.
- Workbook: The Workbook.SheetLensGalleryRenderComplete event.
- Worksheet: Worksheet.LensGalleryRenderComplete.
At the Application (Application.SheetLensGalleryRenderComplete) and workbook (Workbook.SheetLensGalleryRenderComplete) levels, the only parameter of the event is Sh. Sh is a Worksheet object.
Non-Object Events
There are 2 events that aren’t associated with a certain object from within Excel’s object model. You access both of the following events through methods of the Application object.
As explained by John Walkenbach in Excel VBA Programming for Dummies:
Because time and keypresses aren’t associated with a particular object such as a workbook or a worksheet, you program these events in a normal VBA module.
Application.OnTime
You can use the Application.OnTime method for purposes of specifying that a particular procedure runs at a certain time in the future. You can specify the time either of the following ways:
- As a specific time of the day.
- As a time occurring after a certain amount of time passes.
The basic syntax of Application.OnTime is as follows:
expression.OnTime(EarliestTime, Procedure, LatestTime, Schedule)
The following are the 4 parameters of this method:
- EarliestTime: A required argument. You use it to specify the time where you want the procedure to be executed. The value you provide is rounded to the nearest second.
- Procedure: A required parameter that you use to specify (as a String) the name of the procedure that should run at EarliestTime.
- LatestTime: An optional parameter. You can use LatestTime to specify the latest time at which the procedure can be executed. If you specify LatestTime and, by that time, Excel isn’t ready to execute the procedure, the procedure doesn’t run at all.
If you omit LatestTime, Excel simply waits as long as necessary until it can execute the procedure.
- Schedule: Another optional parameter that can take the values of True and False. Schedule allows you to determine whether to (i) schedule a new procedure (True), or (ii) clear a previously set OnTime procedure (False). This may be relevant if you need to clear “a procedure previously set with the same Procedure and EarliestTime values”.
Schedule’s default value is False, which clears a previously set procedure.
As explained by Excel guru John Walkenbach in Excel VBA Programming for Dummies, “the OnTime event persists even after the workbook is closed” if you leave Excel open. Therefore, make sure that you set up the appropriate VBA code to clear as necessary. You can do this by, for example, setting up a procedure that:
- #1: Is triggered when the BeforeClose event occurs.
- #2: Sets the Schedule parameter of the Application.OnTime method to False.
Application.OnKey
The Application.OnKey method allows you to specify a key or key combination that, when pressed, executes a particular procedure.
The OnKey method works because Excel is always monitoring the keys you press. This allows you to set up the equivalent of a keyboard shortcut: a particular key or key combination executes a procedure.
As explained by Excel authorities Mike Alexander and Dick Kusleika in Excel 2016 Power Programming with VBA, there are 2 cases that are an exception to the rule above. In the following situations, Excel doesn’t apply the OnKey method:
- If you’re entering a formula.
- If you’re working with a dialog box.
Even though, strictly speaking, you can use Application.OnKey for purposes of creating a keyboard shortcut for your macros, that’s not the most appropriate way to proceed. In order to assign a keyboard shortcut to execute a Sub procedure, you should generally rely on Excel’s built-in tools. These are the Record Macro dialog (if you’re using the macro recorder) or the Macro dialog box.
The syntax of Application.OnKey is as follows:
expression.OnKey(Key, Procedure)
The OnKey method has the 2 following parameters:
- Key: The key or key combination that triggers the procedure execution.
You specify Key as a string. I explain the main rules you must consider for purposes of specifying Key below.
- Procedure: The procedure that Excel should run when you press Key. There are a couple of special cases that you should consider:
Case #1: If you specify Procedure as empty text (“”), Excel doesn’t do anything when Key is pressed. Specifying Procedure as empty text, then, has the consequence of disabling the keystroke or keystroke combination you specify as Key. In other words, Excel simply ignores that you pressed the key or key combination.
Case #2: If you omit Procedure, (i) any previous assignments done with OnKey are cleared, and (ii) the keystroke combination specified as Key returns to its default meaning.
Key can be (i) a single key combined with Alt, Ctrl or Shift, or (ii) a combination of these keys. The following are the main rules you should consider when specifying Key:
- Rule #1: Every key is represented by a particular character or group of characters.
- Rule #2: Numbers, letters and other characters that are displayed upon you pressing the relevant key, are specified by that key.
For example, in order to specify the letter a, you include “a” in your code.
- Rule #3: In order to specify characters that aren’t displayed when you press a key (for example Backspace, Delete or Esc), you use the codes that appear in the following table:
Key OnKey Code Backspace {BACKSPACE} or {BS} Break {BREAK} Caps Lock {CAPSLOCK} Clear {CLEAR} Delete or Del {DELETE} or {DEL} Down Arrow {DOWN} End {END} Enter {ENTER} (numeric keypad) or ~ (tilde) Esc {ESCAPE} or {ESC} Help {HELP} Home {HOME} Ins {INSERT} Left Arrow {LEFT} Num Lock {NUMLOCK} Page Down {PGDN} Page Up {PGUP} Return {RETURN} Right Arrow {RIGHT} Scroll Lock {SCROLLLOCK} Tab {TAB} Up Arrow {UP} F1 through F15 {F1} through {F15} - Rule #4: If you want to specify a combination of a key with (i) Shift, (ii) Ctrl or (iii) Alt, use the following codes:
Key OnKey Code Shift + (plus) Ctrl ^ (caret) Alt % (percent) - Rule #5: In order to specify some characters whose keys have special meanings, you must surround them with curly braces ({ }). Some of the keys falling within the scope of this rule #5 are plus (+), caret (^), parentheses (( )), tilde (~), brackets ([ ]) and curly braces themselves ({ }).
Similar to the previously explained Application.OnTime method, Application.OnKey doesn’t reset when you close the workbook and leave Excel open. Therefore, it’s also important that you set up the appropriate code to clear the assignments done with OnKey. You can do this by creating a procedure that:
- #1: Is launched upon the BeforeClose event occurring.
- #2: Omits the Procedure argument of Application.OnKey.
Deprecated Or Non-Functional Events
There are some events that have been deprecated and/or are non-functional. Microsoft keeps them within the object model for purposes of backward compatibility. Generally, you should avoid using this events within your VBA applications.
The following are these deprecated/non-functional events:
- Application.WorkbookSync and Workbook.Sync.
- Chart.SeriesChange.
Why An Event-Handler Procedure Isn’t Automatically Executed And Possible Solutions
Once you’ve created an event-handler procedure, you probably want to ensure that Excel runs the macro when the relevant event happens.
There are a few reasons why an event-handler procedure isn’t triggered when you expect it to. However, in my experience, one of the most common reasons why a particular event-handler procedure isn’t executed when expected is that macros aren’t enabled.
I cover the topic of enabling macros in the Complete Guide On How To Enable Macros In Excel. In that blog post, I cover topics such as the following:
- How to change your macro security settings in order to enable macros by default.
- How to enable macros for certain Excel files.
- How to enable macros for a single time.
Event-handler procedures may also fail to execute if events are disabled. Events are, by default, enabled. However, you can control whether events are enabled or disabled through the Application.EnableEvents property.
More precisely, the following VBA statements allow you to enable or disable events:
- To enable events, set the EnableEvents property to True.
Application.EnableEvents = True
- To disable events, set Application.EnableEvents to False.
Application.EnableEvents = False
Note that, since EnableEvents is a property of the Application object, it applies to all Excel workbooks.
There are some legitimate reasons why you would want to disable events in certain circumstances. As explained in Excel 2016 Power Programming with VBA:
One common reason is to prevent an infinite loop of cascading events.
An infinite loop of cascading events may occur if, for example, in the following situation:
- Step #1: You set up an event-handler procedure that is triggered by a particular event (let’s call it “X”).
- Step #2: X occurs and, therefore, Excel executes the event-handler procedure.
- Step #3: The event-handler procedure itself causes changes that result in event X occurring again.
- Step #4: Since X occurs again, Excel executes the event-handler procedure again.
- Step #5: Step #3 occurs again.
Such a loop looks roughly as follows:

There are several ways in which you can avoid the problem of potential infinite loops of cascading events. The following is a common suggestion:
- Disable events at the beginning of your event-handler Sub procedure.
- Re-enable events just before the end of the event-handler procedure.
You disable and re-enable events using the statements I explain above.
There are other ways in which you can deal with the potential problem of infinite loops of recursive events. The following are 2 examples:
- Using a global variable. Although this isn’t a great programming practice.
- Using a Boolean variable within the Class Module containing the relevant events.
Conclusion
After reading this tutorial, you’re ready to start using Excel VBA events within your macros.
In addition to knowing what are VBA events and why are they useful, you have a thorough knowledge of the most relevant events. For example, you’re aware of:
- The differences between Application, workbook, worksheet and chart events.
- How to create event-handler procedures for all of these events.
- What are the main events at the Application, workbook, worksheet and chart level to which your VBA applications can respond to.
This Excel VBA Events Tutorial is accompanied by a Cheat Sheet. You can get immediate free access to this Cheat Sheet by subscribing to the Power Spreadsheets Newsletter.
- What are the Application.OnTime and Application.OnKey methods, and how you can use them.
You also know what are the most common reasons explaining why an event-handler procedure isn’t triggered when the corresponding event occurs, and how you can address some of these problems.
Books Referenced In This Excel VBA Tutorial
- Alexander, Michael (2015). Excel Macros for Dummies. Hoboken, NJ: John Wiley & Sons Inc.
- Alexander, Michael and Kusleika, Dick (2016). Excel 2016 Power Programming with VBA. Indianapolis, IN: John Wiley & Sons Inc.
- Jelen, Bill and Syrstad, Tracy (2015). Excel 2016 VBA and Macros. United States of America: Pearson Education, Inc.
- Walkenbach, John (2015). Excel VBA Programming for Dummies. Hoboken, NJ: John Wiley & Sons Inc.