
In this article I will explain how you can get the current path and name of the file you are working with.
–
File Path:
The file path can be obtained using the code below:
Dim strPath As String
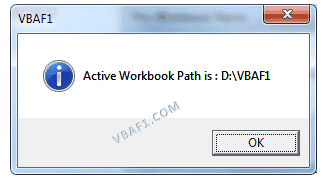
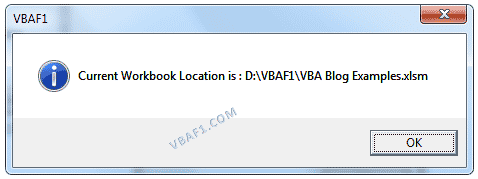
strPath = ThisWorkbook.FullName
MsgBox (strPath)
Result:

Note: If the file has not been saved yet you will get something like this:

–
Get File Name:
The file name can be obtained using the code below:
Dim  strPath As  String

strPath = ThisWorkbook.Name

MsgBox (strPath)
Result:

You can download the file and code related to this article from the link below:
- Get File Path.xlsm
See also:
- VBA Save File Dialog, FileDialog(msoFileDialogSaveAs)
- Excel VBA Save File Dialog, GetSaveAsFilename()
- Excel VBA Open File Dialog
If you need assistance with your code, or you are looking for a VBA programmer to hire feel free to contact me. Also please visit my website www.software-solutions-online.com
Tagged with: CurrentName, CurrentPath, Excel, VBA
Содержание
- How to Get the File Path and File Name using Excel VBA?
- How to Get the File Path using Excel VBA?
- .Path Property
- How to Get File Name using Excel VBA?
- .FullName Property
- How to get the excel file name / path in VBA
- 7 Answers 7
- ExcelExperts.com
- Excel / VBA Consultancy
- Free Training Videos
- Free Spreadsheets
- Excel / VBA Jobs
- Navigation
- Who’s online
- New Excel Experts
- Current Excel / VBA Jobs
- 16. VBA Tips — Get A File Path
- Get A File Path
- Get a path
- Get A File Path
- VBA Get Workbook Path & Location in Excel
- Syntax to Get complete Path of the Workbook in Excel VBA
- Macro to Get Path of the Workbook in Excel VBA
- VBA Code to Get Location of the current Workbook in Excel
- Instructions to Run VBA Macro Code or Procedure:
- Other Useful Resources:
- Browse for file path with VBA: insert value into cell
- The solution
- Building the solution
- Create a named range
- The VBA macro
- Insert folder picture
- Assign macro to picture
- Test it out
- Conclusion
How to Get the File Path and File Name using Excel VBA?
In this post, you will be learning how to get the full File Path and File name using Excel VBA in your Excel Spreadsheet.
The file path and file name using Excel VBA can be accessed using the ‘.Path’ and ‘.FullName‘ properties.
How to Get the File Path using Excel VBA?
.Path Property
The Path property returns the complete, saved path of the workbook -Excel file.
How to Get File Name using Excel VBA?
.FullName Property
The FullName property returns the complete, saved path, including the name of the workbook.
Let’s see these properties with the help of an example.
- Create an Excel file and name it of your choice.
- Firstly, place a command button on your worksheet using the insert option in the Developer tab
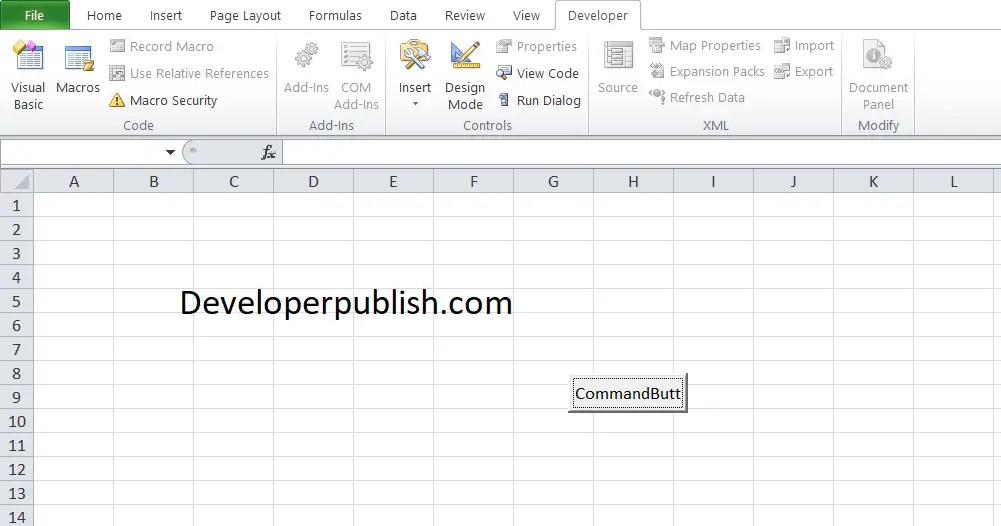
Enter the following code in the VBA of the button:
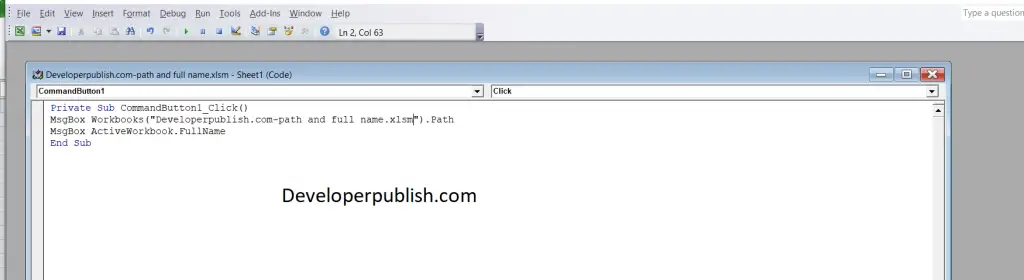
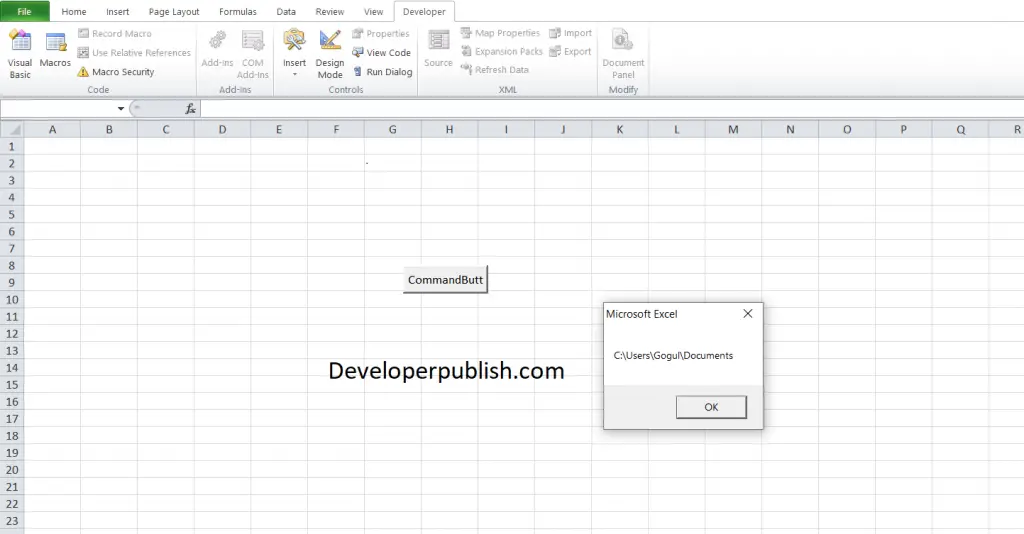
This returns the complete path to the current excel file.
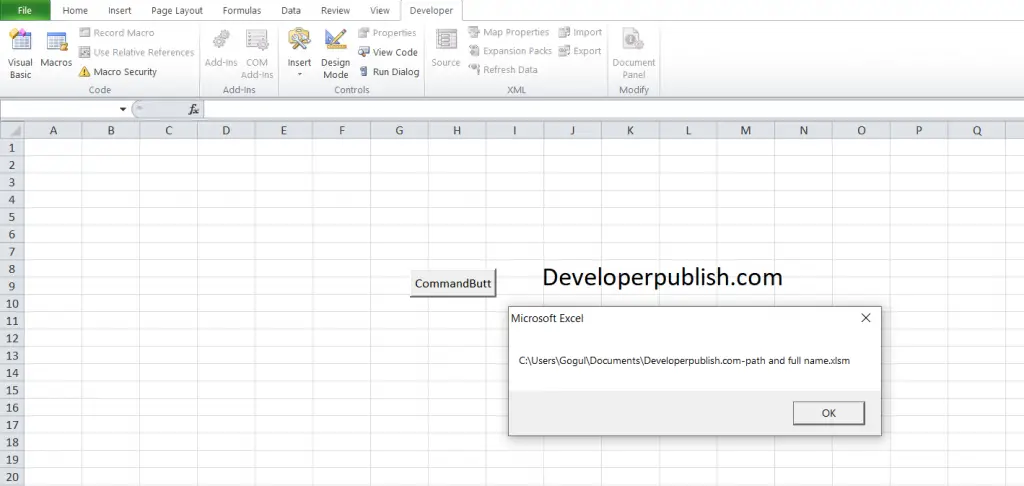
This line returns the complete path, including the name of the active workbook.
You need to enter the exact file name to find its path.
Источник
How to get the excel file name / path in VBA
Say, I’m writing a VBA inside my excel file sample.xls. Now I want to get the full path of sample.xls in my VBA. How do I do it?
7 Answers 7
If you mean VBA, then you can use FullName, for example:
(updated as considered by the comments: the former used ActiveWorkbook.FullName could more likely be wrong, if other office files may be open(ed) and active. But in case you stored the macro in another file, as mentioned by user @user7296559 here, and really want the file name of the macro-using file, ActiveWorkbook could be the correct choice, if it is guaranteed to be active at execution time.)
this is a simple alternative that gives all responses, Fullname, Path, filename.

If you need path only this is the most straightforward way:
if you need path only without file name:
it would return D:Folder
if you need file path with file name also:
it would return D:Foldersample.xls
if you need file name only:
it would return sample.xls
so if you want combine file path and file name to get full directory don’t forget to add «» between. otherwise its simpler using .Path

ActiveWorkbook.FullName would be better I think, in case you have the VBA Macro stored in another Excel Workbook, but you want to get the details of the Excel you are editing, not where the Macro resides.
If they reside in the same file, then it does not matter, but if they are in different files, and you want the file where the Data is rather than where the Macro is, then ActiveWorkbook is the one to go for, because it deals with both scenarios.
Источник
ExcelExperts.com
Excel / VBA Consultancy
Free Training Videos
Free Spreadsheets
Excel / VBA Jobs
Navigation
Who’s online
New Excel Experts
- milagroscanterbury63
- shanelsosa9583420
- tiffinybeaver135352
Current Excel / VBA Jobs
16. VBA Tips — Get A File Path

Using VBA, there is a quick and easy way to obtain the file path of a file and return it to a sheet
- Use GetOpenFileName
- This brings up a dialog box that allows you to browse your files and choose a file
- You can then use that file path how you want
Here’s a screen shot of our setup in Excel:

When we press the button, we get this:

Once a file is selected, and «Open» is pressed, we can use the file path. in this case, we put it in a cell.
Here’s the code we use to get the file path:

Explanation:
- GetOpenFilename allows you to enter the type of file you want to look for
- The Open File dialog box then appears with only the desired file types showing.. (In our example, we look for text files)
- When you choose one and press Open, it goes to a variable
- If you press cancel, GetOpenFilename returns FALSE, so you need to check for that
- You can use that file path as you want
Training Video on how to Get A File Path in Excel:
| Attachment | Size |
|---|---|
| get-a-file-path.xls | 34.5 KB |
Get A File Path
Thanks for sharing the code. Very useful.
Can the code be modified so that we just need to drag and drop the file into the selected cell?
Get a path
Thanks so much! it was really helpful and useful for my job again thanks!!
Get A File Path
Thanks for the code really useful. Just starting VB so not really flowing yet 🙂 How can you adjust the code so that it doesn\’t enter to d6 but to the cell selected by the user on the sheeet
Источник
VBA Get Workbook Path & Location in Excel
VBA Get Workbook Path in Excel. We deal with multiple workbooks at a time. We may want to know Workbook path and its location. In the following tutorial we will learn to get Workbook complete Path and location using Path and FullName properties of Workbook.
Syntax to Get complete Path of the Workbook in Excel VBA
Here is the syntax of to Get Path of the Workbook in Excel VBA.
Where expression represents Workbook object.
Path represents a property of Workbook. It returns Workbook complete Workbook path.
Macro to Get Path of the Workbook in Excel VBA
Let us see the following macro to get path of the active Workbook in Excel VBA.
Here is the output screenshot of above macro.
VBA Code to Get Location of the current Workbook in Excel
Here is the following VBA Code to Get Location of the current Workbook in Excel.
Let us see the output screenshot of above VBA code.
Instructions to Run VBA Macro Code or Procedure:
You can refer the following link for the step by step instructions.
Other Useful Resources:
Click on the following links of the useful resources. These helps to learn and gain more knowledge.
Источник
Browse for file path with VBA: insert value into cell
In this post, we look at how to browse for file path with VBA, and then insert the selected filepath into a cell.
This post is inspired by a question I received:
“If you would want to add a browse button right beside the cell that contains the file path so that you won’t need to manually copy and paste the file path in the cell, how would you do that?”
OK, let me show you the solution that I came up with.
Download the example file: Click the link below to download the example file used for this post:
Watch the video
The solution
Before we look at how to build it, let’s look at the solution in action.
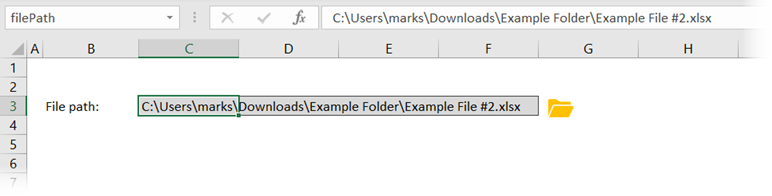
Cell C3 contains a file path, with a folder icon next to it.
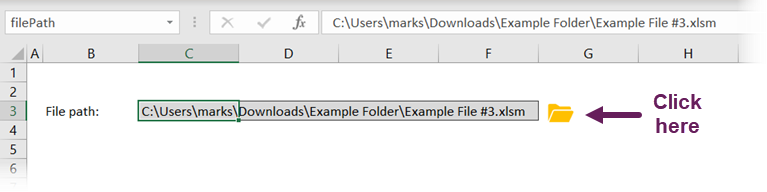
If we click on the folder icon, the file open dialog box opens. We can select a file and click Open.
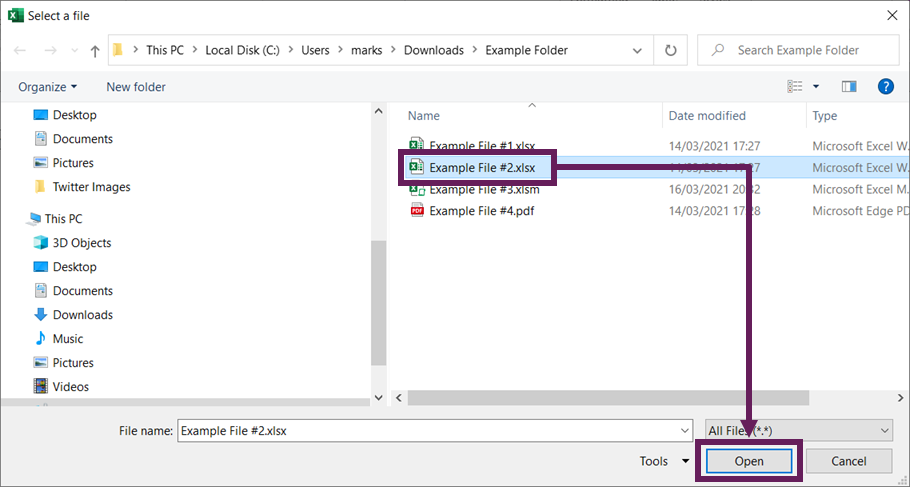
The file path is now inserted into cell C3.
If you’re here to find out how to do this yourself, then you’re in the right place 😁
Building the solution
Now we know what it does; let’s build it.
Create a named range
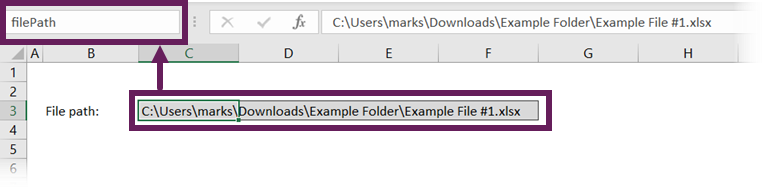
First, we need to create a named range for the cell containing the file path.
While this step isn’t essential, it reduces the risk of error. If we wrote a macro that references cell C3, then inserted a new row or column, the code in the macro doesn’t change, so it then refers to the wrong cell. Therefore, named ranges help to remove this risk.
- Select the cell which contains the file path
- In the name box, type filePath and press Enter

First step. Done. ✅
The VBA macro
The main driving force for this solution is a VBA macro.
If you have the Developer ribbon visible, click Developer > Visual Basic. if not, press ALT + F11.

The Visual Basic Editor opens.
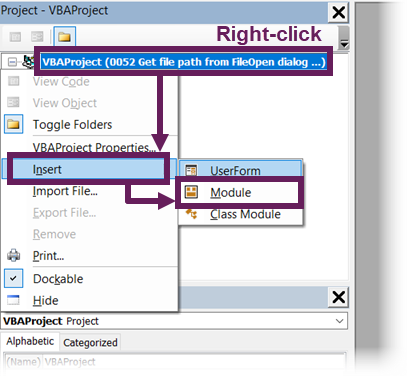
Right-click the file in the Project window, then click Insert > Module from the menu.
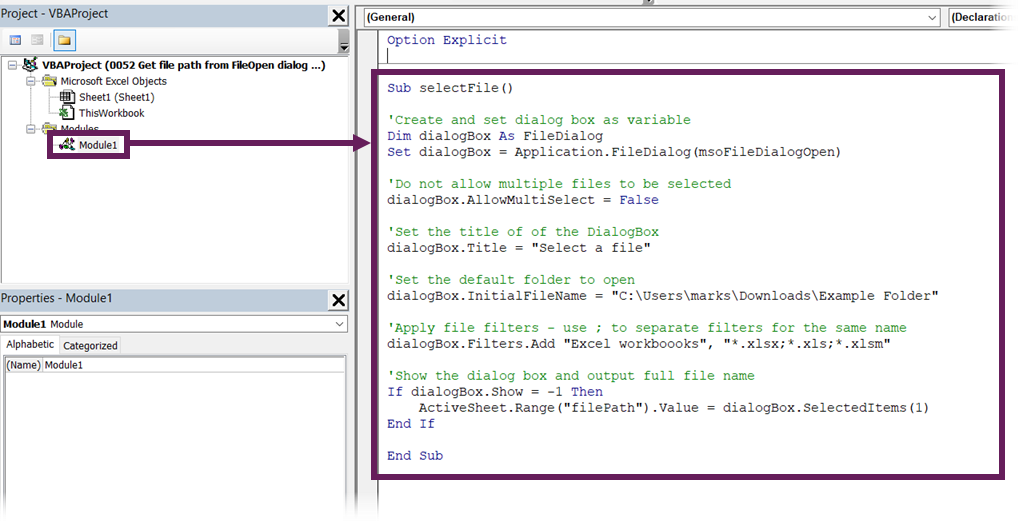
A new code module opens. Enter the following code into the code module
The comments in the code describe the purpose of each section.
Please take careful note of the following, as you will need to change the code for your specific scenario.
ActiveSheet.Range(“filePath”).Value = dialogBox.SelectedItems(1)
Change the word filePath for the named range you created above.
dialogBox.InitialFileName = “C:UsersmarksDownloadsExample Folder”
This contains the default folder path where the file picker opens each time. Change this to match your environment.
dialogBox.Filters.Clear
dialogBox.Filters.Add “Excel workbooks”, “*.xlsx;*.xls;*.xlsm”
This code restricts the types of files that are shown in the file picker. The asterisk ( * ) is a wildcard character; any files ending in .xlsx, .xlsx, and .xlsm will be displayed. To add new file types, PDFs for example, add “;*.pdf” into the text string. Or, to allow all file types, remove the dialogbox.Filters.Add… line completely.
Once the code has been entered and amended to your scenario, close the Visual Basic Editor by clicking on the [X] at the window’s top right.
Insert folder picture
Now we need something to act as the button. I am going to use an Icon. Depending on your version of Excel, you may not have the Icons feature. But you can insert any picture or shape you wish.
To insert an icon like me, click Insert > Icons.
Search for “Folder”, in the icons window. Select the preferred icon and click Insert.
The image will be inserted onto the face of the worksheet.
Move and resize the image to be in the right location. I have also formatted the folder icon to be an orange color (similar to how folders look in the normal Windows environment).
Assign macro to picture
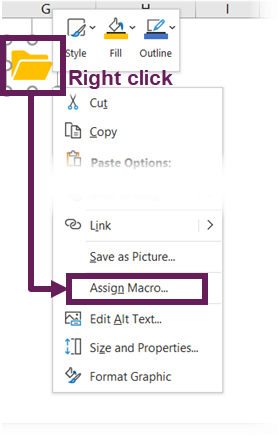
Finally, we assign the macro to the image. Right-click on the image and select Assign macro… from the menu.
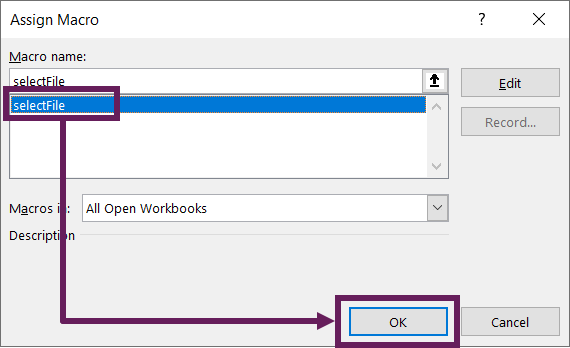
From the Assign Macro window, click the selectFile macro (this is the name of the macro we created earlier), then click OK.
Test it out
That’s it. We’re done. Now go and test it out.
Conclusion
In this post, we have seen how to create a user interface for selecting files. Users can browse for a file path, then insert that into a cell. This is a really useful technique if using cell parameters in Power Query.
Related posts:

About the author
Hey, I’m Mark, and I run Excel Off The Grid.
My parents tell me that at the age of 7 I declared I was going to become a qualified accountant. I was either psychic or had no imagination, as that is exactly what happened. However, it wasn’t until I was 35 that my journey really began.
In 2015, I started a new job, for which I was regularly working after 10pm. As a result, I rarely saw my children during the week. So, I started searching for the secrets to automating Excel. I discovered that by building a small number of simple tools, I could combine them together in different ways to automate nearly all my regular tasks. This meant I could work less hours (and I got pay raises!). Today, I teach these techniques to other professionals in our training program so they too can spend less time at work (and more time with their children and doing the things they love).
Do you need help adapting this post to your needs?
I’m guessing the examples in this post don’t exactly match your situation. We all use Excel differently, so it’s impossible to write a post that will meet everybody’s needs. By taking the time to understand the techniques and principles in this post (and elsewhere on this site), you should be able to adapt it to your needs.
But, if you’re still struggling you should:
- Read other blogs, or watch YouTube videos on the same topic. You will benefit much more by discovering your own solutions.
- Ask the ‘Excel Ninja’ in your office. It’s amazing what things other people know.
- Ask a question in a forum like Mr Excel, or the Microsoft Answers Community. Remember, the people on these forums are generally giving their time for free. So take care to craft your question, make sure it’s clear and concise. List all the things you’ve tried, and provide screenshots, code segments and example workbooks.
- Use Excel Rescue, who are my consultancy partner. They help by providing solutions to smaller Excel problems.
What next?
Don’t go yet, there is plenty more to learn on Excel Off The Grid. Check out the latest posts:
Источник
In this post, we look at how to browse for file path with VBA, and then insert the selected filepath into a cell.
This post is inspired by a question I received:
“If you would want to add a browse button right beside the cell that contains the file path so that you won’t need to manually copy and paste the file path in the cell, how would you do that?”
OK, let me show you the solution that I came up with.
Download the example file: Click the link below to download the example file used for this post:
Watch the video
Watch the video on YouTube.
The solution
Before we look at how to build it, let’s look at the solution in action.
Cell C3 contains a file path, with a folder icon next to it.
If we click on the folder icon, the file open dialog box opens. We can select a file and click Open.
The file path is now inserted into cell C3.
If you’re here to find out how to do this yourself, then you’re in the right place 😁
Building the solution
Now we know what it does; let’s build it.
Create a named range
First, we need to create a named range for the cell containing the file path.
While this step isn’t essential, it reduces the risk of error. If we wrote a macro that references cell C3, then inserted a new row or column, the code in the macro doesn’t change, so it then refers to the wrong cell. Therefore, named ranges help to remove this risk.
- Select the cell which contains the file path
- In the name box, type filePath and press Enter

First step. Done. ✅
The VBA macro
The main driving force for this solution is a VBA macro.
If you have the Developer ribbon visible, click Developer > Visual Basic. if not, press ALT + F11.
The Visual Basic Editor opens.
Right-click the file in the Project window, then click Insert > Module from the menu.
A new code module opens. Enter the following code into the code module
Sub selectFile()

'Create and set dialog box as variable
Dim dialogBox As FileDialog
Set dialogBox = Application.FileDialog(msoFileDialogOpen)

'Do not allow multiple files to be selected
dialogBox.AllowMultiSelect = False

'Set the title of the DialogBox
dialogBox.Title = "Select a file"

'Set the default folder to open
dialogBox.InitialFileName = "C:UsersmarksDownloadsExample Folder"

'Clear the dialog box filters
dialogBox.Filters.Clear
'Apply file filters - use ; to separate filters for the same name
dialogBox.Filters.Add "Excel workbooks", "*.xlsx;*.xls;*.xlsm"

'Show the dialog box and output full file name
If dialogBox.Show = -1 Then
    ActiveSheet.Range("filePath").Value = dialogBox.SelectedItems(1)
End If

End Sub
The comments in the code describe the purpose of each section.
Please take careful note of the following, as you will need to change the code for your specific scenario.
ActiveSheet.Range(“filePath”).Value = dialogBox.SelectedItems(1)
Change the word filePath for the named range you created above.
dialogBox.InitialFileName = “C:UsersmarksDownloadsExample Folder”
This contains the default folder path where the file picker opens each time. Change this to match your environment.
dialogBox.Filters.Clear
dialogBox.Filters.Add “Excel workbooks”, “*.xlsx;*.xls;*.xlsm”
This code restricts the types of files that are shown in the file picker. The asterisk ( * ) is a wildcard character; any files ending in .xlsx, .xlsx, and .xlsm will be displayed. To add new file types, PDFs for example, add “;*.pdf” into the text string. Or, to allow all file types, remove the dialogbox.Filters.Add… line completely.
Once the code has been entered and amended to your scenario, close the Visual Basic Editor by clicking on the [X] at the window’s top right.
Insert folder picture
Now we need something to act as the button. I am going to use an Icon. Depending on your version of Excel, you may not have the Icons feature. But you can insert any picture or shape you wish.
To insert an icon like me, click Insert > Icons.
![]()
Search for “Folder”, in the icons window. Select the preferred icon and click Insert.
![]()
The image will be inserted onto the face of the worksheet.
Move and resize the image to be in the right location. I have also formatted the folder icon to be an orange color (similar to how folders look in the normal Windows environment).
Assign macro to picture
Finally, we assign the macro to the image. Right-click on the image and select Assign macro… from the menu.
From the Assign Macro window, click the selectFile macro (this is the name of the macro we created earlier), then click OK.
Test it out
That’s it. We’re done. Now go and test it out.
Conclusion
In this post, we have seen how to create a user interface for selecting files. Users can browse for a file path, then insert that into a cell. This is a really useful technique if using cell parameters in Power Query.
Related posts:
- Change the Power Query source based on a cell value
- How to fix the Formula.Firewall error in Power Query (2 ways)
- VBA code to copy, move, delete and manage files
About the author
Hey, I’m Mark, and I run Excel Off The Grid.
My parents tell me that at the age of 7 I declared I was going to become a qualified accountant. I was either psychic or had no imagination, as that is exactly what happened. However, it wasn’t until I was 35 that my journey really began.
In 2015, I started a new job, for which I was regularly working after 10pm. As a result, I rarely saw my children during the week. So, I started searching for the secrets to automating Excel. I discovered that by building a small number of simple tools, I could combine them together in different ways to automate nearly all my regular tasks. This meant I could work less hours (and I got pay raises!). Today, I teach these techniques to other professionals in our training program so they too can spend less time at work (and more time with their children and doing the things they love).
Do you need help adapting this post to your needs?
I’m guessing the examples in this post don’t exactly match your situation. We all use Excel differently, so it’s impossible to write a post that will meet everybody’s needs. By taking the time to understand the techniques and principles in this post (and elsewhere on this site), you should be able to adapt it to your needs.
But, if you’re still struggling you should:
- Read other blogs, or watch YouTube videos on the same topic. You will benefit much more by discovering your own solutions.
- Ask the ‘Excel Ninja’ in your office. It’s amazing what things other people know.
- Ask a question in a forum like Mr Excel, or the Microsoft Answers Community. Remember, the people on these forums are generally giving their time for free. So take care to craft your question, make sure it’s clear and concise. List all the things you’ve tried, and provide screenshots, code segments and example workbooks.
- Use Excel Rescue, who are my consultancy partner. They help by providing solutions to smaller Excel problems.
What next?
Don’t go yet, there is plenty more to learn on Excel Off The Grid. Check out the latest posts:
Submitted by Nick on 12 May, 2009 — 11:16
Using VBA, there is a quick and easy way to obtain the file path of a file and return it to a sheet
- Use GetOpenFileName
- This brings up a dialog box that allows you to browse your files and choose a file
- You can then use that file path how you want
Here’s a screen shot of our setup in Excel:
When we press the button, we get this:
Once a file is selected, and «Open» is pressed, we can use the file path… in this case, we put it in a cell.
Here’s the code we use to get the file path:
Explanation:
- GetOpenFilename allows you to enter the type of file you want to look for
- The Open File dialog box then appears with only the desired file types showing.. (In our example, we look for text files)
- When you choose one and press Open, it goes to a variable
- If you press cancel, GetOpenFilename returns FALSE, so you need to check for that
- You can use that file path as you want
Download sheet to practise how to Get A File Path in Excel
Training Video on how to Get A File Path in Excel:
| Attachment | Size |
|---|---|
| get-a-file-path.xls | 34.5 KB |
»
- Nick’s blog
- ShareThis
- 204026 reads
The Path property in Excel VBA returns the complete, saved path to the workbook (Excel file). The FullName property in Excel VBA returns the complete, saved path, including the name of the workbook.
Download path-fullname.xlsm and add it to «C:test»
Place a command button on your worksheet and add the following code lines:
1. The following code line returns the complete path to path-fullname.xlsm.
MsgBox Workbooks(«path-fullname.xlsm»).Path
Result:

2. The following code line returns the complete path, including the name of the active workbook.
MsgBox ActiveWorkbook.FullName
Result:

For a practical example of the FullName property, see our example program Create a Footer Before Printing.