
Содержание
- VBA Excel. Первая кнопка (для начинающих)
- Добавление вкладки «Разработчик»
- Кнопка – элемент управления формы
- Вставка кнопки на лист
- Создание процедуры для кнопки
- VBA Excel. Элемент управления CommandButton (кнопка)
- Элемент управления CommandButton
- Свойства элемента CommandButton
- Примеры кода VBA Excel с кнопкой
- Пример 1
- Условие примера 1
- Решение примера 1
- Assign a macro to a Form or a Control button
- Add a button (Form control)
- Add a command button (ActiveX control)
- Add a button (Form control)
- Add a command button (Visual Basic control)
- Need more help?
VBA Excel. Первая кнопка (для начинающих)
Вставка командной кнопки на рабочий лист для начинающих программировать с нуля. Кнопки из коллекций «Элементы управления формы» и «Элементы ActiveX».
Начинаем программировать с нуля
Часть 3. Первая кнопка
[Часть 1] [Часть 2] [Часть 3] [Часть 4]
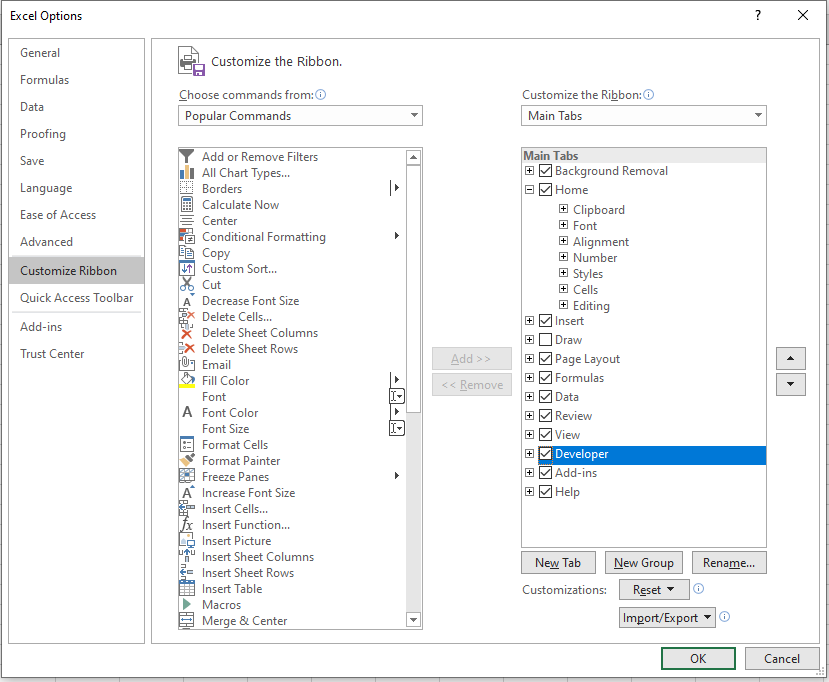
Добавление вкладки «Разработчик»
Вкладка с инструментами, связанными с VBA Excel, называется «Разработчик». Если этой вкладки нет на вашей ленте, добавьте ее через окно «Параметры»:

- Откройте окно «Параметры» через меню «Файл».
- Выберите вкладку «Настроить ленту».
- В правой колонке установите галочку у пункта «Разработчик» и нажмите «OK».
Кнопка – элемент управления формы
Вставка кнопки на лист
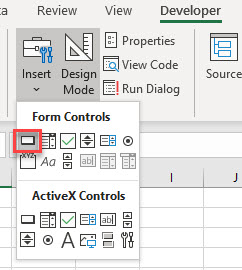
- Выберите вкладку «Разработчик» и нажмите на кнопку «Вставить».
- Нажмите на значок кнопки в коллекции «Элементы управления формы».

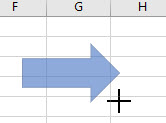
- Кликните в любом месте на рабочем листе Excel.
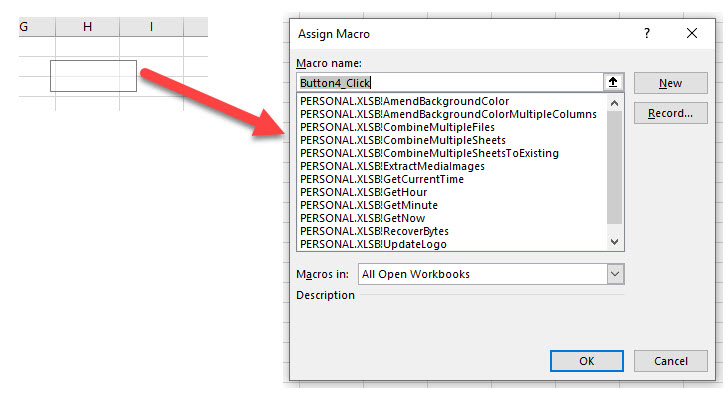
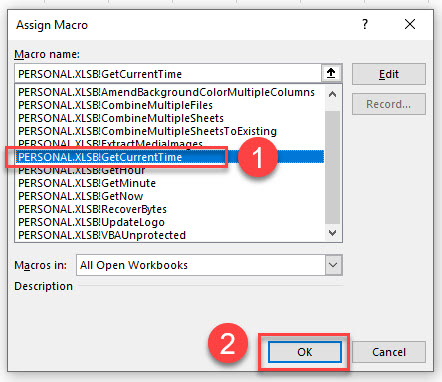
- Откроется окно «Назначить макрос объекту». Нажмите «Отмена», так как макрос для этой кнопки еще не готов.
- После нажатия кнопки «Отмена», на рабочем листе появится новая кнопка из коллекции «Элементы управления формы» в режиме редактирования.

Ухватив мышкой за один из кружочков, можно изменить размер кнопки. Ухватив кнопку за границу, можно перетащить ее в другое место. Также, в режиме редактирования, можно изменить название кнопки прямо на ее поверхности.
Чтобы выйти из режима редактирования кнопки из коллекции «Элементы управления формы», кликните в любом месте на рабочем листе.
Чтобы вернуться в режим редактирования кнопки, кликните по ней правой кнопкой мыши и выберите из контекстного меню нужный пункт. Если вы хотите изменить размер или размещение кнопки перетаскиванием, кликните левой кнопкой мыши в любом месте рабочего листа. После первого клика контекстное меню закроется, а кнопка останется в режиме редактирования.
Создание процедуры для кнопки
Кнопке из коллекции «Элементы управления формы» можно назначить макрос (процедуру), размещенную в стандартном программном модуле.
Создайте или откройте файл Excel с расширением .xlsm (Книга Excel с поддержкой макросов) и перейдите в редактор VBA, нажав сочетание клавиш «Левая_клавиша_Alt+F11».
Если вы не создавали ранее в этом проекте VBA стандартный программный модуль, нажмите кнопку «Module» во вкладке «Insert» главного меню. То же подменю откроется при нажатии на вторую кнопку (после значка Excel) на панели инструментов.

Ссылка на модуль появится в проводнике слева. Если модуль создан ранее, дважды кликните по его ссылке в проводнике, и он откроется справа для редактирования.
Нажмите кнопку «Procedure…» во вкладке «Insert» главного меню. Та же ссылка будет доступна при нажатии на вторую кнопку после значка Excel на панели инструментов.

В открывшемся окне добавления шаблона процедуры оставьте выбранным переключатель «Sub», вставьте в поле «Name» название процедуры «NovayaProtsedura» и нажмите «OK».

В стандартный программный модуль будет вставлен шаблон процедуры «NovayaProtsedura».

Вставьте внутрь шаблона процедуры следующий код:
Источник
VBA Excel. Элемент управления CommandButton (кнопка)
Элемент управления пользовательской формы CommandButton, используемый в VBA Excel для запуска процедур и макросов. Свойства кнопки, примеры кода с ней.
Элемент управления CommandButton
Для запуска процедур и макросов обычно используется событие кнопки – Click.
Свойства элемента CommandButton
| Свойство | Описание |
|---|---|
| AutoSize | Автоподбор размера кнопки. True – размер автоматически подстраивается под длину введенной надписи (заголовка). False – размер элемента управления определяется свойствами Width и Height. |
| BackColor | Цвет элемента управления CommandButton. |
| Caption | Надпись (заголовок) – текст, отображаемый на кнопке. |
| ControlTipText | Текст всплывающей подсказки при наведении курсора на кнопку. |
| Enabled | Возможность взаимодействия пользователя с элементом управления CommandButton. True – взаимодействие включено, False – отключено (цвет надписи становится серым). |
| Font | Шрифт, начертание и размер текста надписи. |
| Height | Высота элемента управления. |
| Left | Расстояние от левого края внутренней границы пользовательской формы до левого края элемента управления. |
| Picture | Добавление изображения вместо текста заголовка или дополнительно к нему. |
| PicturePosition | Выравнивание изображения и текста на кнопке. |
| TabIndex | Определяет позицию элемента управления в очереди на получение фокуса при табуляции, вызываемой нажатием клавиш «Tab», «Enter». Отсчет начинается с 0. |
| Top | Расстояние от верхнего края внутренней границы пользовательской формы до верхнего края элемента управления. |
| Visible | Видимость элемента управления CommandButton. True – элемент отображается на пользовательской форме, False – скрыт. |
| Width | Ширина элемента управления. |
| WordWrap | Перенос текста заголовка на новую строку при достижении ее границы. True – перенос включен, False – перенос выключен. |
В таблице перечислены только основные, часто используемые свойства кнопки. Все доступные свойства отображены в окне Properties элемента управления CommandButton.
Пример кнопки с надписью и изображением
Примеры кода VBA Excel с кнопкой
Изначально для реализации примеров на пользовательскую форму UserForm1 добавлена кнопка CommandButton1.
Пример 1
Изменение цвета и надписи кнопки при наведении на нее курсора.
Условие примера 1
- Действия при загрузке формы: замена заголовка формы по умолчанию на «Пример 1», замена надписи кнопки по умолчанию на «Кнопка», запись цвета кнопки по умолчанию в переменную уровня модуля.
- Сделать, чтобы при наведении курсора на кнопку, она изменяла цвет на зеленый, а надпись «Кнопка» менялась на надпись «Нажми!»
- Добавление кода VBA Excel, который будет при удалении курсора с кнопки возвращать ей первоначальные настройки: цвет по умолчанию и надпись «Кнопка».
Решение примера 1
1. Объявляем в разделе Declarations модуля пользовательской формы (в самом начале модуля, до процедур) переменную myColor:
Источник
Assign a macro to a Form or a Control button
You can use a Form control button or a command button (an ActiveX control) to run a macro that performs an action when a user clicks it. Both these buttons are also known as a push button, which can be set up to automate the printing of a worksheet, filtering data, or calculating numbers. In general, a Form control button and an ActiveX control command button are similar in appearance and function. However, they do have a few differences, which are explained in the following sections.
Button (Form control)
Command button (ActiveX control)
In the sections below, learn how to add a macro to a button in Excel—for Windows or the Mac.
Note: ActiveX controls are not supported on the Mac.
Macros and VBA tools can be found on the Developer tab, which is hidden by default.
The first step is to enable it. For more information, see the article: Show the Developer tab.

Add a button (Form control)
On the Developer tab, in the Controls group, click Insert, and then under Form Controls, click Button  .
.
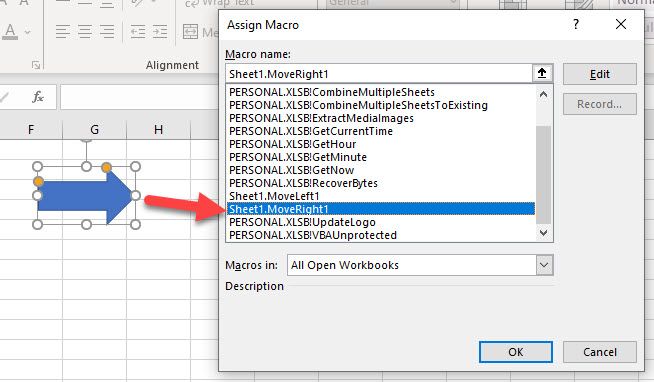
Click the worksheet location where you want the upper-left corner of the button to appear. The Assign Macro popup window appears.
Assign a macro to the button, and then click OK.
To specify the control properties of the button, right-click the button, and then click Format Control.
Add a command button (ActiveX control)
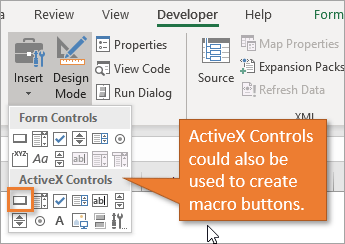
On the Developer tab, in the Controls group, click Insert, and then under ActiveX Controls, click Command Button .
Click the worksheet location at which you want the upper-left corner of the command button to appear.
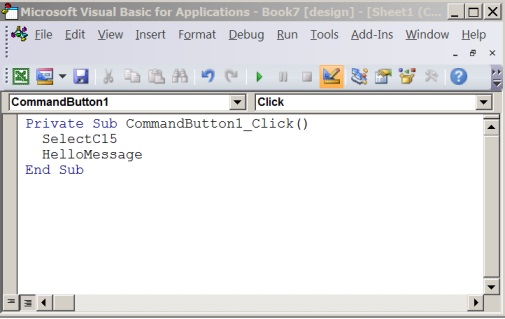
In the Controls group, click View Code. This launches the Visual Basic Editor. Ensure that Click is chose in the drop-down list on the right. The sub procedure CommandButton1_Click (see the figure below) runs these two macros when the button is clicked: SelectC15 and HelloMessage.
In the subprocedure for the command button, do either of the following:
Enter the name of an existing macro in the workbook. You can find macros by clicking Macros in the Code group. You can run multiple macros from a button by entering the macro names on separate lines inside the subprocedure.
As necessary, add your own VBA code.
Close the Visual Basic Editor, and click Design Mode  to ensure design mode is off.
To run the VBA code that is now part of the button, click the ActiveX command button that you just created.
To edit the ActiveX control, make sure that you are in design mode. On the Developer tab, in the Controls group, turn on Design Mode.
To specify the control properties of the command button, on the Developer tab, in the Controls group, click Properties  . You can also right-click the command button, and then click Properties.
Note: Before you click Properties, make sure that the object for which you want to examine or change properties is already selected.
The Properties box appears. For detailed information about each property, select the property, and then press F1 to display a Visual Basic Help topic. You can also type the property name in the Visual Basic Help Search box. The following table summarizes the properties that are available.
If you want to specify
Use this property
Whether the control is loaded when the workbook is opened. (Ignored for ActiveX controls.)
Whether the control can receive focus and respond to user-generated events.
Whether the control can be edited.
The name of the control.
The way the control is attached to the cells below it (free floating, move but do not size, or move and size).
Whether the control can be printed.
Whether the control is visible or hidden.
Font attributes (bold, italic, size, strikethrough, underline, and weight).
Bold, Italic, Size, StrikeThrough, Underline, Weight (Form)
Descriptive text on the control that identifies or describes it.
Whether the contents of the control automatically wrap at the end of a line.
Size and Position:
Whether the size of the control automatically adjusts to display all the contents.
The height or width in points.
Height, Width (Form)
The distance between the control and the left or top edge of the worksheet.
The background color.
The background style (transparent or opaque).
The foreground color.
Whether the control has a shadow.
The bitmap to display in the control.
The location of the picture relative to its caption (left, top, right, and so on).
Keyboard and Mouse:
The shortcut key for the control.
A custom mouse icon.
The type of pointer that is displayed when the user positions the mouse over a particular object (standard, arrow, I-beam, and so on).
Whether the control takes the focus when clicked.
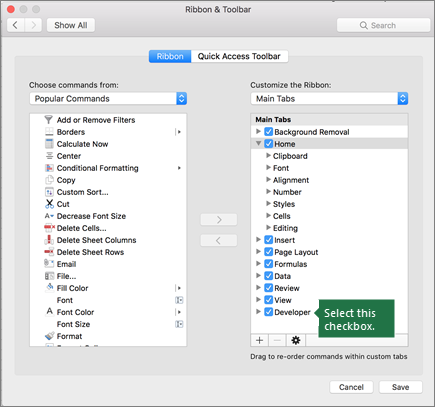
Macros and VBA tools can be found on the Developer tab, which is hidden by default, so the first step is to enable it
Go to Excel > Preferences… > Ribbon & Toolbar.
In the Customize the Ribbon category, in the Main Tabs list, select the Developer check box, and then click Save.
Add a button (Form control)
Follow these steps:
On the Developer tab, click Button .
Click the worksheet location where you want the upper-left corner of the button to appear. The Assign Macro popup window appears.
Note: If you have already inserted a button, you can right-click on it, and select Assign Macro.
Assign a macro to the button and click OK.
To specify the control properties of the button, right-click it, and then select Format Control. .
Add a command button (Visual Basic control)
On the Developer tab, click Button .
Click the worksheet location where you want the upper-left corner of the command button to appear.
Note: If you have already inserted a button, you can right-click on it, and select Assign Macro.
In the Assign Macro dialog box, select New, which will open the Visual Basic Editor ( VBE) to a pane with the following code:
In the subprocedure for the command button, between the Sub and End Sub lines, do either of the following:
Enter the name of an existing macro in the workbook. You can run multiple macros from a button by typing the macro names on separate lines inside the sub procedure
Add your own VBA code.
Click Design Mode to ensure that design mode is off, then close the Visual Basic Editor window.
To edit the button, right-click it and choose Visual Basic.
To specify the control properties of the button, right-click it, and then select Format Control. .
Need more help?
You can always ask an expert in the Excel Tech Community or get support in the Answers community.
Источник
Элемент управления пользовательской формы CommandButton, используемый в VBA Excel для запуска процедур и макросов. Свойства кнопки, примеры кода с ней.
UserForm.CommandButton – это элемент управления пользовательской формы, предназначенный исключительно для запуска процедур и макросов VBA Excel.

Для запуска процедур и макросов обычно используется событие кнопки – Click.
Свойства элемента CommandButton
| Свойство | Описание |
|---|---|
| AutoSize | Автоподбор размера кнопки. True – размер автоматически подстраивается под длину введенной надписи (заголовка). False – размер элемента управления определяется свойствами Width и Height. |
| BackColor | Цвет элемента управления CommandButton. |
| Caption | Надпись (заголовок) – текст, отображаемый на кнопке. |
| ControlTipText | Текст всплывающей подсказки при наведении курсора на кнопку. |
| Enabled | Возможность взаимодействия пользователя с элементом управления CommandButton. True – взаимодействие включено, False – отключено (цвет надписи становится серым). |
| Font | Шрифт, начертание и размер текста надписи. |
| Height | Высота элемента управления. |
| Left | Расстояние от левого края внутренней границы пользовательской формы до левого края элемента управления. |
| Picture | Добавление изображения вместо текста заголовка или дополнительно к нему. |
| PicturePosition | Выравнивание изображения и текста на кнопке. |
| TabIndex | Определяет позицию элемента управления в очереди на получение фокуса при табуляции, вызываемой нажатием клавиш «Tab», «Enter». Отсчет начинается с 0. |
| Top | Расстояние от верхнего края внутренней границы пользовательской формы до верхнего края элемента управления. |
| Visible | Видимость элемента управления CommandButton. True – элемент отображается на пользовательской форме, False – скрыт. |
| Width | Ширина элемента управления. |
| WordWrap | Перенос текста заголовка на новую строку при достижении ее границы. True – перенос включен, False – перенос выключен. |
В таблице перечислены только основные, часто используемые свойства кнопки. Все доступные свойства отображены в окне Properties элемента управления CommandButton.

Пример кнопки с надписью и изображением
Примеры кода VBA Excel с кнопкой
Изначально для реализации примеров на пользовательскую форму UserForm1 добавлена кнопка CommandButton1.
Пример 1
Изменение цвета и надписи кнопки при наведении на нее курсора.
Условие примера 1
- Действия при загрузке формы: замена заголовка формы по умолчанию на «Пример 1», замена надписи кнопки по умолчанию на «Кнопка», запись цвета кнопки по умолчанию в переменную уровня модуля.
- Сделать, чтобы при наведении курсора на кнопку, она изменяла цвет на зеленый, а надпись «Кнопка» менялась на надпись «Нажми!»
- Добавление кода VBA Excel, который будет при удалении курсора с кнопки возвращать ей первоначальные настройки: цвет по умолчанию и надпись «Кнопка».
Решение примера 1
1. Объявляем в разделе Declarations модуля пользовательской формы (в самом начале модуля, до процедур) переменную myColor:
2. Загружаем пользовательскую форму с заданными параметрами:
|
Private Sub UserForm_Initialize() Me.Caption = «Пример 1» With CommandButton1 myColor = .BackColor .Caption = «Кнопка» End With End Sub |
3. Меняем цвет и надпись кнопки при наведении на нее курсора мыши:
|
Private Sub CommandButton1_MouseMove(ByVal _ Button As Integer, ByVal Shift As Integer, _ ByVal X As Single, ByVal Y As Single) With CommandButton1 .BackColor = vbGreen .Caption = «Нажми!» End With End Sub |
4. Возвращаем цвет и надпись кнопки при удалении с нее курсора мыши:
|
Private Sub UserForm_MouseMove(ByVal _ Button As Integer, ByVal Shift As Integer, _ ByVal X As Single, ByVal Y As Single) With CommandButton1 .BackColor = myColor .Caption = «Кнопка» End With End Sub |

Все процедуры размещаются в модуле пользовательской формы. Переменная myColor объявляется на уровне модуля, так как она используется в двух процедурах.
Пример 2
Запуск кода, размещенного внутри процедуры обработки события Click элемента управления CommandButton:
|
Private Sub CommandButton1_Click() MsgBox «Код внутри обработки события Click» End Sub |
Пример 3
Запуск внешней процедуры из процедуры обработки события Click элемента управления CommandButton.
Внешняя процедура, размещенная в стандартном модуле проекта VBA Excel:
|
Sub Test() MsgBox «Запуск внешней процедуры» End Sub |
Вызов внешней процедуры из кода обработки события Click
- с ключевым словом Call:
|
Private Sub CommandButton1_Click() Call Test End Sub |
- без ключевого слова Call:
|
Private Sub CommandButton1_Click() Test End Sub |
Строки вызова внешней процедуры с ключевым словом Call и без него – равнозначны. На ключевое слово Call можно ориентироваться как на подсказку, которая указывает на то, что эта строка вызывает внешнюю процедуру.
In this Article
- Adding a Macro Button to an Excel Worksheet
- Adding a Form Control Button
- Adding an ActiveX Button
- Adding a Macro to a Shape in an Excel Worksheet
- Adding Command Buttons to VBA Forms
This tutorial will demonstrate how to add a macro button in Excel VBA.
Once we have created macros in Excel, it is sometimes useful to create a button in the Excel worksheet to run the macro.
Also, as we use VBA to create UserForms in Excel, we need to be able to create buttons on these UserForms to perform the OK and Cancel operations. This tutorial will demonstrate how to add a macro button to a VBA worksheet, how to add a macro to a shape in VBA (as opposed to a button), and how to add a button onto a User Form in the VBE Editor.
Adding a Macro Button to an Excel Worksheet
Once we have created a macro in Excel VBA, we can create a button on the worksheet to run the macro.
In the Ribbon, select the Developer tab if it is visible. This tab is switched off by default so you will need to switch it on to see the tab on the ribbon.
If the Developer tab is not visible on the ribbon, click on the File tab in the Ribbon, and go down to Options. In the Customize Ribbon options, tick the Developer check box.
Click OK.
The Developer tab will appear on the main ribbon.

There are 2 types of buttons we can add to an Excel sheet – a Form Control button and an ActiveX Control Button.
Adding a Form Control Button
In the Ribbon, select Developer > Insert > Form Controls > Button.
Click and drag in the worksheet to create a button. As soon as you release the mouse button, the assign macro dialog box will appear.
Scroll down to 1) select the macro you wish to assign to the button, and then, 2) click OK.
Right click on the button, and select Edit Text to change the text on the button.
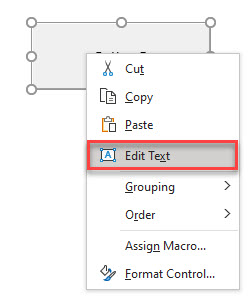
Type an appropriate name for the button and then click off the button.
Click the button to run the macro.
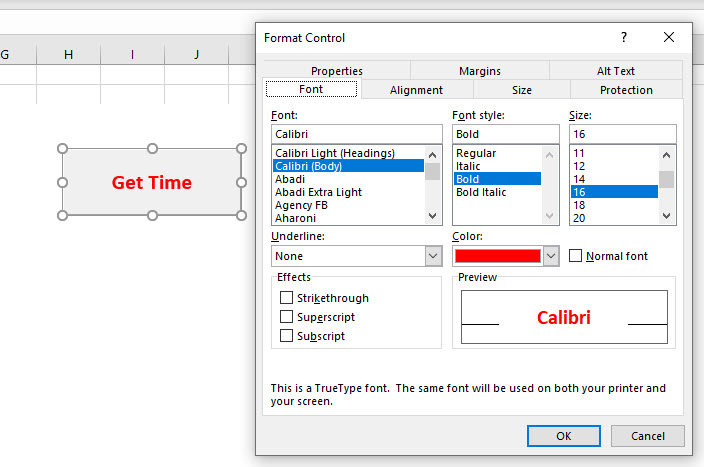
To change the format of the button, right click on the button and select Format Control.

Select the options to format, and click OK.
Adding an ActiveX Button
The ActiveX button is similar to a Form Control Button but instead of assigning an existing macro to the button, we need to write code behind the Click Event of the button. It also has a lot more Properties than the Form Control Button making it a much more flexible control.
In the Ribbon, select Developer > Insert > ActiveX Controls > Command button.
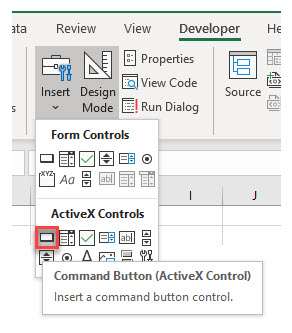
Click and drag in your worksheet to create the button. The button will appear as an Embedded Command Button.
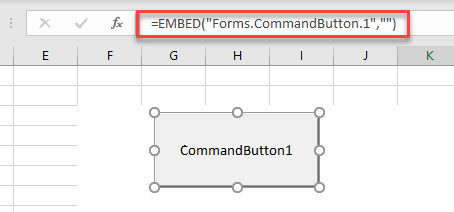
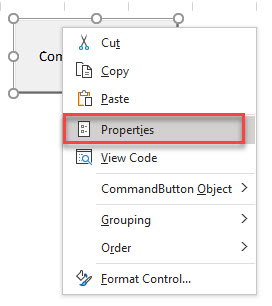
To change the name of the command button, or the text that is displayed, right-click on the command button and click on Properties.
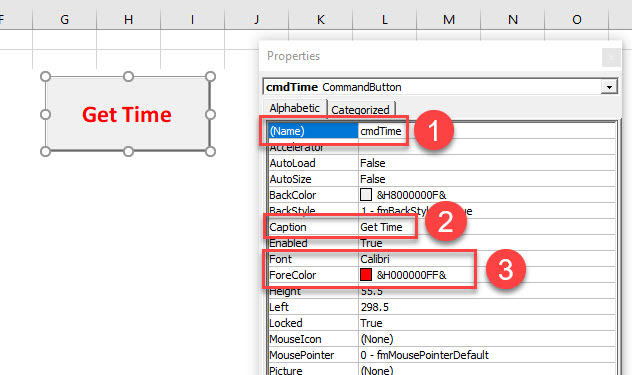
Amend the 1) name of the button, 2) caption of the button and 3) format of the text as required.
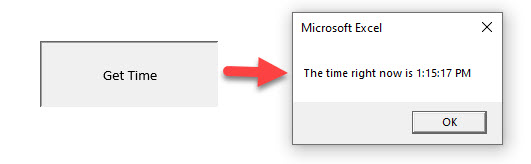
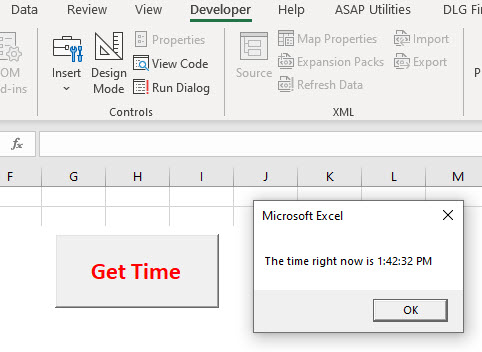
To add code to the button, right-click on the button once more and select View Code.
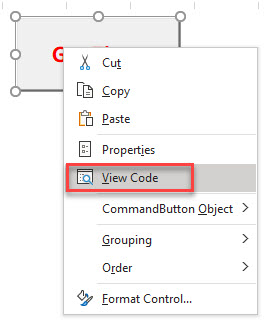
This will automatically create the click event for the button in the VBE Editor. (the click event is the most common event for command buttons and is created by default).
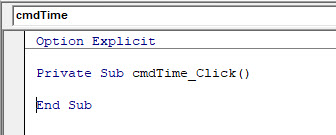
Type the code you require into the event that has been created.
Private Sub cmdTime_Click()
 Dim strT As String
 strT = Time()
 MsgBox "The time right now is " & strT
End Sub
Close the VBE Editor to return to your worksheet.
Click once more on your new button. You will notice that macro does not run, but the button gets selected. This is due to the fact that when you create an ActiveX button, you are automatically put into Design Mode.
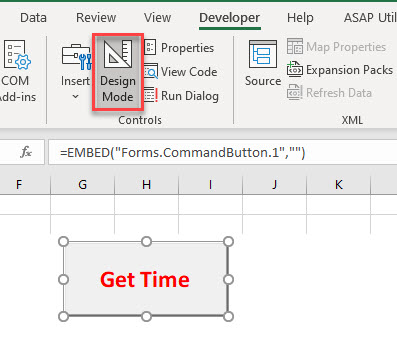
To run the code behind the button, click on the Design Mode button on the Ribbon to go out of Design mode, and then click the button.
Adding a Macro to a Shape in an Excel Worksheet
In the Ribbon, select Insert > Shape.
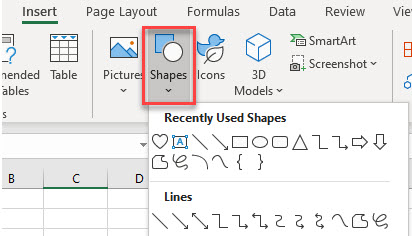
Select the shape from the drop down, and then drag in the Excel worksheet to create the shape.
Right-click on the shape, and select Assign Macro.
Select the macro to assign, and then click OK.
When you move your mouse over your shape, the mouse cursor should turn into a small hand. Click on the shape to run the macro.
Adding Command Buttons to VBA Forms
Creating VBA UserForms is a big part of programming in VBA. It allows you to build a professional looking user interface to communicate with the users of your VBA application. It also allows you to totally control the user in what they are doing to your workbook. To learn how to create UserForms in VBA, click here.
Once a UserForm is created, and controls have been added to a UserForm, buttons can be added to perform functions such as OK and Cancel.
In the Toolbox, select the Command Button control, and then click and drag in your form to create the button.
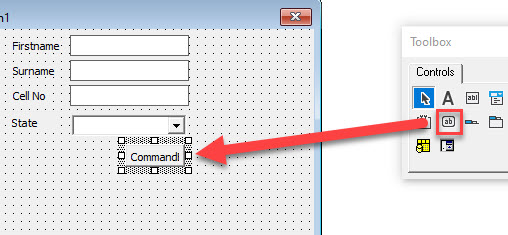
Using the Caption Property, change the caption of the command button to OK, and the Accelerator to “O”
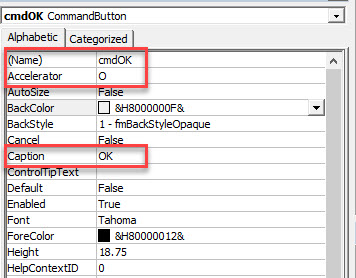
The purpose of the Accelerator is for the user to use the keyboard to activate the button, in this case Alt+O would activate the button.
![]()
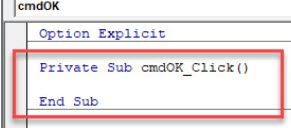
Once we have created the command button, we can double-click on the command button to go to the VBA code. Double-clicking on the command button in the form will automatically create the Click Event for the button as this is the event that is most commonly used by command buttons.
We can now type our relevant VBA code within the procedure that has been created.
VBA Coding Made Easy
Stop searching for VBA code online. Learn more about AutoMacro — A VBA Code Builder that allows beginners to code procedures from scratch with minimal coding knowledge and with many time-saving features for all users!

Learn More!
Bottom Line: Learn how to create macro buttons in a worksheet that run VBA code when clicked. Includes how to format buttons and prevent them from moving and resizing on the sheet.
Skill Level: Intermediate
Video Tutorial
Download the Excel File
Here’s the Excel workbook that I use in the video so you can follow along and practice what you’re learning.
Making User-Friendly Macro Buttons in Your Spreadsheets
Macros make life easier. Buttons make life easier. It’s only natural to marry the two and make the processes you repeatedly have to perform as simple as possible.
You can literally run through a hundred steps with just one small click using macros and buttons–which, of course, is both empowering and gratifying.
Kristen, a member of our VBA Pro Course, loves to add buttons to her spreadsheets for this reason.
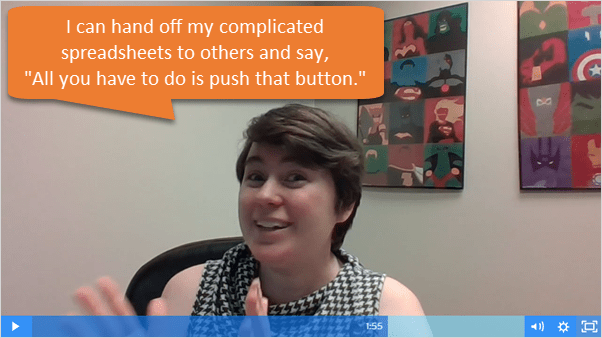
You can watch the entire video to learn more about Kristen’s story with learning VBA, and how she uses macro buttons.
For this tutorial, we’re using macros that have already been created. If you don’t know how to create macros yet, then checkout one of my free webinars to learn the basics getting started with macros & VBA.
So let’s take a look at how to create a button and assign a macro to it.
3 Types of Macro Buttons for Worksheets
In this post I explain three different types of buttons you can place on a worksheet.
- Shapes
- Form Control Buttons
- ActiveX Control Buttons
We’ll start with my favorite…
1. Using Shapes to Create Macro Buttons
In my opinion, the best way to create macro buttons is to use shapes. Shapes give us the most styling/formatting options, and we can make them look like buttons you click every day on modern web pages.
Below, we will create the button on a worksheet and assign a macro to it. Here are the steps to create the macro button:
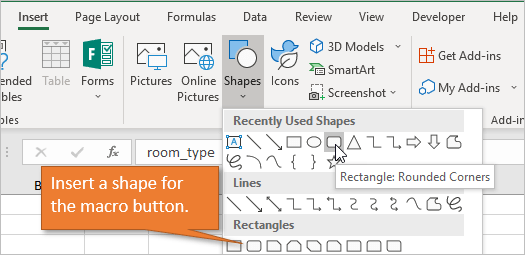
1. Draw a shape on the sheet (Insert tab > Shapes drop-down > Rectangle shape).
2. Add text to the shape (Right-click > Edit Text | or double-click in the shape).
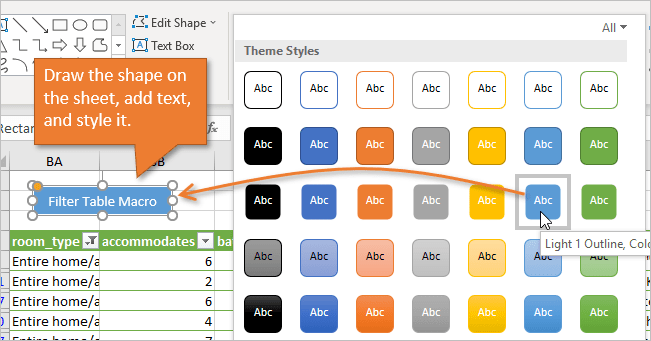
3. Assign the macro (Right-click the border of the shape > Assign Macro…)
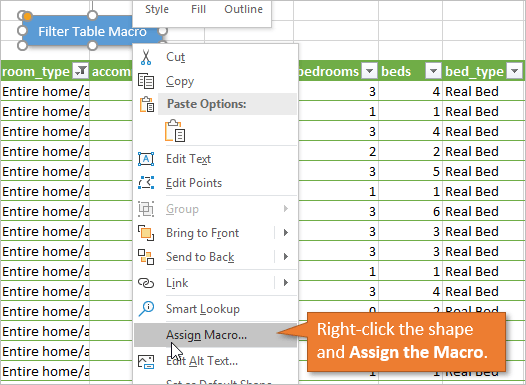
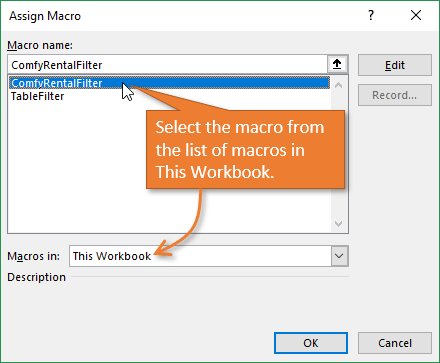
4. Select the macro from the list. It’s important to note that the macro should be selected from the This Workbook list so that when you share the workbook with other users, the macro will be shared as well.
If you assign the macro from another workbook, the button will not work for the people you share the workbook with.
5. Press OK.
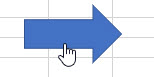
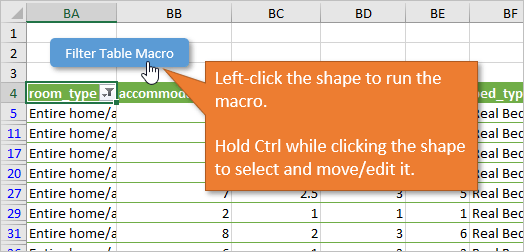
When you hover your mouse over the shape it will now turn into the hand pointer cursor. Clicking the shape will run the macro.
That’s it! That’s how you assign a macro to a button that you’ve created right on the worksheet.
Modifying the Button
If you need to select the shape to change its look or move it, hold the Ctrl key while clicking the shape. This will prevent the macro from running and allow you to modify the shape. Excel offers a ton of options on the Format tab for changing the shape style, shape effects, font color or size, etc.
Preventing the Button from Resizing with Cell Changes
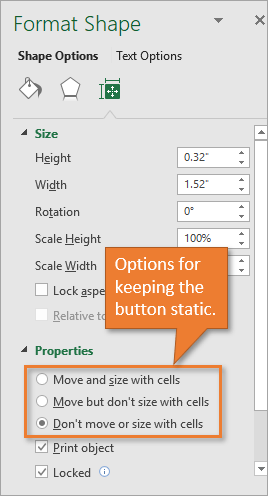
Depending on your settings, it’s likely that when you change the size of the column or row that your button is on, the button size will change as well. If you don’t want that to happen, you can easily adjust the settings to keep the button static.
First, just right click on the button and choose Size and Properties…
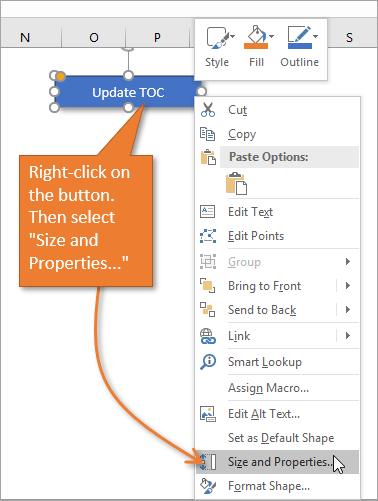
This will bring up the Format Shape pane. There are options for you to choose from in the Properties section, depending on whether or not you want the button to move or resize when changes are made to your sheet.
2. Using Form Controls to Create Macro Buttons
The next option for macro buttons is Form Controls. They are essentially the same in terms of set-up.
The difference between Controls and Shapes is the styling.
Form Control buttons do give the appearance of being pressed when you click on them, which is kind of cool. However, they unfortunately look like a button you’d find on an early version of Windows.
We cannot change the color of the button either. The only formatting options are for the font type, size, and color.
Insert a Form Control Button
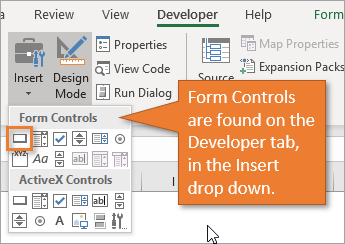
To add a Form Control button, just go to the Developer tab and click on the Insert button. A drop-down gives you options under Form Controls.
3. Using ActiveX Controls for Macro Buttons
The last option is ActiveX Control buttons.
The ActiveX Control buttons do have more formatting options and you can change the button color.
They also require you to add an event macro in the sheet module that will run when the button is clicked. This is done by right-clicking the button and choosing View Code.
You can add other event triggers like double-click. This could perform a different action/macro when the button is double-clicked.
However, I don’t recommend the ActiveX Control buttons. In my experience they are glitchy in terms of consistent appearance. They can end up really big or really small when changes are made to the sheet or when the file is shared back and forth between users.
Placing Buttons in the Ribbon or Toolbar Instead
Another option is to place your macro buttons on any of the tabs in the Excel Ribbon or Quick Access Toolbar.
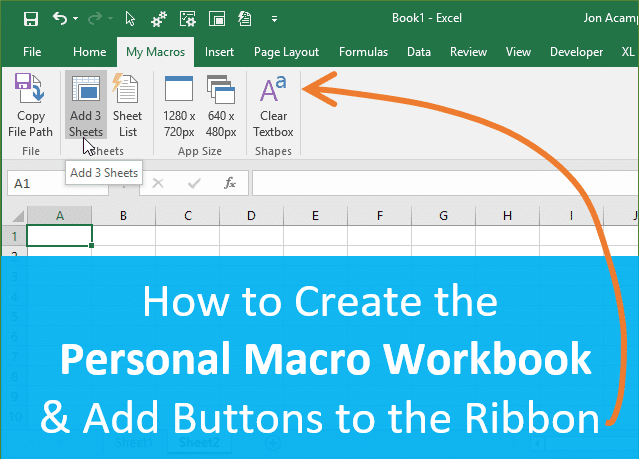
This is video #3 in my 4-part video series on the Personal Macro Workbook. This technique is best for macros that you will only run on your computer because the ribbon button customizations do not travel with the workbook.
If you do want the ribbon buttons to travel with the workbook then you can use XML code to customize the ribbon. I’ll write an article on that in the future, and I do cover extensively in my VBA Pro Course, along with how to create add-ins.
Related Tutorials
I have a couple other posts for you to check out on this topic. Take a few minutes to give them a look!
- How to Create VBA Macro Buttons for Filters in Excel
- Macro Buttons to Add Fields to Pivot Tables
- How to Add a Yes No Pop-up Message Box to a Macro Before It Runs
- How to Enable the Developer Tab in Excel
Conclusion
My overall recommendation is to keep it simple and stick to using shapes for macro buttons. They give you the most formatting options, and are easy to setup and modify.
What will you create macro buttons for? I’d love to hear how you plan to put these buttons to work. If you have any comments or questions about running a macro button that you’ve created, please leave a comment below.
Thank you! 🙂
Fortunately, Excel lets us refer to an ActiveX control on a worksheet by using its name, without reference to the OLEObjects collection. For instance, if we place a command button on a worksheet, Excel will give it the default name CommandButton1. Both of the following lines set the height of this command button to 20 points:
ActiveSheet.OLEObjects(«CommandButton1»).Height = 20 ActiveSheet.CommandButtonl.Height = 20
Unfortunately, however, the properties and methods that we access in this manner are the properties and methods of the OLEObject, not the control itself. These properties are shown in Table 14-4.
|
AltHTML |
Enabled |
PrintObject |
|
Activate |
Height |
ProgId |
|
Application |
Index |
Select |
|
AutoLoad |
Interior |
SendToBack |
|
AutoUpdate |
Left |
Shadow |
|
Border |
LinkedCell |
ShapeRange |
|
BottomRightCell |
ListFillRange |
SourceName |
|
BringToFront |
Locked |
Top |
|
Copy |
Name |
TopLeftCell |
|
CopyPicture |
Object |
Update |
|
Creator |
OLEType |
Verb |
|
Cut |
OnAction |
Visible |
|
Delete |
Parent |
Width |
|
Duplicate |
Placement |
ZOrder |
Thus, for instance, while we can set the Height property of the command button, we cannot set its Caption property in this way. That is, the code:
ActiveSheet.OLEObjects(«CommandButton1»).Caption = «ClickMe» will generate an error.
The way to reach the members of the control itself is to use the Object property of an OLEObject object, which returns the underlying control, and makes its properties and methods accessible. Thus, the following two lines each set the button’s caption:
ActiveSheet.OLEObjects(«CommandButton1»).Object.Caption = «ClickMe» ActiveSheet.CommandButton1.Object.Caption = «ClickMe»
In addition to the standard properties available for ActiveX controls, the following properties can be used with ActiveX controls embedded in sheets in Microsoft Excel:
BottomRightCell
Returns a Range object that represents the cell that lies under the lower-right corner of the object.
LinkedCell
Returns or sets the worksheet range that is linked to the value of the control. Thus, if we place a value in the linked cell, the control will assume this value, and vice-versa.
ListFillRange
Returns or sets the worksheet range that is used to fill a list box control.
Placement
Returns or sets the way that the control is attached to the cells below it. The possible values are the XlPlacement constants: xlMoveAndSize, xlMove, and xlFreeFloating.
PrintObject
Prints the control when the worksheet is printed if this property is set to True. TopLeftCell
Returns a Range object that represents the cell that lies under the top-left corner of the object.
ZOrder
Returns the ZOrder position of the control.
Note also that Table 14-4 has some properties that are not properties of controls themselves. They relate to the OLEObject, which is the container for the control, and thus to the control’s relationship with the worksheet. For instance, the code:
ActiveSheet.CommandButtonl.TopLeftCell.Address returns the address of the top-left cell of the worksheet that lies under the control (or rather, the control’s container: the OLEObject).
As another example, the following code will locate the top-left cell under the command button and then scroll the active window so that this cell (and therefore the command button) is at the upper-left corner of the window:
Dim rng As Range
Set rng = ActiveSheet.CommandButtonl.TopLeftCell With ActiveWindow
.ScrollRow = rng.Row .ScrollColumn = rng.Column End With
It is important to note that some properties and methods of some Excel objects are disabled when an ActiveX control has the focus. For example, the Sort method of the Range object cannot be used when a control is active. Since a control on a worksheet remains active after it is clicked, the following code will fail:
Private Sub CommandButtonl Click
Range(«A:A»).Sort Key1:=Range(«A:A») End Sub
(We will discuss the sort method in Chapter 19. Don’t worry about that now.) This is one disadvantage of placing controls directly on worksheets.
Of course, one way to avoid this problem is to activate another object before calling the sort method. For instance, we can amend the previous code as follows:
Private Sub CommandButtonl Click Range(«A:A»).Activate Range(«A:A»).Sort Key1:=Range(«A:A») CommandButtonl.Activate ‘ Optional
End Sub
It is also worth mentioning that if you save an Excel 97 or Excel 2000 workbook in Excel 5.0/95 Workbook file format, all ActiveX control information will be lost.
Continue reading here: Adding a Control to a Worksheet Programmatically
Was this article helpful?