Worksheet Change Event in VBA and Preventing Event Loops
Related Links:
Excel VBA Events, Event Handlers, Trigger a VBA Macro.
Worksheet Selection Change Event, Excel VBA.
————————————————————————
Contents:
Worksheet_Change Event
Preventing Event Loops with Application.EnableEvents = False
————————————————————————
Worksheet_Change Event:
You can auto run a VBA code, when content of a worksheet cell changes, with the Worksheet_Change event. The change event occurs when cells on the worksheet are changed either by the user, or by any VBA application or by an external link, but not when a cell changes due to recalculation as a result from formula or due to format change. For changes made by calculation, use Worksheet_Calculate event.
Worksheet change procedure is installed with the worksheet, ie. it must be placed in the code module of the appropriate Sheet object. To create a worksheet change event: use the Visual Basic Editor -> in the Project Explorer, double click on the appropriate sheet (under ‘Microsoft Excel Objects’ which is under the VBAProject/name of your workbook) -> in the Code window, select «Worksheet» from the left-side «General» drop-down menu and then select «Change» from the right-side «Declarations» drop-down menu. You will get a procedure «shell» in the code window as follows:
Private Sub Worksheet_Change(ByVal Target As Range)
End Sub
Target is a parameter of data type Range (ie. Target is a Range Object). It refers to the changed Range and can consist of one or multiple cells. If Target is in the defined Range, and its value or content changes, it will trigger the vba procedure. If Target is not in the defined Range, nothing will happen in the worksheet. In this manner, you can limit the events to a particular range for both the Change and SelectionChange events. This can be done in multiple ways:
Using Target Address. Trigger the procedure, if a single cell (A5) value is changed:
If Target.Address = «$A$5» Then MsgBox «Success»
If Target.Address = Range(«$A$5»).Address Then MsgBox «Success»
If Target.Address = Range(«A5»).Address Then MsgBox «Success»
Using Target Address. If cell (A1) or cell (A3) value is changed:
If Target.Address = «$A$1» Or Target.Address = «$A$3» Then MsgBox «Success»
Using Target Address. If any cell(s) value other than that of cell (A1) is changed:
If Target.Address <> «$A$1» Then MsgBox «Success»
The following use of Target.Address is not correct, and the code will not run:
If Target.Address = «$a$5» Then MsgBox «Success»
If Target.Address = «A1» Then MsgBox «Success»
If Target.Address = «$A$1:$A$10» Then MsgBox «Success»
If Target.Address = Range(«$A$1:$A$10») Then MsgBox «Success»
Note: Target.Address should be an absolute reference [unless used as Range(«A5»).Address — see above] and in Caps. Use this to run code when content of a single cell is changed or when any cell(s) other than a specific cell is changed.
Trigger the procedure, if any cell in a column(s) is changed, say for any change in a cell in column B or column C:
If Target.Column = 2 Or Target.Column = 3 Then MsgBox «Success»
Intersect method for a single cell. If Target intersects with the defined Range of A1 ie. if cell (A1) value is changed, the code is triggerred:
If Not Application.Intersect(Target, Range(«A1»)) Is Nothing Then MsgBox «Success»
Trigger the procedure, if at least one cell of Target is A1,B2,C3:
If Not Application.Intersect(Target, Range(«A1,B2,C3»)) Is Nothing Then MsgBox «Success»
At least one cell of Target is within the range C5:D25:
If Not Application.Intersect(Target, Me.Range(«C5:D25»)) Is Nothing Then MsgBox «Success»
If you want the code to run when only a single cell in Range(«C1:C10») is changed and do nothing if multiple cells are changed:
Private Sub Worksheet_Change(ByVal Target As Range)
If Intersect(Target, Range(«C1:C10»)) Is Nothing Or Target.Cells.Count > 1 Then
Exit Sub
Else
MsgBox «Success»
End If
End Sub
Preventing Event Loops with Application.EnableEvents = False
Example of a recursive loop code:
Private Sub Worksheet_Change(ByVal Target As Range)
If Not Application.Intersect(Target, Range(«A1:A10»)) Is Nothing Then
Range(«A5»).Value = Range(«A5»).Value + 1
End If
End Sub
Recursive Event Loop:
If, at each runtime, the worksheet_change event changes the content of a cell which itself is part of the Target Range (ie. which triggers the change event), it will result in reprocessing the change event repeatedly. Recursion is the process of repeating in a similar way viz. when the procedure calls itself. Refer to above example of a recursive loop code, if any cell content in Range(«A1:A10») is changed by the user, the cell A5 value will change and increment by 1; this will again trigger the change event [because of change in value of cell A5 which is in the Target Range(«A1:A10»)] and will in turn change the cell A5 value by incrementing it by 1; and then this change in cell A5 will again trigger the change event and change the cell A5 value by incrementing it by 1; and so on. This will result in a recursive loop which might result in a ‘Out Of Stack Space’ untrappable error, or depending on the Excel setting, the loop might terminate at a threshold limit of say 100. To prevent this, enter the following at the beginning of the code: Application.EnableEvents = False. This means that any change made by the VBA code will not trigger any event and will not enable restarting the worksheet_change event. EnableEvents is not automatically changed back to True, this should be specifically done in your code, by adding the following line at the end of the code: Application.EnableEvents = True. Meanwhile, if during runtime, your code encounters an error, you will need an ErrorHandler (to change EnableEvents back to True) because events have been disabled in the beginning of the code. This can be done as follows.
ErrorHandler, Example 1:
Private Sub Worksheet_Change(ByVal Target As Range)
‘on the occurrence of an error procedure flow is directed to the error-handling routine (ie. ErrHandler) which handles the error
On Error GoTo ErrorHandler
‘to prevent recursion — so that any change made by code will not trigger an event to restart the Worksheet_Change event
Application.EnableEvents = False
‘on changing cell A1 or B1, go to ErrorHandler which reverts EnableEvents to True & then exit sub
If Target.Address = «$A$1» Or Target.Address = «$B$1» Then GoTo ErrorHandler
‘if value of any cell in column 1 or 2 is changed
If Target.Column = 1 Or Target.Column = 2 Then
‘if changed cell value is numeric ie. new value is not text
If IsNumeric(Target) Then
‘increment cell B2 value by 1
Range(«B2»).Value = Range(«B2»).Value + 1
End If
End If
‘EnableEvents is not automatically changed back to True & hence this needs to be done specifically at the end of the code before exit.
‘because an exit statement (ex. Exit Sub) is not placed above, the error-handling routine will also execute when there is no error.
ErrorHandler:
Application.EnableEvents = True
End Sub
ErrorHandler, Example 2:
Private Sub Worksheet_Change(ByVal Target As Range)
On Error Resume Next ‘skip all run-time errors
If Target.Address = «$A$1» Or Target.Address = «$B$1» Then Exit Sub
Application.EnableEvents = False
If Target.Column = 1 Or Target.Column = 2 Then
If IsNumeric(Target) Then
Range(«B2»).Value = Range(«B2»).Value + 1
End If
End If
Application.EnableEvents = True
On Error GoTo 0 ‘Turn off error trapping and re-allow run time errors
End Sub
On Error Statements explained:
On Error Resume Next: Specifies that when a run-time error occurs, control goes to the statement immediately following the statement where the error occurred, and execution continues from that point.
The On Error GoTo 0 statement turns off error trapping. It disables enabled error handler in the current procedure and resets it to Nothing.
On Error GoTo Line: Enables the error-handling routine that starts at the specified Line. The On Error GoTo statement traps all errors, regardless of the exception class.
Событие Worksheet.SelectionChange, используемое в VBA Excel для запуска процедур при выборе диапазона на рабочем листе, в том числе отдельной ячейки.
Синтаксис процедуры, выполнение которой инициируется событием Worksheet.SelectionChange:
|
Private Sub Worksheet_SelectionChange(ByVal Target As Range) ‘Операторы процедуры End Sub |
Эта процедура VBA Excel запускается при смене на рабочем листе выделенного диапазона (SelectionChange). Она должна быть размещена в модуле рабочего листа Excel, смена выбранного диапазона ячеек которого будет инициировать ее запуск.
Аргумент Target — это новый выбранный диапазон на рабочем листе.
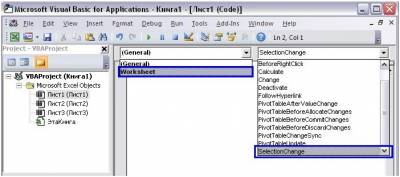
Шаблон процедуры можно скопировать и вставить в модуль рабочего листа, но не обязательно. Если открыть модуль нужного листа, выбрать в левом верхнем поле объект Worksheet, шаблон процедуры будет добавлен автоматически:
У объекта Worksheet есть и другие события, которые можно выбрать в правом верхнем поле модуля рабочего листа. Процедура с событием SelectionChange добавляется по умолчанию.
Примеры кода с Worksheet.SelectionChange
Пример разработчика
Замечательный пример дан на сайте разработчика:
|
Private Sub Worksheet_SelectionChange(ByVal Target As Range) With ActiveWindow .ScrollRow = Target.Row .ScrollColumn = Target.Column End With End Sub |
При выборе на листе любого диапазона, в том числе отдельной ячейки, лист автоматически прокручивается по горизонтали и вертикали, пока выделенный диапазон не окажется в верхнем левом углу экрана.
Эта процедура работает и при выборе ячейки через адресную строку (слева над обозначениями столбцов), и при выборе из кода VBA Excel, например:
Выбор одной отдельной ячейки
Инициируем выполнение основных операторов процедуры с событием Worksheet.SelectionChange выбором одной отдельной ячейки:
|
Private Sub Worksheet_SelectionChange(ByVal Target As Range) If Target.Address = «$E$5» Then MsgBox «Выбрана ячейка E5» End If End Sub |
Основной оператор MsgBox "Выбрана ячейка E5" будет выполнен при выборе ячейки E5.
Примечание:
В условии примера используется свойство Address переменной Target, так как в прямом выражении Target = Range("E5") по умолчанию сравниваются значения диапазонов. В результате этого, при выборе другой ячейки со значением, совпадающим со значением ячейки E5, равенство будет истинным и основные операторы будут выполнены, а при выборе более одной ячейки, будет сгенерирована ошибка.
Выбор диапазона с заданной ячейкой
Выполнение основных операторов процедуры при вхождении заданной ячейки в выбранный диапазон:
|
Private Sub Worksheet_SelectionChange(ByVal Target As Range) If Not Intersect(Target, Range(«B3»)) Is Nothing Then MsgBox «Ячейка B3 входит в выбранный диапазон» End If End Sub |
Основной оператор MsgBox "Ячейка B3 входит в выбранный диапазон" будет выполнен при выделении диапазона, в который входит ячейка B3, в том числе и при выделении одной этой ячейки.
Выбор ячейки в заданной строке
Инициируем выполнение основных операторов процедуры с событием Worksheet.SelectionChange выбором любой отдельной ячейки во второй строке:
|
Private Sub Worksheet_SelectionChange(ByVal Target As Range) If Target.Count > 1 Then Exit Sub If Target.Row = 2 Then MsgBox «Выбрана ячейка во второй строке» End If End Sub |
Дополнительный оператор If Target.Count > 1 Then Exit Sub необходим для выхода из процедуры при выделении более одной ячейки. Причина: при выделении произвольного диапазона, ограниченного сверху второй строкой, выражение Target.Row = 2 будет возвращать значение True, и операторы в блоке If ... End If будут выполнены.
Ввод даты в ячейку первого столбца
Автоматическое добавление текущей даты в выбранную ячейку первого столбца при условии, что предыдущая ячейка сверху не пустая, а ячейка снизу – пустая:
|
Private Sub Worksheet_SelectionChange(ByVal Target As Range) If Target.Count > 1 Or Target.Row = 1 Or Target.Row = ActiveSheet.Rows.Count Then Exit Sub If Target.Column = 1 And Target.Offset(—1, 0) <> «» And Target.Offset(1, 0) = «» Then Target = Format(Now, «DD.MM.YYYY») End If End Sub |
Этот код VBA может быть полезен при ведении реестра, базы данных на листе Excel с записью текущей даты в первой колонке.
Условие If Target.Count > 1 Or Target.Row = 1 Or Target.Row = ActiveSheet.Rows.Count Then Exit Sub завершает процедуру при выборе более одной ячейки, при выборе ячейки A1 и при выборе последней ячейки первого столбца.
Выбор ячейки A1 приводит к ошибке при проверке условия Target.Offset(-1, 0) <> "", так как происходит выход за границы диапазона рабочего листа.
Ошибка выхода за пределы рабочего листа происходит и при проверке условия Target.Offset(1, 0) = "", если выбрать последнюю ячейку первой колонки.
Примечание:
Текущая дата будет введена в следующую пустую ячейку первого столбца при переходе к ней от заполненной в том числе нажатием клавиши «Enter».
Пример без отслеживания Target
Если необходимо, чтобы процедура запускалась при любой смене выделенного диапазона, аргумент Target можно не отслеживать:
|
Private Sub Worksheet_SelectionChange(ByVal Target As Range) If [B1] > 100 Then [A1].Interior.Color = vbGreen Else [A1].Interior.Color = vbBlue End If End Sub |
После ввода значения в ячейку B1, можно нажать Enter или кликнуть по любой другой ячейке рабочего листа, и событие Worksheet.SelectionChange сработает.
Automatically Run Excel Macros When a Cell Changes
VBA Change to a Single Cell
In Excel a Worksheet Change Event is a trigger for a macro when a cell or group of cells change. I will start out by showing how a change to a single cell can trigger an action. The following will colour cell B2 Red whenever the cell changes. The following uses the(ByVal Target As Range) line which uses the Variable named Target. The Target is the Range which will trigger an action. You assign the Range within the code itself.
The following YouTube video takes you the cell change event, both a single cell and multiple cells. The following Excel file goes with the video.
Change Cell.xlsm
Before you fill your boots with the following it is worth mentioning that when you employ the use of the VBA change events you lose the ability to undo in Excel. Normally Excel keeps a record of a number of actions.
The VBA code to perform this action needs to go in the sheet object you want to perform the event. If you wanted to put the code in Sheet1 then you would double click on the sheet you wish to run the code from.
The following is an example of Excel VBA coding you could put in Sheet1 or any of the other sheet objects.
In the example above you need to keep the $ (absolute sign) or the code will not work. So when referencing a single cell the range reference needs to be absolute.
«$B$2”
The following VBA performs the same action as the above example. It is a little more flexible if you wish to add to the range. Once Inside the Worksheet Change Event, if the Target falls within the defined Range and the cell contents change, it will trigger an action inside VBA.
Option Explicit
Private Sub Worksheet_Change(ByVal Target As Range) ‘Excel VBA with more cells in the range.
If Not Intersect(Target, Range(«B2»)) Is Nothing Then
Target.EntireRow.Interior.ColorIndex=15
End If
End Sub
Disable Events
Occasionally one of the things you may wish to do with the cell that is changing is delete, copy, cut or some other action which triggers a circular loop. For example, if you wanted to move a line to another sheet which met a condition, when the condition was met you would trigger the Change Event and when you deleted the row you would start another change event. This second change event would cause a debug error. To get around this you can turn Events off at the start of the procedure and turn them back on at the end of the procedure.
The line of code is;
Application.EnableEvents=False
and the following is an example of how it might be used.
Private Sub Worksheet_Change(ByVal Target As Range) ‘Excel VBA change event test for close.
If Not Intersect(Target, Range(«A2», Range(«A» & Rows.Count).End(xlUp))) Is Nothing Then
Application.EnableEvents=False
If Target=»Closed» Then
Target.EntireRow.Copy Sheet2.Range(«A1»).End(xlDown)(2)
Target.EntireRow.Delete
End If
End If
Application.EnableEvents=True
End Sub
The VBA macro will copy the entire row from one sheet to another and delete the row which was just copied. The example is shown in the file below.
VBA Worksheet Change Event Multiple Cells
When we want to perform an action when more than one cell is changed we can use the following VBA code to change a larger range. It focuses on shifting the range within the Target. The following is an example of a change event where if the cells from A2:A10 change the procedure will trigger an action.
Option Explicit ‘Excel worksheet change event Range A1 to A10
Private Sub Worksheet_Change(ByVal Target As Range)
If Not Intersect(Target, Range(«A2:A10»)) Is Nothing Then
Target.EntireRow.Interior.ColorIndex=15
End If
End Sub
VBA Double Click Event
A double click event in Excel VBA is self explanatory. It will occur on double click of a cell in the Target range. So if you have a range between C13 and O26 where you want to perform an action on Double click, the following should help.
‘Excel worksheet double click change event Range C13 to O26
Private Sub Worksheet_BeforeDoubleClick(ByVal Target As Range, Cancel As Boolean)
If Not Intersect(Target, Range(«C13:O26»)) Is Nothing Then
Target.Value=ActiveCell.Offset(19, 0).Value
End If
End Sub
VBA Before Save Event
This event is triggered as the name suggests before each Save. So as the save Excel file icon is clicked the code which is associated with this event will trigger.
The before Save event needs to go into the ThisWorkbook Object in order for it to run.
The following Excel VBA macro will put the word False in Cell A1 before the file is saved.
Option Explicit
Private Sub Workbook_BeforeSave(ByVal SaveAsUI As Boolean, Cancel As Boolean)
Sheet1.Cells(1, 1)=False
End Sub
Событие листа
Worksheet_SelectionChange
Рассмотрим макрос, который реагирует на выделение ячейки, иногда это бывает полезным и нужным. Т.е. мы навели мышку на ячейку и при этом у нас сработал какой-то макрос. Вот и посмотрим как это делается.
Заходим в окно VB, нажимая Alt+F11. Слева мы видим названия наших листов. Щёлкаем двойным щелчком по желаемому листу. Вверху имеется два окошка в которых по умолчанию написано General и Declarations.
Выбираем в левом окне Worksheets, а в правом SelectionChange.
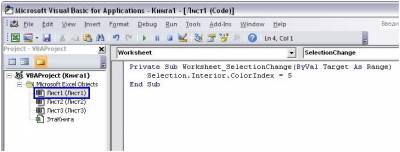
После этого появится следующая запись кода:
Private Sub Worksheet_SelectionChange(ByVal Target As Range)
End Sub
Такая запись нам и будет говорить о том, что необходимо выполнять макрос, когда на листе произойдёт выделение некоторого диапазона.
И если в этот макрос добавить следующий код:
Private Sub Worksheet_SelectionChange(ByVal Target As Range)
Selection.Interior.ColorIndex = 5
End Sub
то какой бы мы диапазон не выделили на этом листе, он окрасится в синий цвет.
Хочу обратить внимание, что макрос работает только на том листе, который Вы выбрали слева в списке листов.
Рассмотрим ещё один пример, в котором будет выделяться всегда только одна ячейка на листе — активная ячейка (в видеоролике показано как это работает).
Private Sub Worksheet_SelectionChange(ByVal Target As Range)
ActiveCell.Select
End Sub
Необходимо только запомнить одно, — что вы можете вставить на лист только один макрос с таким именем, т.е. макрос создающий событие при выделении ячейки. Если вы хотите чтобы происходило несколько разных событий в зависимости от условий на листе, то это необходимо описывать всё в этом же макросе. Ниже приведён пример как макрос выдаёт различные информационные сообщения в зависимости от положения курсора на листе.
Private Sub Worksheet_SelectionChange(ByVal Target As Range)
a = ActiveCell.Column
If a < 10 Then
MsgBox «Курсор находится на столбце №» & a & » — это меньше 10.», _
vbInformation, «Пример»
Else
MsgBox «Курсор находится за пределами моего понимания!», _
vbInformation, «Пример»
End If
End Sub
Существует очень много событиев на листе, которые можно интересно использовать. Все я рассматривать подробно не буду, но основные самые интересные поясню
Worksheet_Change
Рассмотрим событие, которое возникает при редактировании ячейки. Т.е. мы внесли какие-то данные в ячейку, вышли из режима редактирования и при этом у нас сразу сработал какой-то макрос.
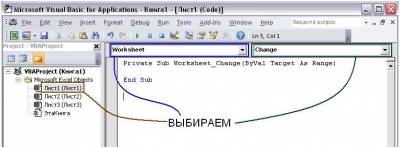
Делается это следующим образом. Заходим в окно VB, щёлкаем слева по листу, событие которого хотим отслеживать. Открывается окно. В левом верхнем окошке выбираем пункт Worksheet и правом окошке Change.
После этого появится следующие начало и конец макроса, который и отвечает за срабатывание при попытке редактировании ячейки.
Private Sub Worksheet_Change(ByVal Target As Range)
End Sub
Для того чтобы определить какая ячейка у нас притерпела изменение можно воспользоваться следующей записью — для определения столбца и ячейки. Наверное это надо было поместить в этот урок.
Stolbec = Target.Column
Stroka = Target.Row
Ну вот, зная координаты теперь мы точно знаем какая ячейка у нас будет обрабатываться. Теперь можно написать макрос, который нам будет сообщать о том, в какой ячейке произошли изменения. Выглядеть это будет, например, так:
Private Sub Worksheet_Change(ByVal Target As Range)
Stolbec = Target.Column
Stroka = Target.Row
MsgBox «Отредактирована ячейка Cells(» & Stroka & «,» & Stolbec & «)», _
vbInformation, «Пример»
End Sub
Рассмотрим такой пример когда, после редактирования ячейки, её текст автоматически закрашивается в синий цвет, а ячейка окрашивается в жёлтый цвет.
Private Sub Worksheet_Change(ByVal Target As Range)
Target.Font.ColorIndex = 5 ‘синий
Target.Interior.ColorIndex = 6 ‘жёлтый
End Sub
И всё бы ничего, отредактировали ячейку, потом выпполнился какой-то макрос. Но вот беда если записать такой макрос, то мы загрустим:
Private Sub Worksheet_Change(ByVal Target As Range)
Target.Cells = «Привет»
End Sub
А загрустим потому, что мы будем заносить в изменённую ячейку какие-то данные. То-есть мы опять её редактируем. Следовательно, как только макрос заносит данные в ячейку, он снова запускает сам себя. И у нас получается зацикливание. Для того чтобы этого не происходило мы используем дополнительную запись, которая блокирует запуск события в момент выполнения текущего.
Private Sub Worksheet_Change(ByVal Target As Range)
Application.EnableEvents = False
Target.Cells = «Привет»
Application.EnableEvents = True
End Sub
Получается, что при выполнении макроса мы отключаем запуск события, затем прописываем в изменённую ячейку данные, затем снова включаем запуск сторонних событий. Вот при такой записи зацикливания не произойдёт. Попробуйте выполнить два выше указанных макроса через F8, и вы поймёте в чём разница этих двух записей, и когда именно неоходимо применять Application.EnableEvents.
Двойной щелчок мыши. BeforeDoubleClick
Иногда охото сделать программу, которая приближается к настоящей, где всякие события происходят от нажатия двойного щелчка мыши. В этом занятии я расскажу, как сделать макрос, который будет реагировать на двойной щелчок ЛКМ.
Что можно сделать при помощи такого макроса? Таблицы, в которых данные можно заносить при помощи двойного щелчка мыши. Например, устанавливать галочки напротив выбранных наименований.
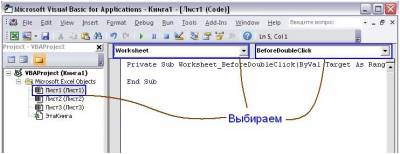
Делается это следующим образом. Заходим в окно VB, щёлкаем слева по необходимому листу. Открывается окно. В левом верхнем окошке выбираем пункт Worksheet, а правом окошке BeforeDoubleClick.
После этого появится следующие начало и конец макроса, который и отвечает за двойной щелчок мыши, производимый по ячейке.
Private Sub Worksheet_BeforeDoubleClick(ByVal Target As Range, Cancel As Boolean)
End Sub
Если в этот код поместить какое-нибудь информационное сообщение, то при двойном щелчке по ячейке, будет появляться это сообщение.
Private Sub Worksheet_BeforeDoubleClick(ByVal Target As Range, Cancel As Boolean)
MsgBox «Вы совершили двойной клик!», vbInformation, «Пример»
End Sub
Но при такой записи есть один нюанс. После совершения двойного нажатия вы входите в режим редактирования ячейки, что очень неудобно. Для того чтобы этого не происходило необходимо написать команду, кооторая будет запрещать вход в режим редактирования. Макрос будет выглядеть так:
Private Sub Worksheet_BeforeDoubleClick(ByVal Target As Range, Cancel As Boolean)
Cancel = True
MsgBox «Вы совершили двойной клик!», vbInformation, «Пример»
End Sub
Cancel = True может принимать только два значения True или False и об этом указано в наименовании макроса Worksheet_BeforeDoubleClick(ByVal Target As Range, Cancel As Boolean).
Но такая запись активизирует двойной щелчёк на всём листе, и это конечно хорошо, но иногда возникает потребность задействовать только часть листа, например только столбец А. На этом этапе мы уже начинаем придумывать какие-то условия. И это можно осуществить всё при помощи того же If … End If или Select Case … End Select.
Private Sub Worksheet_BeforeDoubleClick(ByVal Target As Range, Cancel As Boolean)
If ActiveCell.Column = 1 Then
Cancel = True
MsgBox «Вы совершили двойной клик!», vbInformation, «Пример»
End If
End Sub
При такой записи сообщение будет появляться только в том случае, если мы щёлкаем мышкой по столбцу А.
Усложним пример. Сделаем так, как показано в начале урока на левом рисунке. Попробуем Установить галочки, причём не во всём столбце, а в некотором диапазоне, например В2:В8. Ниже приведён макрос, который может это осуществить.
Private Sub Worksheet_BeforeDoubleClick(ByVal Target As Range, Cancel As Boolean)
If Not Intersect(Target, Range(«B2:B8»)) Is Nothing Then ‘ищем пересечение в данном диапазоне
Target.Font.Name = «Marlett» ‘Задаем текст при двойном шелчке и шрифт текста, в котором символ А и есть галочка
Cancel = True
If Target = «a» Then ‘Искомый текст
Target.Interior.ColorIndex = 23 ‘цвет синий
Target = «»
Else
Target = «a»
Target.Interior.ColorIndex = 6
End If
End If
End Sub
Теперь самое время пояснить его составляющие.
If Not … Is Nothing Then — если производится действие в указанном диапазоне, то выполняем условие. Другими словами, если ячейка, по которой произвели двойной щелчок, попадает в диапазон В2:В8, то выполняем макрос дальше после слова Then;
Intersect(Target, Range(«B2:B8»)) — это указывает переменную, которая должна принимать участие в диапазоне В2:В8, т.е. пересекаться в этом диапазоне, в данном случае это изменяемая ячейка;
Target.Font.Name = «Marlett» — устанавливаем имя шрифта в ячейке, который и отвечает за галочку;
If Target = «a» Then … — если в редактируемой ячейке стоит галочка, то убираем её и закрашиваем ячейку в синий цвет. В противном случае устанавливаем галочку и закрашиваем ячейку в жёлтый цвет.
Ту же самую функцию можно осуществить через другую запись:
Private Sub Worksheet_BeforeDoubleClick(ByVal Target As Range, Cancel As Boolean)
St = Target.Column
Sk = Target.Row
If St = 2 And Sk > 1 And Sk < 9 Then
Target.Font.Name = «Marlett»
Cancel = True
If Target = «a» Then
Target.Interior.ColorIndex = 23
Target = «»
Else
Target = «a»
Target.Interior.ColorIndex = 6
End If
End If
End Sub
Тут диапазон задаётся при помощи координат столбца и строки, а также обычных логических операторов.
Вторая табличка, которая показана в начале страницы справа, выполняется по тем же принципам, только можно не указывать стиль шрифта и вместо а, писать Вкл и Выкл.
В видеоматериале показаны примеры работ приведённых макросов, а также продемонстрирована полная запись их написания.
Правая кнопка мыши. BeforeRightClick
Рассмотрим событие, которое возникает при нажатии на правую кнопку мыши. Иногда просто необходимо сделать так, чтобы заблокировалось меню появляющееся при нажатии на правую кнопку мыши. Или охото сделать своё меню. Именно это мы сегодня и изучим.
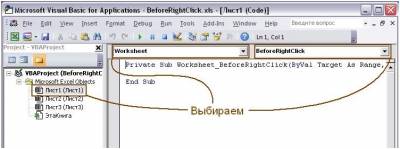
Делается это следующим образом. Заходим в окно VB, щёлкаем слева по листу, событие которого хотим отслеживать. Открывается окно. В левом верхнем окошке выбираем пункт Worksheet и правом окошке BeforeRightClick.
После этого появится следующие начало и конец макроса, который и отвечает за отслеживание правой кнопки мыши.
Private Sub Worksheet_BeforeRightClick(ByVal Target As Range, Cancel As Boolean)
End Sub
И если в этот макрос вставить какое-нибудь информационное сообщение, то при нажатии на правую кнопку мыши на заданном листе, нам отобразится оно.
Private Sub Worksheet_BeforeRightClick(ByVal Target As Range, Cancel As Boolean)
MsgBox «Вы нажали на ПКМ», vbInformation, «Пример»
End Sub
Но при такой записи, после выполнения макроса нам появляется меню. И для того чтобы этого не происходило необходимо добавить следующую запись, которая отвечает за появление меню.
Private Sub Worksheet_BeforeRightClick(ByVal Target As Range, Cancel As Boolean)
Cancel = True
MsgBox «Вы нажали на ПКМ», vbInformation, «Пример»
End Sub
При такой записи, у нас не появляется меню. Теперь зная это можно назначать различные макросы на правую кнопку мыши, которые будут срабатывать в зависимости от того на какую ячейку, столбец или строку Вы навели указатель мыши. Как например в следующем примере.
Private Sub Worksheet_BeforeRightClick(ByVal Target As Range, Cancel As Boolean)
Cancel = True
a = ActiveCell.Column
Select Case a
Case 1
ActiveCell.Interior.ColorIndex = 3
Case 2
ActiveCell.Interior.ColorIndex = 4
Case 3
ActiveCell.Interior.ColorIndex = 5
Case 4
ActiveCell.Interior.ColorIndex = 6
Case 5
ActiveCell.Interior.ColorIndex = 7
Case Else
ActiveCell.Interior.ColorIndex = xlNone
End Select
End Sub
В данном примере показано, что в зависимости от того куда Вы поставите курсор и нажмёте на правую кнопку мыши, ячейка примет окрас в зависимости от номера столбца. Тут рассмотрены только первые 5 столбцов листа. Всё что дальше 5 столбца, при нажатии на ПКМ будет обесцвечиваться.
Если выполнить вот такую запись:
Private Sub Worksheet_BeforeRightClick(ByVal Target As Range, Cancel As Boolean)
Cancel = True
End Sub
то правая кнопка мыши просто напросто не будет «работать», то-есть меню не будет появляться.
Добавление своего раздела в меню правой кнопки мыши
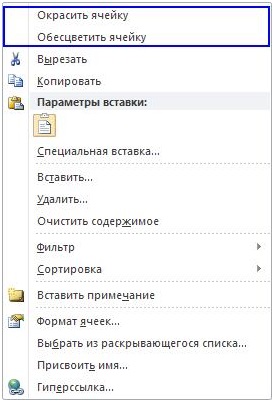
В следующем примере показано как добавить свои два раздела в меню (Окрасить ячейку и Обесцветить ячейку). При нажатии на правую кнопку мыши в меню появляется две новых команды.
Private Sub Worksheet_BeforeRightClick(ByVal Target As Range, Cancel As Boolean)
Dim a As Object
For Each a In Application.CommandBars(«cell»).Controls
If a.Tag = «brccm» Then a.Delete
Next a
With Application.CommandBars(«cell»).Controls.Add(Type:=msoControlButton, _
before:=1, temporary:=True)
.Caption = «Окрасить ячейку»
.OnAction = «cvet1»
.Tag = «brccm»
End With
With Application.CommandBars(«cell»).Controls.Add(Type:=msoControlButton, _
before:=2, temporary:=True)
.Caption = «Обесцветить ячейку»
.OnAction = «cvet0»
.Tag = «brccm»
End With
End Sub
При выборе «Окрасить ячейку», выделенный диапазон заливается синим цветом. При нажатии на «Обесцветить ячейку», выделенный диапазон ячеек обесцвечивается.
Работу данного кода можно посмотреть на «Листе 3» в примере. На видеоролике так же можно посмотреть его работу.
In this tutorial, we’ll discuss the Change and ChangeSelection worksheet events. The Worksheet_Change event-handler procedure executes whenever any cell in the worksheet is changed and Worksheet_SelectionChange event-handler procedure executes when the selection on the worksheet is changed.
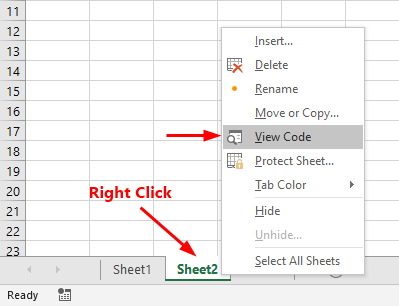
The worksheet event-handler procedures must be in the code module for that worksheet. Put them somewhere else, and they won’t work. You can quickly access that code window by right-clicking the worksheet’s tab and selecting the View Code:
Worksheet_Change event procedure
The Change event triggers whenever any cell in the worksheet is changed. Excel uses the Worksheet_Change event-handler procedure to trap the Change event. The Worksheet_Change procedure accepts Target (the Range object) as the parameter which represents the cell that was changed. The following example displays a message box that shows the address of the Target range:
Private Sub Worksheet_Change(ByVal Target As Range)
 MsgBox Target.Address
End Sub
Try making some changing in cells, every time you make changes, a message box displays the address of the cell that changed.
Monitor changes made to specific cell or range
The Worksheet_Chnage procedure receives the Target as Range object which represents the changed cell(s). In this example, we compare the Target with the given cell range A1:A10 using Intersect method:
Private Sub Worksheet_Change(ByVal Target As Range)
 Dim MyRange As Range
 Set MyRange = Range("A1:A10")
 If Not Intersect(Target, MyRange) Is Nothing Then
  MsgBox ("You've changed the " & Target.Address)
 End If
End Sub
A popup message box appears when a change made in the given cell range:
Worksheet_Change Vs. Worksheet_Calculate
The Worksheet_Change event procedure is not executed by a calculation change, for example, when a formula returning a different value. You must use the Worksheet_Calculate event procedure to capture the changes to values in cells that contain formulas.
Worksheet_SelectionChange event procedure
The Worksheet_SelectionChange event procedure executes when a cell is selected. The following code highlights the active cell with a red color every time a different cell is selected:
Private Sub Worksheet_SelectionChange(ByVal Target As Range)
 Cells.Interior.ColorIndex = 0
 Target.Interior.ColorIndex = 3
End Sub
The first statement removes the background color for all cells in the worksheet. Next, the the active cell is shaded with red color.
Take some action when specific cells or ranges selected
In many cases, you need to execute a piece of code when certain cells or ranges selected. To accomplish this, we use the Intersect method on the Target (selected cell or range) and the range containing the specific cell to verify the Target is one of the specific cells or ranges. If the Target is in the range containing the specific cells, you can execute the code.
The following code highlights the active cell with a red color every time a different cell is selected:
Private Sub Worksheet_SelectionChange(ByVal Target As Range)
 Cells.Interior.ColorIndex = 0
 Dim MyRange As Range
 Set MyRange = Range("A1:A10")
 If Not Intersect(Target, MyRange) Is Nothing Then
  Target.Interior.ColorIndex = 3
 End If
End Sub
by updated Apr 05, 2020


