
Содержание
- VBA Solver
- Enabling the Solver Add-In in Excel
- Enabling the Solver Add-in in VBA
- Using Solver Functions in VBA
- SolverOK
- SolverAdd
- Creating a Solver Example
- VBA Coding Made Easy
- VBA Code Examples Add-in
- Microsoft Excel Solver add-in Examples
- Excel Solver Examples
- Example 1: «Finding a Local Minimum Using the Excel Solver»
- Example 2: «Solving a System of Non-Linear Equations»
- Is There Only ONE Solution?
- Run the Solver Using a VBA Macro
- VBA Solver
- Excel VBA Solver
- Enable Solver in Worksheet
- Enable Solver in VBA
- Solver Functions in VBA
- SolverOk
- SolverAdd
- Example of Solver in Excel VBA
- Things to Remember
- Recommended Articles
VBA Solver
In this Article
This tutorial will show you how to use the Solver add-in in VBA.
Solver is an add-in that is provided with Excel and is used to perform ‘what-if’ analysis by providing alternative answers to a formula in a cell based on values that you may pass to the formula from other cells in your workbook.
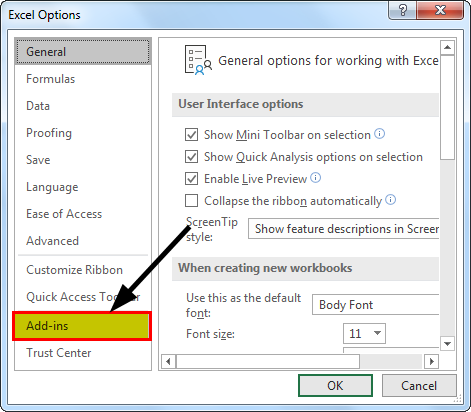
Enabling the Solver Add-In in Excel
Select the File on the Excel ribbon and then go down to Options.
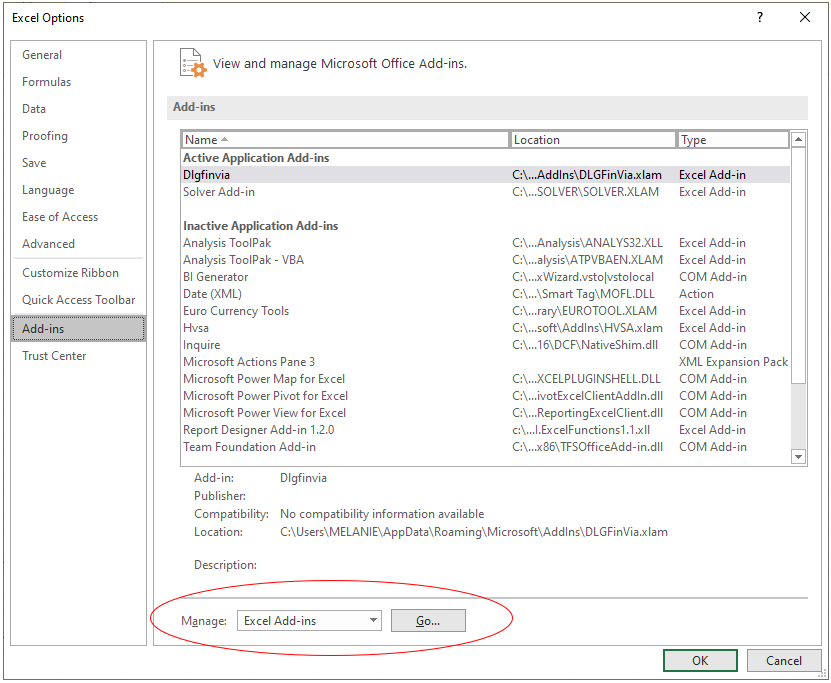
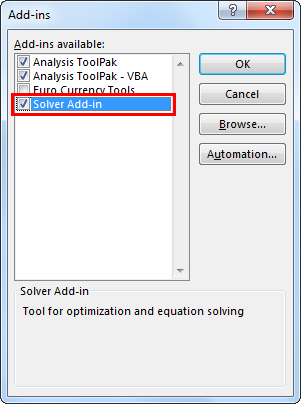
Select Add-ins and click on the Go button next to Excel Add-ins.
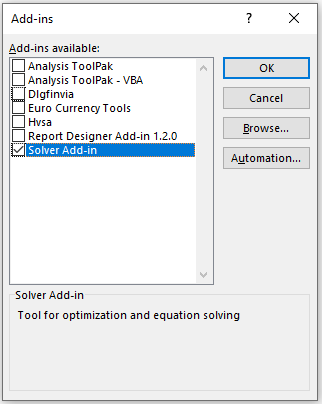
Make sure the Solver Add-in option is selected.
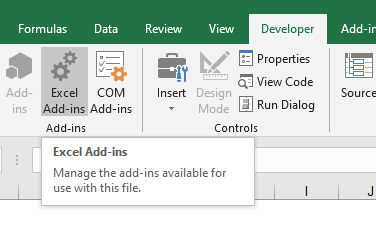
Alternatively, click on the Excel Add-ins on the Developer ribbon to get the Add-ins dialog box.
Enabling the Solver Add-in in VBA
Once you have enabled the Solver Add-in in Excel, you then need to add a reference to it in your VBA Project in order to use it in VBA.
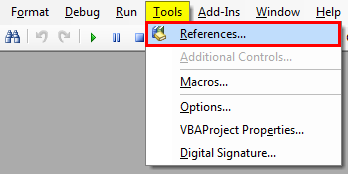
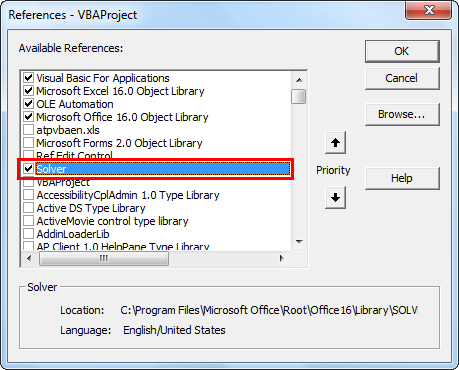
Make sure you are clicked in the VBA Project where you wish to use the Solver. Click on the Tools menu and then on References.
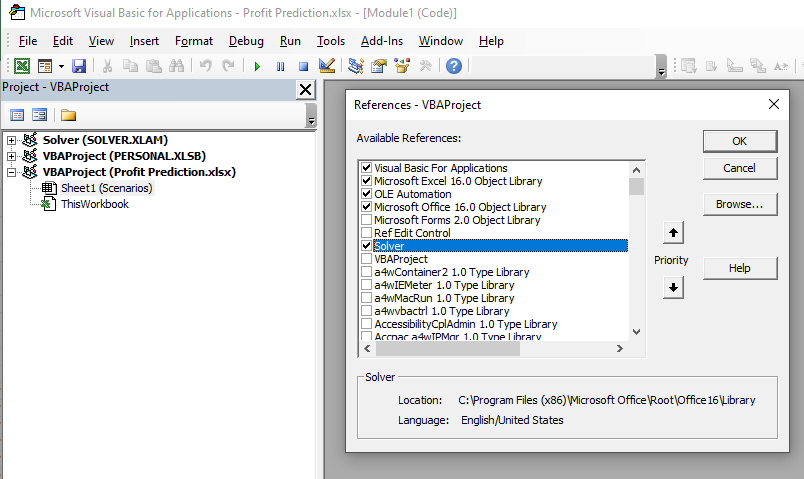
A reference to the Solver Add-in will be added to your project.
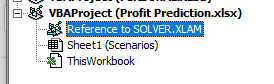
You can now use the Solver Add-in in VBA code!
Using Solver Functions in VBA
We need to use 3 Solver VBA functions to use Solver in VBA. These are SolverOK, SolverAdd, and SolverSolve.
SolverOK

- SetCell – optional – this needs to refer to the cell that needs to be changed – it needs to contain a formula. This corresponds to the Set Objective Cell box in the Solver Parameters dialog box.
- MaxMinVal – optional – You can set this to 1 (Maximize), 2 (Minimize) or 3. This corresponds to the Max, Min, and Value options in the Solver Parameters dialog box.
- ValueOf – optional -If the MaxMinValue is set to 3, then you need to supply this argument.
- ByChange – optional -This tells solver which cells it may change in order to get to the required value. This corresponds to the By Changing Variable Cells box in the Solver Parameters dialog box.
- Engine – optional – this indicates the solving method that needs to be used to get to a solution. 1 for the Simplex LP method, 2 for the GRG Nonlinear method, or 3 for the Evolutionary method. This corresponds to the Select a Solving Method dropdown list in the Solver Parameters dialog box
- EngineDesc – optional -this is an alternate way of selecting the solving method – here you would type the strings “Simplex LP”, “GRG Nonlinear” or “Evolutionary”. This also corresponds to the Select a Solving Method dropdown list in the Solver Parameters dialog box
SolverAdd

- CellRef – required– this is a reference to a cell or a range of cells that are to be changed to solve the problem.
- Relation – required – this is an integer which has to be between 1 to 6 and specifies the logical relation allowed.
- 1 is less than ( =)
- 4 is must have final values that are integers.
- 5 is must have values between 0 or 1.
- 6 is must have final values that are all different and integers.
- FormulaText – optional – The right side of the constraint.
Creating a Solver Example
Consider the following worksheet.
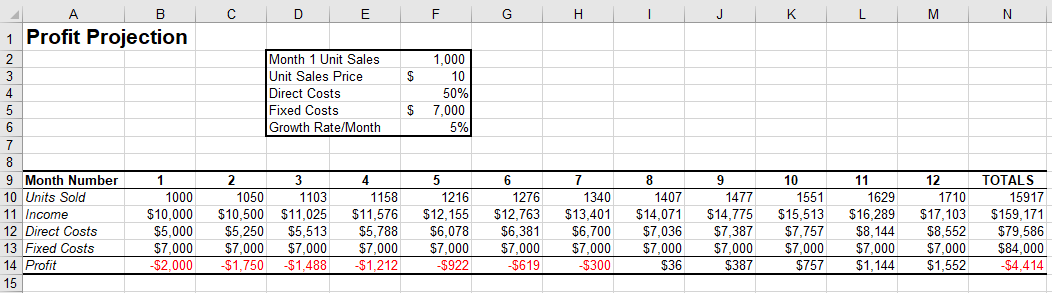
In the sheet above, we need to break even in Month Number one by setting cell B14 to zero by amending the criteria in cells F1 to F6.
Once you have set up the SolverOK parameters, you need to add some criteria restrictions.
Once you have set the SolverOK and the SolverAdd (if required), you can Solve the problem.
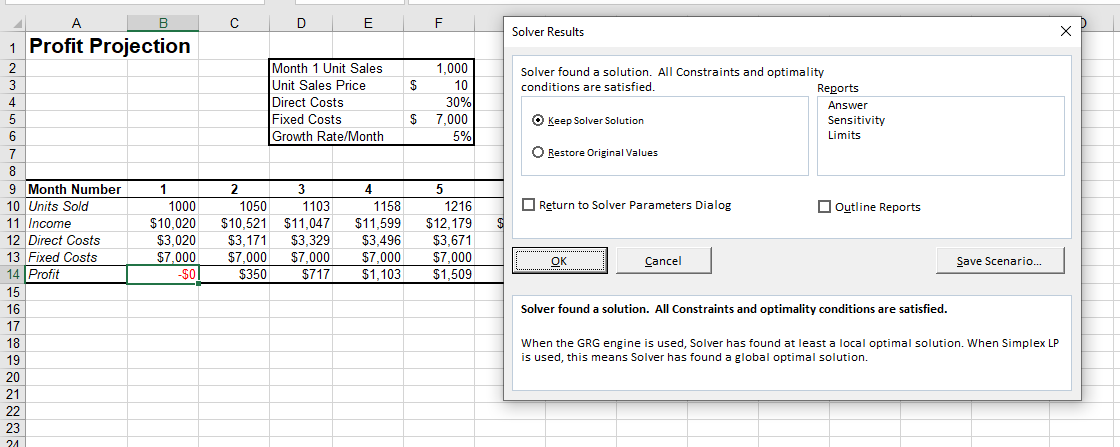
Once you run the code, the following window will show on your screen. Select the option you require (ie Keep the Solver solution, or Restore Original Values), and click OK.
VBA Coding Made Easy
Stop searching for VBA code online. Learn more about AutoMacro — A VBA Code Builder that allows beginners to code procedures from scratch with minimal coding knowledge and with many time-saving features for all users! 

VBA Code Examples Add-in
Easily access all of the code examples found on our site.
Simply navigate to the menu, click, and the code will be inserted directly into your module. .xlam add-in.
Источник
Microsoft Excel Solver add-in Examples
The Microsoft Excel solver add-in is one of the features that makes creating engineering and financial models in a spreadsheet a powerful tool. To be called a «solver» doesn’t do it justice, though, because it is really a powerful optimization algorithm. The tool was developed by Frontline Systems, Inc. (Solver.com) and they offer a great deal of information on their website, including products that expand upon the free Excel solver add in.
This article provides a couple of examples of how to use the Excel solver and call it using a VBA macro. If you want to experiment with using the Solver on financial models, you could try it out on one of my financial calculators such as the Home Mortgage Calculator. Excel’s built-in Goal Seek tool is often enough to solve for x given y, but when you want to add multiple criteria and allow multiple inputs to change, that’s where Solver comes in.
Note: You do not need to download the Solver add-in. If you don’t see it as one of the menu items in your Tools menu (in Excel), then you need to go to Tools > Add-Ins. and check the box next to «Solver Add In».
Excel Solver Examples
Example 1: «Finding a Local Minimum Using the Excel Solver»
Our first example is to going to be very basic, but it will introduce common terms used in optimization, such as objective function, design variables, and constraints. Let’s say we have the following equation, and we want to find the value of x that minimizes f subject to -1 Figure 1: Screenshot of example problem 1.
Cell B11 (The Objective Function): =B15^2-B15+2
To use the Excel solver add in (Tools > Solver . ), we choose our objective function, cell B11, to be the «Target Cell» and choose the «Min» option (see Figure 2 below). Our only design variable is x, so the only cell we are going to change is B15. After adding the two constraints, we click on the Solve button, and we find our answer (x=0.5).
Figure 2: Screenshot of the solver add in dialog box for sample problem 1.
Example 2: «Solving a System of Non-Linear Equations»
In this next practice problem, the solver is used to find values for the unknown angles ( q 2 and q 3) in the following system of equations.
Notice that these equations are in implicit form (equal to zero). To solve the system, we will create an objective function that when minimized, drives both equations to zero. Minimizing the sum of the squares of each implicit equation will accomplish this.
The layout for this problem is shown in the screenshot below. The known variables are called analysis variables and will be treated as constants. Our unknowns, q 2 and q 3, are the design variables. For this example problem, we don’t have any constraints.
Figure 3: Screenshot of example problem 2.
Is There Only ONE Solution?
The screenshot above shows one solution to the problem, but the solution will depend upon the starting values that you have chosen for the unknown angles. For example, try using the starting values, q 2 = -30 degrees, and q 3 = 0 degrees. You should get a different solution! The figure below is an example of a mechanism that can be described using these equations. The second solution is represented by the dashed lines.
Figure 4: Mechanism showing two possible configurations.
This example has demonstrated a very important point having to do with the Excel solver and optimization in general. The solution may depend upon the starting values. For optimization problems, this means that the solution may be only a local optimum.
Run the Solver Using a VBA Macro
If you need to solve the same system of equations or run an optimization routine a number of times using the same model, it is convenient to create a macro that can be run by pressing a single button. An easy way to set this up is to first record all the steps used to set up and run the solver. Let’s use the problem from Example 2 above.
To Record a Solver Macro:
- Step 1: Start the macro recorder (Tools > Macro > Record New Macro . ).
- Step 2: Open the solver dialog box (Tools > Solver . ).
- Step 3: Clear any existing solver settings (Press the Reset All button).
- Step 4: Choose the target cell, design variables, and constraints and press the Solve button. Then select OK to accept the results.
- Step 5: Stop the macro recorder (Tools > Macro > Stop Recording . ).
- Step 6: Add a button to the worksheet, using a button from the Forms toolbar. (If the Forms toolbar is not displayed, right-click on any toolbar and click on «Forms».)
- Step 7: Assign the macro you created to the button. (Right-click on the button and choose «Assign Macro . «)
Before the macro will work, a reference to the Solver VBA add-in functions must be added.
Adding the Solver Reference:
- Step 1: Edit the macro you just created (Tools > Macro > Macros. or Alt+F8). This will open up Visual Basic. You can also press Alt + F11 to open up VBA.
- Step 2: Add the Solver reference in visual basic (Tools > References. then make sure that SOLVER is checked).
The VBA code for the Solver macro that was recorded for Example 2 is shown below.
To keep the Solver Results dialog box from showing up, the userFinish:=True option has been added to the SolverSolve function. For more help on using the Solver functions in VBA, search for «solver» using the VBA help system.
Источник
VBA Solver


Excel VBA Solver
How do you solve complicated problems? If you are unsure how to go about these problems, then there is nothing to worry about; we have a solver in Excel. In our earlier article, “Excel Solver,” we learned how to solve equations in Excel. If you are unaware, “SOLVER” is also available with VBA. This article will take you through how to use “Solver” in VBA.
Table of contents
You are free to use this image on your website, templates, etc., Please provide us with an attribution link How to Provide Attribution? Article Link to be Hyperlinked
For eg:
Source: VBA Solver (wallstreetmojo.com)
Enable Solver in Worksheet
A solver is a hidden tool available under the “Data” tab in Excel (if already enabled).
Step 1: Go to the FILE tab. Under the FILE tab, choose “Options.”

Step 2: In the “Excel Options” window, choose “Add-ins.”
Step 3: At the bottom, chooses “Excel Add-ins” and click on “Go.”

Step 4: Now, check the “Solver Add-in” box. Click on “OK.”
Next, you must see “Solver” under the “Data” tab.
Enable Solver in VBA
In VBA, Solver is an external tool. So, we need to enable it to use it. Follow the below steps to enable it.
Step 1: Go to Tools >>> Reference in Visual Basic Editor Window.
Step 2: From the references list, choose “Solver” and click on “OK” to use it.
Now, we can use Solver in VBA as well.
Solver Functions in VBA
SolverOk

SolverOk ( SetCell, MaxMinVal, ValueOf, ByChange, Engine, EngineDesc)
SetCell: This will be the cell reference that needs to be changed, i.e., the “Profit” cell.
MaxMinVal: This is an optional parameter. Below are numbers and specifiers:
- 1 = Maximize
- 2 = Minimize
- 3 = Match a specific value
ValueOf: This parameter needs to supply if the MaxMinVal argument is 3.
ByChange: By changing which cells, this equation needs to be solved.
SolverAdd
Now, let us see the parameters of SolverAdd.

CellRef: To set the criteria to solve the problem, what cell needs to be changed?
Relation: If the logical values are satisfied, we can use the numbers below.
- 1 is less than ( =)
- 4 must-have final values that are integers.
- 5 must-have values between 0 or 1.
- 6 must-have final values that are all different and integers.
Example of Solver in Excel VBA
Look at the below scenario.

Using this table, we need to identify the “Profit” amount, which needs to be a minimum of 10,000. To arrive at this number, we have certain conditions.
- Units to Sell should be an integer value.
- Price / Unit should be between 7 and 15.
Based on these conditions, we must identify how many units to sell. At what price to get the profit value of 10,000?
Let us solve this equation now.
Code:


Step 3: The first argument of this function is “SetCell,” in this example, we need to change the value of the Profit cell, the B8 cell.
Code:

Step 4: We need to set this cell value to 10,000. So for MaxMinVal, use 3 as the argument value.
Code:

Step 5: The next argument ValueOf value should be 10,000.
Code:

The next argument is ByChange, i.e., by changing which cells this equation needs to be solved. In this case, changing Units to Sell (B1) and Price Per Unit (B2) cells need to be changed.
Code:

Note: remaining arguments are not required here.
Step 6: Once we set the objective cell, we must construct other criteria. So, for this, open the “SolverAdd” function.

Step 7: First Cell Ref we need to change is Price Per Unit cell, B2 cell.
Code:

Step 8: This cell needs to be >= 7, so the Relation argument will be 3.
Code:

Step 9: This cell value should be >=7, Formula Text = 7.
Code:
Step 10: Similarly, the same cell needs to be less than 15, so for this relation is 
Step 11: The first cell, “Units to Sell,” must be an Integer value. So, for this, also set up the criteria below.
Code:
Step 12: In one final step, we need to add the SolverSolve function.
Code:
Run the code by pressing the F5 key to get the result.
When you run the code, you will see the following window.

Press “OK.” You will get the result in an Excel sheet.

So, to earn a profit of 10,000, we need to sell 5,000 units at 7 per price where the cost price is 5.
Things to Remember
- To work with Solver in Excel and VBA, first, enable it for the worksheet, then enable it for VBA reference.
- We once enabled it on worksheets and VBA; we can only access all the Solver functions.
Recommended Articles
This article has been a guide to VBA Solver. Here, we discuss how to enable and use Solver in Excel VBA with the help of an example and downloadable Excel sheet. You can learn more from the following articles: –
Источник
The Microsoft Excel solver add-in is one of the features that makes creating engineering and financial models in a spreadsheet a powerful tool. To be called a «solver» doesn’t do it justice, though, because it is really a powerful optimization algorithm. The tool was developed by Frontline Systems, Inc. (Solver.com) and they offer a great deal of information on their website, including products that expand upon the free Excel solver add in.
Advertisement
This article provides a couple of examples of how to use the Excel solver and call it using a VBA macro. If you want to experiment with using the Solver on financial models, you could try it out on one of my financial calculators such as the Home Mortgage Calculator. Excel’s built-in Goal Seek tool is often enough to solve for x given y, but when you want to add multiple criteria and allow multiple inputs to change, that’s where Solver comes in.
Note: You do not need to download the Solver add-in. If you don’t see it as one of the menu items in your Tools menu (in Excel), then you need to go to Tools > Add-Ins… and check the box next to «Solver Add In».
Example 1: «Finding a Local Minimum Using the Excel Solver»
Our first example is to going to be very basic, but it will introduce common terms used in optimization, such as objective function, design variables, and constraints. Let’s say we have the following equation, and we want to find the value of x that minimizes f subject to -1 <= x <= 5.
![]()
Our objective function is the value that we are going to minimize (f). The design variables are the variables that we are going to allow the Solver to change (just x in this example). We have two constraints: -1 <= x and x <= 5
A convenient way of setting up this problem in Excel is to make a clear distinction between the objective, design variables, and constraints. A screen shot of the example problem is shown below, including the graph of the function so that you can see that the answer should be somewhere between 0 and 2. We need to choose a starting value for x, so let’s choose x = 1 because that is the average number of times Excel crashes on me per week.
Figure 1: Screenshot of example problem 1.
Cell B11 (The Objective Function): =B15^2-B15+2
To use the Excel solver add in (Tools > Solver …), we choose our objective function, cell B11, to be the «Target Cell» and choose the «Min» option (see Figure 2 below). Our only design variable is x, so the only cell we are going to change is B15. After adding the two constraints, we click on the Solve button, and we find our answer (x=0.5).
Figure 2: Screenshot of the solver add in dialog box for sample problem 1.
Example 2: «Solving a System of Non-Linear Equations»
In this next practice problem, the solver is used to find values for the unknown angles (q2 and q3) in the following system of equations.
Notice that these equations are in implicit form (equal to zero).
To solve the system, we will create an objective function that when minimized,
drives both equations to zero. Minimizing the sum of the squares of each implicit equation will accomplish this.
The layout for this problem is shown in the screenshot below. The known variables are called analysis variables and will be treated as constants. Our unknowns, q2 and q3, are the design variables. For this example problem, we don’t have any constraints.
Figure 3: Screenshot of example problem 2.
Is There Only ONE Solution?
The screenshot above shows one solution to the problem, but the solution will depend upon the starting values that you have chosen for the unknown angles.
For example, try using the starting values, q2 = -30 degrees, and q3 = 0 degrees. You should get a different solution! The figure below is an example of a mechanism that can be described using these equations. The second solution is represented by the dashed lines.
Figure 4: Mechanism showing two possible configurations.
This example has demonstrated a very important point having to do with the Excel solver and optimization in general. The solution may depend upon the starting values. For optimization problems, this means that the solution may be only a local optimum.
Run the Solver Using a VBA Macro
If you need to solve the same system of equations or run an optimization
routine a number of times using the same model, it is convenient to create a
macro that can be run by pressing a single button. An easy way to set this up
is to first record all the steps used to set up and run the solver.
Let’s use the problem from Example 2 above.
To Record a Solver Macro:
- Step 1:
Start the macro recorder (Tools > Macro > Record New Macro …). - Step 2:
Open the solver dialog box (Tools > Solver …). - Step 3:
Clear any existing solver settings (Press the Reset All button). - Step 4:
Choose the target cell, design variables, and constraints and press the
Solve button. Then select OK to accept the results. - Step 5:
Stop the macro recorder (Tools > Macro > Stop Recording …). - Step 6:
Add a button to the worksheet, using a button from the Forms toolbar. (If the Forms
toolbar is not displayed, right-click on any toolbar and click on «Forms».) - Step 7:
Assign the macro you created to the button. (Right-click on the button and
choose «Assign Macro …»)
Before the macro will work, a reference to the Solver VBA add-in functions
must be added.
Adding the Solver Reference:
- Step 1:
Edit the macro you just created (Tools > Macro > Macros… or Alt+F8).
This will open up Visual Basic. You can also press Alt+F11 to open up VBA. - Step 2:
Add the Solver reference in visual basic (Tools > References…, then make
sure that SOLVER is checked).
The VBA code for the Solver macro that was recorded for Example 2 is shown
below.
Sub SolverMacro()
' Example Solver VBA Macro
    SolverReset
    SolverOk SetCell:="$B$24", _
             MaxMinVal:=2, _
             ValueOf:="0", _
             ByChange:="$B$16:$B$17"
    SolverSolve userFinish:=True
End Sub
To keep the Solver Results dialog box from showing up, the userFinish:=True option has been added to the SolverSolve function. For more help on using the Solver functions in VBA, search for «solver» using the VBA help system.
References
- «Optimization Tutorial,» From solver.com, July 24, 2004.
- «Creating Visual Basic Macros that Use Microsoft Excel Solver,» From support.microsoft.com, July 24, 2004.
- «Solver Uses Generalized Reduced Gradient Algorithm,» Microsoft Knowledge Base Article — 82890, From support.microsoft.com, July 24, 2004.
Excel VBA Solver
How do you solve complicated problems? If you are unsure how to go about these problems, then there is nothing to worry about; we have a solver in Excel. In our earlier article, “Excel Solver,” we learned how to solve equations in Excel. If you are unaware, “SOLVER” is also available with VBA. This article will take you through how to use “Solver” in VBA.
Table of contents
- Excel VBA Solver
- Enable Solver in Worksheet
- Enable Solver in VBA
- Solver Functions in VBA
- SolverOk
- SolverAdd
- Example of Solver in Excel VBA
- Things to Remember
- Recommended Articles
Enable Solver in Worksheet
A solver is a hidden tool available under the “Data” tab in Excel (if already enabled).
To use SOLVER in excelThe solver in excel is an analysis tool that helps find solutions to complex business problems requiring crucial decisions to be made. For every problem, the goal (objective), variables, and constraints are identified. The solver returns an optimal solution which sets accurate values of the variables, satisfies all constraints, and meets the goal.
read more, first, we need to enable this option. Follow the below steps.
Step 1: Go to the FILE tab. Under the FILE tab, choose “Options.”
Step 2: In the “Excel Options” window, choose “Add-ins.”
Step 3: At the bottom, chooses “Excel Add-ins” and click on “Go.”
Step 4: Now, check the “Solver Add-in” box. Click on “OK.”
Next, you must see “Solver” under the “Data” tab.
Enable Solver in VBA
In VBA, Solver is an external tool. So, we need to enable it to use it. Follow the below steps to enable it.
Step 1: Go to Tools >>> Reference in Visual Basic Editor Window.
Step 2: From the references list, choose “Solver” and click on “OK” to use it.
Now, we can use Solver in VBA as well.
Solver Functions in VBA
To write a VBA codeVBA code refers to a set of instructions written by the user in the Visual Basic Applications programming language on a Visual Basic Editor (VBE) to perform a specific task.read more, we need to use three “Solver Functions” in VBA: “SolverOk,” “SolverAdd,” and “SolverSolve.”
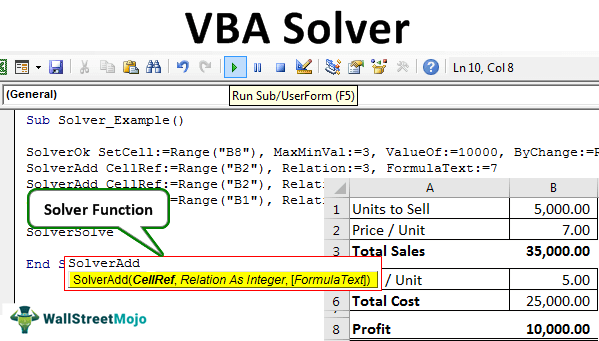
SolverOk
![]()
SolverOk ( SetCell, MaxMinVal, ValueOf, ByChange, Engine, EngineDesc)
SetCell: This will be the cell reference that needs to be changed, i.e., the “Profit” cell.
MaxMinVal: This is an optional parameter. Below are numbers and specifiers:
- 1 = Maximize
- 2 = Minimize
- 3 = Match a specific value
ValueOf: This parameter needs to supply if the MaxMinVal argument is 3.
ByChange: By changing which cells, this equation needs to be solved.
SolverAdd
Now, let us see the parameters of SolverAdd.
![]()
CellRef: To set the criteria to solve the problem, what cell needs to be changed?
Relation: If the logical values are satisfied, we can use the numbers below.
- 1 is less than (<=)
- 2 is equal to (=)
- 3 is greater than (>=)
- 4 must-have final values that are integers.
- 5 must-have values between 0 or 1.
- 6 must-have final values that are all different and integers.
Example of Solver in Excel VBA
You can download this VBA Solver Excel Template here – VBA Solver Excel Template
Look at the below scenario.
Using this table, we need to identify the “Profit” amount, which needs to be a minimum of 10,000. To arrive at this number, we have certain conditions.
- Units to Sell should be an integer value.
- Price / Unit should be between 7 and 15.
Based on these conditions, we must identify how many units to sell. At what price to get the profit value of 10,000?
Let us solve this equation now.
Step 1: Start the VBA sub procedureSUB in VBA is a procedure which contains all the code which automatically gives the statement of end sub and the middle portion is used for coding. Sub statement can be both public and private and the name of the subprocedure is mandatory in VBA.read more.
Code:
Sub Solver_Example()
End Sub
Step 2: First, we need to set the Objective cell referenceCell reference in excel is referring the other cells to a cell to use its values or properties. For instance, if we have data in cell A2 and want to use that in cell A1, use =A2 in cell A1, and this will copy the A2 value in A1.read more using the SolverOk function.
Step 3: The first argument of this function is “SetCell,” in this example, we need to change the value of the Profit cell, the B8 cell.
Code:
Sub Solver_Example()

    SolverOk SetCell:=Range("B8")

End Sub
Step 4: We need to set this cell value to 10,000. So for MaxMinVal, use 3 as the argument value.
Code:
Sub Solver_Example()

    SolverOk SetCell:=Range("B8"), MaxMinVal:=3

End Sub
Step 5: The next argument ValueOf value should be 10,000.
Code:
Sub Solver_Example()

  SolverOk SetCell:=Range("B8"), MaxMinVal:=3, ValueOf:=10000

End Sub
The next argument is ByChange, i.e., by changing which cells this equation needs to be solved. In this case, changing Units to Sell (B1) and Price Per Unit (B2) cells need to be changed.
Code:
Sub Solver_Example()

SolverOk SetCell:=Range("B8"), MaxMinVal:=3, ValueOf:=10000, ByChange:=Range("B1:B2")

End Sub
Note: remaining arguments are not required here.
Step 6: Once we set the objective cell, we must construct other criteria. So, for this, open the “SolverAdd” function.
Step 7: First Cell Ref we need to change is Price Per Unit cell, B2 cell.
Code:
Sub Solver_Example()

SolverOk SetCell:=Range("B8"), MaxMinVal:=3, ValueOf:=10000, ByChange:=Range("B1:B2")
SolverAdd CellRef:=Range("B2")

End Sub
Step 8: This cell needs to be >= 7, so the Relation argument will be 3.
Code:
Sub Solver_Example()

SolverOk SetCell:=Range("B8"), MaxMinVal:=3, ValueOf:=10000, ByChange:=Range("B1:B2")
SolverAdd CellRef:=Range("B2"), Relation:=3

End Sub
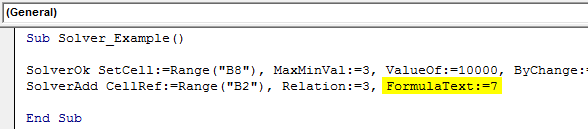
Step 9: This cell value should be >=7, Formula Text = 7.
Code:
Sub Solver_Example()

SolverOk SetCell:=Range("B8"), MaxMinVal:=3, ValueOf:=10000, ByChange:=Range("B1:B2")
SolverAdd CellRef:=Range("B2"), Relation:=3, FormulaText:=7

End Sub
Step 10: Similarly, the same cell needs to be less than 15, so for this relation is <= i.e. 1 as the argument value.
Code:
Sub Solver_Example()

SolverOk SetCell:=Range("B8"), MaxMinVal:=3, ValueOf:=10000, ByChange:=Range("B1:B2")
SolverAdd CellRef:=Range("B2"), Relation:=3, FormulaText:=7
SolverAdd CellRef:=Range("B2"), Relation:=1, FormulaText:=15

End Sub
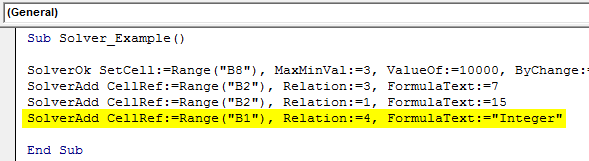
Step 11: The first cell, “Units to Sell,” must be an Integer value. So, for this, also set up the criteria below.
Code:
Sub Solver_Example()

SolverOk SetCell:=Range("B8"), MaxMinVal:=3, ValueOf:=10000, ByChange:=Range("B1:B2")
SolverAdd CellRef:=Range("B2"), Relation:=3, FormulaText:=7
SolverAdd CellRef:=Range("B2"), Relation:=1, FormulaText:=15
SolverAdd CellRef:=Range("B1"), Relation:=4, FormulaText:="Integer"

End Sub
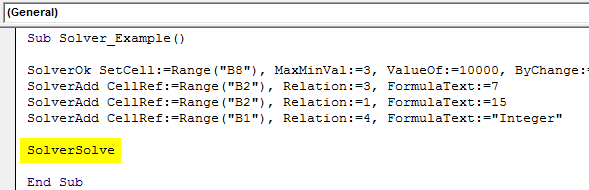
Step 12: In one final step, we need to add the SolverSolve function.
Code:
Sub Solver_Example()

SolverOk SetCell:=Range("B8"), MaxMinVal:=3, ValueOf:=10000, ByChange:=Range("B1:B2")
SolverAdd CellRef:=Range("B2"), Relation:=3, FormulaText:=7
SolverAdd CellRef:=Range("B2"), Relation:=1, FormulaText:=15
SolverAdd CellRef:=Range("B1"), Relation:=4, FormulaText:="Integer"

SolverSolve

End Sub
Run the code by pressing the F5 key to get the result.
When you run the code, you will see the following window.
Press “OK.” You will get the result in an Excel sheet.
So, to earn a profit of 10,000, we need to sell 5,000 units at 7 per price where the cost price is 5.
Things to Remember
- To work with Solver in Excel and VBA, first, enable it for the worksheet, then enable it for VBA reference.
- We once enabled it on worksheets and VBA; we can only access all the Solver functions.
Recommended Articles
This article has been a guide to VBA Solver. Here, we discuss how to enable and use Solver in Excel VBA with the help of an example and downloadable Excel sheet. You can learn more from the following articles: –
- VBA LOOKUP
- Scenario Manager in Excel
- Sensitivity Analysis in Excel
Решатель Excel VBA
Как вы решаете сложные задачи? Если вы не знаете, как решить эти проблемы, вам не о чем беспокоиться; у нас есть решатель в Excel. В нашей предыдущей статье «Решатель Excel» мы узнали, как решать уравнения в Excel. Если вы не знаете, «SOLVER» также доступен с VBA. В этой статье вы узнаете, как использовать «Решатель» в VBA.
Оглавление
- Решатель Excel VBA
- Включить решатель на листе
- Включить решатель в VBA
- Функции решения в VBA
- SolverOk
- СолверДобавить
- Пример решателя в Excel VBA
- То, что нужно запомнить
- Рекомендуемые статьи

Включить решатель на листе
Решатель — это скрытый инструмент, доступный на вкладке «Данные» в Excel (если он уже включен).
Использование SOLVER в excelSOLVER в ExcelРешатель в Excel — это инструмент анализа, который помогает находить решения сложных бизнес-задач, требующих принятия важных решений. Для каждой проблемы определяются цель (задачи), переменные и ограничения. Решатель возвращает оптимальное решение, которое устанавливает точные значения переменных, удовлетворяет всем ограничениям и соответствует цели. читать далее, во-первых, нам нужно включить эту опцию. Выполните следующие шаги.
Шаг 1: Перейдите на вкладку ФАЙЛ. На вкладке ФАЙЛ выберите «Параметры».

Шаг 2: В окне «Параметры Excel» выберите «Надстройки».

Шаг 3: Внизу выберите «Надстройки Excel» и нажмите «Перейти».

Шаг 4: Теперь установите флажок «Надстройка Solver». Нажмите «ОК».

Затем вы должны увидеть «Решатель» на вкладке «Данные».
Включить решатель в VBA
В VBA Solver является внешним инструментом. Итак, нам нужно включить его, чтобы использовать его. Выполните следующие шаги, чтобы включить его.
Шаг 1: Перейдите в Инструменты >>> Справочник в окне редактора Visual Basic.

Шаг 2: В списке ссылок выберите «Решатель» и нажмите «ОК», чтобы использовать его.

Теперь мы можем использовать Solver и в VBA.
Функции решения в VBA
Чтобы написать код VBAНапишите код VBAКод VBA относится к набору инструкций, написанных пользователем на языке программирования приложений Visual Basic в редакторе Visual Basic (VBE) для выполнения определенной задачи. Подробнее, нам нужно использовать три «решателя». Функции» в VBA: «SolverOk», «SolverAdd» и «SolverSolve».
SolverOk
![]()
SolverOk (SetCell, MaxMinVal, ValueOf, ByChange, Engine, EngineDesc)
Сетцелл: Это будет ссылка на ячейку, которую необходимо изменить, т. е. на ячейку «Прибыль».
МаксМинВал: Это необязательный параметр. Ниже приведены числа и спецификаторы:
- 1 = развернуть
- 2 = Свернуть
- 3 = соответствует определенному значению
Значение: Этот параметр необходимо указать, если МаксМинВал аргумент 3.
По изменению: Меняя ячейки, нужно решить это уравнение.
СолверДобавить
Теперь давайте посмотрим параметры СолверДобавить.
![]()
CellRef: Чтобы задать критерии для решения задачи, какую ячейку нужно изменить?
Связь: Если логические значения удовлетворены, мы можем использовать числа ниже.
- 1 меньше (<=)
- 2 равно (=)
- 3 больше, чем (>=)
- 4 обязательных конечных значения, которые являются целыми числами.
- 5 обязательных значений от 0 до 1.
- 6 обязательных окончательных значений, которые все разные и являются целыми числами.
Пример решателя в Excel VBA
.free_excel_div{фон:#d9d9d9;размер шрифта:16px;радиус границы:7px;позиция:относительная;margin:30px;padding:25px 25px 25px 45px}.free_excel_div:before{content:»»;фон:url(центр центр без повтора #207245;ширина:70px;высота:70px;позиция:абсолютная;верх:50%;margin-top:-35px;слева:-35px;граница:5px сплошная #fff;граница-радиус:50%} Вы можете скачать этот шаблон Excel для VBA Solver здесь — Шаблон Excel решателя VBA
Посмотрите на приведенный ниже сценарий.

Используя эту таблицу, нам нужно определить сумму «Прибыли», которая должна быть не менее 10 000. Чтобы прийти к этому числу, у нас есть определенные условия.
- Единицы для продажи должно быть целым числом.
- Цена / ед. должно быть от 7 до 15.
Исходя из этих условий, мы должны определить, сколько единиц нужно продать. По какой цене получить прибыль в размере 10 000?
Теперь решим это уравнение.
Шаг 1: Запустите подпроцедуру VBAVBA SubprocedureSUB в VBA — это процедура, которая содержит весь код, который автоматически дает оператор end sub, а средняя часть используется для кодирования. Оператор Sub может быть как общедоступным, так и частным, а имя подпроцедуры является обязательным в VBA. Подробнее.
Код:
Sub Solver_Example() End Sub

Шаг 2: Во-первых, нам нужно установить ссылку на ячейку ObjectiveCell ReferenceCell в Excel, которая отсылает другие ячейки к ячейке, чтобы использовать ее значения или свойства. Например, если у нас есть данные в ячейке A2 и мы хотим использовать их в ячейке A1, используйте =A2 в ячейке A1, и это скопирует значение A2 в A1. SolverOk функция.

Шаг 3: Первый аргумент этой функции — «SetCell», в этом примере нам нужно изменить значение ячейки «Прибыль», ячейка B8.
Код:
Sub Solver_Example() SolverOk SetCell:=Range(«B8») End Sub

Шаг 4: Нам нужно установить значение этой ячейки на 10 000. Таким образом, для МаксМинВал, используйте 3 в качестве значения аргумента.
Код:
Sub Solver_Example() SolverOk SetCell:=Range(«B8»), MaxMinVal:=3 End Sub

Шаг 5: Следующий аргумент Значение значение должно быть 10000.
Код:
Sub Solver_Example() SolverOk SetCell:=Range(«B8»), MaxMinVal:=3, ValueOf:=10000 End Sub

Следующий аргумент — ByChange, т. е. заменой каких ячеек нужно решить это уравнение. В этом случае необходимо изменить ячейки «Единицы» на «Продажа» (B1) и «Цена за единицу» (B2).
Код:
Sub Solver_Example() SolverOk SetCell:=Range(«B8»), MaxMinVal:=3, ValueOf:=10000, ByChange:=Range(«B1:B2») End Sub

Примечание: остальные аргументы здесь не требуются.
Шаг 6: Как только мы установили целевую ячейку, мы должны построить другие критерии. Итак, для этого открываем функцию «SolverAdd».

Шаг 7: Первый Ссылка на ячейку нам нужно изменить, это цена за единицу ячейки, ячейка B2.
Код:
Sub Solver_Example() SolverOk SetCell:=Range(«B8»), MaxMinVal:=3, ValueOf:=10000, ByChange:=Range(«B1:B2») SolverAdd CellRef:=Range(«B2») End Sub

Шаг 8: Эта ячейка должна быть >= 7, поэтому Связь аргумент будет 3.
Код:
Sub Solver_Example() SolverOk SetCell:=Range(«B8»), MaxMinVal:=3, ValueOf:=10000, ByChange:=Range(«B1:B2») SolverAdd CellRef:=Range(«B2»), Relation:= 3 Конец сабвуфера

Шаг 9: Значение этой ячейки должно быть >=7, Fформула Текст = 7.
Код:
Sub Solver_Example() SolverOk SetCell:=Range(«B8»), MaxMinVal:=3, ValueOf:=10000, ByChange:=Range(«B1:B2») SolverAdd CellRef:=Range(«B2»), Relation:= 3, FormulaText:=7 End Sub

Шаг 10: Точно так же эта же ячейка должна быть меньше 15, поэтому для этого связь is <= т.е. 1 в качестве значения аргумента.
Код:
Sub Solver_Example() SolverOk SetCell:=Range(«B8»), MaxMinVal:=3, ValueOf:=10000, ByChange:=Range(«B1:B2») SolverAdd CellRef:=Range(«B2»), Relation:= 3, FormulaText:=7 SolverAdd CellRef:=Range(«B2»), Relation:=1, FormulaText:=15 End Sub

Шаг 11: Первая ячейка «Единицы для продажи» должна быть целым числом. Итак, для этого также установите критерии ниже.
Код:
Sub Solver_Example() SolverOk SetCell:=Range(«B8»), MaxMinVal:=3, ValueOf:=10000, ByChange:=Range(«B1:B2») SolverAdd CellRef:=Range(«B2»), Relation:= 3, FormulaText:=7 SolverAdd CellRef:=Range(«B2»), Relation:=1, FormulaText:=15 SolverAdd CellRef:=Range(«B1″), Relation:=4, FormulaText:=»Integer» End Sub

Шаг 12: На последнем шаге нам нужно добавить функцию SolverSolve.
Код:
Sub Solver_Example() SolverOk SetCell:=Range(«B8»), MaxMinVal:=3, ValueOf:=10000, ByChange:=Range(«B1:B2») SolverAdd CellRef:=Range(«B2»), Relation:= 3, FormulaText:=7 SolverAdd CellRef:=Range(«B2»), Relation:=1, FormulaText:=15 SolverAdd CellRef:=Range(«B1″), Relation:=4, FormulaText:=»Integer» SolverSolve End Саб

Запустите код, нажав клавишу F5, чтобы получить результат.
Когда вы запустите код, вы увидите следующее окно.

Нажмите «ОК». Вы получите результат в виде листа Excel.

Итак, чтобы получить прибыль в размере 10 000, нам нужно продать 5 000 единиц по 7 за каждую цену, где себестоимость равна 5.
То, что нужно запомнить
- Чтобы работать с Solver в Excel и VBA, сначала включите его для рабочего листа, а затем включите его для справки VBA.
- Однажды мы включили его на листах и в VBA; мы можем получить доступ только ко всем функциям Solver.
Рекомендуемые статьи
Эта статья была руководством по VBA Solver. Здесь мы обсудим, как включить и использовать Solver в Excel VBA с помощью примера и загружаемого листа Excel. Вы можете узнать больше из следующих статей: –
- ПОИСК VBA
- Менеджер сценариев в Excel
- Анализ чувствительности в Excel
Содержание
- Включение надстройки Solver в Excel
- Включение надстройки Solver в VBA
- Использование функций решателя в VBA
- Создание примера решателя
Из этого туториала Вы узнаете, как использовать надстройку Solver в VBA.
Solver — это надстройка, поставляемая с Excel и используемая для выполнения анализа «что, если» путем предоставления альтернативных ответов на формулу в ячейке на основе значений, которые вы можете передать в формулу из других ячеек в вашей книге.
Включение надстройки Solver в Excel
Выберите Файл на ленте Excel, а затем перейдите к Параметры.

Выбирать Надстройки и нажмите на Идти рядом с надстройками Excel.

Убедитесь, что Надстройка Solver выбран вариант.

Или нажмите на Надстройки Excel на Разработчик ленты, чтобы открыть диалоговое окно надстроек.

После того, как вы включили надстройку Solver в Excel, вам необходимо добавить ссылку на нее в свой проект VBA, чтобы использовать ее в VBA.
Убедитесь, что вы выбрали проект VBA, в котором вы хотите использовать Solver. Нажать на Меню инструментов а затем на использованная литература.

Ссылка на Надстройка Solver будет добавлен в ваш проект.

Теперь вы можете использовать надстройку Solver в коде VBA!
Использование функций решателя в VBA
Нам нужно использовать 3 функции Solver VBA, чтобы использовать Solver в VBA. Эти SolverOK, SolverAdd, а также SolverSolve.
СолверОК

- SetCell — по желанию — это должно относиться к ячейке, которую нужно изменить — она должна содержать формулу. Это соответствуетУстановить целевую ячейку коробка вПараметры решателя чат.
- MaxMinVal — по желанию — Вы можете установить значение 1 (Развернуть), 2 (Свернуть) или 3. Это соответствует Максимум, Мин., а такжеЦенить варианты вПараметры решателя чат.
- Значение — по желанию -Если для MaxMinValue установлено значение 3, вам необходимо указать этот аргумент.
- ByChange — по желанию -Это сообщает решателю, какие ячейки он может изменить, чтобы получить требуемое значение. Это соответствуетИзменяя ячейки переменных коробка вПараметры решателя чат.
- Двигатель — по желанию — это указывает на метод решения, который необходимо использовать, чтобы найти решение. 1 для симплексного метода LP, 2 для нелинейного метода GRG или 3 для эволюционного метода. Это соответствуетВыберите метод решения раскрывающийся список вПараметры решателя чат
- EngineDesc — по желанию -это альтернативный способ выбора метода решения — здесь вы должны ввести строки «Simplex LP», «GRG Nonlinear» или «Evolutionary». Это также соответствуетВыберите метод решения раскрывающийся список вПараметры решателя чат
SolverAdd

- CellRef — требуется — это ссылка на ячейку или диапазон ячеек, которые необходимо изменить для решения проблемы.
- Связь — требуется — это целое число, которое должно быть от 1 до 6 и определяет допустимую логическую связь.
- 1 меньше (<=)
- 2 равно (=)
- 3 больше (> =)
- 4 должен иметь конечные значения, которые являются целыми числами.
- 5 должен иметь значения от 0 до 1.
- 6 должен иметь конечные значения, которые все разные и целые.
- FormulaText — по желанию — Правая часть ограничения.
Создание примера решателя
Рассмотрим следующий рабочий лист.

На листе выше нам нужно выйти на уровень безубыточности в первом месяце, установив в ячейке B14 нулевое значение, изменив критерии в ячейках с F1 по F6.
| 123 | Sub TestSolverSolverOk SetCell: = «$ B $ 14», MaxMinVal: = 3, ValueOf: = 0, ByChange: = «$ F $ 2: $ F $ 6», Engine: = 1, EngineDesc: = «GRG Nonlinear»Конец подписки |
После того, как вы настроили параметры SolverOK, вам необходимо добавить некоторые ограничения критериев.
| 1234567 | Sub TestSolverSolverOk SetCell: = «$ B $ 14», MaxMinVal: = 3, ValueOf: = 0, ByChange: = «$ F $ 2: $ F $ 6», Engine: = 1, EngineDesc: = «GRG Nonlinear»‘добавить критерии — F3 не может быть меньше 8SolverAdd CellRef: = «$ F $ 3», отношение: = 3, FormulaText: = «8»‘добавить критерии — F3 не может быть меньше 5000SolverAdd CellRef: = «$ F $ 5», отношение: = 3, FormulaText: = «5000»Конец подписки |
После того, как вы установили SolverOK и SolverAdd (при необходимости), вы можете Решить проблему.
| 1234567 | Sub TestSolverSolverOk SetCell: = «$ B $ 14», MaxMinVal: = 3, ValueOf: = 0, ByChange: = «$ F $ 2: $ F $ 6», Engine: = 1, EngineDesc: = «GRG Nonlinear»‘добавить критерии — F3 не может быть меньше 8 SolverAdd CellRef: = «$ F $ 3», Relation: = 3, FormulaText: = «8»‘ добавить критерии — F3 не может быть меньше 5000SolverAdd CellRef: = «$ F $ 5», отношение: = 3, FormulaText: = «5000»‘найти решение, решив проблемуSolverSolveКонец подписки |
После того, как вы запустите код, на вашем экране появится следующее окно. Выберите нужный вариант (например, «Сохранить решение решателя» или «Восстановить исходные значения») и нажмите «ОК».
