
I use the terms Sheet and Worksheet interchangeably when talking about Excel, I think most users do. Google also appears to think they are the same thing; If I search for “How to loop through Sheets with Excel VBA”, all the results returned on the first page refer to Worksheets.
Yet, Sheets and Worksheets from a VBA perspective are definitely not the same. Unfortunately, most of the VBA code I write doesn’t really consider the differences… bad habits, I know. Hopefully, by writing this post it will inspire me to correct my bad habits, and prevent you from creating bad habits.
In essence, all Worksheets are Sheets, but not all Sheets are Worksheets. There are different types of Sheets:
- Worksheet – the sheet with the gridlines and cells
- Chart – the sheet which contains a single chart
- DialogSheet – an Excel 5 dialog sheet. These are effectively defunct as they have been replaced by VBA UserForms
- Macro sheets – A sheet containing Excel 4 macros. These were replaced by VBA in 1995.
- International Macro sheet – A sheet containing an internationally compatible Excel 4 macro (also replaced in 1995).
Since DialogSheets, and both forms of Macro sheets were replaced in the 90’s, we can pretty much ignore them. That leaves just two types of sheets we are likely to encounter: Charts and Worksheets.
So, in summary, when we refer to Sheets in VBA, we are talking about Charts and Worksheets. And when we refer to Worksheets, we are excluding Charts.
What type of sheet is it?
Different sheet types have their own properties. For example, on a Worksheet you can select cells, but you can’t on a Chart sheet, because there are no cells. So, if we want to perform certain actions on the active sheet, we need to know which type of sheet we are on.
Sub TypeOfActiveSheet()

MsgBox TypeName(ActiveSheet)

End Sub
Running the code above will generate a message box with either “Worksheet” or “Chart” depending on the type of sheet.
Objects and collections
Understanding objects and collections will help us master the use of Charts, Worksheets and Sheets.
Worksheet – A Worksheet is an object which refers to a single worksheet. Each worksheet is a member of the Worksheets and Sheets collection objects.
Worksheets – Worksheets is a collection object which contains all the individual Worksheet objects in a workbook.
Chart – A Chart is an object which refers to a single chart. The chart:
- Can be contained within a Chart Object for a chart contained on the face of the worksheet (outside the scope of this post).
- Can be a member of the Charts and Sheets collection objects.
Charts – Charts is a collection object which contains all the individual Chart sheet objects within a workbook. This should not be confused with the ChartObjects object, which is the collection of charts contained on the face of the worksheet.
Sheets – Sheets is a collection object which contains all the individual Worksheet and Chart sheet objects in a workbook.
Looping through Sheets, Worksheets and Charts
When using the For Each loop, we are looping through each object within a collection.
Example 1 – Looping through each Worksheet in the Worksheets collection
The VBA code below will loop through each Worksheet in the Worksheets collection.
Sub LoopThroughWorksheets()

'Create an instance of the Worksheet object called "ws"
Dim ws As Worksheet

'Loop through each Worksheet object in the Worksheets collection
For Each ws In ActiveWorkbook.Worksheets

    MsgBox ws.Name

Next ws

End Sub
Example 2 – Looping through each Chart in the Charts collection
The following code will loop through each Chart in the Charts collection.
Sub LoopThroughCharts()

'Create an instance of the Chart object called "cht"
Dim cht As Chart

'Loop through each Chart object in the Charts collection
For Each cht In ActiveWorkbook.Charts

    MsgBox cht.Name

Next cht

End Sub
Example 3 – Looping through each Object in the Sheets collection
To loop through every sheet, we cannot declare a Sheet object, because it doesn’t exist. The example below loops through every object (i.e. it will include Chart and Worksheet objects) contained within the Sheets collection.
Sub LoopThroughSheets()

'Create a variable to hold any object called "obj"
Dim obj As Object

'Loop through each Object in the Sheets collection
For Each obj In ActiveWorkbook.Sheets

    MsgBox obj.Name

Next obj

End Sub
Example 4 – Looping through every Sheet in the Sheets collection
As an alternative to Example 3, we could count the sheets, then loop using a For loop.
Sub LoopThroughSheets()

Dim i As Integer

'Count all sheets and loop through each
For i = 1 To Sheets.Count

    MsgBox Sheets(i).Name

Next i

End Sub
This method of looping by counting the objects will work equally well with Charts and Worksheets.

About the author
Hey, I’m Mark, and I run Excel Off The Grid.
My parents tell me that at the age of 7 I declared I was going to become a qualified accountant. I was either psychic or had no imagination, as that is exactly what happened. However, it wasn’t until I was 35 that my journey really began.
In 2015, I started a new job, for which I was regularly working after 10pm. As a result, I rarely saw my children during the week. So, I started searching for the secrets to automating Excel. I discovered that by building a small number of simple tools, I could combine them together in different ways to automate nearly all my regular tasks. This meant I could work less hours (and I got pay raises!). Today, I teach these techniques to other professionals in our training program so they too can spend less time at work (and more time with their children and doing the things they love).
Do you need help adapting this post to your needs?
I’m guessing the examples in this post don’t exactly match your situation. We all use Excel differently, so it’s impossible to write a post that will meet everybody’s needs. By taking the time to understand the techniques and principles in this post (and elsewhere on this site), you should be able to adapt it to your needs.
But, if you’re still struggling you should:
- Read other blogs, or watch YouTube videos on the same topic. You will benefit much more by discovering your own solutions.
- Ask the ‘Excel Ninja’ in your office. It’s amazing what things other people know.
- Ask a question in a forum like Mr Excel, or the Microsoft Answers Community. Remember, the people on these forums are generally giving their time for free. So take care to craft your question, make sure it’s clear and concise. List all the things you’ve tried, and provide screenshots, code segments and example workbooks.
- Use Excel Rescue, who are my consultancy partner. They help by providing solutions to smaller Excel problems.
What next?
Don’t go yet, there is plenty more to learn on Excel Off The Grid. Check out the latest posts:
Поговорим про то, как в VBA обращаться к листам книги Excel.
Вариант 1
У глобального объекта Excel Application есть 2 коллекции листов: Sheets и Worksheets. Отличаются они тем, что вторая коллекция не включает в себя специальные листы макросов, которые поддерживала Excel 4.0 (на минуточку — 1992 год) во времена, когда VBA ещё не было в природе (появился в Excel 5.0). Тяжело найти эстетов, которые всё ещё пользуются такими листами с макросами, поэтому можно считать, что эти коллекции идентичны. Лично я использую коллекцию Sheets просто потому, что 5 букв лучше, чем 9.
Sheets(1).Cells(1,1)
Sheets(1) — это не первый лист, созданный в книге, а лист, который на панели ярлыков листов занимает КРАЙНЕЕ ЛЕВОЕ положение. То есть Sheets(2) будет указывать на второй слева лист на панели ярлыков. Если вам нужен конкретный лист, то ТАК ссылаться на него, как вы понимаете, плохая идея, ибо пользователь, изменив порядок следования листов, нарушит работоспособность вашей программы.
Во всех примерах я буду обращаться к ячейки A1, так как речь не о свойствах объекта Worksheet, а о том, какие есть способы получить синтаксическую конструкцию, указывающую на нужный нам лист.
Вариант 2
Sheets(«First»).Cells(1,1)
Пожалуй, такое обращение к листу наиболее популярно в народе. В скобках и кавычках мы видим пользовательское имя листа. Плохо только то, что имя листа, что называется «hard coded» (жёстко запрограммировано), что является моветоном в программировании. Ибо, если у вас в модуле конструкция Sheets(«First») встречается 100 раз, то при смене имени листа придётся делать поиск с заменой 100 констант в коде. Поэтому обычно делают иначе…
Вариант 3
Гораздо разумней добавить ещё один уровень абстракции и объявить константу, ссылающуюся на имя листа.
Public Const wsFirst = «First»
Sheets(wsFirst).Cells(1,1)
В случае смены имени вам придётся исправить ТОЛЬКО эту константу в начале модуля. Однако, если программа написана и сдана пользователю, а тот в один прекрасный момент берёт и переименовывает лист, то наш код тут же перестаёт работать, что, согласитесь, не слишком хорошо…
Вариант 4
У листа есть свойство Name, которое мы видим на ярлыке листа и которое можем менять (если не включена защита структуры книги, но сейчас не об этом), но ещё есть свойство CodeName, которое присваивается листу в момент создания, и которое пользователь сменить не может. В русской редакции офиса эти CodeName-ы формируются по принципу: Лист1, Лист2, Лист3 и т.д. В англоязычной версии это: Sheet1, Sheet2, Sheet3, etc.
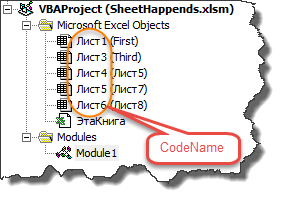
Если вы удалите лист, то его CodeName повторно не будет использовано. Так вот — VBA разпознаёт имена совпадающие с CodeName листа, как объекты типа Worksheet.
Лист1.Cells(1,1) или [Лист1].Cells(1,1)
Это отличная защита от того, что пользователь перенесёт или переименует лист. Но подобные имена ни о чём не говорят нам в процессе программирования в плане того, что располагается на листе, поэтому вы будете частенько ошибаться, путая листы. А те, кто будут потом разбираться в вашем коде, тоже спасибо вам не скажут. Поэтому я предлагаю следующую модификацию этого способа:
Вариант 5
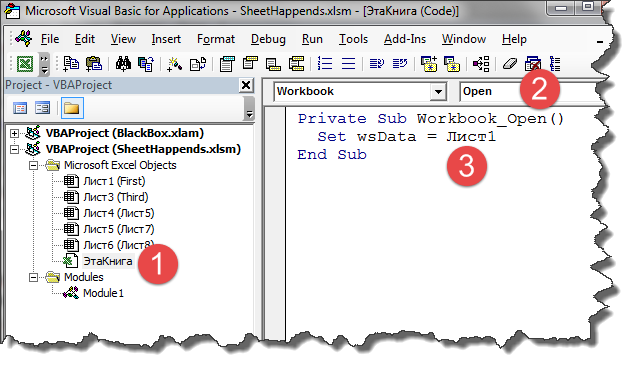
Public wsData As Worksheet
Set wsData = Лист1
wsData.Cells(1,1)
Строку 1 размещаем в объявлениях модуля. Строку 2 размещаем в обработчике события Workbook_Open. И после этого в любом месте книги мы можем использовать объявленные переменные (wsData, строка 3). На мой взгляд, это самый удобный и продвинутый вариант из рассмотренных.
Вариант 6
Не забываем про свойство ActiveSheet объекта Application, указывающее на активный лист книги. Если вы работаете с текущим листом, то использовать его, я считаю, оптимально.
ActiveSheet.Cells(1,1)
Вариант 7
Ну и последнее, если вам передан в подпрограмму объект типа Range, то не забываем, что ссылку на лист возвращает его свойство Worksheet.
Это всё, что я имел сказать по поводу ссылок на листы в Excel VBA 
In this article you will be learning about sheets vs worksheets in excel VBA and how to use of these functions when manipulating spreadsheets.
Table of Contents
- Difference between Worksheets and Sheets in VBA
- Sheets
- Looping through each Object in the Sheets collection
- Looping through every Sheet in the Sheets collection
- Worksheets
- Referencing a Worksheet in VBA
- Using the Worksheet Name
- Using the Index Number
- Using the Worksheet Code Name
- Referring to a Worksheet in a Different Workbook
- Adding a Worksheet
- Deleting a Worksheet
- Delete a specific worksheet.
- Renaming the Worksheets
- Adding Multiple Sheets
- Assigning Worksheet Object to a Variable
- Hide Worksheets Using VBA
- To unhide the sheets
- Hide Sheets Based on the Text in it
- Sorting the Worksheets in an Alphabetical Order
- Creating a Table of Contents of All Worksheets with Hyperlinks
- Referencing a Worksheet in VBA
Difference between Worksheets and Sheets in VBA
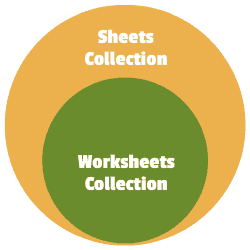
In VBA, you have two collections that can be a bit confusing at times. In a workbook, you can have worksheets and as well as chart sheets.
In Excel VBA:
- The ‘Worksheets’ collection would refer to the collection of all the worksheet objects in a workbook.
- The ‘Sheets’ collection would refer to all the worksheets as well as chart sheets in the workbook.
To run the VBA code in Excel, perform the following first
- Under the developer tab, click visual basic
- Click the insert option and choose a module
- Enter your codes and click run.
Now we know, ‘sheets’ is the collection of worksheets and chart sheets.
Looping through each Object in the Sheets collection
To loop through every sheet,
Code:
Sub UsingObject()

Dim obj As Object

For Each obj In ActiveWorkbook.Sheets

    MsgBox obj.Name

Next obj

End Sub
Looping through every Sheet in the Sheets collection
We can also count the sheets, then loop using a For loop.
Code
Sub UsingCount()

Dim i As Integer

For i = 1 To Sheets.Count

    MsgBox Sheets(i).Name

Next i

End Sub
This method of looping by counting the objects will work equally well with Charts and Worksheets.
Worksheets
When you have to work with worksheets only, use the ‘Worksheets’ collection, and when you have to refer to all sheets, then use the ‘Sheets’ collection.
Let’s see worksheets in detail.
Referencing a Worksheet in VBA
You can refer a worksheet in the following methods.
Using the Worksheet Name
This is the easiest way to refer to a worksheet.
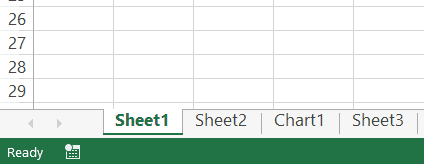
When you are working with a workbook with three worksheets namely Sheet 1, Sheet 2, Sheet 3 (which is common in any excel file) and you want to activate Sheet 3.
Use the following code:
Code:
Sub ActivateSheet()

Worksheets("Sheet3").Activate

End Sub
You can also use the sheets collection method to activate the sheets, as we are using the name of the sheet as the key point.
Use this code
Code:
Sub ActivateSheet()

Sheets("Sheet3").Activate

End Sub
Using the Index Number
The difficult part of using the name of the sheet to refer them is you need to know the exact name of the sheet or the program doesn’t work.
In this case, you can use the index number of the worksheets. The indexing starts from 1 in the collection of sheets.
Use this code to activate Sheet3:
Code
Sub ActivateSheet()

Worksheets(3).Activate

End Sub
Important: A chart sheet is not a part of the worksheets collection.
This is because when we use the index numbers in the Worksheet collection, it will only refer to the worksheets in the workbook.
Note: Indexing goes from left to right. So if you shift Sheet3 to the left of Sheet2, then Worksheets (2) would refer to Sheet3.
Using the Worksheet Code Name
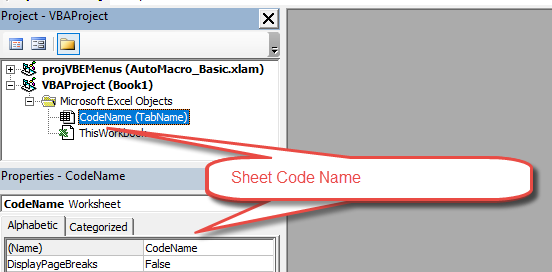
You can use the code name of the worksheet to refer to a worksheet. This code name can be assigned in the VB Editor and it won’t change when you change the name of the worksheet.
To give your worksheet a code name, follow these steps:
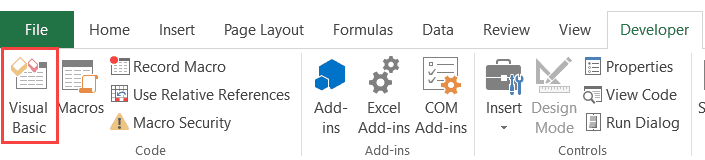
- Under the Developer tab, click the Visual Basic option.
- This will open the VB Editor.
- Now, Click the View option in the menu and click on Project Window.
- Click on the sheet name in the project explorer that you want to rename.
- In the Properties pane, change the name in the field in front of (Name).
Note: Don’t include spaces in the name.
This would change the name of your Worksheet in the VBA, i.e., the code name. Therefore, when you change the worksheet name it doesn’t affect the code in your VBA.
Now, you can use either the Worksheets collection to refer to the worksheet or use the codename.
The following code uses both worksheet collection method and name of the sheet method.
Code
Worksheets("Sheet3").Activate

SH3.Activate
(I have code named my sheet as SH3)
Referring to a Worksheet in a Different Workbook
If you need to access a worksheet in a different workbook,
Code
Sub SheetActivate()

Workbooks("Examples.xlsx").Worksheets("Sheet1").Activate

End Sub
Adding a Worksheet
When you need to add a worksheet
Code
Sub AddSheet()

Worksheets.Add

End Sub
Deleting a Worksheet
When you want to delete a worksheet:
Code
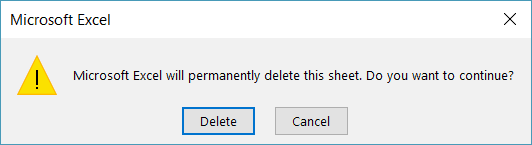
Sub DeleteSheet()

ActiveSheet.Delete

End Sub
Click ok on the warning prompt. The worksheet gets deleted.
To avoid the warning prompt, use the below code:
Code
Sub DeleteSheet()

Application.DisplayAlerts = False

ActiveSheet.Delete

Application.DisplayAlerts = True

End Sub
Note: You can’t undo this delete option. So be sure.
Delete a specific worksheet.
If you want to delete a specific sheet,
Code
Sub DeleteSheet()

Worksheets("Sheet3").Delete

End Sub
You can also use the code name of the sheet to delete it.
Sub DeleteSheet()

SH3.Delete

End Sub
Renaming the Worksheets
When you want to rename the sheets using VBA code:
Sub RenameSheet()

Worksheets("Sheet1").Name = "Naming sheet"

End Sub
Code
Adding Multiple Sheets
When you need to add multiple sheets
Code
Sub RenameSheet()

Dim Countsheets As Integer

Countsheets = Worksheets.Count

For i = 1 To 4

Worksheets.Add after:=Worksheets(Countsheets + i – 1)

Worksheets(Countsheets + i).Name = "Multiple Sheets 1" & i

Next i

End Sub
Assigning Worksheet Object to a Variable
You can assign a worksheet to an object variable, and then use the variable instead of the worksheet references.
Code
Sub RenameSheet()

Dim Ws As Worksheet

For Each Ws In Worksheets

Ws.Name = "Assigning Variable " & Ws.Name

Next Ws

End Sub
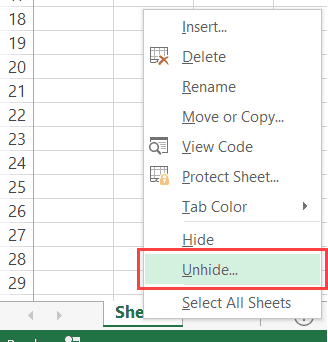
Hide Worksheets Using VBA
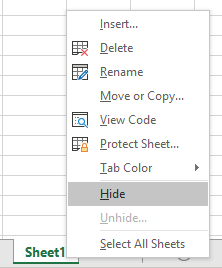
You can hide and unhide worksheets using VBA. Normally when a worksheet is hidden, you can easily unhide the worksheet by right-clicking on any sheet tab.
But if you don’t want to unhide the worksheet in this method, you can do this using VBA.
The code below would hide all the worksheets in the workbook (except the active sheet), such that you cannot unhide it by right-clicking on the sheet name.
Code
Sub HideAllExcetActiveSheet()

Dim Ws As Worksheet

For Each Ws In ThisWorkbook.Worksheets

If Ws.Name <> ActiveSheet.Name Then Ws.Visible = xlSheetVeryHidden

Next Ws

End Sub
If you want to hide sheets that can be unhidden easily, use the below code.
Code
Sub HideAllExceptActiveSheet()

Dim Ws As Worksheet

For Each Ws In ThisWorkbook.Worksheets

If Ws.Name <> ActiveSheet.Name Then Ws.Visible = xlSheetHidden

Next Ws

End Sub
To unhide the sheets
Code:
Sub UnhideAllWoksheets()

Dim Ws As Worksheet

For Each Ws In ThisWorkbook.Worksheets

Ws.Visible = xlSheetVisible

Next Ws

End Sub
Hide Sheets Based on the Text in it
You can hide sheets based on the text in it. You can do this using the VBA INSTR function.
The below code would hide all the sheets except the ones with the text 2020 in it.
Code:
Sub HideWithMatchingText()

Dim Ws As Worksheet

For Each Ws In Worksheets

If InStr(1, Ws.Name, "2020", vbBinaryCompare) = 0 Then

Ws.Visible = xlSheetHidden

End If

Next Ws

End Sub
Sorting the Worksheets in an Alphabetical Order
Using VBA, you can quickly sort the worksheets based on their names.
Use the below code to quickly sort sheets in an ascending order.
Code
Sub SortSheetsTabName()

Application.ScreenUpdating = False

Dim ShCount As Integer, i As Integer, j As Integer

ShCount = Sheets.Count

For i = 1 To ShCount – 1

For j = i + 1 To ShCount

If Sheets(j).Name < Sheets(i).Name Then

Sheets(j).Move before:=Sheets(i)

End If

Next j

Next i

Application.ScreenUpdating = True

End Sub
Creating a Table of Contents of All Worksheets with Hyperlinks
To create a table of contents of all worksheets:
Code
Sub AddIndexSheet()

Worksheets.Add

ActiveSheet.Name = "Index"

For i = 2 To Worksheets.Count

ActiveSheet.Hyperlinks.Add Anchor:=Cells(i – 1, 1), _

Address:="", SubAddress:=Worksheets(i).Name & "!A1", _

TextToDisplay:=Worksheets(i).Name

Next i

End Sub
The above code inserts a new worksheet and names it Index.
It then loops through all the worksheets and creates a hyperlink for all the worksheets in the Index sheet.
Содержание
- Excel vba sheets или worksheets
- Вариант 1
- Sheets(1).Cells(1,1)
- Вариант 2
- Sheets(«First»).Cells(1,1)
- Вариант 3
- Public Const wsFirst = «First»
- Sheets(wsFirst).Cells(1,1)
- Вариант 4
- Лист1.Cells(1,1) или [Лист1].Cells(1,1)
- Вариант 5
- Public wsData As Worksheet
- Set wsData = Лист1
- wsData.Cells(1,1)
- Вариант 6
- ActiveSheet.Cells(1,1)
- Вариант 7
- VBA Sheets – The Ultimate Guide
- Sheets Vs. Worksheets
- Referencing Sheets
- ActiveSheet
- Sheet Name
- Sheet Index Number
- Sheet Index Number – Last Sheet in Workbook
- Sheet “Code Name”
- VBA Coding Made Easy
- Referencing Sheets in Other Workbooks
- Activate vs. Select Sheet
- Activate a Sheet
- Select a Sheet
- Select Multiple Sheets
- Worksheet Variable
- Loop Through All Sheets in Workbook
- Worksheet Protection
- Workbook Protection
- Worksheet Protection
- Protect Worksheet
- Unprotect Worksheet
- Worksheet Visible Property
- Unhide Worksheet
- Hide Worksheet
- Very Hide Worksheet
- Worksheet-Level Events
- Worksheet Activate Event
- Worksheet Change Event
- Worksheet Cheat Sheet
- VBA Worksheets Cheatsheet
- VBA Code Examples Add-in
Excel vba sheets или worksheets
Поговорим про то, как в VBA обращаться к листам книги Excel.
Вариант 1
У глобального объекта Excel Application есть 2 коллекции листов: Sheets и Worksheets . Отличаются они тем, что вторая коллекция не включает в себя специальные листы макросов, которые поддерживала Excel 4.0 (на минуточку — 1992 год) во времена, когда VBA ещё не было в природе (появился в Excel 5.0). Тяжело найти эстетов, которые всё ещё пользуются такими листами с макросами, поэтому можно считать, что эти коллекции идентичны. Лично я использую коллекцию Sheets просто потому, что 5 букв лучше, чем 9.
Sheets(1).Cells(1,1)
Sheets(1) — это не первый лист, созданный в книге, а лист, который на панели ярлыков листов занимает КРАЙНЕЕ ЛЕВОЕ положение. То есть Sheets(2) будет указывать на второй слева лист на панели ярлыков. Если вам нужен конкретный лист, то ТАК ссылаться на него, как вы понимаете, плохая идея, ибо пользователь, изменив порядок следования листов, нарушит работоспособность вашей программы.
Во всех примерах я буду обращаться к ячейки A1, так как речь не о свойствах объекта Worksheet , а о том, какие есть способы получить синтаксическую конструкцию, указывающую на нужный нам лист.
Вариант 2
Sheets(«First»).Cells(1,1)
Пожалуй, такое обращение к листу наиболее популярно в народе. В скобках и кавычках мы видим пользовательское имя листа. Плохо только то, что имя листа, что называется «hard coded» (жёстко запрограммировано), что является моветоном в программировании. Ибо, если у вас в модуле конструкция Sheets(«First») встречается 100 раз, то при смене имени листа придётся делать поиск с заменой 100 констант в коде. Поэтому обычно делают иначе.
Вариант 3
Гораздо разумней добавить ещё один уровень абстракции и объявить константу, ссылающуюся на имя листа.
Public Const wsFirst = «First»
Sheets(wsFirst).Cells(1,1)
В случае смены имени вам придётся исправить ТОЛЬКО эту константу в начале модуля. Однако, если программа написана и сдана пользователю, а тот в один прекрасный момент берёт и переименовывает лист, то наш код тут же перестаёт работать, что, согласитесь, не слишком хорошо.
Вариант 4
У листа есть свойство Name , которое мы видим на ярлыке листа и которое можем менять (если не включена защита структуры книги, но сейчас не об этом), но ещё есть свойство CodeName , которое присваивается листу в момент создания, и которое пользователь сменить не может. В русской редакции офиса эти CodeName -ы формируются по принципу: Лист1 , Лист2 , Лист3 и т.д. В англоязычной версии это: Sheet1 , Sheet2 , Sheet3 , etc.
Если вы удалите лист, то его CodeName повторно не будет использовано. Так вот — VBA разпознаёт имена совпадающие с CodeName листа, как объекты типа Worksheet .
Лист1.Cells(1,1) или [Лист1].Cells(1,1)
Это отличная защита от того, что пользователь перенесёт или переименует лист. Но подобные имена ни о чём не говорят нам в процессе программирования в плане того, что располагается на листе, поэтому вы будете частенько ошибаться, путая листы. А те, кто будут потом разбираться в вашем коде, тоже спасибо вам не скажут. Поэтому я предлагаю следующую модификацию этого способа:
Вариант 5
Public wsData As Worksheet
Set wsData = Лист1
wsData.Cells(1,1)
Строку 1 размещаем в объявлениях модуля. Строку 2 размещаем в обработчике события Workbook_Open . И после этого в любом месте книги мы можем использовать объявленные переменные ( wsData , строка 3). На мой взгляд, это самый удобный и продвинутый вариант из рассмотренных.
Вариант 6
Не забываем про свойство ActiveSheet объекта Application , указывающее на активный лист книги. Если вы работаете с текущим листом, то использовать его, я считаю, оптимально.
ActiveSheet.Cells(1,1)
Вариант 7
Ну и последнее, если вам передан в подпрограмму объект типа Range, то не забываем, что ссылку на лист возвращает его свойство Worksheet .
Это всё, что я имел сказать по поводу ссылок на листы в Excel VBA 🙂
Источник
VBA Sheets – The Ultimate Guide
In this Article
This is the ultimate guide to working with Excel Sheets / Worksheets in VBA.
At the bottom of this guide, we’ve created a cheat sheet of common commands for working with sheets.
Sheets Vs. Worksheets
There are two ways to reference Sheets using VBA. The first is with the Sheets object:
The other is with the Worksheets object:
99% of the time, these two objects are identical. In fact, if you’ve searched online for VBA code examples, you’ve probably seen both objects used. Here is the difference:
The Sheets Collection contains Worksheets AND Chart Sheets.

So use Sheets if you want to include regular Worksheets AND Chart Sheets. Use Worksheets if you want to exclude Chart Sheets. For the rest of this guide we will use Sheets and Worksheets interchangeably.
Referencing Sheets
There are several different ways to reference Sheets:
- ActiveSheet
- Sheet Tab Name
- Sheet Index Number
- Sheet Code Name
ActiveSheet
The ActiveSheet is the Sheet that’s currently active. In other words, if you paused your code and looked at Excel, it’s the sheet that is visible. The below code example will display a MessageBox with the ActiveSheet name.
Sheet Name
You are probably most familiar with referencing Sheets by their Tab Name:
This is the sheet name that’s visible to Excel users. Enter it into the sheets object, as a string of text, surrounded by quotations.
Sheet Index Number
The Sheet Index number is the sheet position in the workbook. 1 is the first sheet. 2 is the second sheet etc.:
Sheet Index Number – Last Sheet in Workbook
To reference the last Sheet in the workbook, use Sheets.Count to get the last Index Number and activate that sheet:
Sheet “Code Name”
The Sheet Code Name is it’s Object name in VBA:
VBA Coding Made Easy
Stop searching for VBA code online. Learn more about AutoMacro — A VBA Code Builder that allows beginners to code procedures from scratch with minimal coding knowledge and with many time-saving features for all users!

Referencing Sheets in Other Workbooks
It’s also easy to reference Sheets in other Workbooks. To do so, you need to use the Workbooks Object:
Important: The Workbook must be open before you can reference its Sheets.
Activate vs. Select Sheet
In another article we discuss everything about activating and selecting sheets. The short version is this:
When you Activate a Sheet it becomes the ActiveSheet. This is the sheet you would see if you looked at your Excel program. Only one sheet may be activate at a time.
Activate a Sheet
When you select a Sheet, it also becomes the ActiveSheet. However, you can select multiple sheets at once. When multiple sheets are selected at once, the “top” sheet is the ActiveSheet. However, you can toggle the ActiveSheet within selected sheets.
Select a Sheet
Select Multiple Sheets
Use an array to select multiple sheets at once:
Worksheet Variable
Assigning a worksheet to an object variable allows you to reference the worksheet by it’s variable name. This can save a lot of typing and make your code easier to read. There are also many other reasons you might want to use variables.
To declare a worksheet variable:
Assign a worksheet to a variable:
Now you can reference the worksheet variable in your code:
Loop Through All Sheets in Workbook
Worksheet variables are useful when you want to loop through all the worksheets in a workbook. The easiest way to do this is:
This code will loop through all worksheets in the workbook, displaying each worksheet name in a message box. Looping through all the sheets in a workbook is very useful when locking / unlocking or hiding / unhiding multiple worksheets at once.
Worksheet Protection
Workbook Protection
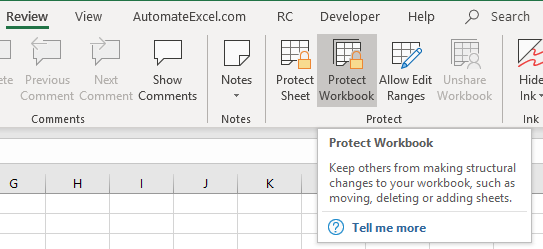
Workbook protection locks the workbook from structural changes like adding, deleting, moving, or hiding worksheets.
You can turn on workbook protection using VBA:
or disable workbook protection:
Note: You can also protect / unprotect without a password by omitting the Password argument:
Worksheet Protection
Worksheet-level protection prevents changes to individual worksheets.
Protect Worksheet
Unprotect Worksheet
There are a variety of options when protecting worksheets (allow formatting changes, allow user to insert rows, etc.) We recommend using the Macro Recorder to record your desired settings.
We discuss worksheet protection in more detail here.
Worksheet Visible Property
You might already know that worksheets can be hidden:
There are actually three worksheet visibility settings: Visible, Hidden, and VeryHidden. Hidden sheets can be unhidden by any regular Excel user – by right-clicking in the worksheet tab area (shown above). VeryHidden sheets can only be unhidden with VBA code or from within the VBA Editor. Use the following code examples to hide / unhide worksheets:
Unhide Worksheet
Hide Worksheet
Very Hide Worksheet
Worksheet-Level Events
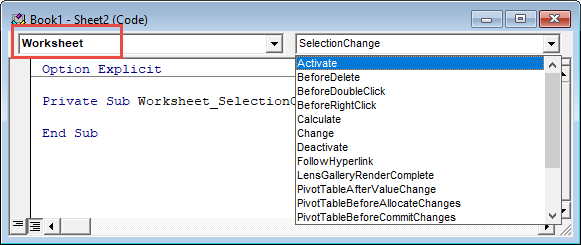
Events are triggers that can cause “Event Procedures” to run. For example, you can cause code to run every time any cell on a worksheet is changed or when a worksheet is activated.
Worksheet event procedures must be placed in a worksheet module:
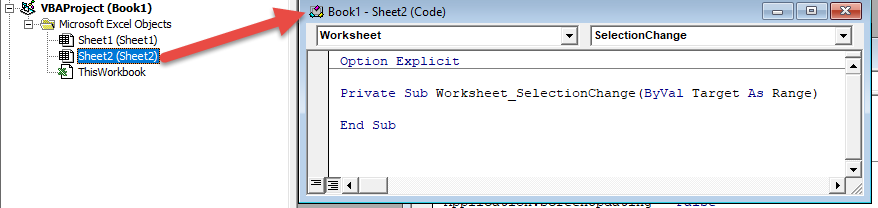
There are numerous worksheet events. To see a complete list, go to a worksheet module , select “Worksheet” from the first drop-down. Then selecting an event procedure from the second drop-down to insert it into the module.
Worksheet Activate Event
Worksheet activate events run each time the worksheet is opened.
This code will select cell A1 (resetting the view area to the top-left of the worksheet) each time the worksheet is opened.
Worksheet Change Event
Worksheet change events run whenever a cell value is changed on the worksheet. Read our tutorial about Worksheet Change Events for more information.
Worksheet Cheat Sheet
Below you will find a cheat sheet containing common code examples for working with sheets in VBA
VBA Worksheets Cheatsheet
VBA worksheets Cheatsheet
| Description | Code Example |
|---|---|
| Referencing and Activating Sheets | |
| Tab Name | Sheets(«Input»).Activate |
| VBA Code Name | Sheet1.Activate |
| Index Position | Sheets(1).Activate |
| Select Sheet | |
| Select Sheet | Sheets(«Input»).Select |
| Set to Variable | Dim ws as Worksheet Set ws = ActiveSheet |
| Name / Rename | ActiveSheet.Name = «NewName» |
| Next Sheet | ActiveSheet.Next.Activate |
| Loop Through all Sheets | Dim ws as Worksheet |
For each ws in Worksheets
Msgbox ws.name
Next ws Loop Through Selected Sheets Dim ws As Worksheet
For Each ws In ActiveWindow.SelectedSheets
MsgBox ws.Name
Next ws Get ActiveSheet MsgBox ActiveSheet.Name Add Sheet Sheets.Add Add Sheet and Name Sheets.Add.Name = «NewSheet» Add Sheet With Name From Cell Sheets.Add.Name = range(«a3»).value Add Sheet After Another Sheets.Add After:=Sheets(«Input») Add Sheet After and Name Sheets.Add(After:=Sheets(«Input»)).Name = «NewSheet» Add Sheet Before and Name Sheets.Add(Before:=Sheets(«Input»)).Name = «NewSheet» Add Sheet to End of Workbook Sheets.Add After:=Sheets(Sheets.Count) Add Sheet to Beginning of Workbook Sheets.Add(Before:=Sheets(1)).Name = «FirstSheet» Add Sheet to Variable Dim ws As Worksheet
Set ws = Sheets.Add Copy Worksheets Move Sheet to End of Workbook Sheets(«Sheet1»).Move After:=Sheets(Sheets.Count) To New Workbook Sheets(«Sheet1»).Copy Selected Sheets To New Workbook ActiveWindow.SelectedSheets.Copy Before Another Sheet Sheets(«Sheet1»).Copy Before:=Sheets(«Sheet2») Before First Sheet Sheets(«Sheet1»).Copy Before:=Sheets(1) After Last Sheet Sheets(«Sheet1»).Copy After:=Sheets(Sheets.Count) Copy and Name Sheets(«Sheet1»).Copy After:=Sheets(Sheets.Count)
ActiveSheet.Name = «LastSheet» Copy and Name From Cell Value Sheets(«Sheet1»).Copy After:=Sheets(Sheets.Count)
ActiveSheet.Name = Range(«A1»).Value To Another Workbook Sheets(«Sheet1»).Copy Before:=Workbooks(«Example.xlsm»).Sheets(1) Hide / Unhide Sheets Hide Sheet Sheets(«Sheet1»).visible = False
or
Sheets(«Sheet1»).visible = xlSheetHidden Unhide Sheet Sheets(«Sheet1»).Visible = True
or
Sheets(«Sheet1»).Visible = xlSheetVisible Very Hide Sheet Sheets(Sheet1).Visible = xlSheetVeryHidden Delete or Clear Sheets Delete Sheet Sheets(«Sheet1»).Delete Delete Sheet (Error Handling) On Error Resume Next
Sheets(«Sheet1»).Delete
On Error GoTo 0 Delete Sheet (No Prompt) Application.DisplayAlerts = False
Sheets(«Sheet1»).Delete
Application.DisplayAlerts = True Clear Sheet Sheets(«Sheet1»).Cells.Clear Clear Sheet Contents Only Sheets(«Sheet1»).Cells.ClearContents Clear Sheet UsedRange Sheets(«Sheet1»).UsedRange.Clear Protect or Unprotect Sheets Unprotect (No Password) Sheets(«Sheet1»).Unprotect Unprotect (Password) Sheets(«Sheet1»).Unprotect «Password» Protect (No Password) Sheets(«Sheet1»).Protect Protect (Password) Sheets(«Sheet1»).Protect «Password» Protect but Allow VBA Access Sheets(«Sheet1»).Protect UserInterfaceOnly:=True Unprotect All Sheets Dim ws As Worksheet
For Each ws In Worksheets
ws.Unprotect «password»
Next ws

VBA Code Examples Add-in
Easily access all of the code examples found on our site.
Simply navigate to the menu, click, and the code will be inserted directly into your module. .xlam add-in.
Источник
Apart from cells and ranges, working with worksheets is another area you should know about to use VBA efficiently in Excel.
Just like any object in VBA, worksheets have different properties and methods associated with it that you can use while automating your work with VBA in Excel.
In this tutorial, I will cover ‘Worksheets’ in detail and also show you some practical examples.
So let’s get started.
All the codes I mention in this tutorial need to be placed in the VB Editor. Go to the ‘Where to Put the VBA Code‘ section to know how it works.
If you’re interested in learning VBA the easy way, check out my Online Excel VBA Training.
Difference between Worksheets and Sheets in VBA
In VBA, you have two collections that can be a bit confusing at times.
In a workbook, you can have worksheets and as well as chart sheets. The example below has three worksheets and one chart sheet.
In Excel VBA:
- The ‘Worksheets’ collection would refer to the collection of all the worksheet objects in a workbook. In the above example, the Worksheets collection would consist of three worksheets.
- The ‘Sheets’ collection would refer to all the worksheets as well as chart sheets in the workbook. In the above example, it would have four elements – 3 Worksheets + 1 Chart sheet.
If you have a workbook that only has worksheets and no chart sheets, then ‘Worksheets’ and ‘Sheets’ collection is the same.
But when you have one or more chart sheets, the ‘Sheets’ collection would be bigger than the ‘Worksheets’ collection
Sheets = Worksheets + Chart Sheets
Now with this distinction, I recommend being as specific as possible when writing a VBA code.
So if you have to refer to worksheets only, use the ‘Worksheets’ collection, and if you have to refer to all sheets (including chart sheets), the use the ‘Sheets’ collection.
In this tutorial, I will be using the ‘Worksheets’ collection only.
Referencing a Worksheet in VBA
There are many different ways you can use to refer to a worksheet in VBA.
Understanding how to refer to worksheets would help you write better code, especially when you’re using loops in your VBA code.
Using the Worksheet Name
The easiest way to refer to a worksheet is to use its name.
For example, suppose you have a workbook with three worksheets – Sheet 1, Sheet 2, Sheet 3.
And you want to activate Sheet 2.
You can do that using the following code:

Sub ActivateSheet()
Worksheets("Sheet2").Activate
End Sub
The above code asks VBA to refer to Sheet2 in the Worksheets collection and activate it.
Since we are using the exact sheet name, you can also use the Sheets collection here. So the below code would also do that same thing.
Sub ActivateSheet()
Sheets("Sheet2").Activate
End Sub
Using the Index Number
While using the sheet name is an easy way to refer to a worksheet, sometimes, you may not know the exact name of the worksheet.
For example, if you’re using a VBA code to add a new worksheet to the workbook, and you don’t know how many worksheets are already there, you would not know the name of the new worksheet.
In this case, you can use the index number of the worksheets.
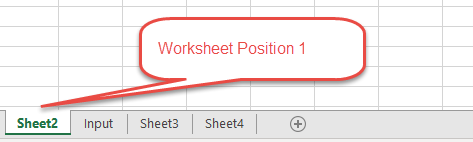
Suppose you have the following sheets in a workbook:
The below code would activate Sheet2:
Sub ActivateSheet()
Worksheets(2).Activate
End Sub
Note that we have used index number 2 in Worksheets(2). This would refer to the second object in the collection of the worksheets.
Now, what happens when you use 3 as the index number?
It will select Sheet3.
If you’re wondering why it selected Sheet3, as it’s clearly the fourth object.
This happens because a chart sheet is not a part of the worksheets collection.
So when we use the index numbers in the Worksheets collection, it will only refer to the worksheets in the workbook (and ignore the chart sheets).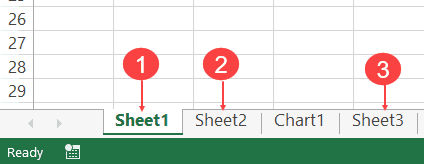
On the contrary, if you’re using Sheets, Sheets(1) would refer to Sheets1, Sheets(2) would refer to Sheet2, Sheets(3) would refer to Chart1 and Sheets(4) would refer to Sheet3.
This technique of using index number is useful when you want to loop through all the worksheets in a workbook. You can count the number of worksheets and then loop through these using this count (we will see how to do this later in this tutorial).
Note: The index number goes from left to right. So if you shift Sheet2 to the left of Sheet1, then Worksheets(1) would refer to Sheet2.
Using the Worksheet Code Name
One of the drawbacks of using the sheet name (as we saw in the section above) is that a user can change it.
And if the sheet name has been changed, your code wouldn’t work until you change the name of the worksheet in the VBA code as well.
To tackle this problem, you can use the code name of the worksheet (instead of the regular name that we have been using so far). A code name can be assigned in the VB Editor and doesn’t change when you change the name of the sheet from the worksheet area.
To give your worksheet a code name, follow the below steps:
- Click the Developer tab.
- Click the Visual Basic button. This will open the VB Editor.

- Click the View option in the menu and click on Project Window. This will make the Properties pane visible. If the Properties pane is already visible, skip this step.
- Click on the sheet name in the project explorer that you want to rename.
- In the Properties pane, change the name in the field in front of (Name). Note that you can’t have spaces in the name.

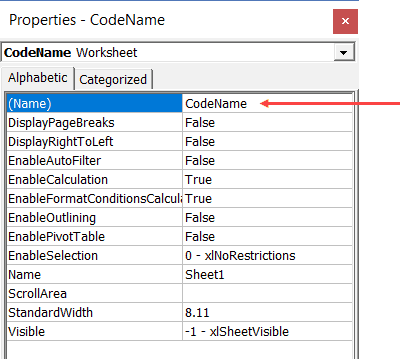
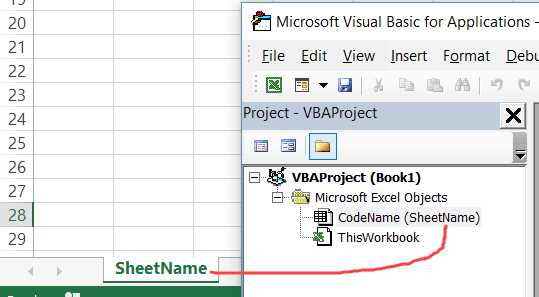
The above steps would change the name of your Worksheet in the VBA backend. In the Excel worksheet view, you can name the worksheet whatever you want, but in the backend, it will respond to both the names – the sheet name and the code name.
In the above image, the sheet name is ‘SheetName’ and the code name is ‘CodeName’. Even if you change the sheet name on the worksheet, the code name still remains the same.
Now, you can use either the Worksheets collection to refer to the worksheet or use the codename.
For example, both the line will activate the worksheet.
Worksheets("Sheetname").Activate
CodeName.Activate
The difference in these two is that if you change the name of the worksheet, the first one wouldn’t work. But the second line would continue to work even with the changed name. The second line (using the CodeName) is also shorter and easier to use.
Referring to a Worksheet in a Different Workbook
If you want to refer to a worksheet in a different workbook, that workbook needs to be open while the code runs, and you need to specify the name of the workbook and the worksheet that you want to refer to.
For example, if you have a workbook with the name Examples and you want to activate Sheet1 in the Example workbook, you need to use the below code:
Sub SheetActivate()
Workbooks("Examples.xlsx").Worksheets("Sheet1").Activate
End Sub
Note that if the workbook has been saved, you need to use the file name along with the extension. If you’re not sure what name to use, take help from Project Explorer.
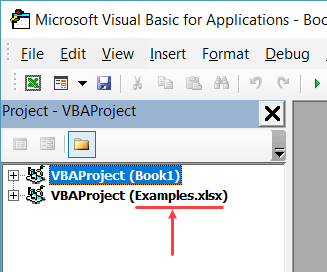
In case the workbook has not been saved, you don’t need to use the file extension.
Adding a Worksheet
The below code would add a worksheet (as the first worksheet – i.e., as the leftmost sheet in the sheet tab).
Sub AddSheet()
Worksheets.Add
End Sub
It takes the default name Sheet2 (or any other number based on how many sheets are already there).
If you want a worksheet to be added before a specific worksheet (say Sheet2), then you can use the below code.
Sub AddSheet()
Worksheets.Add Before:=Worksheets("Sheet2")
End Sub
The above code tells VBA to add a sheet and then uses the ‘Before’ statement to specify the worksheet before which the new worksheet should to be inserted.
Similarly, you can also add a sheet after a worksheet (say Sheet2), using the below code:
Sub AddSheet()
Worksheets.Add After:=Worksheets("Sheet2")
End Sub
If you want the new sheet to be added to the end of the sheets, you need to first know how many sheets are there. The following code first counts the number of sheets, and the adds the new sheet after the last sheet (to which we refer using the index number).
Sub AddSheet()
Dim SheetCount As Integer
SheetCount = Worksheets.Count
Worksheets.Add After:=Worksheets(SheetCount)
End Sub
Deleting a Worksheet
The below code would delete the active sheet from the workbook.
Sub DeleteSheet()
ActiveSheet.Delete
End Sub
The above code would show a warning prompt before deleting the worksheet.
If you don’t want to see the warning prompt, use the below code:
Sub DeleteSheet()
Application.DisplayAlerts = False
ActiveSheet.Delete
Application.DisplayAlerts = True
End Sub
When Application.DisplayAlerts is set to False, it will not show you the warning prompt. If you use it, remember to set it back to True at the end of the code.
Remember that you can’t undo this delete, so use the above code when you’re absolutely sure.
If you want to delete a specific sheet, you can do that using the following code:
Sub DeleteSheet()
Worksheets("Sheet2").Delete
End Sub
You can also use the code name of the sheet to delete it.
Sub DeleteSheet()
Sheet5.Delete
End Sub
Renaming the Worksheets
You can modify the name property of the Worksheet to change its name.
The following code will change the name of Sheet1 to ‘Summary’.
Sub RenameSheet()
Worksheets("Sheet1").Name = "Summary"
End Sub
You can combine this with the adding sheet method to have a set of sheets with specific names.
For example, if you want to insert four sheets with the name 2018 Q1, 2018 Q2, 2018 Q3, and 2018 Q4, you can use the below code.
Sub RenameSheet()
Dim Countsheets As Integer
Countsheets = Worksheets.Count
For i = 1 To 4
Worksheets.Add after:=Worksheets(Countsheets + i - 1)
Worksheets(Countsheets + i).Name = "2018 Q" & i
Next i
End Sub
In the above code, we first count the number of sheets and then use a For Next loop to insert new sheets at the end. As the sheet is added, the code also renames it.
Assigning Worksheet Object to a Variable
When working with worksheets, you can assign a worksheet to an object variable, and then use the variable instead of the worksheet references.
For example, if you want to add a year prefix to all the worksheets, instead of counting the sheets and the running the loop that many numbers of times, you can use the object variable.
Here is the code that will add 2018 as a prefix to all the worksheet’s names.
Sub RenameSheet()
Dim Ws As Worksheet
For Each Ws In Worksheets
Ws.Name = "2018 - " & Ws.Name
Next Ws
End Sub
The above code declares a variable Ws as the worksheet type (using the line ‘Dim Ws As Worksheet’).
Now, we don’t need to count the number of sheets to loop through these. Instead, we can use ‘For each Ws in Worksheets’ loop. This will allow us to go through all the sheets in the worksheets collection. It doesn’t matter whether there are 2 sheets or 20 sheets.
While the above code allows us to loop through all the sheets, you can also assign a specific sheet to a variable.
In the below code, we assign the variable Ws to Sheet2 and use it to access all of Sheet2’s properties.
Sub RenameSheet()
Dim Ws As Worksheet
Set Ws = Worksheets("Sheet2")
Ws.Name = "Summary"
Ws.Protect
End Sub
Once you set a worksheet reference to an object variable (using the SET statement), that object can be used instead of the worksheet reference. This can be helpful when you have a long complicated code and you want to change the reference. Instead of making the change everywhere, you can simply make the change in the SET statement.
Note that the code declares the Ws object as the Worksheet type variable (using the line Dim Ws as Worksheet).
Hide Worksheets Using VBA (Hidden + Very Hidden)
Hiding and Unhiding worksheets in Excel is a straightforward task.
You can hide a worksheet and the user would not see it when he/she opens the workbook. However, they can easily unhide the worksheet by right-clicking on any sheet tab.
But what if you don’t want them to be able to unhide the worksheet(s).
You can do this using VBA.
The code below would hide all the worksheets in the workbook (except the active sheet), such that you can not unhide it by right-clicking on the sheet name.
Sub HideAllExcetActiveSheet()
Dim Ws As Worksheet
For Each Ws In ThisWorkbook.Worksheets
If Ws.Name <> ActiveSheet.Name Then Ws.Visible = xlSheetVeryHidden
Next Ws
End Sub
In the above code, the Ws.Visible property is changed to xlSheetVeryHidden.
- When the Visible property is set to xlSheetVisible, the sheet is visible in the worksheet area (as worksheet tabs).
- When the Visible property is set to xlSheetHidden, the sheet is hidden but the user can unhide it by right-clicking on any sheet tab.
- When the Visible property is set to xlSheetVeryHidden, the sheet is hidden and cannot be unhidden from worksheet area. You need to use a VBA code or the properties window to unhide it.
If you want to simply hide sheets, that can be unhidden easily, use the below code:
Sub HideAllExceptActiveSheet()
Dim Ws As Worksheet
For Each Ws In ThisWorkbook.Worksheets
If Ws.Name <> ActiveSheet.Name Then Ws.Visible = xlSheetHidden
Next Ws
End Sub
The below code would unhide all the worksheets (both hidden and very hidden).
Sub UnhideAllWoksheets()
Dim Ws As Worksheet
For Each Ws In ThisWorkbook.Worksheets
Ws.Visible = xlSheetVisible
Next Ws
End Sub
Related Article: Unhide All Sheets In Excel (at one go)
Hide Sheets Based on the Text in it
Suppose you have multiple sheets with the name of different departments or years and you want to hide all the sheets except the ones that have the year 2018 in it.
You can do this using a VBA INSTR function.
The below code would hide all the sheets except the ones with the text 2018 in it.
Sub HideWithMatchingText()
Dim Ws As Worksheet
For Each Ws In Worksheets
If InStr(1, Ws.Name, "2018", vbBinaryCompare) = 0 Then
Ws.Visible = xlSheetHidden
End If
Next Ws
End Sub
In the above code, the INSTR function returns the position of the character where it finds the matching string. If it doesn’t find the matching string, it returns 0.
The above code checks whether the name has the text 2018 in it. If it does, nothing happens, else the worksheet is hidden.
You can take this a step further by having the text in a cell and using that cell in the code. This will allow you to have a value in the cell and then when you run the macro, all the sheets, except the one with the matching text in it, would remain visible (along with the sheets where you’re entering the value in the cell).
Sorting the Worksheets in an Alphabetical Order
Using VBA, you can quickly sort the worksheets based on their names.
For example, if you have a workbook that has sheets for different department or years, then you can use the below code to quickly sort these sheets in an ascending order.
Sub SortSheetsTabName()
Application.ScreenUpdating = False
Dim ShCount As Integer, i As Integer, j As Integer
ShCount = Sheets.Count
For i = 1 To ShCount - 1
For j = i + 1 To ShCount
If Sheets(j).Name < Sheets(i).Name Then
Sheets(j).Move before:=Sheets(i)
End If
Next j
Next i
Application.ScreenUpdating = True
End Sub
Note that this code works well with text names and in most of the cases with years and numbers too. But it can give you the wrong results in case you have the sheet names as 1,2,11. It will sort and give you the sequence 1, 11, 2. This is because it does the comparison as text and considers 2 bigger than 11.
Protect/Unprotect All the Sheets at One Go
If you have a lot of worksheets in a workbook and you want to protect all the sheets, you can use the VBA code below.
It allows you to specify the password within the code. You will need this password to unprotect the worksheet.
Sub ProtectAllSheets()
Dim ws As Worksheet
Dim password As String
password = "Test123" 'replace Test123 with the password you want
For Each ws In Worksheets
ws.Protect password:=password
Next ws
End Sub
The following code would unprotect all the sheets in one go.
Sub ProtectAllSheets()
Dim ws As Worksheet
Dim password As String
password = "Test123" 'replace Test123 with the password you used while protecting
For Each ws In Worksheets
ws.Unprotect password:=password
Next ws
End Sub
Creating a Table of Contents of All Worksheets (with Hyperlinks)
If you have a set of worksheets in the workbook and you want to quickly insert a summary sheet which has the links to all the sheets, you can use the below code.
Sub AddIndexSheet()
Worksheets.Add
ActiveSheet.Name = "Index"
For i = 2 To Worksheets.Count
ActiveSheet.Hyperlinks.Add Anchor:=Cells(i - 1, 1), _
Address:="", SubAddress:=Worksheets(i).Name & "!A1", _
TextToDisplay:=Worksheets(i).Name
Next i
End Sub
The above code inserts a new worksheet and names it Index.
It then loops through all the worksheets and creates a hyperlink for all the worksheets in the Index sheet.
Where to Put the VBA Code
Wondering where the VBA code goes in your Excel workbook?
Excel has a VBA backend called the VBA editor. You need to copy and paste the code into the VB Editor module code window.
Here are the steps to do this:
- Go to the Developer tab.

- Click on the Visual Basic option. This will open the VB editor in the backend.
- In the Project Explorer pane in the VB Editor, right-click on any object for the workbook in which you want to insert the code. If you don’t see the Project Explorer go to the View tab and click on Project Explorer.
- Go to Insert and click on Module. This will insert a module object for your workbook.

- Copy and paste the code in the module window.


You May Also Like the Following Excel VBA Tutorials:
- Working with Workbooks using VBA.
- Using IF Then Else Statements in VBA.
- For Next Loop in VBA.
- Creating a User-Defined Function in Excel.
- How to Record a Macro in Excel.
- How to Run a Macro in Excel.
- Excel VBA Events – An Easy (and Complete) Guide.
- How to Create an Add-in in Excel.
- How to Save and Reuse Macro using Excel Personal Macro Workbook.
- Using Active Cell in VBA in Excel (Examples)
- How to Open Excel Files Using VBA (Examples)