
На чтение 16 мин. Просмотров 14.5k.

Malcolm Gladwell
Мечтатель начинает с чистого листа бумаги и переосмысливает мир
Эта статья содержит полное руководство по использованию Excel
VBA Worksheet в Excel VBA. Если вы хотите узнать, как что-то сделать быстро, ознакомьтесь с кратким руководством к рабочему листу VBA ниже.
Если вы новичок в VBA, то эта статья — отличное место для начала. Мне нравится разбивать вещи на простые термины и объяснять их на простом языке.
Вы можете прочитать статью от начала до конца, так как она написана в логическом порядке. Или, если предпочитаете, вы можете использовать оглавление ниже и перейти непосредственно к теме по вашему выбору.
Содержание
- Краткое руководство к рабочему листу VBA
- Вступление
- Доступ к рабочему листу
- Использование индекса для доступа к рабочему листу
- Использование кодового имени рабочего листа
- Активный лист
- Объявление объекта листа
- Доступ к рабочему листу в двух словах
- Добавить рабочий лист
- Удалить рабочий лист
- Цикл по рабочим листам
- Использование коллекции листов
- Заключение
Краткое руководство к рабочему листу VBA
В следующей таблице приведен краткий обзор различных методов
Worksheet .
Примечание. Я использую Worksheet в таблице ниже, не указывая рабочую книгу, т.е. Worksheets, а не ThisWorkbook.Worksheets, wk.Worksheets и т.д. Это сделано для того, чтобы примеры были понятными и удобными для чтения. Вы должны всегда указывать рабочую книгу при использовании Worksheets . В противном случае активная рабочая книга будет использоваться по умолчанию.
| Задача | Исполнение |
| Доступ к рабочему листу по имени |
Worksheets(«Лист1») |
| Доступ к рабочему листу по позиции слева |
Worksheets(2) Worksheets(4) |
| Получите доступ к самому левому рабочему листу |
Worksheets(1) |
| Получите доступ к самому правому листу |
Worksheets(Worksheets.Count) |
| Доступ с использованием кодового имени листа (только текущая книга) |
Смотри раздел статьи Использование кодового имени |
| Доступ по кодовому имени рабочего листа (другая рабочая книга) |
Смотри раздел статьи Использование кодового имени |
| Доступ к активному листу | ActiveSheet |
| Объявить переменную листа | Dim sh As Worksheet |
| Назначить переменную листа | Set sh = Worksheets(«Лист1») |
| Добавить лист | Worksheets.Add |
| Добавить рабочий лист и назначить переменную |
Worksheets.Add Before:= Worksheets(1) |
| Добавить лист в первую позицию (слева) |
Set sh =Worksheets.Add |
| Добавить лист в последнюю позицию (справа) |
Worksheets.Add after:=Worksheets(Worksheets.Count) |
| Добавить несколько листов | Worksheets.Add Count:=3 |
| Активировать рабочий лист | sh.Activate |
| Копировать лист | sh.Copy |
| Копировать после листа | sh1.Copy After:=Sh2 |
| Скопировать перед листом | sh1.Copy Before:=Sh2 |
| Удалить рабочий лист | sh.Delete |
| Удалить рабочий лист без предупреждения |
Application.DisplayAlerts = False sh.Delete Application.DisplayAlerts = True |
| Изменить имя листа | sh.Name = «Data» |
| Показать/скрыть лист | sh.Visible = xlSheetHidden sh.Visible = xlSheetVisible sh.Name = «Data» |
| Перебрать все листы (For) | Dim i As Long For i = 1 To Worksheets.Count Debug.Print Worksheets(i).Name Next i |
| Перебрать все листы (For Each) | Dim sh As Worksheet For Each sh In Worksheets Debug.Print sh.Name Next |
Вступление
Три наиболее важных элемента VBA — это Рабочая книга, Рабочий лист и Ячейки. Из всего кода, который вы пишете, 90% будут включать один или все из них.
Наиболее распространенное использование Worksheet в VBA для доступа к его ячейкам. Вы можете использовать его для защиты, скрытия, добавления, перемещения или копирования листа.
Тем не менее, вы будете в основном использовать его для выполнения некоторых действий с одной или несколькими ячейками на листе.
Использование Worksheets более простое, чем использование рабочих книг. С книгами вам может потребоваться открыть их, найти, в какой папке они находятся, проверить, используются ли они, и так далее. С рабочим листом он либо существует в рабочей книге, либо его нет.
Доступ к рабочему листу
В VBA каждая рабочая книга имеет коллекцию рабочих листов. В этой коллекции есть запись для каждого рабочего листа. Эта коллекция называется просто Worksheets и используется очень похоже на коллекцию Workbooks. Чтобы получить доступ к рабочему листу, достаточно указать имя.
Приведенный ниже код записывает «Привет Мир» в ячейках A1 на листах: Лист1, Лист2 и Лист3 текущей рабочей книги.
Sub ZapisVYacheiku1()

    ' Запись в ячейку А1 в листе 1, листе 2 и листе 3
    ThisWorkbook.Worksheets("Лист1").Range("A1") = "Привет Мир"
    ThisWorkbook.Worksheets("Лист2").Range("A1") = "Привет Мир"
    ThisWorkbook.Worksheets("Лист3").Range("A1") = "Привет Мир"

End Sub
Коллекция Worksheets всегда принадлежит книге. Если мы не
указываем рабочую книгу, то активная рабочая книга используется по умолчанию.
Sub ZapisVYacheiku1()

    ' Worksheets относятся к рабочим листам в активной рабочей книге.
    Worksheets("Лист1").Range("A1") = "Привет Мир"
    Worksheets("Лист2").Range("A1") = "Привет Мир"
    Worksheets("Лист3").Range("A1") = "Привет Мир"

End Sub
Скрыть рабочий лист
В следующих примерах показано, как скрыть и показать лист.
ThisWorkbook.Worksheets("Лист1").Visible = xlSheetHidden

ThisWorkbook.Worksheets("Лист1").Visible = xlSheetVisible
Если вы хотите запретить пользователю доступ к рабочему
листу, вы можете сделать его «очень скрытым». Это означает, что это может быть
сделано видимым только кодом.
' Скрыть от доступа пользователя
ThisWorkbook.Worksheets("Лист1").Visible = xlVeryHidden

' Это единственный способ сделать лист xlVeryHidden видимым
ThisWorkbook.Worksheets("Лист1").Visible = xlSheetVisible
Защитить рабочий лист
Другой пример использования Worksheet — когда вы хотите защитить его.
ThisWorkbook.Worksheets("Лист1").Protect Password:="Мойпароль"

ThisWorkbook.Worksheets("Лист1").Unprotect Password:="Мойпароль"
Индекс вне диапазона
При использовании Worksheets вы можете получить сообщение об
ошибке:
Run-time Error 9 Subscript out of Range

Это означает, что вы пытались получить доступ к рабочему листу, который не существует. Это может произойти по следующим причинам:
- Имя Worksheet , присвоенное рабочим листам, написано неправильно.
- Название листа изменилось.
- Рабочий лист был удален.
- Индекс был большим, например Вы использовали рабочие листы (5), но есть только четыре рабочих листа
- Используется неправильная рабочая книга, например Workbooks(«book1.xlsx»).Worksheets(«Лист1») вместо
Workbooks(«book3.xlsx»).Worksheets («Лист1»).
Если у вас остались проблемы, используйте один из циклов из раздела «Циклы по рабочим листам», чтобы напечатать имена всех рабочих листов коллекции.
Использование индекса для доступа к рабочему листу
До сих пор мы использовали имя листа для доступа к листу.
Указатель относится к положению вкладки листа в рабочей книге. Поскольку
положение может быть легко изменено пользователем, не рекомендуется
использовать это.
В следующем коде показаны примеры использования индекса.
' Использование этого кода является плохой идеей, так как
' позиции листа все время меняются
Sub IspIndList()

    With ThisWorkbook
        ' Самый левый лист
        Debug.Print .Worksheets(1).Name
        ' Третий лист слева
        Debug.Print .Worksheets(3).Name
        ' Самый правый лист
        Debug.Print .Worksheets(.Worksheets.Count).Name
    End With

End Sub
В приведенном выше примере я использовал Debug.Print для печати в Immediate Window. Для просмотра этого окна выберите «Вид» -> «Immediate Window » (Ctrl + G).


Использование кодового имени рабочего листа
Лучший способ получить доступ к рабочему листу —
использовать кодовое имя. Каждый лист имеет имя листа и кодовое имя. Имя листа
— это имя, которое отображается на вкладке листа в Excel.
Изменение имени листа не приводит к изменению кодового имени, что означает, что ссылка на лист по кодовому имени — отличная идея.
Если вы посмотрите в окне свойств VBE, вы увидите оба имени.
На рисунке вы можете видеть, что кодовое имя — это имя вне скобок, а имя листа
— в скобках.

Вы можете изменить как имя листа, так и кодовое имя в окне
свойств листа (см. Изображение ниже).

Если ваш код ссылается на кодовое имя, то пользователь может
изменить имя листа, и это не повлияет на ваш код. В приведенном ниже примере мы
ссылаемся на рабочий лист напрямую, используя кодовое имя.
Sub IspKodImya2()

    ' Используя кодовое имя листа
    Debug.Print CodeName.Name
    CodeName.Range("A1") = 45
    CodeName.Visible = True

End Sub
Это делает код легким для чтения и безопасным от изменения
пользователем имени листа.
Кодовое имя в других книгах
Есть один недостаток использования кодового имени. Он относится только к рабочим листам в рабочей книге, которая содержит код, т.е. ThisWorkbook.
Однако мы можем использовать простую функцию, чтобы найти
кодовое имя листа в другой книге.
Sub ИспЛист()

    Dim sh As Worksheet
    ' Получить рабочий лист под кодовым именем
    Set sh = SheetFromCodeName("CodeName", ThisWorkbook)
    ' Используйте рабочий лист
    Debug.Print sh.Name

End Sub

' Эта функция получает объект листа из кодового имени
Public Function SheetFromCodeName(Name As String, bk As Workbook) As Worksheet

    Dim sh As Worksheet
    For Each sh In bk.Worksheets
        If sh.CodeName = Name Then
           Set SheetFromCodeName = sh
           Exit For
        End If
    Next sh

End Function
Использование приведенного выше кода означает, что если
пользователь изменит имя рабочего листа, то на ваш код это не повлияет.
Существует другой способ получения имени листа внешней
рабочей книги с использованием кодового имени. Вы можете использовать элемент
VBProject этой Рабочей книги.
Вы можете увидеть, как это сделать, в примере ниже. Я включил это, как дополнительную информацию, я бы рекомендовал использовать метод из предыдущего примера, а не этот.
Public Function SheetFromCodeName2(codeName As String _
                             , bk As Workbook) As Worksheet

    ' Получить имя листа из CodeName, используя VBProject
    Dim sheetName As String
    sheetName = bk.VBProject.VBComponents(codeName).Properties("Name")

    ' Используйте имя листа, чтобы получить объект листа
    Set SheetFromCodeName2 = bk.Worksheets(sheetName)

End Function
Резюме кодового имени
Ниже приведено краткое описание использования кодового имени:
- Кодовое имя рабочего листа может быть
использовано непосредственно в коде, например. Sheet1.Range - Кодовое имя будет по-прежнему работать, если имя
рабочего листа будет изменено. - Кодовое имя может использоваться только для
листов в той же книге, что и код. - Везде, где вы видите ThisWorkbook.Worksheets
(«имя листа»), вы можете заменить его кодовым именем рабочего листа. - Вы можете использовать функцию SheetFromCodeName
сверху, чтобы получить кодовое имя рабочих листов в других рабочих книгах.
Активный лист
Объект ActiveSheet ссылается на рабочий лист, который в данный момент активен. Вы должны использовать ActiveSheet только в том случае, если у вас есть особая необходимость ссылаться на активный лист.
В противном случае вы должны указать рабочий лист, который
вы используете.
Если вы используете метод листа, такой как Range, и не
упоминаете лист, он по умолчанию будет использовать активный лист.
' Написать в ячейку A1 в активном листе
ActiveSheet.Range("A1") = 99

' Активный лист используется по умолчанию, если лист не используется
Range("A1") = 99
Объявление объекта листа
Объявление объекта листа полезно для того, чтобы сделать ваш
код более понятным и легким для чтения.
В следующем примере показан код для обновления диапазонов
ячеек. Первый Sub не объявляет объект листа. Вторая подпрограмма объявляет
объект листа, и поэтому код намного понятнее.
Sub NeObyavObektList()

    Debug.Print ThisWorkbook.Worksheets("Лист1").Name
    ThisWorkbook.Worksheets("Лист1").Range("A1") = 6
    ThisWorkbook.Worksheets("Лист1").Range("B2:B9").Font.Italic = True
    ThisWorkbook.Worksheets("Лист1").Range("B2:B9").Interior.Color = rgbRed

End Sub
Sub ObyavObektList()

    Dim sht As Worksheet
    Set sht = ThisWorkbook.Worksheets("Лист1")

    sht.Range("A1") = 6
    sht.Range("B2:B9").Font.Italic = True
    sht.Range("B2:B9").Interior.Color = rgbRed

End Sub
Вы также можете использовать ключевое слово With с объектом
листа, как показано в следующем примере.
Sub ObyavObektListWith()

    Dim sht As Worksheet
    Set sht = ThisWorkbook.Worksheets("Лист1")

    With sht
        .Range("A1") = 6
        .Range("B2:B9").Font.Italic = True
        .Range("B2:B9").Interior.Color = rgbRed
    End With

End Sub
Доступ к рабочему листу в двух словах
Из-за множества различных способов доступа к рабочему листу вы можете быть сбитыми с толку. Так что в этом разделе я собираюсь разбить его на простые термины.
- Если вы хотите использовать тот лист, который активен в данный момент, используйте ActiveSheet.
ActiveSheet.Range("A1") = 55
2. Если лист находится в той же книге, что и код, используйте кодовое имя.
3. Если рабочая таблица находится в другой рабочей книге, сначала получите рабочую книгу, а затем получите рабочую таблицу.
' Получить рабочую книгу
Dim wk As Workbook
Set wk = Workbooks.Open("C:ДокументыСчета.xlsx", ReadOnly:=True)
' Затем получите лист
Dim sh As Worksheet
Set sh = wk.Worksheets("Лист1")
Если вы хотите защитить пользователя от изменения имени листа, используйте функцию SheetFromCodeName из раздела «Имя кода».
' Получить рабочую книгу
Dim wk As Workbook
Set wk = Workbooks.Open("C:ДокументыСчета.xlsx", ReadOnly:=True)

' Затем получите лист
Dim sh As Worksheet
Set sh = SheetFromCodeName("sheetcodename",wk)
Добавить рабочий лист
Примеры в этом разделе показывают, как добавить новую
рабочую таблицу в рабочую книгу. Если вы не предоставите никаких аргументов для
функции Add, то новый
рабочий лист будет помещен перед активным рабочим листом.
Когда вы добавляете рабочий лист, он создается с именем по умолчанию, например «Лист4». Если вы хотите изменить имя, вы можете легко сделать это, используя свойство Name.
В следующем примере добавляется новый рабочий лист и изменяется имя на «Счета». Если лист с именем «Счета» уже существует, вы получите сообщение об ошибке.
Sub DobavitList()

    Dim sht As Worksheet

    ' Добавляет новый лист перед активным листом
    Set sht = ThisWorkbook.Worksheets.Add
    ' Установите название листа
    sht.Name = "Счета"

    ' Добавляет 3 новых листа перед активным листом
    ThisWorkbook.Worksheets.Add Count:=3

End Sub
В предыдущем примере вы добавляете листы по отношению к
активному листу. Вы также можете указать точную позицию для размещения листа.
Для этого вам нужно указать, какой лист новый лист должен
быть вставлен до или после. Следующий код показывает вам, как это сделать.
Sub DobavitListPervPosl()

    Dim shtNew As Worksheet
    Dim shtFirst As Worksheet, shtLast As Worksheet

    With ThisWorkbook

        Set shtFirst = .Worksheets(1)
        Set shtLast = .Worksheets(.Worksheets.Count)

        ' Добавляет новый лист на первую позицию в книге
        Set shtNew = Worksheets.Add(Before:=shtFirst)
        shtNew.Name = "FirstSheet"

        ' Добавляет новый лист к последней позиции в книге
        Set shtNew = Worksheets.Add(After:=shtLast)
        shtNew.Name = "LastSheet"

    End With

End Sub
Удалить рабочий лист
Чтобы удалить лист, просто вызовите Delete.
Dim sh As Worksheet
Set sh = ThisWorkbook.Worksheets("Лист12")
sh.Delete
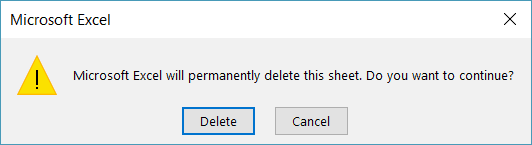
Excel отобразит предупреждающее сообщение при удалении листа. Если вы хотите скрыть это сообщение, вы можете использовать код ниже:
Application.DisplayAlerts = False
sh.Delete
Application.DisplayAlerts = True
Есть два аспекта, которые нужно учитывать при удалении таблиц.
Если вы попытаетесь получить доступ к рабочему листу после
его удаления, вы получите ошибку «Subscript out of Range», которую мы видели в
разделе «Доступ к рабочему листу».
Dim sh As Worksheet
Set sh = ThisWorkbook.Worksheets("Лист2")
sh.Delete

' Эта строка выдаст «Subscript out of Range», так как «Лист2» не существует
Set sh = ThisWorkbook.Worksheets("Лист2")
Вторая проблема — когда вы назначаете переменную листа. Если вы попытаетесь использовать эту переменную после удаления листа, вы получите ошибку автоматизации, подобную этой:
Run-Time error -21147221080 (800401a8′) Automation Error
Если вы используете кодовое имя рабочего листа, а не
переменную, это приведет к сбою Excel,
а не к ошибке автоматизации.
В следующем примере показано, как происходят ошибки автоматизации.
sh.Delete

' Эта строка выдаст ошибку автоматизации
Debug.Assert sh.Name
Если вы назначите переменную Worksheet действительному рабочему листу, он будет работать нормально.
sh.Delete

' Назначить sh на другой лист
Set sh = Worksheets("Лист3")

' Эта строка будет работать нормально
Debug.Assert sh.Name
Цикл по рабочим листам
Элемент «Worksheets» — это набор рабочих листов, принадлежащих рабочей книге. Вы можете просмотреть каждый лист в коллекции рабочих листов, используя циклы «For Each» или «For».
В следующем примере используется цикл For Each.
Sub CiklForEach()

    ' Записывает «Привет Мир» в ячейку A1 для каждого листа
    Dim sht As Worksheet
    For Each sht In ThisWorkbook.Worksheets
         sht.Range("A1") = "Привет Мир"
    Next sht

End Sub
В следующем примере используется стандартный цикл For.
Sub CiklFor()

    ' Записывает «Привет Мир» в ячейку A1 для каждого листа
    Dim i As Long
    For i = 1 To ThisWorkbook.Worksheets.Count
         ThisWorkbook.Worksheets(i).Range("A1") = "Привет Мир"
    Next sht

End Sub
Вы видели, как получить доступ ко всем открытым рабочим книгам и как получить доступ ко всем рабочим листам в ThisWorkbook. Давайте сделаем еще один шаг вперед — узнаем, как получить доступ ко всем рабочим листам во всех открытых рабочих книгах.
Примечание. Если вы используете код, подобный этому, для записи на листы, то сначала сделайте резервную копию всего, так как в итоге вы можете записать неверные данные на все листы.
Sub NazvVsehStr()

    ' Печатает рабочую книгу и названия листов для
    ' всех листов в открытых рабочих книгах
    Dim wrk As Workbook
    Dim sht As Worksheet
    For Each wrk In Workbooks
        For Each sht In wrk.Worksheets
            Debug.Print wrk.Name + ":" + sht.Name
        Next sht
    Next wrk

End Sub
Использование коллекции листов
Рабочая книга имеет еще одну коллекцию, похожую на Worksheets под названием Sheets. Это иногда путает пользователей. Чтобы понять, в первую очередь, вам нужно знать о типе листа, который является диаграммой.
В Excel есть возможность создать лист, который является диаграммой. Для этого нужно:
- Создать диаграмму на любом листе.
- Щелкнуть правой кнопкой мыши на графике и выбрать «Переместить».
- Выбрать первый вариант «Новый лист» и нажмите «ОК».
Теперь у вас есть рабочая книга, в которой есть типовые листы и лист-диаграмма.
- Коллекция «Worksheets » относится ко всем рабочим листам в рабочей книге. Не включает в себя листы типа диаграммы.
- Коллекция Sheets относится ко всем листам, принадлежащим книге, включая листы типовой диаграммы.
Ниже приведены два примера кода. Первый проходит через все
листы в рабочей книге и печатает название листа и тип листа. Второй пример
делает то же самое с коллекцией Worksheets.
Чтобы опробовать эти примеры, вы должны сначала добавить лист-диаграмму в свою книгу, чтобы увидеть разницу.
Sub KollSheets()

    Dim sht As Variant
    ' Показать название и тип каждого листа
    For Each sht In ThisWorkbook.Sheets
        Debug.Print sht.Name & " is type " & TypeName(sht)
    Next sht

End Sub

Sub KollWorkSheets()

    Dim sht As Variant
    ' Показать название и тип каждого листа
    For Each sht In ThisWorkbook.Worksheets
        Debug.Print sht.Name & " is type " & TypeName(sht)
    Next sht

End Sub
Если у вас нет листов диаграмм, то использование коллекции Sheets — то же самое, что использование коллекции WorkSheets.
Заключение
На этом мы завершаем статью о Worksheet VBA. Я надеюсь, что было полезным.
Три наиболее важных элемента Excel VBA — это рабочие книги, рабочие таблицы, диапазоны и ячейки.
Эти элементы будут использоваться практически во всем, что вы делаете. Понимание их сделает вашу жизнь намного проще и сделает изучение VBA увлекательнее.
Создание, копирование, перемещение и удаление рабочих листов Excel с помощью кода VBA. Методы Sheets.Add, Worksheet.Copy, Worksheet.Move и Worksheet.Delete.
Создание новых листов
Создание новых рабочих листов осуществляется с помощью метода Sheets.Add.
Синтаксис метода Sheets.Add
expression.Add [Before, After, Count, Type]
где expression — переменная, представляющая собой объект Sheet.
Компоненты метода Sheets.Add
- Before* — необязательный параметр типа данных Variant, указывающий на лист, перед которым будет добавлен новый.
- After* — необязательный параметр типа данных Variant, указывающий на лист, после которого будет добавлен новый.
- Count — необязательный параметр типа данных Variant, указывающий, сколько листов будет добавлено (по умолчанию — 1).
- Type — необязательный параметр типа данных Variant, указывающий тип листа: xlWorksheet** (рабочий лист) или xlChart (диаграмма), по умолчанию — xlWorksheet.
*Если Before и After не указаны, новый лист, по умолчанию, будет добавлен перед активным листом.
**Для создания рабочего листа (xlWorksheet) можно использовать метод Worksheets.Add, который для создания диаграмм уже не подойдет.
Примеры создания листов
|
1 2 3 4 5 6 7 8 9 10 11 12 13 14 15 16 17 18 19 20 |
‘Создание рабочего листа: Sheets.Add Worksheets.Add ThisWorkbook.Sheets.Add After:=ActiveSheet, Count:=2 Workbooks(«Книга1.xlsm»).Sheets.Add After:=Лист1 Workbooks(«Книга1.xlsm»).Sheets.Add After:=Worksheets(1) Workbooks(«Книга1.xlsm»).Sheets.Add After:=Worksheets(«Лист1») ‘Создание нового листа с заданным именем: Workbooks(«Книга1.xlsm»).Sheets.Add.Name = «Мой новый лист» ‘Создание диаграммы: Sheets.Add Type:=xlChart ‘Добавление нового листа перед ‘последним листом рабочей книги Sheets.Add Before:=Sheets(Sheets.Count) ‘Добавление нового листа в конец Sheets.Add After:=Sheets(Sheets.Count) |
- Лист1 в After:=Лист1 — это уникальное имя листа, указанное в проводнике редактора VBA без скобок.
- Лист1 в After:=Worksheets(«Лист1») — это имя на ярлыке листа, указанное в проводнике редактора VBA в скобках.
Создаваемый лист можно присвоить объектной переменной:
|
Dim myList As Object ‘В активной книге Set myList = Worksheets.Add ‘В книге «Книга1.xlsm» Set myList = Workbooks(«Книга1.xlsm»).Worksheets.Add ‘Работаем с переменной myList.Name = «Listok1» myList.Cells(1, 1) = myList.Name ‘Очищаем переменную Set myList = Nothing |
Если создаваемый лист присваивается объектной переменной, он будет помещен перед активным листом. Указать дополнительные параметры невозможно.
Копирование листов
Копирование рабочих листов осуществляется с помощью метода Worksheet.Copy.
Синтаксис метода Worksheet.Copy
expression.Copy [Before, After]
где expression — переменная, представляющая собой объект Worksheet.
Компоненты метода Worksheet.Copy
- Before* — необязательный параметр типа данных Variant, указывающий на лист, перед которым будет добавлена копия.
- After* — необязательный параметр типа данных Variant, указывающий на лист, после которого будет добавлена копия.
*Если Before и After не указаны, Excel создаст новую книгу и поместит копию листа в нее. Если скопированный лист содержит код в проекте VBA (в модуле листа), он тоже будет перенесен в новую книгу.
Примеры копирования листов
|
1 2 3 4 5 6 7 8 9 10 11 12 13 14 15 16 17 18 19 20 21 22 23 |
‘В пределах активной книги ‘(уникальные имена листов) Лист1.Copy After:=Лист2 ‘В пределах активной книги ‘(имена листов на ярлычках) Worksheets(«Лист1»).Copy Before:=Worksheets(«Лист2») ‘Вставить копию в конец Лист1.Copy After:=Sheets(Sheets.Count) ‘Из одной книги в другую Workbooks(«Книга1.xlsm»).Worksheets(«Лист1»).Copy _ After:=Workbooks(«Книга2.xlsm»).Worksheets(«Лист1») ‘Один лист активной книги в новую книгу Лист1.Copy ‘Несколько листов активной книги в новую книгу* Sheets(Array(«Лист1», «Лист2», «Лист3»)).Copy ‘Все листы книги с кодом в новую книгу ThisWorkbook.Worksheets.Copy |
* Если при копировании в новую книгу нескольких листов хотя бы один лист содержит умную таблицу — копирование невозможно. Один лист, содержащий умную таблицу, копируется в новую книгу без проблем.
Если рабочие книги указаны как элементы коллекции Workbooks, в том числе ActiveWorkbook и ThisWorkbook, листы нужно указывать как элементы коллекции Worksheets, использование уникальных имен вызовет ошибку.
Перемещение листов
Перемещение рабочих листов осуществляется с помощью метода Worksheet.Move.
Синтаксис метода Worksheet.Move
expression.Move [Before, After]
где expression — переменная, представляющая собой объект Worksheet.
Компоненты метода Worksheet.Move
- Before* — необязательный параметр типа данных Variant, указывающий на лист, перед которым будет размещен перемещаемый лист.
- After* — необязательный параметр типа данных Variant, указывающий на лист, после которого будет размещен перемещаемый лист.
*Если Before и After не указаны, Excel создаст новую книгу и переместит лист в нее.
Примеры перемещения листов
Простые примеры перемещения листов:
|
1 2 3 4 5 6 7 8 9 10 11 12 13 14 15 16 17 |
‘В пределах активной книги ‘(уникальные имена листов) Лист1.Move After:=Лист2 ‘В пределах активной книги ‘(имена листов на ярлычках) Worksheets(«Лист1»).Move Before:=Worksheets(«Лист2») ‘Размещение после последнего листа: Лист1.Move After:=Sheets(Sheets.Count) ‘Из одной книги в другую Workbooks(«Книга1.xlsm»).Worksheets(«Лист1»).Move _ After:=Workbooks(«Книга2.xlsm»).Worksheets(«Лист1») ‘В новую книгу Лист1.Move |
Если рабочие книги указаны как элементы коллекции Workbooks, в том числе ActiveWorkbook и ThisWorkbook, листы нужно указывать как элементы коллекции Worksheets, использование уникальных имен вызовет ошибку.
Перемещение листа «Лист4» в позицию перед листом, указанным как по порядковому номеру, так и по имени ярлыка:
|
Sub Peremeshcheniye() Dim x x = InputBox(«Введите имя или номер листа», «Перемещение листа «Лист4»») If IsNumeric(x) Then x = CLng(x) Sheets(«Лист4»).Move Before:=Sheets(x) End Sub |
Удаление листов
Удаление рабочих листов осуществляется с помощью метода Worksheet.Delete
Синтаксис метода Worksheet.Delete
expression.Delete
где expression — переменная, представляющая собой объект Worksheet.
Примеры удаления листов
|
‘По уникальному имени Лист1.Delete ‘По имени на ярлычке Worksheets(«Лист1»).Delete ‘По индексу листа Worksheets(1).Delete ‘В другой книге Workbooks(«Книга1.xlsm»).Worksheets(«Лист1»).Delete |
Если рабочие книги указаны как элементы коллекции Workbooks, в том числе ActiveWorkbook и ThisWorkbook, листы нужно указывать как элементы коллекции Worksheets, использование уникальных имен вызовет ошибку.
Как обратиться к рабочему листу, переименовать, скрыть или отобразить его с помощью кода VBA Excel, смотрите в этой статье.
Return to VBA Code Examples
In this Article
- Defining Object Variables
- Declaring the Object Variable
- Set Value
- Object Examples in Excel
- Workbook Object
- Worksheet Object
- Range Object
- Shape Object
This tutorial will teach you how to define object variables using the Set statement in VBA.
Defining Object Variables
Objects are the cornerstone of Microsoft Office – without objects, we cannot achieve anything. In Excel, objects include the Workbook, Worksheet or Range Objects. In Microsoft Word, examples are the Document or Table object. Each object has a variety of Properties and Methods that can be programmed to control the behavior of that object.
Declaring the Object Variable
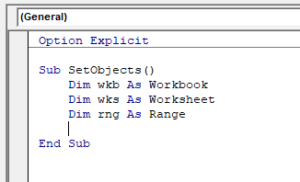
Before we can reference the object in code, and therefore control the object, we need to declare the object. We can do this using the Dim Statement.
Dim wkb as Workbook
Dim wks as Worksheet
Dim Rng as Range
Dim wdDoc as Document
Dim wdTbl as Table
Dim shp as Shape
This Dim declaration can occur inside a procedure:
or outside a procedure at the module-level:
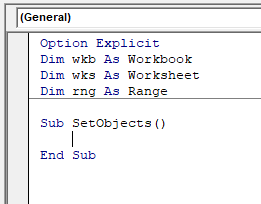
If the variable is declared at the module-level (outside the procedure), the variable can be used throughout the module.
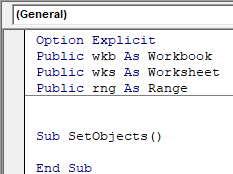
If the object variable is declared with the Public statement then the variable can be used throughout the VBA Project:
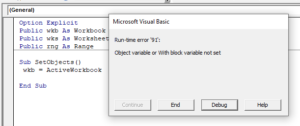
Set Value
Once you have declared the object, you need to assign a value to the object. This must be done using the Set statement and can only be done within a Procedure.
Sub SetObjects()
   Set wkb = ActiveWorkbook
   Set wks = Sheet1
   Set rng = Range("A1:G4")
End Sub
Note: This is different than assigning values to non-object variables. You MUST use the Set statement to assign the object to the variable. If you do not, you’ll receive an error:
Once you have assigned a value to the object, you can then write code to control the behavior or manipulate the object.
Object Examples in Excel
Workbook Object
Once you have declared a workbook variable, you can then assign a workbook to that object and use the Properties and Methods available to manipulate that object. In the example below we are going to save a workbook.
Sub WorkbookObject()
'declare the workbook object
   Dim wkb as Workbook
'assign an unsaved workbook to the object
   Set wkb = Workbooks("Book1")
'save the workbook
   wkb.SaveAs "C:datatestbook.xlsx"
'close the workbook
   wkb.close
'remember to release the object
   Set wkb = Nothing
End Sub
Worksheet Object
Similarly you can manipulate a worksheet or worksheets once you have declared the worksheet as a variable. In the example below, we rename Sheet1 and Sheet2.
Sub WorksheetObject()
   Dim wks1 As Worksheet
   Dim wks2 As Worksheet
'initialize the objects
   Set wks1 = Sheet1
   Set wks2 = Sheet2
'rename the sheets
   wks1.Name = "Customers"
   wks2.Name = "Products"
'set the objects to nothing
   wks1 = Nothing
   wks2 = Nothing
End Sub
VBA Coding Made Easy
Stop searching for VBA code online. Learn more about AutoMacro — A VBA Code Builder that allows beginners to code procedures from scratch with minimal coding knowledge and with many time-saving features for all users!

Learn More
Range Object
The Range object is one of the most useful objects to manipulate in Excel. In the example below, we bold Range A1 to E1 and format it with a bottom border.
Sub RangeObject()
Dim rng1 As Range
'intialize the range
   Set rng = Range("A1:E1")
'bold the range and set the bottom border
   rng.Font.Bold = True
   With rng1.Borders(xlEdgeBottom)
      .LineStyle = xlContinuous
      .ColorIndex = 0
      .TintAndShade = 0
      .Weight = xlThin
   End With
End Sub
Shape Object
You can also use object variables to work with shapes.
Sub AddShape()
   Dim shp As Shape
'create the shape
   Set shp = ActiveDocument.Shapes.AddShape(msoShapeSmileyFace, 68.25, 225.75, 136.5, 96#)
   With shp
'change inside colour and style
      .Fill.ForeColor.RGB = RGB(255, 255, 0)
      .Fill.Solid
'adjust the smile!
      .Adjustments.Item(1) = 0.07181
   End With
End Sub
“The visionary starts with a clean sheet of paper, and re-imagines the world” – Malcolm Gladwell
This post provides a complete guide to using the Excel VBA Worksheet in Excel VBA. If you want to know how to do something quickly then check out the quick guide to the VBA Worksheet below.
If you are new to VBA then this post is a great place to start. I like to break things down into simple terms and explain them in plain English without the jargon.
You can read through the post from start to finish as it is written in a logical order. If you prefer, you can use the table of contents below and go directly to the topic of your choice.
A Quick Guide to the VBA Worksheet
The following table gives a quick run down to the different worksheet methods.
Note: I use Worksheets in the table below without specifying the workbook i.e.Worksheets rather than ThisWorkbook.Worksheets, wk.Worksheets etc. This is to make the examples clear and easy to read. You should always specify the workbook when using Worksheets. Otherwise the active workbook will be used by default.
| Task | How to |
|---|---|
| Access worksheet by name | Worksheets(«Sheet1») |
| Access worksheet by position from left | Worksheets(2) Worksheets(4) |
| Access the left most worksheet | Worksheets(1) |
| Access the right most worksheet | Worksheets(Worksheets.Count) |
| Access using worksheet code name(current workbook only) | see Code Name section below |
| Access using worksheet code name(other workbook) | see Code Name section below |
| Access the active worksheet | ActiveSheet |
| Declare worksheet variable | Dim sh As Worksheet |
| Assign worksheet variable | Set sh = Worksheets(«Sheet1») |
| Add worksheet | Worksheets.Add |
| Add worksheet and assign to variable | Set sh =Worksheets.Add |
| Add worksheet to first position(left) | Worksheets.Add Before:=Worksheets(1) |
| Add worksheet to last position(right) | Worksheets.Add after:=Worksheets(Worksheets.Count) |
| Add multiple worksheets | Worksheets.Add Count:=3 |
| Activate Worksheet | sh.Activate |
| Copy Worksheet | sh.Copy |
| Copy after a worksheet | sh1.Copy After:=Sh2 |
| Copy before a worksheet | sh1.Copy Before:=Sh2 |
| Delete Worksheet | sh.Delete |
| Delete Worksheet without warning | Application.DisplayAlerts = False sh.Delete Application.DisplayAlerts = True |
| Change worksheet name | sh.Name = «Data» |
| Show/hide worksheet | sh.Visible = xlSheetHidden sh.Visible = xlSheetVisible |
| Loop through all worksheets(For) | Dim i As Long For i = 1 To Worksheets.Count Debug.Print Worksheets(i).Name Next i |
| Loop through all worksheets(For Each) | Dim sh As Worksheet For Each sh In Worksheets Debug.Print sh.Name Next |
Introduction
The three most important elements of VBA are the Workbook, the Worksheet and Cells. Of all the code your write, 90% will involve one or all of them.
The most common use of the worksheet in VBA is for accessing its cells. You may use it to protect, hide, add, move or copy a worksheet. However, you will mainly use it to perform some action on one or more cells on the worksheet.
Using Worksheets is more straightforward than using workbooks. With workbooks you may need to open them, find which folder they are in, check if they are in use and so on. With a worksheet, it either exists in the workbook or it doesn’t.
Accessing the Worksheet
In VBA, each workbook has a collection of worksheets. There is an entry in this collection for each worksheet in the workbook. This collection is simply called Worksheets and is used in a very similar way to the Workbooks collection. To get access to a worksheet all you have to do is supply the name.
The code below writes “Hello World” in Cell A1 of Sheet1, Sheet2 and Sheet3 of the current workbook.
' https://excelmacromastery.com/
Public Sub WriteToCell1()

    ' Write To cell A1 In Sheet1,Sheet2 And Sheet3
    ThisWorkbook.Worksheets("Sheet1").Range("A1") = "Hello World"
    ThisWorkbook.Worksheets("Sheet2").Range("A1") = "Hello World"
    ThisWorkbook.Worksheets("Sheet3").Range("A1") = "Hello World"

End Sub
The Worksheets collection is always belong to a workbook. If we don’t specify the workbook then the active workbook is used by default.
' https://excelmacromastery.com/
Public Sub WriteToCell1()

    ' Worksheets refers to the worksheets in the active workbook
    Worksheets("Sheet1").Range("A1") = "Hello World"
    Worksheets("Sheet2").Range("A1") = "Hello World"
    Worksheets("Sheet3").Range("A1") = "Hello World"

End Sub
Hide Worksheet
The following examples show how to hide and unhide a worksheet
ThisWorkbook.Worksheets("Sheet1").Visible = xlSheetHidden

ThisWorkbook.Worksheets("Sheet1").Visible = xlSheetVisible
If you want to prevent a user accessing the worksheet, you can make it “very hidden”. This means it can only be made visible by the code.
' Hide from user access
ThisWorkbook.Worksheets("Sheet1").Visible = xlVeryHidden

' This is the only way to make a xlVeryHidden sheet visible
ThisWorkbook.Worksheets("Sheet1").Visible = xlSheetVisible
Protect Worksheet
Another example of using the worksheet is when you want to protect it
ThisWorkbook.Worksheets("Sheet1").Protect Password:="MyPass"

ThisWorkbook.Worksheets("Sheet1").Unprotect Password:="MyPass"
Subscript Out of Range
When you use Worksheets you may get the error:
Run-time Error 9 Subscript out of Range

This means you tried to access a worksheet that doesn’t exist. This may happen for the following reasons
- The worksheet name given to Worksheets is spelled incorrectly.
- The name of the worksheet has changed.
- The worksheet was deleted.
- The index was to large e.g. You used Worksheets(5) but there are only four worksheets
- The wrong workbook is being used e.g. Workbooks(“book1.xlsx”).Worksheets(“Sheet1”) instead of Workbooks(“book3.xlsx”).Worksheets(“Sheet1”).
If you still have issues then use one of the loops from Loop Through The Worksheets section to print the names of all worksheets the collection.
Using the Index to Access the Worksheet
So far we have been using the sheet name to access the sheet. The index refers to the sheet tab position in the workbook. As the position can easily be changed by the user it is not a good idea to use this.
The following code shows examples of using the index
' https://excelmacromastery.com/
' Using this code is a bad idea as
' sheet positions changes all the time
Public Sub UseSheetIdx()

    With ThisWorkbook
        ' Left most sheet
        Debug.Print .Worksheets(1).Name
        ' The third sheet from the left
        Debug.Print .Worksheets(3).Name
        ' Right most sheet
        Debug.Print .Worksheets(.Worksheets.Count).Name
    End With

End Sub
In the example above, I used Debug.Print to print to the Immediate Window. To view this window select View->Immediate Window(or Ctrl G)


Using the Code Name of a Worksheet
The best method of accessing the worksheet is using the code name. Each worksheet has a sheet name and a code name. The sheet name is the name that appears in the worksheet tab in Excel.
Changing the sheet name does not change the code name meaning that referencing a sheet by the code name is a good idea.
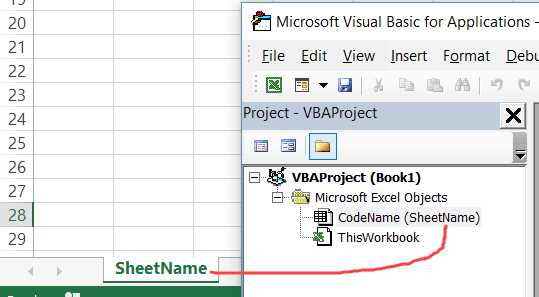
If you look in the VBE property window you will see both names. In the image you can see that the code name is the name outside the parenthesis and the sheet name is in the parenthesis.

You can change both the sheet name and the code name in the property window of the sheet(see image below).

If your code refers to the code name then the user can change the name of the sheet and it will not affect your code. In the example below we reference the worksheet directly using the code name.
' https://excelmacromastery.com/
Public Sub UseCodeName2()

    ' Using the code name of the worksheet
    Debug.Print CodeName.Name
    CodeName.Range("A1") = 45
    CodeName.Visible = True

End Sub
This makes the code easy to read and safe from the user changing the sheet name.
Code Name in other Workbooks
There is one drawback to using the code name. It can only refer to worksheets in the workbook that contains the code i.e. ThisWorkbook.
However, we can use a simple function to find the code name of a worksheet in a different workbook.
' https://excelmacromastery.com/
Public Sub UseSheet()

    Dim sh As Worksheet
    ' Get the worksheet using the codename
    Set sh = SheetFromCodeName("CodeName", ThisWorkbook)
    ' Use the worksheet
    Debug.Print sh.Name

End Sub

' This function gets the worksheet object from the Code Name
Public Function SheetFromCodeName(Name As String, bk As Workbook) As Worksheet

    Dim sh As Worksheet
    For Each sh In bk.Worksheets
        If sh.CodeName = Name Then
           Set SheetFromCodeName = sh
           Exit For
        End If
    Next sh

End Function
Using the above code means that if the user changes the name of the worksheet then your code will not be affected.
There is another way of getting the sheet name of an external workbook using the code name. You can use the VBProject element of that Workbook.
You can see how to do this in the example below. I have included this for completeness only and I would recommend using the method in the previous example rather than this one.
' https://excelmacromastery.com/
Public Function SheetFromCodeName2(codeName As String _
                             , bk As Workbook) As Worksheet

    ' Get the sheet name from the CodeName using the VBProject
    Dim sheetName As String
    sheetName = bk.VBProject.VBComponents(codeName).Properties("Name")

    ' Use the sheet name to get the worksheet object
    Set SheetFromCodeName2 = bk.Worksheets(sheetName)

End Function
Code Name Summary
The following is a quick summary of using the Code Name
- The code name of the worksheet can be used directly in the code e.g. Sheet1.Range
- The code name will still work if the worksheet name is changed.
- The code name can only be used for worksheets in the same workbook as the code.
- Anywhere you see ThisWorkbook.Worksheets(“sheetname”) you can replace it with the code name of the worksheet.
- You can use the SheetFromCodeName function from above to get the code name of worksheets in other workbooks.
The Active Sheet
The ActiveSheet object refers to the worksheet that is currently active. You should only use ActiveSheet if you have a specific need to refer to the worksheet that is active.
Otherwise you should specify the worksheet you are using.
If you use a worksheet method like Range and don’t mention the worksheet, it will use the active worksheet by default.
' Write to Cell A1 in the active sheet
ActiveSheet.Range("A1") = 99

' Active sheet is the default if no sheet used
Range("A1") = 99
Declaring a Worksheet Object
Declaring a worksheet object is useful for making your code neater and easier to read.
The next example shows code for updating ranges of cells. The first Sub does not declare a worksheet object. The second sub declares a worksheet object and the code is therefore much clearer.
' https://excelmacromastery.com/
Public Sub SetRangeVals()

    Debug.Print ThisWorkbook.Worksheets("Sheet1").Name
    ThisWorkbook.Worksheets("Sheet1").Range("A1") = 6
    ThisWorkbook.Worksheets("Sheet1").Range("B2:B9").Font.Italic = True
    ThisWorkbook.Worksheets("Sheet1").Range("B2:B9").Interior.Color = rgbRed

End Sub
' https://excelmacromastery.com/
Public Sub SetRangeValsObj()

    Dim sht As Worksheet
    Set sht = ThisWorkbook.Worksheets("Sheet1")

    sht.Range("A1") = 6
    sht.Range("B2:B9").Font.Italic = True
    sht.Range("B2:B9").Interior.Color = rgbRed

End Sub
You could also use the With keyword with the worksheet object as the next example shows.
' https://excelmacromastery.com/
Public Sub SetRangeValsObjWith()

    Dim sht As Worksheet
    Set sht = ThisWorkbook.Worksheets("Sheet1")

    With sht
        .Range("A1") = 6
        .Range("B2:B9").Font.Italic = True
        .Range("B2:B9").Interior.Color = rgbRed
    End With

End Sub
Accessing the Worksheet in a Nutshell
With all the different ways to access a worksheet, you may be feeling overwhelmed or confused. So in this section, I am going to break it down into simple terms
1. If you want to use whichever worksheet is currently active then use ActiveSheet.
ActiveSheet.Range("A1") = 55
2. If the worksheet is in the same workbook as the code then use the Code Name.
Sheet1.Range("A1") = 55
3. If the worksheet is in a different workbook then first get workbook and then get the worksheet.
' Get workbook
Dim wk As Workbook
Set wk = Workbooks.Open("C:DocsAccounts.xlsx", ReadOnly:=True)

' Then get worksheet
Dim sh As Worksheet
Set sh = wk.Worksheets("Sheet1")
If you want to protect against the user changing the sheet name then use the SheetFromCodeName function from the Code Name section.
' Get workbook
Dim wk As Workbook
Set wk = Workbooks.Open("C:DocsAccounts.xlsx", ReadOnly:=True)

' Then get worksheet
Dim sh As Worksheet
Set sh = SheetFromCodeName("sheetcodename",wk)
Add Worksheet
The examples in this section show you how to add a new worksheet to a workbook. If you do not supply any arguments to the Add function then the new worksheet will be placed before the active worksheet.
When you add a Worksheet, it is created with a default name like “Sheet4”. If you want to change the name then you can easily do this using the Name property.
The following example adds a new worksheet and changes the name to “Accounts”. If a worksheet with the name “Accounts” already exists then you will get an error.
' https://excelmacromastery.com/
Public Sub AddSheet()

    Dim sht As Worksheet

    ' Adds new sheet before active sheet
    Set sht = ThisWorkbook.Worksheets.Add
    ' Set the name of sheet
    sht.Name = "Accounts"

    ' Adds 3 new sheets before active sheet
    ThisWorkbook.Worksheets.Add Count:=3

End Sub
In the previous example, you are adding worksheets in relation to the active worksheet. You can also specify the exact position to place the worksheet.
To do this you need to specify which worksheet the new one should be inserted before or after. The following code shows you how to do this.
' https://excelmacromastery.com/
Public Sub AddSheetFirstLast()

    Dim shtNew As Worksheet
    Dim shtFirst As Worksheet, shtLast As Worksheet

    With ThisWorkbook

        Set shtFirst = .Worksheets(1)
        Set shtLast = .Worksheets(.Worksheets.Count)

        ' Adds new sheet to first position in the workbook
        Set shtNew = Worksheets.Add(Before:=shtFirst)
        shtNew.Name = "FirstSheet"

        ' Adds new sheet to last position in the workbook
        Set shtNew = Worksheets.Add(After:=shtLast)
        shtNew.Name = "LastSheet"

    End With

End Sub
Delete Worksheet
To delete a worksheet you simply call the Delete member.
Dim sh As Worksheet
Set sh = ThisWorkbook.Worksheets("Sheet12")
sh.Delete
Excel will display a warning message when you delete a worksheet. If you want to hide this message you can use the code below
Application.DisplayAlerts = False
sh.Delete
Application.DisplayAlerts = True
There are two issues to watch out for when it comes to deleting worksheets.
If you try to access the worksheet after deleting it you will get the “Subscript out of Range” error we saw in the Accessing the Worksheet section.
Dim sh As Worksheet
Set sh = ThisWorkbook.Worksheets("Sheet2")
sh.Delete

' This line will give 'Subscript out of Range' as "Sheet2" does not exist
Set sh = ThisWorkbook.Worksheets("Sheet2")
The second issue is when you assign a worksheet variable. If you try to use this variable after the worksheet is deleted then you will get an Automation error like this
Run-Time error -21147221080 (800401a8′) Automation Error
If you are using the Code Name of the worksheet rather than a variable, then this will cause Excel to crash rather than give the automation error.
The following example shows how an automation errors occurs
sh.Delete

' This line will give Automation error
Debug.Assert sh.Name
If you assign the Worksheet variable to a valid worksheet it will work fine
sh.Delete

' Assign sh to another worksheet
Set sh = Worksheets("sheet3")

' This line will work fine
Debug.Assert sh.Name
Loop Through the Worksheets
The Worksheets member of Workbooks is a collection of worksheets belonging to a workbook. You can go through each sheet in the worksheets collection using a For Each Loop or a For Loop.
The following example uses a For Each loop.
' https://excelmacromastery.com/
Public Sub LoopForEach()

    ' Writes "Hello World" into cell A1 for each worksheet
    Dim sht As Worksheet
    For Each sht In ThisWorkbook.Worksheets
         sht.Range("A1") = "Hello World"
    Next sht

End Sub
The next example uses the standard For loop
' https://excelmacromastery.com/
Public Sub LoopFor()

    ' Writes "Hello World" into cell A1 for each worksheet
    Dim i As Long
    For i = 1 To ThisWorkbook.Worksheets.Count
         ThisWorkbook.Worksheets(i).Range("A1") = "Hello World"
    Next sht

End Sub
You have seen how to access all open workbooks and how to access all worksheets in ThisWorkbook. Lets take it one step further. Lets access all worksheets in all open workbooks.
Note: If you use code like this to write to worksheets then back everything up first as you could end up writing the incorrect data to all the sheets.
' https://excelmacromastery.com/
Public Sub AllSheetNames()

    ' Prints the workbook and sheet names for
    ' all sheets in open workbooks
    Dim wrk As Workbook
    Dim sht As Worksheet
    For Each wrk In Workbooks
        For Each sht In wrk.Worksheets
            Debug.Print wrk.Name + ":" + sht.Name
        Next sht
    Next wrk

End Sub
Using the Sheets Collection
The workbook has another collection similar to Worksheets called Sheets. This causes confusion at times among users. To explain this first you need to know about a sheet type that is a chart.
It is possible in Excel to have a sheet that is a chart. To do this
- Create a chart on any sheet.
- Right click on the chart and select Move.
- Select the first option which is “New Sheet” and click Ok.
Now you have a workbook with sheets of type worksheet and one of type chart.
- The Worksheets collection refers to all worksheets in a workbook. It does not include sheets of type chart.
- The Sheets collection refers to all sheets belonging to a workbook including sheets of type chart.
There are two code examples below. The first goes through all the Sheets in a workbook and prints the name of the sheet and type of sheet it is. The second example does the same with the Worksheets collection.
To try out these examples you should add a Chart sheet to your workbook first so you will see the difference.
' https://excelmacromastery.com/
Public Sub CollSheets()

    Dim sht As Variant
    ' Display the name and type of each sheet
    For Each sht In ThisWorkbook.Sheets
        Debug.Print sht.Name & " is type " & TypeName(sht)
    Next sht

End Sub

Public Sub CollWorkSheets()

    Dim sht As Variant
    ' Display the name and type of each sheet
    For Each sht In ThisWorkbook.Worksheets
        Debug.Print sht.Name & " is type " & TypeName(sht)
    Next sht

End Sub
If do not have chart sheets then using the Sheets collection is the same as using the Worksheets collection.
Conclusion
This concludes the post on the VBA Worksheet. I hope you found it useful.
The three most important elements of Excel VBA are Workbooks, Worksheets and Ranges and Cells. These elements will be used in almost everything you do. Understanding them will make you life much easier and make learning VBA much simpler.
What’s Next?
Free VBA Tutorial If you are new to VBA or you want to sharpen your existing VBA skills then why not try out the The Ultimate VBA Tutorial.
Related Training: Get full access to the Excel VBA training webinars and all the tutorials.
(NOTE: Planning to build or manage a VBA Application? Learn how to build 10 Excel VBA applications from scratch.)
Apart from cells and ranges, working with worksheets is another area you should know about to use VBA efficiently in Excel.
Just like any object in VBA, worksheets have different properties and methods associated with it that you can use while automating your work with VBA in Excel.
In this tutorial, I will cover ‘Worksheets’ in detail and also show you some practical examples.
So let’s get started.
All the codes I mention in this tutorial need to be placed in the VB Editor. Go to the ‘Where to Put the VBA Code‘ section to know how it works.
If you’re interested in learning VBA the easy way, check out my Online Excel VBA Training.
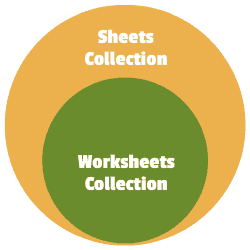
Difference between Worksheets and Sheets in VBA
In VBA, you have two collections that can be a bit confusing at times.
In a workbook, you can have worksheets and as well as chart sheets. The example below has three worksheets and one chart sheet.
In Excel VBA:
- The ‘Worksheets’ collection would refer to the collection of all the worksheet objects in a workbook. In the above example, the Worksheets collection would consist of three worksheets.
- The ‘Sheets’ collection would refer to all the worksheets as well as chart sheets in the workbook. In the above example, it would have four elements – 3 Worksheets + 1 Chart sheet.
If you have a workbook that only has worksheets and no chart sheets, then ‘Worksheets’ and ‘Sheets’ collection is the same.
But when you have one or more chart sheets, the ‘Sheets’ collection would be bigger than the ‘Worksheets’ collection
Sheets = Worksheets + Chart Sheets
Now with this distinction, I recommend being as specific as possible when writing a VBA code.
So if you have to refer to worksheets only, use the ‘Worksheets’ collection, and if you have to refer to all sheets (including chart sheets), the use the ‘Sheets’ collection.
In this tutorial, I will be using the ‘Worksheets’ collection only.
Referencing a Worksheet in VBA
There are many different ways you can use to refer to a worksheet in VBA.
Understanding how to refer to worksheets would help you write better code, especially when you’re using loops in your VBA code.
Using the Worksheet Name
The easiest way to refer to a worksheet is to use its name.
For example, suppose you have a workbook with three worksheets – Sheet 1, Sheet 2, Sheet 3.
And you want to activate Sheet 2.
You can do that using the following code:

Sub ActivateSheet()
Worksheets("Sheet2").Activate
End Sub
The above code asks VBA to refer to Sheet2 in the Worksheets collection and activate it.
Since we are using the exact sheet name, you can also use the Sheets collection here. So the below code would also do that same thing.
Sub ActivateSheet()
Sheets("Sheet2").Activate
End Sub
Using the Index Number
While using the sheet name is an easy way to refer to a worksheet, sometimes, you may not know the exact name of the worksheet.
For example, if you’re using a VBA code to add a new worksheet to the workbook, and you don’t know how many worksheets are already there, you would not know the name of the new worksheet.
In this case, you can use the index number of the worksheets.
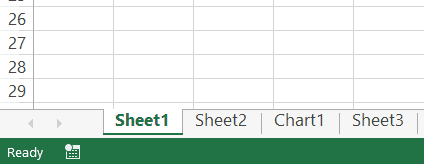
Suppose you have the following sheets in a workbook:
The below code would activate Sheet2:
Sub ActivateSheet()
Worksheets(2).Activate
End Sub
Note that we have used index number 2 in Worksheets(2). This would refer to the second object in the collection of the worksheets.
Now, what happens when you use 3 as the index number?
It will select Sheet3.
If you’re wondering why it selected Sheet3, as it’s clearly the fourth object.
This happens because a chart sheet is not a part of the worksheets collection.
So when we use the index numbers in the Worksheets collection, it will only refer to the worksheets in the workbook (and ignore the chart sheets).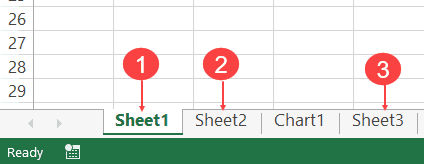
On the contrary, if you’re using Sheets, Sheets(1) would refer to Sheets1, Sheets(2) would refer to Sheet2, Sheets(3) would refer to Chart1 and Sheets(4) would refer to Sheet3.
This technique of using index number is useful when you want to loop through all the worksheets in a workbook. You can count the number of worksheets and then loop through these using this count (we will see how to do this later in this tutorial).
Note: The index number goes from left to right. So if you shift Sheet2 to the left of Sheet1, then Worksheets(1) would refer to Sheet2.
Using the Worksheet Code Name
One of the drawbacks of using the sheet name (as we saw in the section above) is that a user can change it.
And if the sheet name has been changed, your code wouldn’t work until you change the name of the worksheet in the VBA code as well.
To tackle this problem, you can use the code name of the worksheet (instead of the regular name that we have been using so far). A code name can be assigned in the VB Editor and doesn’t change when you change the name of the sheet from the worksheet area.
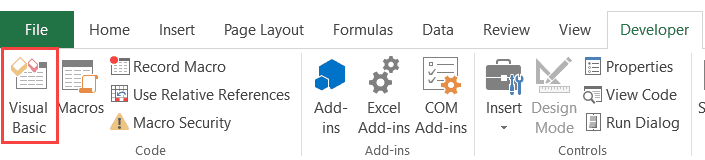
To give your worksheet a code name, follow the below steps:
- Click the Developer tab.
- Click the Visual Basic button. This will open the VB Editor.

- Click the View option in the menu and click on Project Window. This will make the Properties pane visible. If the Properties pane is already visible, skip this step.
- Click on the sheet name in the project explorer that you want to rename.
- In the Properties pane, change the name in the field in front of (Name). Note that you can’t have spaces in the name.

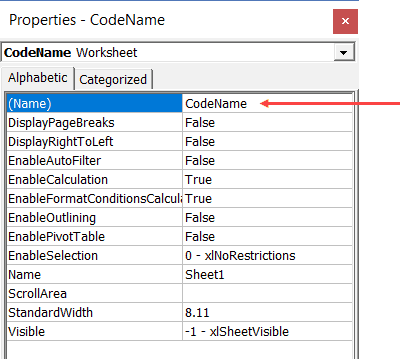
The above steps would change the name of your Worksheet in the VBA backend. In the Excel worksheet view, you can name the worksheet whatever you want, but in the backend, it will respond to both the names – the sheet name and the code name.
In the above image, the sheet name is ‘SheetName’ and the code name is ‘CodeName’. Even if you change the sheet name on the worksheet, the code name still remains the same.
Now, you can use either the Worksheets collection to refer to the worksheet or use the codename.
For example, both the line will activate the worksheet.
Worksheets("Sheetname").Activate
CodeName.Activate
The difference in these two is that if you change the name of the worksheet, the first one wouldn’t work. But the second line would continue to work even with the changed name. The second line (using the CodeName) is also shorter and easier to use.
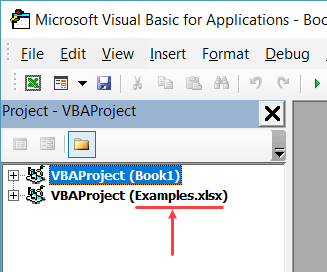
Referring to a Worksheet in a Different Workbook
If you want to refer to a worksheet in a different workbook, that workbook needs to be open while the code runs, and you need to specify the name of the workbook and the worksheet that you want to refer to.
For example, if you have a workbook with the name Examples and you want to activate Sheet1 in the Example workbook, you need to use the below code:
Sub SheetActivate()
Workbooks("Examples.xlsx").Worksheets("Sheet1").Activate
End Sub
Note that if the workbook has been saved, you need to use the file name along with the extension. If you’re not sure what name to use, take help from Project Explorer.
In case the workbook has not been saved, you don’t need to use the file extension.
Adding a Worksheet
The below code would add a worksheet (as the first worksheet – i.e., as the leftmost sheet in the sheet tab).
Sub AddSheet()
Worksheets.Add
End Sub
It takes the default name Sheet2 (or any other number based on how many sheets are already there).
If you want a worksheet to be added before a specific worksheet (say Sheet2), then you can use the below code.
Sub AddSheet()
Worksheets.Add Before:=Worksheets("Sheet2")
End Sub
The above code tells VBA to add a sheet and then uses the ‘Before’ statement to specify the worksheet before which the new worksheet should to be inserted.
Similarly, you can also add a sheet after a worksheet (say Sheet2), using the below code:
Sub AddSheet()
Worksheets.Add After:=Worksheets("Sheet2")
End Sub
If you want the new sheet to be added to the end of the sheets, you need to first know how many sheets are there. The following code first counts the number of sheets, and the adds the new sheet after the last sheet (to which we refer using the index number).
Sub AddSheet()
Dim SheetCount As Integer
SheetCount = Worksheets.Count
Worksheets.Add After:=Worksheets(SheetCount)
End Sub
Deleting a Worksheet
The below code would delete the active sheet from the workbook.
Sub DeleteSheet()
ActiveSheet.Delete
End Sub
The above code would show a warning prompt before deleting the worksheet.
If you don’t want to see the warning prompt, use the below code:
Sub DeleteSheet()
Application.DisplayAlerts = False
ActiveSheet.Delete
Application.DisplayAlerts = True
End Sub
When Application.DisplayAlerts is set to False, it will not show you the warning prompt. If you use it, remember to set it back to True at the end of the code.
Remember that you can’t undo this delete, so use the above code when you’re absolutely sure.
If you want to delete a specific sheet, you can do that using the following code:
Sub DeleteSheet()
Worksheets("Sheet2").Delete
End Sub
You can also use the code name of the sheet to delete it.
Sub DeleteSheet()
Sheet5.Delete
End Sub
Renaming the Worksheets
You can modify the name property of the Worksheet to change its name.
The following code will change the name of Sheet1 to ‘Summary’.
Sub RenameSheet()
Worksheets("Sheet1").Name = "Summary"
End Sub
You can combine this with the adding sheet method to have a set of sheets with specific names.
For example, if you want to insert four sheets with the name 2018 Q1, 2018 Q2, 2018 Q3, and 2018 Q4, you can use the below code.
Sub RenameSheet()
Dim Countsheets As Integer
Countsheets = Worksheets.Count
For i = 1 To 4
Worksheets.Add after:=Worksheets(Countsheets + i - 1)
Worksheets(Countsheets + i).Name = "2018 Q" & i
Next i
End Sub
In the above code, we first count the number of sheets and then use a For Next loop to insert new sheets at the end. As the sheet is added, the code also renames it.
Assigning Worksheet Object to a Variable
When working with worksheets, you can assign a worksheet to an object variable, and then use the variable instead of the worksheet references.
For example, if you want to add a year prefix to all the worksheets, instead of counting the sheets and the running the loop that many numbers of times, you can use the object variable.
Here is the code that will add 2018 as a prefix to all the worksheet’s names.
Sub RenameSheet()
Dim Ws As Worksheet
For Each Ws In Worksheets
Ws.Name = "2018 - " & Ws.Name
Next Ws
End Sub
The above code declares a variable Ws as the worksheet type (using the line ‘Dim Ws As Worksheet’).
Now, we don’t need to count the number of sheets to loop through these. Instead, we can use ‘For each Ws in Worksheets’ loop. This will allow us to go through all the sheets in the worksheets collection. It doesn’t matter whether there are 2 sheets or 20 sheets.
While the above code allows us to loop through all the sheets, you can also assign a specific sheet to a variable.
In the below code, we assign the variable Ws to Sheet2 and use it to access all of Sheet2’s properties.
Sub RenameSheet()
Dim Ws As Worksheet
Set Ws = Worksheets("Sheet2")
Ws.Name = "Summary"
Ws.Protect
End Sub
Once you set a worksheet reference to an object variable (using the SET statement), that object can be used instead of the worksheet reference. This can be helpful when you have a long complicated code and you want to change the reference. Instead of making the change everywhere, you can simply make the change in the SET statement.
Note that the code declares the Ws object as the Worksheet type variable (using the line Dim Ws as Worksheet).
Hide Worksheets Using VBA (Hidden + Very Hidden)
Hiding and Unhiding worksheets in Excel is a straightforward task.
You can hide a worksheet and the user would not see it when he/she opens the workbook. However, they can easily unhide the worksheet by right-clicking on any sheet tab.
But what if you don’t want them to be able to unhide the worksheet(s).
You can do this using VBA.
The code below would hide all the worksheets in the workbook (except the active sheet), such that you can not unhide it by right-clicking on the sheet name.
Sub HideAllExcetActiveSheet()
Dim Ws As Worksheet
For Each Ws In ThisWorkbook.Worksheets
If Ws.Name <> ActiveSheet.Name Then Ws.Visible = xlSheetVeryHidden
Next Ws
End Sub
In the above code, the Ws.Visible property is changed to xlSheetVeryHidden.
- When the Visible property is set to xlSheetVisible, the sheet is visible in the worksheet area (as worksheet tabs).
- When the Visible property is set to xlSheetHidden, the sheet is hidden but the user can unhide it by right-clicking on any sheet tab.
- When the Visible property is set to xlSheetVeryHidden, the sheet is hidden and cannot be unhidden from worksheet area. You need to use a VBA code or the properties window to unhide it.
If you want to simply hide sheets, that can be unhidden easily, use the below code:
Sub HideAllExceptActiveSheet()
Dim Ws As Worksheet
For Each Ws In ThisWorkbook.Worksheets
If Ws.Name <> ActiveSheet.Name Then Ws.Visible = xlSheetHidden
Next Ws
End Sub
The below code would unhide all the worksheets (both hidden and very hidden).
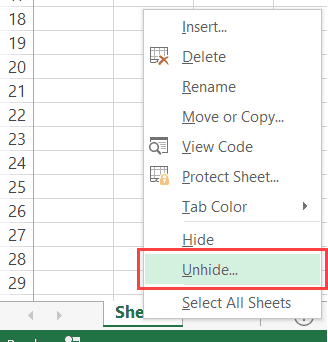
Sub UnhideAllWoksheets()
Dim Ws As Worksheet
For Each Ws In ThisWorkbook.Worksheets
Ws.Visible = xlSheetVisible
Next Ws
End Sub
Related Article: Unhide All Sheets In Excel (at one go)
Hide Sheets Based on the Text in it
Suppose you have multiple sheets with the name of different departments or years and you want to hide all the sheets except the ones that have the year 2018 in it.
You can do this using a VBA INSTR function.
The below code would hide all the sheets except the ones with the text 2018 in it.
Sub HideWithMatchingText()
Dim Ws As Worksheet
For Each Ws In Worksheets
If InStr(1, Ws.Name, "2018", vbBinaryCompare) = 0 Then
Ws.Visible = xlSheetHidden
End If
Next Ws
End Sub
In the above code, the INSTR function returns the position of the character where it finds the matching string. If it doesn’t find the matching string, it returns 0.
The above code checks whether the name has the text 2018 in it. If it does, nothing happens, else the worksheet is hidden.
You can take this a step further by having the text in a cell and using that cell in the code. This will allow you to have a value in the cell and then when you run the macro, all the sheets, except the one with the matching text in it, would remain visible (along with the sheets where you’re entering the value in the cell).
Sorting the Worksheets in an Alphabetical Order
Using VBA, you can quickly sort the worksheets based on their names.
For example, if you have a workbook that has sheets for different department or years, then you can use the below code to quickly sort these sheets in an ascending order.
Sub SortSheetsTabName()
Application.ScreenUpdating = False
Dim ShCount As Integer, i As Integer, j As Integer
ShCount = Sheets.Count
For i = 1 To ShCount - 1
For j = i + 1 To ShCount
If Sheets(j).Name < Sheets(i).Name Then
Sheets(j).Move before:=Sheets(i)
End If
Next j
Next i
Application.ScreenUpdating = True
End Sub
Note that this code works well with text names and in most of the cases with years and numbers too. But it can give you the wrong results in case you have the sheet names as 1,2,11. It will sort and give you the sequence 1, 11, 2. This is because it does the comparison as text and considers 2 bigger than 11.
Protect/Unprotect All the Sheets at One Go
If you have a lot of worksheets in a workbook and you want to protect all the sheets, you can use the VBA code below.
It allows you to specify the password within the code. You will need this password to unprotect the worksheet.
Sub ProtectAllSheets()
Dim ws As Worksheet
Dim password As String
password = "Test123" 'replace Test123 with the password you want
For Each ws In Worksheets
ws.Protect password:=password
Next ws
End Sub
The following code would unprotect all the sheets in one go.
Sub ProtectAllSheets()
Dim ws As Worksheet
Dim password As String
password = "Test123" 'replace Test123 with the password you used while protecting
For Each ws In Worksheets
ws.Unprotect password:=password
Next ws
End Sub
Creating a Table of Contents of All Worksheets (with Hyperlinks)
If you have a set of worksheets in the workbook and you want to quickly insert a summary sheet which has the links to all the sheets, you can use the below code.
Sub AddIndexSheet()
Worksheets.Add
ActiveSheet.Name = "Index"
For i = 2 To Worksheets.Count
ActiveSheet.Hyperlinks.Add Anchor:=Cells(i - 1, 1), _
Address:="", SubAddress:=Worksheets(i).Name & "!A1", _
TextToDisplay:=Worksheets(i).Name
Next i
End Sub
The above code inserts a new worksheet and names it Index.
It then loops through all the worksheets and creates a hyperlink for all the worksheets in the Index sheet.
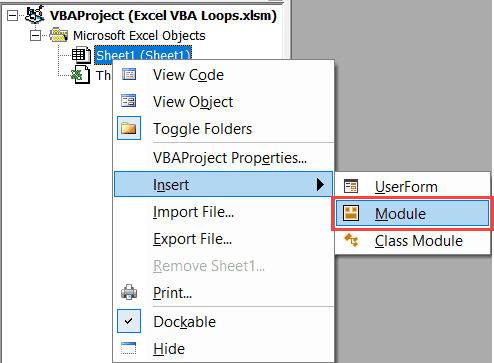
Where to Put the VBA Code
Wondering where the VBA code goes in your Excel workbook?
Excel has a VBA backend called the VBA editor. You need to copy and paste the code into the VB Editor module code window.
Here are the steps to do this:
- Go to the Developer tab.

- Click on the Visual Basic option. This will open the VB editor in the backend.
- In the Project Explorer pane in the VB Editor, right-click on any object for the workbook in which you want to insert the code. If you don’t see the Project Explorer go to the View tab and click on Project Explorer.
- Go to Insert and click on Module. This will insert a module object for your workbook.

- Copy and paste the code in the module window.


You May Also Like the Following Excel VBA Tutorials:
- Working with Workbooks using VBA.
- Using IF Then Else Statements in VBA.
- For Next Loop in VBA.
- Creating a User-Defined Function in Excel.
- How to Record a Macro in Excel.
- How to Run a Macro in Excel.
- Excel VBA Events – An Easy (and Complete) Guide.
- How to Create an Add-in in Excel.
- How to Save and Reuse Macro using Excel Personal Macro Workbook.
- Using Active Cell in VBA in Excel (Examples)
- How to Open Excel Files Using VBA (Examples)