
VBA Serial Port routines for Microsoft Office
New for 2022 — Windows 10, Office 2019 (Excel, Word, Access)
Getting Serial (COM) Ports working as intended in VBA can be surprisingly difficult in certain usage scenarios.
New VBA routines here will help resolve these issues in Excel, Word and Access (Windows PC versions only).
Functions are straightforward to use with coding style to support infrequent VBA users and developers.
Intended to help implement ad-hoc projects for serial data acquisition or transfer.
No plug-ins, DLLs, ActiveX, licences, payments or registrations are required.
More Information
VBA Issues
The in-built VBA functions for COM Port data can suffer from the following issues :-
-
Setting port parameters with the VBA open command may not work in some Windows versions e.g.
Open "COM1:9600,N,8,1" For Read Access As #1
(command line workaround known, settings can revert after reboot) -
Attempting to read data when there is none waiting will cause VBA to hang with a ‘not responding’ message.
Get #1, , Read_Data_ByteThe new functions address both of these issues, and also where data transfers take longer than the 5-6 second VBA timeout.
Background
The legacy of serial comms means that many online solution searches are now time-expired with links to defunct web sites etc.
New functions here are therefore a fresh start for 2022 and are based largely on Microsoft’s Win32 API calls and documentation.
Developed on Windows 10 (64-Bit) with a local Microsoft Office 2019 Professional (32-Bit VBA7) installation.
Tested on Office 2016 Professional (64-bit VBA7) and Office 2019 Professional (32-Bit VBA7)
COM Ports
Multiple com ports are supported, including physical hardware ports and synthetic virtual software ports.
All read and write functions are synchronous, in part because not all serial port types support overlapped operation.
Performance on a modern PC is good, with software timing delays required to allow the relatively slow serial com ports to catch up.
Reading, Writing and Waiting are ‘timesliced’ to ensure that VBA remains responsive during any extended data transfers or waiting times.
Debugging
-
Debugging can be set on/off per port with results shown in the VBA immediate window.
-
Extensive debug functionality makes several modules quite verbose.
Other Versions
-
No-Debug (more compact)
-
Simplified (single com port)
-
Minimal (single com port, no settings)
-
VBA6 / 32-Bit (legacy Windows/Office)
Alternatives (Excel Only)
- Microsoft Data Streamer for Excel
Optional steps for Excel only
- Functions can be used directly in Worksheet cells as formulas where appropriate.
- Remove comment mark before
Option Private Moduleto prevent function names appearing in cell formula drop-down lists. - Remove comment mark before
Application.Volatilewhere indicated to refresh results when functions are used in cells and the worksheet is recalculated (e.g. with F9 key).
Optional Ribbon Customisation
Office 2010 XML and SERIAL_PORT_RIBBON example files are available in the Ribbon folder.
Function List
COM Port Control
Read/Write/Check Data
Port Signalling Functions
Show Functions
Private functions are not intended to be called directly by users.
Содержание
- Technical Articles
- Wednesday, May 19, 2010
- Serial Port Communication in Excel (VBA)
- Introduction to Serial Port Communication in VBA
- Serial Port Communication Script
- Using ActiveXperts Serial Port Component with VBA (Visual Basic for Applications)
- Step 1: Download and install the ActiveXperts Serial Port Component
- Step 2: Create a new Excel document
- Step 3: Fill in the dropdown-menu’s
- Step 4: Send an AT command to a connected Hayes compatible modem
- Omron Host Link Protocol Part 2 – VBA Excel
Technical Articles
This blog has been created to provide you with latest, updated and best in quality Technical Articles. Your Comments and Feedback is highly appreciated.
Wednesday, May 19, 2010
Serial Port Communication in Excel (VBA)
Introduction to Serial Port Communication in VBA
The purpose of this article is to demonstrate how you can perform serial port communication in the VBA (Visual Basic Applications — script editor included in any typical Microsoft Excel distribution) but without using the MSComm control or any other third party add-on or ActiveX. The great advantage of this method, which uses API functions to call the serial port directly, is that you do not really need to install anything on your PC, apart from the Excel itself (which, let’s admit it, already exists on most PCs). Other methods always require the installation of an ActiveX, or at least the registration of an “.ocx” file, like for instance the MSComm control. Even the method of programming in C#, which I have suggested in a different article (Serial Port Communication in C#) needs the installation of the .NET Framework and of the C# compiler itself. It is assumed that the reader would have some basic knowledge of programming (but really basic, not even intermediate)
In order to get access to the VBA script editor, you first need to make the corresponding buttons available on the Excel toolbars (they are not there by default). Once you have started your Excel, choose from the top menu: View -> Toolbars -> Visual Basic. This will make visible another small toolbar, with the following buttons:

These buttons will enable you to launch the editor in which you will be able to write the Visual Basic Code and will also allow you to directly create windows-style controls like textboxes, push buttons, labels, radio buttons, checkboxes etc. In order to make these
available on the main toolbar, you need to activate the Control Toolbox button, from the small toolbar activated at the previous step. This will, in turn, make available a number of new other buttons that will allow you to build the mentioned controls:

As a goal for this article, I would intend to demonstrate how you open the serial port, how you write a few bytes, how you read some bytes, and then how you close the serial port. In order to do all these, you will need to create four windows-style buttons, each of them performing one of the tasks that I have enumerated before.
Click on the Command Button control from the recently activated toolbar, and then draw 4 similar buttons anywhere on the surface of your excel worksheet (it will be a challenge to draw them all of the same size!):

Once you did that, click on the Visual Basic Editor button from the toolbar that you activated in the very first place.

This will open the environment in which you can write the code for the Visual Basic scripts that will perform the operations you wanted. Once there, make sure that you double click on the Sheet1(Sheet1) entry in the top left project tree window:

The effect of this action will be the opening in the main window of this environment of the actual sheet in which you will write the VB code. Once you reached this stage, copy paste the code below in there. This Visual Basic Code “defines” the constants, structures and
API functions that you will use later to perform the intended operations. The comments in the code are self explanatory.The article continues after the end of this code, please scroll all the way down.
Serial Port Communication Script
I know the code looks lengthy and elaborate, but you need not to worry about that. It actually implements many more functions than you really need to use. Some of them, for instance, are used to set high/low the control lines of the serial port (DTR, RTS) or to read the state of the other control lines (CTS, DSR). The actual functions to write/read the serial port, which are defined above too, do call some of the other functions defined, but this is not important for the end user of the code. And if you made it so far…you have half of the job done!
Make sure you save the file (by clicking the common “Save” button) and then go back to the excel worksheet, where the 4 buttons that you have drawin are waiting for you to do something with them!
First of all, make sure that the “Design Mode” button is activated in the second toolbar that you added throughout this process:

Now you can give appropriate names to each of the four buttons you have created before. In order to do this, right-click on the first of these buttons, and from the pop-up menu, choose the
Properties option:

A window will open with all the properties of the button object. Change the Caption property to “Initialise”, and then close the window. This will change the label on the first button to this very text:

Once you do this for the first button, repeat the operation and change the labels on the other three buttons
to “Write”, “Read” and “Close”.
Now it is time to start adding code to your buttons. In order to do this, click on the first button you created, and from the pop-up menu, choose theView Code option:

This will open again the scripting environment, adding a new function to the code; it will mark the
beginning of the function:
This is the place where you will write the code to initialize the serial port. For this, we will be using the CommOpen function, defined above, which takes as parameters the ID of the COM port you want to open (COM1, COM2 etc) and a few strings that define the baud rate, the parity and the number of data and stop bits. The code for realizing this is:
It opens COM1, at a baud rate of 9600, no parity, 8 data bits and one stop bit. The number of the COM port is specified by the value assigned to the intPortID variable. The lngStatus variable will contain the value returned by the CommOpen function, and will indicate if the port was successfully open or if any error was encountered.
Once you completed this function, go back to the excel sheet, and by the same process of right-clicking and choosing the View Code option, create the function for the second button, the one with the “Write” label written on it. The code for this function should be as follows:
This actually calls the CommWrite function, which takes two parameters: the number of the COM port to write to (it has to be the same like for the one you have opened with the previous CommOpen function) and a string of characters that will be sent to the serial port. In this case, theintPortID variable specifies that we deal with COM1, and the data to be sent is stored in the strData variable (the string looks funny because it is a command string for a programmable power supply we have in the lab; it basically interrogates the power supply regarding its unique identification number)
Again, the lngStatus variable will indicate if the write was successful, or if
an error occurred.
In the same way, create and add the code for the third button:
This will try to read 10 characters from COM1 and store them in the strData variable. Once the data is stored you can do whatever you want with it: put it in a table, write it in a cell from the sheet put it through another VB algorithm etc.
The next logical step is to close the serial port, for this, you should use the fourth button you have created previously in order to create the function:
Remember that the VBA in Excel is rather an interpreter than a compiler. What this means is that once you have written the code, you do not need to compile it, you just need to execute the scripts. In order to do this, make sure the “Design Mode” button is now inactive in the second toolbar that you added throughout this process:
Once this is achieved, you may go ahead and click on the buttons that you have created; each time you press a button, the code from the corresponding function will be executed. You should obviously click the buttons in the order we have discussed. First initialize the port, and then write something to the port. If you have a device connected to the serial port of your PC, then you might attempt to read 10 characters from it, if not, then just go ahead and close the port.
Please bear in mind that I did not write this code myself. It is freely available on the internet if you have the time and patience to dig it up (well, hopefully we brought it closer to you by this article). I am not a professional programmer myself, so I cannot theoretically explain every detail of the code. However, I did make a test excel file and I successfully tested it by communicating with a TTI programmable power supply.
In my opinion, this serial port communication method has some advantages: there is no need to install anything on your PC, and sometimes, the data you read from the serial port is meant to be integrated in tables or graphs (very easy to do this in excel). The trade-offs are, however, present: no real compiler, so slow execution speed, and no…ease of programming like in C#, for instance.
In Download section, you may find a file that should have resulted from thoroughly following the steps in this article.
Источник
Using ActiveXperts Serial Port Component with VBA (Visual Basic for Applications)
ActiveXperts Serial Port Component is a software development kit (SDK) that enables the user to communicate to a device over a serial interface.
Such a device can be: a weight indicator, a modem, a scanner, or any other device that is equiped with a serial port. It can even be another PC, connected via a NULL modem cable.
ActiveXperts Serial Port Component features the following:
- Direct COM port support (like ‘COM1’)
- TAPI (Windows Telephony Device) support (like ‘Standard 56000 bps Modem’);
- Support for RS-232/RS422/RS485, up to 256 simultaneous ports;
- Support for all types of Hayes compatible modems;
- Support for serial cable as well as USB cable or Bluetooth connections;
- Support for Virtual COM ports (i.e. COM ports redirected through the network);
- Hardware flow control (RTS/CTS, DTR/DSR) and software flowcontrol (XON/XOFF) support;
- Configurable baudrate/parity/stopbits, full buffered data transfer, text/binary data transfer.
Step 1: Download and install the ActiveXperts Serial Port Component
Download the ActiveXperts Serial Port Component from the ActiveXperts Download Site and start the installation. The installation guides you through the installation process.
Step 2: Create a new Excel document
Create the form displayed in the image below. To create the buttons, textarea’s and drop down menu’s, click «View», «Toolbars», «Control toolbox».
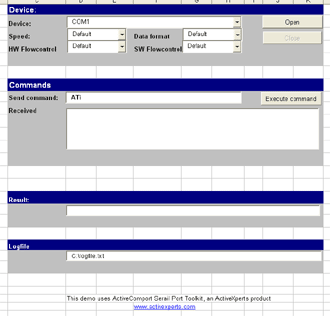
(Click on the picture to enlarge)
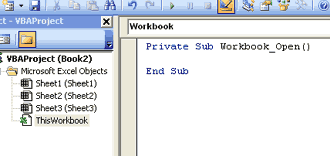
Wen you’re finished setting up the form, you need to fill in the dropdown menu’s. You need to load the content of your submenu when you open your workbook.You can do this using a visual basic code. To edit your visual basic code you need to be in design mode. To get in design mode, click the button «Design mode»  on the control toolbox. You can edit the visual basic code behind your form in Excel by clicking the button «View code»
  below «Design mode» on the control toolbox.
(Click on the picture to enlarge)
Type the following code in private sub workbook_open():
Make sure you’re directing to the right sheet (worksheets(«sheet1»)).
Step 4: Send an AT command to a connected Hayes compatible modem
In this step the code to send and recieve information from the modem will be written. Type the code below down to sheet1. Make sure the buttons, comboboxes and textarea’s have the right names.
The following code shows how to query a modem:
Источник
Omron Host Link Protocol Part 2 – VBA Excel
We will use VBA in Excel to communicate to an Omron PLC. This will use the serial host link protocol.
ACC Omron Host Link VBA
In Part 1, we used VB6 to communicate from the computer to the PLC (Host Link Protocol). We will now use Visual Basic for Applications (VBA) to accomplish the same task. NETComm will be the serial driver, and Excel will be our program. Using Excel, we will have access to the Excel Object Model to utilize worksheets, ranges, etc.
Please refer to Part 1 (How to Implement the Omron PLC Host Link Protocol) for the details of the wiring of the serial port and protocol sequence.
Register Serial Communication for VBA
The first step in using VBA is to download and register NETComm.ocx. To use serial communications with VBA, you must register the NETComm.ocx driver.
Call up a dos prompt with administrator authority. (Right-click on the cmd.exe program and select run as administrator.)
Type ‘regsvr32 netcomm.ocx’
An information box indicates that the NETComm.ocx was registered successfully.
Create the Excel spreadsheet
Now open Excel and make the following on Sheet 1.
Select Developer and then Visual Basic.
If you do not have the Developer option to select, then do the following:
Select File : Options: Customized Ribbon
Select Developer and hit OK
VBA – Visual Basic for Applications will open
Insert a user form.
Excel VBA add Serial Communication.
Add NETComm1 to UserForm1. If it is not on your Toolbar, select additional controls and NETCommOCX.NETComm. Press the OK. Then drag this control onto your form.
Create three command buttons. This can be done by going to Design Mode, and under the Insert menu, you can select Command Buttons.
Here is the entire code for the application:
Note: The Chart on Sheet1 is just a selection of the first ten DM areas and inserts a bar graph.
Run the Excel Program to communicate to the Omron PLC (Host Link Protocol)
Running the program produces the following information:
Download the excel file ACC Omron Host Link VBA.XLS. This is the complete program mentioned above.
When you open the file, it will warn you about macros. This is the VBA application. Press’ Enable Macros’.
When changing the parameters on the screen, you will also get a warning about Active X. This is the NETComm.ocx that was registered above. Press ‘OK’ to run the application.
Watch on YouTube: How to Implement the Omron Host Link Protocol Part 2 – VBA
If you have any questions or need further information, please get in touch with me.
Thank you,
Garry
If you’re like most of my readers, you’re committed to learning about technology. Numbering systems used in PLCs are not challenging to learn and understand. We will walk through the numbering systems used in PLCs. This includes Bits, Decimals, Hexadecimal, ASCII, and Floating Points.
To get this free article, subscribe to my free email newsletter.
Use the information to inform other people how numbering systems work. Sign up now.
The ‘Robust Data Logging for Free’ eBook is also available as a free download. The link is included when you subscribe to ACC Automation.
Источник


")
2 November, 2015
29.507
Views3 Comments
Maurizio @ dev.emcelettronica.com discuss how we can do serial communication in Excel environment. He writes:
The purpose of this article is to demonstrate how you can perform serial port communication in the VBA (Visual Basic Applications – script editor included in any typical Microsoft Excel distribution) but without using the MSComm control or any other third party add-on or ActiveX.
Serial Port Communication in Excel (VBA) – [Link]
Please follow and like us:
![]()
![]()
![]()
![]()
![]()

Mike is the founder and editor of Electronics-Lab.com, an electronics engineering community/news and project sharing platform. He studied Electronics and Physics and enjoys everything that has moving electrons and fun. His interests lying on solar cells, microcontrollers and switchmode power supplies. Feel free to reach him for feedback, random tips or just to say hello 
view all posts by admin
Join 97,426 other subscribers

TagCloud
The purpose of this article is to demonstrate how you can perform serial port communication in the VBA (Visual Basic Applications – script editor included in any typical Microsoft Excel distribution) but without using the MSComm control or any other third party add-on or ActiveX.
1. Introduction
The great advantage of this method, which uses API functions to call the serial port directly, is that you do not really need to install anything on your PC, apart from the Excel itself (which, let’s admit it, already exists on most PCs). Other methods always require the installation of an ActiveX, or at least the registration of an “.ocx” file, like for instance the MSComm control. In order to get access to the VBA script editor, you first need to make the corresponding buttons available on the Excel toolbars (they are not there by default). These buttons will enable you to launch the editor in which you will be able to write the Visual Basic Code and will also allow you to directly create windows-style controls like textboxes, push buttons, labels, radio buttons, checkboxes etc. In order to make these available on the main toolbar, you need to activate the Control Toolbox button, from the small toolbar activated at the previous step. As a goal for this article, I would intend to demonstrate how you open the serial port, how you write a few bytes, how you read some bytes, and then how you close the serial port. In order to do all these, you will need to create four windows-style buttons, each of them performing one of the tasks that I have enumerated before. Click on the Command Button control from the recently activated toolbar, and then draw 4 similar buttons anywhere on the surface of your excel worksheet (figure 1).
Figure 1: Command button for a version of excel
Once you did that, click on the Visual Basic Editor button from the toolbar that you activated in the very first place. This will open the environment in which you can write the code for the Visual Basic scripts that will perform the operations you wanted. Once there, make sure that you double click on the Sheet1(Sheet1) entry. The effect of this action will be the opening in the main window of this environment of the actual sheet in which you will write the VB code. Once you reached this stage, copy paste the code below in there. This Visual Basic Code “defines” the constants, structures and API functions that you will use later to perform the intended operations. The comments in the code are self
Source : Serial Port Communication in Excel (VBA)
Introduction to Serial Port Communication in VBA
The purpose of this article is to demonstrate how you can perform serial port communication in the VBA (Visual Basic Applications — script editor included in any typical Microsoft Excel distribution) but without using the MSComm control or any other third party add-on or ActiveX. The great advantage of this method, which uses API functions to call the serial port directly, is that you do not really need to install anything on your PC, apart from the Excel itself (which, let’s admit it, already exists on most PCs). Other methods always require the installation of an ActiveX, or at least the registration of an “.ocx” file, like for instance the MSComm control. Even the method of programming in C#, which I have suggested in a different article (Serial Port Communication in C#) needs the installation of the .NET Framework and of the C# compiler itself. It is assumed that the reader would have some basic knowledge of programming (but really basic, not even intermediate)
In order to get access to the VBA script editor, you first need to make the corresponding buttons available on the Excel toolbars (they are not there by default). Once you have started your Excel, choose from the top menu: View -> Toolbars -> Visual Basic. This will make visible another small toolbar, with the following buttons:

These buttons will enable you to launch the editor in which you will be able to write the Visual Basic Code and will also allow you to directly create windows-style controls like textboxes, push buttons, labels, radio buttons, checkboxes etc. In order to make these
available on the main toolbar, you need to activate the Control Toolbox button, from the small toolbar activated at the previous step. This will, in turn, make available a number of new other buttons that will allow you to build the mentioned controls:

As a goal for this article, I would intend to demonstrate how you open the serial port, how you write a few bytes, how you read some bytes, and then how you close the serial port. In order to do all these, you will need to create four windows-style buttons, each of them performing one of the tasks that I have enumerated before.
Click on the Command Button control from the recently activated toolbar, and then draw 4 similar buttons anywhere on the surface of your excel worksheet (it will be a challenge to draw them all of the same size!):

Once you did that, click on the Visual Basic Editor button from the toolbar that you activated in the very first place.

This will open the environment in which you can write the code for the Visual Basic scripts that will perform the operations you wanted. Once there, make sure that you double click on the Sheet1(Sheet1) entry in the top left project tree window:

The effect of this action will be the opening in the main window of this environment of the actual sheet in which you will write the VB code. Once you reached this stage, copy paste the code below in there. This Visual Basic Code “defines” the constants, structures and
API functions that you will use later to perform the intended operations. The comments in the code are self explanatory.The article continues after the end of this code, please scroll all the way down.
Option Explicit '------------------------------------------------------------------------------- ' ' This VB module is a collection of routines to perform serial port I/O without ' using the Microsoft Comm Control component. This module uses the Windows API ' to perform the overlapped I/O operations necessary for serial communications. ' ' The routine can handle up to 4 serial ports which are identified with a ' Port ID. ' ' All routines (with the exception of CommRead and CommWrite) return an error ' code or 0 if no error occurs. The routine CommGetError can be used to get ' the complete error message. '------------------------------------------------------------------------------- '------------------------------------------------------------------------------- ' Public Constants '------------------------------------------------------------------------------- ' Output Control Lines (CommSetLine) Const LINE_BREAK = 1 Const LINE_DTR = 2 Const LINE_RTS = 3 ' Input Control Lines (CommGetLine) Const LINE_CTS = &H10& Const LINE_DSR = &H20& Const LINE_RING = &H40& Const LINE_RLSD = &H80& Const LINE_CD = &H80& '------------------------------------------------------------------------------- ' System Constants '------------------------------------------------------------------------------- Private Const ERROR_IO_INCOMPLETE = 996& Private Const ERROR_IO_PENDING = 997 Private Const GENERIC_READ = &H80000000 Private Const GENERIC_WRITE = &H40000000 Private Const FILE_ATTRIBUTE_NORMAL = &H80 Private Const FILE_FLAG_OVERLAPPED = &H40000000 Private Const FORMAT_MESSAGE_FROM_SYSTEM = &H1000 Private Const OPEN_EXISTING = 3 ' COMM Functions Private Const MS_CTS_ON = &H10& Private Const MS_DSR_ON = &H20& Private Const MS_RING_ON = &H40& Private Const MS_RLSD_ON = &H80& Private Const PURGE_RXABORT = &H2 Private Const PURGE_RXCLEAR = &H8 Private Const PURGE_TXABORT = &H1 Private Const PURGE_TXCLEAR = &H4 ' COMM Escape Functions Private Const CLRBREAK = 9 Private Const CLRDTR = 6 Private Const CLRRTS = 4 Private Const SETBREAK = 8 Private Const SETDTR = 5 Private Const SETRTS = 3 '------------------------------------------------------------------------------- ' System Structures '------------------------------------------------------------------------------- Private Type COMSTAT fBitFields As Long ' See Comment in Win32API.Txt cbInQue As Long cbOutQue As Long End Type Private Type COMMTIMEOUTS ReadIntervalTimeout As Long ReadTotalTimeoutMultiplier As Long ReadTotalTimeoutConstant As Long WriteTotalTimeoutMultiplier As Long WriteTotalTimeoutConstant As Long End Type ' ' The DCB structure defines the control setting for a serial ' communications device. ' Private Type DCB DCBlength As Long BaudRate As Long fBitFields As Long ' See Comments in Win32API.Txt wReserved As Integer XonLim As Integer XoffLim As Integer ByteSize As Byte Parity As Byte StopBits As Byte XonChar As Byte XoffChar As Byte ErrorChar As Byte EofChar As Byte EvtChar As Byte wReserved1 As Integer 'Reserved; Do Not Use End Type Private Type OVERLAPPED Internal As Long InternalHigh As Long offset As Long OffsetHigh As Long hEvent As Long End Type Private Type SECURITY_ATTRIBUTES nLength As Long lpSecurityDescriptor As Long bInheritHandle As Long End Type '------------------------------------------------------------------------------- ' System Functions '------------------------------------------------------------------------------- ' ' Fills a specified DCB structure with values specified in ' a device-control string. ' Private Declare Function BuildCommDCB Lib "kernel32" Alias "BuildCommDCBA" _ (ByVal lpDef As String, lpDCB As DCB) As Long ' ' Retrieves information about a communications error and reports ' the current status of a communications device. The function is ' called when a communications error occurs, and it clears the ' device's error flag to enable additional input and output ' (I/O) operations. ' Private Declare Function ClearCommError Lib "kernel32" _ (ByVal hFile As Long, lpErrors As Long, lpStat As COMSTAT) As Long ' ' Closes an open communications device or file handle. ' Private Declare Function CloseHandle Lib "kernel32" (ByVal hObject As Long) As Long ' ' Creates or opens a communications resource and returns a handle ' that can be used to access the resource. ' Private Declare Function CreateFile Lib "kernel32" Alias "CreateFileA" _ (ByVal lpFileName As String, ByVal dwDesiredAccess As Long, _ ByVal dwShareMode As Long, lpSecurityAttributes As Any, _ ByVal dwCreationDisposition As Long, ByVal dwFlagsAndAttributes As Long, _ ByVal hTemplateFile As Long) As Long ' ' Directs a specified communications device to perform a function. ' Private Declare Function EscapeCommFunction Lib "kernel32" _ (ByVal nCid As Long, ByVal nFunc As Long) As Long ' ' Formats a message string such as an error string returned ' by anoher function. ' Private Declare Function FormatMessage Lib "kernel32" Alias "FormatMessageA" _ (ByVal dwFlags As Long, lpSource As Any, ByVal dwMessageId As Long, _ ByVal dwLanguageId As Long, ByVal lpBuffer As String, ByVal nSize As Long, _ Arguments As Long) As Long ' ' Retrieves modem control-register values. ' Private Declare Function GetCommModemStatus Lib "kernel32" _ (ByVal hFile As Long, lpModemStat As Long) As Long ' ' Retrieves the current control settings for a specified ' communications device. ' Private Declare Function GetCommState Lib "kernel32" _ (ByVal nCid As Long, lpDCB As DCB) As Long ' ' Retrieves the calling thread's last-error code value. ' Private Declare Function GetLastError Lib "kernel32" () As Long ' ' Retrieves the results of an overlapped operation on the ' specified file, named pipe, or communications device. ' Private Declare Function GetOverlappedResult Lib "kernel32" _ (ByVal hFile As Long, lpOverlapped As OVERLAPPED, _ lpNumberOfBytesTransferred As Long, ByVal bWait As Long) As Long ' ' Discards all characters from the output or input buffer of a ' specified communications resource. It can also terminate ' pending read or write operations on the resource. ' Private Declare Function PurgeComm Lib "kernel32" _ (ByVal hFile As Long, ByVal dwFlags As Long) As Long ' ' Reads data from a file, starting at the position indicated by the ' file pointer. After the read operation has been completed, the ' file pointer is adjusted by the number of bytes actually read, ' unless the file handle is created with the overlapped attribute. ' If the file handle is created for overlapped input and output ' (I/O), the application must adjust the position of the file pointer ' after the read operation. ' Private Declare Function ReadFile Lib "kernel32" _ (ByVal hFile As Long, ByVal lpBuffer As String, _ ByVal nNumberOfBytesToRead As Long, ByRef lpNumberOfBytesRead As Long, _ lpOverlapped As OVERLAPPED) As Long ' ' Configures a communications device according to the specifications ' in a device-control block (a DCB structure). The function ' reinitializes all hardware and control settings, but it does not ' empty output or input queues. ' Private Declare Function SetCommState Lib "kernel32" _ (ByVal hCommDev As Long, lpDCB As DCB) As Long ' ' Sets the time-out parameters for all read and write operations on a ' specified communications device. ' Private Declare Function SetCommTimeouts Lib "kernel32" _ (ByVal hFile As Long, lpCommTimeouts As COMMTIMEOUTS) As Long ' ' Initializes the communications parameters for a specified ' communications device. ' Private Declare Function SetupComm Lib "kernel32" _ (ByVal hFile As Long, ByVal dwInQueue As Long, ByVal dwOutQueue As Long) As Long ' ' Writes data to a file and is designed for both synchronous and a ' synchronous operation. The function starts writing data to the file ' at the position indicated by the file pointer. After the write ' operation has been completed, the file pointer is adjusted by the ' number of bytes actually written, except when the file is opened with ' FILE_FLAG_OVERLAPPED. If the file handle was created for overlapped ' input and output (I/O), the application must adjust the position of ' the file pointer after the write operation is finished. ' Private Declare Function WriteFile Lib "kernel32" _ (ByVal hFile As Long, ByVal lpBuffer As String, _ ByVal nNumberOfBytesToWrite As Long, lpNumberOfBytesWritten As Long, _ lpOverlapped As OVERLAPPED) As Long Private Declare Sub AppSleep Lib "kernel32" Alias "Sleep" (ByVal dwMilliseconds As Long) '------------------------------------------------------------------------------- ' Program Constants '------------------------------------------------------------------------------- Private Const MAX_PORTS = 4 '------------------------------------------------------------------------------- ' Program Structures '------------------------------------------------------------------------------- Private Type COMM_ERROR lngErrorCode As Long strFunction As String strErrorMessage As String End Type Private Type COMM_PORT lngHandle As Long blnPortOpen As Boolean udtDCB As DCB End Type '------------------------------------------------------------------------------- ' Program Storage '------------------------------------------------------------------------------- Private udtCommOverlap As OVERLAPPED Private udtCommError As COMM_ERROR Private udtPorts(1 To MAX_PORTS) As COMM_PORT '------------------------------------------------------------------------------- ' GetSystemMessage - Gets system error text for the specified error code. '------------------------------------------------------------------------------- Public Function GetSystemMessage(lngErrorCode As Long) As String Dim intPos As Integer Dim strMessage As String, strMsgBuff As String * 256 Call FormatMessage(FORMAT_MESSAGE_FROM_SYSTEM, 0, lngErrorCode, 0, strMsgBuff, 255, 0) intPos = InStr(1, strMsgBuff, vbNullChar) If intPos > 0 Then strMessage = Trim$(Left$(strMsgBuff, intPos - 1)) Else strMessage = Trim$(strMsgBuff) End If GetSystemMessage = strMessage End Function Public Function PauseApp(PauseInSeconds As Long) Call AppSleep(PauseInSeconds * 1000) End Function '------------------------------------------------------------------------------- ' CommOpen - Opens/Initializes serial port. ' ' ' Parameters: ' intPortID - Port ID used when port was opened. ' strPort - COM port name. (COM1, COM2, COM3, COM4) ' strSettings - Communication settings. ' Example: "baud=9600 parity=N data=8 stop=1" ' ' Returns: ' Error Code - 0 = No Error. ' '------------------------------------------------------------------------------- Public Function CommOpen(intPortID As Integer, strPort As String, _ strSettings As String) As Long Dim lngStatus As Long Dim udtCommTimeOuts As COMMTIMEOUTS On Error GoTo Routine_Error ' See if port already in use. If udtPorts(intPortID).blnPortOpen Then lngStatus = -1 With udtCommError .lngErrorCode = lngStatus .strFunction = "CommOpen" .strErrorMessage = "Port in use." End With GoTo Routine_Exit End If ' Open serial port. udtPorts(intPortID).lngHandle = CreateFile(strPort, GENERIC_READ Or _ GENERIC_WRITE, 0, ByVal 0&, OPEN_EXISTING, FILE_ATTRIBUTE_NORMAL, 0) If udtPorts(intPortID).lngHandle = -1 Then lngStatus = SetCommError("CommOpen (CreateFile)") GoTo Routine_Exit End If udtPorts(intPortID).blnPortOpen = True ' Setup device buffers (1K each). lngStatus = SetupComm(udtPorts(intPortID).lngHandle, 1024, 1024) If lngStatus = 0 Then lngStatus = SetCommError("CommOpen (SetupComm)") GoTo Routine_Exit End If ' Purge buffers. lngStatus = PurgeComm(udtPorts(intPortID).lngHandle, PURGE_TXABORT Or _ PURGE_RXABORT Or PURGE_TXCLEAR Or PURGE_RXCLEAR) If lngStatus = 0 Then lngStatus = SetCommError("CommOpen (PurgeComm)") GoTo Routine_Exit End If ' Set serial port timeouts. With udtCommTimeOuts .ReadIntervalTimeout = -1 .ReadTotalTimeoutMultiplier = 0 .ReadTotalTimeoutConstant = 1000 .WriteTotalTimeoutMultiplier = 0 .WriteTotalTimeoutMultiplier = 1000 End With lngStatus = SetCommTimeouts(udtPorts(intPortID).lngHandle, udtCommTimeOuts) If lngStatus = 0 Then lngStatus = SetCommError("CommOpen (SetCommTimeouts)") GoTo Routine_Exit End If ' Get the current state (DCB). lngStatus = GetCommState(udtPorts(intPortID).lngHandle, _ udtPorts(intPortID).udtDCB) If lngStatus = 0 Then lngStatus = SetCommError("CommOpen (GetCommState)") GoTo Routine_Exit End If ' Modify the DCB to reflect the desired settings. lngStatus = BuildCommDCB(strSettings, udtPorts(intPortID).udtDCB) If lngStatus = 0 Then lngStatus = SetCommError("CommOpen (BuildCommDCB)") GoTo Routine_Exit End If ' Set the new state. lngStatus = SetCommState(udtPorts(intPortID).lngHandle, _ udtPorts(intPortID).udtDCB) If lngStatus = 0 Then lngStatus = SetCommError("CommOpen (SetCommState)") GoTo Routine_Exit End If lngStatus = 0 Routine_Exit: CommOpen = lngStatus Exit Function Routine_Error: lngStatus = Err.Number With udtCommError .lngErrorCode = lngStatus .strFunction = "CommOpen" .strErrorMessage = Err.Description End With Resume Routine_Exit End Function Private Function SetCommError(strFunction As String) As Long With udtCommError .lngErrorCode = Err.LastDllError .strFunction = strFunction .strErrorMessage = GetSystemMessage(.lngErrorCode) SetCommError = .lngErrorCode End With End Function Private Function SetCommErrorEx(strFunction As String, lngHnd As Long) As Long Dim lngErrorFlags As Long Dim udtCommStat As COMSTAT With udtCommError .lngErrorCode = GetLastError .strFunction = strFunction .strErrorMessage = GetSystemMessage(.lngErrorCode) Call ClearCommError(lngHnd, lngErrorFlags, udtCommStat) .strErrorMessage = .strErrorMessage & " COMM Error Flags = " & _ Hex$(lngErrorFlags) SetCommErrorEx = .lngErrorCode End With End Function '------------------------------------------------------------------------------- ' CommSet - Modifies the serial port settings. ' ' Parameters: ' intPortID - Port ID used when port was opened. ' strSettings - Communication settings. ' Example: "baud=9600 parity=N data=8 stop=1" ' ' Returns: ' Error Code - 0 = No Error. '------------------------------------------------------------------------------- Public Function CommSet(intPortID As Integer, strSettings As String) As Long Dim lngStatus As Long On Error GoTo Routine_Error lngStatus = GetCommState(udtPorts(intPortID).lngHandle, _ udtPorts(intPortID).udtDCB) If lngStatus = 0 Then lngStatus = SetCommError("CommSet (GetCommState)") GoTo Routine_Exit End If lngStatus = BuildCommDCB(strSettings, udtPorts(intPortID).udtDCB) If lngStatus = 0 Then lngStatus = SetCommError("CommSet (BuildCommDCB)") GoTo Routine_Exit End If lngStatus = SetCommState(udtPorts(intPortID).lngHandle, _ udtPorts(intPortID).udtDCB) If lngStatus = 0 Then lngStatus = SetCommError("CommSet (SetCommState)") GoTo Routine_Exit End If lngStatus = 0 Routine_Exit: CommSet = lngStatus Exit Function Routine_Error: lngStatus = Err.Number With udtCommError .lngErrorCode = lngStatus .strFunction = "CommSet" .strErrorMessage = Err.Description End With Resume Routine_Exit End Function '------------------------------------------------------------------------------- ' CommClose - Close the serial port. ' ' Parameters: ' intPortID - Port ID used when port was opened. ' ' Returns: ' Error Code - 0 = No Error. '------------------------------------------------------------------------------- Public Function CommClose(intPortID As Integer) As Long Dim lngStatus As Long On Error GoTo Routine_Error If udtPorts(intPortID).blnPortOpen Then lngStatus = CloseHandle(udtPorts(intPortID).lngHandle) If lngStatus = 0 Then lngStatus = SetCommError("CommClose (CloseHandle)") GoTo Routine_Exit End If udtPorts(intPortID).blnPortOpen = False End If lngStatus = 0 Routine_Exit: CommClose = lngStatus Exit Function Routine_Error: lngStatus = Err.Number With udtCommError .lngErrorCode = lngStatus .strFunction = "CommClose" .strErrorMessage = Err.Description End With Resume Routine_Exit End Function '------------------------------------------------------------------------------- ' CommFlush - Flush the send and receive serial port buffers. ' ' Parameters: ' intPortID - Port ID used when port was opened. ' ' Returns: ' Error Code - 0 = No Error. '------------------------------------------------------------------------------- Public Function CommFlush(intPortID As Integer) As Long Dim lngStatus As Long On Error GoTo Routine_Error lngStatus = PurgeComm(udtPorts(intPortID).lngHandle, PURGE_TXABORT Or _ PURGE_RXABORT Or PURGE_TXCLEAR Or PURGE_RXCLEAR) If lngStatus = 0 Then lngStatus = SetCommError("CommFlush (PurgeComm)") GoTo Routine_Exit End If lngStatus = 0 Routine_Exit: CommFlush = lngStatus Exit Function Routine_Error: lngStatus = Err.Number With udtCommError .lngErrorCode = lngStatus .strFunction = "CommFlush" .strErrorMessage = Err.Description End With Resume Routine_Exit End Function '------------------------------------------------------------------------------- ' CommRead - Read serial port input buffer. ' ' Parameters: ' intPortID - Port ID used when port was opened. ' strData - Data buffer. ' lngSize - Maximum number of bytes to be read. ' ' Returns: ' Error Code - 0 = No Error. '------------------------------------------------------------------------------- Public Function CommRead(intPortID As Integer, strData As String, _ lngSize As Long) As Long Dim lngStatus As Long Dim lngRdSize As Long, lngBytesRead As Long Dim lngRdStatus As Long, strRdBuffer As String * 1024 Dim lngErrorFlags As Long, udtCommStat As COMSTAT On Error GoTo Routine_Error strData = "" lngBytesRead = 0 DoEvents ' Clear any previous errors and get current status. lngStatus = ClearCommError(udtPorts(intPortID).lngHandle, lngErrorFlags, _ udtCommStat) If lngStatus = 0 Then lngBytesRead = -1 lngStatus = SetCommError("CommRead (ClearCommError)") GoTo Routine_Exit End If If udtCommStat.cbInQue > 0 Then If udtCommStat.cbInQue > lngSize Then lngRdSize = udtCommStat.cbInQue Else lngRdSize = lngSize End If Else lngRdSize = 0 End If If lngRdSize Then lngRdStatus = ReadFile(udtPorts(intPortID).lngHandle, strRdBuffer, _ lngRdSize, lngBytesRead, udtCommOverlap) If lngRdStatus = 0 Then lngStatus = GetLastError If lngStatus = ERROR_IO_PENDING Then ' Wait for read to complete. ' This function will timeout according to the ' COMMTIMEOUTS.ReadTotalTimeoutConstant variable. ' Every time it times out, check for port errors. ' Loop until operation is complete. While GetOverlappedResult(udtPorts(intPortID).lngHandle, _ udtCommOverlap, lngBytesRead, True) = 0 lngStatus = GetLastError If lngStatus <> ERROR_IO_INCOMPLETE Then lngBytesRead = -1 lngStatus = SetCommErrorEx( _ "CommRead (GetOverlappedResult)", _ udtPorts(intPortID).lngHandle) GoTo Routine_Exit End If Wend Else ' Some other error occurred. lngBytesRead = -1 lngStatus = SetCommErrorEx("CommRead (ReadFile)", _ udtPorts(intPortID).lngHandle) GoTo Routine_Exit End If End If strData = Left$(strRdBuffer, lngBytesRead) End If Routine_Exit: CommRead = lngBytesRead Exit Function Routine_Error: lngBytesRead = -1 lngStatus = Err.Number With udtCommError .lngErrorCode = lngStatus .strFunction = "CommRead" .strErrorMessage = Err.Description End With Resume Routine_Exit End Function '------------------------------------------------------------------------------- ' CommWrite - Output data to the serial port. ' ' Parameters: ' intPortID - Port ID used when port was opened. ' strData - Data to be transmitted. ' ' Returns: ' Error Code - 0 = No Error. '------------------------------------------------------------------------------- Public Function CommWrite(intPortID As Integer, strData As String) As Long Dim i As Integer Dim lngStatus As Long, lngSize As Long Dim lngWrSize As Long, lngWrStatus As Long On Error GoTo Routine_Error ' Get the length of the data. lngSize = Len(strData) ' Output the data. lngWrStatus = WriteFile(udtPorts(intPortID).lngHandle, strData, lngSize, _ lngWrSize, udtCommOverlap) ' Note that normally the following code will not execute because the driver ' caches write operations. Small I/O requests (up to several thousand bytes) ' will normally be accepted immediately and WriteFile will return true even ' though an overlapped operation was specified. DoEvents If lngWrStatus = 0 Then lngStatus = GetLastError If lngStatus = 0 Then GoTo Routine_Exit ElseIf lngStatus = ERROR_IO_PENDING Then ' We should wait for the completion of the write operation so we know ' if it worked or not. ' ' This is only one way to do this. It might be beneficial to place the ' writing operation in a separate thread so that blocking on completion ' will not negatively affect the responsiveness of the UI. ' ' If the write takes long enough to complete, this function will timeout ' according to the CommTimeOuts.WriteTotalTimeoutConstant variable. ' At that time we can check for errors and then wait some more. ' Loop until operation is complete. While GetOverlappedResult(udtPorts(intPortID).lngHandle, _ udtCommOverlap, lngWrSize, True) = 0 lngStatus = GetLastError If lngStatus <> ERROR_IO_INCOMPLETE Then lngStatus = SetCommErrorEx( _ "CommWrite (GetOverlappedResult)", _ udtPorts(intPortID).lngHandle) GoTo Routine_Exit End If Wend Else ' Some other error occurred. lngWrSize = -1 lngStatus = SetCommErrorEx("CommWrite (WriteFile)", _ udtPorts(intPortID).lngHandle) GoTo Routine_Exit End If End If For i = 1 To 10 DoEvents Next Routine_Exit: CommWrite = lngWrSize Exit Function Routine_Error: lngStatus = Err.Number With udtCommError .lngErrorCode = lngStatus .strFunction = "CommWrite" .strErrorMessage = Err.Description End With Resume Routine_Exit End Function '------------------------------------------------------------------------------- ' CommGetLine - Get the state of selected serial port control lines. ' ' Parameters: ' intPortID - Port ID used when port was opened. ' intLine - Serial port line. CTS, DSR, RING, RLSD (CD) ' blnState - Returns state of line (Cleared or Set). ' ' Returns: ' Error Code - 0 = No Error. '------------------------------------------------------------------------------- Public Function CommGetLine(intPortID As Integer, intLine As Integer, _ blnState As Boolean) As Long Dim lngStatus As Long Dim lngComStatus As Long, lngModemStatus As Long On Error GoTo Routine_Error lngStatus = GetCommModemStatus(udtPorts(intPortID).lngHandle, lngModemStatus) If lngStatus = 0 Then lngStatus = SetCommError("CommReadCD (GetCommModemStatus)") GoTo Routine_Exit End If If (lngModemStatus And intLine) Then blnState = True Else blnState = False End If lngStatus = 0 Routine_Exit: CommGetLine = lngStatus Exit Function Routine_Error: lngStatus = Err.Number With udtCommError .lngErrorCode = lngStatus .strFunction = "CommReadCD" .strErrorMessage = Err.Description End With Resume Routine_Exit End Function '------------------------------------------------------------------------------- ' CommSetLine - Set the state of selected serial port control lines. ' ' Parameters: ' intPortID - Port ID used when port was opened. ' intLine - Serial port line. BREAK, DTR, RTS ' Note: BREAK actually sets or clears a "break" condition on ' the transmit data line. ' blnState - Sets the state of line (Cleared or Set). ' ' Returns: ' Error Code - 0 = No Error. '------------------------------------------------------------------------------- Public Function CommSetLine(intPortID As Integer, intLine As Integer, _ blnState As Boolean) As Long Dim lngStatus As Long Dim lngNewState As Long On Error GoTo Routine_Error If intLine = LINE_BREAK Then If blnState Then lngNewState = SETBREAK Else lngNewState = CLRBREAK End If ElseIf intLine = LINE_DTR Then If blnState Then lngNewState = SETDTR Else lngNewState = CLRDTR End If ElseIf intLine = LINE_RTS Then If blnState Then lngNewState = SETRTS Else lngNewState = CLRRTS End If End If lngStatus = EscapeCommFunction(udtPorts(intPortID).lngHandle, lngNewState) If lngStatus = 0 Then lngStatus = SetCommError("CommSetLine (EscapeCommFunction)") GoTo Routine_Exit End If lngStatus = 0 Routine_Exit: CommSetLine = lngStatus Exit Function Routine_Error: lngStatus = Err.Number With udtCommError .lngErrorCode = lngStatus .strFunction = "CommSetLine" .strErrorMessage = Err.Description End With Resume Routine_Exit End Function '------------------------------------------------------------------------------- ' CommGetError - Get the last serial port error message. ' ' Parameters: ' strMessage - Error message from last serial port error. ' ' Returns: ' Error Code - Last serial port error code. '------------------------------------------------------------------------------- Public Function CommGetError(strMessage As String) As Long With udtCommError CommGetError = .lngErrorCode strMessage = "Error (" & CStr(.lngErrorCode) & "): " & .strFunction & _ " - " & .strErrorMessage End With End Function
I know the code looks lengthy and elaborate, but you need not to worry about that. It actually implements many more functions than you really need to use. Some of them, for instance, are used to set high/low the control lines of the serial port (DTR, RTS) or to read the state of the other control lines (CTS, DSR). The actual functions to write/read the serial port, which are defined above too, do call some of the other functions defined, but this is not important for the end user of the code. And if you made it so far…you have half of the job done!
Make sure you save the file (by clicking the common “Save” button) and then go back to the excel worksheet, where the 4 buttons that you have drawin are waiting for you to do something with them!
First of all, make sure that the “Design Mode” button is activated in the second toolbar that you added throughout this process:

Now you can give appropriate names to each of the four buttons you have created before. In order to do this, right-click on the first of these buttons, and from the pop-up menu, choose the
Properties option:

A window will open with all the properties of the button object. Change the Caption property to “Initialise”, and then close the window. This will change the label on the first button to this very text:

Once you do this for the first button, repeat the operation and change the labels on the other three buttons
to “Write”, “Read” and “Close”.
Now it is time to start adding code to your buttons. In order to do this, click on the first button you created, and from the pop-up menu, choose theView Code option:

This will open again the scripting environment, adding a new function to the code; it will mark the
beginning of the function:
Private Sub CommandButton1_Click() End Sub
This is the place where you will write the code to initialize the serial port. For this, we will be using the CommOpen function, defined above, which takes as parameters the ID of the COM port you want to open (COM1, COM2 etc) and a few strings that define the baud rate, the parity and the number of data and stop bits. The code for realizing this is:
Private Sub CommandButton1_Click() Dim intPortID As Integer ' Ex. 1, 2, 3, 4 for COM1 - COM4 Dim lngStatus As Long intPortID = 1 ' Open COM port lngStatus = CommOpen(intPortID, "COM" & CStr(intPortID), _ "baud=9600 parity=N data=8 stop=1") End Sub
It opens COM1, at a baud rate of 9600, no parity, 8 data bits and one stop bit. The number of the COM port is specified by the value assigned to the intPortID variable. The lngStatus variable will contain the value returned by the CommOpen function, and will indicate if the port was successfully open or if any error was encountered.
Once you completed this function, go back to the excel sheet, and by the same process of right-clicking and choosing the View Code option, create the function for the second button, the one with the “Write” label written on it. The code for this function should be as follows:
Private Sub CommandButton2_Click() Dim intPortID As Integer ' Ex. 1, 2, 3, 4 for COM1 - COM4 Dim lngStatus As Long Dim strData As String intPortID = 1 strData = "*IDN?;" 'Writa data lngStatus = CommWrite(intPortID, strData) End Sub
This actually calls the CommWrite function, which takes two parameters: the number of the COM port to write to (it has to be the same like for the one you have opened with the previous CommOpen function) and a string of characters that will be sent to the serial port. In this case, theintPortID variable specifies that we deal with COM1, and the data to be sent is stored in the strData variable (the string looks funny because it is a command string for a programmable power supply we have in the lab; it basically interrogates the power supply regarding its unique identification number)
Again, the lngStatus variable will indicate if the write was successful, or if
an error occurred.
In the same way, create and add the code for the third button:
Private Sub CommandButton3_Click() Dim intPortID As Integer ' Ex. 1, 2, 3, 4 for COM1 - COM4 Dim lngStatus As Long Dim strData As String intPortID = 1 lngStatus = CommRead(intPortID, strData, 10) End Sub
This will try to read 10 characters from COM1 and store them in the strData variable. Once the data is stored you can do whatever you want with it: put it in a table, write it in a cell from the sheet put it through another VB algorithm etc.
Private Sub CommandButton4_Click() Dim intPortID As Integer ' Ex. 1, 2, 3, 4 for COM1 - COM4 intPortID = 1 Call CommClose(intPortID) End Sub
The next logical step is to close the serial port, for this, you should use the fourth button you have created previously in order to create the function:
Remember that the VBA in Excel is rather an interpreter than a compiler. What this means is that once you have written the code, you do not need to compile it, you just need to execute the scripts. In order to do this, make sure the “Design Mode” button is now inactive in the second toolbar that you added throughout this process:
Once this is achieved, you may go ahead and click on the buttons that you have created; each time you press a button, the code from the corresponding function will be executed. You should obviously click the buttons in the order we have discussed. First initialize the port, and then write something to the port. If you have a device connected to the serial port of your PC, then you might attempt to read 10 characters from it, if not, then just go ahead and close the port.
Please bear in mind that I did not write this code myself. It is freely available on the internet if you have the time and patience to dig it up (well, hopefully we brought it closer to you by this article). I am not a professional programmer myself, so I cannot theoretically explain every detail of the code. However, I did make a test excel file and I successfully tested it by communicating with a TTI programmable power supply.
In my opinion, this serial port communication method has some advantages: there is no need to install anything on your PC, and sometimes, the data you read from the serial port is meant to be integrated in tables or graphs (very easy to do this in excel). The trade-offs are, however, present: no real compiler, so slow execution speed, and no…ease of programming like in C#, for instance.
In Download section, you may find a file that should have resulted from thoroughly following the steps in this article.