
Do you have some values arranged as rows in your workbook, and do you want to convert text in rows to columns in Excel like this?
In Excel, you can do this manually or automatically in multiple ways depending on your purpose. Read on to get all the details and choose the best solution for yourself.
How to convert rows into columns or columns to rows in Excel – the basic solution
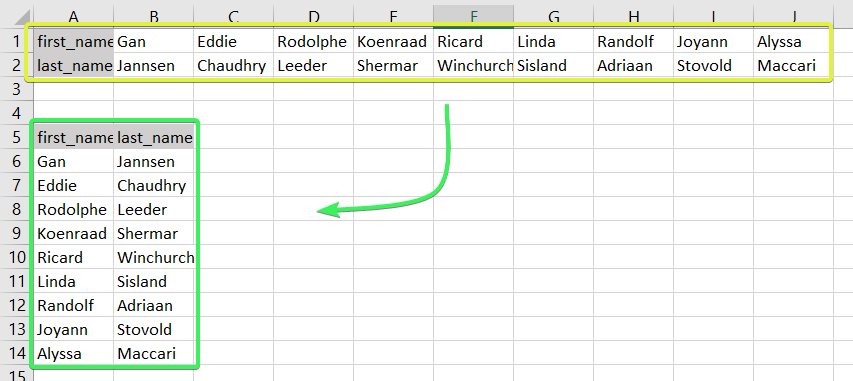
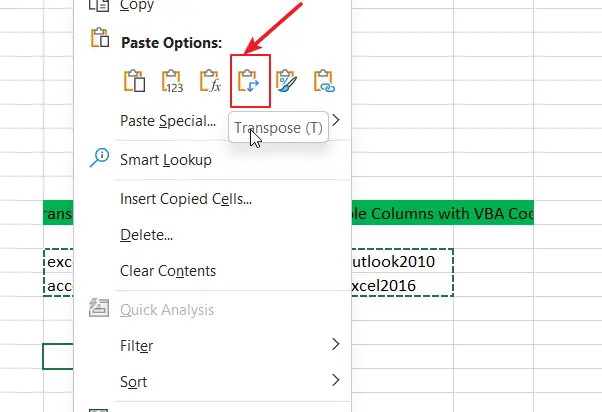
The easiest way to convert rows to columns in Excel is via the Paste Transpose option. Here is how it looks:
- Select and copy the needed range
- Right-click on a cell where you want to convert rows to columns
- Select the Paste Transpose option to rotate rows to columns
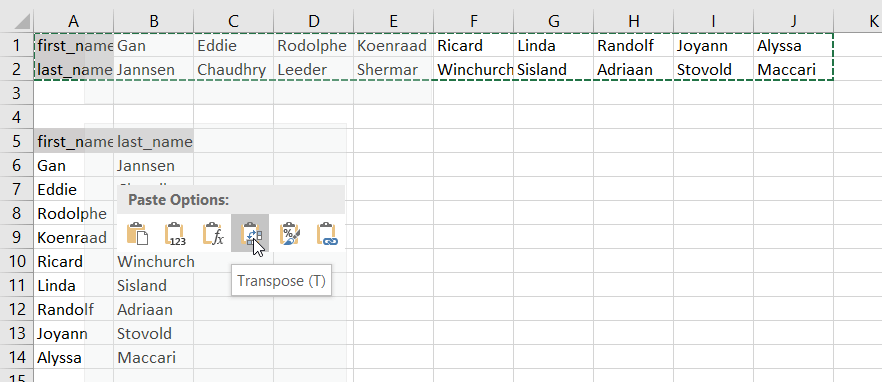
As an alternative, you can use the Paste Special option and mark Transpose using its menu.

It works the same if you need to convert columns to rows in Excel.

This is the best way for a one-time conversion of small to medium numbers of rows both in the Excel desktop and online.
Can I convert multiple rows to columns in Excel from another workbook?
The method above will work well if you want to convert rows to columns in Excel between different workbooks using Excel desktop. You need to have both spreadsheets open and do the copying and pasting as described.
However, in Excel Online, this won’t work for different workbooks. The Paste Transpose option is not available.
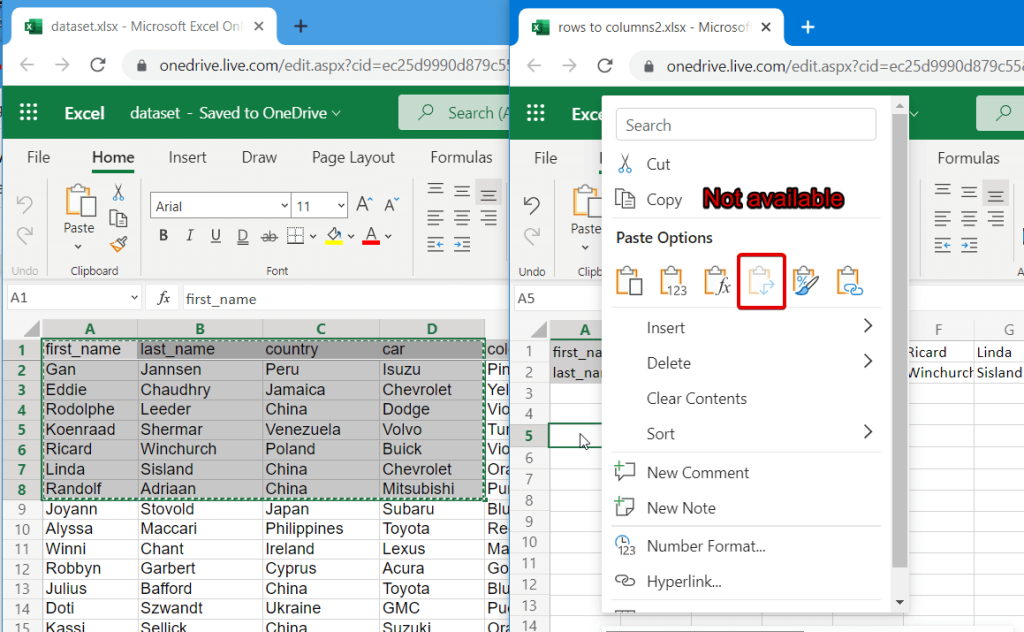
Therefore, in this case, it’s better to use the TRANSPOSE function.
How to switch rows and columns in Excel in more efficient ways
To switch rows and columns in Excel automatically or dynamically, you can use one of these options:
- Excel TRANSPOSE function
- VBA macro
- Power Query
Let’s check out each of them in the example of a data range that we imported to Excel from a Google Sheets file using Coupler.io.

Coupler.io is an integration solution that synchronizes data between source and destination apps on a regular schedule. For example, you can set up an automatic data export from Google Sheets every day to your Excel workbook.
Check out all the available Excel integrations.

How to change row to column in Excel with TRANSPOSE
TRANSPOSE is the Excel function that allows you to switch rows and columns in Excel. Here is its syntax:
=TRANSPOSE(array)array– an array of columns or rows to transpose
One of the main benefits of TRANSPOSE is that it links the converted columns/rows with the source rows/columns. So, if the values in the rows change, the same changes will be made in the converted columns.
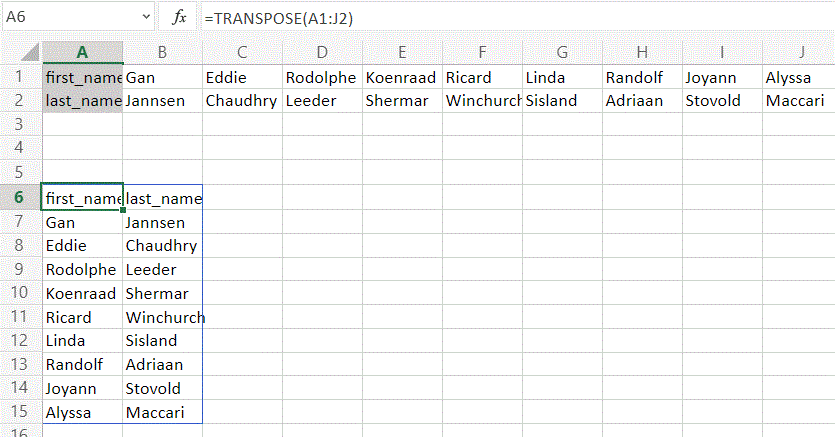
TRANSPOSE formula to convert multiple rows to columns in Excel desktop
TRANSPOSE is an array formula, which means that you’ll need to select a number of cells in the columns that correspond to the number of cells in the rows to be converted and press Ctrl+Shift+Enter.
=TRANSPOSE(A1:J2)

Fortunately, you don’t have to go through this procedure in Excel Online.
TRANSPOSE formula to rotate row to column in Excel Online
You can simply insert your TRANSPOSE formula in a cell and hit enter. The rows will be rotated to columns right away without any additional button combinations.
Excel TRANSPOSE multiple rows in a group to columns between different workbooks
We promised to demonstrate how you can use TRANSPOSE to rotate rows to columns between different workbooks. In Excel Online, you need to do the following:
- Copy a range of columns to rotate from one spreadsheet and paste it as a link to another spreadsheet.

- We need this URL path to use in the TRANSPOSE formula, so copy it.

- The URL path above is for a cell, not for an array. So, you’ll need to slightly update it to an array to use in your TRANSPOSE formula. Here is what it should look like:
=TRANSPOSE('https://d.docs.live.net/ec25d9990d879c55/Docs/Convert rows to columns/[dataset.xlsx]dataset'!A1:D12)

You can follow the same logic for rotating rows to columns between workbooks in Excel desktop.
Are there other formulas to convert columns to rows in Excel?
TRANSPOSE is not the only function you can use to change rows to columns in Excel. A combination of INDIRECT and ADDRESS functions can be considered as an alternative, but the flow to convert rows to columns in Excel using this formula is much trickier. Let’s check it out in the following example.
How to convert text in columns to rows in Excel using INDIRECT+ADDRESS
If you have a set of columns with the first cell A1, the following formula will allow you to convert columns to rows in Excel.
=INDIRECT(ADDRESS(COLUMN(A1),ROW(A1)))

But where are the rows, you may ask! Well, first you need to drag this formula down if you are converting multiple columns to rows. Then drag it to the right.

NOTE: This Excel formula only to convert data in columns to rows starting with A1 cell. If your columns start from another cell, check out the next section.
How to convert Excel data in columns to rows using INDIRECT+ADDRESS from other cells
To convert columns to rows in Excel with INDIRECT+ADDRESS formulas from not A1 cell only, use the following formula:
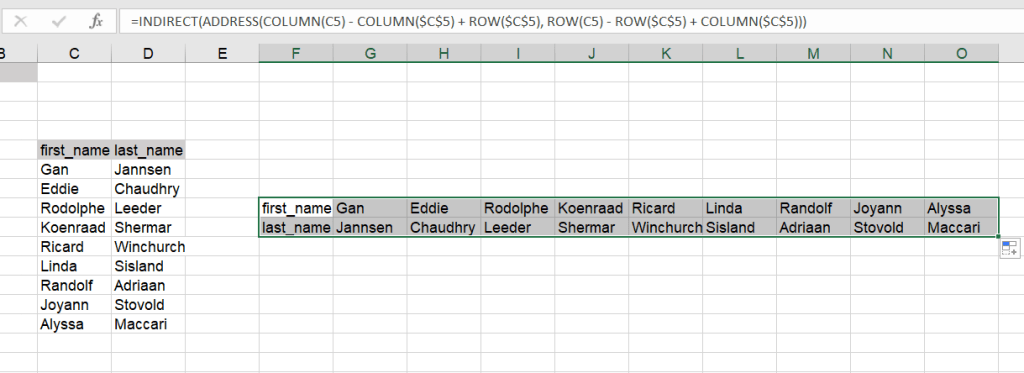
=INDIRECT(ADDRESS(COLUMN(first_cell) - COLUMN($first_cell) + ROW($first_cell), ROW(first_cell) - ROW($first_cell) + COLUMN($first_cell)))
- first_cell – enter the first cell of your columns
Here is an example of how to convert Excel data in columns to rows:
=INDIRECT(ADDRESS(COLUMN(C5) - COLUMN($C$5) + ROW($C$5), ROW(C5) - ROW($C$5) + COLUMN($C$5)))
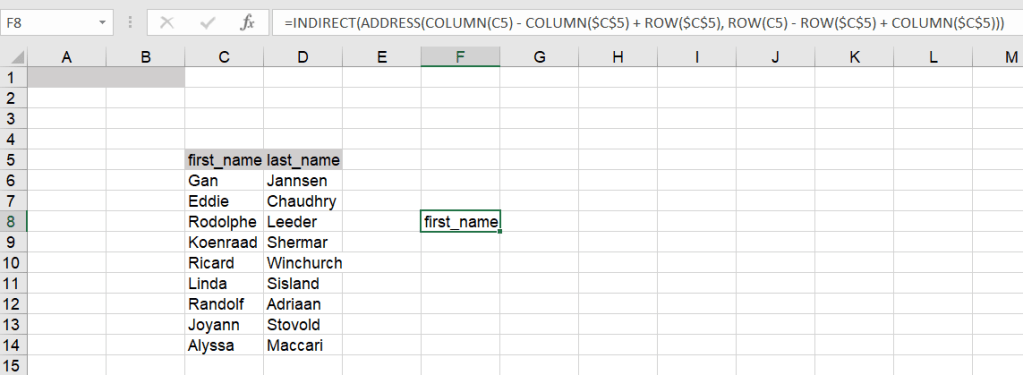
Again, you’ll need to drag the formula down and to the right to populate the rest of the cells.
How to automatically convert rows to columns in Excel VBA
VBA is a superb option if you want to customize some function or functionality. However, this option is only code-based. Below we provide a script that allows you to change rows to columns in Excel automatically.
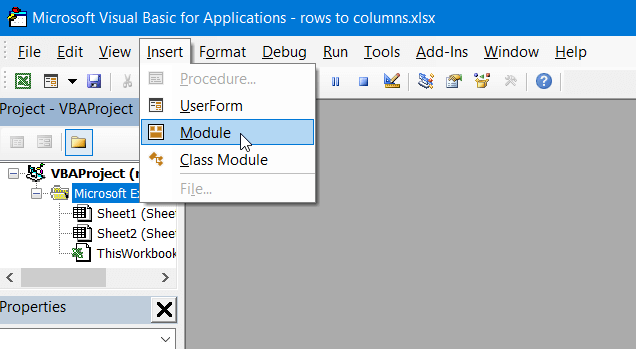
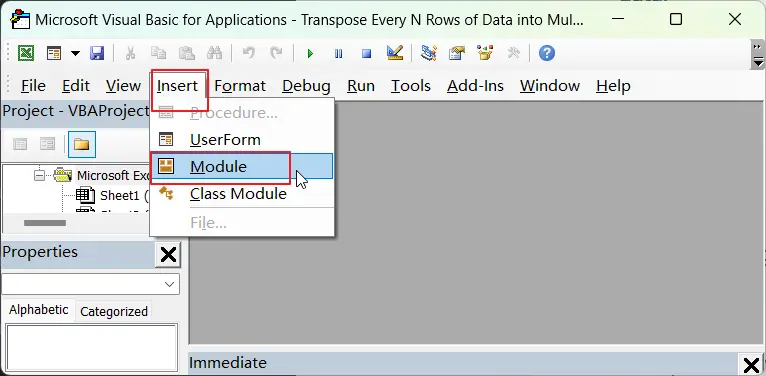
- Go to the Visual Basic Editor (VBE). Click Alt+F11 or you can go to the Developer tab => Visual Basic.

- In VBE, go to Insert => Module.
- Copy and paste the script into the window. You’ll find the script in the next section.

- Now you can close the VBE. Go to Developer => Macros and you’ll see your RowsToColumns macro. Click Run.

- You’ll be asked to select the array to rotate and the cell to insert the rotated columns.

- There you go!

VBA macro script to convert multiple rows to columns in Excel
Sub TransposeColumnsRows()
    Dim SourceRange As Range
    Dim DestRange As Range

    Set SourceRange = Application.InputBox(Prompt:="Please select the range to transpose", Title:="Transpose Rows to Columns", Type:=8)
    Set DestRange = Application.InputBox(Prompt:="Select the upper left cell of the destination range", Title:="Transpose Rows to Columns", Type:=8)

    SourceRange.Copy
    DestRange.Select
    Selection.PasteSpecial Paste:=xlPasteAll, Operation:=xlNone, SkipBlanks:=False, Transpose:=True
    Application.CutCopyMode = False

End Sub

Sub RowsToColumns()
    Dim SourceRange As Range
    Dim DestRange As Range

    Set SourceRange = Application.InputBox(Prompt:="Select the array to rotate", Title:="Convert Rows to Columns", Type:=8)
    Set DestRange = Application.InputBox(Prompt:="Select the cell to insert the rotated columns", Title:="Convert Rows to Columns", Type:=8)

    SourceRange.Copy
    DestRange.Select
    Selection.PasteSpecial Paste:=xlPasteAll, Operation:=xlNone, SkipBlanks:=False, Transpose:=True
    Application.CutCopyMode = False

End Sub
Read more in our Excel Macros Tutorial.
Convert rows to column in Excel using Power Query
Power Query is another powerful tool available for Excel users. We wrote a separate Power Query Tutorial, so feel free to check it out.
Meanwhile, you can use Power Query to transpose rows to columns. To do this, go to the Data tab, and create a query from table.

- Then select a range of cells to convert rows to columns in Excel. Click OK to open the Power Query Editor.

- In the Power Query Editor, go to the Transform tab and click Transpose. The rows will be rotated to columns.
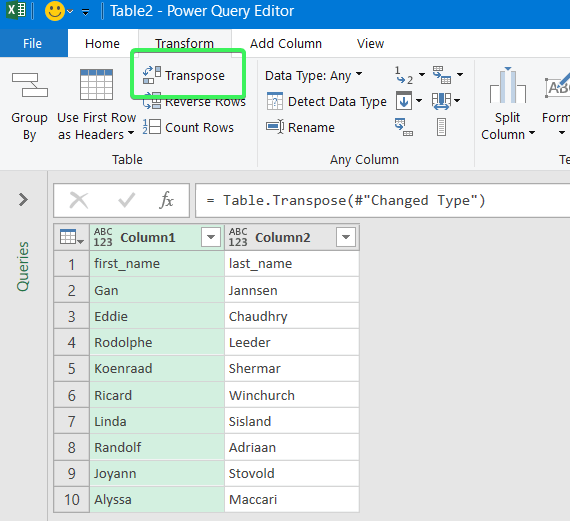
- If you want to keep the headers for your columns, click the Use First Row as Headers button.
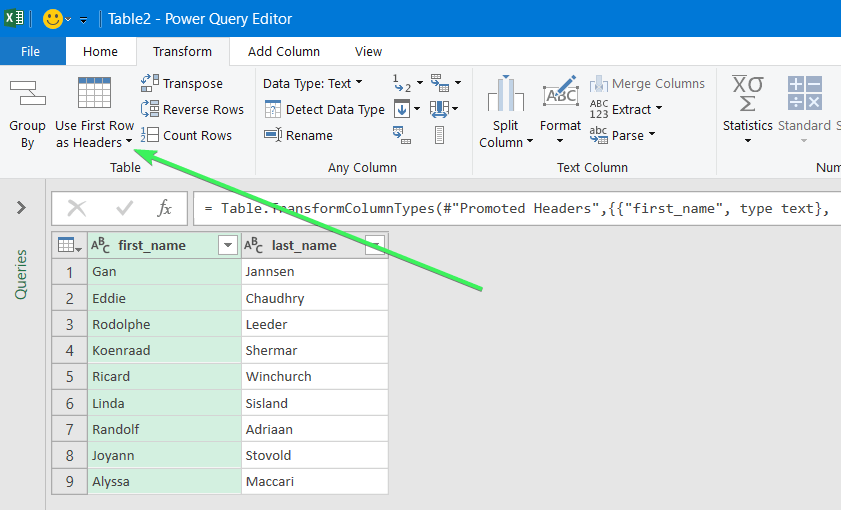
- That’s it. You can Close & Load your dataset – the rows will be converted to columns.

Error message when trying to convert rows to columns in Excel
To wrap up with converting Excel data in columns to rows, let’s review the typical error messages you can face during the flow.
Overlap error

The overlap error occurs when you’re trying to paste the transposed range into the area of the copied range. Please avoid doing this.
Wrong data type error

You may see this #VALUE! error when you implement the TRANSPOSE formula in Excel desktop without pressing Ctrl+Shift+Enter.
Other errors may be caused by typos or other misprints in the formulas you use to convert groups of data from rows to columns in Excel. Always double-check the syntax before pressing Enter or Ctrl+Shift+Enter 🙂 . Good luck with your data!
-

A content manager at Coupler.io whose key responsibility is to ensure that the readers love our content on the blog. With 5 years of experience as a wordsmith in SaaS, I know how to make texts resonate with readers’ queries✍🏼

Back to Blog
Focus on your business
goals while we take care of your data!
Try Coupler.io
This post will guide you how to transpose data from rows to column with a formula in excel using both a VBA code and a formula. How do I transpose every N rows from one column to multiple columns in Excel.
In Excel, Transposing data is a common task, but when you want to transpose every N rows of data into multiple columns, it can be a bit trickier. In this post, we’ll show you how to use a VBA code and a formula to accomplish this task easily.
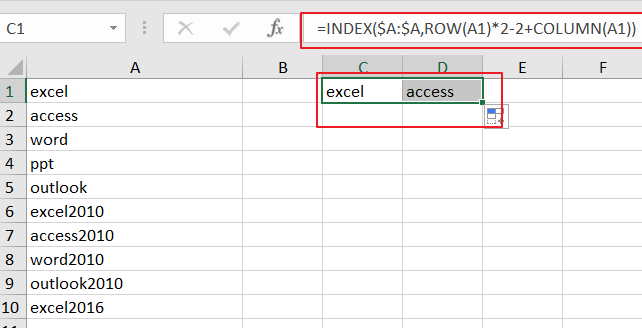
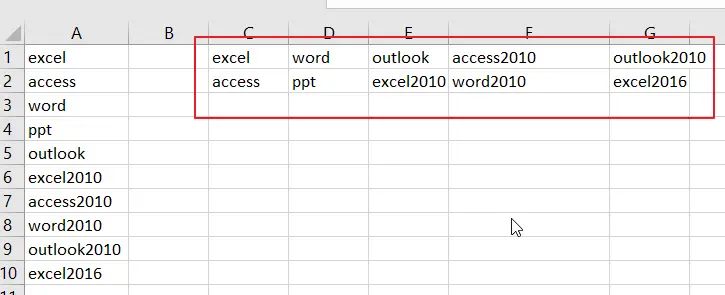
Assuming that you have a list of data in range A1:A10 in column A, and you want to transpose every 2 rows from column A to Mulitple columns. for example, you want to transpose range A1:A2 to C1:D1, A3:A4 to C2:D2. How to do it.
![]()
Table of Contents
- 1. Video: transpose Every N Rows of Data into Multiple Columns
- 2. Transpose Every N Rows of Data into Multiple Columns Using Excel Formula
- 3. Transpose Every N Rows of Data into Multiple Columns with VBA Code
- 4. Conclusion
- 5. Related Functions
1. Video: transpose Every N Rows of Data into Multiple Columns
Here’s a video tutorial on how to transpose every N rows of data into multiple columns in Excel using a formula and VBA code.
2. Transpose Every N Rows of Data into Multiple Columns Using Excel Formula
You can also transpose every N rows of data into multiple columns in Excel using a formula based on the INDEX function, the Row function and the Column Function. Like as below:
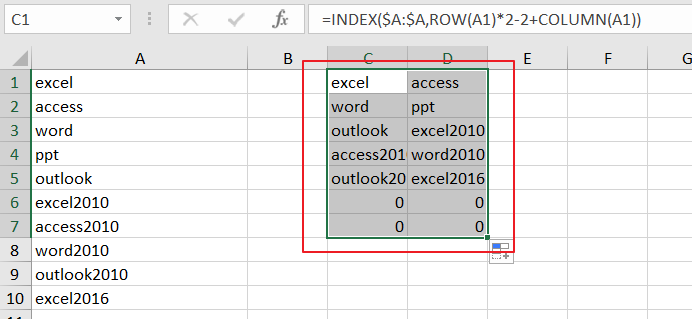
=INDEX($A:$A,ROW(A1)*2-2+COLUMN(A1))Type this formula into cell C1, and press Enter key on your keyboard, and then drag the AutoFill Handle to CEll D1.
Then you need to drag the AutoFill Handle in cell D1 down to other cells until value 0 is displayed in cells.
3. Transpose Every N Rows of Data into Multiple Columns with VBA Code
You can also use VBA code to transpose every N rows of data into multiple columns in Excel. Here’s a step-by-step guide:
Step1: Open the Excel workbook you want to work with and press “Alt + F11” to open the Visual Basic Editor.
Step2: In the Visual Basic Editor, click on “Insert” from the menu bar and select “Module” to create a new module.
Step3: Copy and paste the following code into the module window.
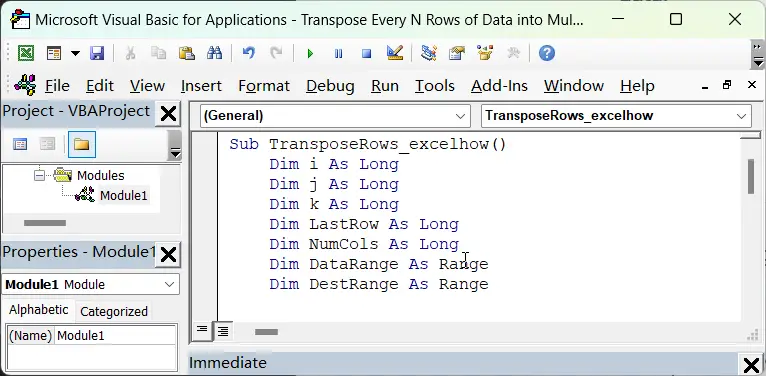
Sub TransposeRows_excelhow()
    Dim i As Long
    Dim j As Long
    Dim k As Long
    Dim LastRow As Long
    Dim NumCols As Long
    Dim DataRange As Range
    Dim DestRange As Range

    ' Set the number of rows to transpose into each column
    NumCols = Application.InputBox("Enter the number of rows to transpose into each column:")

    ' Select the range of cells to transpose
    On Error Resume Next
    Set DataRange = Application.InputBox("Select the range of cells to transpose:", Type:=8)
    On Error GoTo 0
    If DataRange Is Nothing Then Exit Sub

    ' Select the destination range for the transposed data
    On Error Resume Next
    Set DestRange = Application.InputBox("Select the destination range for the transposed data:", Type:=8)
    On Error GoTo 0
    If DestRange Is Nothing Then Exit Sub

    LastRow = DataRange.Rows.Count
    k = 0

    For i = 1 To LastRow Step NumCols
        k = k + 1
        For j = 0 To NumCols - 1
            DestRange.Offset(j, k - 1).Value = DataRange.Offset(i + j - 1, 0).Value
        Next j
    Next i
End Sub
Step4: Press “F5” or click on the “Run” button in the toolbar to run the code.
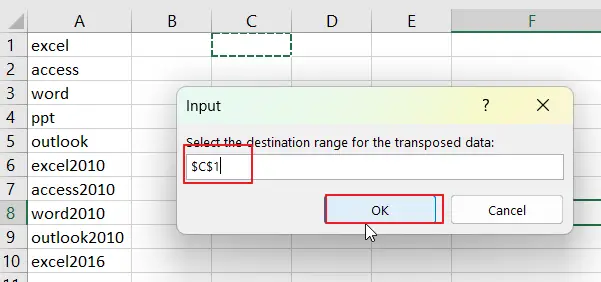
Step5: Enter the number of rows to transpose into each column, such as: 2,Click OK button.
![]()
Step6: Select the range of cells to transpose, such as: selecting range A1:A10. Click OK button.

Step7: Select the destination range for the transposed data, such as: Cell C1. Click on Ok button.
Step8: Once you have entered the required information, the selected range of cells will be transposed into multiple columns according to the number of rows you specified.
Step9: select the transposed data and press Ctrl +C to copy it. Then right click on a black cell and select “Transpose” from the Paste option menu list.
Step10: You can quickly and easily transpose every N rows of data into multiple columns using the TRANSPOSE function in Excel.
![]()
4. Conclusion
Transposing every N rows of data into multiple columns in Excel can be done using either a VBA code or a formula. Both the VBA code and the formula are effective methods for transposing every N rows of data into multiple columns in Excel. The best method to use will depend on the specific needs of your project and your level of comfort with coding in VBA.
- Excel INDEX function
The Excel INDEX function returns a value from a table based on the index (row number and column number)The INDEX function is a build-in function in Microsoft Excel and it is categorized as a Lookup and Reference Function.The syntax of the INDEX function is as below:= INDEX (array, row_num,[column_num])… - Excel ROW function
The Excel ROW function returns the row number of a cell reference.The ROW function is a build-in function in Microsoft Excel and it is categorized as a Lookup and Reference Function.The syntax of the ROW function is as below:= ROW ([reference])…. - Excel COLUMN function
The Excel COLUMN function returns the first column number of the given cell reference.The syntax of the COLUMN function is as below:=COLUMN ([reference])….
We have seen the Transpose function in the Excel worksheet when we paste any data table to the worksheet. Transpose changes the position of rows and columns, i.e., rows become columns, and columns become rows in a Data Table. Since it is a worksheet function in VBA, we use it with the Application.Worksheet method in VBA.
How to Transpose in VBA?
Switching rows and columns is a data manipulation technique that almost all users use in Excel. The process of converting horizontal data to vertical and vertical data to horizontal is called “Transpose” in Excel. We are sure you must be familiar with transposing in a regular worksheet. This article will show you how to use the transpose method in VBA coding.
We can transpose in VBA using two methods.
- Transpose Using TRANSPOSE Formula.
- Transpose Using Paste Special MethodPaste special in Excel allows you to paste partial aspects of the data copied. There are several ways to paste special in Excel, including right-clicking on the target cell and selecting paste special, or using a shortcut such as CTRL+ALT+V or ALT+E+S.read more.
When transposing, we are swapping rows to columns and columns to rows. So, for example, if the data is in a 4 X 3 array, it becomes a 3 X 4 array.
Let us see some examples of transposing columns to rows in VBA.
Table of contents
- How to Transpose in VBA?
- #1 – VBA Transpose Using TRANSPOSE Formula
- #2 – VBA Transpose Using Paste Special Method
- Things to Remember
- Recommended Articles
#1 – VBA Transpose Using TRANSPOSE Formula
Like how we use TRANSPOSE in excelThe TRANSPOSE function in excel helps rotate (switch) the values from rows to columns and vice versa. Being a part of the Excel lookup and reference functions, its purpose is to organize the data in the desired format. To execute the formula, the exact size of the range to be transposed is selected and the CSE key (“Control+Shift+Enter”) is pressed.
read more similarly, we can also not have a TRANSPOSE formula in VBA, so we need to use it under the Worksheet function class.
For example, look at the below data image.

We will try to transpose this array of values. Follow the below steps to transpose the data.
Step 1: Start the subprocedure.
Code:
Sub Transpose_Example1()

End Sub

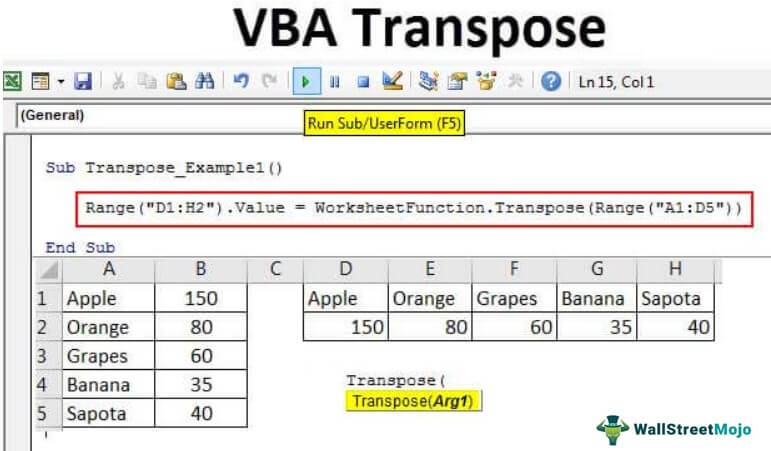
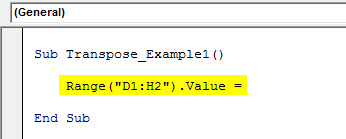
Step 2: First, we must decide where to transpose the data. In this, we have chosen to transpose from cell D1 to H2. So, enter the VBA codeVBA code refers to a set of instructions written by the user in the Visual Basic Applications programming language on a Visual Basic Editor (VBE) to perform a specific task.read more as Range (“D1: H2”).Value =
Code:
Sub Transpose_Example1()

Range("D1:H2").Value =

End Sub
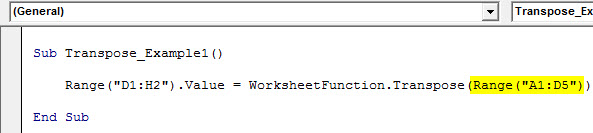
Step 3: Now, in the range mentioned above, we need the value of range A1 to B5. To arrive at this, open the “WorksheetFunction” class and select the “Transpose” formula.

Step 4: In Arg 1, supply the data source range, i.e., Range (“A1: D5”).
Code:
Sub Transpose_Example1()

Range("D1:H2").Value = WorksheetFunction.Transpose(Range("A1:D5"))

End Sub
We have completed the TRANSPOSE formula coding. Now, run the code to see the result in the D1 to H2 range of cells.

As we have seen in the above image, it has converted the range of cells from columns to rows.
#2 – VBA Transpose Using Paste Special Method
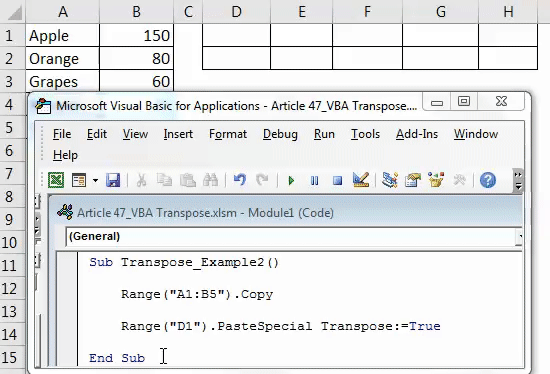
We can also transpose using the Paste Special method. Consider the same data for this example as well.
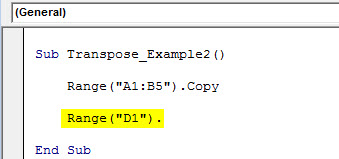
The first thing we must do to transpose is copy the data. So, write the code as Range(“A1: B5”).Copy
Code:
Sub Transpose_Example2()

Range("A1:B5").Copy

End Sub

The next thing is we need to decide where we are going to paste the data. In this case, we have chosen D1 as the desired destination cell.
Code:
Sub Transpose_Example2()

Range("A1:B5").Copy

Range("D1").

End Sub
Once the desired destination cell is selected, we must select the “Paste Special” method.

With Paste Special, we can perform all our actions with regular Paste Special methods in a worksheet.
Ignore all the parameters, select the last parameter, i.e., Transpose, and make this TRUE.
Code:
Sub Transpose_Example2()

Range("A1:B5").Copy

Range("D1").PasteSpecial Transpose:=True

End Sub

It will also transpose the data like the previous method.
Like this, we can use the TRANSPOSE formula or Paste Special method to transpose the data to switch rows to columnsRows can be transposed to columns by using paste special method and the data can be linked to the original data by simply selecting ‘Paste Link’ form the paste special dialog box. It could also be done by using INDIRECT formula and ADDRESS functions.read more and columns to rows.
Things to Remember
- If we use the TRANSPOSE worksheet function, it is mandatory to calculate the number of rows and columnsA cell is the intersection of rows and columns. Rows and columns make the software that is called excel. The area of excel worksheet is divided into rows and columns and at any point in time, if we want to refer a particular location of this area, we need to refer a cell.read more to transpose the data. For example, if we have 5 rows and 3 columns, it becomes 3 rows and 5 columns while transposing.
- If you want the same formatting while using paste special, you must use the Paste Type argument as “xlPasteFormats.”
You can download this VBA Transpose Excel Template from here – VBA Transpose Excel Template.
Recommended Articles
This article has been a guide to VBA Transpose. Here, we discussed transposing columns to rows using VBA code with examples and a downloadable Excel template. Below are some useful articles related to VBA: –
- VBA IIF
- Find and Replace Function in VBA
- ArrayList in VBA Excel
- Not Equal in VBA
VBA Transpose
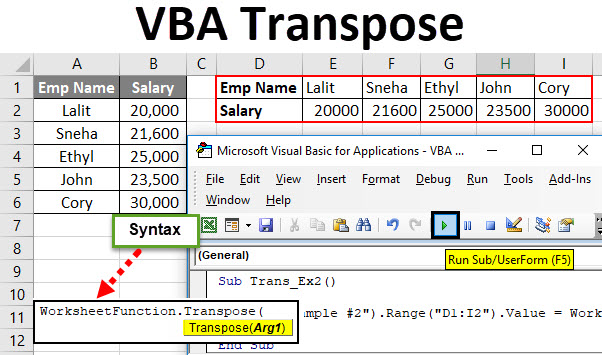
Being a Microsoft Excel user, you may frequently have used transpose function which allows the swapping between rows and columns for an array. Converting rows into column and columns into rows is what a transpose function does for you in excel. The number of rows becomes a number of columns and vice versa. Means, if you have 2 rows and 3 columns in your array, after transposing it will change to an array with 3 rows and 2 columns. In this tutorial, we will go through VBA Transpose which will allow you to automate the transpose method you to use in Excel.
Syntax of Transpose in Excel VBA
VBA Transpose has the following syntax:
![]()
Where,
Arg1: It is a required argument which is nothing but a range of cells we wanted to transpose (i.e. array).
The first part of the syntax is nothing but an expression under which Transpose function can be used. For example, WorksheetFunction.
How to Use Excel VBA Transpose?
We will learn how to use a Transpose with few examples in Excel VBA.
You can download this VBA Transpose Excel Template here – VBA Transpose Excel Template
Example #1 – VBA Transpose of One-dimensional Array
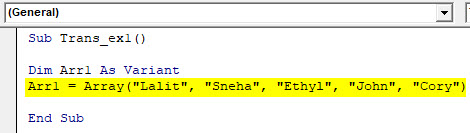
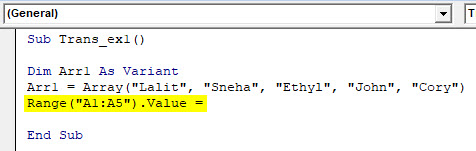
Suppose you are working on a data with lists (which is a one-dimensional array) like names of an employee given (“Lalit”, “Sneha”, “Ethyl”, “John”, “Cory”) and you want this list to be pasted in excel cell wise. Let’s see how we can do this.
Follow the below steps to use Transpose in VBA.
Step 1: Insert a new module and define a new sub-procedure to create a macro in VBA.
Code:
Sub Trans_ex1()

End Sub

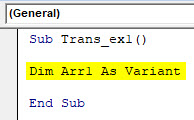
Step 2: Define a new variable which can hold your one-dimensional array.
Code:
Sub Trans_ex1()

Dim Arr1 As Variant

End Sub
Step 3: Define the list as an array using the Array function. This would be the list you wanted to paste in your excel sheet.
Code:
Sub Trans_ex1()

Dim Arr1 As Variant
Arr1 = Array("Lalit", "Sneha", "Ethyl", "John", "Cory")

End Sub
Step 4: Now use the Range.Value method to define the range in which these values you wanted to get pasted.
Code:
Sub Trans_ex1()

Dim Arr1 As Variant
Arr1 = Array("Lalit", "Sneha", "Ethyl", "John", "Cory")
Range("A1:A5").Value =

End Sub
Step 5: Use Application.WorksheetFunction.Transpose on the given array to be able to transpose the list defined under Arr1 variable.
Code:
Sub Trans_ex1()

Dim Arr1 As Variant
Arr1 = Array("Lalit", "Sneha", "Ethyl", "John", "Cory")
Range("A1:A5").Value = Application.WorksheetFunction.Transpose(Arr1)

End Sub
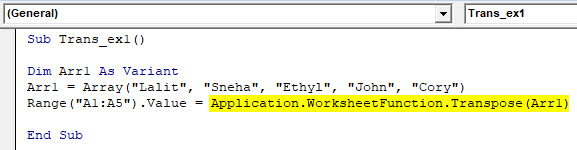
Here, we have defined a code which will allow the system to transpose the data in list array called Arr1 and then store it under cell A1:A5 on the active worksheet.
Step 6: Hit F5 or Run button under VBE to run this code and see the output under active excel spreadsheet.
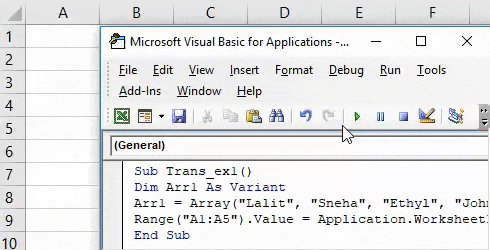
You can see that the given array of the list is transposed into one single column and stored under cell A1 to A5.
Example #2 – VBA Transpose of two-dimensional Array
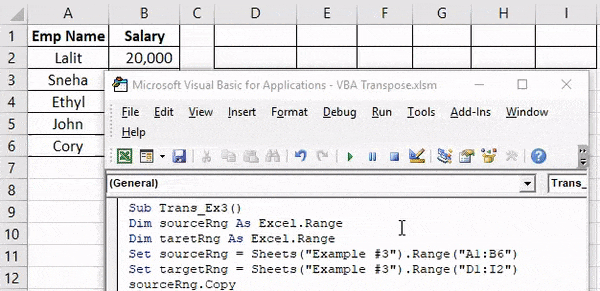
Suppose you have a two-dimensional array of employees and their salaries as below:
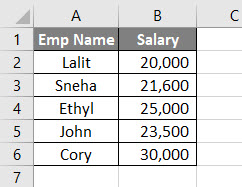
This is a two-dimensional data with six rows and two columns. After transposing, it would be an array with two rows and six columns.
Follow the below steps to use Transpose in VBA.
Step 1: Define a sub-procedure to store a macro.
Code:
Sub Trans_Ex2()

End Sub
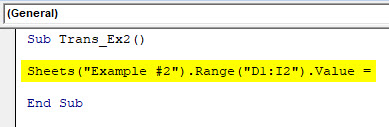
Step 2: Decide the range where you want to transpose this data. It can be done using Sheets.Range.Value function. I would be saving the transposed array into cell D1 to I2.
Code:
Sub Trans_Ex2()

Sheets("Example #2").Range("D1:I2").Value =

End Sub
Step 3: Use WorksheetFunction.Transpose to be able to assign an array A1:B6 to transpose function.
Code:
Sub Trans_Ex2()

Sheets("Example #2").Range("D1:I2").Value = WorksheetFunction.Transpose(

End Sub

Step 4: We need to specify the argument for Transpose function. We wanted to transpose a range of array A1:B6. Thus, use Range(“A1:B6”) as an argument.
Code:
Sub Trans_Ex2()

Sheets("Example #2").Range("D1:I2").Value = WorksheetFunction.Transpose(Range("A1:B6"))

End Sub

Step 5: Hit F5 or Run button to run this code and see the output.

Here, range of array A1:B6 is transposed and stored into a range of array D1:I2 with the help of VBA Transpose function in excel.
Example #3 – VBA Transpose of an array with Paste Special Method
We can also transpose the array and paste as special as well do in Excel using Alt + E + S. We can use different operations under this paste special method.
Let us consider the same data as we have used in the previous example.

Follow the below steps to use Transpose in VBA.
Step 1: Define a sub-procedure to store the macro.
Code:
Sub Trans_Ex3()

End Sub
Step 2: Define two new variables, one which can hold the data source array (sourceRng) and others which can hold the output array range (targetRng).
Code:
Sub Trans_Ex3()

Dim sourceRng As Excel.Range
Dim taretRng As Excel.Range

End Sub
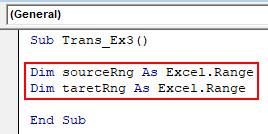
Please note that the type of these variables defined as (Excel.Range). Because we wanted to transpose the data which is an array range.
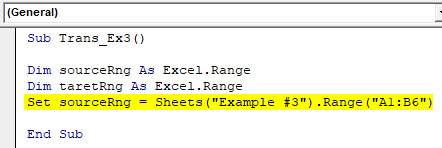
Step 3: Set the source range as A1:B6 (The data we wanted to take the transpose of ) using Sheets.Range function.
Code:
Sub Trans_Ex3()

Dim sourceRng As Excel.Range
Dim taretRng As Excel.Range
Set sourceRng = Sheets("Example #3").Range("A1:B6")

End Sub
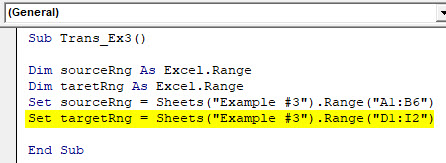
Step 4: Set the target/destination range as D1:I2 (The range of cells where the output will be stored) using Sheets.Range function.
Code:
Sub Trans_Ex3()

Dim sourceRng As Excel.Range
Dim taretRng As Excel.Range
Set sourceRng = Sheets("Example #3").Range("A1:B6")
Set targetRng = Sheets("Example #3").Range("D1:I2")

End Sub
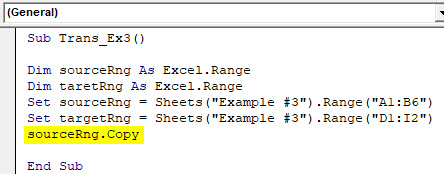
Step 5: Now, use the command Copy to copy the source data range from your worksheet.
Code:
Sub Trans_Ex3()

Dim sourceRng As Excel.Range
Dim taretRng As Excel.Range
Set sourceRng = Sheets("Example #3").Range("A1:B6")
Set targetRng = Sheets("Example #3").Range("D1:I2")
sourceRng.Copy

End Sub
Step 6: We are going to use PasteSpecial function on variable targetRng to save the transposed output under the target range (D1:I2) in your worksheet.
Code:
Sub Trans_Ex3()

Dim sourceRng As Excel.Range
Dim taretRng As Excel.Range
Set sourceRng = Sheets("Example #3").Range("A1:B6")
Set targetRng = Sheets("Example #3").Range("D1:I2")
sourceRng.Copy
targetRng.PasteSpecial Paste:=xlPasteValues, Operation:=xlNone, SkipBlanks:=False, Transpose:=True

End Sub
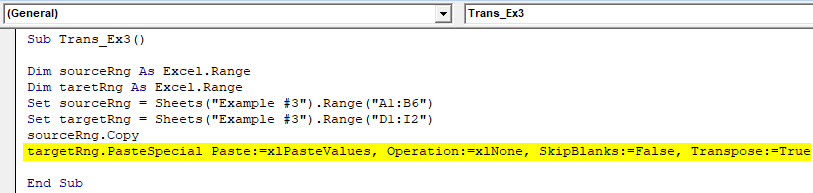
- Paste: Allows to paste values in a different format (like Paste as Values, as Formulae, As Format, etc.). It is similar as to that of Excel (We do Alt + E + S to have different paste special options). In our example, we have set it to paste as values.
- Operation: There are different operations which can be performed like addition, subtraction, multiplication, division (in the same way we can do in Excel).
- SkipBlanks: If set True, this command allows to skip the blanks if any from your data while doing different paste special operations. We set it to False, means we wanted not to skip the blanks.
- Transpose: If set True, it allows to take the transpose of an array of data.
Step 7: Run this code by hitting F5 or Run button and see the output.
Things to Remember
- While working on a one-dimensional array, it should always be horizontal (One row, multiple columns) in order to apply the transpose method.
- It is mandatory to find out the number of rows and number of columns while using VBA Transpose in Excel. If we have 3 rows and 5 columns, after transpose there would be 5 rows with three columns.
- Normally, Transpose method does not include formatting of the source data. If you want to apply the same format as that of source data, you either manually have to set it or using paste special option XlPasteFormat you will be able to hold the format of source data to the target data.
- The number of elements Transpose function can take in an array cannot exceed 5461.
- An array cannot contain any item/string having length more than 255. If included, it will cause errors such as 13, Type Mismatch, 5, Invalid procedure call or argument, 1004, application defined or object defined error.
- The source array cannot contain any null value (such as “Null”, “#N/A”).
Recommended Articles
This has been a guide to VBA Transpose. Here we discussed how to use Excel VBA Transpose along with practical examples and downloadable excel template. You can also go through our other suggested articles –
- VBA String
- VBA XML
- VBA Case
- VBA Month
You should avoid using Copy and Paste — if something else takes the focus while you are doing that then the data will not be pasted into your work book. It’s not a robust method and can take a long time.
You should convert the Range of data into an array, transpose the array and then set the value of an appropriate Range to that transposed array.
For example if you have a spreadsheet set up like this
Col A Col B
CTR   22/2/22
CTR   28/2/22
CTR   31/3/22
Use this code to change it to
Col A Col B     Col C     Col D
CTR   22/2/22   28/2/22   31/3/22
and to get rid of the rest of the data
Public Sub demo()


    Dim lRows As Long
    lRows = ThisWorkbook.Sheets(1).Cells(ThisWorkbook.Sheets(1).Rows.Count, "A").End(xlUp).Row


    Dim arrDemo As Variant
    arrDemo = ThisWorkbook.Sheets(1).Range("B1:B" & CStr(lRows)).Value


    Dim arrTransposed As Variant
    arrTransposed = Application.WorksheetFunction.Transpose(arrDemo)


    Range("B1").Resize(1, lRows).Value = arrTransposed


    ThisWorkbook.Sheets(1).Range("A2:B" & CStr(lRows)).ClearContents


End Sub