
When creating a VBA UserForm, we generally set it to a specific size. Most other forms and windows within the Excel and Windows environments do not have a fixed sized; they can be resized by the user. With a bit of coding magic, we can achieve a similar resizing effect for our VBA UserForms. This post will show you how.
There are two solutions presented below, a Windows API method and a VBA only method. Of the two, the Windows API solution has a smoother, more integrated feel for the user, but it will only work on Windows. If your code is expected to work on Windows and Mac, then using the VBA solution is the better option.
Windows API Solution
Windows API codes make use of special functions which are not part of Excel or VBA, but part of the main Windows application. The topic of Windows API codes is too big to discuss here, but by following the instructions below you can still get the code working, even if you don’t have a full understanding of why it works.
Remember, Windows API codes will only work on Windows.
How does it work?
A brief overview of how the process works will help with understanding what the code below does.
- Change the Windows setting to enable the UserForm to be resized.
- On the UserForm use the Resize event to capture when the form is resized.
- The objects’ size or position changes after each resize event.
Setting up the Windows API code
Copy the following code into a new standard module. It must be included at the top of the module before any functions or subprocedures, but below the Option Explicit statement (if there is one).
Public Const GWL_STYLE = -16
Public Const WS_CAPTION = &HC00000
Public Const WS_THICKFRAME = &H40000

#If VBA7 Then
    Public Declare PtrSafe Function GetWindowLong _
        Lib "user32" Alias "GetWindowLongA" ( _
        ByVal hWnd As Long, ByVal nIndex As Long) As Long
    Public Declare PtrSafe Function SetWindowLong _
        Lib "user32" Alias "SetWindowLongA" ( _
        ByVal hWnd As Long, ByVal nIndex As Long, _
        ByVal dwNewLong As Long) As Long
    Public Declare PtrSafe Function DrawMenuBar _
        Lib "user32" (ByVal hWnd As Long) As Long
    Public Declare PtrSafe Function FindWindowA _
        Lib "user32" (ByVal lpClassName As String, _
        ByVal lpWindowName As String) As Long
#Else
    Public Declare Function GetWindowLong _
        Lib "user32" Alias "GetWindowLongA" ( _
        ByVal hWnd As Long, ByVal nIndex As Long) As Long
    Public Declare Function SetWindowLong _
        Lib "user32" Alias "SetWindowLongA" ( _
        ByVal hWnd As Long, ByVal nIndex As Long, _
        ByVal dwNewLong As Long) As Long
    Public Declare Function DrawMenuBar _
        Lib "user32" (ByVal hWnd As Long) As Long
    Public Declare Function FindWindowA _
        Lib "user32" (ByVal lpClassName As String, _
        ByVal lpWindowName As String) As Long
#End If
This following code must be included within the same module as the code above but does not need to be directly below it.
Sub ResizeWindowSettings(frm As Object, show As Boolean)

Dim windowStyle As Long
Dim windowHandle As Long

'Get the references to window and style position within the Windows memory
windowHandle = FindWindowA(vbNullString, frm.Caption)
windowStyle = GetWindowLong(windowHandle, GWL_STYLE)

'Determine the style to apply based
If show = False Then
    windowStyle = windowStyle And (Not WS_THICKFRAME)
Else
    windowStyle = windowStyle + (WS_THICKFRAME)
End If

'Apply the new style
SetWindowLong windowHandle, GWL_STYLE, windowStyle

'Recreate the UserForm window with the new style
DrawMenuBar windowHandle

End Sub
The two code segments above create a reusable procedure which we can use to toggle the UserForm’s resize setting on or off. Anytime we want to turn on resizing for a UserForm, use the following:
Call ResizeWindowSettings(myUserForm, True)
To turn off resizing, use the following
Call ResizeWindowSettings(myUserForm, False)
Just replace myUserForm with the name of your form, or use Me if within the UserForm’s code module.
Setting up the UserForm
To illustrate the process, I’ve created a UserForm which looks like this:
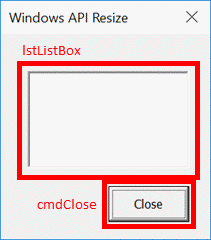
There are just two elements:
- A ListBox called lstListBox
- A Button called cmdClose
Both of these elements should change when then UserForm resizes. lstListBox should change in size, but not in position while the cmdClose will change in position but not in size. To enable this to happen we need to know the position of these objects from the bottom and right of the UserForm. Provided we keep the same distance from the bottom and right it will appear that these items are moving in sync with the UserForm.
The code below must be included within the UserForm’s code module to function correctly.
To capture the initial bottom and right positions of the ListBox and Button, we set up some Private variables to hold the values.
Private lstListBoxBottom As Double
Private lstListBoxRight As Double
Private cmdCloseBottom As Double
Private cmdCloseRight As Double
Now let’s set up what happens when the UserForm initializes.
Firstly, resizing is enabled by calling the code created in the Windows API section above. Secondly, we store the position of the objects in the private variables created above.
Private Sub UserForm_Initialize()

'Call the Window API to enable resizing
Call ResizeWindowSettings(Me, True)

'Get the bottom right anchor position of the objects to be resized
lstListBoxBottom = Me.Height - lstListBox.Top - lstListBox.Height
lstListBoxRight = Me.Width - lstListBox.Left - lstListBox.Width
cmdCloseBottom = Me.Height - cmdClose.Top - cmdClose.Height
cmdCloseRight = Me.Width - cmdClose.Left - cmdClose.Width

End Sub
Next, using the UserForm’s resize event, we change the size/position of ListBox and the Button:
- lstListBox changes height and width
- cmdCloses changes top and left position
Private Sub UserForm_Resize()

On Error Resume Next

'Set the new position of the objects
lstListBox.Height = Me.Height - lstListBoxBottom - lstListBox.Top
lstListBox.Width = Me.Width - lstListBoxRight - lstListBox.Left
cmdClose.Top = Me.Height - cmdCloseBottom - cmdClose.Height
cmdClose.Left = Me.Width - cmdCloseRight - cmdClose.Width

On Error GoTo 0

End Sub
That is it. You’ve now got the code you need. So fire up the UserForm and start resizing.
![]()
When the mouse hovers over the edge of the UserForm, the icon changes, just click and drag. With this method, resizing can happen on any side of the UserForm.
VBA only solution
The VBA solution makes use of mouse events to trigger when to change the height and width of the UserForm. Personally, I think it’s not as smooth as the Window API solution, but it is much easier to understand and can be used on a Mac too.
How does it work?
The VBA solution uses a different method of application to the Window API solution.
- The UserForm contains an object which when clicked records the position of the mouse.
- As the mouse moves, the UserForm and it’s objects are repositioned or resized based on the new mouse position.
- When the mouse button is released, movement ceases to adjust the size.
Setting up the UserForm
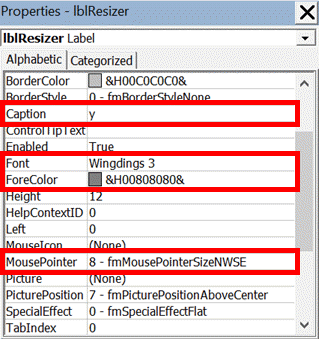
To illustrate the process, I have created anotherUserForm; it looks like this:

There are just three elements:
- ListBox called lstListBox
- Button called cmdClose
- Label called lblResizer
The lblResizer is a label which includes the “y” character from the Wingdings 3 font set. This displays as a small triangle in the bottom right corner to show the user where to click to resize the window. The Color and MousePointer properties are set as follows:
All of these elements, along with the UserForm itself will need to change when the mouse is clicked and moved whilst over the lblResizer object.
All the code must be contained within the UserForm’s code module.
We will set up some Private variables to hold the mouse position and click status, along with the minimum allowed window size.
Private resizeEnabled As Boolean
Private mouseX As Double
Private mouseY As Double
Private minWidth As Double
Private minHeight As Double
When initializing the UserForm, the code below will place the lblResizer into the bottom right corner, and set the minimum permitted window size.
Private Sub UserForm_Initialize()

'Position the resize icon
lblResizer.Left = Me.InsideWidth - lblResizer.Width
lblResizer.Top = Me.InsideHeight - lblResizer.Height
minHeight = 125
minWidth = 125

End Sub
The following code triggers when the mouse clicks on the lblResizer icon. The code records that the icon has been clicked and the position of the mouse at that moment.
Private Sub lblResizer_MouseDown(ByVal Button As Integer, ByVal Shift As Integer, _
    ByVal X As Single, ByVal Y As Single)

'The user clicked on the lblResizer
resizeEnabled = True

'Capture the mouse position on click
mouseX = X
mouseY = Y

End Sub
The following code triggers when the mouse moves while over the lblResizer.
Firstly, it will check that the window is larger than the minimum permitted size, and that mouse has been clicked. If both of these are True, the UserForm and the objects are re-positioned or resized based on the size of the mouse movement.
Private Sub lblResizer_MouseMove(ByVal Button As Integer, ByVal Shift As Integer, _
    ByVal X As Single, ByVal Y As Single)

'Check if the UserForm is not resized too small
Dim allowResize As Boolean

allowResize = True

If Me.Width + X - mouseX < minWidth Then allowResize = False
If Me.Height + Y - mouseY < minHeight Then allowResize = False

'Check if the mouse clicked on the lblResizer and above minimum size
If resizeEnabled = True And allowResize = True Then

    'Resize/move objects based on mouse movement since click

    'Resize the UserForm
    Me.Width = Me.Width + X - mouseX
    Me.Height = Me.Height + Y - mouseY

    'Resize the ListBox
    lstListBox.Width = lstListBox.Width + X - mouseX
    lstListBox.Height = lstListBox.Height + Y - mouseY

    'Move the Close Button
    cmdClose.Left = cmdClose.Left + X - mouseX
    cmdClose.Top = cmdClose.Top + Y - mouseY

    'Move the Resizer icon
    lblResizer.Left = Me.InsideWidth - lblResizer.Width
    lblResizer.Top = Me.InsideHeight - lblResizer.Height

End If

End Sub
The following code triggers when the mouse button is released; the mouse movement ceases to resize the UserForm.
Private Sub lblResizer_MouseUp(ByVal Button As Integer, ByVal Shift As Integer, _
    ByVal X As Single, ByVal Y As Single)

'The user un-clicked on the lblResizer
resizeEnabled = False

End Sub
That is it; we’re good to go. Open up the UserForm and start resizing.
![]()
In this example, the UserForm only resizes when the mouse clicks on the icon in the bottom right. We could add the ability to expand from the right, bottom, or left by using objects positioned just inside the edges of the UserForm.
Download the example file
Want to see these examples working? Then download the example file.

About the author
Hey, I’m Mark, and I run Excel Off The Grid.
My parents tell me that at the age of 7 I declared I was going to become a qualified accountant. I was either psychic or had no imagination, as that is exactly what happened. However, it wasn’t until I was 35 that my journey really began.
In 2015, I started a new job, for which I was regularly working after 10pm. As a result, I rarely saw my children during the week. So, I started searching for the secrets to automating Excel. I discovered that by building a small number of simple tools, I could combine them together in different ways to automate nearly all my regular tasks. This meant I could work less hours (and I got pay raises!). Today, I teach these techniques to other professionals in our training program so they too can spend less time at work (and more time with their children and doing the things they love).
Do you need help adapting this post to your needs?
I’m guessing the examples in this post don’t exactly match your situation. We all use Excel differently, so it’s impossible to write a post that will meet everybody’s needs. By taking the time to understand the techniques and principles in this post (and elsewhere on this site), you should be able to adapt it to your needs.
But, if you’re still struggling you should:
- Read other blogs, or watch YouTube videos on the same topic. You will benefit much more by discovering your own solutions.
- Ask the ‘Excel Ninja’ in your office. It’s amazing what things other people know.
- Ask a question in a forum like Mr Excel, or the Microsoft Answers Community. Remember, the people on these forums are generally giving their time for free. So take care to craft your question, make sure it’s clear and concise. List all the things you’ve tried, and provide screenshots, code segments and example workbooks.
- Use Excel Rescue, who are my consultancy partner. They help by providing solutions to smaller Excel problems.
What next?
Don’t go yet, there is plenty more to learn on Excel Off The Grid. Check out the latest posts:
I have 4 Excel Windows:
-
Microsoft Visual Basic for Applications — PERSONAL.XLSB [break]
-
Workbook1
-
Workbook2
-
Workbook3
I want to Change the sizes of my windows in that way:
-
VBA will be: Height = 100% of my computer height, Width = 50% half of my computer width and position of the window should be on the right side.
-
Workbooks 1-3 will be: Height = 100% of my computer height, Width = 50% half of my computer width and position of the window should be on the left side.
**I guess for access to Microsoft Visual Basic for Applications — PERSONAL.XLSB [break] I need a reference to windows system library, but i believe it should be possible
Any ideas please?
asked Jan 31, 2020 at 10:09
![]()
AssafAssaf
892 silver badges8 bronze badges
You can try below code:
Sub ChangeWindowSize()
    ' get size of a screen
    Application.WindowState = xlMaximized
    windWidth = Application.width
    windHeight = Application.height
    ' set size and location of a main workbook
    Application.WindowState = xlNormal
    Application.Top = 0
    Application.Left = 0
    Application.width = windWidth / 2
    Application.height = windHeight

    Call OpenOtherWorkBookAndSetSize(windWidth, windHeight)
End Sub

Sub OpenOtherWorkBookAndSetSize(windWidth As Variant, windHeight As Variant)
    Dim appExcel As Application
    Dim objWorkbook As Workbook
    Dim i As Integer

    'create new excel application object
    Set appExcel = New Application
    'open other workbook
    Set objWorkbook = appExcel.Workbooks.Open("path to the file")
    ' just example setting
    appExcel.WindowState = xlNormal
    appExcel.Top = 0
    appExcel.Left = windWidth / 2
    appExcel.width = windWidth / 2
    appExcel.height = windHeight
    appExcel.Visible = True
End Sub
It will split your screen into halves  Now you can modify further this code
Example result:

answered Jan 31, 2020 at 10:31
![]()
Michał TurczynMichał Turczyn
31.7k14 gold badges45 silver badges69 bronze badges
2
Установка состояния окна приложения Excel из кода VBA с помощью свойства Application.WindowState. Сворачивание и разворачивание окна. Чтение данных о состоянии окна.
Application.WindowState — это свойство, которое задает или возвращает состояние окна приложения Excel.
Состояние окна приложения Excel задается константой из коллекции XlWindowState, при чтении информации о состоянии окна — свойство Application.WindowState возвращает числовое значение константы.
Свойство Application.WindowState позволяет развернуть окно приложения Excel из кода VBA на весь экран — до максимального размера, свернуть окно «в иконку» или задать ему нормальные размеры, установленные ранее, развернув из свернутого или свернув из максимального.
Синтаксис свойства WindowState объекта Application:
Константы XlWindowState
Константы из коллекции XlWindowState:
| Константа | Значение | Описание |
|---|---|---|
| xlMaximized | -4137 | Максимальное окно (развернуто на весь экран) |
| xlMinimized | -4140 | Минимальное окно (свернуто «в иконку») |
| xlNormal | -4143 | Нормальное окно (размеры, установленные ранее) |
Пример кода с WindowState
Пример записи и чтения свойства Application.WindowState:
|
Sub Test() ‘Запись свойства WindowState Application.WindowState = xlMaximized ‘или -4137 ‘Application.WindowState = xlMinimized ‘или -4140 ‘Application.WindowState = xlNormal ‘или -4143 ‘Проверка, в каком состоянии находится окно приложения MsgBox Application.WindowState End Sub |
Попробуйте по очереди задавать разные константы свойству Application.WindowState и смотрите, какое значение будет считано. У меня получились удивительные результаты при выполнении строк кода по очереди, как в примере:
Application.WindowState = xlMinimized— MsgBox возвращает совсем не -4140;- после первого запуска
Application.WindowState = xlNormal— окно приложения разворачивается на весь экран, после второго запуска — переходит к нормальному состоянию.
Не удалось мне добиться значения -4140 и при минимизации окна вручную, разместив предварительно следующий код в модуль книги:
|
Private Sub Workbook_WindowResize(ByVal Wn As Window) MsgBox Application.WindowState End Sub |
Добрый день!
Есть задача сделать размер окна максимально возможным в соответствии с заданной пропорцией W=1,6 H. Затем разместить в нем диапазон Range(«A1:AW19») так, чтобы только он в окне и отражался.
Однако, работает это так, как будто команда .Width = Application.UsableWidth не дает максимального увеличения ширины окна (аналогично с Height = Application.UsableHeight). Т.е.на разных устройствах разное отображение — где то правильно, где то перекос идет.
Код:
| Код |
|---|
Sub window_adjustment()   'sets excel window according to the master ratio proportion

Dim MasteRatio As Single
    MasteRatio = 1440 / 900

    With ActiveWindow

         .WindowState = xlNormal
         .Top = 1
         .left = 1

            If (Application.UsableWidth / MasteRatio <= Application.UsableHeight) Then
               .Width = Application.UsableWidth      'width mastered
               .Height = .Width / MasteRatio
            Else
                .Height = Application.UsableHeight   'height mastered
                .Width = .Height * MasteRatio
            End If

   End With

    Range("A1:AW19").Select             'set range to fill the entire screen out
    ActiveWindow.Zoom = True

    Range("a3").Select

End Sub
|
Установка размера окна программы в макросе
На чтение 3 мин. Просмотров 34 Опубликовано 14.05.2021
Кристоферу нужно в макросе установить размер окна программы Excel. Он знает, как установить размер рабочего листа в окне программы, но это не то, что ему нужно. Ему интересно, как он может установить общий размер окна программы, а также убедиться, что он не устанавливает его больше, чем фактический размер экрана пользователя.
Это можно сделать довольно легко, если кто-то знает какие объекты и свойства использовать в вашем макросе. Объект, который вы хотите использовать, – это объект Application, который относится к приложению Excel. Вот соответствующие свойства:
- Top. Пиксель экрана, на котором должен быть размещен верхний край окна приложения.
- Left. Пиксель экрана, на котором должен быть размещен левый край окна приложения.
- Ширина. Ширина окна приложения в пикселях.
- Высота. Высота окна приложения в пикселях.
Имея это в виду, вы можете установить положение и размер окна программы следующим образом:
Sub SetWindowSize1 () Application.WindowState = xlNormal Application.Top = 25 Application .Left = 25 Application.Width = 300 Application.Height = 200End Sub
Этот макрос определяет, что левый верхний угол окна программы составляет 25 пикселей от верхнего края экрана и 25 пикселей от в левой части экрана. Затем окно программы устанавливается на 300 пикселей в ширину и 200 пикселей в высоту. Также обратите внимание на установку свойства WindowState в первом макросе. Это устанавливает окно в «нормальное» состояние, то есть такое, которое может быть изменено на что-то большее, чем минимизированное, и меньшее, чем развернутое. (Если вы хотите, чтобы окно программы Excel занимало весь экран, просто установите для свойства WindowState значение xlMaximized и забудьте остальные настройки в макросе.)
Конечно, этот макрос устанавливает Excel окно программы должно быть достаточно маленьким. Скорее всего, вы захотите, чтобы он был больше, но вы не хотите, чтобы он был больше, чем размер экрана пользователя. Самый простой способ определить размер экрана пользователя – просто развернуть окно приложения Excel и затем просмотреть свойства «Ширина» и «Высота». Затем вы можете отрегулировать эти цифры в зависимости от того, где вы хотите, чтобы был верхний левый угол экрана, а затем отрегулировать соответствующим образом.
В качестве примера предположим, что вы хотите, чтобы окно программы начиналось с 25, 50, и вы хотите, чтобы он был 1000 x 500. Вы можете использовать код, подобный следующему:
Sub SetWindowSize2 () Dim iMaxWidth As Integer Dim iMaxHeight As Integer Dim iStartX As Integer Dim iStartY As Integer Dim iDesiredWidth As Integer Dim iDesiredHeight As Integer iStartX = 50 'Расстояние слева iStartY = 25' Расстояние сверху iDesiredWidth = 1000 iDesiredHeight = 500 С приложением .WindowState = xlMaximized iMaxWidth = Application.Width iMaxHeight = Application. Высота 'Отрегулируйте для начальной точки iMaxWidth = iMaxWidth - iStartX iMaxHeight = iMaxHeight - iStartY Если iDesiredWidth> iMaxWidth Тогда iDesiredWidth = iMaxWidth Конец Если iDesiredHeight> iMaxHeight Тогда iDesiredHeight = iMax. = iDesiredWidth .Height = iDesiredHeight End WithEnd Sub