Объединение диапазона ячеек в одну или построчно с помощью кода VBA Excel. Метод Range.Merge и свойство MergeCells. Отмена объединения ячеек. Примеры.
Метод Range.Merge
Метод Merge объекта Range объединяет ячейки заданного диапазона в одну или построчно из кода VBA Excel.
Синтаксис метода:
- Expression — выражение, возвращающее объект Range.
- Across — логическое значение, определяющее характер объединения ячеек:
- True — ячейки объединяются построчно: каждая строка заданного диапазона преобразуется в одну ячейку.
- False — весь диапазон преобразуется в одну ячейку. False является значением по умолчанию.
Преимущество метода Range.Merge перед свойством MergeCells заключается в возможности построчного объединения ячеек заданного диапазона без использования цикла.
Свойство MergeCells
Свойство MergeCells объекта Range применяется как для объединения ячеек, так и для его отмены.
Синтаксис свойства с присвоением значения:
|
Expression.MergeCells = Boolean |
- Expression — выражение, представляющее объект Range.
- Boolean — логическое значение, определяющее необходимость объединения ячеек или его отмены:
- True — объединение ячеек заданного диапазона.
- False — отмена объединения ячеек.
С помощью свойства MergeCells можно из кода VBA Excel проверять диапазон (отдельную ячейку), входит ли он (она) в объединенную ячейку (True) или нет (False). Если проверяемый диапазон окажется комбинированным, то есть содержащим объединенные и необъединенные ячейки, компилятор сгенерирует ошибку.
Переменная Expression для отмены объединения ячеек с помощью свойства Range.MergeCells может представлять одну любую ячейку, входящую в объединенный диапазон.
Метод Range.UnMerge
Метод UnMerge объекта Range разделяет объединенную область на отдельные ячейки из кода VBA Excel.
Синтаксис метода:
Expression — выражение, возвращающее объект Range.
Переменная Expression для отмены объединения ячеек методом UnMerge может представлять одну любую ячейку, входящую в объединенный диапазон.
Примеры объединения ячеек и его отмены
Пример 1
Наблюдаем, как происходит объединение ячеек при разных значениях параметра Across:
|
Sub Primer1() ‘Объединяем ячейки диапазона «A1:D4» построчно Range(«A1:D4»).Merge (True) ‘Объединяем диапазон «A5:D8» в одну ячейку ‘Across принимает значение False по умолчанию Range(«A5:D8»).Merge End Sub |
Не забываем, что логическое выражение True можно заменить единичкой, а False — нулем.
Пример 2
Отменяем объединение ячеек в диапазонах из первого примера:
|
Sub Primer2() Range(«A1:D8»).MergeCells = False End Sub |
Пример 3
Предполагается, что перед этим примером отменено объединение ячеек кодом из предыдущего примера.
|
Sub Primer3() ‘Объединяем ячейки диапазона «A1:D4» Range(«A1:D4»).MergeCells = 1 ‘Проверяем принадлежность диапазона ‘объединенной ячейке* MsgBox Range(«A1:C2»).MergeCells MsgBox Range(«A6:C7»).MergeCells ‘Ячейки диапазона «A5:D8» ‘можно объединить и так Cells(5, 1).Resize(4, 4).Merge End Sub |
*Если проверяемый диапазон окажется комбинированным, VBA Excel сгенерирует ошибку.
Пример 4
Отмена объединения ячеек с помощью метода Range.UnMerge:
|
Sub Primer4() ‘Объединяем ячейки диапазона «A1:C4» Range(«A1:C4»).Merge MsgBox «Ячейки диапазона ««A1:C4»» объединены» ‘Смотрим адрес диапазона, входящего в объединенную ячейку MsgBox Range(«A2»).MergeArea.Address ‘Отменяем объединение ячеек диапазона «A1:C4» Range(«B3»).UnMerge ‘или: Range(«B3»).MergeArea.UnMerge MsgBox «Объединение ячеек диапазона ««A1:C4»» отменено» End Sub |
Предупреждение перед объединением
Если объединяемые ячейки не являются пустыми, пред их объединением появится предупреждающее диалоговое окно с сообщением: «В объединенной ячейке сохраняется только значение из верхней левой ячейки диапазона. Остальные значения будут потеряны.»
Пример 5
Наблюдаем появление предупреждающего окна:
|
Sub Primer5() ‘Отменяем объединение ячеек в диапазоне «A1:D4» Range(«A1:D4»).MergeCells = 0 ‘Заполняем ячейки диапазона текстом Range(«A1:D4») = «Ячейка не пустая» ‘Объединяем ячейки диапазона «A1:D4» Range(«A1:D4»).MergeCells = 1 ‘Наблюдаем предупреждающее диалоговое окно End Sub |
Чтобы избежать появление предупреждающего окна, следует использовать свойство Application.DisplayAlerts, с помощью которого можно отказаться от показа диалоговых окон при работе кода VBA Excel.
Пример 6
|
Sub Primer6() ‘Отменяем объединение ячеек в диапазоне «A5:D8» Range(«A5:D8»).MergeCells = 0 ‘Заполняем ячейки диапазона «A5:D8» текстом Range(«A5:D8») = «Ячейка не пустая» Application.DisplayAlerts = False Range(«A5:D8»).MergeCells = 1 Application.DisplayAlerts = True End Sub |
Теперь все прошло без появления диалогового окна. Главное, не забывать после объединения ячеек возвращать свойству Application.DisplayAlerts значение True.
Кстати, если во время работы VBA Excel предупреждающее окно не показывается, это не означает, что оно игнорируется. Просто программа самостоятельно принимает к действию ответное значение диалогового окна по умолчанию.
|
Переход по объеденённым ячейкам |
||||||||
Ответить |
||||||||
Ответить |
||||||||
Ответить |
||||||||
Ответить |
||||||||
Ответить |
||||||||
Ответить |
||||||||
Ответить |
||||||||
Ответить |
Return to VBA Code Examples
In this Article
- Merge Cells Using VBA
- Unmerge Cells Using VBA
- More Merge Examples
- Merge Rows Using VBA
- Merge Columns Using VBA
- Merge and Center Cell Contents Horizontally
- Merge and Center Cell Contents Vertically
- Merge Cells Across a Cell Range
In this tutorial, we are going to look at the different ways you can merge cells using VBA.
Merge Cells Using VBA
You can merge cells in VBA using the Range.Merge method. The following code will merge cells A1:C1:
Sub MergingCells()

Range("A1:C1").Merge

End Sub
The result is:
Unmerge Cells Using VBA
You can unmerge a merged cell range using the Range.UnMerge method. Let’s say you’ve merged the cell range A1:D1. You can use one of the cell references in the range to unmerge the cells. The following code shows you how to unmerge cells A1:D1, in this case we are using cell B1:
Sub UnmergeCells()

Range("B1").UnMerge

End Sub
More Merge Examples
Merge Rows Using VBA
You can merge rows using VBA by specifying the row numbers that you want to merge. We have the text in cell A1 shown below:
The following code will merge rows 1-4:
Sub MergeRows()

Range("1:4").Merge

End Sub
The result is:
Merge Columns Using VBA
You can merge columns using VBA and the column letters. The following code will merge columns A:C.
Sub MergeColumns()

Range("A:C").Merge

End Sub
The result is:
Merge and Center Cell Contents Horizontally
You can merge and center cell contents horizontally across a cell range. You have to merge the cells of interest and also set the horizontal alignment property of the range object to center. We have the text in cell A1 as shown below:
The following code will merge the cell range A1:D1 and center the contents of cell A1 horizontally across this cell range:
Sub MergeandCenterContentsHorizontally()

Range("A1:D1").Merge
Range("A1:D1").HorizontalAlignment = xlCenter

End Sub
The result is:
VBA Coding Made Easy
Stop searching for VBA code online. Learn more about AutoMacro — A VBA Code Builder that allows beginners to code procedures from scratch with minimal coding knowledge and with many time-saving features for all users!
Learn More
Merge and Center Cell Contents Vertically
You can merge and center cell contents vertically across a cell range. You have to merge the cells of interest and also set the vertical alignment property of the range object to center. We have the text in cell A1 as shown below:
The following code will merge the cell range A1:A4 and center the contents of cell A1 vertically across this cell range:
Sub MergeandCenterContentsVertically()

Range("A1:A4").Merge
Range("A1:D1").VerticalAlignment = xlCenter

End Sub
The result is:
Merge Cells Across a Cell Range
You can merge cells across a cell range. You have to set the optional Across parameter of the Merge method to True. We have the text in cell A1 as shown below:
The following code will merge the cell range A1:D1:
Sub MergeCellsAcross()

Range("A1:D1").Merge Across:=True

End Sub
The result is:
Объединить ячейки чтобы придать таблице читабельный вид очень часто существенно усложняется с увеличением объема данных. Так же весьма неблагодарным занятием является присвоение соответственных границ для ячеек. На помощь пользователям приходят макросы, благодаря которым все эти действия можно выполнить автоматически.
Автоматическое объединение большого количества ячеек по вертикали
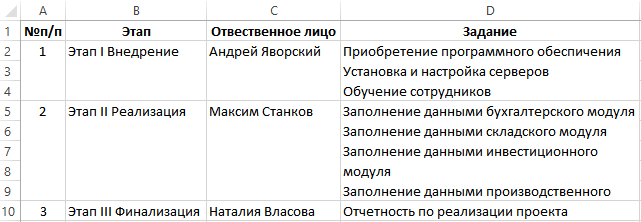
Допустим мы имеем маркетинговый план внедрения нового информационного программного продукта:
Чтобы план было легче визуально анализировать лучше объединить ячейки этапов выполнения плана: A2:A4, B2:B4 и т.д. К сожалению, многократно объединять диапазоны с большим количеством строк вручную – это задание требует слишком много времени и сил. Кроме того, можно допустить много ошибок после очередного десятка выделения ячеек перед объединением. Рассмотрим каким способом можно существенно облегчить свой труд переложив большую часть работы на простую программу, написанную на языке VBA прямо в Excel. Для этого следует написать макрос, который безошибочно быстро и автоматически объединит ячейки диапазонов с разным количеством строк для каждого столбца.
- Сначала откройте редактор макросов: «РАЗРАБОТЧИК»-«Код»-«Visual Basic» (или просто нажмите ALT+F11).
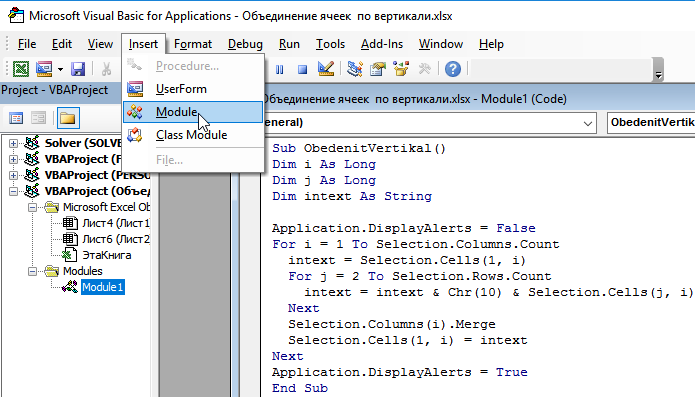
- Откройте стандартный модуль выбрав инструмент в редакторе: «Insert»-«Module» и введите в него следующий код макроса для объединения ячеек:
Sub ObedenitVertikal()
Dim i As Long
Dim j As Long
Dim intext As String
Application.DisplayAlerts = False
For i = 1 To Selection.Columns.Count
  intext = Selection.Cells(1, i)
  For j = 2 To Selection.Rows.Count
    intext = intext & Chr(10) & Selection.Cells(j, i)
  Next
  Selection.Columns(i).Merge
  Selection.Cells(1, i) = intext
Next
Application.DisplayAlerts = True
End Sub
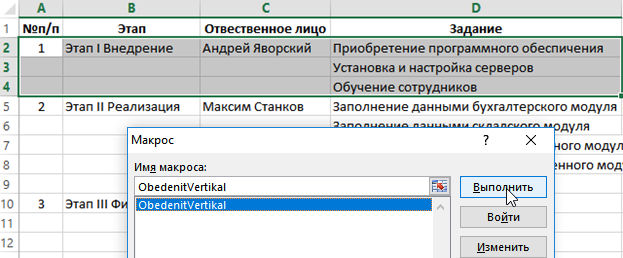
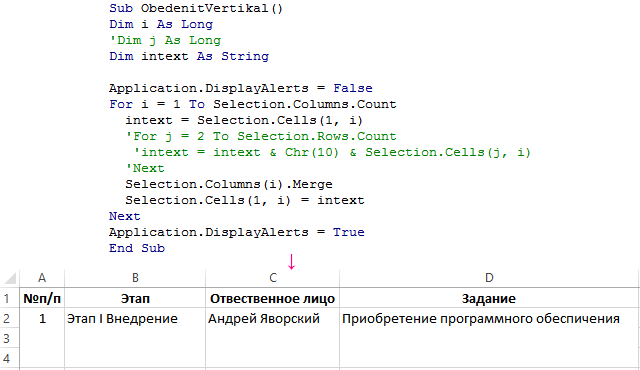
Пока что это еще не полная версия макроса поэтому перед тем как его проверить нам все еще вручную необходимо выделить первый диапазон A2:D4. После чего можно выполнить нашу первую версию макроса.
Запуск макроса для объединения ячеек
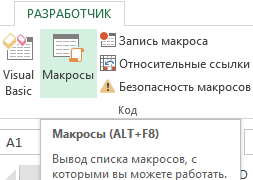
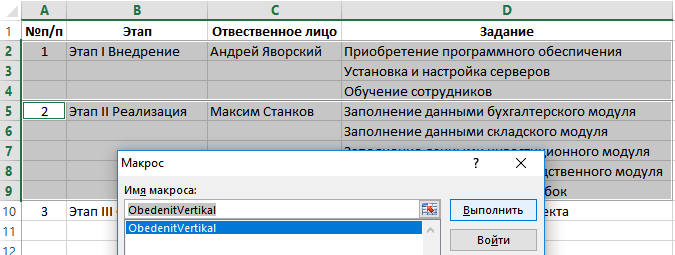
Выбираем инструмент: «РАЗРАБОТЧИК»-«Код»-«Макросы».
В появившемся диалоговом окне выделяем значение «ObedenitVertikal» и нажимаем на кнопку «Выполнить».
Потом снова вручную выделите новый диапазон A5:D9 и повторно выполните тот же макрос. Ячейки будут выделены как показано ниже на рисунке:
В начале кода определены 3 переменные: две из них выполняют функцию счетчика, а третья служит для временного хранения текстового содержания ячеек. Счетчик первой переменной в цикле проходит по очереди все столбцы выделенного диапазона ячеек. В каждом таком столбце в текстовую переменную записывается текст, который содержится в первой ячейке каждого выделенного столбца. Второй счетчик идет по строкам каждого столбца и дописывает в текстовую переменную текстовые значения из остальных ячеек каждого текущего столбца выделенного диапазона – сверху вниз. Тексты, взятые из отдельных ячеек разделяться символом обрыва строки.
Символ обрыва строки вставлен с помощью функции Chr(10). Каждый вводимый символ из клавиатуры имеет свой код ASCII. Если введем код 10 в качестве аргумента для функции Chr(), тогда она будет возвращать символ обрыва строки. Такой же код ASCII на клавиатуре вызывается клавишей Enter для обрыва строки во всех текстовых редакторах.
Потом остальной код макроса объединяет все ячейки столбцов в выделенном диапазоне, а потом заполняет их текстом из текстовой переменной. Чтобы не появлялось предупреждающее сообщение об объединении ячеек, в начале кода программы макроса отключаем отображение сообщений в Excel средствами программирования. Для этой цели используем свойство: Application.DisplayAlerts = Fale. После выполнения кода макроса изменяем значение свойства на True, чтобы в дальнейшем процессе работы с программой Excel все сообщения предупреждений (Alerts) имели возможность отображаться.
Внимание! Если ячейки выделенного диапазона будут содержать формулы, то после выполнения макроса эти формулы будут заменены на текст. В результате после объединения ячеек макросом, формулы могут быть утеряны.
Модернизация и настройка кода макроса для объединения ячеек
Если нам нужно изменить текст разделяющий отдельные строки символов содержащийся в целых ячейках, то можно вписать другой код символа, текст или несколько текстов соединенных символом амперсантом (&). Допустим мы хотим вставить между двумя символами разрыва строки текст, состоящий из пяти тире «——». Тогда данную строку следует модифицировать следующим образом:
intext = intext & Chr(10) & “——” & Chr(10) & Selection.Cells(j, i)
Если в объединенной ячейке мы хотим всегда вставлять только текст из первой ячейки в выделенном столбце (без текстов, записанных в остальных ячейках), тогда удалим или закомментируем переменную второго счетчика и часть кода второго цикла:
Если нам нужно чтобы выполнять макрос после выделения нескольких диапазонов (с удержанием клавиши CTRL), тогда можно добавить еще одну переменную, которая будет дополнять функцию счетчика:
Dim k As Long
Перед первым циклом добавим новую строку с кодом:
For k = 1 To Selection.Areas.Count
А после последнего цикла добавим строку конца нового цикла:
Next
Соответственно добавим новый отступ, чтобы код был более читабельным. Кроме того, после всех изменений для объекта Selection добавим ссылку на диапазон:
Selection.Areas(k)
Полная новая версия макроса для объедения ячеек выделенных нескольких диапазонов, выглядит так:
Sub ObedenitVertikal()
Dim i As Long
Dim j As Long
Dim k As Long
Dim intext As String
Application.DisplayAlerts = False
For k = 1 To Selection.Areas.Count
  For i = 1 To Selection.Areas(k).Columns.Count
    intext = Selection.Areas(k).Cells(1, i)
    For j = 2 To Selection.Areas(k).Rows.Count
     intext = intext & Chr(10) & Selection.Areas(k).Cells(j, i)
    Next
    Selection.Areas(k).Columns(i).Merge
    Selection.Areas(k).Cells(1, i) = intext
  Next
Next
Application.DisplayAlerts = True
End Sub
Тепер выделяем 2 диапазона подряд A2:D4, A5:D8, A с нажатой клавишей CTRL на клавиатуре:
В результате получаем идентичный вид таблицы с объединенными ячейками:
Читайте также:
Как разъединить объединенные ячейки в Excel используя макрос.
Как объединить столбцы в Excel используя макрос.
Если выполнить первую версию макроса (без всех этих изменений), для многократного выделения диапазонов с нажатой клавишей CTRL, то объединение строк по столбцам будет выполнено только для первого диапазона.

This VBA Tutorial is accompanied by Excel workbooks containing the data and macros I use in the examples below. You can get immediate free access to these example workbooks by subscribing to the Power Spreadsheets Newsletter.
Use the following Table of Contents to navigate to the section you’re interested in.
Related VBA and Macro Tutorials
The following VBA and Macro Tutorials may help you better understand and implement the contents below:
- General VBA constructs and structures:
- Learn about using variables here.
- Learn about VBA data types here.
- Learn about R1C1 and A1 style references here.
- Practical VBA applications and macro examples:
- Learn how to work with worksheets here.
You can find additional VBA and Macro Tutorials in the Archives.
VBA Code to Merge Cells
To merge cells with VBA, use a statement with the following structure:
Worksheet.Range("FirstCell:LastCell").Merge
Process Followed by VBA Code
VBA Statement Explanation
- Item: Worksheet.
- VBA Construct: Workbook.Worksheets property.
- Description: Returns a Worksheet object representing the worksheet you work with.
- Item: Range(“FirstCell:LastCell”).
- VBA Construct: Worksheet.Range property.
- Description: Returns a Range object representing the cell range between FirstCell and LastCell. This is the cell range you merge.
Specify FirstCell and LastCell using an A1-style cell reference. Separate FirstCell and LastCell using the range operator, a colon (:). Enclose the entire cell range address within quotations (“”).
- Item: Merge.
- VBA Construct: Range.Merge method.
- Description: Merges the cells represented by the Range object you specify in item #2 above to create a merged cell.
Macro Example
The following macro merges cells A5 to E6 of the worksheet named “Merge Cells”.
Sub mergeCells()

    Worksheets("Merge Cells").Range("A5:E6").Merge

End Sub
Effects of Executing Macro Example
The following GIF illustrates the results of executing this macro example. As expected, cells A5 to E6 are merged.
#2: Unmerge Cells
VBA Code to Unmerge Cells
To unmerge cells with VBA, use a statement with the following structure:
Worksheet.Range("A1CellReference").UnMerge
Process Followed by VBA Code
VBA Statement Explanation
- Item: Worksheet.
- VBA Construct: Workbook.Worksheets property.
- Description: Returns a Worksheet object representing the worksheet you work with.
- Item: Range(“A1CellReference”).
- VBA Construct: Worksheet.Range property.
- Description: Returns a Range object representing a cell within the merged cell you unmerge. Specify the cell using an A1-style cell reference (A1CellReference) enclosed within quotations (“”).
- Item: UnMerge.
- VBA Construct: Range.UnMerge method.
- Description: Separates the merged cell containing the cell you specify in item #2 above into individual regular cells.
Macro Example
The following macro unmerges the merged cell containing cell C6 of the worksheet named “Merge Cells”.
Sub unmergeCells()

    Worksheets("Merge Cells").Range("C6").UnMerge

End Sub
Effects of Executing Macro Example
The following GIF illustrates the results of executing this macro example. As expected, the merged cell containing cell C6 is unmerged into individual regular cells.
The merged cell range (A5 to E6) was originally merged using the macro example #1 above.
#3: Merge Cells and Center
VBA Code to Merge Cells and Center
To merge cells and center the contents with VBA, use a macro with the following statement structure:
With Worksheet.Range("FirstCell:LastCell")
    .HorizontalAlignment = xlCenter
    .VerticalAlignment = xlCenter
    .Merge
End With
Process Followed by VBA Code
VBA Statement Explanation
Lines #1 and #5: With Worksheet.Range(“FirstCell:LastCell”) | End With
- Item: With… End With.
- VBA Construct: With… End With statement.
- Description: Statements within the With… End With statement (lines #2 through #4 below) are executed on the Range object returned by item #3 below.
- Item: Worksheet.
- VBA Construct: Workbook.Worksheets property.
- Description: Returns a Worksheet object representing the worksheet you work with.
- Item: Range(“FirstCell:LastCell”).
- VBA Construct: Worksheet.Range property.
- Description: Returns a Range object representing the cell range between FirstCell and LastCell. This is the cell range you merge.
Specify FirstCell and LastCell using an A1-style cell reference. Separate FirstCell and LastCell using the range operator, a colon (:). Enclose the entire cell range address within quotations (“”).
Line #2: .HorizontalAlignment = xlCenter
- Item: HorizontalAlignment = xlCenter.
- VBA Construct: Range.HorizontalAlignment property.
- Description: Horizontally centers the contents of the cell range you specify in line #1 above by setting the HorizontalAlignment property to xlCenter.
Line #3: VerticalAlignment = xlCenter
- Item: VerticalAlignment = xlCenter.
- VBA Construct: Range.VerticalAlignment property.
- Description: Vertically centers the contents of the cell range you specify in line #1 above by setting the VerticalAlignment property to xlCenter.
Line #4: Merge
- Item: Merge.
- VBA Construct: Range.Merge method.
- Description: Merges the cells represented by the Range object you specify in line #1 above to create a merged cell.
Macro Example
The following macro (i) centers the contents in cells A8 to E9 of the worksheet named “Merge Cells”, and (ii) merges those cells.
Sub mergeCellsAndCenter()

    With Worksheets("Merge Cells").Range("A8:E9")
        .HorizontalAlignment = xlCenter
        .VerticalAlignment = xlCenter
        .Merge
    End With

End Sub
Effects of Executing Macro Example
The following GIF illustrates the results of executing this macro example. As expected, VBA merges cells A8 to E9 and centers the contents.
#4: Merge Cells Across
VBA Code to Merge Cells Across
To merge cells across (in the same row) with VBA, use a statement with the following structure:
Worksheet.Range("FirstCell:LastCell").Merge Across:=True
Process Followed by VBA Code
VBA Statement Explanation
- Item: Worksheet.
- VBA Construct: Workbook.Worksheets property.
- Description: Returns a Worksheet object representing the worksheet you work with.
- Item: Range(“FirstCell:LastCell”).
- VBA Construct: Worksheet.Range property.
- Description: Returns a Range object representing the cell range between FirstCell and LastCell. This is the cell range you merge.
Specify FirstCell and LastCell using an A1-style cell reference. Separate FirstCell and LastCell using the range operator, a colon (:). Enclose the entire cell range address within quotations (“”).
- Item: Merge.
- VBA Construct: Range.Merge method.
- Description: Merges the cells in each row of the cell range you specify in item #2 above to create separate merged cells. For these purposes, considers the Across parameter (item #4 below).
- Item: Across:=True.
- VBA Construct: Across parameter of the Range.Merge method.
- Description: Specifies that the cells in each row of the cell range you specify in item #2 above are merged separately. In other words, the cells in each row are merged into separate merged cells (vs. a single merged cell covering the entire cell range).
The default value of the Across parameter is False. In such case, all cells within the cell range you specify are merged into a single cell. This is the equivalent of simply merging cells (operation #1 above).
Macro Example
The following macro merges cells A11 to E15 of the worksheet named “Merge Cells” across. Therefore, the cells in each row from row 11 to row 15 are merged into separate merged cells.
Sub mergeCellsAcross()

    Worksheets("Merge Cells").Range("A11:E15").Merge Across:=True

End Sub
Effects of Executing Macro Example
The following GIF illustrates the results of executing this macro example. As expected, VBA merges cells A11 to E15 across.
#5: Merge Cells Based on Cell Value
VBA Code to Merge Cells Based on Cell Value
To merge cells based on a cell value (whether it meets certain criteria), use a macro with the following statement structure:
With Worksheet
    For Counter = LastRow To FirstRow Step -1
        If .Cells(Counter, CriteriaColumn).Value = Criteria Then .Range(.Cells(Counter, FirstColumn), .Cells(Counter, LastColumn)).Merge
    Next Counter
End With
Process Followed by VBA Code
VBA Statement Explanation
Lines #1 and #5: With Worksheet | End With
- Item: With… End With.
- VBA Construct: With… End With statement.
- Description: Statements within the With… End With statement (lines #2 through #4 below) are executed on the Worksheet object returned by item #2 below.
- Item: Worksheet.
- VBA Construct: Workbook.Worksheets property.
- Description: Returns a Worksheet object representing the worksheet you work with.
Lines #2 and #4: For Counter = LastRow To FirstRow Step -1 | Next Counter
- Item: For… Next Counter.
- VBA Construct: For… Next statement.
- Description: Repeats the statements within the loop (line #3 below) for each row between FirstRow (item #4 below) and LastRow (item #3 below).
- Item: Counter.
- VBA Construct: Counter of For… Next statement.
- Description: Loop counter. If you explicitly declare a variable to represent the loop counter, use the Long data type.
- Item: LastRow.
- VBA Construct: Counter Start of For… Next statement.
- Description: Number of the last row (further down the worksheet) you want the macro to consider when identifying rows to merge cells. The number of the last row is also the initial value of Counter (item #2 above).
If you explicitly declare a variable to represent the number of the last row to consider, use the Long data type.
- Item: FirstRow.
- VBA Construct: Counter End of For… Next statement.
- Description: Number of the first row (closer to the top of the worksheet) you want the macro to consider when identifying rows to merge cells. The number of the first row is also the final value of Counter (item (#2 above).
If you explicitly declare a variable to represent the number of the first row to consider, use the Long data type.
- Item: Step -1.
- VBA Construct: Step of For… Next statement.
- Description: Amount by which Counter (item #2 above) changes every time a loop iteration occurs.
In this scenario, you loop backwards: from LastRow (item #3 above) to FirstRow (item #4 above). Therefore, step is -1.
Line #3: If .Cells(Counter, CriteriaColumn).Value = Criteria Then .Range(.Cells(Counter, FirstColumn), .Cells(Counter, LastColumn)).Merge
- Item: If… Then.
- VBA Construct: If… Then… Else statement.
- Description: Conditionally executes the statement at the end of the line of code (items #5 through #8 below) if the condition specified in item #4 below is met.
- Item: .Cells(Counter, CriteriaColumn).
- VBA Construct: Worksheet.Cells property and Range.Item property.
- Description: Returns a Range object representing the cell at the intersection of row number Counter and column number CriteriaColumn.
At any given time, the value of the loop counter (Counter) is the same as that of the row through which the macro is currently looping. CriteriaColumn is the number of the column containing the cells you consider for purposes of determining whether to merge cells in the row through which the macro is currently looping.
- Item: Value.
- VBA Construct: Range.Value property.
- Description: Returns the value of the cell represented by the Range object returned by item #2 above.
- Item: .Cells(Counter, CriteriaColumn).Value = Criteria.
- VBA Construct: Condition of If… Then… Else statement.
- Description: This condition is an expression that evaluates to True or False, as follows:
-
- True: When the value of the cell represented by the Range object returned by item #2 above is equal to the criteria you specify (Criteria).
- False: When the value of the cell represented by the Range object returned by item #2 above isn’t equal to the criteria you specify (Criteria).
If you explicitly declare a variable to represent value, ensure that the data type you use can handle the value you use as criteria.
-
- Item: .Range.
- VBA Construct: Worksheet.Range property.
- Description: Returns a Range object representing a cell range specified as follows:
- Leftmost cell: Range object returned by item #6 below.
- Rightmost cell: Range object returned by item #7 below.
- Item: .Cells(Counter, FirstColumn).
- VBA Construct: Worksheet.Cells property and Range.Item property.
- Description: Returns a Range object representing the cell at the intersection of row number Counter and column number FirstColumn.
At any given time, the value of the loop counter (Counter) is the same as that of the row through which the macro is currently looping. FirstColumn is the number of the first column in the cell range you want the macro to merge. If you explicitly declare a variable to represent FirstColumn, use the Long data type.
- Item: .Cells(Counter, LastColumn).
- VBA Construct: Worksheet.Cells property and Range.Item property.
- Description: Returns a Range object representing the cell at the intersection of row number Counter and column number LastColumn.
At any given time, the value of the loop counter (Counter) is the same as that of the row through which the macro is currently looping. LastColumn is the number of the last column in the cell range you want the macro to merge. If you explicitly declare a variable to represent LastColumn, use the Long data type.
- Item: Merge.
- VBA Construct: Range.Merge method.
- Description: Merges the cells represented by the Range object returned by items #5 through #7 above to create a merged cell.
Macro Example
The following macro merges cells in columns myFirstColumn through myLastColumn in each row between myFirstRow and myLastRow where the value stored in column myCriteriaColumn is the string held by the myCriteria variable.
- myFirstRow is set to 5.
- myLastRow is set to the number of the last row with data in the worksheet named “Merge Cells Based on Criteria”. The constructs used by the statement that finds the last row with data in the worksheet are the Worksheet.Cells property, the Range.Find method, and the Range.Row property.
- Both myCriteriaColumn and myFirstColumn are set to 1 (column A).
- myLastColumn is set to 5 (column E).
- myCriteria holds the string “Merge cells”
Sub mergeCellsBasedOnCriteria()

    Dim myFirstRow As Long
    Dim myLastRow As Long
    Dim myCriteriaColumn As Long
    Dim myFirstColumn As Long
    Dim myLastColumn As Long
    Dim myWorksheet As Worksheet
    Dim myCriteria As String
    Dim iCounter As Long

    myFirstRow = 5
    myCriteriaColumn = 1
    myFirstColumn = 1
    myLastColumn = 5
    myCriteria = "Merge cells"

    Set myWorksheet = Worksheets("Merge Cells Based on Criteria")

    With myWorksheet

        myLastRow = .Cells.Find(What:="*", LookIn:=xlFormulas, LookAt:=xlPart, SearchOrder:=xlByRows, SearchDirection:=xlPrevious).Row

        For iCounter = myLastRow To myFirstRow Step -1
            If .Cells(iCounter, myCriteriaColumn).Value = myCriteria Then .Range(.Cells(iCounter, myFirstColumn), .Cells(iCounter, myLastColumn)).Merge
        Next iCounter

    End With

End Sub
Effects of Executing Macro Example
The following GIF illustrates the results of executing this macro example. As expected, VBA merges cells in columns A through E in each row where the value stored in column A is the string “Merge Cells”.
#6: Merge Cells Within a Row Based on Cell Value
VBA Code to Merge Cells Within a Row Based on Cell Value
To merge cells within a row based on a cell value (the cell value determines the number of cells to merge), use a macro with the following statement structure:
With Worksheet
    For Counter = LastRow To FirstRow Step -1
        .Cells(Counter, BaseColumn).Resize(ColumnSize:=.Cells(Counter, SizeColumn).Value).Merge
    Next iCounter
End With
Process Followed by VBA Code
VBA Statement Explanation
Lines #1 and #5: With Worksheet | End With
- Item: With… End With.
- VBA Construct: With… End With statement.
- Description: Statements within the With… End With statement (lines #2 through #4 below) are executed on the Worksheet object returned by item #2 below.
- Item: Worksheet.
- VBA Construct: Workbook.Worksheets property.
- Description: Returns a Worksheet object representing the worksheet you work with.
Lines #2 and #4: For Counter = LastRow To FirstRow Step -1 | Next Counter
- Item: For… Next Counter.
- VBA Construct: For… Next statement.
- Description: Repeats the statements within the loop (line #3 below) for each row between FirstRow (item #4 below) and LastRow (item #3 below).
- Item: Counter.
- VBA Construct: Counter of For… Next statement.
- Description: Loop counter. If you explicitly declare a variable to represent the loop counter, use the Long data type.
- Item: LastRow.
- VBA Construct: Counter Start of For… Next statement.
- Description: Number of the last row (further down the worksheet) you want the macro to consider when identifying rows to merge cells. The number of the last row is also the initial value of Counter (item #2 above).
If you explicitly declare a variable to represent the number of the last row to consider, use the Long data type.
- Item: FirstRow.
- VBA Construct: Counter End of For… Next statement.
- Description: Number of the first row (closer to the top of the worksheet) you want the macro to consider when identifying rows to merge cells. The number of the first row is also the final value of Counter (item (#2 above).
If you explicitly declare a variable to represent the number of the first row to consider, use the Long data type.
- Item: Step -1.
- VBA Construct: Step of For… Next statement.
- Description: Amount by which Counter (item #2 above) changes every time a loop iteration occurs.
In this scenario, you loop backwards: from LastRow (item #3 above) to FirstRow (item #4 above). Therefore, step is -1.
Line #3: .Cells(Counter, BaseColumn).Resize(ColumnSize:=.Cells(Counter, SizeColumn).Value).Merge
- Item: .Cells(Counter, BaseColumn).
- VBA Construct: Worksheet.Cells property and Range.Item property.
- Description: Returns a Range object representing the cell at the intersection of row number Counter and column number BaseColumn.
At any given time, the value of the loop counter (Counter) is the same as that of the row through which the macro is currently looping. BaseColumn is the number of the column you use as base for purposes of merging cells within the row through which the macro is currently looping.
- Item: Resize(ColumnSize:=.Cells(Counter, SizeColumn).Value).
- VBA Construct: Range.Resize property.
- Description: Returns a Range object representing a resized cell range. The Range object returned by Range.Resize is determined as follows:
- Base Cell Range: The base Range object (prior to resizing) is that returned by item #1 above.
- Row Size: The number of rows in the cell range returned by Range.Resize remain the same. In other words, the cell range where cells are merged is 1 row tall.
This is because the first parameter of Resize (known as RowSize) is omitted. Therefore, the number of rows in the cell range remains the same.
- Column Size: The number of columns in the cell range returned by Range.Resize is determined by item #3 below.
- Item: ColumnSize:=.Cells(Counter, SizeColumn).Value.
- VBA Constructs: ColumnSize parameter of Range.Resize property and Range.Value property.
- Description: Specifies the number of columns in the Range object returned by the Range.Resize property. The number of columns in this cell range is equal to the value within the cell at the intersection of row number Counter and column number SizeColumn (.Cells(Counter, SizeColumn).Value).
At any given time, the value of the loop counter (Counter) is the same as that of the row through which the macro is currently looping. SizeColumn is the number of the column containing the number of cells you want to merge within the row through which the macro is currently looping.
- Item: Merge.
- VBA Construct: Range.Merge method.
- Description: Merges the cells represented by the Range object returned by items #1 through #3 above.
Macro Example
The following macro merges a certain number of cells, starting with the cell in column myBaseColumn, in each row between myFirstRow and myLastRow. The number of merged cells is equal to the value stored in mySizeColumn. If that value is 1, no cells are merged.
In other words, the macro merges the cells between column number mySizeColumn and the column whose number is equal to that stored within the cell in myBaseColumn.
- myFirstRow is set to 5.
- myLastRow is set to the number of the last row with data in the worksheet named “Merge Cells Based on Cell Value”. The constructs used by the statement that finds the last row with data in the worksheet are the Worksheet.Cells property, the Range.Find method, and the Range.Row property.
- Both myBaseColumn and mySizeColumn are set to 1 (column A).
Sub mergeCellsBasedOnCellValue()

    Dim myFirstRow As Long
    Dim myLastRow As Long
    Dim myBaseColumn As Long
    Dim mySizeColumn As Long
    Dim myWorksheet As Worksheet
    Dim iCounter As Long

    myFirstRow = 5
    myBaseColumn = 1
    mySizeColumn = 1

    Set myWorksheet = Worksheets("Merge Cells Based on Cell Value")

    With myWorksheet

        myLastRow = .Cells.Find(What:="*", LookIn:=xlFormulas, LookAt:=xlPart, SearchOrder:=xlByRows, SearchDirection:=xlPrevious).Row

        For iCounter = myLastRow To myFirstRow Step -1
            .Cells(iCounter, myBaseColumn).Resize(ColumnSize:=.Cells(iCounter, mySizeColumn).Value).Merge
        Next iCounter

End With

End Sub
Effects of Executing Macro Example
The following GIF illustrates the results of executing this macro example. As expected, for each row with data, the macro merges the cells between column A and the column whose number is specified in column A.
References to VBA Constructs Used in this VBA Tutorial
Use the following links to visit the appropriate webpage within the Microsoft Office Dev Center:
- Identify the worksheet you work with:
- Workbook.Worksheets property.
- Return a Range object representing the cells you merge:
- Worksheet.Range property.
- Worksheet.Cells property.
- Range.Resize property.
- Merge cells:
- Range.Merge method.
- Unmerge cells:
- Range.UnMerge method.
- Center the contents of a cell range horizontally or vertically:
- Range.HorizontalAlignment property.
- Range.VerticalAlignment property.
- Identify last row with data in a worksheet:
- Range.Find method.
- Range.Row property.
- Loop through rows:
- For… Next statement.
- Identify the value stored in a cell to specify criteria for merging cells.
- Range.Value property.
- Test if cells meet criteria for merging:
- If… Then… Else statement.
- Work with variables:
- Dim statement.
- Set statement.
- Data types:
- Long data type.
- String data type.
- Simplify object references:
- With… End With statement.


