
LoadPicture
LoadPicture([FileName], [Size], [ColorDepth],[X,Y])
Используя свойство Picture, функция загружает графическое изображение в форму или элементы управления PictureBox и Image. Visual Basic различает следующие форматы графических файлов: растровые файлы (.bmp), значки (.ico), файлы (.rle) с групповым кодированием(run-length encoded), метафайлы (.wmf), улучшенные метафайлы (.emf), файлы типа GIF (.gif) и JPEG (.jpg)
Параметры
| FileName | Необязательный параметр. Строковая переменная, определяющая имя загружаемого графического файла. Может включать имя папки и диска. Если не указано значение файла, то функция LoadPicture очищает элементы управления Image или PictureBox |
| Size | Необязательный параметр типа Variant. Если FileName является курсором или значком файла, то параметр определяет желаемый размер изображения. Допустимые значения приведены в таблице установок |
| ColorDepth | Необязательный параметр типа Variant. Если FileName является курсором или значком файла, то параметр определяет желаемую глубину цвета. Допустимые значения приведены в таблице установок |
| X | Необязательный параметр типа Variant. Обязателен, если указан параметр Y. Если FileName является курсором или значком файла, то параметр определяет желаемую ширину. В файле, содержащем множество отдельных изображений, в случае, если изображение заданного размера не доступно, используется наилучшее приближение. Значения X и Y используются, если установлено значение vbLPCustom аргумента ColorDepth. Для значков файлов наибольшее возможное значение 255 |
| Y | Необязательный параметр типа Variant. Обязателен,если указан параметр X.Если FileName является курсором или значком файла, то параметр определяет желаемую высоту. В файле, содержащем множество отдельных изображений, используется наилучшее приближение в случае, если изображение заданного размера не доступно. Для значков файлов наибольшее возможное значение 255 |
Установки
Установки для части Size приведены в таблице
| Константа | Значение | Описание |
| vbLPSmall | 0 | Системный значок малого размера |
| vbLPLarge | 1 | Системный значок большого размера, определяемого видеодрайвером |
| vbLPSmallShell | 2 | Значок малого размера для оболочки. Размер определяется установками кнопок Заголовок на вкладке Оформление диалогового окна Экран Панели управления |
| vbLPLargeShell | 3 | Значок большого размера для оболочки. Размер определяется установками кнопок Заголовок на вкладке Оформление диалогового окна Экран Панели управления |
| vbLPCustom | 4 | Определяемый размер, задается аргументами X и Y |
Установки для части ColorDepth приведены в таблице
| Константа | Значение | Описание |
| vbLPDefault | 0 | Оптимальное значение при использовании определенных файлов |
| vbLPMonochrome | 1 | 2 цвета |
| vbLPVGAColor | 2 | 16 цветов |
| vbLPColor | 3 | 256 цветов |
Чтобы загрузить графическое изображение в элементы управления PictureBox и Image или же использовать его в качестве фона формы, следует присвоить возвращаемое значение функции LoadPicture значению свойства Picture данных элементов. Например:
Set Picture = LoadPicture("PARTY.BMP")
Set Picture1.Picture = LoadPicture("PARTY.BMP")
Чтобы прикрепить к форме значок, приравняйте значение свойства Icon данной формы значению, возвращаемому функцией LoadPicture:
Set Form1.Icon = LoadPicture("MYICON.ICO")
Значки могут быть присвоены для свойства DragIcon любого элемента управления, за исключением элементов управления Timer и Menu. Например:
Set Command1.DragIcon = LoadPicture("MYICON.ICO")
С помощью функции LoadPicture можно загрузить графический файл в системный Буфер обмена:
Clipboard.SetData LoadPicture("PARTY.BMP")
Категория
Функции загрузки данных
UserForm Controls — Image and RefEdit
UserForm acts as a container in which you add multiple ActiveX controls, each of which has a specific use and associated properties. By itself, a UserForm will not be of much use unless ActiveX controls are added to it which are the actual user-interactive objects. Using ActiveX Controls on a Worksheet have been illustrated in detail, in the separate section of «Excel VBA: ActiveX Controls, Form Controls & AutoShapes on a Worksheet».
Also refer «2. UserForm and Controls — Properties» for properties common to the UserForm and most Controls
Note: In below given examples, vba codes are required to be entered in the Code Module of the UserForm, unless specified otherwise.
————————————
Contents:
Image Control
RefEdit control
————————————
Image Control
Image control is used to display a Picture on the UserForm. The first step is to add an Image control to the UserForm. To assign a picture to this control at design time, specify a picture using the «Picture» property, which will display it in the UserForm. To remove a picture, press DELETE in the value field of «Picture» property in Properties window (Note: pressing BACKSPACE will not remove the picture). You can assign a picture to the Image control at run time by using the LoadPicture function, as shown below. An important aspect is to fit a picture in the Image control or adapt the control’s size to the picture, which determines how the picture will get displayed. This can be done using the PictureSizeMode Property as described below.
PictureSizeMode Property: Specifies how the picture will be displayed viz. in relation to its original size and scale. There are 3 settings: (i) fmPictureSizeModeClip (value 0) — this is the default value and it clips that part of the picture which is larger than its container ie. the Image control; (ii) fmPictureSizeModeStretch (value 1) — stretches the picture to fit its container ie. the Image control, and might distort the picture horizontally or vertically; (iii) fmPictureSizeModeZoom (value 3) — enlarges (does not distort) the picture — picture is enlarged till it first reaches the horizontal or vertical limit of its container (ie. Image control). If the horizontal limit is reached first, then the remaining vertical space will appear blank and if the vertical limit is reached first, then the remaining horizontal space will appear blank. PictureSizeMode property can be set in the Properties window and can also be used with a macro or vba code.
PictureAlignment Property: Specifies the relative position or alignment of the picture within the Image control. There are 5 settings: (i) fmPictureAlignmentTopLeft (value 0); (ii) fmPictureAlignmentTopRight (value 1); (iii) fmPictureAlignmentCenter (value 2); (iv) fmPictureAlignmentBottomLeft (value 3); and (v) fmPictureAlignmentBottomRight (value 4). The settings are self-explanatory viz. fmPictureAlignmentBottomLeft setting means that picture aligns at the bottom left corner of the Image control. Note: If the image is set to fmSizeModeStretch (in its PictureSizeMode property) the picture stretches to fit its container/Image control, then the PictureAlignment property does not have any effect.
Using the LoadPicture function to assign a picture to the Image control at run time:
Syntax: ImageControl.Picture = LoadPicture(pathname)
Example 1: Select picture from ListBox to display in Image control — refer Image 31. See below code:

Private Sub UserForm_Initialize()
‘Add items in ListBox:
ListBox1.AddItem «picture1»
ListBox1.AddItem «picture2»
ListBox1.AddItem «picture3»
ListBox1.AddItem «picture4»
End Sub
Private Sub ListBox1_Click()
‘select picture from list to display in Image control:
If ListBox1.Value = «picture1» Then
Image1.Picture = LoadPicture(«C:Project_1NewPicturesTestImage1.jpg»)
ElseIf ListBox1.Value = «picture2» Then
Image1.Picture = LoadPicture(«C:Project_1NewPicturesTestImage2.jpg»)
ElseIf ListBox1.Value = «picture3» Then
Image1.Picture = LoadPicture(«C:Project_1NewPicturesTestImage3.jpg»)
ElseIf ListBox1.Value = «picture4» Then
Image1.Picture = LoadPicture(«C:Project_1NewPicturesTestImage4.jpg»)
End If
End Sub
Example 2: Select full path (folder & filename) of a picture from ListBox to display in Image control — refer Image 32. See below code:

Private Sub UserForm_Initialize()
‘load ListBox showing full path (folder & filename) of the pictures:
Dim pic1 As String
Dim pic2 As String
Dim pic3 As String
Dim pic4 As String
pic1 = «C:Project_1NewPicturesTestImage1.jpg»
pic2 = «C:Project_1NewPicturesTestImage2.jpg»
pic3 = «C:Project_1NewPicturesTestImage3.jpg»
pic4 = «C:Project_1NewPicturesTestImage4.jpg»
ListBox1.AddItem pic1
ListBox1.AddItem pic2
ListBox1.AddItem pic3
ListBox1.AddItem pic4
End Sub
Private Sub ListBox1_Click()
‘select picture from list to display in Image control:
Image1.Picture = LoadPicture(ListBox1.List(ListBox1.ListIndex))
End Sub
Example 3: To display a picture in the command button, on activation of UserForm:
Private Sub UserForm_Initialize()
CommandButton1.Picture = LoadPicture(«C:Project_1NewPicturesTestImage1.jpg»)
End Sub
Example 4: To display picture in the Image control on clicking the command button:
Private Sub CommandButton1_Click()
‘clicking the command button will display a picture in Image control:
With UserForm6
Image1.Picture = LoadPicture(«C:Project_1NewPicturesTestImage1.jpg»)
End With
End Sub
Use LoadPicture property with GetOpenFilename Method
GetOpenFilename Method:
This method enables a user to enter a file name in the standard open dialog box which is displayed. The method does not open any file, it only displays the box to accept the file name, and returns the user-entered name or name of the selected file which might also be a path (ie. folders & file name).
Syntax: expression .GetOpenFilename([FileFilter], [FilterIndex], [Title], [ButtonText], [MultiSelect]). Expression (an Application object) is necessary to inclue, other variants are optional to mention.
FileFilter is a string which specifies the criteria to filter files. It comprises of pairs of strings (ie. a pair for each filter criteria), each part includes the wildcard character and is separated by commas ex. filefilter:=«Text Files (*.txt),*.txt,Tiff Files(*.tif),*.tif,JPEG Files(*.jpg),*.jpg». This example of FileFilter specifies 3 criteria of file filters (viz. Text files, Tiff files & JPEG files) and enables a user to enter/select files with extensions .txt. .jpg and .tif only. To include multiple expressions in a single criteria of file filter, use semi-colons to separate each expression ex. filefilter:=«JPEG File Interchange Format (*.jpg;*.jpeg;*.jfif;*.jpe),*.jpg;*.jpeg;*.jfif;*.jpe». This example of FileFilter specifies 1 criteria of file filter (of JPEG format) and includes 4 expressions which enables selection of files with extensions .jpg, .jpeg, .jfif & .jpe. Omitting this argument will default to «All Files (*.*),*.*».
FilterIndex is the default criteria of file filter, specified by the index number which ranges from 1 to the number of specified criteria of file fliters. Omitting to mention FilterIndex (or specifying an index number beyond its range) will default to the first criteria of file filter.
Title specifies the title of the dialog box which is displayed on using the GetOpenFilename Method. The default title is «Open» if not specified.
MultiSelect value of True allows multiple-file selection and if set to False (which is also the default value) will allow single file selection.


Example 5: Use LoadPicture property with GetOpenFilename Method to Load Picture to an Image control. Refer Images 33a to 33c. See below codes:
Private Sub UserForm_Initialize()
‘set yellow background color of Image control
Me.Image1.BackColor = RGB(255, 255, 0)
Me.Label1.Caption = «Click on the Yellow box to Select & Load Picture»
End Sub
Private Sub Image1_Click()
‘use LoadPicture property with GetOpenFilename Method to Load Picture to an Image control.
Dim strFileName As String
‘use GetOpenFilename Method to select picture
strFileName = Application.GetOpenFilename(filefilter:=«Tiff Files(*.tif;*.tiff),*.tif;*.tiff,JPEG Files (*.jpg;*.jpeg;*.jfif;*.jpe),*.jpg;*.jpeg;*.jfif;*.jpe,Bitmap Files(*.bmp),*.bmp», FilterIndex:=2, Title:=«Select a File», MultiSelect:=False)
If strFileName = «False» Then
MsgBox «File Not Selected!»
Else
‘load picture to Image control, using LoadPicture property
Me.Image1.Picture = LoadPicture(strFileName)
‘after any change vba has to be told to refresh the UserForm for the change to appear
Me.Repaint
‘label caption changes after picture is loaded
Me.Label1.Caption = «Picture Loaded»
End If
End Sub
Private Sub CommandButton1_Click()
‘clicking «Close» button will unload the UserForm
Unload Me
End Sub
Example 6: Use LoadPicture property with GetOpenFilename Method to Load Picture to an Image control. Refer Images 33a to 33c. See below codes:
Private Sub UserForm_Initialize()
‘set yellow background color of Image control
Me.Image1.BackColor = RGB(255, 255, 0)
Me.Label1.Caption = «Click on the Yellow box to Select & Load Picture»
End Sub
Private Sub Image1_Click()
‘use LoadPicture property with GetOpenFilename Method to Load Picture to an Image control.
Dim strFltr As String, strTtl As String, strFileName As String
Dim iFltrIndx As Integer
Dim bMltiSlct As Boolean
‘set value for variables to be used in GetOpenFilename Method
strFltr = «Tiff Files(*.tif;*.tiff),*.tif;*.tiff,JPEG Files (*.jpg;*.jpeg;*.jfif;*.jpe),*.jpg;*.jpeg;*.jfif;*.jpe,Bitmap Files(*.bmp),*.bmp»
iFltrIndx = 2
strTtl = «Select a File»
bMltiSlct = False
‘ChDrive Statement sets the current drive to C
ChDrive «C»
‘ChDir statement sets the current directory to C:Project_1NewPictures
ChDir «C:Project_1NewPictures»
‘use GetOpenFilename Method to select picture:
strFileName = Application.GetOpenFilename(strFltr, iFltrIndx, strTtl, , bMltiSlct)
If strFileName <> «False» Then
‘load picture to Image control, using LoadPicture property
Me.Image1.Picture = LoadPicture(strFileName)
‘after any change vba has to be told to refresh the UserForm for the change to appear
Me.Repaint
‘label caption changes after picture is loaded
Me.Label1.Caption = «Picture Loaded»
End If
End Sub
Private Sub CommandButton1_Click()
‘clicking «Close» button will unload the UserForm
Unload Me
End Sub
——————————————————————————————————————————
RefEdit control
The RefEdit control is available only in a VBA UserForm, and allows a user to select a worksheet range from a box, or to type in the range therein. The RefEdit control displays the cell or range address (can be a single cell or a range of contiguous or non-contiguous cells) which a user selects or enters by typing in. To get the cell or range address which is stored in a RefEdit control, use the Value property. A RefEdit control displays the range that you reference and it behaves similar to the built-in Excel reference boxes viz. when you select a function on the excel worksheet, then click ok, you can see the buttons on the right of the argument boxes and on clicking them you can select a worksheet range (the main dialog box collapses here and re-appears when you click the button again).
Example 5: User RefEdit control to select a worksheet range and execute code in the referenced range with CommanButton. Refer Image 34. See below code:

Private Sub CommandButton1_Click()
‘clicking on command button performs action on selected range in RefEdit control:
Dim strAddress As String
‘select range in RefEdit control
strAddress = RefEdit1.Value
‘enter text & background color in selected range
Range(strAddress).Value = «Hello»
Range(strAddress).Interior.Color = RGB(255, 0, 0)
‘click yes to close UserForm and no to continue with another selection
If MsgBox(«Action Performed, Exit?», vbQuestion + vbYesNo) = vbYes Then
Unload Me
End If
End Sub
Добавление изображений на элементы управления пользовательской формы. Свойство Picture. Привязка картинки в редакторе и из кода VBA Excel. Удаление изображения.
Свойство Picture есть у пользовательской формы и некоторых элементов управления: CheckBox, CommandButton, Frame, Image, Label, OptionButton, ToggleButton. Оно позволяет отобразить на этих объектах изображение с расширением jpg, bmp, gif.
Синтаксис
object.Picture = LoadPicture(«pathname»)
- object – пользовательская форма или подходящий элемент управления;
- pathname – полный путь к изображению.
Добавление изображений в редакторе VBA
Чтобы добавить картинку на форму или элемент управления в редакторе VBA Excel, необходимо в окне Properties выбранного объекта нажать кнопку с тремя точками в поле значений свойства Picture:

Откроется окно проводника, с помощью которого следует выбрать нужное изображение.
Картинка на элементе управления может использоваться вместо надписи или вместе с ней. За выравнивание изображения и положение надписи на объекте отвечает свойство PicturePosition. Подходящее значение свойства PicturePosition проще подобрать в окне Properties выбранного элемента управления.
Добавление изображений из кода VBA Excel
Пример кода VBA Excel, добавляющего надпись и изображение на элемент управления ToggleButton:
|
Private Sub UserForm_Initialize() With ToggleButton1 .Caption = «Кекс домашний» .Picture = LoadPicture(«C:PHOTOkeks.jpg») .PicturePosition = 4 End With End Sub |

Программное удаление изображения
Удаляется изображение из элемента управления в коде VBA Excel путем присвоения свойству Picture значения Nothing с помощью ключевого слова Set:
|
Set CommandButton1.Picture = Nothing |
Dear Friends,
In this article, I am going to teach you a simple VBA code, which help you in inserting a picture in Excel Sheet. I will also discuss about difference between Inserting a picture in Excel and Embedding a picture in Excel Sheet using Excel VBA.
It is based on request from one of LEM reader who wants to know, How to insert a picture in excel sheet using VBA code It is a very simple one liner code to insert a picture in Excel using vba code.

Insert Picture Using VBA Code
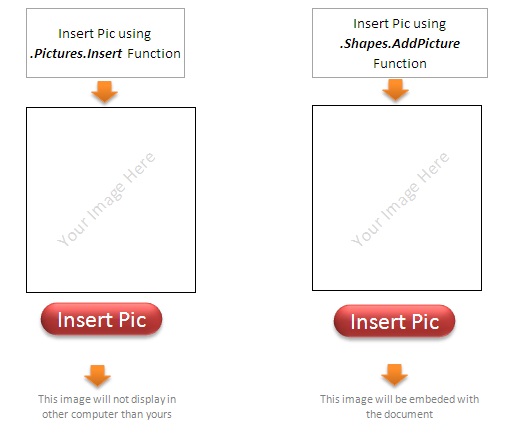
Basically, there are two methods to insert a picture in Excel Sheet
Method 1. ActiveSheet.Pictures.Insert
Method 2. ActiveSheet.Shapes.AddPicture
VBA Code for Inserting Picture in Excel Sheet [Method 1]
Using .Pictures.Insert() method, you can insert a picture in Active sheet. Let see the Syntax of this method:
Syntax of .Pictures.Insert Method
[highlight color=”yellow”]ActiveSheet.Pictures.Insert(‘Picture URL’)[/highlight]
This function requires only one parameter – Full path of the picture to be inserted in Excel Sheet. This is a mandatory parameter here.
For Example:
ActiveSheet.Pictures.Insert(“C:….myPic.jpg”)
Above statement will simply insert myPic.jpg picture in Active sheet in its original Size.
If you want to resize and locate the picture according to you, then use the following statement to resize the image and place it where ever you want in the excel sheet.
1. VBA Code to re-size (height and width) the inserted picture
Below code will set the height and width of the selected picture in worksheet which is inserted using VBA code:
    With ActiveSheet.Pictures.Insert("Picture full path")
        .Left = 110
        .Top = 220
        .Width = 123
        .Height = 134
    End With
Explanation and issues with above Code
Left and Top will be set without any issue.
Later, Width of the image will be set to 123 as specified – Height of the image will be automatically set to a respective height to the width – because AspectRatio of the image is by default set to True
Similarly when control goes to the next statement then it will reset the height to 134 and since, aspect ratio is false, width will be adjusted to new respective value.
Challenge here is that you can NOT set AspectRatio flag of the picture while inserting it. (by above statement)
Therefore, be careful while resizing the picture while inserting it by using the above code
So what is the solution?
Here is the solution…
1. first add the picture in its own size.
2. Store the name of this image (uniquely generated one) in a variable. So that you can refer this picture uniquely later on
3. Using this variable, select that Shape and set the aspect ratio to false
4. Then set the height and width of the picture.
Here is the code now…
    Dim nameOfPicture as String
    With ActiveSheet.Pictures.Insert("Picture file full path")
        .Left = ActiveSheet.Range("photograph").Left + 2
        .Top = ActiveSheet.Range("photograph").Top + 2
        nameOfPicture= .Name
    End With
    ActiveSheet.Pictures(profile).Select
    With Selection.ShapeRange
        .LockAspectRatio = msoFalse
        .Width = 123
        .Height = 134
    End With
2. VBA Code to set the location of the inserted Picture
Here you can either set fixed Left and Top value where you want to place your picture. In this case no matter what is the height and width of the cell in the worksheet, your picture will be always placed at a specific location. But suppose if you want – your picture should always be placed at a specific row and column then you can set the left and top values as follows:
    With ActiveSheet.Pictures.Insert(<path of your picture in local drive>)
        .Left = ActiveSheet.Range("A1").Left
        .Top = ActiveSheet.Range("A1").Top
        .Placement = 1
    End With
Now your selected picture will always be placed where Column A1 starts from left and Row 1 starts from top. It means even if you change height or width of the Range A1, your picture is always going to be in Range A1 only.
Warning!
This method, simply links the image in to your Excel Sheet. It means, after inserting a picture, using this method, if you send it to another computer, picture will not be displayed and an Error message be displayed.
Therefore, this method is good only when you are going to use this excel sheet always in your own computer.
VBA Code for Embedding Picture in Excel Sheet [Method 2]
Using .Shapes.AddPicture() method, you can insert a picture in Active sheet. This method overcome the challenges of above method. This allows user to Embed the picture with the Excel Workbook itself. It means, even if you share the workbook to other computer… this picture will go with the document and you will be able to see it in other computer as well.
Syntax of .Shapes.AddPicture Method
[highlight color=”yellow”].Shapes.AddPicture( Filename , LinkToFile , SaveWithDocument , Left , Top , Width , Height )[/highlight]
Where:
Filename : (Mandatory) As the names suggests, this is the complete file path of the picture you want to embed to your Excel Sheet
LinkToFile : (Mandatory) MsoTriState- True or False – To set whether you want to create a link to the file?
SaveWithDocument : (Mandatory) MsoTriState – True or False – This is the flag which needs to be set to TRUE to embed the picture with Excel Sheet.
Left : (Mandatory)The position of the upper-left corner of the picture with respect to the upper-left corner of the document.
Top : (Mandatory) The position (in points) of the upper-left corner of the picture with respect to the top of the document.
Width : (Mandatory) The width of the picture you want to set. To keep the picture in its original width provide -1
Height : (Mandatory) The Height of the picture you want to set. To keep the picture in its original Height provide -1
Example:
Following VBA code will Embed this picture with the Excel file and it will display in any computer you sent it.
ActiveSheet.Shapes.AddPicture _
Filename:="full path of your file with extension", _
linktofile:=msoFalse, savewithdocument:=msoCTrue, _
Left:=50, Top:=50, Width:=250, Height:=250
Info !
Therefore .Shapes.AddPicture Method can insert a picture with and without links just simply by passing some flags.
For your practice I have created an Excel workbook which you can download and play around.
VBA Code Insert Picture – Sample Workbook
While it is not often that we have to control pictures or images within Excel, based on the number of Google searches for this topic, it’s clearly something people want to know more about. This post serves as a reference to cover most of the scenarios we’re likely to encounter to copy, insert, move, delete and control pictures.
This code can be used in conjunction with my post about using a user defined function to insert and change pictures based on a cell value, which can be found here: https://exceloffthegrid.com/automatically-change-picture/
Download the example file
I recommend you download the example file for this post. Then you’ll be able to work along with examples and see the solution in action, plus the file will be useful for future reference.
![]()
Download the file: 0042 VBA copy insert, move, delete pictures.zip
Adapting the code to your needs
It is unlikely that any of the codes will meet your exact requirements. Every code snippet uses variables to hold either the image, the worksheet, a range or an object. By changing those variables, the code can easily be changed and combined with other code snippets to meet your specific requirements.
Insert an image into a worksheet
The following code will insert an image into the active cell of the active worksheet, keeping the original image’s size.
Sub InsertImage()

Dim ws As Worksheet
Dim imagePath As String
Dim imgLeft As Double
Dim imgTop As Double

Set ws = ActiveSheet
imagePath = "C:UsersmarksDocumentsmyImage.png"
imgLeft = ActiveCell.Left
imgTop = ActiveCell.Top

'Width & Height = -1 means keep original size
ws.Shapes.AddPicture _
    fileName:=imagePath, _
    LinkToFile:=msoFalse, _
    SaveWithDocument:=msoTrue, _
    Left:=imgLeft, _
    Top:=imgTop, _
    Width:=-1, _
    Height:=-1

End Sub
Depending on our needs, it may be better to create an image straight into an object variable. Then we can refer to the image by using the variable and do not need to know the name of the image. The following code is an example of this technique.
Sub InsertImageToDeclaredVariable()

Dim myImage As Shape
Dim ws As Worksheet
Dim imagePath As String
Dim imgLeft As Double
Dim imgTop As Double

Set ws = ActiveSheet
imagePath = "C:UsersmarksDocumentsmyImage.png"
imgLeft = ActiveCell.Left
imgTop = ActiveCell.Top

Set myImage = ws.Shapes.AddPicture( _
    Filename:=imagePath, _
    LinkToFile:=msoFalse, _
    SaveWithDocument:=msoTrue, _
    Left:=imgLeft, _
    Top:=imgTop, _
    Width:=-1, _
    Height:=-1)

'Use the variable for the created image
MsgBox myImage.Name

End Sub
Image names
The code below will display the name of the last inserted image.
The message box is to illustrate that the code works. Once we have captured the shape as an object in the real world, we would perform other actions on the shape.
Sub GetNameOfLastInsertedImage()

Dim myImage As Shape

Set myImage = ActiveSheet.Shapes(ActiveSheet.Shapes.Count)

MsgBox myImage.Name

End Sub
The code below renames an existing image.
Sub RenameImage()

Dim myImage As Shape
Dim ws As Worksheet

Set ws = ActiveSheet
Set myImage = ws.Shapes("Picture 2")

myImage.Name = "New Image Name"

End Sub
Get image properties
The following code demonstrates how to retrieve common image properties
Sub GetImageProperties()

Dim myImage As Shape
Dim ws As Worksheet

Set ws = ActiveSheet
Set myImage = ws.Shapes("Picture 1")

MsgBox "Top: " & myImage.Top & vbNewLine & _
    "Left: " & myImage.Left & vbNewLine & _
    "Width: " & myImage.Width & vbNewLine & _
    "Height: " & myImage.Height & vbNewLine & _
    "Z-Order: " & myImage.ZOrderPosition & vbNewLine & _
    "Name: " & myImage.Name & vbNewLine & _
    "Top Left Cell: " & myImage.TopLeftCell & vbNewLine

End Sub
Delete an image
The following code will delete an image called Picture 1 from the active worksheet.
Sub DeleteImage()

Dim myImage As Shape
Dim ws As Worksheet

Set ws = ActiveSheet
Set myImage = ws.Shapes("Picture 1")

myImage.Delete

End Sub
Make images invisible
Images can be made invisible. They still exist and are part of the workbook, but they are not visible to the user.
Sub MakeImageInvisible()

Dim myImage As Shape
Dim ws As Worksheet

Set ws = ActiveSheet
Set myImage = ws.Shapes("Picture 1")

myImage.Visible = msoFalse

'Make the image visible again
'myImage.Visible = msoTrue

End Sub
Loop through all images on a worksheet
The following code will loop through all the images on the active sheet.
Sub LoopThroughImagesOnWs()

Dim shp As Shape
Dim ws As Worksheet

Set ws = ActiveSheet

For Each shp In ws.Shapes

    If shp.Type = msoPicture Then

        'Do something to the image
        'Example, show message box
        MsgBox shp.Name & " is a picture"

    End If

Next shp

End Sub
Delete an image
The code below will delete a specific named picture.
Sub DeletePicture()

Dim myImage As Shape

Set myImage = ActiveSheet.Shapes("Picture 1")

myImage.Delete

End Sub
Confirm if the selected object is a picture
The code below will check if a specific object is a Picture.
Sub CheckIfSelectionIsPicture()

Dim thing As Object
Set thing = Selection

If TypeName(thing) = "Picture" Then
    MsgBox "Selection is a picture"
Else
    MsgBox "Selection is NOT a picture"
End If

End Sub
Linked pictures
Images can be linked to cells or named ranges. This makes the image dynamic; when the contents of the cells change, so does the picture.
Sub MakeImageLinkedPicture()

Dim ws As Worksheet

Set ws = ActiveSheet

ws.Pictures("Picture 1").Formula = "=A1:D10"

End Sub
Image placement and locking options
Image behavior can be controlled using the placement option.
Sub ImagePlacementAndLockingOptions()

Dim myImage As Shape
Dim ws As Worksheet

Set ws = ActiveSheet
Set myImage = ws.Shapes("Picture 1")

'Image placement options
myImage.Placement = xlFreeFloating
'The other placement options are:
'xlMoveAndSize
'xlMove

'Locking images (prevent editing image when worksheet protected)
myImage.Locked = True
'The other placement options are:
'myImage.Locked = False

End Sub
Rotate images
The following code rotates the image by a specific amount
Sub RotateImageIncremental()

Dim myImage As Shape
Dim rotationValue As Integer

Set myImage = ActiveSheet.Shapes("Picture 1")
rotationValue = 45

'Rotate the image by the amount specified by the rotationValue
myImage.IncrementRotation (rotationValue)

End Sub
The following code rotates the image to a specific amount.
Sub RotateImageAbsolute()

Dim myImage As Shape
Dim rotationValue As Integer

Set myImage = ActiveSheet.Shapes("Picture 2")
rotationValue = 90

'Rotate the image to the amount specified by the rotationValue
myImage.rotation = rotationValue

End Sub
Set image position to the center of a cell
An image is positioned based on the top and left of that image. The following code will set the position so that it appears centered within a specific cell.
Sub CenterInCell()

Dim myImage As Shape
Dim cellLocation As Range

Set myImage = ActiveSheet.Shapes("Picture 1")
Set cellLocation = ActiveSheet.Range("B4")

myImage.Top = cellLocation.Top + (cellLocation.Height / 2) - (myImage.Height / 2)
myImage.Left = cellLocation.Left + (cellLocation.Width / 2) - (myImage.Width / 2)

End Sub
Flipping an image horizontally or vertically
Flip the image horizontally:
Sub FlipImageHorizontal()

Dim myImage As Shape
Set myImage = ActiveSheet.Shapes("Picture 1")

myImage.Flip msoFlipHorizontal

End Sub
Flip the image vertically:
Sub FlipImageVertical()

Dim myImage As Shape
Set myImage = ActiveSheet.Shapes("Picture 1")

myImage.Flip msoFlipVertical

End Sub
Resize an image
The code below locks the aspect ratio; therefore, resizing the width or height will maintain the image’s proportions.
Sub ResizeImageLockAspectRatio()

Dim myImage As Shape
Dim imageWidth As Double

Set myImage = ActiveSheet.Shapes("Picture 1")
imageWidth = 100

myImage.LockAspectRatio = msoTrue
myImage.Width = imageWidth

End Sub
When setting the aspect ratio to msoFalse, the height and width operate independently.
Sub ResizeImageHeightOrWidth()

Dim myImage As Shape
Dim imageWidth As Double
Dim imageHeight as Double

Set myImage = ActiveSheet.Shapes("Picture 1")
imageWidth = 100
imageHeight = 50

myImage.LockAspectRatio = msoFalse
myImage.Width = imageWidth
myImage.Height = imageHeight

End Sub
The following code positions an image and stretches it to perfectly cover a specified range.
Sub StretchImageToCoverCells()

Dim myImage As Shape
Dim ws As Worksheet
Dim rng As Range

Set ws = ActiveSheet
Set myImage = ws.Shapes("Picture 1")
Set rng = ws.Range("A2:D10")

myImage.LockAspectRatio = msoFalse

myImage.Left = rng.Left
myImage.Top = rng.Top
myImage.Width = rng.Width
myImage.Height = rng.Height

End Sub
Cropping
The code below crops an image based on the distance from the top, left, bottom or right.
Sub CropImage()

Dim myImage As Shape
Set myImage = ActiveSheet.Shapes("Picture1")

myImage.PictureFormat.CropLeft = 50
myImage.PictureFormat.CropTop = 50
myImage.PictureFormat.CropRight = 50
myImage.PictureFormat.CropBottom = 50

End Sub
Changing Z-Order
The image can be moved forward or backward within the stack of objects (known as the Z-Order).
Sub ChangeZOrderRelative()

Dim myImage As Shape

Set myImage = ActiveSheet.Shapes("Picture 1")

myImage.ZOrder msoBringForward

'Alternative send backward
'myImage.ZOrder msoSendBackward

End Sub
The Z-Order position cannot be set directly. First, send the image to the back, then move the image forward with a loop. Continue looping until the image reaches the correct Z-Order Position.
Sub ChangeZOrderAbsolute()

Dim myImage As Shape
Dim imageWidth As Double
Dim imageZPosition As Integer

Set myImage = ActiveSheet.Shapes("Picture 1")
imageZPosition = 3

'Force z-order to zero then bring forward
myImage.ZOrder msoSendToBack

Do While myImage.zOrderPosition < imageZPosition

    myImage.ZOrder msoBringForward

Loop

End Sub
Set the background image
The background image appears behind the cells in the spreadsheet.
Sub SetImageBackground()

Dim ws As Worksheet
Dim imgPath As String

Set ws = ActiveSheet
imgPath = "C:UsersmarksDocumentsmyImage.png"

ws.SetBackgroundPicture fileName:=imgPath

'Remove the background image
'ws.SetBackgroundPicture fileName:="

End Sub
Save picture from Excel
If we have a picture in an Excel workbook, there is no straightforward way to save it to disk as a picture. A common workaround is to set the picture as the background of a chart area, then export the chart as an image.
Sub SavePictureFromExcel()

Dim myPic As Shape
Dim tempChartObj As ChartObject
Dim savePath As String

Set myPic = ActiveSheet.Shapes("Picture 1")
Set tempChartObj = ActiveSheet.ChartObjects.Add(0, 0, myPic.Width, myPic.Height)
savePath = "C:UsersmarksDownloadsmySavedPic.jpg"

'Copy picture into chart, then export chart
myPic.Copy

tempChartObj.Chart.ChartArea.Select
tempChartObj.Chart.Paste
tempChartObj.Chart.Export savePath
tempChartObj.Delete

End Sub
Conclusion
In this post we have provided over 25 examples to demonstrate how to insert, delete, move and control pictures with VBA. Checkout the other posts on this site which use these techniques:
- 3 ways to change or insert images based cell values
- Creating custom Map Charts using shapes and VBA

About the author
Hey, I’m Mark, and I run Excel Off The Grid.
My parents tell me that at the age of 7 I declared I was going to become a qualified accountant. I was either psychic or had no imagination, as that is exactly what happened. However, it wasn’t until I was 35 that my journey really began.
In 2015, I started a new job, for which I was regularly working after 10pm. As a result, I rarely saw my children during the week. So, I started searching for the secrets to automating Excel. I discovered that by building a small number of simple tools, I could combine them together in different ways to automate nearly all my regular tasks. This meant I could work less hours (and I got pay raises!). Today, I teach these techniques to other professionals in our training program so they too can spend less time at work (and more time with their children and doing the things they love).
Do you need help adapting this post to your needs?
I’m guessing the examples in this post don’t exactly match your situation. We all use Excel differently, so it’s impossible to write a post that will meet everybody’s needs. By taking the time to understand the techniques and principles in this post (and elsewhere on this site), you should be able to adapt it to your needs.
But, if you’re still struggling you should:
- Read other blogs, or watch YouTube videos on the same topic. You will benefit much more by discovering your own solutions.
- Ask the ‘Excel Ninja’ in your office. It’s amazing what things other people know.
- Ask a question in a forum like Mr Excel, or the Microsoft Answers Community. Remember, the people on these forums are generally giving their time for free. So take care to craft your question, make sure it’s clear and concise. List all the things you’ve tried, and provide screenshots, code segments and example workbooks.
- Use Excel Rescue, who are my consultancy partner. They help by providing solutions to smaller Excel problems.
What next?
Don’t go yet, there is plenty more to learn on Excel Off The Grid. Check out the latest posts: