
Returns a MAPIFolder
object that represents the default folder of the requested type for the current profile, for example, obtains the default Calendar folder for the user who is currently logged on.
Note To return a specific non-default folder, use the Folders
collection.
expression.GetDefaultFolder(FolderType)
expression Required. An expression that returns a NameSpace
object.
FolderType Required OlDefaultFolders. The type of default folder to return.
| OlDefaultFolders can be one of these OlDefaultFolders constants. |
| olFolderCalendar |
| olFolderContacts |
| olFolderDeletedItems |
| olFolderDrafts |
| olFolderInbox |
| olFolderJournal |
| olFolderNotes |
| olFolderOutbox |
| olFolderSentMail |
| olFolderTasks |
| olPublicFoldersAllPublicFolders |
| olFolderJunk |
Example
This Visual Basic for Applications (VBA) example uses the CurrentFolder
property to change the displayed folder to the user’s default Calendar folder.
Sub ChangeCurrentFolder()
	Dim myolApp As Outlook.Application
	Dim myNamespace As Outlook.NameSpace
	Set myolApp = CreateObject("Outlook.Application")
	Set myNamespace = myolApp.GetNamespace("MAPI")
	Set myolApp.ActiveExplorer.CurrentFolder = _
	myNamespace.GetDefaultFolder(olFolderCalendar)
End Sub
If you use Microsoft Visual Basic Scripting Edition (VBScript) in a Microsoft Outlook form, you do not create the Application
object, and you cannot use named constants. This example shows how to perform the same task using VBScript code.
Set myNameSpace = Application.GetNameSpace("MAPI")
Set Application.ActiveExplorer.CurrentFolder = _
myNameSpace.GetDefaultFolder(9)
This VBA example returns the first folder in the Tasks Folders collection.
Sub DisplayATaskFolder()
Dim myolApp As Outlook.Application
Dim myNamespace As Outlook.NameSpace
Dim myTasks As Outlook.MAPIFolder
Dim myFolder As Outlook.MAPIFolder
Set myolApp = CreateObject("Outlook.Application")
Set myNamespace = myolApp.GetNamespace("MAPI")
Set myTasks = myNamespace.GetDefaultFolder(olFolderTasks)
Set myFolder = myTasks.Folders(1)
myFolder.Display
End Sub
Last reviewed on April 8, 2021 390 Comments
This code sample uses a default Outlook folder:
Sub Whatever()
  Dim Ns As Outlook.NameSpace

  Set Ns = Application.GetNamespace("MAPI")

'use the default folder
Set Items = Ns.GetDefaultFolder(olFolderCalendar).Items

'do whatever

End Sub
To use a folder at the same level as the Default folders (such as Calendar, Inbox etc), use this in place of Set Items = Ns.GetDefaultFolder(olFolderCalendar).Items, where SharedCal is the folder name:
Set Items = Session.GetDefaultFolder(olFolderCalendar).Parent._
     Folders("SharedCal").Items
When the folder is a subfolder under the default Calendar folder, use this instead:
Set Items = Session.GetDefaultFolder(olFolderCalendar)._
  Folders("SharedCal").Items
To use the currently selected folder, you’ll need to use:
Set Items = Application.ActiveExplorer.CurrentFolder.Items
Use a folder in another pst or mailbox
To use a specific folder in another data file in the profile, you need to use a function. Call the function in your macro in this manner, where GetFolderPath is the function name:
Set Items = GetFolderPath("New PSTTest Cal").Items

After adding the function to ThisOutlookSession:
Function GetFolderPath(ByVal FolderPath As String) As Outlook.Folder
    Dim oFolder As Outlook.Folder
    Dim FoldersArray As Variant
    Dim i As Integer

    On Error GoTo GetFolderPath_Error
    If Left(FolderPath, 2) = "\" Then
        FolderPath = Right(FolderPath, Len(FolderPath) - 2)
    End If
    'Convert folderpath to array
    FoldersArray = Split(FolderPath, "")
    Set oFolder = Application.Session.Folders.item(FoldersArray(0))
    If Not oFolder Is Nothing Then
        For i = 1 To UBound(FoldersArray, 1)
            Dim SubFolders As Outlook.Folders
            Set SubFolders = oFolder.Folders
            Set oFolder = SubFolders.item(FoldersArray(i))
            If oFolder Is Nothing Then
                Set GetFolderPath = Nothing
            End If
        Next
    End If
    'Return the oFolder
    Set GetFolderPath = oFolder
    Exit Function

GetFolderPath_Error:
    Set GetFolderPath = Nothing
    Exit Function
End Function
Use a shared folder (Exchange mailbox)
To access a shared folder in another user’s Exchange server mailbox, you need to use GetSharedDefaultFolder to reference the mailbox, after resolving the address to the folder. If the shared folder was opened from a sharing invitation (or Open Other User’s folder command), you may need to use the method in the next section.
You can use the mailbox owner’s display name, alias, or email address when resolving the recipient.
  Dim NS As Outlook.NameSpace
  Dim objOwner As Outlook.Recipient

  Set NS = Application.GetNamespace("MAPI")
  Set objOwner = NS.CreateRecipient("maryc")
    objOwner.Resolve

 If objOwner.Resolved Then
   'MsgBox objOwner.Name
 Set newCalFolder = NS.GetSharedDefaultFolder(objOwner, olFolderCalendar)
 End If
To add an item to a folder in a shared mailbox, use Items.add:
Set objAppt = newCalFolder.Items.Add(olAppointmentItem)
Default Folder Names
The following are the default folder names to use when referencing Outlook’s default folders.
| Name | Value | Description |
|---|---|---|
| olFolderCalendar | 9 | Calendar folder |
| olFolderContacts | 10 | Contacts folder |
| olFolderDeletedItems | 3 | Deleted Items folder |
| olFolderDrafts | 16 | Drafts folder |
| olFolderInbox | 6 | Inbox folder |
| olFolderJournal | 11 | Journal folder |
| olFolderJunk | 23 | Junk E-Mail folder |
| olFolderNotes | 12 | Notes folder |
| olFolderOutbox | 4 | Outbox folder |
| olFolderSentMail | 5 | Sent Mail folder |
| olFolderSuggestedContacts | 30 | Suggested Contacts folder |
| olFolderTasks | 13 | Tasks folder |
| olFolderToDo | 28 | To Do folder |
| olPublicFoldersAllPublicFolders | 18 | All Public Folders folder in Exchange Public Folders store (Exchange only) |
| olFolderRssFeeds | 25 | RSS Feeds folder |
Access a Folder Opened from a Sharing Invitation
In order to access a folder received from a folder Invitation (or using Open Other User’s folder command), you need find the folder on the navigation pane. This will work with default folders opened using Open Other User’s Folder command or any folder shared from a sharing invitation.
    Dim objPane As Outlook.NavigationPane
    Dim objModule As Outlook.CalendarModule

    Set objPane = Application.ActiveExplorer.NavigationPane
    Set objModule = objPane.Modules.GetNavigationModule(olModuleCalendar)

    With objModule.NavigationGroups

        For g = 1 To .Count
        Set objGroup = .Item(g)

            For i = 1 To objGroup.NavigationFolders.Count
            Set objNavFolder = objGroup.NavigationFolders.Item(i)

' need to use the calendar name as displayed in calendar list
            If objNavFolder = "Philip Poremsky - Test" Then
             Set CalFolder = objNavFolder.Folder
            End If
            Next
        Next
    End With
Хитрости »
28 Ноябрь 2015 41330 просмотров
Сегодня я хотел бы поделиться очередным решением с использованием Outlook. Задача сохранить все файлы Excel, хранящиеся как вложения, из папки Входящие(Inbox) на диск. Решение достигается только применением кода на VBA. Код ниже не имеет практически никаких настроек — он просто сохраняет абсолютно все вложения Excel из папки Входящие(включая подпапки):
Sub SaveAttachedItemsFromOutlook()
    Dim objOutlApp As Object, oNSpace As Object, oIncoming As Object
    Dim oIncMails As Object, oMail As Object, oAtch As Object
    Dim IsNotAppRun As Boolean
    Dim sFolder As String, s As String
    'диалог запроса выбора папки с файлами
    With Application.FileDialog(msoFileDialogFolderPicker)
        If .Show = False Then Exit Sub
        sFolder = .SelectedItems(1)
    End With
    sFolder = sFolder & IIf(Right(sFolder, 1) = Application.PathSeparator, "", Application.PathSeparator)
    'отключаем обновление экрана, чтобы наши действия не мелькали
    Application.ScreenUpdating = False

    'подключаемся к Outlook
    On Error Resume Next
    Set objOutlApp = GetObject(, "outlook.Application")
    If objOutlApp Is Nothing Then
        Set objOutlApp = CreateObject("outlook.Application")
        IsNotAppRun = True
    End If
    'получаем доступ к папкам почты
    Set oNSpace = objOutlApp.GetNamespace("MAPI")
    'подключаемся к папке Входящие, почтового ящика по умолчанию
    Set oIncoming = oNSpace.GetDefaultFolder(6)
    'Удаленные ==> GetDefaultFolder(3)
    'Исходящие ==> GetDefaultFolder(4)
    'Отправленные ==> GetDefaultFolder(5)
    'Входящие ==> GetDefaultFolder(6)

    'получаем коллекцию писем Входящие(включая подпапки)
    Set oIncMails = oIncoming.Items
    'просматриваем каждое письмо
    For Each oMail In oIncMails
        'просматриваем каждое вложение письма
        For Each oAtch In oMail.Attachments
            'отбираем только файлы Excel
            If oAtch Like "*.xl*" Then
                s = GetAtchName(sFolder & oAtch)
               oAtch.SaveAsFile s
            End If
        Next
    Next
    'Если приложение Outlook было открыта кодом - закрываем
    If IsNotAppRun Then
        objOutlApp.Quit
    End If
    'очищаем переменные
    Set oIncMails = Nothing
    Set oIncoming = Nothing
    Set oNSpace = Nothing
    Set objOutlApp = Nothing
    'возвращаем ранее отключенное обновление экрана
    Application.ScreenUpdating = True
End Sub
'---------------------------------------------------------------------------------------
' Procedure : GetAtchName
' Purpose   : Функция получения уникального имени файла
'             если файл с именем s уже есть - добавляет номер в скобках
'---------------------------------------------------------------------------------------
Function GetAtchName(ByVal s As String)
    Dim s1 As String, s2 As String, sEx As String
    Dim lu As Long, lp As Long

    s1 = s
    lp = InStrRev(s, ".", -1, 1)
    If lp Then
        sEx = Mid(s, lp)
        s1 = Mid(s, 1, lp - 1)
    End If
    s2 = s
    lu = 0
    Do While (Dir(s2, 16) <> "")
        lu = lu + 1
        s2 = s1 & "(" & lu & ")" & sEx
    Loop
    GetAtchName = s2
End Function
Код необходимо поместить в стандартный модуль и запустить. Или скачать приложенный ниже файл — там уже есть и кнопка для запуска:
 Tips_GetOutlookAttach.xls (54,0 KiB, 3 278 скачиваний)
Макросы должны быть разрешены. Если не знаете что это такое — Что такое макрос и где его искать?
После запуска код попросит указать папку, в которую сохранять вложения. После этого все вложения, являющиеся файлами Excel, будут сохранены в указанную папку. Если имена каких-то вложений совпадают, то к имени файла в скобках добавляется номер (х).
Код имеет некоторые недостатки:
- нет возможности отобрать какие-то другие файлы, кроме Excel. Это легко исправить, если в строке If oAtch Like «*.xl*» Then вместо «xl*» указать нужное расширение. Например «*.png» или «*.gif»
- нет возможности выбрать папку для просмотра вложений — просматриваются абсолютно все письма папки Входящие учетной записи по умолчанию. Но можно указать только папку, отличную от Входящих: Удаленные, Исходящие, Отправленные — в коде есть комментарий с числовыми константами этих папок. Но в этих папках как правило вложения не просматривают
- и самый большой недостаток — нельзя выбрать учетную запись Outlook, для которой просматривать Входящие. Просмотр возможен исключительно в учетной записи, установленной по умолчанию
Именно из-за наличия такого количества недостатков я написал другой код — более сложный. Приводить в статье его не буду, т.к. он состоит из нескольких модулей и формы пользователя — проще будет скачать файл ниже и посмотреть. Вот как он выглядит в работе:

Как работает: скачиваете файл
Tips_GetOutlookAttach_Advanced.xls (91,5 KiB, 4 095 скачиваний)
После открытия файла нажимаете на кнопку и появляется форма(как на картинке выше).
В левом списке формы уже будут отображены все учетные записи Outlook. Необходимо выбрать нужную. После выбора учетной записи в правом списке отобразятся все папки, созданные для этой учетной записи в папке Входящие. Если выбрать одну или несколько папок, то будут просматриваться вложения исключительно в выбранных папках. Если ничего не выбрать — программа уточнит, действительно ли не планировалось выбирать ни одной папки и надо ли просматривать абсолютно все письма только в папке Входящие(исключая подпапки).
Просматривать все папки — если установлен, то вложения будут просматриваться во всех письмах папки Входящие(включая все подпапки).
Выберите папку для сохранения вложений — кнопкой справа от поля выбирается папка, в которую надо сохранить все найденные вложения.
Отбирать вложения — указываются маски для типов файлов, которые необходимо отбирать. По умолчанию установлена маска «*.*» — отбирать все файлы. Однако можно указать любой тип файлов. Например, если указать «*.jpeg» — будут отобраны исключительно рисунки с расширением .jpeg. Если необходимо отбирать файлы более одного типа, то все маски можно перечислить через прямую черту — |. Например, чтобы отобрать все файлы Word, Excel и PowerPoint следует указать такую маску: «*.doc*|*.xl*|*.ppt*». Тут есть и еще один нюанс — таким образом можно указать маску не только форматов, но и имен файлов. К примеру, чтобы отобрать только файлы Excel, содержащие в имени слово «отчет» необходимо задать такую маску: «*отчет*.xl*».
После нажатия СОХРАНИТЬ ВЛОЖЕНИЯ внизу формы отобразится информационное окно, показывающее в какой папке идет поиск вложений и каков прогресс выполнения операции поиска в этой папке(на картинке это зеленая полоса внизу формы). Если имена каких-то вложений совпадают, то к имени файла в скобках добавляется номер (х).
В обоих кодах и файлах используется обращение к индексам папок, которые используются в Outlook по умолчанию:
Удаленные ==> GetDefaultFolder(3)
Исходящие ==> GetDefaultFolder(4)
Отправленные ==> GetDefaultFolder(5)
Входящие ==> GetDefaultFolder(6)
но здесь кроется маленький нюанс: порядок папок на некоторых ПК может отличаться(как правило это либо на серверных версиях, либо вследствие вмешательства в структуру папок). Поэтому, если отбор из папок не идет — можно попробовать найти нужную следующим кодом:Sub FindIncomingFolder() Dim objOutlApp As Object, oNSpace As Object, i As Long On Error Resume Next Set objOutlApp = GetObject(, "outlook.Application") If objOutlApp Is Nothing Then Set objOutlApp = CreateObject("outlook.Application") End If Set oNSpace = objOutlApp.GetNamespace("MAPI") For i = 1 To 50 MsgBox i & " = " & oNSpace.GetDefaultFolder(i) Next End SubТогда достаточно будет запустить код и посмотреть какому номеру в показываемых сообщениях соответствует папка Входящие(Incoming).
Так же см.:
Сохранить вложения из Outlook
Как отправить письмо из Excel?
Вставить в письмо Outlook таблицу Excel с форматированием
Вставить в письмо подпись из Outlook через VBA
Как отправить письмо от другой учетной записи Outlook
Статья помогла? Поделись ссылкой с друзьями!
![]() Видеоуроки
Видеоуроки
Поиск по меткам
Access
apple watch
Multex
Power Query и Power BI
VBA управление кодами
Бесплатные надстройки
Дата и время
Записки
ИП
Надстройки
Печать
Политика Конфиденциальности
Почта
Программы
Работа с приложениями
Разработка приложений
Росстат
Тренинги и вебинары
Финансовые
Форматирование
Функции Excel
акции MulTEx
ссылки
статистика
ки CDO (о ней — в разд. 13.8), на использование объектной модели
Outlook.
GetSharedDefaultFolder() — этот метод делает то же, что и
GetDefaultFolder(), но применяется тогда, когда у пользователя в Outlook кроме своего ящика открыты еще и почтовые ящики других пользователей. Метод позволяет получить ссылку, например, на папку Inbox в другом почтовом ящике.
Logon() — позволяет установить соединение по протоколу MAPI (т. е. установить соединение с Exchange Server). В качестве необязательных параметров принимает имя почтового профиля, параметр, определяющий, показывать ли пользователю диалоговое окно выбора профиля и т. п. Разрыв соединения производится при помощи метода Logoff().
PickFolder() — открывает диалоговое окно Выбор папки. Если пользователь выбрал папку в этом окне и нажал OK, то возвращается объект MAPIFolder для выбранной папки.
Обычно, когда мы программным образом работаем с Outlook, нам нужно чтото сделать с его элементами — почтовыми сообщениями, контактами, встречами в календаре и т. п. Все эти элементы расположены в папках Outlook (либо встроенных, либо созданных пользователем). Папкам в объектной модели Outlook соответствуют объекты MAPIFolder, которые сведены в коллек-
цию Folders.
В Outlook папки могут быть вложены друг в друга. На самом верху расположены папки верхнего уровня (это не Входящие, Контакты, Черновики и т. п., как вы могли подумать, а папки более высокого уровня, например,
Личные папки, Общие папки, Mailbox — Administrator). Доступ к кол-
лекции Folders, представляющей собой папки самого верхнего уровня, производится через свойство Folders объекта Namespace (см. разд. 13.4):
Dim oOutlook As New Outlook.Application
Dim oNameSpace As Outlook.NameSpace
Dim oFolder As Outlook.MAPIFolder
Set oNameSpace = oOutlook.GetNamespace(«MAPI»)
For Each oFolder In oNameSpace.Folders
Debug.Print oFolder.Name
Next
Если вам нужна конкретная встроенная папка, например Inbox, то проще всего найти ее при помощи метода GetDefaultFolder() объекта Namespace:
|
Программирование в Outlook |
339 |
Dim oOutlook As New Outlook.Application
Dim oNameSpace As Outlook.NameSpace
Dim oFolder As Outlook.MAPIFolder
Set oNameSpace = oOutlook.GetNamespace(«MAPI»)
Set oFolder = oNameSpace.GetDefaultFolder(olFolderInbox)
Debug.Print oFolder.Name
Очень часто требуется пройти циклом по всем папкам в почтовом ящике Outlook (а иногда даже в нескольких ящиках), просмотреть все сообщения в каждой папке (и во всех вложенных папках) и что-то сделать с этими сообщениями, например, собрать все письма от определенного отправителя, разбросанные по разным папкам, в одну специальную. В нашем примере мы просто пройдем циклом по всем папкам Outlook и выведем их имена, но, конечно, этот пример несложно переделать так, чтобы он выполнял какоенибудь действие над ними в зависимости от условия. В нашем случае удобнее всего использовать две процедуры, одна из которых будет вызывать саму себя:
Public Sub StartProc1()
Dim oOutlook As New Outlook.Application
Dim oNamespace As Outlook.NameSpace
Dim oChildFolder As Outlook.MAPIFolder
Set oNamespace = oOutlook.GetNamespace(«MAPI»)
‘Перебираем каждую папку верхнего уровня и ‘вызываем для нее процедуру DoFolder()
For Each oChildFolder In oNamespace.Folders DoFolder oChildFolder
Next
End Sub
‘Эта процедура выводит имя всех сложенных папок и ‘для каждой из них опять вызывает саму себя
Public Sub DoFolder(ByVal oFolder As MAPIFolder)
Dim oChildFolder As Outlook.MAPIFolder
For Each oChildFolder In oFolder.Folders Debug.Print oChildFolder.Name
‘Для каждой вложенной папки опять вызываем процедуру DoFolder() DoFolder oChildFolder
Next
End Sub
Далее представлена информация о свойствах и методах коллекции Folders и
объекта MAPIFolder.
У коллекции Folders свойства и методы стандартные, как и у большинства коллекций (Count, Item(), Add(), Remove() и т. п.). Зато у объекта MAPIFolder
важных свойств и методов очень много.
Самые важные свойства объекта MAPIFolder приведены в следующем списке.
AddressBookName — позволяет поменять имя папки с контактами для отображения в адресной книге пользователя. Для других папок применяться не может (вернется ошибка).
CurrentView — возвращает объект View, который определяет, как отображается данная папка для пользователя. Для объекта MAPIFolder это свойство доступно только для чтения.
DefaultItemType — это свойство позволяет вернуть (в виде константного значения) тип элемента папки по умолчанию (почтовое сообщение, контакт и т. п.). Это свойство определяется при создании папки и после изменено быть не может. Обычно это свойство используется для исключения каких-то папок из обработки (чтобы, например, не искать почтовые сообщения в папке с контактами).
DefaultMessageClass — то же самое, что и DefaultItemType, но информация возвращается не в виде числа, а в виде строкового значения. Выбирайте, что вам удобнее.
Description — просто описание папки. При использовании графического интерфейса Outlook доступно через свойства папки.
EntryID — это свойство очень удобно использовать как уникальный идентификатор сообщения, который создается автоматически при появлении сообщения в любом MAPI-совместимом хранилище (например, в файле Outlook или в почтовом ящике Exchange Server) и изменяется только при переносе в другое хранилище.
FolderPath — полный путь к папке в иерархии хранилища Outlook, напри-
мер, «\Личные папкиВходящие».
Folders — очень важное свойство, которое возвращает коллекцию вложенных папок для данной папки. Как уже говорилось, очень часто используется для того, чтобы пройти циклом по всему дереву папок.
InAppFolderSyncObject — определяет, будет ли эта папка синхронизироваться при работе специальной группы синхронизации (объекта SyncObject) под названием Application Folders. Эта группа синхронизации (она видна через меню Сервис | Отправить/Получить) отличается тем, что только ее можно изменять программным образом.
IsSharePointFolder — позволяет определить, находится ли эта папка с контактами или элементами календаря на Windows SharePoint Services
|
Программирование в Outlook |
341 |
(для обеспечения коллективной работы). Обычно используется для проверок.
Items — еще одно важнейшее свойство. Обеспечивает доступ к коллекции Items всех элементов данной папки. Подробнее про работу с элементами папок — в разд. 13.6.
Name — это, конечно, имя папки.
ShowAsOutlookAB — определяет, показывать ли содержимое папки с элементами типа Контакты в окне выбора адреса при создании почтового сообщения. По умолчанию для всех папок с Контактами это свойство установлено в True. Обычно используется только тогда, когда какая-то папка с контактами используется для служебных целей.
ShowItemCount — определяет, что будет показываться в строке сообщений приложения Outlook для папки: ничего, общее количество всех сообщений или общее количество только непрочитанных сообщений.
StoreID — MAPI-совместимый уникальный идентификатор хранилища, в котором находится данная папка. Выглядит как очень длинная строка (516 символов). Можно использовать для распознавания, например, нескольких почтовых ящиков Exchange.
UnReadIemCount — количество непрочитанных сообщений для данной папки. Доступно только для чтения.
Views — возвращает коллекцию объектов View (режимов отображения), которые ассоциированы с данной папкой.
WebViewOn — позволяет включить для папки отображение в виде HTMLстраницы (которая может быть совершенно посторонней и никак не связанной с элементами Outlook и с самой этой папкой). Страница, которую нужно отобразить, задается при помощи свойства WebViewURL. Эту возможность можно включить и в графическом интерфейсе на вкладке Домашняя страница свойств папки.
То, что делают методы CopyTo(), MoveTo(), Delete(), AddToFavorites(),
Display(), — понятно из их названий. Метод GetExplorer() позволяет вернуть объект Explorer, представляющий эту папку в Проводнике Outlook.
13.6. Коллекция Items
и объекты элементов Outlook
Работа с элементами папок (почтовыми сообщениями, контактами, элементами календаря и т. п.) — это обычно самая важная часть программ, исполь-
зующих объектную модель Outlook. Именно с ними и приходится выполнять различные операции.
Доступ к элементам папок чаще всего производится через свойство Items объекта MAPIFolder, которое возвращает коллекцию Items. В этой коллекции находятся все элементы данной папки. Однако единого объекта для них не предусмотрено. Вместо этого в вашем распоряжении 16 отдельных объектов для каждого вида элементов в Outlook.
AppointmentItem — то, что на графическом интерфейсе русского Outlook называется Встречей. Этот элемент обычно находится в папке Кален-
дарь.
ContactItem — это контакт. Создавать новые контакты программным образом приходится очень часто.
DistList — это еще один элемент, который обычно находится в папке Контакты. Он представляет собой список рассылки.
DocumentItem — это любой файл, который помещен внутрь хранилища Outlook и не совпадает по своему формату ни с одним другим элементом Outlook. Объектом DocumentItem может быть, например, документ Word,
книга Excel, ZIP-архив, файл Acrobat Reader PDF, исполняемый EXE-файл и т. п. — в общем, любой файл операционной системы. Однако увлекаться хранением файлов в хранилищах Outlook (файлах PST, а также в почтовых ящиках и общих папках Exchange Server), конечно, не стоит. Это замедлит доступ к обычным элементам Outlook. Такая возможность изначально была предусмотрена для того, чтобы, например, в общей папке Outlook для проекта вместе с перепиской по нему хранить также и различные, относящиеся к нему файлы.
JournalItem — это запись в дневнике.
MailItem — наиболее привычный многим элемент. Представляет собой сообщение электронной почты.
MeetingItem — приглашение на встречу (специальный тип электронного сообщения). Обычно встречается там же, где и обычные сообщения электронной почты, например, в папке Inbox. Создать программным образом этот элемент невозможно — он создается только автоматически при получении соответствующего сообщения (отправить его можно при помощи объекта AppointmentItem, что соответствует элементу Встреча в Кален-
даре).
NoteItem — объект заметки (из папки Заметки). От всех других элементов отличается минимальным количеством свойств и методов.
|
Программирование в Outlook |
343 |
PostItem — еще одна специальная разновидность почтового сообщения. Это сообщение, которое отправлено в общую папку. От обычного объекта MailItem отличается тем, что:
•встречается только в общих папках;
•для его отправки вместо метода Send() используется метод Post().
RemoteItem — тоже очень специальная разновидность почтового сообщения. Этот объект представляет собой почтовое сообщение с минимальным количеством заполненных свойств (заполнена может быть только информация о получателе, отправителе, дате получения и размере сообщения) и текстом сообщения, в котором находятся первые 256 символов письма. Эти объекты создаются автоматически в тех ситуациях, когда Outlook подключается к почтовому ящику на сервере Exchange Server через соединение удаленного доступа (обычно коммутируемое). Если сообщение находится в файле OST (т. е. скачано с того же сервера Exchange Server по MAPI или получено по протоколу POP3/IMAP4), то этот объект никогда для него не создается.
ReportItem — специальное почтовое сообщение, представляющее собой специально сгенерированное служебное письмо: обычно это сообщение о невозможности доставки (non-delivery report), созданное вашим почтовым сервером, о задержке в передаче сообщения или о другой ошибке. Эти объекты также нельзя создавать программным образом, они создаются только автоматически при получении сообщения такого типа.
TaskItem — это задача или поручение из папки Задачи.
TaskRequestAcceptItem, TaskRequestDeclineItem, TaskRequestItem, TaskRequestUpdateItem — это специальные почтовые сообщения, которые относятся к переписке по поводу делегирования задач. Эти объекты также нельзя создавать программным образом.
Надо сказать, что в подавляющем большинстве случаев вас будут интересовать только объекты MailItem, ContactItem и иногда DocumentItem. На их рассмотрении мы и сосредоточимся.
И еще один очень важный момент. Как уже говорилось ранее, в объектную модель Outlook встроены специальные ограничения, которые призваны не дать вирусам использовать возможности этой объектной модели в своих интересах. Как правило, это самые важные свойства, в которых содержится информация об адресах электронной почты, имени отправителя, тексте писем и т. п. Эти ограничения встроены в следующие объекты: AppointmentItem, ContactItem, MailItem и TaskItem, т. е. во все основные объекты элементов Outlook. Ограничения наложены и на некоторые действия, которые могут выполняться с этими объектами, например, на отправку писем. Так, создание
344 Глава 13
и отправка электронного сообщения средствами Outlook выглядит очень просто:
Dim oOutlook As New Outlook.Application Dim oMessage As Outlook.MailItem ‘Создаем объект сообщения
Set oMessage = oOutlook.CreateItem(olMailItem) ‘Кому
oMessage.To = «Administrator@nwtraders.msft» ‘Тема сообщения
oMessage.Subject = «Привет из VBA»
‘Текст сообщения. Использование свойства Body означает, ‘что мы посылаем сообщение обычным текстом.
‘Можно также послать сообщение в формате HTML или RTF oMessage.Body = «Текст сообщения»
‘Добавляем вложение
oMessage.Attachments.Add («C:installlog.txt») ‘Отправляем сообщение
oMessage.Send
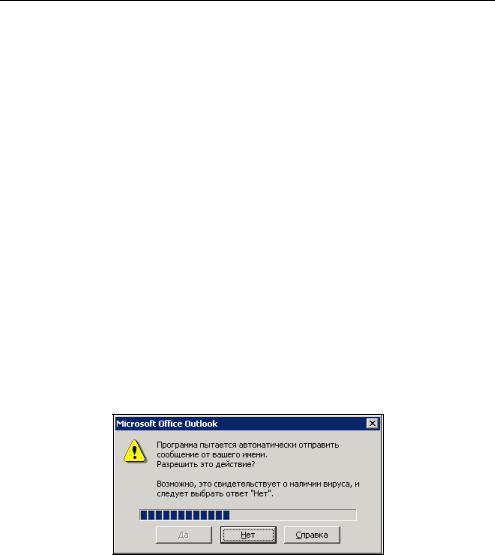
Однако чтобы усложнить жизнь вирусам, вместо простой отправки сообщения появляется окно, аналогичное представленному на рис. 13.3. Более того, чтобы добиться окончательной победы над вирусами, кнопка Да на протяжении нескольких секунд будет недоступна.
Рис. 13.3. Предупреждающее окно в Outlook
Что же делать в такой ситуации? Варианты могут быть разными:
первый вариант — отправлять сообщение из макроса, который находит-
ся в модуле VBA самого Outlook (без программного открытия Outlook). В этом случае такое окно появляться не будет. Но такое решение обычно не очень удобно, особенно с точки зрения переноса этого программного кода для запуска на разных компьютерах;
|
Программирование в Outlook |
345 |
второй вариант — использовать специальные заменители объектов
Outlook, которые не выдают таких сообщений и позволяют разработчикам отправлять сообщения из VBA без проблем. Самое распространенное и рекомендованное средство такого рода — Outlook Redemption. Получить информацию о нем и бесплатно скачать его можно с сайта http:// www.dimastr.com/redemption. Этот вариант вполне удобен, если вы занимаетесь рассылкой электронной почты с одного сервера, но устанавливать его на все компьютеры, конечно, хлопотно;
третий вариант — программным образом обнаруживать окна подтверждений и также программно нажимать в них нужные кнопки. Однако разработчики Microsoft позаботились о том, чтобы из кода VBA или VBScript сделать это было невозможно. В принципе, такие операции вполне можно выполнить при помощи низкоуровнего программного интерфейса Windows API (или, как вариант, получить доступ к этим возможностям при помощи специальных средств специального программного интерфейса для работы с сообщениями MAPI). Однако вам придется использоваться вместо VBA другими языками программирования (C++ или Delphi), поскольку VBA не поддерживает все нужные типы данных для работы с API. Кроме того, для уверенной работы с API требуются специальные знания в области системного программирования. Дополнительную информацию об использовании таких приемов при работе с Outlook
можно получить из статьи http://www.mapilab.com/ru/support/articles /vb_outlook_security_1.html (на русском языке);
четвертый вариант (с моей точки зрения наиболее удобный) — использо-
вать для рассылки и программной обработки входящих писем объектную библиотеку CDO, которая есть на любом компьютере под управлением Windows 2000, XP и 2003. Подробнее о применении этой библиотеки будет рассказано в разд. 13.8.
Теперь о самих объектах элементов Outlook. Свойств и методов у этих объектов очень много (например, у объекта ContactItem почти 100 свойств), и на рассмотрение всех их потребовалось бы очень много времени. Тем не менее большинство свойств этих объектов очевидны и проблем при их использовании возникнуть не должно. Обычно единственный вопрос, который может возникнуть, — какое программное свойство соответствует определенному атрибуту элемента. К сожалению, макрорекордера в Outlook не предусмотрено, но понять, как называется то или иное свойство, можно при помощи окна Locals. Его использование рассмотрим на примере. Пусть вам нужно найти, какому программному свойству объекта ContactItem соответствует поле
Краткое имя.
Первое, что нам нужно сделать, — это создать контакт, в котором было бы заполнено данное свойство, например, строкой «Краткое имя» (рис. 13.4).

Рис. 13.4. Создаем контакт
Следующее, что нужно сделать, — написать программный код, в котором был бы создан объект данного элемента. Например, если этот контакт находится в папке Контакты, то код (из макроса в Outlook) может быть таким:
Dim oNamespace As NameSpace
Dim oFolder As MAPIFolder
Dim oContactItem As ContactItem
Set oNamespace = Application.GetNamespace(«MAPI»)
Set oFolder = oNamespace.GetDefaultFolder(olFolderContacts)
Set oContactItem = oFolder.Items(«Контакт1»)
Stop
Команда Stop здесь предназначена для того, чтобы остановиться в нужном месте.
Затем нужно запустить код на выполнение и, когда он остановится на последней строке, открыть (при помощи меню View) окно Locals.
В нашем случае вы увидите в нем четыре объекта (рис. 13.5).
Конечно же, нам нужно развернуть узел объекта oContactItem и поискать его свойство, для которого установлено значение «Краткое имя». К своему
Соседние файлы в предмете [НЕСОРТИРОВАННОЕ]
- #
- #
- #
- #
- #
- #
- #
- #
- #
- #
- #
Automate Microsoft Outlook from Excel, using VBA
—————————————————————————————————————————————
Contents:
Create a new instance of the Outlook application and Create an instance of a NameSpace object variable
Reference Existing Outlook Folders and Create New Folders, in Automation
Create New Outlook Items and Reference Outlook Items, in Automation
—————————————————————————————————————————————
In this section it is explained how to Automate Outlook from Excel, with practical examples and codes, and topics include: Automate using Early Binding and Late Binding, Create a new instance of the Outlook application, Create an instance of a NameSpace object variable, Reference Existing Outlook Folders and Create New Folders in Automation, Create New Outlook Items and Reference Existing Outlook Items in Automation, Outlook Contact item and the default Contacts folder, Mail item in Outlook and the default Inbox folder, relevant vba methods used in automation viz. Application.GetNamespace Method, Items.Add Method, Application.CreateItem Method, and so on.
The first steps in Automation are to create a new instance of the Outlook application (ie. the application object) and to create an instance of a NameSpace object variable, to access existing Outlook items.
Create a new instance of the Outlook application:
When you use vba in an Office Application, say Outlook, a reference to the Outlook Object Library is set by default. When you Automate to work with Outlook objects from another application, say Excel, you can add a reference to the Outlook object library in Excel (your host application) by clicking Tools-References in VBE, which will enable using Outlook’s predefined constants. This is a must when you automate using Early Binding (explained earlier). Once this reference is added, a new instance of Outlook application can be created by using the New keyword.
Automate Outlook from Excel, using Late Binding: You need not add a reference to the Outlook object library in Excel (your host application), in this case you will not be able to use the Outlook’s predefined constants and will need to replace them by their numerical values in your code. In Late Binding, the object variable is declared as an Object Type which can be a reference to any object, and this makes an object late bound. In Late Binding, the object library is not exposed during design-time, but the binding happens during run-time using the CreateObject or the GetObject functions. CreateObject creates a new instance of Outlook and GetObject returns an already running instance of the Outlook object.
Click here for a detailed explanation of Automation using Early Binding and Late Binding.
Use the Application.GetNamespace Method to create an instance of a NameSpace object variable, to access existing Outlook items:
MAPI (Messaging Application Programming Interface) is a proprietary email protocol of Microsoft, used for development of Microsoft Outlook messaging applications. All information is stored in MAPI folders by Outlook. You can interact with the data stored in Outlook by setting a Namespace object to MAPI. The Namespace object provides methods to access data sources, and the only supported data source is MAPI.
Use the Application.GetNamespace Method to return the Outlook NameSpace object of type «MAPI»: ApplicationObjectVariable.GetNameSpace («MAPI»). Doing this will allow access to all Outlook data. The GetNameSpace method has the same affect as the Application.Session Property which can alternatively be used to create the Outlook NameSpace object for the current session.
Reference Existing Outlook Folders and Create New Folders, in Automation
We show how to reference existing Outlook folders and add new folders, with the help of practical examples/codes, as below. Remember to add a reference to the Outlook Object Library in Excel (your host application) by clicking Tools-References in VBE, which will enable using Outlook’s predefined constants.
NameSpace.GetDefaultFolder Method returns the default folder of the specified type.
NameSpace.GetDefaultFolder Method returns the default folder of the specified type. Outlook folder types include Calendar (for storing appointments), Contacts (for storing contact items), Inbox (for incoming e-mails), Tasks (for storing tasks), and so on. Though a user can create multiple folders of each type, it is usually convenient to store all information in the default folder ie. instead of creating multiple folders of the Contact type, all contacts are usually stored in the default Contacts folder.
Example 1: Return the default outlook folder of the specified type — automate using Early Binding.
Sub AutomateOutlook1()
‘Automate using Early Binding: Add a reference to the Outlook Object Library in Excel (your host application) by clicking Tools-References in VBE, which will enable using Outlook’s predefined constants. Once this reference is added, a new instance of Outlook application can be created by using the New keyword.
Dim applOutlook As Outlook.Application
Dim nsOutlook As Outlook.Namespace
Dim cfOutlook As Outlook.Folder
Dim ifOutlook As Outlook.Folder
‘Create a new instance of the Outlook application. Set the Application object as follows:
Set applOutlook = New Outlook.Application
‘use the GetNameSpace method to instantiate (ie. create an instance) a NameSpace object variable, to access existing Outlook items. Set the NameSpace object as follows:
Set nsOutlook = applOutlook.GetNamespace(«MAPI»)
‘assign the object variable cfOutlook to the default Contacts folder:
Set cfOutlook = nsOutlook.GetDefaultFolder(olFolderContacts)
MsgBox cfOutlook
‘assign the object variable ifOutlook to the default Inbox folder:
Set ifOutlook = nsOutlook.GetDefaultFolder(olFolderInbox)
MsgBox ifOutlook
End Sub
Example 2: Return the default outlook folder of the specified type — automate using Late Binding.
Sub AutomateOutlook2()
‘Automate Outlook from Excel, using Late Binding. You need not add a reference to the Outlook library in Excel (your host application), in this case you will not be able to use the Outlook’s predefined constants and will need to replace them by their numerical values in your code.
Dim applOutlook As Object
Dim nsOutlook As Object
Dim cfOutlook As Object
Dim ifOutlook As Object
‘Create a new instance of the Outlook application, if an existing Outlook object is not available. Set the Application object as follows:
On Error Resume Next
Set applOutlook = GetObject(, «Outlook.Application»)
‘if an instance of an existing Outlook object is not available, an error will occur (Err.Number = 0 means no error):
If Err.Number <> 0 Then
Set applOutlook = CreateObject(«Outlook.Application»)
End If
‘disable error handling:
On Error GoTo 0
‘use the GetNameSpace method to instantiate (ie. create an instance) a NameSpace object variable, to access existing Outlook items. Set the NameSpace object as follows:
Set nsOutlook = applOutlook.GetNamespace(«MAPI»)
‘assign the object variable cfOutlook to the default Contacts folder:
‘The numerical value of olFolderContacts is 10. The following code has replaced the Outlook’s built-in constant olFolderContacts by its numerical value 10.
Set cfOutlook = nsOutlook.GetDefaultFolder(10)
MsgBox cfOutlook
‘assign the object variable ifOutlook to the default Inbox folder:
‘The numerical value of olFolderInbox is 6. The following code has replaced the Outlook’s built-in constant olFolderInbox by its numerical value 6.
Set ifOutlook = nsOutlook.GetDefaultFolder(6)
MsgBox ifOutlook
End Sub
Example 3: Refer a subfolder of a default folder type by name or index number.
Sub AutomateOutlook3()
Dim applOutlook As Outlook.Application
Dim nsOutlook As Outlook.Namespace
Dim cfOutlook As Outlook.Folder
Dim csfOutlook As Outlook.Folder
Set applOutlook = New Outlook.Application
Set nsOutlook = applOutlook.GetNamespace(«MAPI»)
Set cfOutlook = nsOutlook.GetDefaultFolder(olFolderContacts)
‘refer to a folder named «cont_1» which is a subfolder of the default Contacts folder (note that folder names are case-sensitive):
Set csfOutlook = cfOutlook.Folders(«cont_1»)
MsgBox csfOutlook
‘refer to the first folder which is a subfolder of the default Contacts folder.
Set csfOutlook = cfOutlook.Folders(1)
MsgBox csfOutlook
‘refer to the second folder which is a subfolder of the default Contacts folder.
Set csfOutlook = cfOutlook.Folders(2)
MsgBox csfOutlook
‘return the number of subfolders of the default Contacts folder:
MsgBox cfOutlook.Folders.Count
End Sub
Example 4: Refer a specific outlook folder by name and refer to subfolders going from up to down.
Sub AutomateOutlook4()
Dim applOutlook As Outlook.Application
Dim nsOutlook As Outlook.Namespace
Dim fOutlook As Outlook.Folder
Dim sf1Outlook As Outlook.Folder
Dim sf2Outlook As Outlook.Folder
Set applOutlook = New Outlook.Application
Set nsOutlook = applOutlook.GetNamespace(«MAPI»)
‘assign the object variable fOutlook to the «Personal Folders» folder:
Set fOutlook = nsOutlook.Folders(«Personal Folders»)
MsgBox fOutlook
‘»Friends» is a subfolder of «Personal Folders» folder:
Set sf1Outlook = fOutlook.Folders(«Friends»)
MsgBox sf1Outlook
‘»Friend_1″ is a subfolder of «Friends» folder:
Set sf2Outlook = sf1Outlook.Folders(«Friend_1»)
MsgBox sf2Outlook
‘return the number of subfolders in the «Personal Folders» folder:
MsgBox fOutlook.Folders.Count
End Sub
The Folders.Add Method creates new outlook folders.
Use the Folders.Add Method to create new folders. It is necessary to specify the first argument which is the name of the new folder. Not specifying the second argument of folder type will default to the same folder type in which it is created. With this method a new folder is created in the folders collection.
The Parent Property returns the Parent folder wherein the folder or item is located.
Example 5: Use the Folders.Add Method to create new folders, and the Parent Property to return the Parent folder.
Sub AutomateOutlook5()
Dim applOutlook As Outlook.Application
Dim nsOutlook As Outlook.Namespace
Dim fOutlook As Outlook.Folder
Dim sf1Outlook As Outlook.Folder
Dim sf2Outlook As Outlook.Folder
Dim pFolder As Outlook.Folder
Set applOutlook = New Outlook.Application
Set nsOutlook = applOutlook.GetNamespace(«MAPI»)
‘assign the object variable fOutlook to the «Personal Folders» folder:
Set fOutlook = nsOutlook.Folders(«Personal Folders»)
MsgBox fOutlook
‘use the Folders.Add Method to create a new folder «New Folder 1» in the «Personal Folders» folder:
Set sf1Outlook = fOutlook.Folders.Add(«New Folder 1»)
‘use the Folders.Add Method to create a new folder «New Folder 2» in the «New Folder 1» folder:
Set sf2Outlook = sf1Outlook.Folders.Add(«New Folder 2»)
‘Use the Parent Property to return the Parent folder of the «New Folder 1» folder:
Set pFolder = sf1Outlook.Parent
MsgBox pFolder
‘Use the Parent Property to return the Parent folder of the «New Folder 2» folder:
Set pFolder = sf2Outlook.Parent
MsgBox pFolder
End Sub
Create New Outlook Items and Reference Outlook Items, in Automation
Create a new Outlook item
We explain how a new Outlook item can be created using the Items.Add Method and the Application.CreateItem Method.
Forms: Contents of an Outlook item are viewed either in an explorer window, or through a form. For each item type (Contact, Appointment, Mail Message, etc) Outlook has a standard form(s), which is the principal user interface for the item wherein its content can be viewed or edited. Customized versions of these forms can be created wherein the item display can be modified.
MessageClass: An item is linked to the form where it is based, using the MessageClass property. An item’s message class identifies the form to be used or activated for displaying it. Message class is used to identify a form for: Email messages (IPM.Note), Contacts (IPM.Contact), Documents (IPM.Document), Appointments (IPM.Appointment), Distribution lists (IPM.DistList), Resending a failed message (IPM.Resend), and so on. Message class ID is mentioned in brackets.
Items.Add Method: By using the Items.Add Method you can create a new item based on any message class — this means that items can be created using the default Outlook item types (OlItemType constants) of olAppointmentItem, olContactItem, olJournalItem, olMailItem, olNoteItem, olPostItem, and olTaskItem, or any valid message class. With the Items.Add method, you can create new items using a custom form based on the specified MessageClass.
Example 6: Use the Items.Add Method to create a new Outlook contact item in the default Contacts folder, with or without using a Custom Form.
Sub AutomateOutlook6()
Dim applOutlook As Outlook.Application
Dim nsOutlook As Outlook.Namespace
Dim cFolder As Outlook.Folder
Dim cItem As Outlook.ContactItem
Set applOutlook = New Outlook.Application
Set nsOutlook = applOutlook.GetNamespace(«MAPI»)
‘set reference to the default Contacts folder where the new item is being created:
Set cFolder = nsOutlook.GetDefaultFolder(olFolderContacts)
‘Use the Items.Add method (message class for a custom form is specified) to add a new contact item, using the custom contact form called «custForm1». Remember that the custom form «custForm1» should already have been created.:
Set cItem = cFolder.Items.Add(«IPM.Contact.custForm1»)
‘Alternate 1: Use the Items.Add method (a default Outlook message class is specified) to add a new contact item, based on the standard/default contact form:
‘Set cItem = cFolder.Items.Add(«IPM.Contact»)
‘Alternate 2: Use the Items.Add method (OlItemType constant is specified) to add a new contact item, based on the standard/default contact Form:
‘Set cItem = cFolder.Items.Add(olContactItem)
‘Alternate 3: Use the Items.Add method (item type not specifically mentioned) to add a new contact item, based on the standard contact form. If the item type is not specified after Add, it defaults to its parent folder’s type:
‘Set cItem = cFolder.Items.Add
‘set properties of the new contact item:
With cItem
.Display
.FullName = «Alan Croft»
.Gender = olMale
.Email1Address = «alanalan1 @alan.com»
.Email1AddressType = «SMTP»
.Birthday = «March 02, 1977»
.Email2Address = «alanalan2 @alan.com»
.HomeAddressStreet = «Elm Street»
.HomeAddressCity = «Los Angeles»
.HomeAddressState = «California»
.HomeAddressCountry = «USA»
.HomeAddressPostalCode = «90001»
.Close olSave
End With
End Sub
Example 7: Use the Items.Add Method to create a new Outlook contact item in the default Contacts folder.
For live code of this example, click to download excel file.
Sub AutomateOutlook7()
Dim applOutlook As Outlook.Application
Dim nsOutlook As Outlook.Namespace
Dim cFolder As Outlook.Folder
Dim cItem As Outlook.ContactItem
Dim cItem1 As Outlook.ContactItem
Dim cItem2 As Outlook.ContactItem
Set applOutlook = New Outlook.Application
Set nsOutlook = applOutlook.GetNamespace(«MAPI»)
‘set reference to the folder where a new item is to be created:
Set cFolder = nsOutlook.GetDefaultFolder(olFolderContacts)
‘set an existing contact item, to copy some of its properties to the new item:
Set cItem1 = cFolder.Items(«Hutch Care»)
‘add a new contact item:
‘Note that it if the item type is not specified after Add [viz. Add(olContactItem)], it defaults to its parent folder’s type.
Set cItem2 = cFolder.Items.Add
‘check if contact name already exists in the contacts folder:
For Each cItem In cFolder.Items
If cItem.firstName = «Alan» And cItem.LastName = «Croft» Then
MsgBox «Name already exists»
Exit Sub
End If
Next
With cItem2
.Display
.firstName = «Alan»
.LastName = «Croft»
.CompanyName = «Alan Properties LLC»
.Email1Address = «alanalan1 @alan.com»
.HomeAddress = «Northridge, LA, CA, USA»
.BusinessAddress = «Ventura, LA, CA, USA»
.SelectedMailingAddress = olBusiness
.BusinessTelephoneNumber = «213-725-1234»
‘copy MobileTelephoneNumber from existing contact item (cItem1):
.MobileTelephoneNumber = cItem1.MobileTelephoneNumber
.Close olSave
End With
End Sub
Example 8: Use the Items.Add Method to create a new Outlook contact item in a specific Contacts folder.
Sub AutomateOutlook8()
Dim applOutlook As Outlook.Application
Dim nsOutlook As Outlook.Namespace
Dim cFolder As Outlook.Folder
Dim subFolder1 As Outlook.Folder
Dim cItem As Outlook.ContactItem
Set applOutlook = New Outlook.Application
Set nsOutlook = applOutlook.GetNamespace(«MAPI»)
‘set reference to the folder (named «cont») where a new item is to be created:
Set cFolder = nsOutlook.Folders(«Personal Folders»)
Set subFolder1 = cFolder.Folders(«cont»)
Set cItem = subFolder1.Items.Add(olContactItem)
With cItem
.Display
.firstName = «Alan»
.LastName = «Croft»
.CompanyName = «Alan Properties LLC»
.Email1Address = «alanalan1 @alan.com»
.HomeAddress = «Northridge, LA, CA, USA»
.BusinessAddress = «Ventura, LA, CA, USA»
.SelectedMailingAddress = olBusiness
.BusinessTelephoneNumber = «213-725-1234»
.MobileTelephoneNumber = «213-725-5678»
.Close olSave
End With
End Sub
CreateItem method: Using the CreateItem method, only default Outlook items (olAppointmentItem, olContactItem, olDistributionListItem, olJournalItem, olMailItem, olNoteItem, olPostItem, and olTaskItem) can be created. To use this method you must mention the only argument of the Outlook item type for the new item. To create a new Outlook item based on a custom form, use the Items.Add Method.
Example 9: Use the Application.CreateItem Method to create or return a new mail item in Outlook.
Sub AutomateOutlook9()
‘Note that this example opens and displays a new email message in Outlook, enters subject, body and attaches a file, but does not send a mail.
Dim applOutlook As Outlook.Application
Dim miOutlook As Outlook.MailItem
Set applOutlook = New Outlook.Application
‘create and display a new email item:
Set miOutlook = applOutlook.CreateItem(olMailItem)
‘set properties of the new mail item:
With miOutlook
.Display
.Subject = «Sending a Test Mail»
.Body = «Wish the best in learning Outlook Automation!»
‘attach a file from the specified folder:
.Attachments.Add («C:UsersAmit TandonDocumentsFriends.docx»)
End With
End Sub
Example 10: Use the Application.CreateItem Method to create a new contact Outlook item in the default Contacts folder.
Sub AutomateOutlook10()
‘Use the Application.CreateItem Method to create a new contact Outlook item in the default Contacts folder.
‘Using this method a new contact item is always created in the default Contacts folder.
Dim applOutlook As Outlook.Application
Dim cItem As Outlook.ContactItem
Set applOutlook = New Outlook.Application
‘create and display a new contact form for input, using the Application.CreateItem Method:
Set cItem = applOutlook.CreateItem(olContactItem)
With cItem
.Display
.firstName = «Alan»
.LastName = «Croft»
.CompanyName = «Alan Properties LLC»
.Email1Address = «alanalan1 @alan.com»
.HomeAddress = «Northridge, LA, CA, USA»
.BusinessAddress = «Ventura, LA, CA, USA»
.SelectedMailingAddress = olBusiness
.BusinessTelephoneNumber = «213-725-1234»
.MobileTelephoneNumber = «213-725-5678»
.Close olSave
End With
End Sub
Reference Existing Items in an Outlook Folder
Items collection represents all items contained in a folder, in which a specific item can be referenced by an Index value, for example, OutlookFolder.Items(1) refers to the first item in the collection. OutlookFolder.Items.Count will return the total number of items in the Folder. Specific items in a collection are referenced using an Index, which for example can be done with the For … Next vba statement, or the Do While … Loop vba statement. You can loop through all items in the collection without using an Index, with the For Each … Next vba statement.
Example 11: Use the For … Next vba statement to loop through (and delete) all items in the «Deleted Items» folder, using item Index.
Sub AutomateOutlook11()
‘Use the For … Next vba statement to loop through (and delete) all items in the «Deleted Items» folder, using item Index.
Dim applOutlook As Outlook.Application
Dim nsOutlook As Outlook.Namespace
Dim delFolder As Outlook.Folder
Dim delItems As Outlook.Items
Dim dItem As Object
Dim count As Long, n As Long
Set applOutlook = New Outlook.Application
Set nsOutlook = applOutlook.GetNamespace(«MAPI»)
‘set the default Deleted Items folder:
Set delFolder = nsOutlook.GetDefaultFolder(olFolderDeletedItems)
‘set the items collection:
Set delItems = delFolder.Items
‘determine number of items in the collection:
count = delItems.count
‘start deleting from the last item:
For n = count To 1 Step -1
delItems(n).Delete
Next n
‘Alternate Code: start deleting from the last item. Declare dItem as Object:
‘For n = count To 1 Step -1
‘Set dItem = delItems.Item(n)
‘dItem.Delete
‘Next n
‘Caution: Do not use the For Each … Next vba statement as below, to delete (or move) items because it cannot handle the updated collection (ie. number of items) on deletion of an item, and not all items will get deleted. It is best to use a loop which down counts, as in this example.
‘Dim dItem As Object
‘For Each dItem In delItems
‘dItem.Delete
‘Next
End Sub
Example 12: Use the Do While … Loop vba statement to loop through all items in the default Inbox folder, using item Index.
Sub AutomateOutlook12()
‘Use the Do While … Loop vba statement to loop through all items in the default Inbox folder, using item Index.
Dim applOutlook As Outlook.Application
Dim nsOutlook As Outlook.Namespace
Dim mFolder As Outlook.Folder
Dim mItems As Outlook.Items
Dim mItem As Outlook.MailItem
Dim count As Long, i As Long
Set applOutlook = New Outlook.Application
Set nsOutlook = applOutlook.GetNamespace(«MAPI»)
‘set the default Invbox folder:
Set mFolder = nsOutlook.GetDefaultFolder(olFolderInbox)
‘set the items collection:
Set mItems = mFolder.Items
i = 1
count = mItems.count
Do While i <= count
Set mItem = mItems.Item(i)
MsgBox mItem.Subject
i = i + 1
Loop
End Sub
Example 13: Use the For Each … Next vba statement to loop through all items in the Default Contacts folder, without using their Index. Each item is then posted to the specified Excel worksheet.
Sub AutomateOutlook13()
‘Use the For Each … Next vba statement to loop through all items in the Default Contacts folder, without using their Index. Each item is then posted to the specified Excel worksheet.
Dim applOutlook As Outlook.Application
Dim nsOutlook As Outlook.Namespace
Dim cFolder As Outlook.Folder
Dim cItems As Outlook.Items
Dim cItem As Outlook.ContactItem
Dim ws As Worksheet
‘set the worksheet:
Set ws = ActiveWorkbook.Sheets(«Sheet1»)
Set applOutlook = New Outlook.Application
Set nsOutlook = applOutlook.GetNamespace(«MAPI»)
‘set reference to the default Contact Items folder:
Set cFolder = nsOutlook.GetDefaultFolder(olFolderContacts)
‘set the items collection:
Set cItems = cFolder.Items
‘post each outlook item in the items collection, to a new worksheet row:
i = 0
For Each cItem In cItems
‘start posting in worksheet from the first row:
i = i + 1
ws.Cells(i, 1) = cItem.firstName
ws.Cells(i, 2) = cItem.LastName
ws.Cells(i, 3) = cItem.Email1Address
ws.Cells(i, 4) = cItem.MobileTelephoneNumber
Next
End Sub
Example 14: Reference an existing Outlook contact item, return and update its properties.
Sub AutomateOutlook14()
‘Reference an existing Outlook contact item, return and update its properties.
Dim applOutlook As Outlook.Application
Dim nsOutlook As Outlook.Namespace
Dim cFolder As Outlook.Folder
Dim cItem As Outlook.ContactItem
Set applOutlook = New Outlook.Application
Set nsOutlook = applOutlook.GetNamespace(«MAPI»)
‘set reference to the folder where the item is located:
Set cFolder = nsOutlook.Folders(«Personal Folders»).Folders(«Contacts»)
‘returns the number of items in the folder:
MsgBox cFolder.Items.count
‘find contact name in the folder:
For Each cItem In cFolder.Items
If cItem.FullName = «Alan Croft» Then
‘return the company name and email id of the contact item:
MsgBox «Company Name is » & cItem.CompanyName & «, and Email Id is » & cItem.Email1Address
‘replace existing email («alanalan1 @alan.com») with new email id («alanNew @alan.com»):
cItem.Email1Address = Replace(cItem.Email1Address, «alanalan1 @alan.com», «alanNew @alan.com»)
cItem.Save
MsgBox «done»
Exit Sub
End If
Next
End Sub
Find method: To search for a specific item in the items collection (ie. a specific folder) basis one of its values, use the Find method, and use the FindNext method for searching the next item based on the same value criteria.
Example 15: Using the Find Method, search a specific item in the default Contact Items folder basis one of its values.
Sub AutomateOutlook15()
‘Using the Find Method, search a specific item in the default Contact Items folder basis one of its values.
Dim applOutlook As Outlook.Application
Dim nsOutlook As Outlook.Namespace
Dim cFolder As Outlook.Folder
Dim cItems As Outlook.Items
Dim cItem As Outlook.ContactItem
Set applOutlook = New Outlook.Application
Set nsOutlook = applOutlook.GetNamespace(«MAPI»)
‘set reference to the default Contact Items folder:
Set cFolder = nsOutlook.GetDefaultFolder(olFolderContacts)
‘set the items collection:
Set cItems = cFolder.Items
‘find the contact item name «Alan Croft», in the folder:
Set cItem = cItems.Find(«[FullName]=«»Alan Croft»»»)
‘return properties of the contact item name «Alan Croft»:
MsgBox cItem.Email1Address
MsgBox cItem.MobileTelephoneNumber
End Sub
Example 16: Use the Find and FindNext methods to search the default Inbox folder for emails which have no subject, and return their received time, sender’s name, attachments and the total number of such mails.
For live code of this example, click to download excel file.
Sub AutomateOutlook16()
‘Use the Find and FindNext methods to search the default Inbox folder for emails which have no subject, and return their received time, sender’s name, attachments and the total number of such mails.
Dim applOutlook As Outlook.Application
Dim nsOutlook As Outlook.Namespace
Dim eFolder As Outlook.Folder
Dim eItems As Outlook.Items
Dim eItem As Outlook.MailItem
Dim att As Outlook.Attachment
Dim atts As Outlook.Attachments
Dim i As Long
Set applOutlook = New Outlook.Application
Set nsOutlook = applOutlook.GetNamespace(«MAPI»)
‘assign the object variable eFolder to the default Inbox folder:
Set eFolder = nsOutlook.GetDefaultFolder(olFolderInbox)
‘set the items collection:
Set eItems = eFolder.Items
‘search emails in Inbox folder which have no subject:
Set eItem = eItems.Find(«[Subject]=«»»»»)
‘loop through all emails in the folder:
For i = 1 To eItems.count
‘Check if mail item (without subject) is not found. TypeName function returns the data type information of a variable ex. MailItem. If the function returns «Nothing», it means that no object is currently assigned to the variable.
If TypeName(eItem) = «Nothing» Then
MsgBox «No more mail without a Subject!»
MsgBox «Total Mails found without a subject: » & i — 1
Exit Sub
End If
‘search result no. of the mail item being referenced:
MsgBox «Search Result No: » & i
’email received time:
MsgBox «Received Time: » & eItem.ReceivedTime
’email sender’s name:
MsgBox «Sender’s Name: » & eItem.SenderName
‘name of each attachment in a mail item:
Set atts = eItem.Attachments
For Each att In atts
MsgBox «Attachment: » & att.DisplayName
Next
‘search next mail item without a subject:
Set eItem = eItems.FindNext
Next i
MsgBox «Total Mails found without a subject: » & i — 1
End Sub
Restrict Method. Use the Find method to find a specific item in an Outlook folder. To get additional items matching the same criteris, use the FindNext method as shown above. The Restrict Method is used to return a collection of items meeting a specified criteria.
Example 17: Use the Restrict Method to return a collection of mail items meeting a specified criteria viz. whose Importance is set to High.
Sub AutomateOutlook17()
‘Use the Restrict Method to return a collection of mail items meeting a specified criteria viz. whose Importance is set to High.
Dim applOutlook As Outlook.Application
Dim nsOutlook As Outlook.Namespace
Dim eFolder As Outlook.Folder
Dim eItems As Outlook.Items
Dim eItem As Outlook.MailItem
Dim eResItems As Outlook.Items
Dim strCriteria As String
Set applOutlook = New Outlook.Application
Set nsOutlook = applOutlook.GetNamespace(«MAPI»)
‘assign the object variable eFolder to the default Inbox folder:
Set eFolder = nsOutlook.GetDefaultFolder(olFolderInbox)
‘set the items collection:
Set eItems = eFolder.Items
‘set criteria viz. Importance set to High:
strCriteria = «[Importance]=«»High»»»
‘set collection of items meeting the specified criteria:
Set eResItems = eItems.Restrict(strCriteria)
If eResItems.count < 1 Then
MsgBox «No Mail Item of High Importance»
Exit Sub
End If
For Each eItem In eResItems
’email received time:
MsgBox eItem.ReceivedTime
’email sender’s name:
MsgBox eItem.SenderName
’email subject:
MsgBox eItem.Subject
Next
End Sub