
|
Доброго времени суток! Прошу описать применение функцию «Set» на доступном языке Особенно интересует когда обязательно объявлять: Спасибо заранее! P.S. буду рад любому Вашему ответу, даже короткому |
|


|
Для переменных текстового, числового и логического типов SET не применяется. Для ОБЪЕКТОВ необходимо использовать оператор SET |
|
|
KuklP Пользователь Сообщений: 14868 E-mail и реквизиты в профиле. |
Всегда желательно в конце процедуры: Я сам — дурнее всякого примера! … |
|
И вообще, вас что, на Гугле забанили? По VBA есть куча справочников — в каждом описано различие между SET и LET Цитата: В VBA существует два основных типа инструкций присваивания Let и Инструкция Set присваивает ссылку на объект переменной или свойству |
|
|
Alex_ST  Пользователь Сообщений: 2746 На лицо ужасный, добрый внутри |
ИМХО, если переменная определена в процедуре (локальная), то время её жизни ограничено процедурой и по окончании процедуры (Exit Sub) все локальные переменные «умирают» и освобождают память. Поэтому Set «Переменная» = Nothing для локальных переменных делать не обязательно (конечно, если сама процедура не жутко жадная в смысле пожирания памяти) С уважением, Алексей (ИМХО: Excel-2003 — THE BEST!!!) |
|
The_Prist  Пользователь Сообщений: 14181 Профессиональная разработка приложений для MS Office |
{quote}{login=Alex_ST}{date=10.06.2010 11:29}{thema=}{post}Поэтому Set «Переменная» = Nothing для локальных переменных делать не обязательно (конечно, если сама процедура не жутко жадная в смысле пожирания памяти){/post}{/quote}Позвольте не согласиться. VBA редактор не такой уж продвинутый, как может показаться и он своими силами высвобождает память не всегда корректно. Он по идее должен все выгрузить, но такое происходит далеко не всегда. Лично я предпочитаю в большинстве случаев именно принудительно высвобождать память от подобных переменных, что и Вам советую. Даже самый простой вопрос можно превратить в огромную проблему. Достаточно не уметь формулировать вопросы… |
|
KuklP Пользователь Сообщений: 14868 E-mail и реквизиты в профиле. |
{quote}{login=Alex_ST}{date=10.06.2010 11:29}{thema=}{post}ИМХО, если переменная определена в процедуре (локальная), то время её жизни ограничено процедурой и по окончании процедуры (Exit Sub) все локальные переменные «умирают» и освобождают память. Поэтому Set «Переменная» = Nothing для локальных переменных делать не обязательно (конечно, если сама процедура не жутко жадная в смысле пожирания памяти){/post}{/quote} Я сам — дурнее всякого примера! … |
|
KuklP Пользователь Сообщений: 14868 E-mail и реквизиты в профиле. |
Ну вот, за Димой разве успеешь…. Могу только дополнить — не только в ВБА. ВБ5, ВБ6 тоже грешили этим. И сами разработчики рекомендовали делать ТАК явно. Я сам — дурнее всякого примера! … |
|
Alex_ST Пользователь Сообщений: 2746 На лицо ужасный, добрый внутри |
По поводу «правил хорошего тона» при программировании абсолютно с вами согласен. Это как ржавчина на кузове автомобиля: на скорость не влияет, но и самому смотреть противно, и похвастаться перед другими как-то стыдно… С уважением, Алексей (ИМХО: Excel-2003 — THE BEST!!!) |
|
EducatedFool, спасибо Вам за ответы, но зачем иронизировать или Вы не заметили «…на доступном языке»?! Спасибо Вам, Алексей, Дмитрий и Сергей! P.S. теперь все понятно и просто. |
|
|
KuklP Пользователь Сообщений: 14868 E-mail и реквизиты в профиле. |
Алекс, я покраснел прочитав: «к сожалению иногда грешат примерами без комментариев.» Правда, неудобно. Но я так и читаю чужой код. Не глядя на комменты. Самоучка — и так привык. С Вами абсолютно согласен(только вчера azam-у объяснял полезность комментов), но себя, боюсь, уже не исправлю:-( Я на этом форуме мнооооогому пытаюсь научиться. В первой строке списка доброта Юрий М, его умение общаться, не обижая других. Мне бы так. Ладно, что-то я совсем расчувствовался(это из мультика, не подумайте). Я сам — дурнее всякого примера! … |
|
слэн  Пользователь Сообщений: 5192 |
зря вы на goto ополчились коммменты, да, ленюсь писать, каюсь |
|
The_Prist Пользователь Сообщений: 14181 Профессиональная разработка приложений для MS Office |
Я тоже не понимаю, чем GoTo не угодил. Да, плохо смотрится, когда таких переходов куча и они используются нецелесообразно. Но иногда ведь действительно нужен этот переход и если без него, то наоборот, код смотрится более неграмотно и загроможденно, потому что приходится выдумать обходные пути. И не помню, чтобы кто-то рекомендовал его не использовать. Вывод: не брезгуйте этим оператором — он бывает весьма полезен и не вреден в умеренных количествах. Даже самый простой вопрос можно превратить в огромную проблему. Достаточно не уметь формулировать вопросы… |
|
The_Prist Пользователь Сообщений: 14181 Профессиональная разработка приложений для MS Office |
Мне лично комменты писать откровенно лень. Прописывать комменты бывает намного дольше, чем сами коды. Для себя я пишу с комментами, а в форум — лень…. P.S. Исправляться не собираюсь. Пока, во всяком случае. Даже самый простой вопрос можно превратить в огромную проблему. Достаточно не уметь формулировать вопросы… |
|
KuklP Пользователь Сообщений: 14868 E-mail и реквизиты в профиле. |
{quote}{login=слэн}{date=10.06.2010 12:52}{thema=}{post}зря вы на goto ополчились http://khpi-iip.mipk.kharkiv.edu/library/extent/dijkstra/pp/ewd215.html почитайте(прям сейчас нашел, не умею, как Дима, доходчиво объяснять) Я сам — дурнее всякого примера! … |
|
Hugo Пользователь Сообщений: 23249 |
Но что-то есть в этом GoTo… В AutoIt с 3-й версии его вообще убрали, тоже мучался, так я и не понял, как сподручнее обходить, местами вообще придуманный алгоритм менять приходилось… |
|
KuklP Пользователь Сообщений: 14868 E-mail и реквизиты в профиле. |
{quote}{login=Hugo}{date=10.06.2010 02:04}{thema=}{post}Но что-то есть в этом GoTo… В AutoIt с 3-й версии его вообще убрали, тоже мучался, так я и не понял, как сподручнее обходить, местами вообще придуманный алгоритм менять приходилось…{/post}{/quote} Я сам — дурнее всякого примера! … |
|
слэн Пользователь Сообщений: 5192 |
вот пример когда никак: on error goto вот пример, когда как, но не красиво и yt’aatrnbdyj^ for i=1 to n можно, конечно, функцией оформить, с использованием exit function, но на вызов функции тратится время |
|
{quote}{login=слэн}{date=10.06.2010 02:12}{thema=}{post} http://forum.ixbt.com/topic.cgi?id=23:31044 |
|
|
KuklP Пользователь Сообщений: 14868 E-mail и реквизиты в профиле. |
Слэн(хочу Вас все же называть с большой буквы), плохой пример. Во всех примерах мэтров программирования goto используется только для определения ошибки, с последующим Exit Sub. То есть goto на выход. И я в жизни не встречал ситуаций, когда нельзя было избежать его. Поначалу(это еще в 2000 где-то), напрягало, помню. Зато сейчас даже в мыслях не бывает. Вот так мозги перестроились. Прсто блок стоит. Я сам — дурнее всякого примера! … |
|
KuklP Пользователь Сообщений: 14868 E-mail и реквизиты в профиле. |
{quote}{login=Казанский}{date=10.06.2010 02:17}{thema=Re: }{post}{quote}{login=слэн}{date=10.06.2010 02:12}{thema=}{post} http://forum.ixbt.com/topic.cgi?id=23:31044 {/post}{/quote} Я сам — дурнее всякого примера! … |
|
слэн Пользователь Сообщений: 5192 |
вообщето алгоритм можно записать так: Sub t() что короче, яснее и быстрее но я уже приводил на форуме множество раз алгоритмы, с использованием on error goto ( и в паре с ним ще и просто goto) — да, можно сделать по-другому, но так быстрее.. зачем же делать хуже, но без goto ? |
|
слэн Пользователь Сообщений: 5192 |
можно еще так: Sub t() |
|
KuklP Пользователь Сообщений: 14868 E-mail и реквизиты в профиле. |
Слэн, Вы читаете, что я пишу? Я сам — дурнее всякого примера! … |
|
KuklP Пользователь Сообщений: 14868 E-mail и реквизиты в профиле. |
В слове anser буква W пропущена, но это уже флуд. Если честно — боюсь, Диме позавчера спать не давали, оффтопили по полной. Чувствую, психанет и начнет стирать все без разбора. А главное по делу! Хотя этот топик флудом не считаю. Мы, как программеры, обсуждаем целесообразность применения оператора goto. Я сам — дурнее всякого примера! … |
|
Эммм…мммм…а хорошая тема получилось Спасибо и за «GoTo» |
|
|
Alex_ST Пользователь Сообщений: 2746 На лицо ужасный, добрый внутри |
Ну, я бы не был так категоричен, утверждая, что обсуждение целесообразности применения оператора goto в топике с названием «Описание применения «Set»» не является оффтопом… С уважением, Алексей (ИМХО: Excel-2003 — THE BEST!!!) |
|
Alex_ST Пользователь Сообщений: 2746 На лицо ужасный, добрый внутри |
Да… А топик-стартер-то, оказывается, ещё не спит, а тему-то просматривает… С уважением, Алексей (ИМХО: Excel-2003 — THE BEST!!!) |
|
слэн Пользователь Сообщений: 5192 |
<но я уже приводил на форуме множество раз алгоритмы, с использованием on error goto ( и в паре с ним еще и просто goto)> вот пример из моего решателя балды: (уж поверьте — оптимизировал-оптимизировал Sub fnd(ByVal s$) pos = InStr(1, s, «?») |
|
KuklP Пользователь Сообщений: 14868 E-mail и реквизиты в профиле. |
#30 10.06.2010 15:37:39 To Alex_ST: Ну вот. пришел поручик Ржевский и все опошлил:-) Я сам — дурнее всякого примера! … |
Excel VBA Set
“Set”, is a keyword used in VBA programming to assign a reference to an object or cell range which is going to remain fix throughout the program or code in Excel. VBA Set basically helps us in avoiding repetitive input of range we need to select while executing the code. In excel, “Set” is mostly applied on worksheets/cell range in a particular sheet.
Syntax
Set object-name/variable = Object/Range
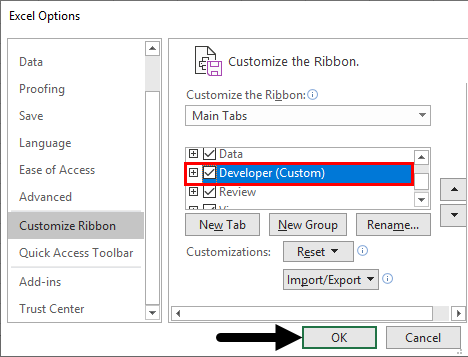
Note: You need to have Developer tab in the excel worksheet.
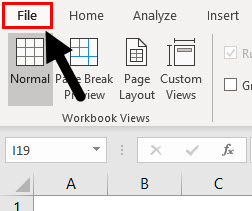
If you do not see the “Developer” tab in excel, refer below steps:
Step 1: Click on File Option.
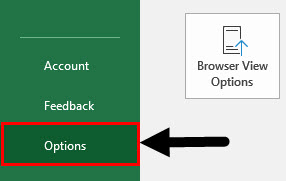
Step 2: Drop-down appears, Click on Options tab.
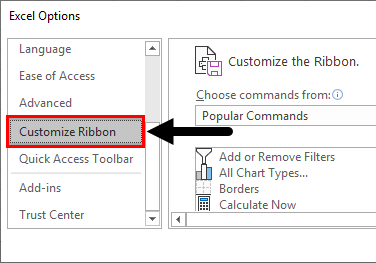
Step 3: Once you click on “Options”, a dialog box appears as shown below and click on the Customize Ribbon option.
Step 4: When we drag down in the customize ribbon options we will find an option for Developer we need to check that box which will enable us to use VBA in excel.
How to Use a Set Keyword in VBA?
Below are the different examples to use set keyword in Excel VBA.
You can download this VBA Set Excel Template here – VBA Set Excel Template
Excel VBA Set – Example #1
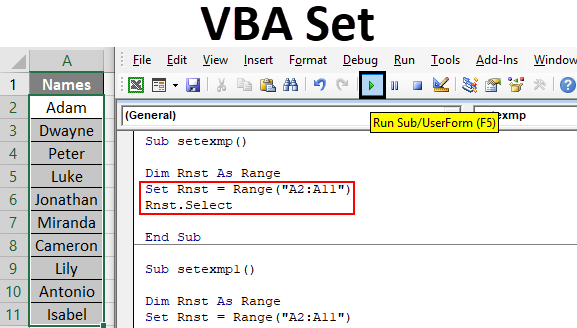
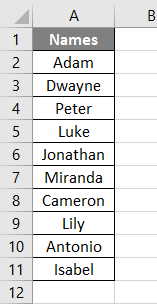
We shall take a simple example of a Set keyword in Excel VBA. Suppose we would like to select a range and set it as fix range so as to avoid the repetition. Below is the cell range containing the names:
Follow the below steps to use set keyword in Excel VBA:
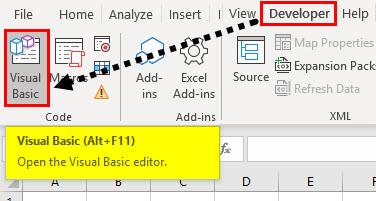
Step 1: Click on “Developer” tab and then click on the “Visual Basic” option on the left-hand side (first option) as shown below.
Once you click on it, a new window appears as shown below:
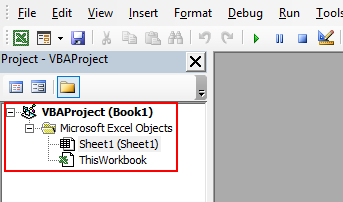
You will notice that it contains two tabs on the left-hand side, “Sheet1(Sheet1)” and “ThisWorkbook”. The only difference is “Sheet1” when you want to execute code for this particular sheet only and in “ThisWorkbook”, we can write a code and execute which can be applied for the whole excel workbook.
Step 2: Double Click on “Sheet1(Sheet1) and you will see a blank screen where we need to write the code. First, declare a subset as Sub name and press enter and you will see a subset created as shown below:
Code:
Sub setexmp()

End Sub
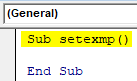
This is the way we create a subset and automatically “End Sub” appears. This is by default feature of excel. If “End Sub” does not appear the code will not execute and throw an error.
Step 3: Now, we shall declare variables to be used in the code.
Type Dim variable name and variable type. Here, the name will be like the identity of the range and type would be whether as Integer, Long, String, Range, etc.
Code:
Sub setexmp()

Dim Rnst As Range

End Sub
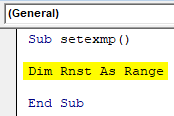
Here “Rnst” is a variable name and assign(As) it as Range function. This will alert the system that, a range selection would be done.
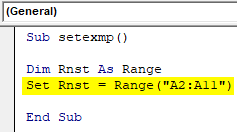
Step 4: Then type “Set” keyword and give a range using the format: Set variable = Range(“cell range”).
Code:
Sub setexmp()

Dim Rnst As Range
Set Rnst = Range("A2:A11")

End Sub
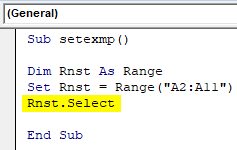
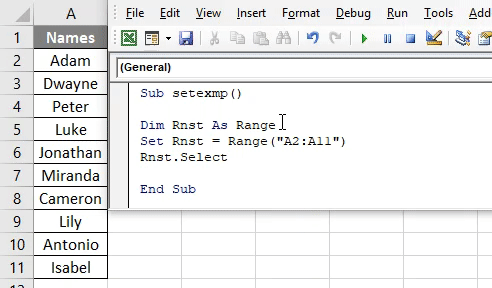
Step 5: We have to select this row range specified. Hence, type select as Rnst.Select Refer screenshot below:
Code:
Sub setexmp()

Dim Rnst As Range
Set Rnst = Range("A2:A11")
Rnst.Select

End Sub
Step 6: Run the code by hitting F5 or Run button and see the output.
It will select the Range specified which is from cells A2 to A11.
Excel VBA Set – Example #2
Suppose we want to paste these cells or range in another cell. We shall use the same code as above and add code for pasting that data in multiple columns.
Follow the below steps:
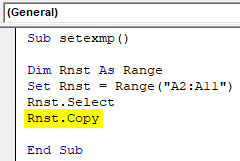
Step 1: Now we will copy the range of cells which is the name column. Type copy i.e. “Rnst.Copy”, when you type “Rnst.”a kind of drop-down appears. It contains various functions like copy, paste, etc.
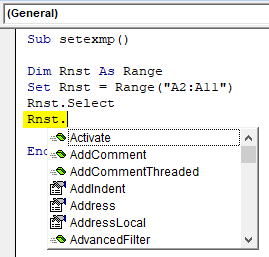
Step 2: You can scroll down and select the desired function you want to perform. Here just type “Copy” as shown in the screenshot below:
Code:
Sub setexmp()

Dim Rnst As Range
Set Rnst = Range("A2:A11")
Rnst.Select
Rnst.Copy

End Sub
Step 3: Compile the code by pressing F8 Key.
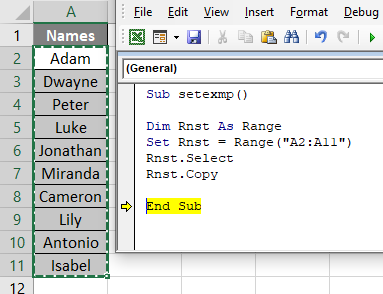
Once, you execute this copy function, you will see that in excel the range is copied and dotted lines appear around the cell range as shown below:
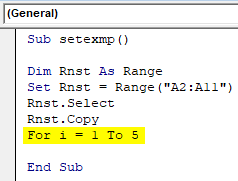
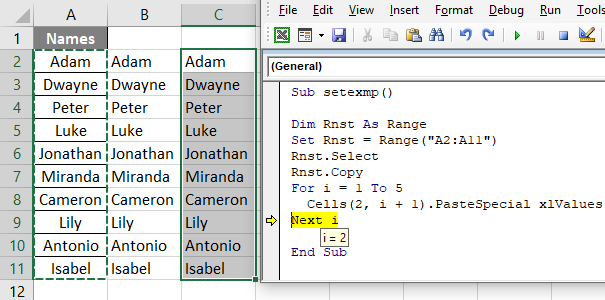
Step 4: Now, we need to paste this cells, say in adjacent columns one by one, so we need to use a loop function “For” and suppose 5 times we need to paste so we will type it as shown below:
For Integer i = 1 to 5 -> this specifies how many times we need to paste the data. If 5 then 1 to 5 else whichever count you prefer.
Code:
Sub setexmp()

Dim Rnst As Range
Set Rnst = Range("A2:A11")
Rnst.Select
Rnst.Copy
For i = 1 To 5

End Sub
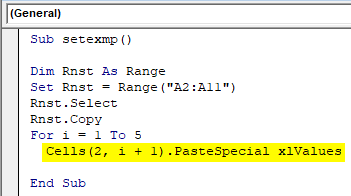
Step 5: Select a cell in which you want to paste this cell range. Suppose we want to start pasting from column B2 and then pasting the data should be dynamic i.e. it should automatically select adjacent columns one by one without overlapping. Hence, the syntax would be “Cell(row number, column number).PasteSpecial”.
Cells(2, i + 1).PasteSpecial, Here, 2-> represents the row number and, i+1 -> represents column number. i+1 means the first value of I declared in “For” loop is i=1, hence column value will become 2, it specifies that it start pasting from column B. And as and when i value increases it will keep selecting adjacent columns one by one.
Code:
Sub setexmp()

Dim Rnst As Range
Set Rnst = Range("A2:A11")
Rnst.Select
Rnst.Copy
For i = 1 To 5
  Cells(2, i + 1).PasteSpecial xlValues

End Sub
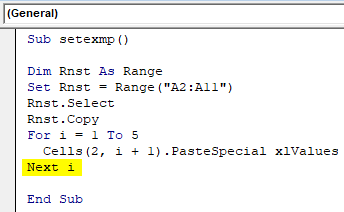
Step 6: Type “Next i” which means that you are increasing the value of “i” one by one so that the column pasting remains dynamic.
Code:
Sub setexmp()

Dim Rnst As Range
Set Rnst = Range("A2:A11")
Rnst.Select
Rnst.Copy
For i = 1 To 5
  Cells(2, i + 1).PasteSpecial xlValues
Next i

End Sub
Step 7: Press “F8” to see the code execute line by line and will show you the pasting of cell in adjacent columns one by one.
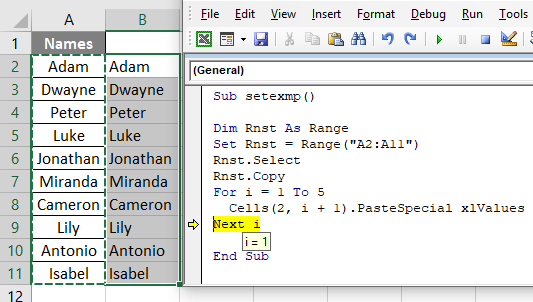
Here you can see the value of i is 1 and data has been pasted in column B as desired.
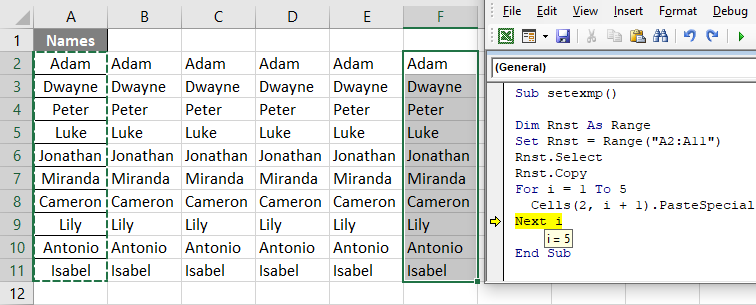
Step 8: Now when you press “F8” again you will see that now the value of i is 2. Hence, 2+1 will become 3 and data will be pasted in Cell (2,3) i.e. row value is same but column number changes as shown in the screenshot below:
After repeating loop completes you will see the data pasted 5 times i.e. from count 1 to 5 starting to paste from Column B till Column F as shown below:
Excel VBA Set – Example #3
Suppose we would like to show a count of the number of cells in that range in a message box appearing on click of a button. We shall take the same data as shown below.

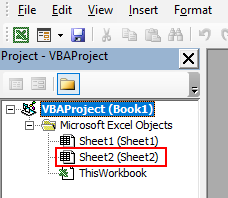
Also, we will run this example’s code in the new sheet. Hence, add a new sheet and in VBA window it will appear as below:
We will have to insert a command button option. It’s a feature of excel, so follow the below steps:
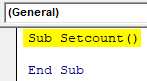
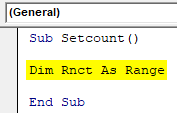
Step 1: Enter a subset name say “Setcount()” as shown in the screenshot below:
Code:
Sub Setcount()

End Sub
Step 2: Declare the same variable “Rnct” as a range in the subset as shown in the screenshot below:
Code:
Sub Setcount()

Dim Rnct As Range

End Sub
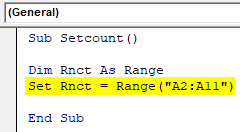
Step 3: Then type “Set” keyword and give a range.
Code:
Sub Setcount()

Dim Rnct As Range
Set Rnct = Range("A2:A11")

End Sub
Step 4: Now, after fixing the range, we need to see pop up box or dialog box showing the count of cells in the range. Hence, use “MsgBox” function which upon execution a count will appear in the dialog box. Type “MsgBox variable name.count”. The moment after typing the variable name then dot(.) a drop-down appears containing various functions and we would select “count” or manually type “count”.
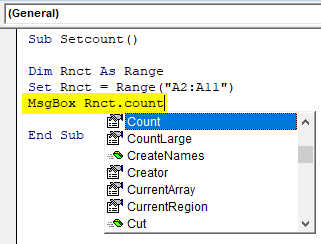
Type “MsgBox Rnct.count” and upon execution, it will appear count.
Step 5: Now, we want to insert a command button and on click, on that button that message box should appear.
Click on “Insert” in the “Developer” tab as highlighted in the red box and you will see a drop-down of category “Form Controls”. Click on the very first rectangle box-like shape which we will have to manually draw and insert in excel sheet:

Step 6: Upon click on the rectangle box, draw and insert the box in sheet and once you start drawing a dialog box appears as shown below. It’s an “Assign Macro” window button and select the “Setcount” subset macro. Click on “OK”.
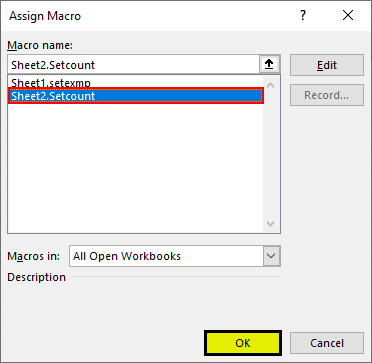
This signifies that we have assigned count macro to this button. And upon click, it will execute.
Step 7: It will appear as shown below in excel.
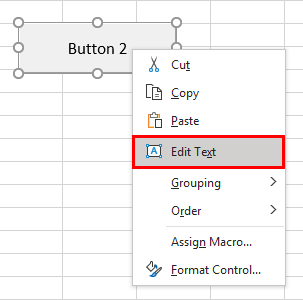
Step 8: Right-click on it and rename it using the “Edit Text” option as shown below:
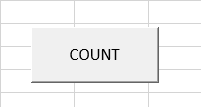
Step 9: Give it a name as “COUNT” and you will see it in excel as count as shown below.
Step 10: Then click on the “COUNT” button: Once you click on “COUNT” button a message box appears as shown below:
As we can see there are 10 names and have shown the correct number from range A2 to A11.
Things to Remember
- Make sure you have the “Developer” tab inserted in Excel ribbons to run this VBA codes.
- ‘Set’ is mostly applied on worksheets/cell range in a particular sheet.
Recommended Articles
This is a guide to VBA Set. Here we discuss how to assign a reference to an object or cell range using excel VBA Set Keyword along with practical examples and downloadable excel template. Below are some useful excel articles related to VBA –
- VBA Concatenate
- VBA Range Cells
- VBA RGB
- VBA XML
VBA Set is a statement that assigns any value key that says an object or a reference to a variable. We use this function to define the parameter for a certain variable. For example, if we write Set M = A, the M reference has the same values and attributes as A.
In VBA, an object is a core of Excel because, without objects, we cannot do anything. Objects are a workbook, worksheet, and range. When we declare a variable, we need to assign a data type. We can also assign objects as data types. To assign a value to declared object variables, we need to use the word “SET.” The word “Set” refers to a new object in VBA. For example, the particular range of the particular worksheet.
Table of contents
- Excel VBA Set Statement
- How to use Excel VBA Set Statement?
- #1 – Set Statement with Range Object Variables
- #2 – Set Statement with Worksheet Object Variables
- #1 – Without “Set” Word
- #2 – With “Set” Word
- #3 – Set Statement with Workbook Object Variables
- Recommended Articles
- How to use Excel VBA Set Statement?
How to use Excel VBA Set Statement?
You can download this VBA Set Statement Template here – VBA Set Statement Template
#1 – Set Statement with Range Object Variables
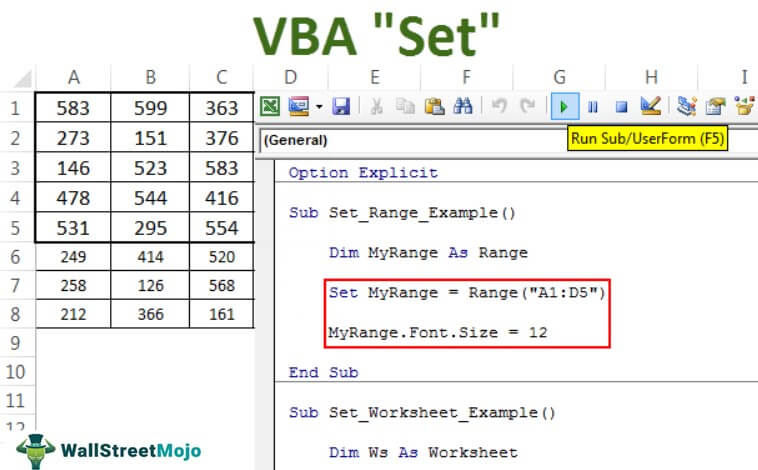
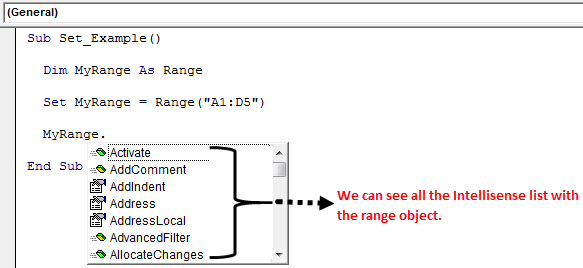
For example, assume you want to use the range A1 to D5 quite often. Then, instead of writing the code as Range(“A1:D5”) every time, we can declare the variable as range and set the range reference as Range(“A1:D5”).
Step 1: Declare the variable as a Range object.
Code:
Sub Set_Example()
Dim MyRange As Range
End Sub

Step 2: When we assign the data type as a range, use the word “Set.”
Code:
Sub Set_Example()

Dim MyRange As Range

Set MyRange =

End Sub

Step 3: Now, mention the range.
Code:
Sub Set_Example()

  Dim MyRange As Range

  Set MyRange = Range("A1:D5")

End Sub

Step 4: The variable “MyRange” equals the range A1 to D5. Using this variable, we can access this range’s properties and methods.
We can copy, add a comment in excelIn Excel, Insert Comment is a feature used to share tips or details with different users working within the same spreadsheet. You can either right-click on the required cell, click on “Insert Comment” & type the comment, use the shortcut key, i.e., Shift+F2, or click on the Review Tab & select “New Comment”. read more, and do many other things.
For example, for purpose, we have created some numbers here.

Now using the variable, we will change the font size to 12.
Code:
Sub Set_Example()

  Dim MyRange As Range

  Set MyRange = Range("A1:D5")

  MyRange.Font.Size = 12

End Sub

It will change the font size of the assigned range.

Like this, we can do many things with a particular range by using the word “Set.”
#2 – Set Statement with Worksheet Object Variables
We have seen how “set” works with a range object in VBARange is a property in VBA that helps specify a particular cell, a range of cells, a row, a column, or a three-dimensional range. In the context of the Excel worksheet, the VBA range object includes a single cell or multiple cells spread across various rows and columns.read more. It works the same as the worksheet object as well..
Let’s say you have 5 worksheets in your workbook. However, you want to keep going back to the one particular worksheet. So, you can set that worksheet name to the defined object variable.
For example, look at the below code.
Code:
Sub Set_Worksheet_Example()

    Dim Ws As Worksheet

    Set Ws = Worksheets("Summary Sheet")

End Sub
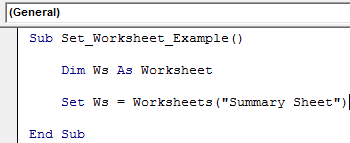
The above code defines the variable “Ws” as an object variable. In the next line, by using the word “Set,” we set the variable to the worksheet named “Summary Sheet.”
By using this variable, we can do all the associated things. Take a look at the below two sets of code.
#1 – Without “Set” Word
Code:
Sub Set_Worksheet_Example1()

    'To select the sheet
    Worksheets("Summary Sheet").Select

    'To Activate the sheet
    Worksheets("Summary Sheet").Activate

    'To hide the sheet
    Worksheets("Summary Sheet").Visible = xlVeryHidden

    'To unhide the sheet
    Worksheets("Summary Sheet").Visible = xlVisible

End Sub
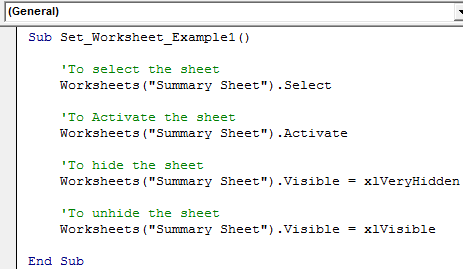
Every time we have used the worksheets object to refer to the sheet “Summary Sheet,” This makes the code lengthy and requires a lot of time to type.
As part of the huge code, it is frustrating to type the worksheet name like this every time you need to reference it.
Now, look at the advantage of using “Set” in code.
#2 – With “Set” Word
Code:
Sub Set_Worksheet_Example()

    Dim Ws As Worksheet

    Set Ws = Worksheets("Summary Sheet")

   'To select the sheet
    Ws.Select

   'To Activate the sheet
    Ws.Activate

   'To hide the sheet
    Ws.Visible = xlVeryHidden

   'To unhide the sheet
    Ws.Visible = xlVisible

End Sub

When we set the worksheet name, we can see the variable name while entering the code as part of the list.
#3 – Set Statement with Workbook Object Variables
The real advantage of the word “Set” in VBA arises when we need to reference different workbooks.
When we work with different workbooks, it is hard to type in the full name of the workbook, along with its file extension.
Assume you have two different workbooks named “Sales Summary File 2018.xlsx” and “Sales Summary File 2019.xlsx” we can set the two workbooks like the below code.
Code:
Sub Set_Workbook_Example1()

Dim Wb1 As Workbook
Dim Wb2 As Workbook

Set Wb1 = Workbooks("Sales Summary File 2018.xlsx")
Set Wb2 = Workbooks("Sales Summary File 2019.xlsx")

End Sub

Now, variable Wb1 is equal to the workbook named “Sales Summary File 2018.xlsx,” and variable Wb2 is equal to the workbook named “Sales Summary File 2019.xlsx”.
We can access all the properties and methods associated with the workbook using this variable.
We can shorten the code like the one below.
Without Using Set Keyword to activate the workbook:
Workbooks("Sales Summary File 2018.xlsx").Activate
Using the Set Keyword to activate the workbook:
Wb1.Activate
It makes the writing of the code much simpler. However, once we set the workbook name, there is a worry of typo errors in the workbook names.
Recommended Articles
This article is a guide to VBA Set. Here, we learn how to use Excel VBA set statements to reference the object variable and some simple to advanced examples. Below are some useful Excel articles related to VBA: –
- VBA ReDim Array
- VBA LEN
- VBA Code in Excel
- VBA RGB
Before we get into the Set keyword, I’m going to quickly go over a couple fundamentals about objects in VBA. If you already know this stuff, just skip ahead a couple sections.
Introduction to Objects
An object in a programming language is a class with some properties and methods. For example, a textbox is an object. This object can have properties like:
- font color
- size
- background color
- font styles like bold, italics and underline, etc.
It can have methods like:
- onchange
- onclick
- onload, etc.
An object is a data type that can hold values, properties, and change behavior too. In simple terms, we can also call an object a collection of several variables. In that respect, arrays, dictionaries, and lists are all objects, because they hold several values.
Assigning a Value to an Object
Unlike variables, objects cannot be assigned references using a mere “=” (equal to) sign. They are special since they hold several / large values.
The Set Keyword
The “set” keyword must be used in order to assign object references to any variable or empty the contents of an object.
Syntax
Set < object var > = {[ New ] < object expression >} | Nothing
Where
< object var >is the name of the variable which will hold the object- New is an optional keyword that can be used during declaration to implicitly enable object creation
< object expression >is the expression that points to the objectNothingis used to empty the space the object is using and make is equal to null. “Nothing” is the keyword that has to be used for objects. This statement discontinues the association of the object with its variable name.
Examples
An Object for a Range in a Worksheet
Here we use the Set keyword to define a range of cells on a worksheet.
I = 5
J = 10
Set range_new1 = Worksheets("My demo sheet").Rows( i &amp;amp; ":" &amp;amp; j )
Open a Browser (Ex: Internet Explorer)
We create an object that defines a browser (in this case, Internet Explorer). From there onwards, we can easily refer to the same object or work on it using a single word.
Set IE_demo = CreateObject("InternetExplorer.Application")
    IE_demo.Visible = True

    IE_demo.Navigate "https://www.google.com"
The code below is a simple example to perform some actions on a browser window. We define an object that holds the document, i.e. all html code of the specific browser window. Then, using that object, we try to list out objects with the same tagname or classname or specific elements (as defined in the html content of the doc object).
' this line of code sets the “doc” as an object containing the browser’s document content
Set doc = IE_demo.document
Set the value for object “inputtags” . It is set to contain all input tags of the doc object.
Set inputtags = doc.getElementsByTagName("input").Value
Here the “elem” object is set to contain all element(s) of the document object that have the class name “all-title”. Then we click on the first item ( with index 0) in that list.
Set elem = doc.getElementsByClassName("all-title").Item
' now the first item in the list of elem object list is clicked
elem.all.Item(0).Click
' close the document
doc.close
' empty the doc object and release resources
Set doc = Nothing
Setting a File as an Object
There may be situations where we keep referring to a file to perform many actions on it like open, read, write, append, validate, close, open file again, save data, and many more. Instead of referring to the whole file path again and again, it can instead be defined as an object with a short object name that can be used throughout the code. Here is an example that demonstrates this:
Set elem=doc.getElementsByClassName("all-title").Item
' now the first item in the list of elem object is clicked
elem.all.Item(0).Click
' close the document
doc.close
'empty the doc object and release resources
Set doc = Nothing

Sub open_a_file_demo()

' declare variables
Dim str_path_name
Dim wb1 As Workbook

' assigning a value
str_path_name = "C:UsersLAKSHMI RAMAKRISHNANDownloadsProject 2.xlsx"

' now let us open the file using the this statement and assign it to the wb1 object so that it can be used in the code further. The set keyword is used to do this.
Set wb1 = Workbooks.Open(Filename:=str_path_name, ReadOnly:=True)
‘Try reading the file using the object
Msgbox wb1.Sheets(2).cells(3, 4).Value
' Try writing after opening the file in "read only mode". This should throw an error.
Wb1.Sheets(0).Cells(2, 2).Value = "Try writing"
End Sub
Using Set Keyword to Create a Shell Object
There are several operations that use the shell commands to perform some things on the windows. For example, killing a task from the task manager, opening a file, running a thread at a scheduled time, and many more.
Here is a short program to create the necessary variables and objects, as well to open a notepad and a browser window using the created shell object. The id of the object opened last is also printed at the end.
Sub shell_demo_4()

'Declaration of objects and variables
Dim objsh_obj As Object
Dim intcounter As Integer
Dim str_ie_pr_id

'Assign all values
Set str_ie_pr_id = Nothing
intcounter = 0
Set objsh_obj = CreateObject("shell.application")
counter = objsh_obj.Windows.Count

' open an internet explorer
IE = Shell("C:Program FilesInternet Exploreriexplore.exe -nosessionmerging , -noframemerging", vbNormalFocus)

'open a notepad
ret_val = Shell("C:WINDOWSNOTEPAD.EXE", 1)

'wait till the window opens
Do Until objsh_obj.Windows.Count = intcounter + 1
Loop

'set the new process ids for the opened objects

' the last but first that was opened
Set str_ie_pr_id = objsh_obj.Windows(objsh_obj.Windows.Count - 2)

' the last object that was opened
Set str_ie_pr_id = objsh_obj.Windows(objsh_obj.Windows.Count - 1)

'Print the last process id alone
Debug.Print str_ie_pr_id

End Sub

Conclusion
The above examples demonstrate the use of the “Set” keyword. We can create “short word” references to any object that can be easily referred to or reused in the code window further. It can help us avoid repeated use of lengthy expressions which might also be cumbersome and difficult to maintain.
Знак присвоения без SET присваивает скалярное значение. А с SET — ссылку на объект. То есть использовать его или нет — зависит от типа значения справа от знака присвоения. Ну и желаемого результата, конечно (включая и желание не получить ошибку несоответствия типов).
Пример.
- Откройте Excel.
- Откройте окно редактора VBA (Ctrl-F11). Измените размеры окон так, чтобы видеть и таблицу, и редактор.
- В редакторе добавьте модуль (Insert-Module).
- Вставьте в модуль следующий текст:
Sub test() Dim x, y Range("A1").Value = 123 x = Range("A1") Set y = Range("A1") End Sub - Поставьте курсор в середину модуля, и начните пошаговое выполнение нажатием F8. Доведите исполнение до финального End Sub (когда эта строка будет подсвечена жёлтым цветом).
- Откройте окно локальных переменных (View — Locals Window).
Вы увидите, что первый оператор присвоения присвоил переменной x скалярное значение. Поскольку справа был объект, то в качестве скалярного значения было взято свойство объекта по умолчанию. Для объекта типа Range объектом по умолчанию является его свойство .Value — посему в переменную помещено значение 123. И соответственно переменная имеет тип Variant/Double.
А вот второй оператор присвоения, использующий Set, поместил во вторую переменную y ссылку на объект Range. И переменная имеет тип Variant/Object/Range.